Leaderboard


Popular Content
Showing content with the highest reputation since 02/27/2014 in Posts
-
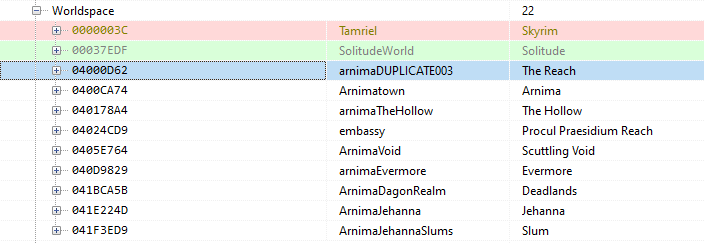
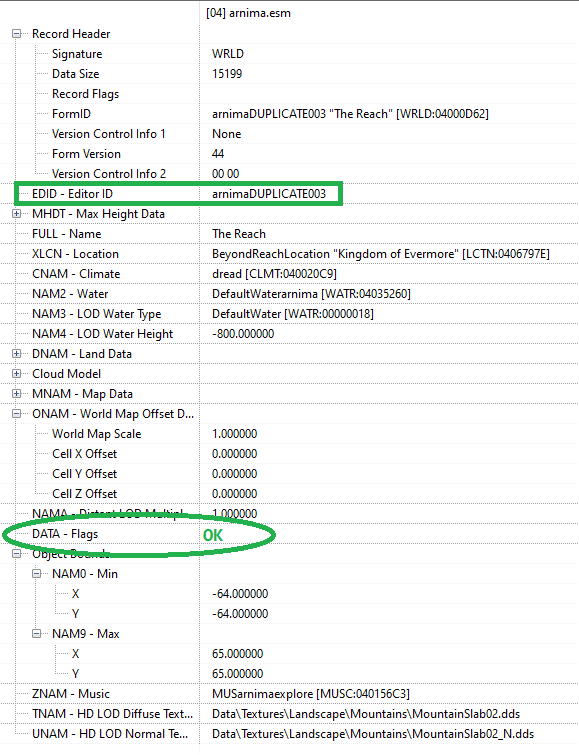
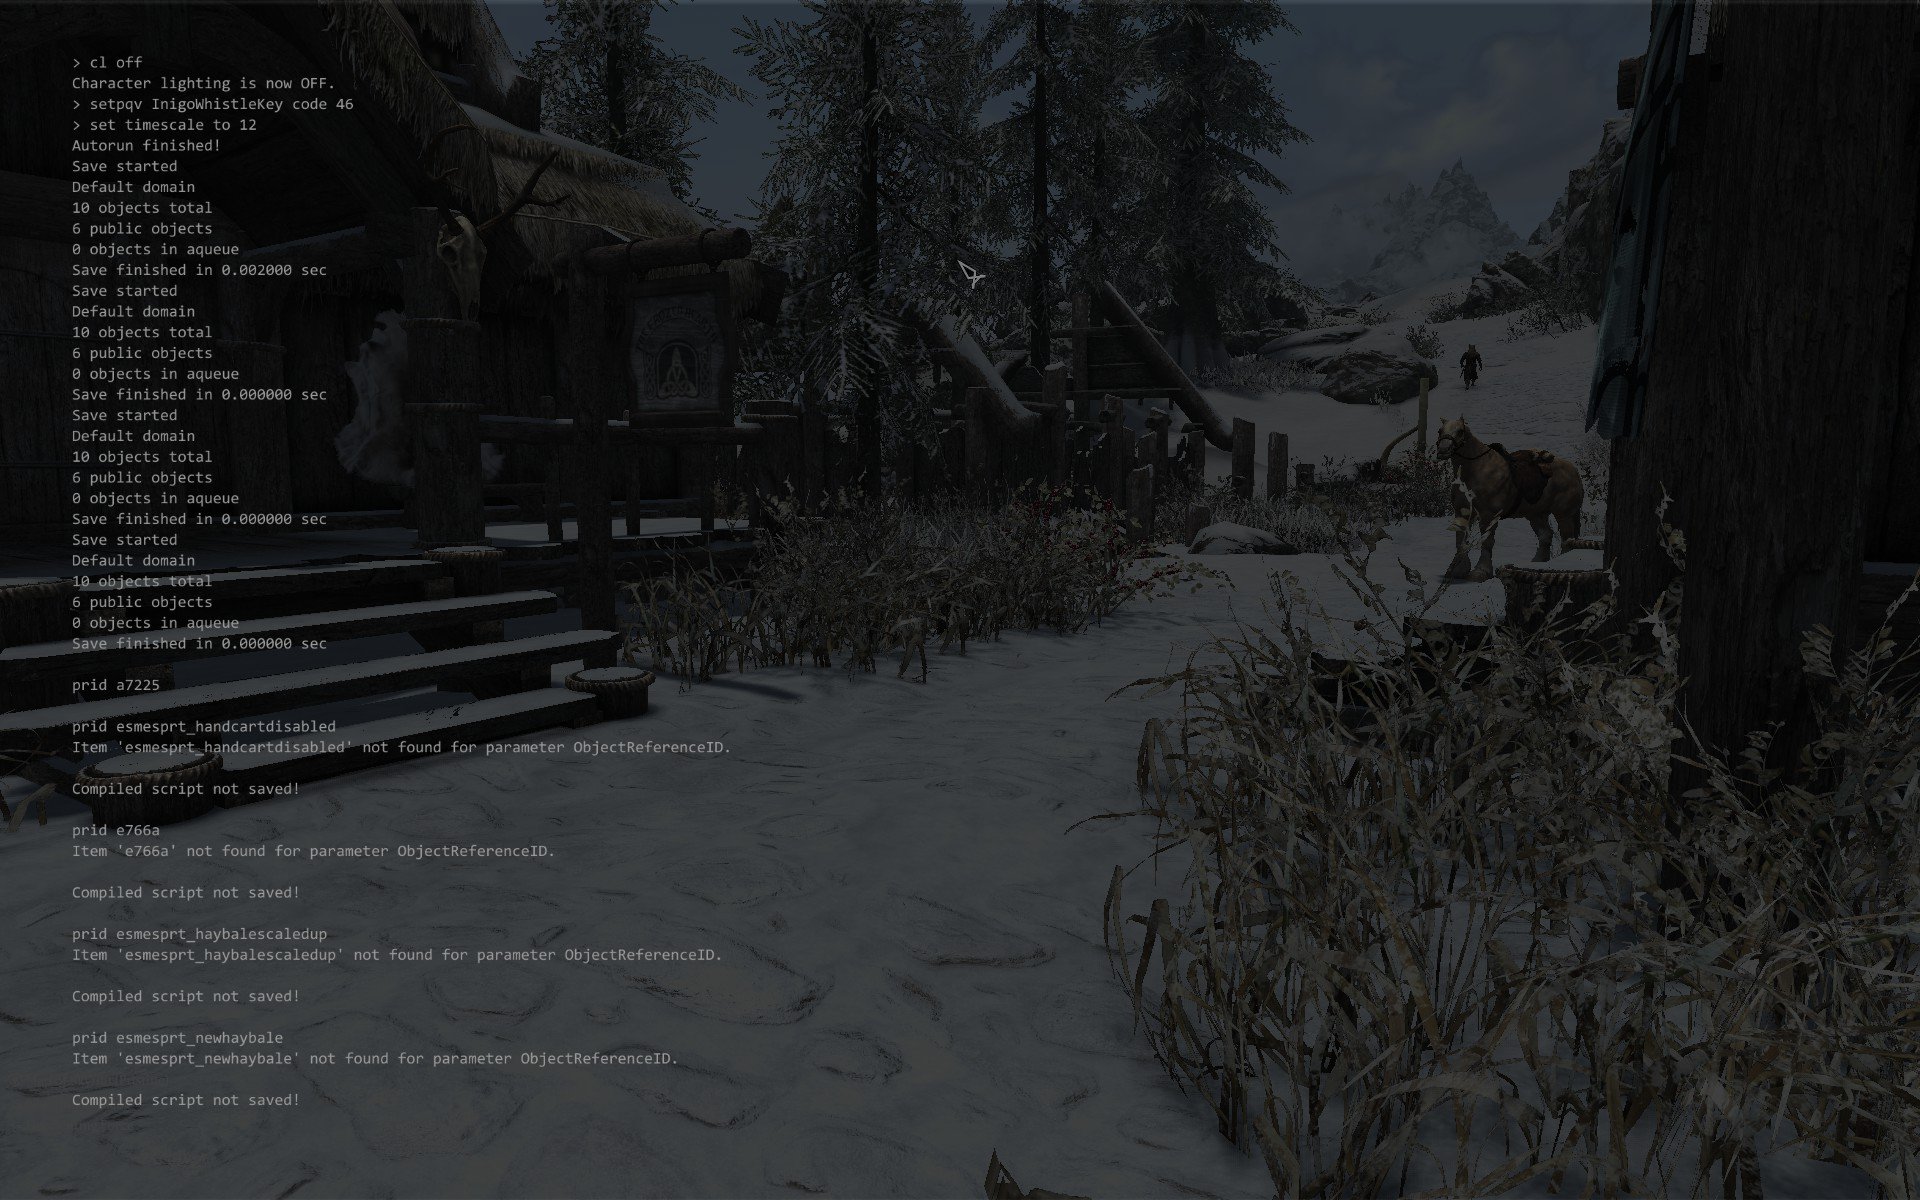
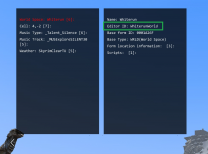
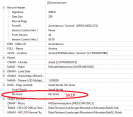
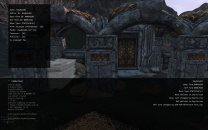
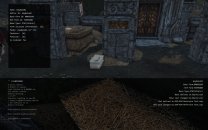
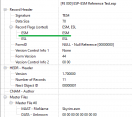
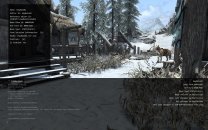
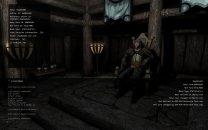
The following time-saving procedure allows for adding new worldspaces to an existing grass cache, or for updating the current grass cache of specific worldspaces, without re-generating the cache of all worldspaces from scratch, which as we all know can be a very time-consuming process. This is not a guide about precaching grass from scratch with NGIO. It is assumed you have already precached grass with NGIO successfully at least once, and know how to repeat the operation. The procedure assumes Mod Organizer 2 is used as the mod manager. IMPORTANT: Grass Cache Helper NG is required for Skyrim SE/AE 1.6.x players. The existing grass cache must have been generated with Grass Cache Helper NG activated, and it must remain activated at all times for incremental precaching, and for playing. Step 1: Note the Editor ID of the worldspace(s) you want to add or update. Figuring out which worldspace(s) and their Editor ID is a task left up to the reader. See some suggestions at the end about finding out this information. Step 2: EXTREMELY IMPORTANT. Disable your existing grass cache mod[1] on the left side of MO2. Failure to do so will wipe out the entire grass cache during the later steps, which will then need to be exhaustively re-generated from scratch, which would make this tip completely pointless. Step 3: Edit NGIO configuration and specify the list of worldspaces to add or update. The NGIO configuration file is [..]\NetScriptFramework\Plugins\GrassControl.config.txt. Edit it with a text editor. You may want to make a backup copy of that file before editing it. Search for 'OnlyPregenerateWorldSpaces' or scroll down until you see it. Then comment out the line by prepending it with a # character. Add a new line like this, containing the Editor IDs you gathered in Step 1: OnlyPregenerateWorldSpaces = "Worldspace1EditorID;Worldspace2EditorID;Worldspace3EditorID" The list of worldspace(s) to add or update must be enclosed in double quotes, multiple Editor IDs separated by semicolon. Example showing the result of editing and specifying only one worldspace: Step 4: Launch the NGIO precaching process from MO2 as usual. You may need to make preparations[2] specific to your mod setup before launching the process. The process should only take a few minutes[3], more or less depending on the number and size of specified worldspaces. Wait until it completes successfully. Step 5: Move the grass folder from MO2's Overwrite folder to your existing grass cache mod. If you are updating the grass cache of worldspace(s), you will be prompted to confirm replacing the existing cache files with the new ones. Step 6: Undo the NGIO configuration changes you made in Step 3. If you made a backup copy of GrassControl.config.txt as suggested, simply restore it. If you added new worldspace(s), don't forget to edit GrassControl.config.txt and append their Editor ID to the existing OnlyPregenerateWorldSpaces line. Otherwise they'll be missing the next time you re-generate the entire grass cache from scratch. Step 7: Re-enable your grass cache mod on the left side of MO2. That's it. Enjoy[4] your updated or added grass. Notes [1] Your existing grass cache mod is the mod containing the grass folder, not the mod containing NGIO (inside a NetScriptFramework folder). If you have merged both mods, then you're doing it wrong. Split them into two separate mods. [2] Preparations such as reducing Skyrim's display resolution, disabling mods that may interfere with the precaching process, switching environments/profiles... Anything that had to be done when generating from scratch. [3] If you're updating Tamriel (Skyrim's main worldspace), the largest of all worldspaces, it will take quite a while, but it will still be faster to process it individually than processing all worldspaces in the entire load order. [4] You're not yet completely done if you use the grass cache for grass LODs. You'll need to (re-)generate LODs with DynDOLOD for the specific worldspace(s) you added or updated. Refer to the official DynDOLOD documentation for details: Updating or Updating. How to find out the Editor ID of worldspace(s) with grass Method 1: Recommended when adding new worldspace(s) for its accuracy. Requires xEdit, basic knowledge of its operation, and Worldspaces with Grass SSEEdit Script for No Grass In Objects. Install 'Worldspaces with Grass SSEEdit Script for No Grass In Objects' as instructed on its mod page. Load up in xEdit the plugins of the mods adding new lands, as well as any grass/landscape mod plugins. Omit other plugins. Run the 'List worldspaces with grass' script. When it's done, copy the resulting list and paste it to some place where you can edit it. Remove all vanilla worldspaces from the list. The remaining worldspaces are the new ones with grass. Example with Wyrmstooth: AlftandWorld;Blackreach;BloatedMansGrottoWorld;BluePalaceWingWorld;DarkwaterWorld;DeepwoodRedoubtWorld;Dimfrost;EastEmpireWarehouse;FallowstoneCaveWorldEnd;FallowstoneCaveWorldStart;FrostmereCryptWorld;JaphetsFollyWorld;KarthspireRedoubtWorld;KatariahWorld;LabyrinthianWorld03;LabyrinthianWorld04;MarkarthWorld;RedEagleRedoubtWorld;RiftenWorld;ShadowgreenCavernWorld;SkuldafnWorld;SolitudeWorld;Sovngarde;Tamriel;WhiterunDragonsreachWorld;WhiterunWorld;WindhelmPitWorldspace;WindhelmWorld;WyrmstoothWorld Method 2: Suitable when adding or updating worldspace(s). Physically go to the place in-game where there is already grass to be updated or where there should be grass to be added. Use fast-travel, coc or cow console commands, whatever works to get there. Open the (More Informative) Console and press the Tab key until the Worldspace & Cell information card is displayed. Ctrl+Click the 'World Space' field in the information card, to display more details. Note the Editor ID. See following screenshot for illustration: Method 3: When adding new worldspace(s), less accurate than Method 1. Requires xEdit and basic knowledge of its operation. Load up the plugin of the mod adding new lands in xEdit. Expand the Worldspace node. Select a new worldspace entry (i.e. not vanilla), and check the 'DATA - Flags (sorted)' section on the right panel. If it contains 'No Grass' then skip it, go to step 6. Otherwise note its Editor ID. Repeat from step 3 for each new worldspace entry. Illustrated example showing the first two worldspaces from Beyond Reach:


 4 points
 -
v2.0 is now live! I will also have a new video on the mod page soon to demo the new heavy storms. Many FormIDs have changed for the extra non-vanilla weathers, so any 3rd-party patches may need to be rebuilt.4 points
-
New version released which packages everything into one FOMOD installer.
 3 points
 -
Seems I should edit the title of this discussion because it looks like I will be using the Step CR Patch. I think I've managed to remove the need for the most of the Creations leaving just Survival and Saint's & Seducers. At Your Own Pace - College of Winterhold, Vrokii - Minimalistic Perks of Skyrim and Odin - Skyrim Magic Overhaul have also been cleaned from the patch after going through looking through it closely. Fingers crossed it'll hold up! I was planning to clean more but I learnt more about Atlas Map Markers so with the settings and a patch came to a way to use it. I also saw that with Alternate Start there is still an option to begin the game on the Wagon into Helgen... so if that's the case why am I trying to work to remove it just so I can start my next game that way? So far almost everything is Step Guide v2.3, except for a few skipped mods and none of the optional choices, and I loaded the game everything seems to be working. It is before Step 5 so there is no grass cache but everything looks good. I think the next steps before that are to now finish setting out the mods I'm going to use that come from outside the Step Guide, when that's all set up and my collection of Step Apocrypha is done and working together nicely I'll move on to Step 5.3 points
-
Relationship Dialogue Overhaul Lite added an optional AI Overhaul Patch3 points
-
No problem, That is why STEP is here. It is not only a modding guide for various games, but a repository of knowledge on what is needed to do it. Without the participation of the community it will never expand on that knowledge. All users from beginners to experts are treated a equals and with respect and welcome to ask questions no matter how simple or complex they are.3 points
-
I've created a MO2 plugin to band-aid this issue. Thanks for information provided here. Plugin just redirects anything that goes to Documents/Skyrim.INI back to Documents/Skyrim Special Edition via MO2 VFS, it's not a real fix but enough to satisfy my OCD for now. https://www.nexusmods.com/skyrimspecialedition/mods/1449323 points
-
I really like Pandora compared to Nemesis. I belive Pandora will be the new standard.3 points
-
Thanks for all the work in the guide, just wanted to mention that im following the changelog to update to 2.3 and noticed that "Moon and Star - CC Consistency and Immersion" and "Moon and Star - Cleaned Fixed and ESMed" are not in the changelog for Patches3 points
-
Having played many many hours with this mod without any issues after dumping FIZZLE, I'd strongly recommend it. It's very lightweight compared to FIZZLE, as its script runs only when casting spells vs. FIZZLE's cloak spell script which runs "constantly". It doesn't have the various compatibility and performance issues carried by cloak spell-based distribution to NPCs. Its user experience for new users is also superior to FIZZLE: a spellcasting failure is indicated by a "puff" of colored smoke (different color depending on spell type) around the player (or the NPC), which is easily noticeable even in first-person view. Whereas with FIZZLE a failure is indicated by a small audio "click" and nothing else happens. I found that FIZZLE feedback quite confusing and it was difficult to notice what was happening when I started playing with FIZZLE. It has its own formula for calculating the chances of success/failure which is not the same as FIZZLE's so the experience may feel different at first for users accustomed to FIZZLE. But the idea is the same: trying to cast higher level spells than skill levels may fail, the chances of failure increasing the higher the level difference. I was using a different mod than EEOS in my playthroughs to distribute spells to NPCs so I can't speak to how well this mod works with EEOS in regards to NPCs trying and failing or succeeding to cast spells in a pure STEP setup. Note: I'm not currently playing or even running Skyrim these days, haven't been for the past 6 months or so, and don't intend to return to it for quite a while, if ever. I just thought I'd chime in in favor of this mod, which is quite underrated IMHO. There are not many mods that do this kind of thing it seems. Last I checked there were 3 mods: FIZZLE, this one and another one that I don't remember. This mod also exists in a "full featured" version by the same MA, with more options and features, and a much more "sophisticated" behavior (not recommended for STEP). My 2 cents, hope they help. Cheers.3 points
-
Great work on getting that updated!3 points
-
Good day good STEP-people! So we had a game update and there will be some problem follow the guide as is. - SKSE is updated. According to ianpatt on Nexus SKSE page BGS will update the game again soon so no hurry updating/reinstalling stuff. - The game update has caused some issues with SkyUI (same post on Nexus SKSE page as above) I am in the middle off an actuall playtrough so i will wait with the updates.3 points
-
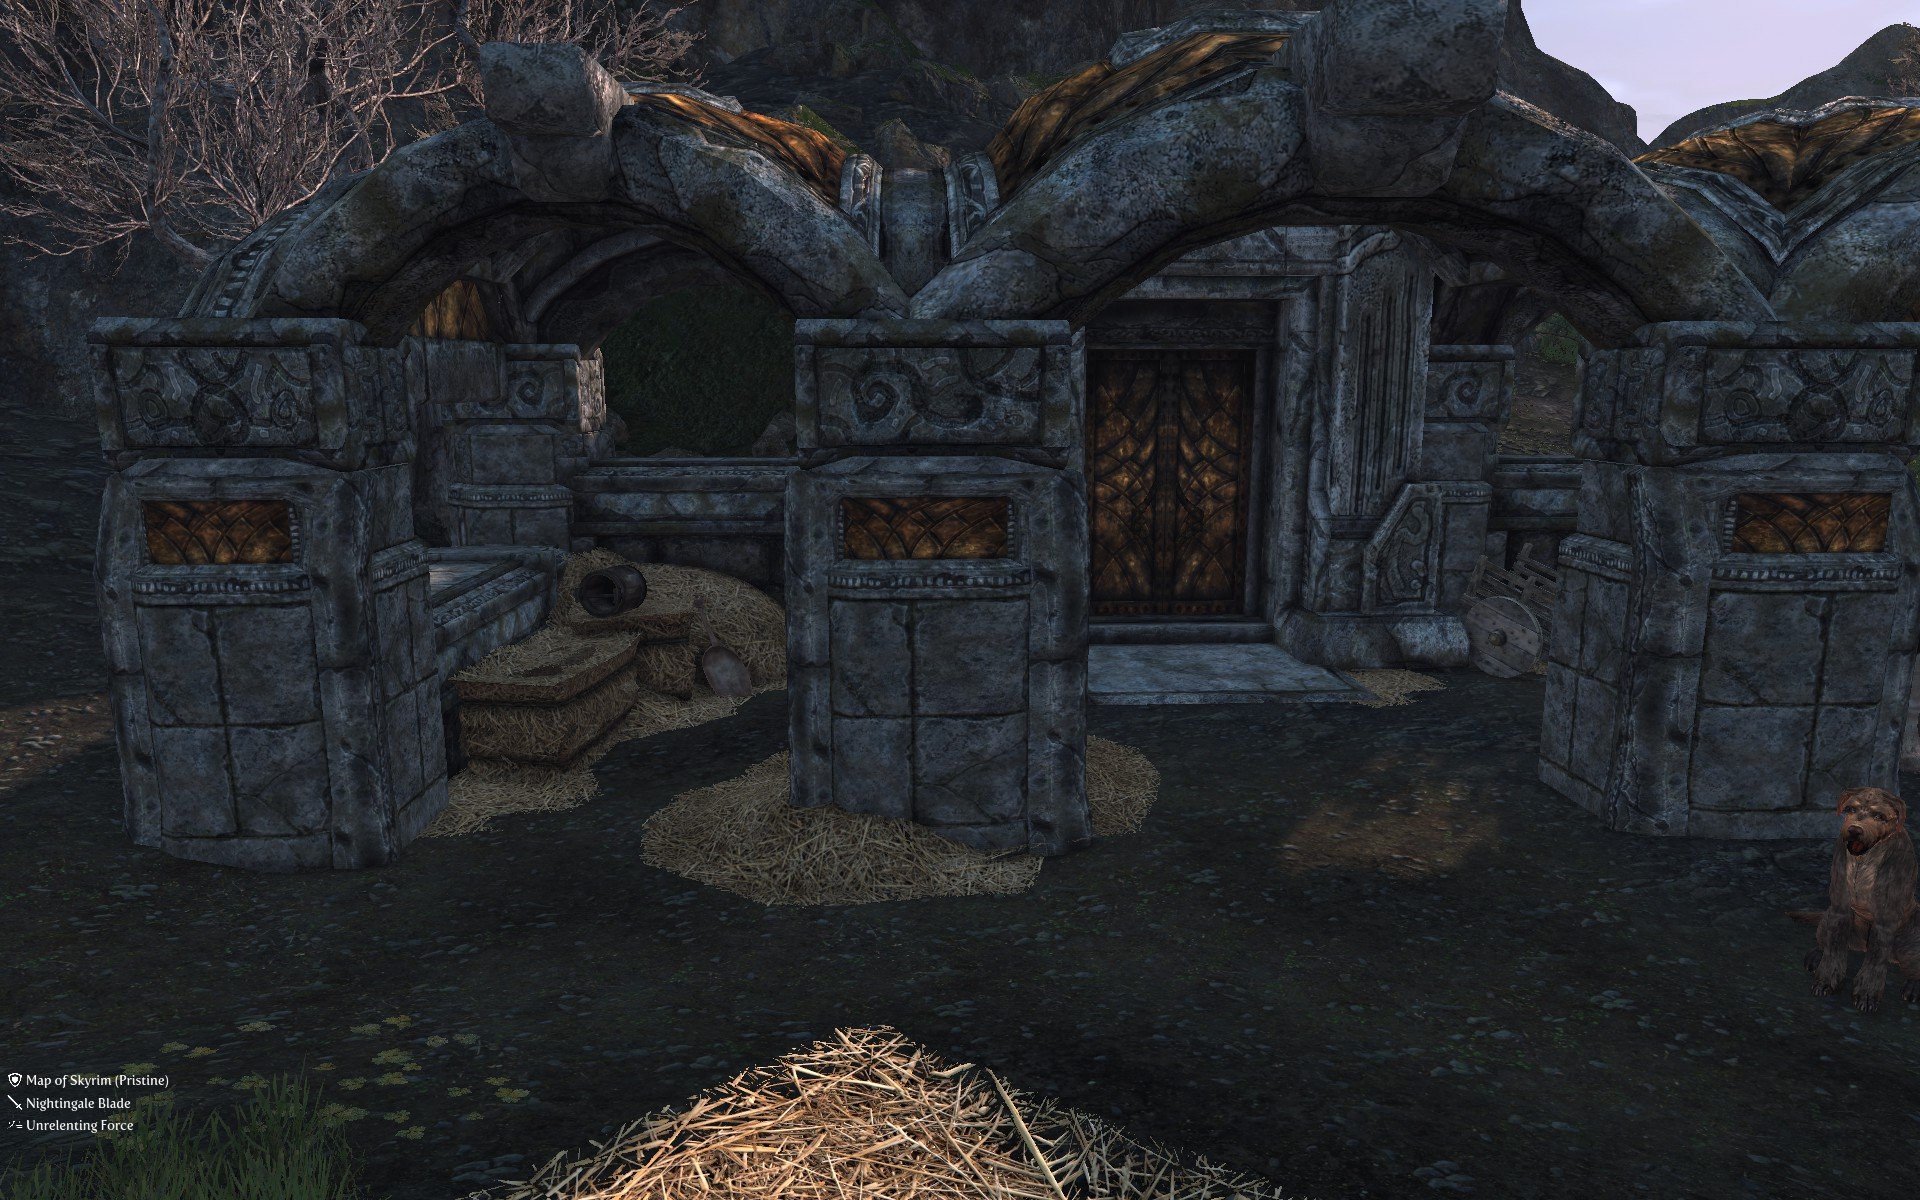
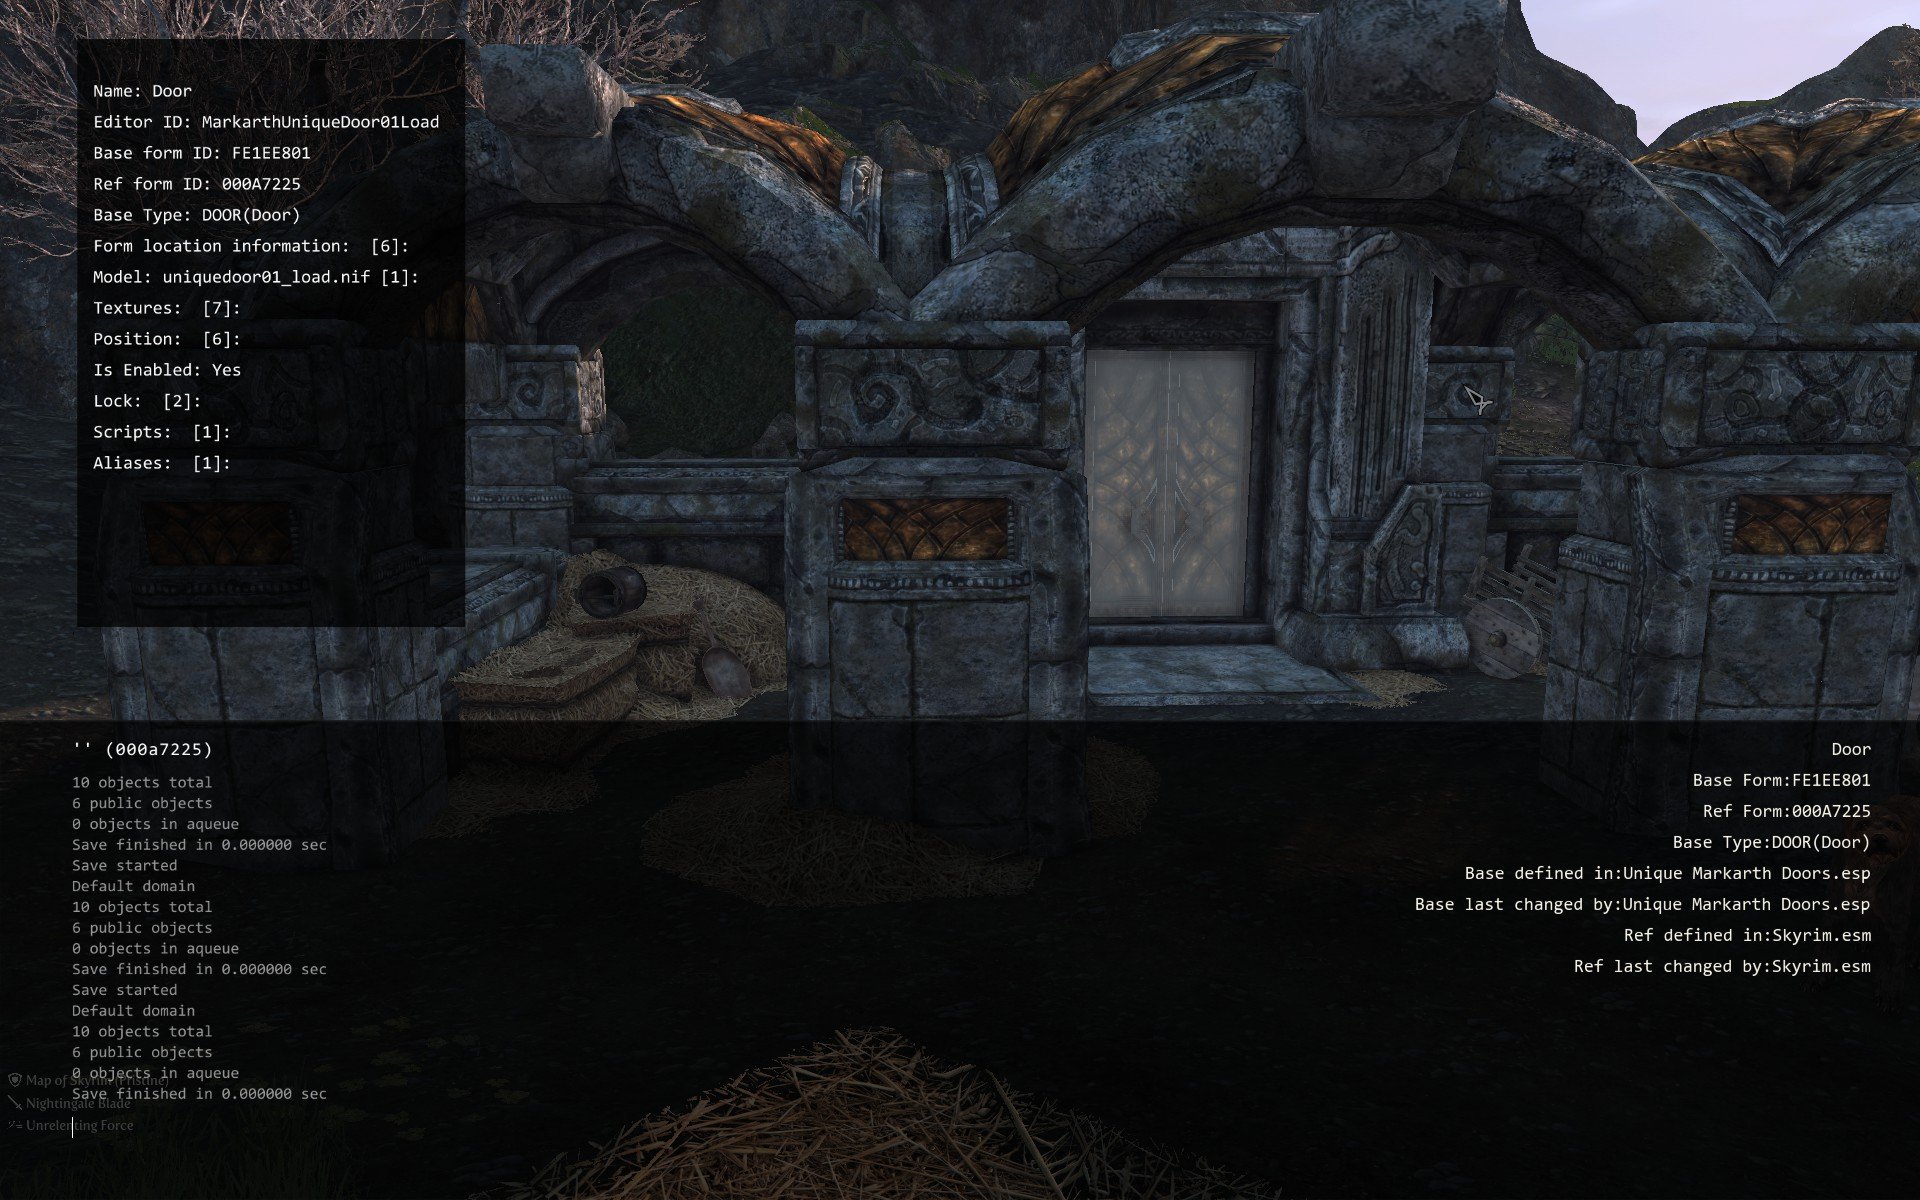
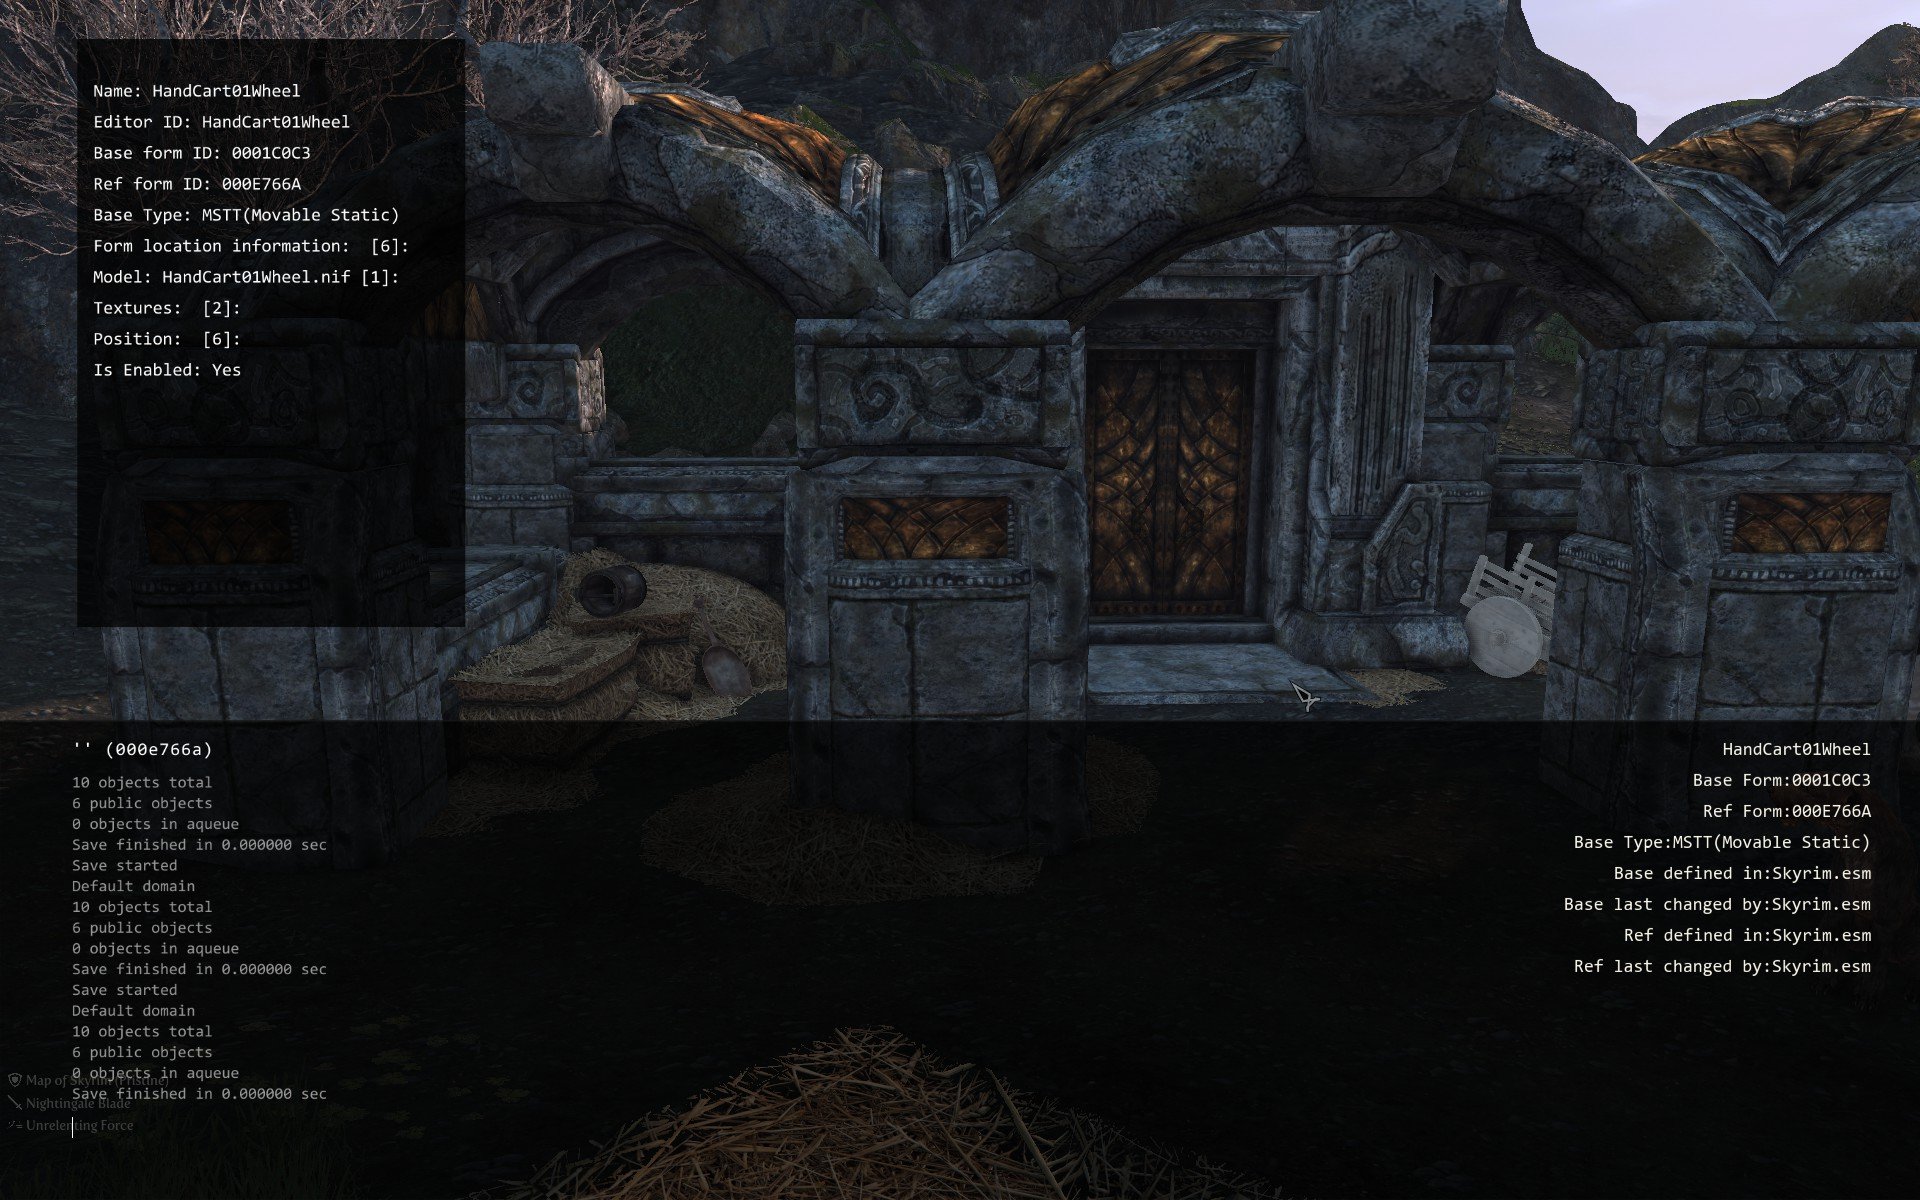
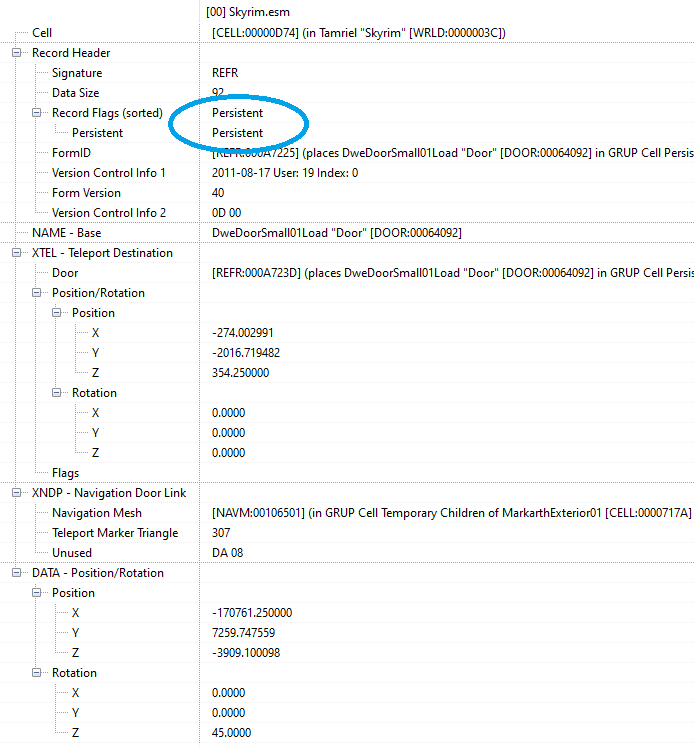
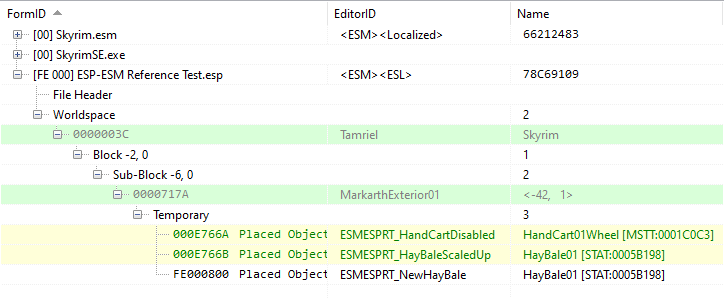
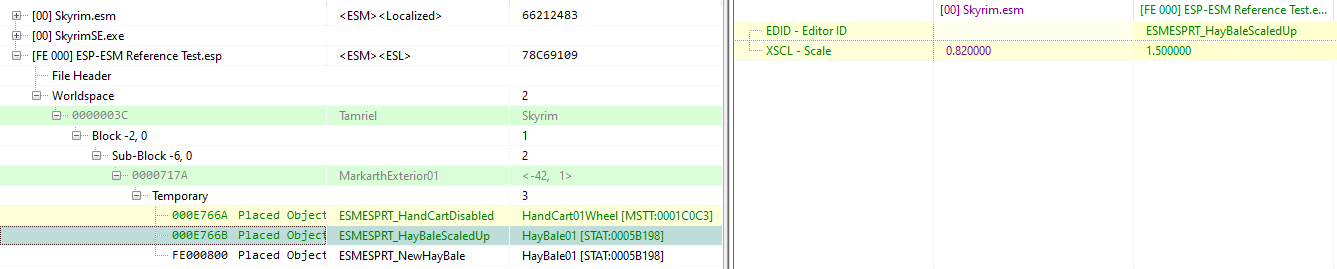
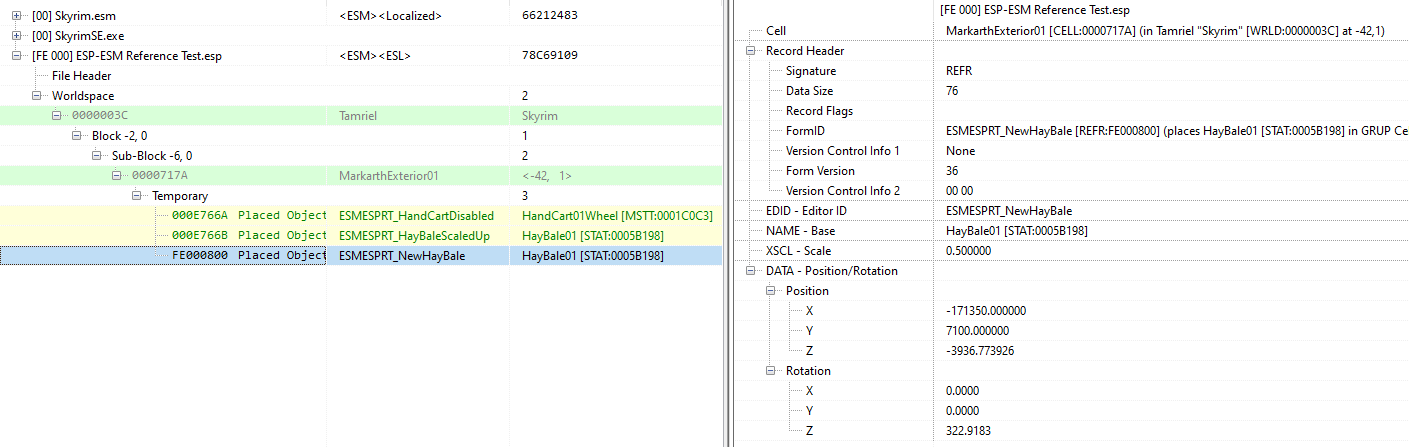
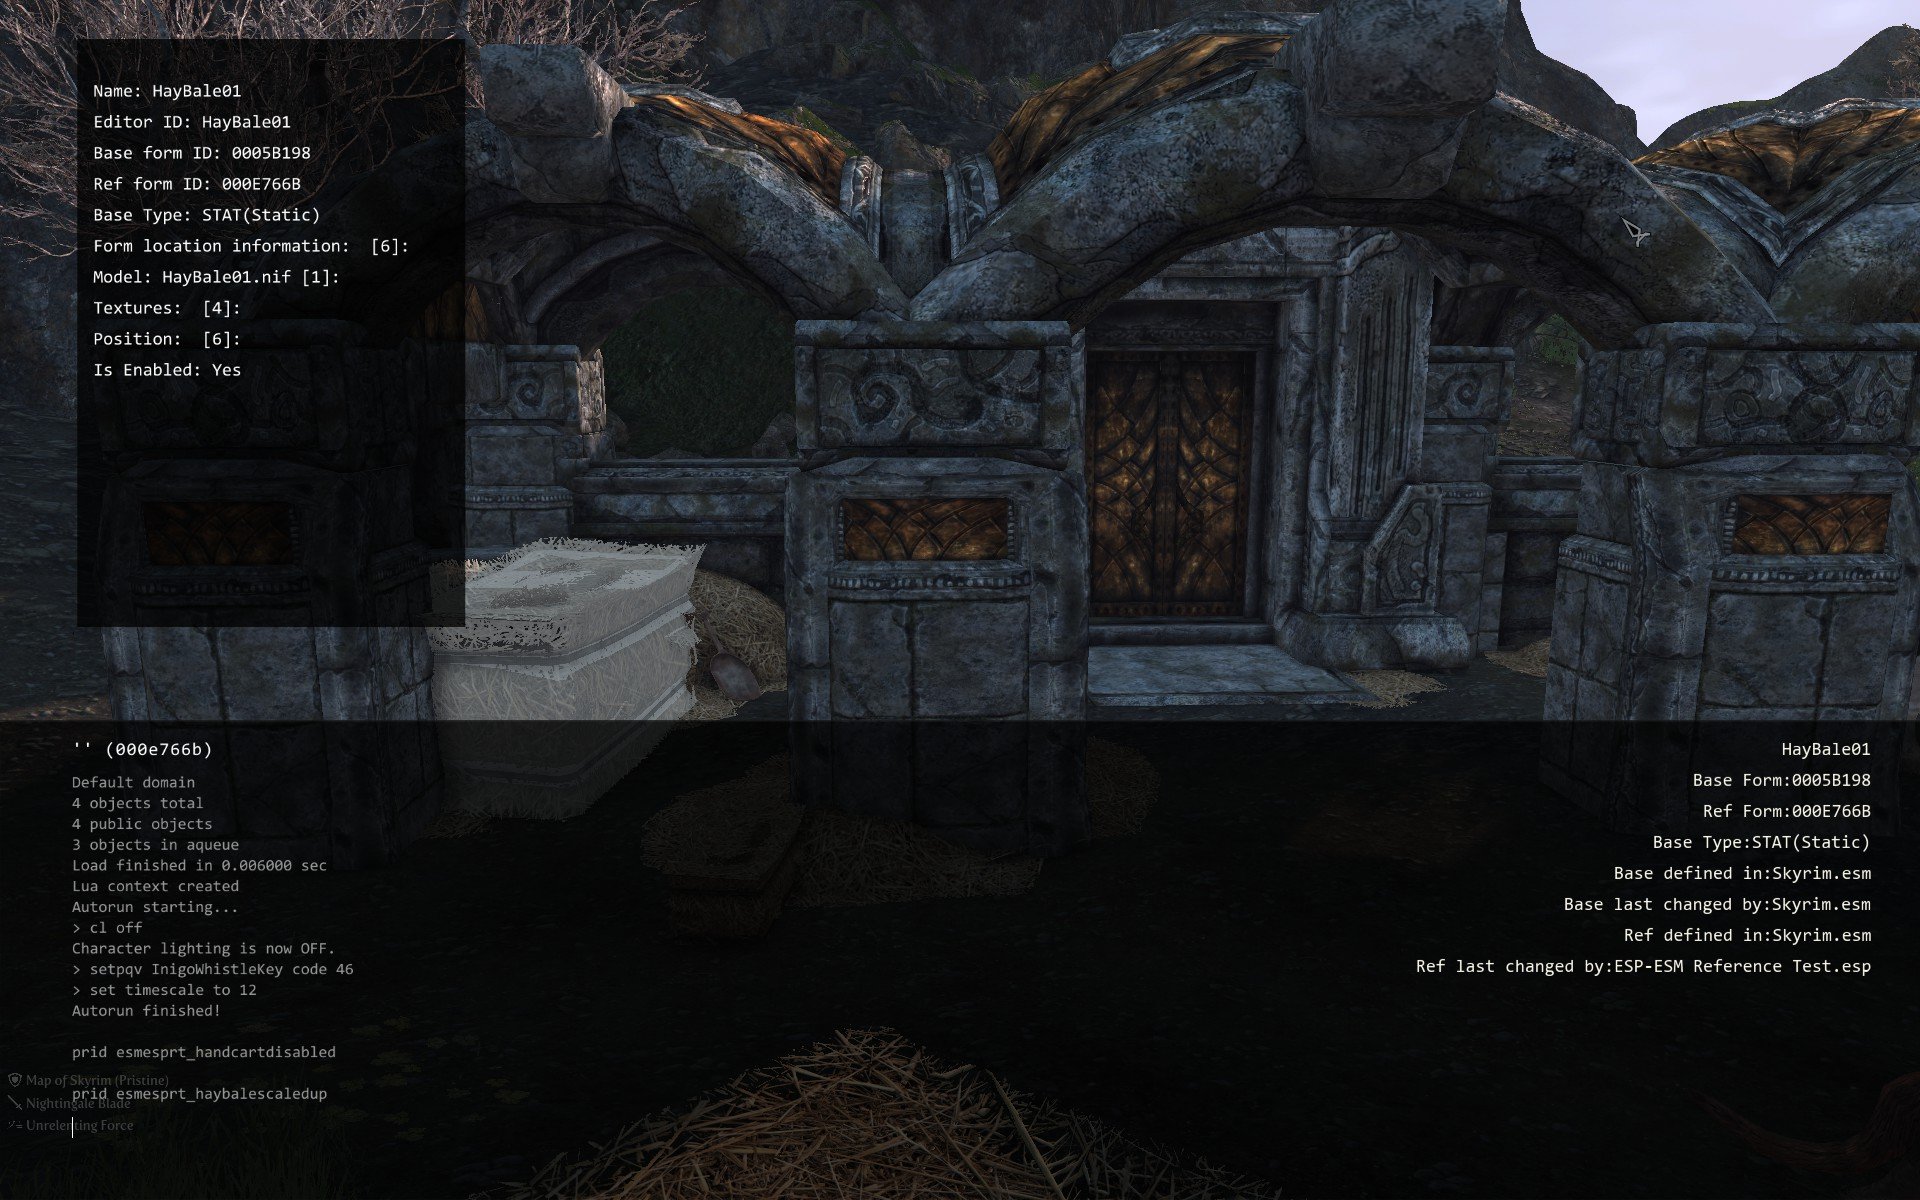
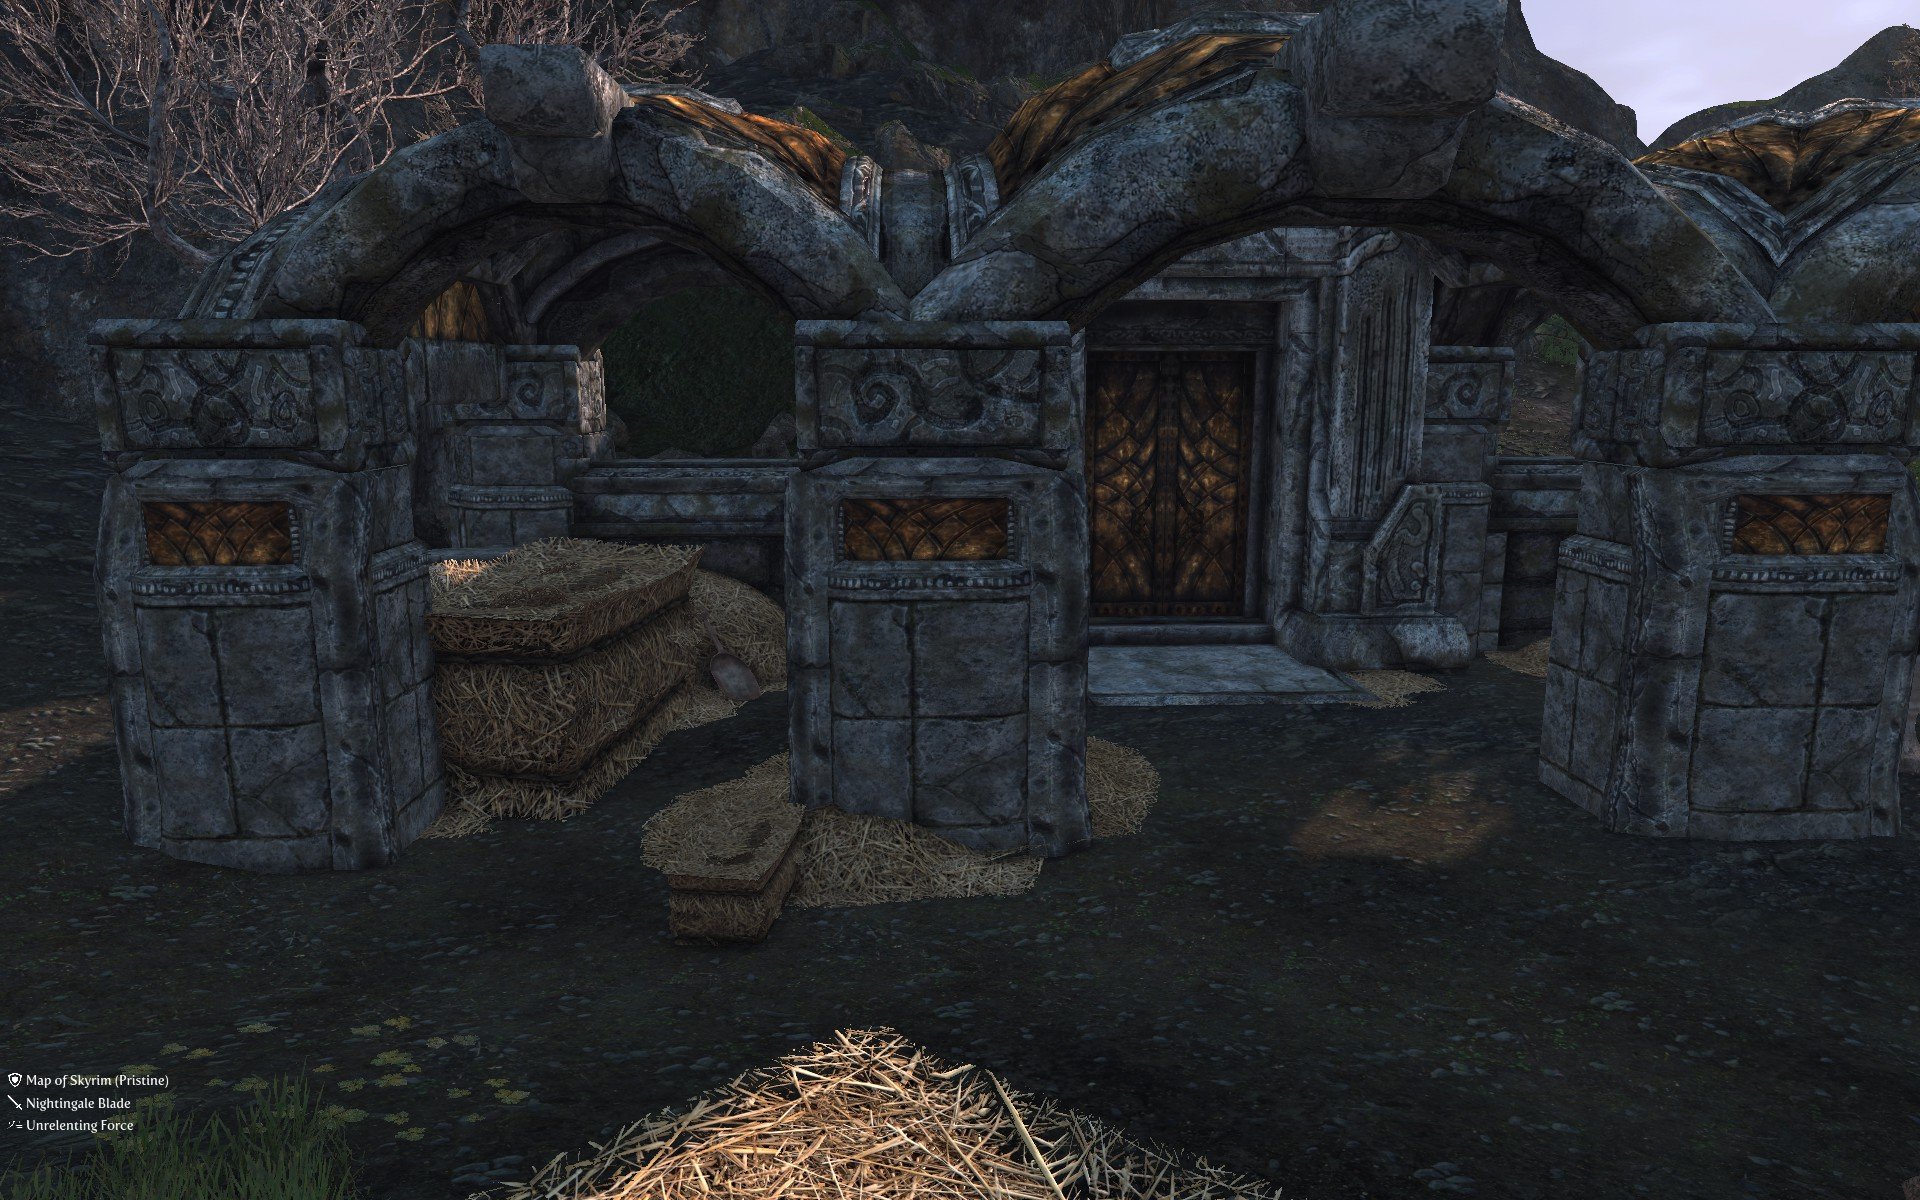
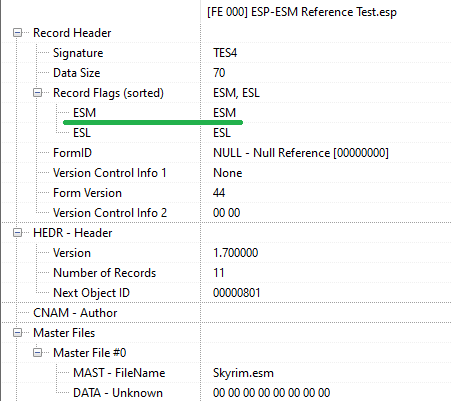
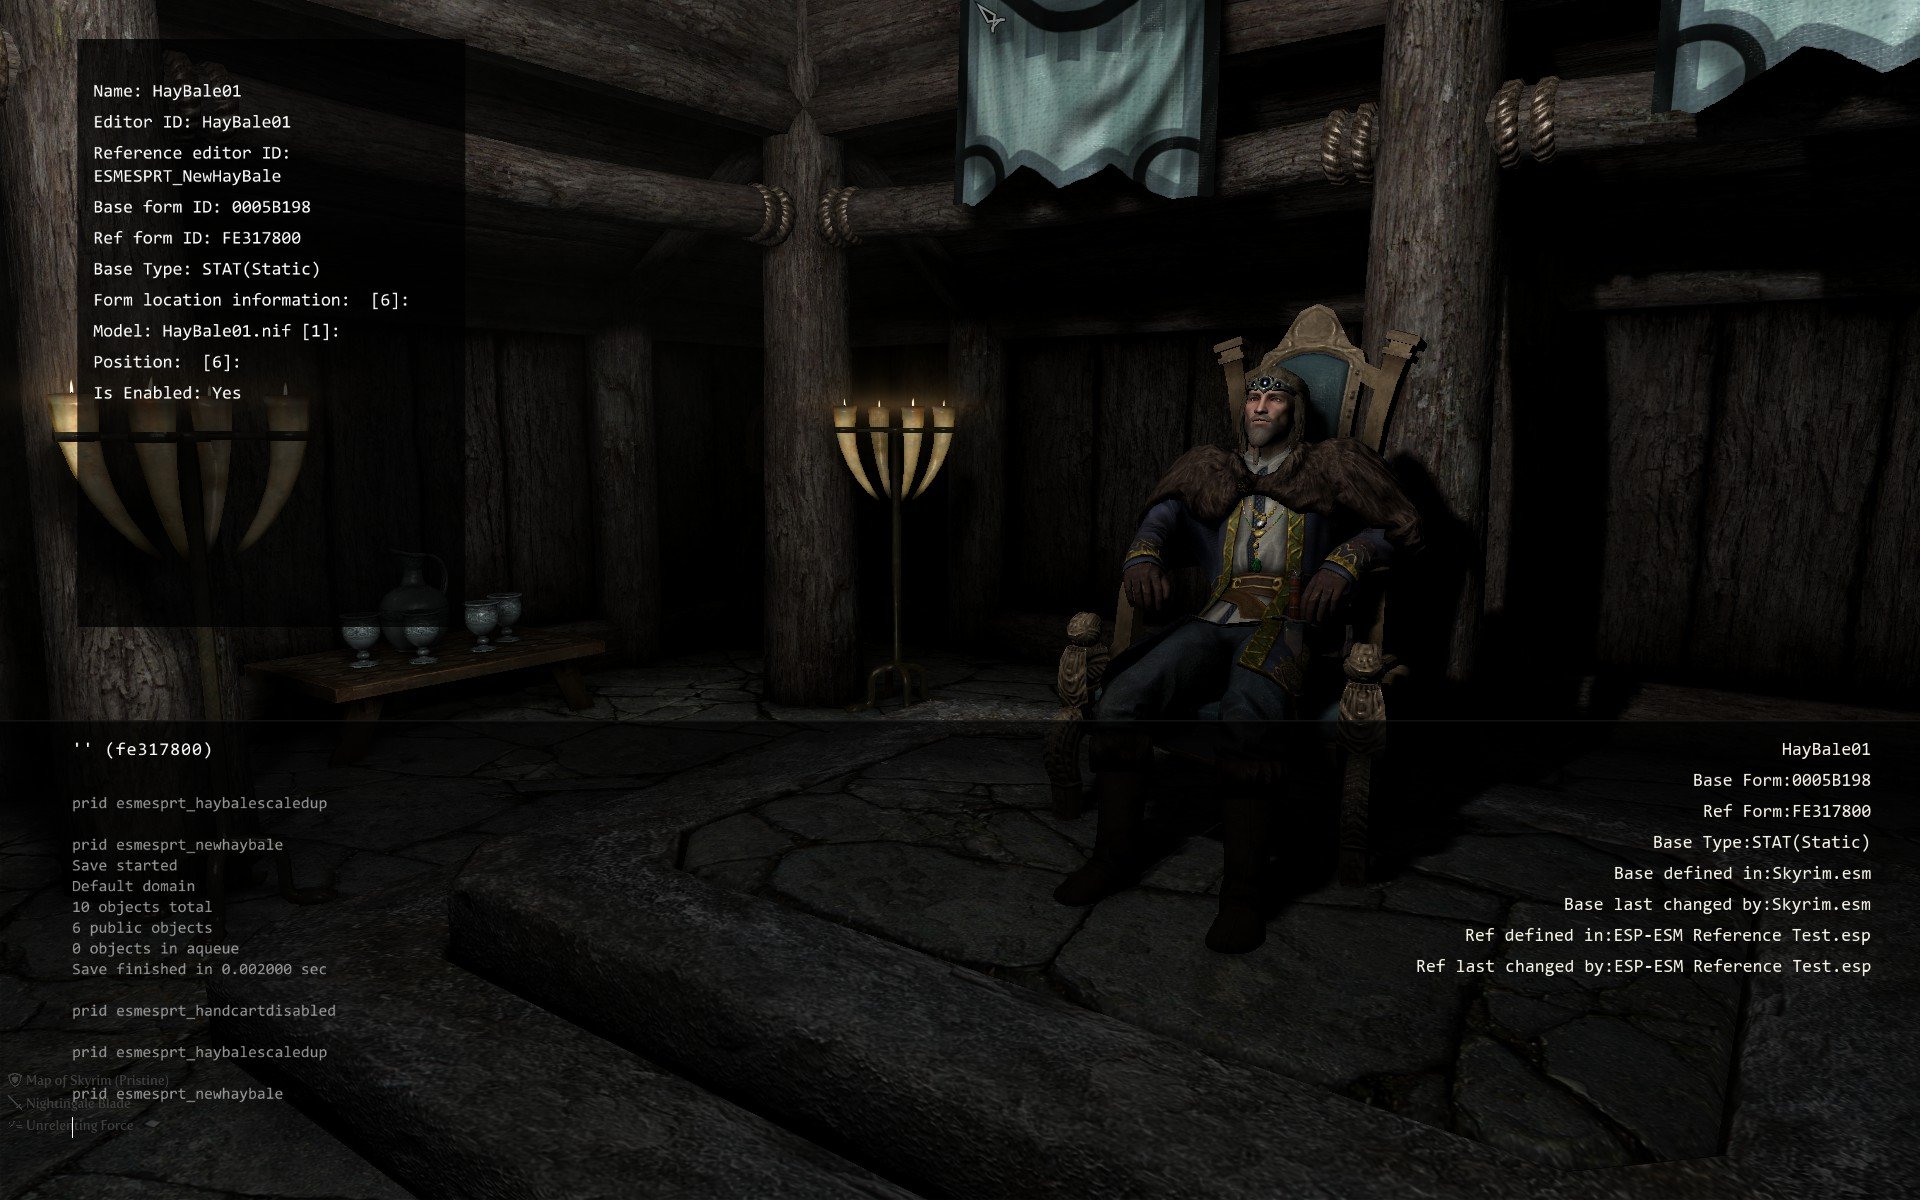
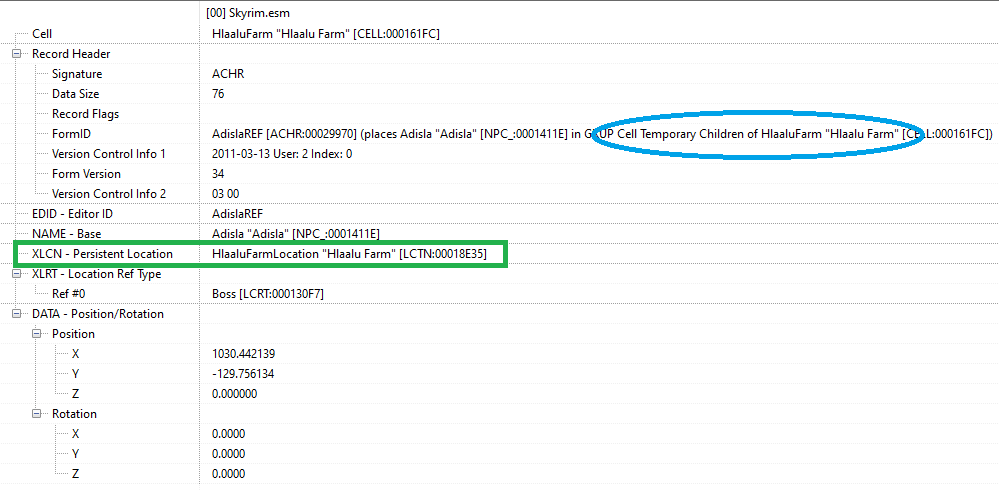
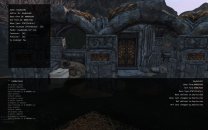
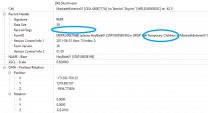
Illustrated practical demonstration of the engine's handling of temporary references in ESM vs. ESP plugins For mod authors and advanced mod users. TLDR: Skip to the Summary section further down. Part 1: The initial (vanilla) state We're in Markarth, in front of the stables. Let's look at a few objects: the door, a handcart, and a hay bale: Notice the console shows a Textures field for all the references. This indicates the textures are loaded and the object is rendered. The door is a persistent reference because it's used with navmeshes for NPCs, among other things. The other objects are temporary references. The door is only interesting as a point of temporary/persistent comparison later on. Part 2: The demonstration plugin Now let's make a simple plugin for an hypothetical mod. We're going to permanently disable the handcart, make the hay bale bigger, and place a new small hay bale: So the plugin overrides two vanilla references and adds a new reference. We've also given each reference an Editor ID to more easily look them up. Let's go take a look at the changes in-game with our new plugin enabled. The handcart is disabled and no longer visible, the existing hay bale has grown in size, and there is a new small hay bale not far from it: For the next tests, we'll be moving to Winterhold, far, far away at the opposite end of the map. In Winterhold, the cells we were in in Markarth (i.e. the active grid) won't be active any more. Part 3: Engine handling with an ESM plugin The demonstration plugin is ESM-flagged. This is how Bethesda intended things to be based on how the engine is designed and behaves in Skyrim SE. Let's look at our references from Winterhold. First the door. The door is still there, despite it being in Markarth and us in Wintherhold, as expected since it's a persistent reference. But note the Textures field is no longer present, meaning the door while still being loaded in the game, is no longer rendered. It all makes sense. As for all the other references, they can't be found. They're no longer loaded in the game at all. It all makes sense again, since they're temporary in a cell outside Markarth and we're in Winterhold: Part 4: Engine handling with an ESP plugin We remove the ESM flag from the demonstration plugin. This is how 99% of all mods made and released by mod authors are. Let's again look at our references from Winterhold: Surprise! They're all found. They're all loaded (but not rendered, as they have no Textures field). They're essentially treated like persistent references by the engine. Note that even though the handcart is permanently disabled, it's still loaded. An object that will never ever seen in-game is wasting engine resources. Also note that the hay bale originally defined in Skyrim.esm, but has been overridden by our plugin, is now always loaded. The hay bale is now wasting engine resources. We can even go into the Jar's Longhouse, an interior cell, and they're still there: Summary The Skyrim SE engine is designed to handle (object or actor) references in ESM plugins, not in ESP plugins. References in ESP plugins still "work" but not as intended by Bethesda. Temporary references in ESP plugins essentially behave like persistent references: always loaded in the game, available and reachable globally from anywhere. All temporary references in ESP plugins, whether they are overriding existing temporary references, or newly added references, are affected. Temporary references in ESP plugins contribute to the total amount of loaded references, which has a hard limit. Even though temporary references in ESP plugins don't waste rendering resources, they still consume engine resources, mainly memory. Miscellaneous Notes ESP plugins are bad not only because they're wasteful, but they also hide all the bugs in mods. Since all the references, temporary or persistent, are always loaded, there is no longer a meaningful distinction between persistent and temporary. A temporary reference may be used in the wrong context, it's all fine, it doesn't matter as it's always loaded, it always can be found. The same plugin would be a CTD crashfest if it were ESM, or some things wouldn't work correctly. All Creation Club modules, from the simplest gimmick to the largest content, are released by Bethesda as ESM plugins (.esl is the "light" version of .esm), for a simple reason: it's how plugins are expected to be in Skyrim SE. People can be confused by the term ESM which is commonly associated with game masters, i.e. the core game files (Skyrim.esm, Update.esm, etc.). And so they think it doesn't make sense for a mod or a patch to be ESM, to be a master. The two concepts must be disassociated. Game masters are the core game files, yes. But ESM is something else, it's just a small flag that has no relation with the nature or purpose of the plugin, but has big implications for the engine. Again, Creation Club modules are not core game files, they're Bethesda-approved mods, and yet they are all ESM. There is no downside to plugins being ESM, while ESP plugins exhibit proven disadvantages and deficiencies. Technically, ESM vs. ESP only matters for plugins that add new references or modify existing references. Those that don't can be ESP. Large references are not related to temporary or persistent references. They're a separate feature that is only available, and that is no coincidence, in ESM plugins. ESP plugins that override large references cause visual bugs, which is another reason ESP plugins are a bad idea. In our demonstration above, we only used static object references. The increased resource usage and waste caused by ESP plugins is worse with temporary NPC references (ACHR), because the engine must periodically evaluate and process their AI packages in case they might need to travel somewhere, or do something on a schedule. The engine is optimized to prioritize and refresh the most often the NPCs closest to the player, but it still must check all loaded NPCs from time to time. It's too late now to do anything about it. There's too much legacy with 99% of all existing mods using ESP plugins. Making existing ESP plugins into ESM can be trivial or extremely difficult. Even if some ESP plugins can be made ESM, there is the issue of sort orders and dependencies, particularly with automated sorting tools such as LOOT. This may require that other plugins be made ESM in order to satisfy the dependencies or sorting metarules. Nevertheless, certain kinds of mods which only deal with static (STAT/TREE/FLORA) or moveable static objects (MSTT) - such as tree mods; or landscape clutter mods - can and should be made ESM as they typically add or touch thousands of temporary references. Persistent Location There exists a sparely documented reference attribute named 'Persistent Location' which is extensively used by Bethesda in the vanilla plugins, but is apparently ignored or unknown by mod authors. It seems to be used exclusively with NPC references, so may only be intended to be used with them. It allows a temporary ACHR to become "temporarily" persistent as long as the player is in the specified location. As a reminder, a location (LCTN record) is a "tag" that is applied to specific cells, which together belong to, and form, a geographic location. The Persistent Location is an optimization feature: it avoids making an NPC reference persistent, which creates some overhead for the engine as discussed above, and instead keeps it as a temporary reference while allowing for some advanced NPC behavior across multiple cells, even across interior/exterior cells, while the player is in the geographic location. For example, Adisla, a farmer working at the Hlaalu farm near Windhelm: This minor NPC has advanced AI packages to make her sleep and eat inside, work and wander outside, on a specific schedule. She also has dialogue scenes with other NPCs on the farm. These features require her to be persistent. However her reference is temporary. But the Persistent Location attribute makes her persistent only when the player is in the Hlaalu Farm. Once the player exits the location the reference becomes temporary again, and completely unloads when the player moves further away. Obviously this is only meaningful in ESM plugins. It's completely useless in ESP plugins, since all temporary references are always and everywhere pseudo-persistent.


 3 points
 -
You may have noticed this mod displays a popup banner in the center of the main menu screen while the game starts, and a popup progress bar in the top-right corner of the screen while it loads animations, both using very bright coloring and style reminiscent of 1980s personal computers. I dislike both. What if every SKSE mod displayed its own banner on the screen, it would be a mess. They can be turned off by editing settings in [...]\SKSE\Plugins\OpenAnimationReplacer.ini: To turn off the popup banner, set bShowWelcomeBanner to false: bShowWelcomeBanner = false To turn off the popup progress bar, set bEnableAnimationQueueProgressBar to false: bEnableAnimationQueueProgressBar = false I'd recommend to leave them on (the default) initially, so you can see the mod is starting up properly. Once you've seen them a dozen times and you've had enough, you may want to turn them off.3 points
-
The main theme in Fallout: New Vegas is letting go. And I have to let go. We are expecting our second child any day now and once the baby gets born I won't have the time to play and curate for quite some time. I can't say how long it will take, I can't even say if I'll make a comeback as a curator, but I know I would like to get back to it one day. On the practical side of things, the guide is currently still in working condition and would probably manage to stay in working order for 3 months or so. If someone wants to take it from here, they are free to do so. After all, that is the way Step modding works. I will keep reading the Feedback thread and providing advice when I can, but I can't make any promises on regularity. I don't want to saound too melodramatic. This is not goodbye, just a call for would-be curators willing to step in. Step is a great community and the FNV Guide has helped me get through taxing times, giving me something to do through the occasional bouts of insomnia. I want to thank the admins for giving me this opportunity (and encouraging my hobby), the guide users for the effort of installing ~300 mods (I hoipe it was worth it) and I hope that someday I will be able to contribute again. P.S. Should have given a longer notice, but I'm hooked up on gaming and was delaying the inevitable in self-denial.3 points
-
I originally included these notes in my previous post under a spoiler tag, but I'll put them here without as I think they were missed (they included that bit about Bthardamz). In the Tool Setup table, xEdit.exe and xEditQuickAutoClean.exe should be named SSEEdit.exe and SSEEditQuickAutoClean. The collapsible here does refer to them by their original names, as does the System Setup Guide. If they should be renamed, the filename should be changed in both places. SPID no longer has a separate AE file, but instead, a FOMOD. May want to do a FOMOD table like you do for other mods with FOMODs (though it's an easy install, tbh--just the one choice of your game version). Same goes for Simple Offence Suppression. I recall the original version of the guide having instructions for adding mods from .zip, instead of Nexus. I know how to do this, but someone who doesn't might be confused when running into Skyrim Realistic Overhaul, Skyrim Redesigned WIP, and Arthmoor's mods. If these are elsewhere or I've overlooked them, ignore! Enhanced Vanilla Trees' FOMOD collapsible is missing the "Greener Pines" section of the custom FOMOD. Glacier LOD Meshes should have a note on it, like the other Skyrim LE mods, that it is compatible and the warning can be ignored. Reverb Interior Sounds Expansion does not ask me about Skyrim VR--unsure if FOMOD was updated or what. For Tempered Skins for Males, we're free to choose whatever we like. After choosing underwear option A2 however, the files I'm supposed to hide for underwear are not present. Will report back if this breaks something. Butterflies Unchained still lists the CACO patch as necessary--may want to note that it's unnecessary if you haven't installed CACO now that it's optional. Same thing goes for the Kryptopyrs Patch Hub--many of these are for CACO or CCOR or TCIY specifically and aren't necessary if those aren't installed. Could use some organization to reflect this. Same for Vokrii patch--unnecessary if you don't have CACO. It's clear to me, reading the ENBSeries collapsible, that the Step ENB preset files from Nexus should go straight into the root folder, but you may want to say this specifically. (Note from later: the guide does get to this, but it's at the end of the section, in the collapsible for the Post-Processing patch. Maybe have the files placed when the ENB preset is downloaded originally, in the ENBSeries collapsible itself?) All mods added! List of things that are currently listed as "redundant" in case that's helpful: the three DLCs, Majestic Mountains Double-Sided Patch, Battle Ready Candlelight Fixes, Rudy HQ - Bthardamz. Can provide overwrite reports if needed. Items that needed xEdit quick cleaning: SmoothShores.esp, imp_helm_legend.esp3 points
-
Some notes: CACO has been updated for 1.6.640. Alandtse has developed an alternative to Crash Logger here, also supporting 1.6.640. I was thinking about downgrading to 1.6.353, but I worry that with the majority of these DLL-based mods updated, some will only have 1.6.640 versions available, so I will continue waiting. Thanks for maintaining this list!3 points
-
Na, I really didn't mean you :) Reading my post again, I see that it can easily be understood that way. What I meant to say is that you are pouring your free time into the STEP project. For others to make passive aggressive statements about how you should best use that time seems inappropriate. Besides, it is also really counter productive. No one obligates you to contribute in a way you do not want to, that's how the Skyrim community works (*hopefully, *mostly, ect. ). You probably contributing to STEP because you are having fun sharing your expertise in the current modding process and building with others. That alone seems like a really good reason to keep things the way they are.3 points
-
I've updated the mod with some additional customizable settings for the plume.3 points
-
Hi, Hackfield here! First and foremost, thank you for accepting my mod, it's a huge honor to have a place in the list that taught me how to mod my game back in 2013. Second, a couple of news: I'll soon release version 0.9 of the mod, including the ability to set Confidence and Aggressiveness of owned horses in the MCM (defaults will be Cautious and Unaggressive, just like in vanilla) Also, in version 0.9, I'll be finally adding the ability for horses to equip given saddles. Nothing fancy tho, horses will equip the last saddle you place in their inventory, kinda like what followers do if you give them a better gear than what they have. This feature will require Keyword Item Distributor and Papyrus Extender to work, however, they're completely optional, in the case someone is not interested in saddles, they can just skip these two requirements and the mod will work as usual. I'm always open to feedback and suggestions, and thanks again for considering my little mod.3 points
-
Keep it simple: just move the XPMSE.esp plugin to 'Optional' on MO2's 'Optional ESPs' tab. No need to hide anything but the plugin, which MO2's Optional conveniently does. The plugin starts hidden quests to set up the MCM and the whole cloak spell thingamajig, which run scripts. Without the plugin, the scripts and MCM interface resources are completely harmless and can stay where they are. If users want to use these features, they can just move the plugin back from 'Optional', without unhiding anything. That's it.3 points
-
Starting with DynDOLOD Alpha-59 I updated the waterfall rule for Skyrim Special Edition so there is a static LOD model in object LOD Level 4 already. They are slightly moved down and back so it shouldn't z-fight with the full / dynamic LOD models.3 points
-
This is a beta of [FNV|FO3|FO4|FO4VR|TES5|SSE|TES5VR|ENDERAL|ENDERALSE]LODGen with terrain LOD meshes and textures generation. This is for experienced mod authors and users that know how to use xEdit, xLODGen or DynDOLOD already. Installation and Setup Download xLODGen beta 132 - based on xEdit 4.1.6. See the xEdit Discord #xlodgen-builds channel for changelog. Unzip into a dedicated folder outside of any Steam, game or mod manager folders or special Windows folders like Program Files, Users, Desktop, Documents, Downloads etc. Do not mix with xEdit installations. Rename xLODGenx64.exe to [game mode]LODGenx64.exe (TES5LODGenx64.exe for example) or start with command line parameter -fnv, -fo3, -fo4, -fo4vr, -tes5, tes5vr, -sse, -enderal, -enderalse Use -o:"c:\OutputPath\" command line parameter to change where files are generated to, default is the game folder. Then install output as a mod. Do not generate into any game, any mod manager folders or special Windows folder like Program Files x86, Users, Desktop, Documents, Downloads etc. If a mod manager is used, refer to its manual how to add tools and their command line arguments. Otherwise use a windows shortcut. If required, use command line arguments to set the paths to certain directories and files. For example: -m:"c:\Users\[USERNAME]\Documents\My Games\Skyrim Special Edition GOG\" -p:"c:\Users\[USERNAME]\AppData\Local\Skyrim Special Edition GOG\plugins.txt" -d:"c:\GOG Games\Skyrim Special Edition GOG\Data\" or -m:"c:\Users\[USERNAME]\Documents\My Games\Skyrim Special Edition MS\" -p:"%localappdata%\Packages\BethesdaSoftworks.SkyrimSE-PC_3275kfvn8vcwc\LocalCache\Local\Skyrim Special Edition MS\Plugins.txt" -d:"c:\Program Files\ModifiableWindowsApps\Skyrim Special Edition (PC)\Data\" Requirements Microsoft Visual C++ Redistributable for Visual Studio 2015, 2017 and 2019 - Required by LODGen.exe/LODGenx64.exe and Texconv.exe/Texconvx64.exe. Get matching platform x86/x64 depending on which xLODGen.exe (x86) or xLODGenx64.exe (x64) is used. RTFM and Share Results See the included Skyrim-Occlusion-Readme.txt for a brief explanation of the Skyrim TVDT Occlusion data generation. Read the hints that are shown when the mouse pointer rests on a setting. Ask specific questions or give feedback in the dedicated Skyrim TVDT - Occlusion Data thread. See the included Terrain-LOD-Readme.txt for a brief explanation of the settings for terrain LOD generation. Read the hints that are shown when the mouse pointer rests on a setting. Ask specific questions about terrain LOD in this thread for a more in-depth explanation if required and share feedback (with screenshots) about results or problems. These tools generate LOD meshes and textures "exactly" like CK, but not like the meshes and textures which are shipping with the games (they are often manually edited). However, these tools provide more options and higher resolutions (use the x64 version if there are memory errors because you believe you require 4k or higher) and can be updated to add more useful features and options. I did some testing in the different games, but finding the best combinations of options and settings requires lots of testing and are a matter of personal opinion and which game is used, the load order, mods, even different worldspaces probably. That means, I am only able to give generic guidelines and hints to send you off to find and test for yourself and share your results. My main interested is that generations works correctly and without problems for now. This beta is about testing and reporting problems. Check out the thread xLODGen Terrain Settings Compare. Also refer to any modding guide which has a list of relevant mods close to your load order. The object and tree LOD generation is the same as the current versions of xEdit / xLODGen. Refer to their respective descriptions and explanations. Obviously, users of Skryim/Enderal/Skyrim SE/Skyrim VR/EnderalSE continue to use the easier and more comprehensive DynDOLOD for drastically improved object and tree LOD generation and only use xLODGen for terrain LOD (and maybe Occlusion) generation. See https://dyndolod.info/Help/xLODGen for terrain LOD generation instructions. First Time Here are suggestion to start without going crazy and that should be quick enough to generate: Set quality of meshes for LOD4 to 5 and then +5 for each next level. Or just set levels 8/16/32 to 10. Check protect cell borders (yes it fixes the ugly terrain drops at outer cell borders that still exist in Fallout 4). Use the max vertices setting only if you want to hard limit max file size. In Skyrim Special Edition or Skyrim VR, if you notice terrain briefly flickering when new areas are loading in, set [Display] bEnableLandFade=0 in Skyrim.INI Set Optimize Unseen to off for LOD4 for first generation. Start experimenting with a value of 550 with a quality setting of 10 or lower for LOD32 (used for map) and compare coastlines and file size to other settings. To quickly generate terrain LOD meshes just for the map, check only terrain LOD Meshes, check the Specific Chunk checkbox and set drop down to 32. Leave SW fields empty for complete map or set SW cell coordinates to same values as a *.btr filename to test a specific area with lots of water, river etc. Set texture sizes to 512 for a start. Larger sizes and large world spaces will take a considerable time (like 15 to 30 minutes or more easily). Each higher resolution means quadruple the work. Use DXT1 for diffuse and 565 (DXT1 if on Windows 7) for normal maps. If generating for Skyrim Special Edition and VRAM is not of concern use BC7. Uncheck mipmaps, raise steepness and Bake normal maps. For now, leave the Brightness, Contrast and Gamma at 0 and 1.0 respectively. If using PBR textures use a gamma of 0.6 ~ 0.7 to account for the sRGB to linear conversion. It seems that only Skyrim CK and Skyrim SE CK are manipulating the intensity of the textures to adjust for the noise.dds and the god awful "improved" snow shader of Skyrim SE (just turn that thing off, really) - Fallout does not do any of this. If textures seem too dark in the game, brighten the noise.dds instead or vice versa. That way you can get perfectly matching LOD textures that look just like the textures in the loaded cells. For Skyrim a good average color of the noise texture seems to be around #C0. See below for a couple noise texture downloads. If you want to test larger texture sizes, use the chunk option to limit the number of textures that need to be generated. For example, check [x] Specific chunk, leave the drop down empty and set WS to the lower left cell coordinate of an 32x32 area, like 0, 0. It will then generate all textures up to 31,31. Not all worldspaces have their origin at 0,0 so you will have to check already generated meshes/texture filenames for their lower left coordinates. Questions and Feedback Obliviously anything related to xLODGen terrain LOD beta should be posted in this thread. Upload the [FNV|FO3|FO4|FO4VR|TES5|SSE|TES5VR|ENDERAL|ENDERALSE]LODGen_log.txt that is saved in the same folder were xLODGenx64.exe is after the tool is closed. Also upload bugreport.txt in case it exists. Posts related to Occlusion should be made here. Recommended Optionals TES5-Terrain-Tamriel.esm (Mega), SSE-Terrain-Tamriel.esm (Mega) TES5-Terrain-Tamriel-Extend.esm (Mega), SSE-Terrain-Tamriel-Extend.esm (Mega) - These extend the sea of ghost further to the north (see screenshots) SSE-Terrain-Tamriel-Full-Extend.esm (Mega) - Entire map from -96,-96 to 95,96 with northern ocean extension. Useful for mod authors. Only use one at a time. Put in game data folder obviously. Adds back terrain for Skyrim (Tamriel worldspace) at the outer edges so there is no missing terrain meshes/textures when generating terrain LOD for Skyrim. Load as early with lowest priority as possible, so that any other plugins overwriting or adding land records or cells with the same coordinates take precedence. Only required to be loaded when generating terrain LOD. No harm done when loaded in-game but typically the player can not get close to these areas. There are no effects outside the far away added cells. Noise Single color flat noise, Adjusted vanilla noise, HD Terrain Noise Texture SE 1.0 Examples for Skyrim. Install to game folder like any other texture mod. The noise texture is applied in-game on top of terrain LOD textures, so no effect for LOD generation. Only the red channel is used in case the textures is not a grey channel format. MipMaps are ignored. The textures is tiled 3x3 per LOD quad, e.g. for LOD level 4, the noise texture is repeated 3 times to cover 4 cells, for LOD level 8, the noise texture is repeated 3 times to cover 8 cells and so on. Test-Terrain-Tamriel.7z For testing terrain LOD distances. Plain color terrain LOD textures for Tamriel with coordinates for every LOD quad. Green for LOD 4, yellow for LOD8, blue for LOD 16 and red for LOD 32.2 points
-
I noticed a slight issue with this mod, for which I created a patch. When wielding magic, movement speeds revert to vanilla which is slightly faster than the modded values. The patch I made changes the "NPC_Magic_MT" values to match the values from the mod, so now the movement speed is consistent when wielding magic.2 points
-
Finally able to take a screenshot and show how the 2K option looks for Aspens Ablaze. Taken on the Ivarstead bridge at about 11am game time with the Step's Cathedral Weather and ENB. I haven't played with Aspens Ablaze's default 4K but I think it's new 2K option looks great
 2 points
 -
All redone over the week and hopefully I paid more attention getting things set up. I also thought to try ENB for the first time if I'm giving this much effort to it and the performance test looks very good inside and outside Whiterun with the Step ENB - Heavy selection. After the cow tamriel -40 24 it was a little stranger outside Riften. I'm not sure if it's something with the ENB or if it's because I have not yet run DynDOLOD or if it's something with the precached grass but the ground looked like it wasn't up to it like it was outside Whiterun... maybe I'm just too critical here. I know I need to track down these because I'm learning that ENB needs more attention. I checked them with More Informative Console /Meshes/clutter/upperclass/upperbench01.nif /Meshes/clutter/upperclass/uppercupboard01.nif /Meshes/clutter/upperclass/upperendtable01.nif all had a blue showing like that and I could only find them with a mesh in SMIM - Quality Addon and no texture anywhere. Not sure if I should hide these meshes or if I should look for a mod with textures. I'll have to think about that while I double check everything is done right and then I'll run DynDOLOD and hopefully I'll have a good game to play over Christmas and New Years Edit: Loaded grass has purple hue at a distance this thread has given me some ideas to test out and see what I can do instead of turning off ENB Edit again: And another thread Weird ground textures in Riften before step 5 gives me some answers as I've been doing the performance tests before the DynDOLOD generation so Cathedral Landscapes (Temp) xLODGen is active. I'm just too nervous!2 points
-
Discussion topic: Footprints - Alternative Design by ArtistoMods Wiki Link Setting up Footprints and SPID for Footprints I read through the Step forum threads about some possible issues with the decals or meshes and ENB. I'm not sure if these are still questions as I don't think I've ever played with ENB but my memory isn't great... anyway I saw this when I was looking at those two mods on Nexus and it seems to be a very good thing to add with them. I'll be putting it after SPID for Footprints to see how it goes on the list I'm making following (mostly) Step's Guide v2.3.2 points
-
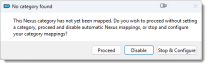
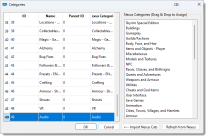
This is an issue with cross game category mapping. The mod categories of SkyrimLE do not match with those of SkyrimSE. This mod is in the "Audio - SFX, Music, and Voice" which has 61 assigned to the category, whick MO2 uses to map them. SkyrimSE does not have any category with that index. I was able to reproduce the problem you described above. When you get to this dialog: You press "Stop & configure" and get this next dialog: You select the audio name and click OK to assign the category, but this is not the purpose of this interaction. It is to import the game categories from the current game managed by MO2. A better option is to just press the "Proceed" button as seen in the first image, install the mod and assign the category from the mods configuration page. If you are going to do this a lot on this install you can also make your own custom category in MO2 settings, Configure Mod Categories.
 2 points
 -
Discussion topic: Dragons Shout with Voice Update - SSE by ntn9713c Wiki Link Patch for Dragons Shout with Voice to add shout voice to DLC dragons, Ulfric Stormcloak and Greybeards Adds to and fixes Dragon Shout With Voice. No need for "Dragons Shout with Voice from Location" with this added (i asked the author on the mod page).2 points
-
I can also confirm that this fixes collision issues with Manic Elytra Nymph that are not addressed by IWHN. Seems to work fine as a drop-in replacement for the original.2 points
-
Some potentially relevant tips from the top comments/bugs on Nexus:
 2 points
 -
xLODGen beta (47 or newer) and DynDOLOD (2.70 or newer) can be used to update or generate TVDT Occlusion culling data on cell records, which is famously wrong for some cells in Tamriel causing rectangular holes in the distant LOD. Please read the included documentation Skyrim-Occlusion-Readme.txt in the xLODGen archive and the TVDT - Occlusion Data section in Docs/DynDOLOD_Manual.html to learn about TVDT data, how to generate it and the settings. Mod users / complete load orders For Skyrim, Skyrim VR and Skyim Special Edition I generally suggest to use DynDOLOD 3/xLODGen to create an Occlusion.esp for the entire load order. Generating the Occlusion.esp is fairly quick with quality 2 and it means not having additional plugins as master in DynDOLOD. The Occlusion.esp is automatically ESL flagged for Skyrim Special Edition. Since DynDOLOD is just the advanced version of xLODGen for tree and object LOD generation, the code to generate the occlusion data and the results are the same. Using DynDOLOD has the advantage that the occlusion is generated automatically with pre-defined settings in the DynDOLOD INI as part of the LOD generation process. Using xLODGen has the advantage of being able to update a separate plugin which only contains the occlusion data and nothing else more quickly and even for a specific worldspace only. For Enderal it seems more convenient to have DynDOLOD generate the data into the DynDOLOD plugin, so in DynDOLOD it is enabled by default for Enderal only. There are also additional optimizations in DynDOLOD for Enderal that help improve performance in certain locations. In xLODGen the Occlusion generation is an additional option below the Terrain LOD options. See the included documentation for information about the settings. Once generation is complete, Occlusion.esp is saved to the data folder (or MO mod folder / MO Overwrite folder accordingly). To make sure its updated TVDT data is used, ensure the Occlusion.esp is loaded last so it overwrites any other plugin. Generate the Occlusion.esp last. So the order would be: Finalize load order use xLODGen to generate terrain LOD meshes [and textures] use TexGen/DynDOLOD to generate drastically improved object and tree LOD (uses terrain LOD meshes for object LOD optimization) use xLODGen to create Occlusion.esp (uses object LOD meshes to determine max height samples) If the load order changes afterwards and a plugin makes changes to WRLD/CELL records, the entire worldspace should be updated in the Occlusion.esp (unless the new plugin loads after Occlusion.esp of course). Worldspaces in Occlusion.esp can be updated by simply starting xLODGen with the current Occlusion.esp being last in the load order. Select the desired worldspaces only and generate Occlusion for it. The selected worldspace is removed from Occlusion.esp and then generated completely anew for the new load order. Other worldspaces in the Occlsuion.esp will not be changed. Mod authors It is possible to update the TVDT data on CELLs in a single plugin by starting the tool in edit mode. Generate/Update object LOD first so the object LOD meshes match the current state of the worldspace. As suggested in the included documentation, generate max height data for all cells with CK beforehand. You are welcome to test the included MHDT generation as well. Consider defining/updating the Border Region for the worldspace so the +Border filter option can be used. Either start xLODGen.exe in edit mode with the -edit command line or rename xLODGen.exe to [Gamemode]Edit.exe e.g. TES5Edit.exe Select loading of plugins as usual. Right click desired plugin in the left tree view, click Other, Generate LOD. Check Occlusion and verify the text next to it mentions the desired plugin to be updated. Adjust other settings as desired and explained in the included documentation. For large / multi people projects it is probably better to generate an Occlusion.esp the usual way and merge the TVDT data. Stick to the usual workflow. As always, mod authors are welcome to direct message me here or on discord for help with their projects. Read the provided information and in case of questions about occlusion generation, post them in this thread regardless of using xLODGen or DynDOLOD.2 points
-
The purpose of this is to complete the first part of the guide, the System Setup Guide. I am using Arch Linux, installed and updated as of 04/10/2024, using the Arch wiki with very little deviation to start with. My desktop environment is KDE Plasma, this means sound system is pipewire and qt6 the windowing agent. Most of this will probably not matter in the end, just something to keep in mind if you use a different distro, kernel and environment, something to keep in mind qas you follow along, but what is the most important part of this is WINE. That should be universal enough. I am also going to walk through setting up Skyrim to work without Lutris. so, a lot of manual command line stuff here. I will also get to a point that MO2 is working and ENB support. the rest is up to you, dear reader. So, a couple extra notes, I have fully migrated to systemd for boot and system service handling. I am on Wayland, 6.13 linux Zen kernel (I use virtualization programs, Zen has patches to make things easier as a lot of the dkms extensions are patched in. If you think any other info is needed, I'll share more of my setup as the plethora of setups out there might affect your success in following what I have outlined here. System Setup Guide (SSG) Have Linux installed Install WINE and dependencies (sttaging or not, doesn't matter, rezlly, I don't use it) Install winetricks and dependencies Download wine-ge (8.26) as of writing this Direct landing page on github https://github.com/GloriousEggroll/wine-ge-custom/releases/tag/GE-Proton8-26 File: "wine-lutris-GE-Proton8-26-x86_64.tar.xz" unarchive to a place. I suggest in the home directory. For me, it would be: /home/jrich82/wine-ge_8-26/ /home/jrich82/ will definitely be different for you. "jrich82" is my user folder. You may or may not have depending on how you installed Linux. (I also renamed the wine-ge folder to something a little shorter and memorable, keeping the version number in case) Since I have Skyrim AE on GoG, I downloaded all the installer files from the site.and put them at "/home/jrich82/Downloads/SkyrimAE/" (your download folder may be different, just make a note of it.) As of writing, I have yet to get the latest version of GoG galaxy to work properly, so manually downloading the files will be your better bet. Might take a moment, but this guide is trying to do as much as possible thorugh terminal and manual intervention anyway. Much more of a reward feeling when you have everything working Assuming you have nothing downloaded or installed before. You should have: The game: setup_the_elder_scrolls_v_skyrim_special_edition_0.1.3905696_(70738).exe setup_the_elder_scrolls_v_skyrim_special_edition_0.1.3905696_(64bit)_(70738)-1.bin setup_the_elder_scrolls_v_skyrim_special_edition_0.1.3905696_(64bit)_(70738)-2.bin setup_the_elder_scrolls_v_skyrim_special_edition_0.1.3905696_(64bit)_(70738)-3.bin setup_the_elder_scrolls_v_skyrim_special_edition_0.1.3905696_(64bit)_(70738)-4.bin setup_the_elder_scrolls_v_skyrim_special_edition_0.1.3905696_(64bit)_(70738)-5.bin setup_the_elder_scrolls_v_skyrim_special_edition_0.1.3905696_(64bit)_(70738)-6.bin setup_the_elder_scrolls_v_skyrim_special_edition_0.1.3905696_(64bit)_(70738)-7.bin setup_the_elder_scrolls_v_skyrim_special_edition_0.1.3905696_(64bit)_(70738).bin AE DLC: setup_the_elder_scrolls_v_skyrim_anniversary_upgrade_0.1.3905696_(64bit)_(70738).exe setup_the_elder_scrolls_v_skyrim_anniversary_upgrade_0.1.3905696_(64bit)_(70738)-1.bin Skyrim Anniversary Edition from GoG install: Syntax is important. Keep in mind the (), "" and _ Also, capitalization, unlike Windows is imperative as the folder Skyrim is different from the folder skyrim. Also, if you miss the double quotes, it will error as "(" is the a start of an escape sequence for Linux I will also be using direct folder paths. Adjust for your install. Base game: WINEPREFIX="/home/jrich82/Games/Skyrim" /home/jrich82/wine-ge_8-26/bin/wine /home/jrich82/Downloads/SkyrimAE/"setup_the_elder_scrolls_v_skyrim_special_edition_0.1.3905696_(64bit)_(70738).exe" command line break-down: WINEPREFIX is the prefix fodler for the game, keeping it separate form any other ewine prefix you might have. I find this better as things can stay separated and hcnages specifically for Skyrim can happen without messing with what you alreayd have setup. This is then followed by the wine executable from GloriousEggroll "/home/jrich82/wine-ge_8-26/bin/wine" Again, your path might be different, depending on where you extracted the archive downloaded from github. It should point ot he "wine" executable int he bin folder for it. If you should need the prefix to work as 32-bit (these commands should work with just about any windows installer/executable) add "WINEARCH=win32" example: "WINEPREFIX=~/Games/some-random-game WINEARCH=win32" I won't be using the WINEARCH= argument here as I think it should default to win64 behavior by default. Then the executable for Skyrim AE downloaded from GoG. "/home/jrich82/Downloads/SkyrimAE/setup_the_elder_scrolls_v_skyrim_special_edition_0.1.3905696_(64bit)_(70738).exe" TLDR; prefix wine executable I changed one thing dduring the install, I changed the install location from C:\GOG Games\Skyrim Anniversary Edition to C:\Skyrim Anniversary DLC upgrade install: WINEPREFIX="/home/jrich82/Games/Skyrim" /home/jrich82/wine-ge_8-26/bin/wine /home/jrich82/Downloads/SkyrimAE/"setup_the_elder_scrolls_v_skyrim_anniversary_upgrade_0.1.3905696_(64bit)_(70738).exe" First run, Vanilla Skyrim AE! So far so good? Located at /home/jrich82/Games/Skyrim some files and folders. We want to pay attention to everything under "drive_c" This is basically your "C:" drive. For now, I am going to run Skyrim through the Skyrim launcher: WINEPREFIX="/home/jrich82/Games/Skyrim" /home/jrich82/wine-ge_8-26/bin/wine /home/jrich82/Games/Skyrim/drive_c/Skyrim/"SkyrimSELauncher.exe" NOTE remember the location where you told the GoG insaller to point to: "C:\" = is "drive_c/Skyrim" for me. So, the final path is /home/jrich82/Games/Skyrim/drive_c/Skyrim/"SkyrimSELauncher.exe side-quest! For me, I had some odd graphical glitching, so I thought I would fix that before moving on. I decided DXVK dll integration would work. So I downloaded the latest release https://github.com/doitsujin/dxvk/releases/tag/v2.4.1 Inside "dxvk-2.4.1.tar.gz", is an x64 folder. copy these dlls to /home/jrich82/Games/Skyrim/drive_c/windows/system32 (create folders "windows" and "system32" if you don't have them) keep them nested WIndows/System32 This is how it looks on my system using the same commands, your location might varry if you change some things to suite your folder organization you want to practice. /home/jrich82/Games/Skyrim/drive_c/Windows/System32 now, we need to override the "native" libraries: WINEPREFIX="/home/jrich82/Games/Skyrim" winecfg on the "Libraries" tab, in the drop down for "New override for library": I entered "d3d10core.dll" and clicked "add" I also did this for "d3d9.dll" "d3d11.dll" and "dxgi.dll" then clicked OK. and tried running again. graphical glitches gone! Some folders to keep in mind: Again, these might be different on your install, especially anything "jrich82", should be your username. /home/jrich82/Games/Skyrim/drive_c/Skyrim (the main game folder) /home/jrich82/Games/Skyrim/drive_c/users/jrich82/Documents/My Games/Skyrim Special Edition GOG (this folder will have your ini and save files.) Mod Organizer 2 install Now, we will install MO2 and make sure that works. WINEPREFIX="/home/jrich82/Games/Skyrim" /home/jrich82/wine-ge_8-26/bin/wine /home/jrich82/Downloads/"Mod.Organizer-2.5.2.exe" The installer wants to put it at "C:\Modding\MO2" I think this is fine I just left everything at recommended install It will throw up a couple errors, just "Ignore" them and let the installer finish. Uncheck Launch Mod Organizer. MO2 should now be at /home/jrich82/Games/Skyrim/drive_c/Modding/MO2/ Try running it and see what happens. WINEPREFIX="/home/jrich82/Games/Skyrim" /home/jrich82/wine-ge_8-26/bin/wine /home/jrich82/Games/Skyrim/drive_c/Modding/MO2/"ModOrganizer.exe" You should be greeted with the New Instance dialog. set up as the guide suggests, or whatever you already know how to use if you have used it before. I like portable, so I chose that, ensured it saw where Skyrim was installed and clicke don GoG (not Steam or Epic) I also connected to my nexus account through my API key. Once the initial setup was done and default profile available, I tested running the game through MO2, and again; success. Everything is working so far. BethINI I created a folder BethINI under the Modding folder: /home/jrich82/Games/Skyrim/drive_c/Modding/BethINI/ WINEPREFIX="/home/jrich82/Games/Skyrim" /home/jrich82/wine-ge_8-26/bin/wine /home/jrich82/Games/Skyrim/drive_c/Modding/BethINI/"BethINI.exe" It ran, just couldn't find the launcher and INI. easy enough to resolve, just point to it in the dialog box that pops up. LOOT Installing LOOT was pretty simple, but the executable wouldn't run. I just downloaded the 7z and created a folder for it /home/jrich82/Games/Skyrim/drive_c/Modding/LOOT/ WINEPREFIX="/home/jrich82/Games/Skyrim" /home/jrich82/wine-ge_8-26/bin/wine /home/jrich82/Games/Skyrim/drive_c/Modding/LOOT/"LOOT.exe" Ran fine. Updated the master list and sorted the plugins xEdit I just downloaded the 7z and created a folder for it /home/jrich82/Games/Skyrim/drive_c/Modding/TES5Edit/ WINEPREFIX="/home/jrich82/Games/Skyrim" /home/jrich82/wine-ge_8-26/bin/wine /home/jrich82/Games/Skyrim/drive_c/Modding/TES5Edit/"TES5Edit.exe" While it runs, it could not see the registry key for Skyrim. You can add in the line arguments manually specifying the data, ini and plugins.txt file -D:"C:\Skyrim\Data" -I:"C:\Users\jrich82\Documents\My Games\Skyrim Special Edition GOG\Skyrim.ini" -P:"C:\Users\jrich82\AppData\Local\Skyrim Special Edition GOG\plugins.txt" (again, pay attention to your path, they most likely do NOT match mine) xLODGen Follow the guides instructions. Same with TE5Edit, xLODGen is based off it, you need to add the same argument -D:"C:\Skyrim\Data" -I:"C:\Users\jrich82\Documents\My Games\Skyrim Special Edition GOG\Skyrim.ini" -P:"C:\Users\jrich82\AppData\Local\Skyrim Special Edition GOG\plugins.txt" You should now be ready to follow the rest of the STEP guide. Just remember whatever path to certain folders you used and you should be fine. Beyond that, the rest of the guide can be followed I gather. The most important parts work; SKSE64 reports the proper version and some extended commands do their thing. ENB series 502 with STEP's ENB downloads (all three) work. It took about 5 hours, counting the downloads, and the bulk of the time was spent finding fixes for things that didn't work "out of the box" and needed to be tested multiple times before I was confident they can be replicated. Again, this guide is just for setup. I am not really planning on rebuilding STEP, but every step should work properly. If I missed anything, let me know! I will try to also answer questions to the best of my ability if something doesn't go right. When you get into the tool setup stage of the guide, just append the STEP guide's arguments to these and you should be good to go.2 points
-
bump for STEP CR2 points
-
We need to make one small additional change to the STEP - CR or STEP - Lighting and Weather CR (not sure which this would be for) If you load xEdit and look at SightlessNavFix.esp and conflict check to that file only you will see the lighting mod Ambiance loads before it. The XCLL lighting data you want from Ambiance for FormID 00025195 - Abandoned Cave will lose to SightlessNavFix.esp (Navigator Navmesh Fixes) gaining back the default Skyrim colorspace values.2 points
-
shouldn't this be marked as accepted?2 points
-
With the addition of 'Immersive Equipment Displays' to the guide you now seem to have two opposing concepts of display, at least when it comes to quivers/bolts. While 'IED' wants to show everything equipped and favorited, 'Unequip Quiver SE' wants to hide quivers/bolts or only show them in certain conditions. In testing both mods together they worked fine, but depending on conditions akwardly contradicted each other, so I eventually ended up deactivating 'Unequip Quiver SE'. It seems that if a user wants to set all the main conditions of hiding quivers/bolts 'Unequip Quiver SE' does, they can also do so now via setting manually conditions in 'IED' alone, as explained in 'Immersive Equipment Displays - Tutorials and presets', making 'Unequip Quiver SE' redundant in the long run? (There is also a preset available to disable the quiver when a bow or crossbow is not equipped/displayed).2 points
-
Discussion topic: Keyboard Shortcuts Fix by xSHADOWMANx Wiki Link I find it highly irritating how Bethesda fully takes hold of the keyboard input. Starting with not being able to recognise other keyboard layout settings than English, so I can't type "@" in the creators content login window unless I change my layout settings. Neither copy nor paste are working for that field either. And you can't use the keyboard media keys which is annoying if you just want to change the volume a little bit on the fly. This mod fixes this and I can confirm this mod works with SE1.5.97.0 executable and binkw64dll, all other files from Steam version and SKSE64 1.5.97.2 points
-
It is safe to ignore. The HD overhaul has an optional 4K Galaxy file that depends on that framework, but none of the main files do.2 points
-
Section 20-Patches, penultimate item: Step Patch - Conflict Resolution. Expanding it or following the Wiki link shows the following text (relevant bit highlighted in green): You're not making any sense: Files are there but you can't find them? You found the file but it's not the right one - which file? Please read carefully and follow these 3 simple steps: Go to https://www.nexusmods.com/skyrimspecialedition/mods/31054/?tab=files. Download the file named 'Step Grass'. It's listed on that page, at the very bottom of the page. Install 'Step Grass' as a separate mod and enable in MO2.2 points
-
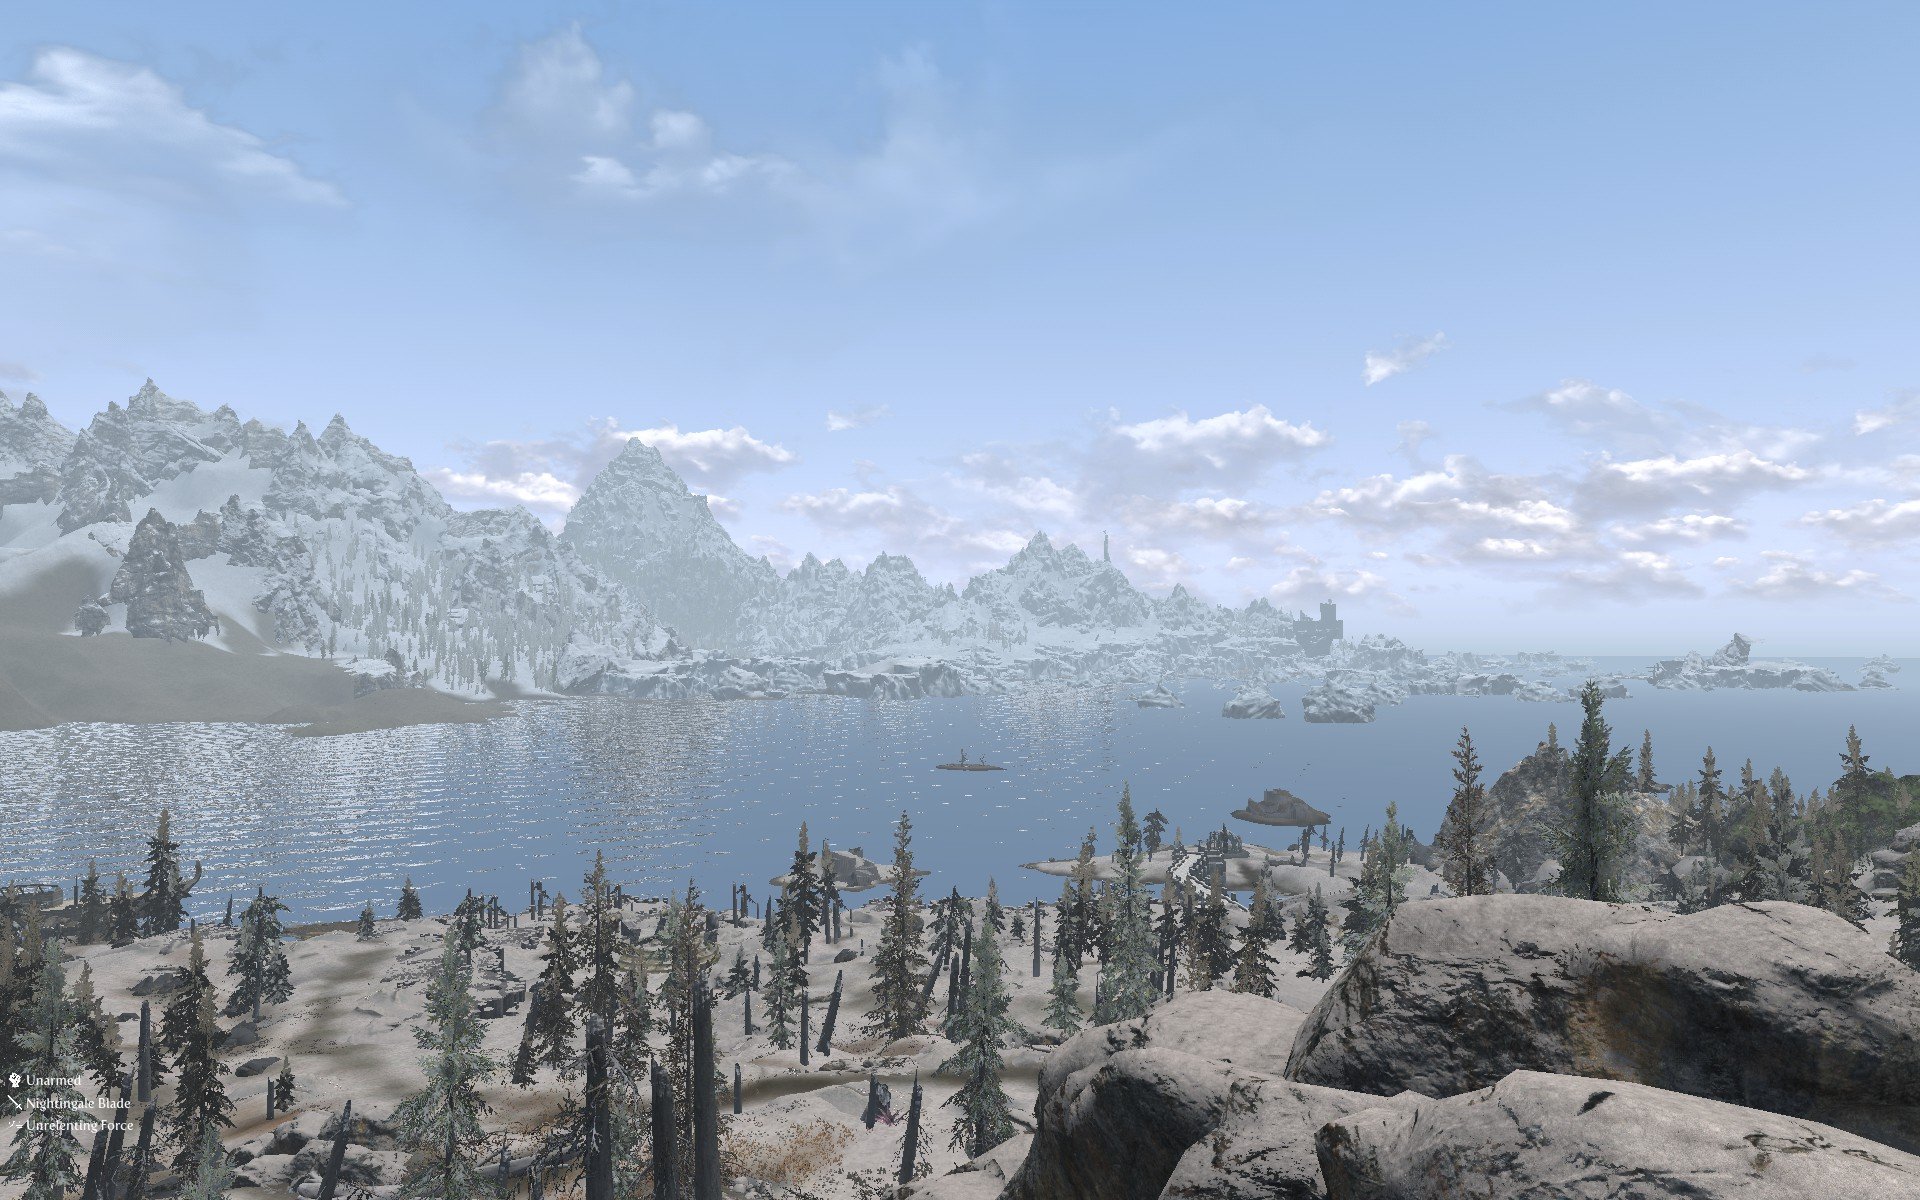
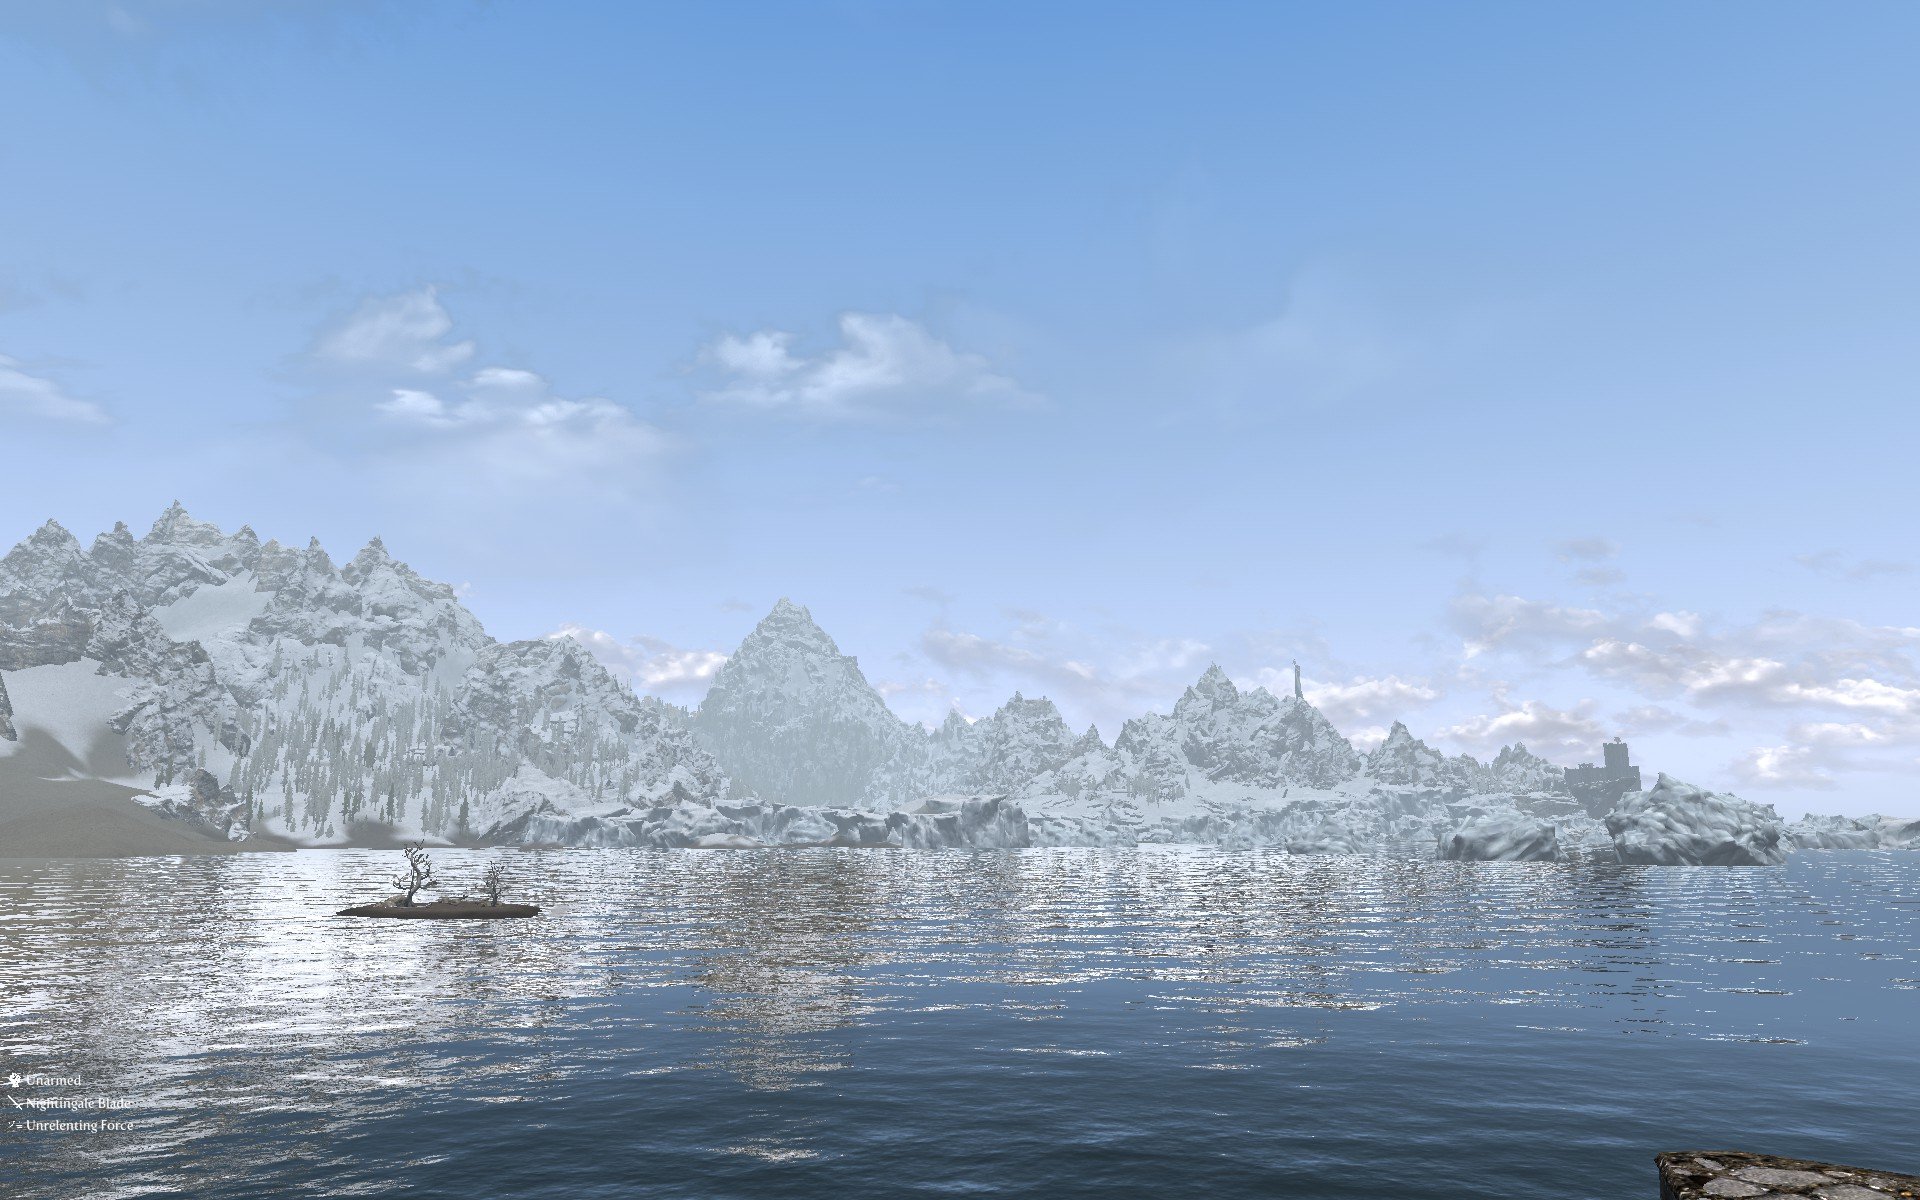
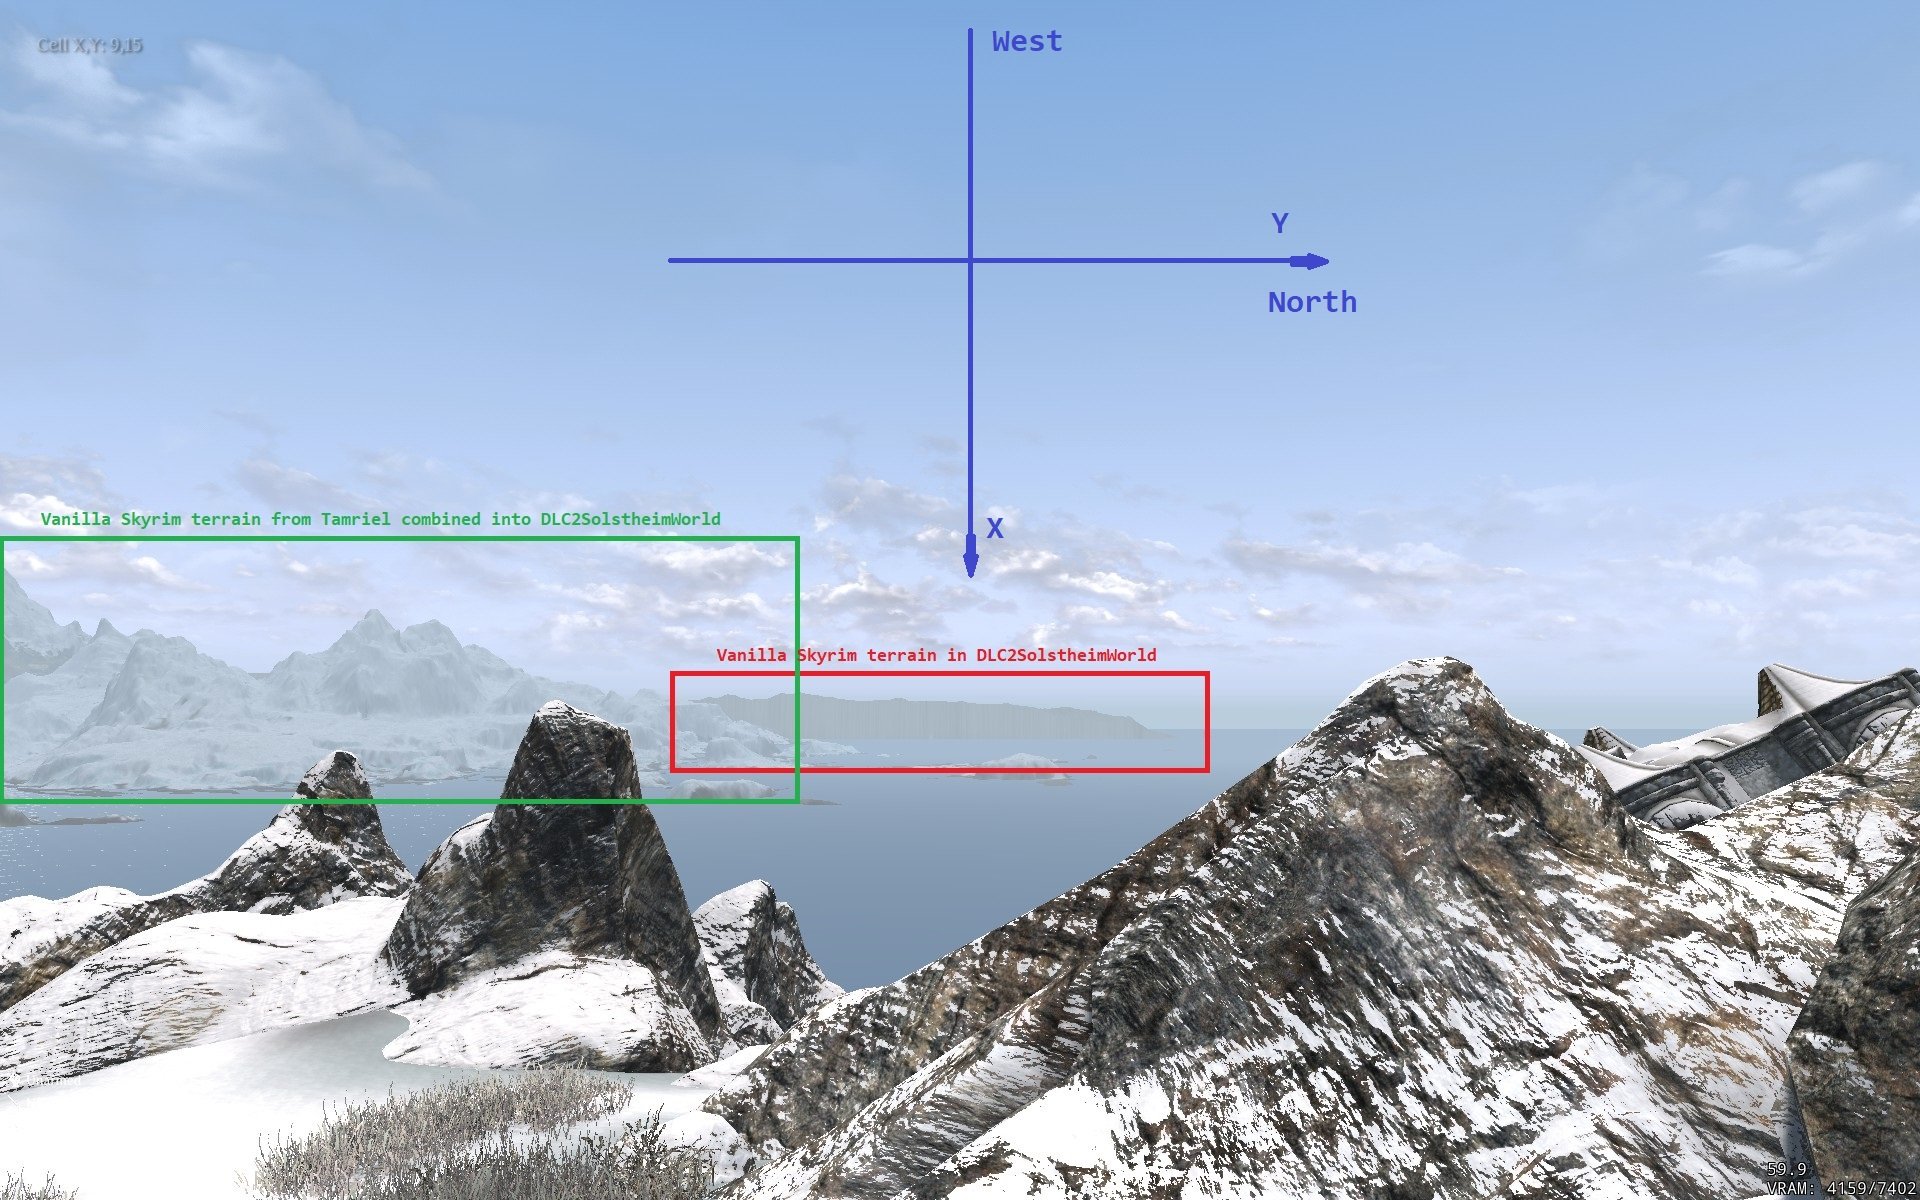
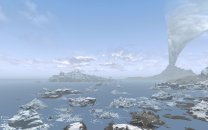
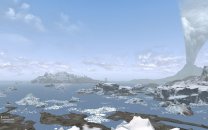
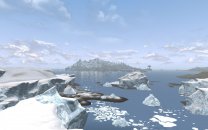
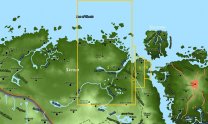
I wanted to share some Combined Worldspaces for LOD configurations I made for my Skyrim SE game, as a kind of showcase for this wonderful new feature in xLODGen and DynDOLOD. I hope it's useful and instructive. Changelog: Preliminary Remarks There are no restrictions on the use, modification or sharing of the provided configurations. All credit goes to sheson & co. for developing and providing such amazing tools for free. I merely leveraged their capabilities. All screenshots were taken at noon o'clock with Skyrim Clear weather for best visibility. Actual results in-game will vary depending on weather, time of day, lighting & weather mods. I don't know how the combined worldspaces look on the game's 3D map, as I use flat paper maps. They should look ok but may not be visible depending on how much the 3D map can be zoomed or panned. Purpose and Usage Example 1: Wyrmstooth in Skyrim As seen from: Solitude Lighthouse | Coast near Broken Oar Grotto | Fort Hraggstad Tower Analysis: Implementation: Configuration: Example 2: Solstheim in Skyrim As seen from: College of Winterhold Upper Walkway | Snow Veil Sanctum | Near the border with Morrowind The Vvardenfell island and the Red Mountain volcano seen above are not part of the combined worldspaces. They're something else. Implementation: Configuration: Example 3: Skyrim in Solstheim As seen from: Near Fahlbtharz | Atop an unnamed Broken Tower | On the Isle of Basalt Analysis: Implementation: Configuration: Installation Limitations Useful Resources


 2 points
 -
I was not talking about that, so there's no arguing there. What I meant is that mods like Lucien Lachance AE cater to ES lore-obsessed freaks, which must be extremely few among the STEP user base. Most users likely don't care one bit. Including this mod is odd in that it creates an isolated special case. In order to be ES lore-obsessed freak-friendly, the guide would need to cover similar lore consistency details equally and more comprehensively throughout the game - which is not one of its goals, AFAIK - such as applying the same treatment to Jiub. So instead of making the Spectral Assassin a special case, while other lore consistency details are ignored, this mod and its changes might as well be omitted entirely. The guide then becomes consistent and balanced in how it treats lore details.2 points
-
Mod updated to 1.9.0 and now includes the optional update files.2 points
-
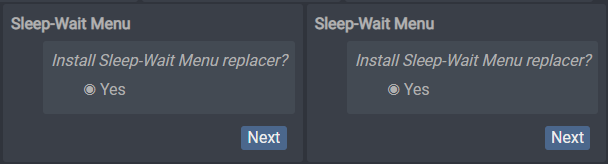
I've been using this mod (Warm Text variant) ever since it was released. It set it up a while ago, so my memory is a bit rough. Installation Options FOMOD > Sleep-Wait Menu > Install Sleep-Wait Menu replacer? Yes. The configuration panel is shown twice in a row on the wiki page: FOMOD > HUD Menu > Install HUD? Yes. Should be 'No'. This option doesn't apply to STEP Guide, as it requires SkyHUD, which is currently not included in STEP Guide and is not even in Testing. I personally use it and would recommend it, though at this point I'd be hard pressed to tell you exactly what SkyHUD does and how it differs from/improves upon vanilla. FOMOD > Compass Navigation Overhaul > Yes, beige markers. Should be 'No'. This option doesn't apply to STEP Guide, as it requires Compass Navigation Overhaul, which is currently not included in STEP Guide. I see CNO is currently in 'Testing' though, so it could be considered. Beware however that DDDM is not compatible with CNO 2.x (the compass will be completely broken when both are used together, even with DDDM compatibility option). This can be fixed by borrowing the compass SWF from other DDDM-based mods, albeit with a vanilla-white style. I personally use CNO with DDDM, with the manual borrowed SWF overwrite hack, and would recommend it. FOMOD > Quick Loot Menu > Install QuickLootRE replacer? > Yes, Quick Loot EE. I don't use Quick Loot EE or RE so can't comment on that. FOMOD > Wheel Menu > Install Wheel Menu replacer? > Yes. Should be 'No'. This option doesn't apply to STEP Guide, as it requires UIExtensions, which is currently not included in STEP Guide and is not even in Testing. I don't use it so can't comment on that. Seems to be geared towards console controller users. FOMOD > Cursors > Replace the cursor? > Yes, static. The cursor replacers, even the static one, are too fancy/distracting for me and not in the same flat style as the overall design. I prefer the vanilla flat cursor style of Small Vanilla Cursors currently included in STEP Guide, even though they have different color (white vs. DDDM gold). FOMOD > Font > Replace the main font? > ENG (Latin). This will conflict with Font Overhaul. I don't care much for the main 'Friz Quadrata' font so I don't use it but I like the 'Consolas' font for the console so I kept it. Requires manual editing of fontconfig.txt to pick and choose fonts from DDDM vs. Font Overhaul. FOMOD > New UI Sounds > Install new UI sounds? > No. You may want to give the new UI sounds a try. I think they're nice. They're softer than the vanilla sounds. For example, vanilla has a loud 'whoosh-bang' sound for crafting potions at an alchemy table, while DDDM uses a more natural and subdued 'gurgle' sound. Conflicts As noted on the mod page, this should be installed dead last in the UI mod group and overwrite everything. Font Overhaul See previous point above. Icons For Skyrim Character Sheet Redundant, can be removed as DDDM provides its own complete set when the Skyrim Character Sheet option is selected in FOMOD. Wider MCM Menu for SkyUI Better Dialogue Controls Better MessageBox Controls Redundant, can be removed as DDDM fully incorporates them. Convenient Reading UI While DDDM incorporates the main reading UI from that mod (same MA), I'd recommend keeping and overwriting Convenient Reading UI for its other features that are not included, such as faster page turning animations and other stuff I can't think of at the moment. Other Oxygen Meter should be replaced by Oxygen Meter 2. The original Oxygen Meter uses the enchantment charge bar for its widget. Oxygen Meter 2 uses a custom widget. DDDM replaces the custom widget with its own DDDM-style widget, similar to Magik/Health/Stamina bars, integrating seamlessly with the UI theme. Final Words The 'Warm text' variant and its golden-colored theme may not be to everyone taste and may cause issues with vision-impaired users. While I prefer it over White, you may want to evaluate and consider the more neutral White option as the default. This mod is a beast with all its components and dependencies. Customizing it requires navigating a maze of configurations, and identifying the source of issues can be a hassle. This might create technical support headaches. Nevertheless I like this mod a lot and can't imagine playing without it. I made a few tweaks to the configuration, matter of personal preferences. Can be discussed later if needed, if I can find/remember what changes I made and why.
 2 points
 -
For me this mod acting weird, some animals run on the bottom, some like running on the surface, some properly swimming.
 2 points
 -
I've recently finished the guide and things are working pretty good for me. I've tested the game a bit before moving on adding other mods and haven't come across any issue.2 points
-
Uploaded a new DynDOLOD DLL version for Skyrim Special Edition 1.6.353 (Anniversary Edition). It requires SKSE64 2.1.5 or higher.2 points
-
Recreated and uploaded the Standalone archive again. Download Alpha-56 again unpack into new, empty folder.2 points
-
Just thought I'd share something I make heavy use of in MO2. You can use symbols and emojis (such as many found here for example) in the comments field (that's the small one line box) of a mod's Notes tab as custom flags, and also filter the mod list by these symbols. For example, I use 🧹 to indicate a plugin has been cleaned in xEdit, ⚠️ to indicate I put some important information in the full notes field, 👻 to indicate I hid some files (hey, that was the best thing I could find ), etc.2 points