
SkyrimSE:2.0.0
WARNING
This guide is out of date and is NOT supported! It may contain information that is incorrect or not in line with the current state of the game.Go to the latest supported SkyrimSE Guide.
This Release
This is our next major release of the Step SkyrimSE Guide. As described in the Step Versioning Documentation, this is a 'major' release due to adoption of the latest version of DynDOLOD (at the time of this writing, v3.00 Alpha 33), which brings several very useful enhancements, including grass LOD generation and several handy features with respect to LOD creation for mod authors. Additionally, we are introducing some significant, vanilla-friendly modifications to Skyrim's magic system and magic-related perks.
There have been many changes, so check out the Changelog for all of the fine details.
- Visit the forums, and provide feedback related to this guide.
- Also follow Step Modifications on Facebook.
- To support hosting and maintenance of the Step Community Project, consider donating to the project.
About Step
Created by TheCompiler (Daniele Ferraro), Step is a collaborative project with input from the modding community, technical volunteers, and project administrators. The goal is to provide tested and validated methods for establishing and maintaining an enhanced modded Skyrim. Thus, the Guide provides detailed, well-tested build instructions for a solid modded Skyrim that achieves an enhanced, vanilla experience. It's meant to be installed in its entirety and not piecemeal.
The Step team collects information from the modding community through extensive mod testing, detailed reviews, feedback, and suggestions exchanged on the Step Community Forums. Posting rules apply, so be sure to read and follow them. Engage and enjoy a warm welcome and plenty of high-quality support from a large community of experienced members.
New to Modding?
We recommend that you ...
- read through this Guide at least once before attempting installation.
- follow all linked guides and read through them, as well.
There is a lot of information to absorb and learn in order to successfully build a modded game. We and the community, have brought together a lot of this information into guides as a free and hopefully convenient resource for all. New and experienced modders alike will find many answers within these guides and linked resources. This Guide is written in such a way that it expects users to know the basics of modding and related tools (e.g. mod managers, LOD optimizers, configuration utilities, etc.). However our support forums are always available for our users.
Nomenclature
The following nomenclature is used throughout this guide and should be understood before proceeding.
- 'tick' means 'check': Frequently, the word 'check' or 'checked' can mean 'ensure' in addition to "check mark", so 'check' is not used where it is synonymous with 'tick' to avoid any mistakes that can (and have) happened from this conflation.
- Baseline: An installation of a mod using the recommend file option listed within the Baseline column of the mod tables below.
- Step Patches: A "patch" is a plugin that allows two or more mods to work together without conflicting. The Step Patches are such plugins, but allow all of the mods in the Step Guide to work harmoniously together. Some users refer to this as a conflict resolution patch or "CR Patch".
Minimum System Requirements
We recommend the following hardware configuration for running a Step SkyrimSE installation at a resolution of 1920x1080. The minimum requirements will allow most users to install and run the Baseline options, which match SkyrimSE's recommended requirements. Our recommended requirements below will allow most users to install and run the Guide using higher quality options with all of the Guide's optional components (Lighting & Weather, ENB, etc.).
Users wishing to install high quality options at resolutions higher than 1920x1080, be advised a more powerful system will likely be required than what is listed below.
| Hardware | Minimum | Recommended |
|---|---|---|
| Windows OS | Windows 10 64-bit | Windows 10 64-bit |
| CPU | Intel Core i5-3470 or equivalent | Intel Core i5-4670 or equivalent or better |
| System RAM | 8 GB | 8 GB or higher |
| GPU | Nvidia GTX 780 3GB / AMD R9 290 4GB | Nvidia GTX 970 or equivalent or better / 4GB VRAM or higher |
| Drive Space | ~65 GBs (includes game+guide) | ~75 GBs (includes game+guide) |
| Monitor Resolution | 1920x1080 | 1920x1080 or higher |
Time Requirement
Users should be aware that it will usually take anywhere from several hours to a several days to complete this Guide from start to finish. Since this is a start to finish process, a recommend schedule for completing it is:
- Day 1 : Steps 1 - 3
- Day 2 : Step 4
- Step 4 is installing all the mods. Depending on download speeds and previous modding knowledge, this step could span 1-3 days.
- Final Day : Finish the remainder of the Guide.
The overall message here is that Step encourages users to always follow proper computer ergonomics when modding! Remember to take breaks and happy modding!
STEP 1
Follow the System Setup Guide!
Those who have not completed the System Setup Guide should STOP and do so now BEFORE continuing this guide! This is a perquisite for completing any of the Step Bethesda mod-build guides.
NEW GUIDE FOLLOWERS: Deviate from these instructions at your own risk! Instructions in this guide presume that previous instructions have been followed.
STEP 2
Mod Organizer - Skyrim SE Initialization
FIRST, follow the System Setup Guide. The below instructions describe how to initialize a Skyrim SE instance in Mod Organizer (MO). If MO wass installed as a Portable application, the instructions below will need to be reinterpreted accordingly. Those who already have a MO instance for Skyrim SE can skip this initialization:
- Launch MO by running its executable (e.g.
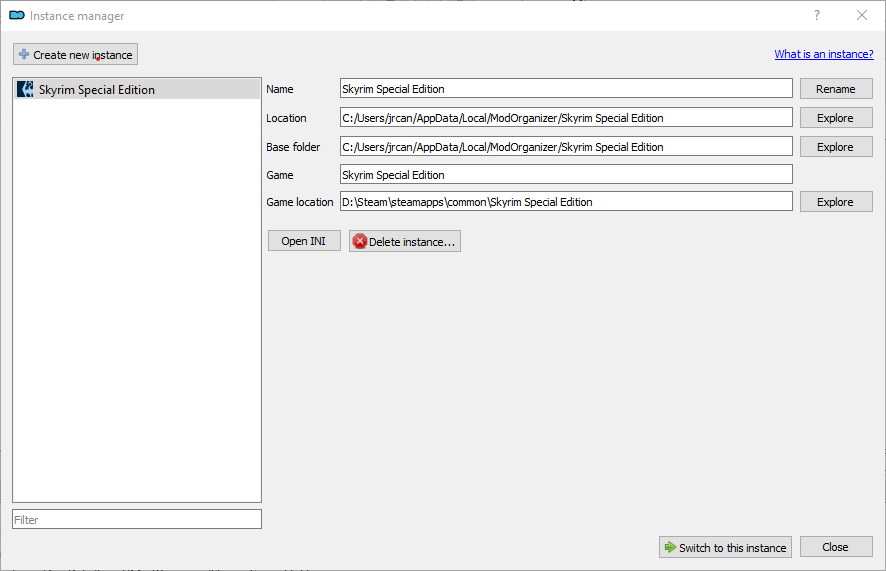
..Modding/Tools/Mod Organizer/ModOrganizer.exe) - Upon load, click the Instance Manager button on the tool (first button).
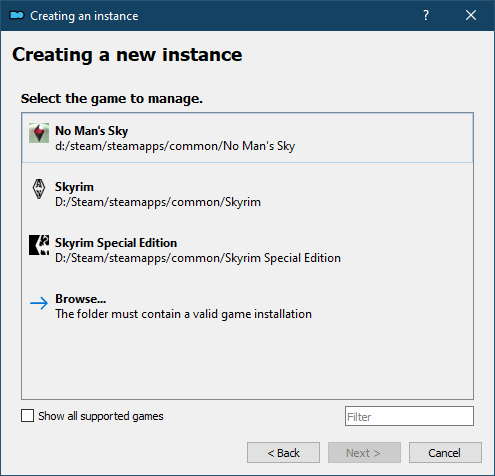
- Click [Create new instance] button.
- Select Skyrim Special Edition and click [Next].
- If it didn't find the game, users can manually browse to the game's location.
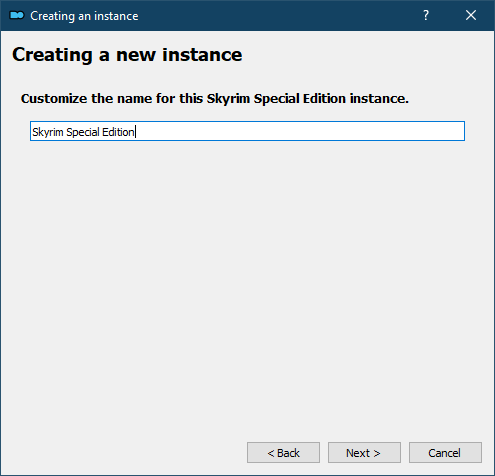
- Name the instance something like
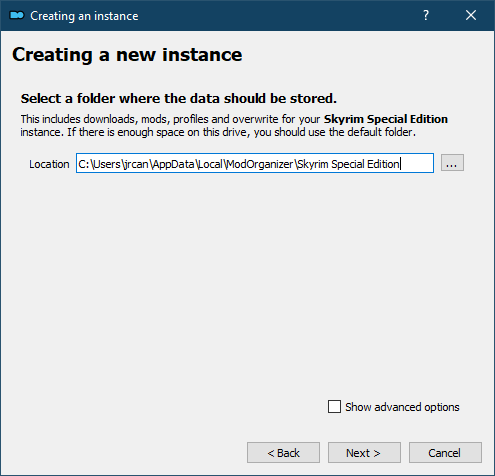
Step Skyrim SEor keep the default. Click [Next]. - (optional) change the location of data stored. Step recommends the default location, unless space restraints prevent this. Click [Next].
- A confirmation window will display with the installation information. Click [Finish].
- MO is now ready to use with this guide.

Profile Setup
Mod Organizer's profile feature allows the creation of multiple mod-builds. Begin by creating/editing two profiles for use with this guide:
- Launch MO, choosing the Skyrim SE Instance.
- On the Default profile, arrange the mods in the left pane in the following order:
- DLC: Dawnguard
- DLC: HearthFires
- DLC: Dragonborn
- Click the
 button on the menu bar.
 - Select the Default profile.
- Ensure the Use profile-specific Game INI Files box is ticked and click [Copy].
- Name the new profile
Step SkyrimSE, or anything similar. - Ensure the Use profile-specific Game INI Files box is ticked.
- Close the window by clicking [Close].
- Select the Step SkyrimSE profile from the profile selection down-drop.
- It is normal to get a notice saying some INI files were missing and will be copied.
- If an error is displayed about missing "modlist.txt" files, restart MO (or do a system reboot if one hasn't been done yet).
- Click the
 button and select [Create empty mod].
 - Name it xEdit Output.
Tool Setup
All tools installed in the System Setup Guide should be added to MO. Some tools will have been auto-detected and added; however, ensure the settings below are set correctly for all tools. xEdit is used in this example:
- Click the
 button at the top of the main Mod Organizer window.
 - Over the left pane of the executables config, click the [+] to add a new executable, and then [Add from file...].
- Navigate to the SSEEdit.exe file (e.g.
..Modding/Tools/xEdit/SSEEdit.exe).- This should auto-fill most of the fields.
- Change the title to xEdit.
- Input the following in the Arguments field separated by a single space:
- e.g.
-IKnowWhatImDoing -SSE -AllowMasterFilesEdit - "-IKnowWhatImDoing": This turns off a warning presented when users make edits.
- "-AllowMasterFilesEdit": By default xEdit will not allow master file editing. This allows users to edit these files.
- e.g.
- Tick the Create files in mod instead of overwrite box. Select the xEdit Output mod from the drop-down.
- Tick the Use applications icon for desktop shortcuts box.
- Click [Apply].
- Repeat these steps to add the remaining executables as indicated in the table below:
Tool Setup Reference for Skyrim SE
| Application Title | Executable | Argument(s) |
|---|---|---|
| xEdit | xEdit.exe | -SSE -IKnowWhatImDoing -AllowMasterFilesEditTick the Create files in mod instead of overwrite box and select the xEdit Output mod from the drop-down. |
| xEditQuickAutoClean | xEditQuickAutoClean.exe | -SSETick the Create files in mod instead of overwrite box and select the xEdit Output mod from the drop-down. |
| LOOT | LOOT.exe | --game="Skyrim Special Edition"
|
| xLODGen | xLODGenx64.exe | -lodgen -sse -o:"DriveLetter:\Modding\Tools\xLODGen\xLODGen_Output"Replace DriveLetter: with the drive letter of the 'Modding' folder. |
Users can arrange the tools in any order using the up and down buttons above the list. This will dictate the order that tools are listed in the MO "Run" dropdown menu. Close the window by clicking the [OK] button.
BethINI Setup
BethINI needs to be run for the current MO profile to establish the configuration files before beginning mod installation. This ensures that all users share a common configuration during the modding process. As such, please do not deviate from the instructions below. Once the guide is complete and things are confirmed to be working, there's an optional BethINI setup located at the end of this guide that can be used to fine tune the configuration.
BethINI Initialization
- Close MO and run BethINI (e.g.
..Modding/Tools/BethINI/BethINI.exe).- If prompted by Windows protection, click More Info and then [Run anyway].
- When BethINI launches, select "Skyrim Special Edition" from the game selection box.
- Allow BethINI to handle custom INIs, if prompted.
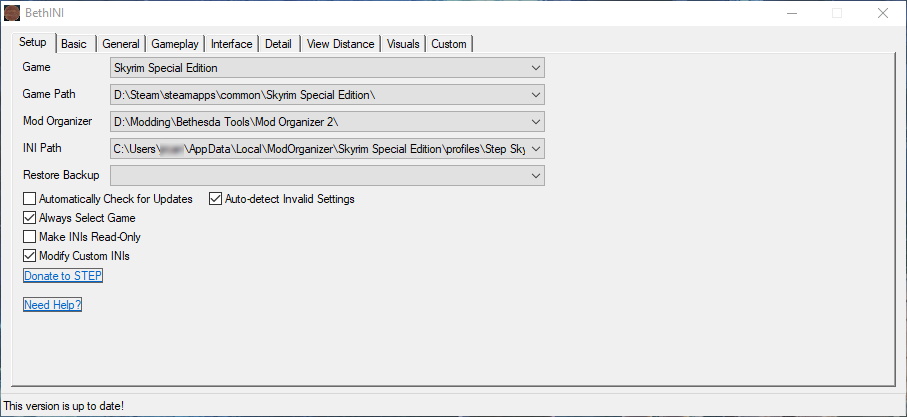
- Go to the Setup tab and ensure the
- Ensure the Game path is correct (e.g.
..\Steam\steamapps\common\Skyrim Special Edition). - Ensure the Mod Organizer path is correct (e.g.
..\Modding\Tools\Mod Organizer). - The INI Path name depends on the MO Profile Setup
- If BethINI does not automatically display the profile created previously, browse to the applicable MO profile under the instance created previously in step 5 of the MO initialization instructions (e.g.,
%LOCALAPPDATA%\ModOrganizer\{instanceName}\profiles\STEP SkyrimSE). - Select the Step SkyrimSE profile folder, and click [Open].
- Click [OK] at the prompts to restart BethINI with the desired profile configured. Allow BethINI to handle custom INIs, if prompted.
- If BethINI does not automatically display the profile created previously, browse to the applicable MO profile under the instance created previously in step 5 of the MO initialization instructions (e.g.,
- Ensure the Game path is correct (e.g.
- Return to the Setup tab.
- The “Automatically Check for Updates”, “Auto-detect Invalid Settings”, “Always Select Game”, and “Modify Custom INIs” boxes should be ticked.
- Keep BethINI open.
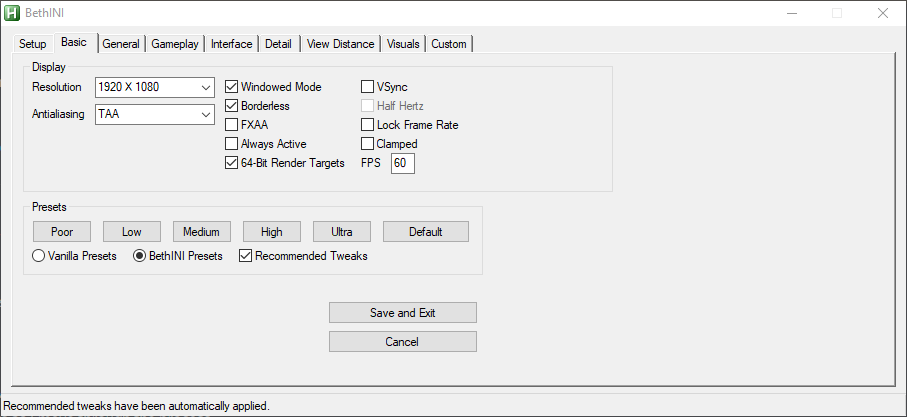
BethINI Basline Configuration
Configure BethINI as follows. Please do no deviate from these instructions at this time:
- Click the [Default] button.
- Click the [High] preset
- Please avoid the temptation to click 'Ultra' for now, even if the PC is high-end.
- Window Resolution should match the system resolution.
- Tick Borderless
- It is optional but recommended to tick Always Active
- Optionally tick 64-bit Render Targets, but keep this setting in mind as an easy performance boost at very little visual cost if having performance issues later on.
- Untick VSync and Lock Frame Rate
- Note that these settings may be overridden by SSE Display Tweaks configuration file, enblocal.ini, and/or driver settings.
- The Screenshots directory, Filename, and Index can be set to whatever the user desires. Screenshots are taken by pressing the Print Screen button on the keyboard (PrtSc).
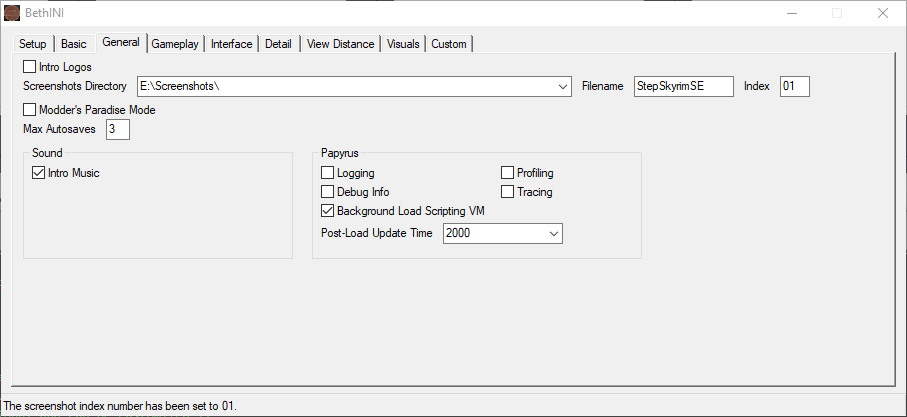
- Users that require subtitles may enable them here.
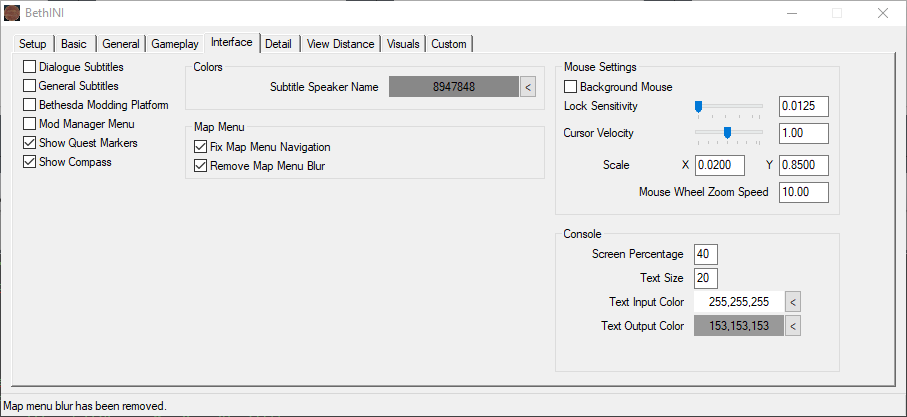
- Untick Reflect Sky and Anamorphic Lens Flare. Optionally untick Lens Flare if desired.
- Set Shadow Bias to 0.47.

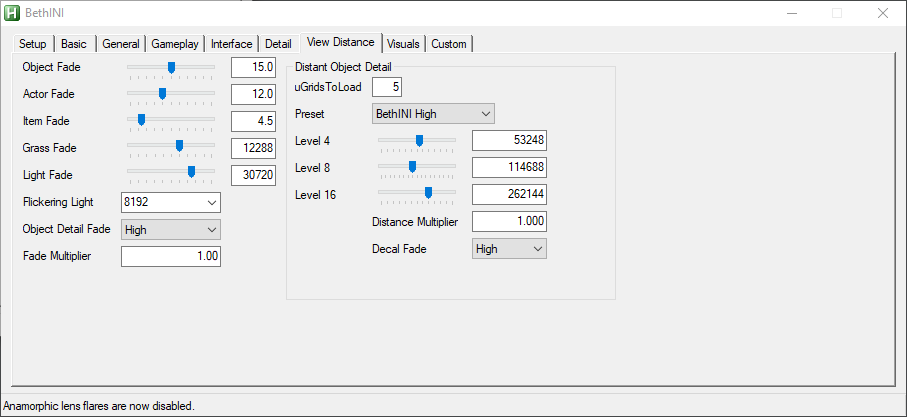
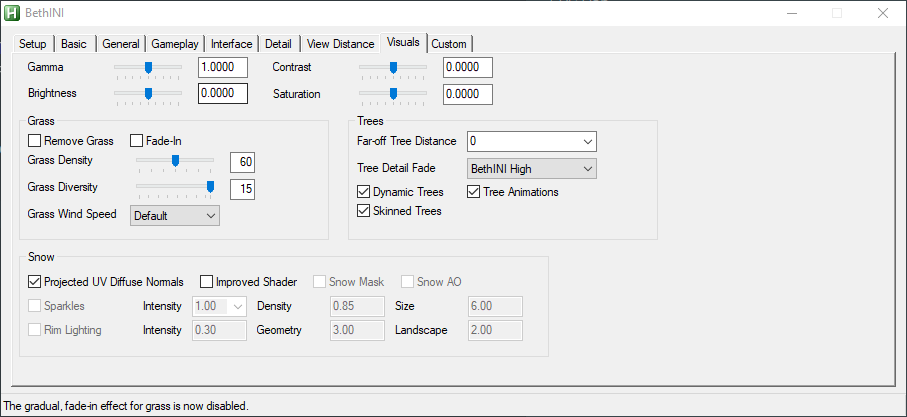
- Untick Fade-In
- Set Far-off Tree Distance to 0. The far-off trees will be rendered in object LOD via DynDOLOD instead.
- Set Grass Density to 60
- Set Grass Diversity to 15
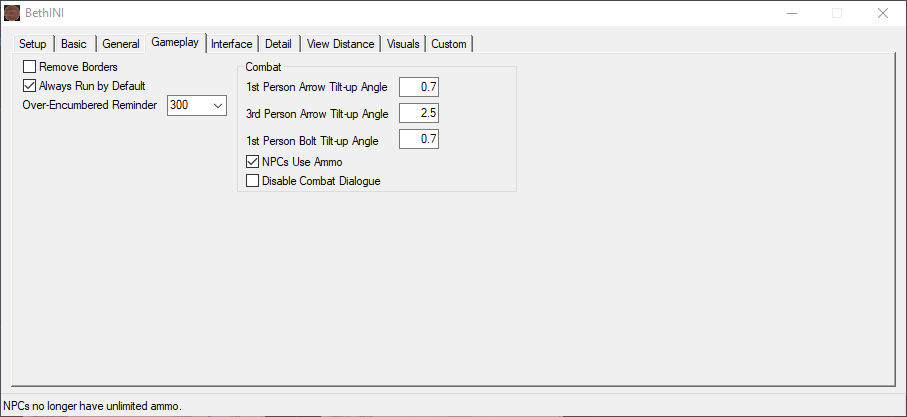
- Section drop-down, select Controls.
- Setting drop-down, select fDialogueHardStopAngle1P.
- Set value: 180 and click [Save].
- Setting drop-down, select fDialogueHardStopAngle3P.
- Set value: 180 and click [Save].
- Setting drop-down, select fDialogueSoftStopAngle1P.
- Set value: 150 and click [Save].
- Setting drop-down, select fDialogueSoftStopAngle3P.
- Set value: 150 and click [Save].
- Section drop-down, select Display.
- Setting drop-down, select bEnableLandFade.
- Set value: 0 and click [Save].
- Setting drop-down, select fWaterSSRIntensity.
- Set value: 0.5 and click [Save].
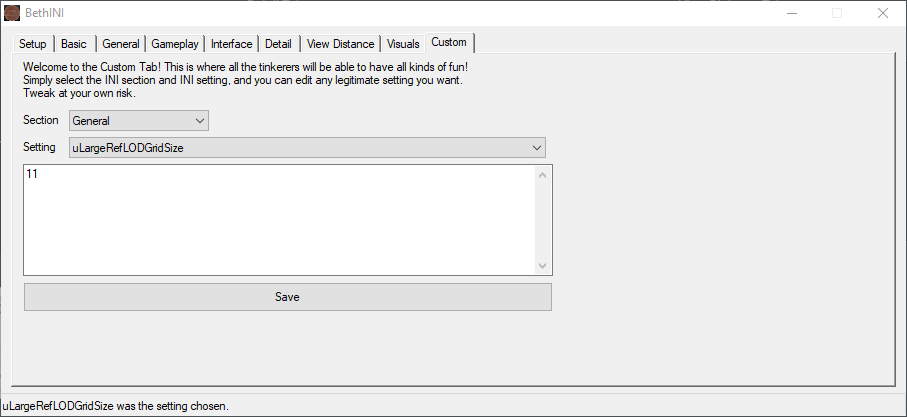
- Section drop-down, select General.
- Setting drop-down, select uLargeRefLODGridSize.
- Set value: 11 and click [Save].
- Section drop-down, select Interface.
- Setting drop-down, select fBookOpenTime.
- Set value: 500 and click [Save].
- Setting drop-down, select uMaxCustomItemNameLength.
- Set value: 64 and click [Save].
- Return to Basic tab, and click [Save and Exit].
STEP 3
LOOT
At any time during the mod installation process, LOOT should be used to sort plugin load order before running the game. This is necessary to ensure proper plugin priority (load order), which can have a dramatic impact on the game. Users not running the game during the mod installation step of the Guide can wait to sort after this step is complete. To sort with LOOT:
- Launch LOOT via Mod Organizer 2 from the executables drop-down menu at the top of the right pane.
- If LOOT fails to start, try adding the following argument as described in Tools Setup:
--single-process. If LOOT cannot find the game directory, add the path to../Skyrim Special Editionfolder to Installed Path under LOOT settings.
- If LOOT fails to start, try adding the following argument as described in Tools Setup:
- Click the [Sort Plugins] icon at the top of the LOOT window.
- Several plugins will show warnings. The next section describes how to clean them up.
- Click [Apply] button, which has replaced the Sort button at the top.
- Close LOOT.
NOTE
When running LOOT before completing the Step Guide, additional warnings may be indicated. These will all be addressed by the end of this Guide.Up to this point, users should only have the following plugins, in the order listed:
- Skyrim.esm
- Update.esm
- Dawnguard.esm
- HearthFires.esm
- Dragonborn.esm
If the plugins are not in the order listed, run LOOT now.
Cleaning Vanilla Master Files
Step no longer recommends cleaning the vanilla masters, since this has always been unnecessary. See the relevant posts for details and further reading. We continue to provide general plugin cleaning instructions for those mods that may require it.
NOTE
For those that have previously-cleaned vanilla masters, please feel free to continue using them. It is also fine to revert to the uncleaned vanilla masters. Effectively, there is no difference.Standard Cleaning Procedures
- Run xEditQuickAutoClean from the drop-down executable list in MO.
- On the plugin selection window, double-click on the mod being cleaned (e.g. Update.esm).
- Once xEdit is finished, click [X] at upper right to close. A backup of the original plugin will automatically be saved into (e.g.,
../xEdit Output/SSEEdit Backups) inside of xEdit Oputput mod (or in Overwrite at the bottom of the MO mod list (left) pane id previous instructions were NOT followed!). - To verify the plugin has been cleaned, LOOT can be run again, and no warnings should be apparent.
Understanding the Step Patches
A “conflict resolution” patch, or CR Patch, is a plugin that resolves conflicts between various active plugins. They allow using various mods together without any major issues while still achieving the desired outcome from the mods. Thus, the Step Patches are one part patch and one part mod.
The Step Patches are built specifically for the Step mod list. They are required and are dependent on specific mods as noted in the mod list. They will not resolve conflicts with any applicable mods that are not within the guide's mod list, though.
Step Patches
- Step SkyrimSE - Conflict Resolution Patch (Step CR Patch)
- For those that would opt for their own custom lighting and weather mods
- Patches all applicable mods except for Lighting & Weather mods
- Required for all users!
- Step SkyrimSE - Lighting & Weather Patch (Step LW Patch)
- For those that are using Guide's lighting and weather mod from the Lighting & Weather mod group.
- Patches only the applicable Lighting & Weather mods; the CR Patch is still required!
STEP 4
At this point, the PC modding environment should be fully set up and ready for mod installation. Those unfamiliar with using MO should return to that guide for a refresher. When installing mods, keep the following in mind:
- To maintain compatibility with downstream Patch instructions, it is important to install Patch-related mods as described in their respective Notes.
- After installing a mod, enable the mod in MO.
- If no Notes or Step recommendations are provided for a particular mod, all options are good. Step encourages user customization.
- Mods should be arranged in MO in the order that they are listed to ensure other mods further down the list overwrite/override those occurring before them. This is necessary to ensure the desired outcome.
- Mods are listed in alphabetical order within each Mod Group and any deviations from this are purposeful to achieve the desired outcome.
- Always install plugins (ESLs/ESMs/ESPs), unless otherwise noted. When there is a choice between ESL and ESP, always choose ESL unless otherwise noted.
- Always follow LOOT's advice in regards to mod cleaning and sorting unless otherwise noted.
- Step does not recommend extracting BSAs as a general principle, since it adds to the potential for user error and unnecessary support issues. Experienced and self-supporting users may derive benefit from doing so, however.
MO2
MO Separators: Mod Organizer features the ability to create separators within the mod list to group mods for easier visual reference. Step recommends using these separators for each Mod Group following below. To create a separator:
- Click the button on the top of the mod list pane.
- Select [Create Separator] and give the separator a name. Step recommends using the Mod Group names (i.e., Extensions, Resources, Lighting & Weather, etc.).
- Create a new separator for each new Mod Group while working through the Guide.
- Separator colors can be customized by right-clicking on any separator and selecting Select Color.
Mod Table Reference
Below is the legend and reference for the mod tables used in this Guide. Users should refer back to it when confused about a mod listing.
| Mod Name | Baseline | Instructions | |||
|---|---|---|---|---|---|
| Mod (patch/enb-independent) |
Baseline | Notes | |||
| Mod (patch/enb-dependent) |
Baseline | Notes |
Mod Table Legend
| Table Flags | A red vertical bar indicates that the mod is required by the Step CR Patch. A yellow bar indicates that the mod is required by the Step L&W Patch. A blue bar indicates the mod supports or otherwise relates to ENB. | |||
| Mod Name | Nexus mod name presented as a link to Nexus for download. | |||
| Link to the mod's wiki page, which includes various information about the mod. | ||||
| Baseline | This notes the Step Baseline version or option of the corresponding mod that should be installed, and usually refers to options affecting performance/quality. General suggestions are located in the "Notes" column; see below. | |||
| Instructions | Brief notes that apply to the mod or installation. In some cases, mods with several options will include a suggested option. These suggestions will take the form of: "Step recommends: Option A Main File." In other cases, there may only be one appropriate option, which fits the Step Mandate. These instructions will take the form of: "Install Option A Main File." Users will also see links displayed as: [Expand]. Users should click these links to expand the mod row to reveal detailed instructions for installing the mod. |
02-Extenders
- Mods that expand on the inherent functionality of a game or another mod without themselves affecting content
| Mod Name | Baseline | Instructions |
|---|
| Address Library for SKSE Plugins |
Install the All in one (Anniversary Edition) main file. |
| Crash Logger |
Crash logs are located in ..\Documents\My Games\Skyrim Special Edition\SKSE
|
| FileAccess Interface for Skyrim SE Scripts |
Install FileAccess Interface for Skyrim SE Scripts - FISSES (Anniversary Edition) main file. |
| PapyrusUtil SE |
Install PapyrusUtil AE - Scripting Utility Functions main file. |
| SKSE64 |
Detailed Instructions available | |||||
Root Files Installation
Data Files Installation
INI File
[Display] iTintTextureResolution=2048 [General] ClearInvalidRegistrations=1 Scripts
Once complete, the SKSE64 mod's folder structure should be:
Launcher Configuration
Normally, MO should auto-detect that SKSE is installed upon a restart of the program, and it will auto-generate the SKSE game launcher. This should be used for launching Skyrim going forward. Below are some recommendations for further configuration of the SKSE launcher ... or, if for some reason MO fails to configure this. Please ensure the following is correct for SKSE:
Reference Image: | ||||||

| SSE Display Tweaks |
Detailed Instructions available | |||||
As stated in the mod's Description, this mod will stabilize the display of rendered content for smooth gameplay without limiting frame rates, and this should be the case for almost all modern PCs running SSE.
[Render] FramerateLimit=?? UIFramerateLimit=?? [OSD] Enable=true InitiallyOn=false
For more general information, see the SSE Display Settings guide. Advanced Configuration
As with any mod with an INI configuration, Step recommends creating an 'empty' mod to contain a customizable configuration that will not be overwritten when the mod is updated. The INI file will not be generated until the game is launched, and it should appear in Overwrite. Once that is done later in the guide, revisit this mod and complete the following if it will be customized:
Example Custom Configuration Override
[Render] ; EnableVSync=false ; Uncomment to disable Vsync from this mod. Useful for those with G-SYNC/Freesync-compatible hardware ; EnableTearing=true ; Uncomment to disable Vsync/frame limits in bordered windowed mode FramerateLimit=141 ; Uncomment to set a specific in-game frame limit UIFramerateLimit=141 ; Uncomment to set a specific UI frame limit (i.e., in-game menus) ; LoadingScreenFramerateLimit=60 ; Uncomment to set a specific loading-screen frame limit [HAVOK] MinimumFramerate=50 ; Uncomment to set a specific loading-screen frame limit MaximumFramerate=141 ; Uncomment to set a havok frame limit (should be equal to FramerateLimit) OSDStatsEnabled=true ; uncomment to enable havok stats in the in-game screen display [Papyrus] DynamicUpdateBudget=true BudgetMaxFPS=141 ; Uncomment to set a papyrus budget frame limit (should be equal to FramerateLimit) OSDStatsEnabled=true ; Uncomment to enable papyrus budget stats in the in-game screen display [OSD] Enable=true ; Uncomment to enable the in-game screen display using the default toggle (Left Shift + Insert by default) InitiallyOn=false ; uncomment to enable the in-game screen display on by default | ||||||
| SSE Engine Fixes |
Detailed Instructions available | |||||
Once installed, double-click on the mod to open up the information window, and ensure the following settings in EngineFixes.toml ("Text Files" tab): [Patches] WaterflowAnimation = true WaterflowSpeed = 16.0 Leave the remainder of the settings at their defaults. (reference image) | ||||||
| Unique Map Weather Framework |
03-Resources
- Mods solely providing assets intended specifically for use by other mods without themselves affecting content
| Mod Name | Baseline | Instructions |
|---|
| Grass Cache Fixes |
| MCM Helper |
Detailed Instructions available | |||||||
Install the Main File.
| ||||||||
| Spell Perk Item Distributor |
Detailed Instructions available | |||||||
| ||||||||
| XLODGen Resource - SSE Terrain Tamriel |
Detailed Instructions available | |||||
| NOTE: This file is only used for generation of terrain LOD using xLODGen and should be disabled afterward.
Download and install SSE Terrain Tamriel Extend. Rename the mod to | ||||||
04-Foundation
- Baseline mods that should be overridden by other mods AND/OR that make widely-accepted programmatic changes expected by other mods
| Mod Name | Baseline | Instructions |
|---|
| Unofficial High Definition Audio Project |
Download and install all Main Files. Merge when asked. |
| Skyrim Landscape and Water Fixes |
Detailed Instructions available | |||||||
| ||||||||
| Unofficial Skyrim Special Edition Patch |
| Cathedral - Plants |
| Skyrim SE particle patch for ENB |
Detailed Instructions available | |||||||
21 Post-Processing
For "Light Shafts" option, select 'Yes' if using ENB.
Particle patch for ENB.esp | ||||||||
| DynDOLOD Resources SE 3 |
Detailed Instructions available | |||||||
| ||||||||
| Static Mesh Improvement Mod |
Detailed Instructions available | |||||||
| ||||||||
| Skyrim Realistic Overhaul |
Detailed Instructions available | |||||
Hide the following files/folders (instructions for hiding files/folders): Textures\architecture\whiterun\wrfieldgrass01_n.dds | ||||||
| Enhanced Lights and FX |
Detailed Instructions available | |||||||
Only the meshes from this mod will be used.
EnhancedLightsandFX.esp ELFX - Exteriors.esp | ||||||||
| ELFX Fixes |
Detailed Instructions available | |||||||
ELFX Fixes.esp ELFX Fixes Ragged Flagon Fix.esp | ||||||||
| ELFX - Exteriors Fixes |
Detailed Instructions available | |||||
| Choose only 'one' Main File.
ELFX - Exteriors.esp 21-Post-Processing
Those installing this ModGroup should choose the ENB version. | ||||||
| Static Mesh improvement Mod - SMIM - Quality Addon |
| Static Mesh Improvement Mod Improvement Mod |
Detailed Instructions available | |||||||
| ||||||||
| Assorted mesh fixes |
| Unofficial Material Fix |
Install the Unofficial Material Fix main file. |
| Flickering Meshes Fix |
Detailed Instructions available | |||||||
| ||||||||
| Majestic Mountains |
Detailed Instructions available | |||||||||
Step Recommends: Lightside
Main File
Update File
Install the Update File by choosing to [Merge] when prompted Optional File
Install the Optional File by choosing to [Merge] when prompted
| ||||||||||
| Cathedral Landscapes |
Detailed Instructions available | |||||||
Please be aware this mod deviates to a degree from the vanilla style with respect to some landscape textures. However, we feel the benefits the mod brings far outweigh this drawback.
| ||||||||
| Mesh Patch for Various Mods |
Detailed Instructions available | |||||
Install the following Main Files, in the order listed, and merge when asked:
| ||||||
| RUSTIC CLOTHING - Special Edition |
2K |
05-Animation and Physics
- Mods that affect animations or physics
No mods defined.
06-Models and Textures
- Mods that replace existing models or textures
No mods defined.
No mods defined.
08-Character Appearance
- Mods that affect the appearance of the player character or NPCs
| Mod Name | Baseline | Instructions |
|---|
| Beards |
1K | Detailed Instructions available | ||||||
| ||||||||
| Brows |
512 | Detailed Instructions available | ||||||
| ||||||||
| Consistent Older People |
Step recommends: Consistent Older People XX Loose optional file |
| Coverkhajiits |
2K | Step Recommends: CoverKhajiits 2K main file |
| FAR - Forgotten Argonian Roots |
2K | Detailed Instructions available | ||||||
Install the 2K Main File if possible, but if it's still corrupt, use the 4K version.
| ||||||||
| Female Vampires Have Fangs |
| Lore Corrected Races |
| Lucien Lachance AE |
Detailed Instructions available | |||||||
| ||||||||
| More Realistic Hair |
This is a SkyrimLE mod, and the MO warning indicator in the left pane can be ignored. |
| Natural Eyes SSE |
Low Res | Detailed Instructions available | ||||
| The SSE version of this mod was hidden, so the LE version is linked instead. There is no difference, since these are only textures. | ||||||
| Northborn Scars |
| Simple Children |
Detailed Instructions available | |||||||
| Install the Main File using the instructions below. Merge the Update File, selecting the textures of choice.
NOTE: This mod relies on meshes from TK Children, which will be installed later.
This mod's plugin should be cleaned, as it contains an old USSEP forward that will result in the game freezing otherwise.
Reference: | ||||||||

| Superior Lore-Friendly Hair |
1K | Detailed Instructions available | ||||
| This is a SkyrimLE mod, and the MO warning indicator in the left pane can be ignored.
Step recommends: SLF Hair - Rough Hair - Lite 1K | ||||||
| Tempered Skins for Females - UNP |
Detailed Instructions available | |||||||
| This is a Not Safe For Work (NSFW) mod page and installer! The instructions below are for the most vanilla-like options. Users are free to customize the options to according to their preferences.
| ||||||||
| Tempered Skins for Males |
Detailed Instructions available | |||||||
| This is a Not Safe For Work (NSFW) mod page and installer! Step recommends: Tempered Skins for Males - Dressed Version Main File. The instructions below are for the most vanilla-like options. Users are free to customize the options to according to their preferences.
textures/actors/character/argonianmale (entire folder) textures/actors/character/khajiitmale/khajiitmalehead_s.dds textures/actors/character/male/maleunderwear.dds textures/actors/character/male/maleunderwear_n.dds textures/armor/briarheart/briarheart.dds textures/armor/briarheart/briarheart_n.dds | ||||||||
| TK Children SE |
Detailed Instructions available | |||||
| Install the Main File. When installing the FOMOD, use the default options, since all but the TRI meshes will be disabled as indicated below.
Disable the following plugins (instructions for disabling plugins): TKChildren.esm TKChildren.esp Hide the following folders (instructions for hiding files/folders): Textures Meshes/Actors/character/facegendata Meshes/Actors/character/TKChildren | ||||||
| Vanilla Makeup HD |
2K | Step recommends: VMHD - All Races - 2K main file. Merge Update File matching the quality chosen for the Main File. |
| Vanilla Warpaints Absolution |
2K | Detailed Instructions available | ||||||
| ||||||||
09-Fixes
- Mods have a programmatic component that fixes various bugs and/or inconsistencies
| Mod Name | Baseline | Instructions |
|---|
| Archery Quick Shot Perk Bug Fix |
| Battle-Ready Candlelight Fixes |
| Butterflies Land True |
Step recommends: Butterflies Land True - ESPFE Alternate Version optional file |
| Critters Aint Snitches |
| Eye Normal Map Fix SSE |
Step recommends: Eye Normal Map Fix SSE BC7 optional file |
| Fix Note Icon for SkyUI (SKSE64 plugin) |
Install the FixNotesForSkyUI Skyrim AE main file. |
| Fuz Ro D-oh - Silent Voice |
Detailed Instructions available | |||||
| Install the Main File. Merge the Optional File.
As with any mod with an INI configuration, Step recommends creating an 'empty' mod to contain a customizable configuration (INI or similar file) that will not be overwritten when the mod is updated. The INI file will not be generated until the game is launched, and it should appear in Overwrite. Rather than moving the content into the original mod, create a custom mod to contain only the INI configuration file:
| ||||||

| Hearthfires Houses Building Fix |
| Hunters Not Bandits |
| Invisibility and Eyes Mesh Fix |
Detailed Instructions available | |||||||
Install the Invisibility and Eyes Mesh Fix Main File.
| ||||||||
| Labyrinthian Shalidor's Maze Fixes |
| Powerofthrees Tweaks |
Detailed Instructions available | |||||
| Install the powerofthree's Tweaks main file, choosing "SSE v1.6.629+ (*Anniversary Edition*)" in the FOMOD.
As with any mod with an INI configuration, Step recommends creating an 'empty' mod to contain a customizable configuration that will not be overwritten when the mod is updated. The INI file will not be generated until the game is launched, and it should appear in Overwrite. Once that is done later in the guide, revisit this mod and complete the following if it will be customized:
| ||||||
| Shadows Of Sunlight - In Small Exterior World Spaces |
| Skyrim Project Optimization SE |
Install the Skyrim SE - Project Optimization - ESL VERSION. |
| SPID for Footprints |
| Unlimited Bookshelves |
| Unnecessarily Fixed Fixed Dragon Stalking Fix |
| Waterbreathing Breathless Emerge SSE |
Install Waterbreathing Breathless Emerge USSEP optional file. |
| XP32 Maximum Skeleton SE - Fixed Scripts |
| XPMSSE - Nemesis - Papyrus Stack Fix |
10-Gameplay-General
- Mods that affect general or multiple gameplay mechanics
| Mod Name | Baseline | Instructions |
|---|
| Complete Alchemy and Cooking Overhaul |
Detailed Instructions available | |||||
| This mod makes large changes the alchemy and cooking systems! Since the changes of this mod are so widespread and may not always be vanilla-friendly, its installation has been made optional. Step recommends its installation and for those that do a separate patch is provided within the Step Patches mod. Installation
The file has a misnamed texture. Rename | ||||||
| Complete Crafting Overhaul Remastered |
Detailed Instructions available | |||||
| This mod makes large, non-vanilla changes to armor, item, and weapon stats! A minor subset of these changes are forwarded into the Step patches for consistency. To keep it simple for the user, this mod is optional and is not required by the Step patches; nevertheless, Step recommends that these changes be removed from the Step patches by experienced users if this mod isn't installed, because a minor subset of this mod's changes are forced by the Step patches. Installation
Install the main file. | ||||||
| GIST - Genuinely Intelligent Soul Trap SE |
Install the Main File only. |
| Weapons Armor Clothing and Clutter Fixes |
2K-1K | Detailed Instructions available | ||||||
| This mod makes large, non-vanilla changes to armor, item, and weapon stats! A minor subset of these changes are forwarded into the Step patches for consistency. To keep it simple for the user, this mod is optional and is not required by the Step patches; nevertheless, Step recommends that these changes be removed from the Step patches by experienced users if this mod isn't installed, because a minor subset of this mod's changes are forced by the Step patches. Installation
Install the Main File.
| ||||||||
No mods defined.
12-Gameplay-Economy
- Mods that affect currency, rewards, values, rates, or any other economy-related mechanics
| Mod Name | Baseline | Instructions |
|---|
| Trade and Barter |
13-Gameplay-Immersion
- Mods that help to improve game immersion and role-playing scenarios
| Mod Name | Baseline | Instructions |
|---|
| Butterflies Unchained |
Detailed Instructions available | |||||
| Install the Butterflies Unchained (ESL Version) main file. If CACO will be used, also install the Butterflies Unchained (ESL Version) - Complete Alchemy and Cooking Overhaul Patch from Optional Files. | ||||||
| Disease Descriptions for the Immersive Adventurer SE |
Detailed Instructions available | |||||||
| ||||||||
| Get Snowy |
Detailed Instructions available | |||||
| Install the Main File.
Disable the following plugins (instructions for disabling plugins): getSnowy_ObsidianWeathers_Patch.esp getSnowy_WnC-Ashes Patch.esp 21-Post-Processing
Ignore the Main File, and install the Optional File instead. Disable the plugins as instructed above. | ||||||
| Go On Ahead |
| Guard Dialogue Overhaul SE |
| Improved Traps |
Detailed Instructions available | |||||
| Install the Improved Traps main file. Merge the Improved Traps - Follower Safety Patch miscellaneous file. Do not install Mining Makes Noise file! | ||||||
| No Lockpick Activate (SKSE) - Updated |
| Point The Way |
| Reasonable Movement Speed |
| Relationship Dialogue Overhaul Lite |
| Simple Drop Lit Torches SE |
| Simplest Horses |
| Torches Ignite Oil |
Detailed Instructions available | |||||
| Install the Torches Ignite Oil - Shock Edition Arcane Archer Pack Compatibility main file.
Disable the following plugins (instructions for disabling plugins): Torches Ignite Oil - Shock Edition and Arcane Archer Pack Compatibility.esp | ||||||
14-Gameplay-Quests
- Mods that alter aspects of quests and/or related lore
| Mod Name | Baseline | Instructions |
|---|
| Alternate Start - Live Another Life - SSE |
The latest version is on AFK Mods. Nexus page does not receive updates. |
| Even Better Quest Objectives SE |
Detailed Instructions available | |||||||
Install the Main File.
| ||||||||
| Gildergreen Regrown |
| Here We Go Again - World Interactions |
Detailed Instructions available | |||||||
| ||||||||
| Not So Fast - Mage Guild |
| Not So Fast - Main Quest |
| The Choice is Yours |
Detailed Instructions available | |||||
| This mod causes some vanilla quests to not start pending player interaction or until specific conditions are met. Since these changes can confuse some users and may not always be vanilla-friendly, its installation has been made optional. Step recommends its installation and for those that do a separate patch is provided within the Step Patches mod. Installation
Install the main file. | ||||||
| The Paarthurnax Dilemma |
The latest version is on AFK Mods. Nexus page does not receive updates. |
| Thieves Guild Requirements SE |
Install the Main File. A new game is required, if upgrading from v4 to v5 |
| Timing is Everything SE |
No mods defined.
16-Interface
- Mods that affect any aspect of the user interface
| Mod Name | Baseline | Instructions |
|---|
| A Clear Map of Skyrim and Other Worlds |
Detailed Instructions available | |||||||
Also download the ACMOS Road Generator Tool - PART 2 and extract it to the Tools folder (e.g. | ||||||||
| Atlas Map Markers SE - Updated with MCM |
| Better Container Controls for SkyUI |
Install the BCC-SkyUI-ESL-v31 optional file. |
| Better Dialogue Controls |
| Better MessageBox Controls |
| CoMAP - Common Marker Addon Project |
Detailed Instructions available | |||||||
| This mod has several "Undiscovered Marker" options, and all are valid. For more immersive/mysterious gameplay,
Step recommends: Obscured Undiscovered HUD Markers (Diamond or Question Mark) and either of the Author's Cut Options The most enhanced, vanilla-friendly options are as follows:
Configuration
As with any mod with an INI configuration, Step recommends creating an 'empty' mod to contain a customizable configuration that will not be overwritten when the mod is updated. The INI file will not be generated until the game is launched, and it should appear in Overwrite. Once that is done later in the guide, revisit this mod and complete the following if it will be customized:
Make the following changes to the custom configuration file:
[Map] bObscuredUndiscovered=0 ; Set to '1' if a Obscured Undiscovered Option other than "None" was chosen fMarkerScale=0.75 [HUD] bObscuredUndiscovered=0 ; Set to '1' if a Obscured Undiscovered Option other than "None" was chosen | ||||||||
| Convenient Reading UI - SE |
Detailed Instructions available | |||||
| Install the Main File. Merge the Font Overhaul Compatibility Patch optional file. Configure INI
Step recommends using the default for the INI with a change to the 'Steal' font color if the book is not owned or free for the taking, but all INI settings should be adjusted according to user preference.
sBookStealTextColor=0xFF0000 | ||||||
| Font Overhaul - Natural Typefaces for Skyrim |
Detailed Instructions available | |||||||
Install the Main File.
| ||||||||
| Horse Stamina HUD - Script-Free |
Install Horse Stamina HUD SE main file for 1.6.x. |
| Immersive HUD - iHUD Special Edition |
| Lore-Based Loading Screens |
| More Informative Console |
Install the More Informative Console 1.x.x AE (1.6.640 plus) main file. |
| MoreHUD Inventory Edition |
Install moreHUD Inventory Edition Loose Version - AE main file. |
| MoreHUD SE |
Install the moreHUD SE Light Master - AE master file. |
| RaceMenu |
| SkyUI |
Detailed Instructions available | |||||
| Install the Main File.
As a temporary measure to fix an issue introduced with game runtime update 1.6.1130, also install SkyUI SE - Difficulty Persistence Fix as a separate mod at one higher priority than SkyUI. | ||||||
| SkyUI SE - Flashing Savegames Fix |
Detailed Instructions available | |||||
| This fix works for all versions of Skyrim SE and AE before v1.6.1130. The "Creations" update (v1.6.1130 and later) introduced new changes to the menu.
With the v1.6.1130-v1.6.1170 runtime, use SkyUI SE - Difficulty Persistence Fix, which includes this Flashing Savegames Fix. | ||||||
| SkyUI - Ghost Item Bug Fix |
| Smaller Vanilla Cursors SE |
Detailed Instructions available | |||||||
| ||||||||
| Viewable Faction Ranks |
Detailed Instructions available | |||||
| Install the Viewable Faction Ranks ESL main file.
NOTE: This mod has a reporting issue with respect to making the PC a member of the respective thane faction upon discovering the corresponding settlement/town, even if the respective quests are not completed. See the forum link for more details. | ||||||
| Wider MCM Menu for SkyUI |
Detailed Instructions available | |||||
| Install one Main File of choice. Step Recommends: Opt. 3 or Opt. 4.
Compares: LINK NOTE: Some display configurations may require a different option if top/bottom of menus are cut off. | ||||||
| Yes Im Sure |
17-Locations
- Mods that programmatically add new or alter vanilla locations
| Mod Name | Baseline | Instructions |
|---|
| Bring Out Your Dead |
| Cutting Room Floor - SSE |
| Farmhouse Chimneys SE |
Detailed Instructions available | |||||||
Install the Main File:
Also install the USSEP patch from Optional Files. | ||||||||
| Hearthfire Extended |
Detailed Instructions available | |||||
| Install the Main File. Merge the Hearthfire Extended - Cutting Room Floor Patch optional file. | ||||||
| Helarchen Creek |
| Landscape Fixes For Grass Mods |
Detailed Instructions available | |||||||
| Install the Main File. Install Patches for Arthmoor's Town add-ons FOMOD under Optional Files as a separate mod for independent version tracking:
| ||||||||
| Oakwood |
| Oblivion Gates Remade |
Detailed Instructions available | |||||||
Install the Main File.
| ||||||||
| Smooth Shores |
| Snowy Landscapes in Snowy Regions |
Detailed Instructions available | |||||||
| ||||||||
18-Lighting and Weather
We wish to be clear that the mods included within this section are completely optional. They are still within the Mandate, however, we've made this section optional for users who wish to customize their own lighting and weather. As such, we've included an additional patch solely for this mod group.
- Mods that affect lighting and/or weather systems **installation is optional**
No mods defined.
19-Utilities
- Mods that generate derived mod output from load-order-specific assets
| Mod Name | Baseline | Instructions |
|---|
| DynDOLOD 3 Alpha |
Detailed Instructions available | ||||||||||||||
Configure MO Executable
Configure as follows (If necessary, revisit the Tool Setup in the guide.):
Modify INI
The guide disables grass LOD by default. Instructions for enabling grass LODGen are also provided and may be enabled at a later time as instructed by the guide if adequate performance headroom is available. Navigate to Expert=1
Level32=1 DoubleSidedTextureMask=mountain,mtn DoubleSidedMeshMask=mountain,mtnNavigate to TreeMSAlphaThreshold=127
| |||||||||||||||
| Nemesis Unlimited Behavior Engine |
Detailed Instructions available | |||||
| Install the Main File.
Add to Mod Organizer Executables
Nemesis is run through Mod Organizer like most other tools. Add Nemesis to the list of executables by doing the following:
Create Mod for Output
It is recommended to create a mod to store output files from Nemesis by doing the following:
Run Nemesis
Nemesis must be run whenever animation/skeleton mods are added/updated. To do so:
| ||||||
20-Patches
- Mods that programmatically resolve load-order conflicts
| Mod Name | Baseline | Instructions |
|---|
| AI Overhaul SSE Official Patch Hub |
Detailed Instructions available | |||||
| Install AI Overhaul - Cutting Room Floor Patch. Merge AI Overhaul - Relationship Dialogue Overhaul Patch. | ||||||
| Circlet USSEP Fixes |
Install the Gemling Queen Jewelry SE USSEP Circlet Fix main file. |
| Kryptopyrs Patch Hub |
Detailed Instructions available | |||||
| Since the FOMOD is not updated as regularly as the individual patches, do not install it. Instead, install the following individual patches under Miscellaneous Files.
| ||||||
| Majestic Mountains Creation Club Landscape Patch |
| Realistic Boat Bobbing Patch Hub |
Detailed Instructions available | |||||
Install the following (merge if asked):
| ||||||
| Smooth Shores Patches |
Detailed Instructions available | |||||
| Install all files EXCEPT Smooth Shores Patches - Worldspace Transition Tweaks Patch #.#.#.
The files can be merged into a single mod if prompted. | ||||||
| Umgak's Vokrii Compatibility Patch Compendium |
Detailed Instructions available | |||||||
| ||||||||
| Unofficial Skyrim Creation Club Content Patches |
Install the Main File. |
| Step Patch - Conflict Resolution |
Detailed Instructions available | |||||
| ||||||
| Step Patch - Lighting and Weather |
Install the Step Patch - Lighting and Weather optional file ONLY if the 18-Lighting and Weather ModGroup is installed. |
Run Nemesis
Nemesis needs to run in order to generate a new skeleton any time that animation/skeleton mods are added/changed. To do so:
- Ensure all plugins are ticked, and sort with LOOT.
- Choose Nemesis from the executables dropdown and click [Run] to run it through Mod Organizer.
- Tick any relevant mods listed at the top. For STEP users, none need to be selected.
- Click [Update Engine] and wait until the progress bar has finished.
- Click [Launch Nemesis Behavior Engine] and wait until it says "Behavior generation complete" and close.
- Enable the new plugin in the right pane of MO by ticking it.
- Sort the load order with LOOT, again.
Mod List Cleanup & Performance Check
Final Sorting and Cleaning
Before moving on, run LOOT from MO, then sort, and accept the default load order provided. Review the mod list in LOOT looking for any plugins reported as needing to be cleaned. Keep in mind that LOOT tends to lag behind on the report information, so it will not always be accurate. Ignore any reported missing compatibility patches or other warnings. These are either handled by the Step Patches or not of any concern. Perform the standard cleaning procedures on the mods requiring cleaning.
Be aware the Step Patches are designed to work with a default, LOOT-sorted plugin order. This eliminates the need to set rules on the load order. From this point on:
- Ensure all applicable mods are ticked in the left pane of MO.
- Ensure all plugins are ticked in the right pane of MO.
- Sort the load order using LOOT whenever plugins are added/removed.
- Update LOOT (the program and masterlist) whenever updates are available.
Performance Tuning
The goal at this point is to have at least 80 FPS in exteriors on average. It's necessary to determine how much performance headroom is available before generating LOD, because the full LODGen setup can cost upwards of 30 FPS on average in exteriors. Before beginning, uncap FPS if it was configured in SSE Display Tweaks or via the driver software so that actual frame rates can be measured. Some users may by required to turn of vsync to measure above 60FPS. These changes should be reversed when FPS performance is no longer a concern.
It's recommended to turn on the On-Screen Display (OSD) settings in SSE Display Tweaks to measure FPS. Other third-party applications like FRAPS, Skyrim Performance Monitor (SPM), and even driver software can be used but are unnecessary with SSE Display Tweaks. Optional instructions are provided to assist.
Take a moment to configure the chosen FPS overlay as described above. If SPM or FRAPS are used for some reason, install into e.g., C:/Modding/Tools/SPM.
- Uncap FPS if it was configured in BethINI, SSE Display Tweaks, or via the driver software so that actual frame rates can be seen. This can be set again when the build is fully completed. Ignore any stuttering, screen tearing, etc. for the time being, as these are probably not related to performance if FPS ≥ 60.
- Launch SkyrimSE, and start a NEW game to verify that Skyrim loads without issue.
- Ensure that the FPS overlay is working.
- NOTE: If the game crashes at any point, there is a problem with load order, enabled mods, or any number of things missed in the above instructions. Please troubleshoot by validating that all instructions have been followed. If custom mods have been installed and enabled, disable them.
- Create a character to test initial frame rates. Skyrim should successfully load into the Alternate Start character generation interface.
- At the Statue of Mara, select "I own property in one of the holds".
- Select "Breezehome".
- Rest, and then save the game when the Breezehome interior loads. This will be the clean save to use for testing performance before and after LODGen.
- Exit Breezhome, then Whiterun, and stand at the end of the wood deck looking out over the tundra.
- Note FPS while panning over the horizon
Performance/Quality Optimization
There are many things that can be modified to improve performance and quality, depending on the performance headroom available. Following are some suggestions listed in descending priority:
- Consider revisiting the BethINI Setup to set the 'Low', 'Medium', 'High', or 'Ultra' preset until FPS is close to or greater than 80 FPS while looking West across the tundra outside of the Whiterun main gate. NOTE: Changing the preset revises View Distance, so be certain to change "Level 16" to 300000.
- Consider modifying the following grass settings in GrassControl.config.txt of the No Grass In Objects mod:
- Set
ExtendGrassDistance = FalseandOverwriteGrassDistance = 6000or less to improve performance. Increase the latter value to improve quality at the cost of performance. - Don't forget to also lower
OverwriteGrassFadeRangeto some value less than 6000 (like 3000). - Set
OverwriteMinGrassSizeto a value of 50-20 to improve quality (default of '60' is already the performance optimum, but it can be increased further to optimize the quality-performance trade-off).
- Set
- If FPS is at least 80 in the test area, then consider enabling grass LODGen (addressed below, including screenshots)
21-Post-Processing
NOTE
This section is completely optional. All is still within the Mandate, however, we've made this section optional for users who wish to customize their own custom post-processing. As such, we've included an additional patch solely for this section's mod group.Using Cathedral Minimalist ENB as a starting point, the Step Team built an ENB Preset specifically tailored to the mod list with this SkyrimSE Guide. Two different configurations are available for use. The Milk-Drinker configuration is designed to be light-weight; costing 5-10FPS. It is tailored to be used by the majority of Guide users to fix many of Skyrim's lighting issues while bringing in some additional enhancements and features. The Dragonborn configuration is the fully designed Preset with all the desired effects and features enabled. It will cost ~20FPS outdoor.
- If average FPS is between 75-90 (HINT: check in the Rift and the Frozen Marshes), Step recommends installing the Milk-Drinker configuration.
- If average FPS is > 90, Step recommends the Dragonborn configuration. Keep in mind that LOD generation is more important to visual enhancement than ENB.
- Mods that affect post-processing graphics **installation is optional**
| Mod Name | Baseline | Instructions |
|---|
| Deadly Spell Impacts Transparency Fix for ENB |
| ENBSeries |
Detailed Instructions available | |||||
| For those unfamiliar with ENB, see the ENBSeries guide for information about ENBSeries post processing. Otherwise, download and install ENB as follows:
Install ENBSeries Binaries
Install the Step ENB
Three versions of the Step ENB preset are available, depending on performance requirements:
NOTE: The Step ENB comes with a recommended
| ||||||
| ENB Helper SE |
Install the ENB Helper SE for SSE 1.6.x main file. |
| ENB Light |
Detailed Instructions available | |||||||
| Install the ENB Light 0.98 Alpha 2 update file using the instructions below. Merge the ENB Light SMIM Textures optional file.
| ||||||||
| ENB Lights for Aetherium Shards |
| ENB Particle Lights Dwemer Lanterns |
| Particle Lights For ENB SE - Paragon Gems |
Install the Particle Lights For ENB SE - Paragon Gems - Iconic's Gems Patch main file. |
| Particle Lights for ENB Wisps Witchlight |
| Radiant - Candles |
Detailed Instructions available | |||||||
| ||||||||
| Rudy HQ More Lights for ENB SE Bthardamz |
| Rudy HQ More Lights for ENB SE Deathbells and Nirnroots |
| Rudy HQ More Lights for ENB SE Glowing Mushrooms |
Detailed Instructions available | |||||
| Hide the following file (instructions for hiding files/folders):
textures\plants\glowingmushrooms01.dds | ||||||
| Rudy HQ More Lights for ENB SE Torchbugs and Moths |
| Word Wall Transparency Fix for ENB |
| Step Patch - Post-Processing |
Detailed Instructions available | |||||
| ||||||
STEP 6
Now that all the mods and patches have been installed/sorted and performance margins are acceptable, the next step is to generate custom LOD data for the mod list. Recommended settings correspond to rendered game resolutions that can benefit. Using 'higher' settings will otherwise be a waste of PC resources that may be necessary to keep frame rates above 50 FPS. Use 'lower' settings as a compromise if necessary. Any time a mod providing LOD assets is added, removed, or changed, LOD should be regenerated. Examples include --but are not limited to-- most of the '03-Foundation' mods, No Grass In Objects, Enhanced Vanilla Trees, Just Ice, etc.
Before moving on, create three empty mods for the LOD output:
- Click on the button and select, [Create empty mod].
- Name it
Step SkyrimSE - xLODGen Output.- This places a new, empty mod at the bottom of the mod list. However if it's not, place it last in the mod list.
- Repeat these steps to create two more new mods named:
Step SkyrimSE - TexGen Output, andStep SkyrimSE - DynDOLOD Output. - Place these new mods directly after Step SkyrimSE - xLODGen Output.
- Find the (TEMP) - Cathedral Landscapes - LODGen mod from the 04-Foundation mod group and enable it if it is not enabled. This mod ONLY needs to be enabled for terrain LOD generation. If it is not disabled before actually playing the game, it will cause visual glitches.
The last few mods in the mod list should now reflect the following (numbering is approximate and reflects the number of mods installed without extra mods or mod-list separators):
- DLC: Hearthfires
- ...
- (TEMP) - SSE Terrain - Tamriel - xLODGen
- (TEMP) - Cathedral Landscapes - LODGen NOTE: This mod can be here or under 04-Foundation with Cathedral Landscapes main mod, but it must be DISABLED later as instructed!
- Step SkyrimSE - xLODGen Output
- Step SkyrimSE - TexGen Output
- Step SkyrimSE - DynDOLOD Output
NOTE
Complete the following in order, and ensure that all mods are enabled and plugins enabled and sorted!xLODGen
xLODGen is run first to generate updated LOD terrain textures and meshes so that landscape LOD is updated with mod changes:
Preparation
- Ensure the both (TEMP) - SSE Terrain - Tamriel - xLODGen and (TEMP) - Cathedral Landscapes - xLODGen are active in the plugin list (ticked), as they will be used by xLODGen to regenerate corrected landscape LOD and disabled afterwards.
- Sort with LOOT.
Generation
- Run xLODGen from the MO executable drop-down list.
- Select all worldspaces.
- Ensure that ONLY the Terrain LOD box is ticked in the right pane.
- Use the following settings, which have been verified in extensive testing:
 NOTE:Those running 4k resolution or higher should consider bumping up all texture sizes by doubling values shown (256 --> 512, 512 --> 1024).
- Click [Generate] to run the process, which will require upwards of 30 minutes, depending on the PC.
- Once the "LOD generation complete" message has appeared, close xLODGen.


Wrap Up
- Navigate to the xLODGen output folder (e.g.
..Modding/Tools/xLODGen/xLODGen_Output). - Back on MO, open the Step SkrimSE - xLODGen Output mod in an Explorer window (Ctrl+double click).
- Cut and paste the files from the LOD generation to the Step Skyrim SE - xLODGen Output folder. Close both folders.
- Enable Step SkrimSE - xLODGen Output mod.
- Once enabled, double-click the mod in MO to bring up the mod's information window.
- Select the Conflicts tab.
- At the top on the Winning file conflicts: pane, type A Clear Map of Skyrim in the filter box (top right).
- Select all lines in the filtered Winning file conflicts: pane.
- Right-click on any selected file and select Hide.
- Close the window.
- Disable (TEMP) - SSE Terrain - Tamriel - xLODGen and (TEMP) - Cathedral Landscapes - xLODGen mods (only needed as xLODGen resources).
DynDOLOD
Object LOD will be created using Dynamic Distant Objects LOD (DynDOLOD). At a significant performance cost (upwards of 10 FPS) for a subtle improvement to LOD, DynDOLOD v3+ supports generation of grass billboard LOD. This guide disables grass LODGen by default, but if performance allows, the results may be worth it.
WARNING
These instructions are a WIP and may change slightly until we have all of the facts and testing results.(optional) Generate Grass LOD
Generate grass LOD ONLY if performance headroom is available per Performance Tuning instructions.
Worldspaces with Grass SSEEdit Script will be used to reduce the amount of worldspaces traversed by NGIO in precaching grass. This will reduce the generation time for some by as much as 80%.
- Ensure all plugins are activated, and sort with LOOT.
- Open xEdit with all plugins ticked.
- Once the "Background Loader: Finished" message appears, right click anywhere in the left pane and select [Apply Script...].
- Select List worldspaces with grass from the Script drop-down, and click [OK].
- After a minute or two, when the "Worldspaces with grass" window appears, right-click the highlighted text and select [Copy].
- Click OK and exit SSEdit.
- In the MO left pane, search for and double click on No Grass In Objects mod.
- Click the [Text Files] tab in the mod information window.
- Click on GrassControl.config.txt, and paste the clipboard content between the quotation marks of the
OnlyPregenerateWorldSpacessetting. - Before saving the file and exiting the information window, ensure the following settings:
RayCast = True
SuperDenseGrass = False
ProfilerReport = False
UseGrassCache = True
ExtendGrassDistance = False
ExtendGrassCount = True
EnsureMaxGrassTypesPerTextureSetting = 15
OverwriteGrassDistance = 6144
OverwriteGrassFadeRange = 14128
OverwriteMinGrassSize = 67
GlobalGrassScale = 1.15
OnlyLoadFromCache = True
DynDOLODGrassMode = 1
This process will take about 20-40 minutes to complete, depending on the system. The game will typically crash during grass generation, but MO will restart the process automatically. There is no need to monitor or click [OK] when restarts occur.
- Click the
 button in MO, and select [Precache Grass].
 - When the game displays the error message stating "Grass generation finished successfully!", click [OK].
- Unless SKSE output has been configured specifically (not applicable if this guide's instructions were followed), the grass cache will be generated in Overwrite.
- Right-click Overwrite, select [Create Mod...], name it
Grass Cache, and click [OK]. - Place this mod just after No Grass In Objects mod in the MO left pane.
Navigate to C:/Modding/Tools/DynDOLOD/Edit Scripts/DynDOLOD/DynDOLOD_SSE.ini, and modify GrassBrightness* values, which affect grass LOD brightness/hue. For good results with Cathedral Landscapes grasses:
GrassBrightnessTopR=0.365
GrassBrightnessTopG=0.36
GrassBrightnessTopB=0.355
GrassBrightnessBottomR=0.200
GrassBrightnessBottomG=0.203
GrassBrightnessBottomB=0.205


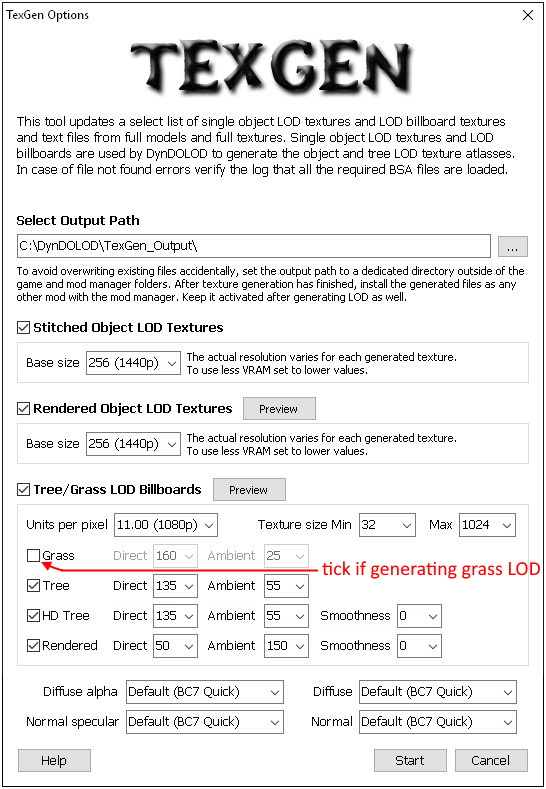
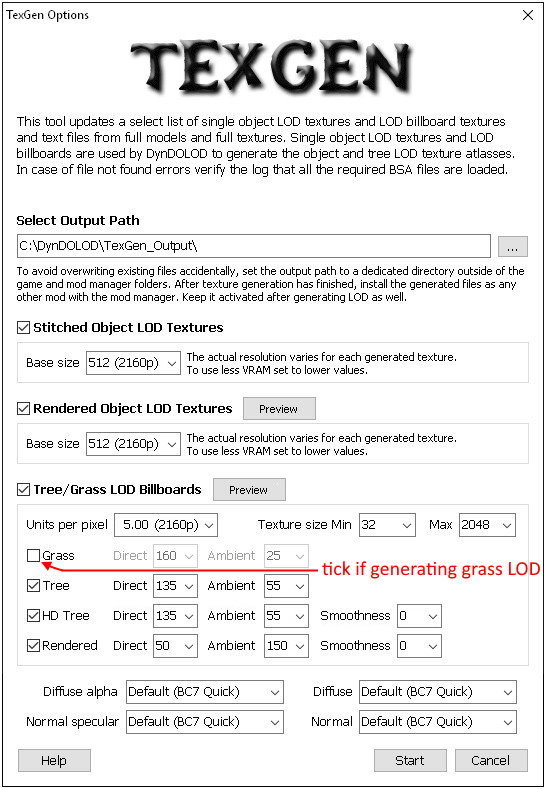
Run TexGen
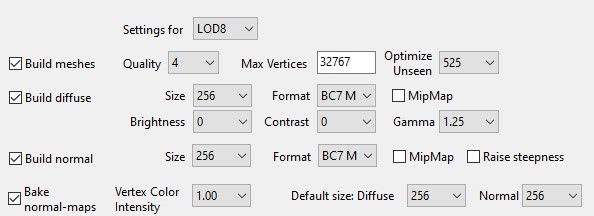
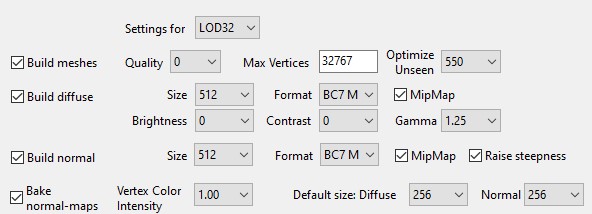
TexGen 3, shipped with DynDOLOD 3, will generate custom object LOD textures based on enabled mods. TexGen 3 will also generate grass billboards for LOD.
- Run TexGen from the MO executable drop-down list.
- Keep the default Output location, and use the setting corresponding to rendered game resolution: 1080p = HD, 1440p = QHD, 2160p = 4k
- NOTE: If generating grass LOD, be sure to tick "Grass" when replecating the following examples.
- Click [Start].
- Once the completed message has appeared (15-30 minutes, depending on the PC), click [Exit].
- Navigate to the DynDOLOD TexGen_Output folder location (e.g.
../Modding/Tools/DynDOLOD/TexGen_Output). - Move the files from the TexGen_Output folder into the Step SkyrimSE - TexGen Output mod:
- In MO, hold down the Ctrl key and double-click the Step SkyrimSE - TexGen Output mod. Alternatively, right click the mod to open it in an Explorer window.
- Enable the Step SkyrimSE - TexGen Output mod in MO.

Run DynDOLOD
DynDOLOD will generate the object LOD.
Configure and Generate
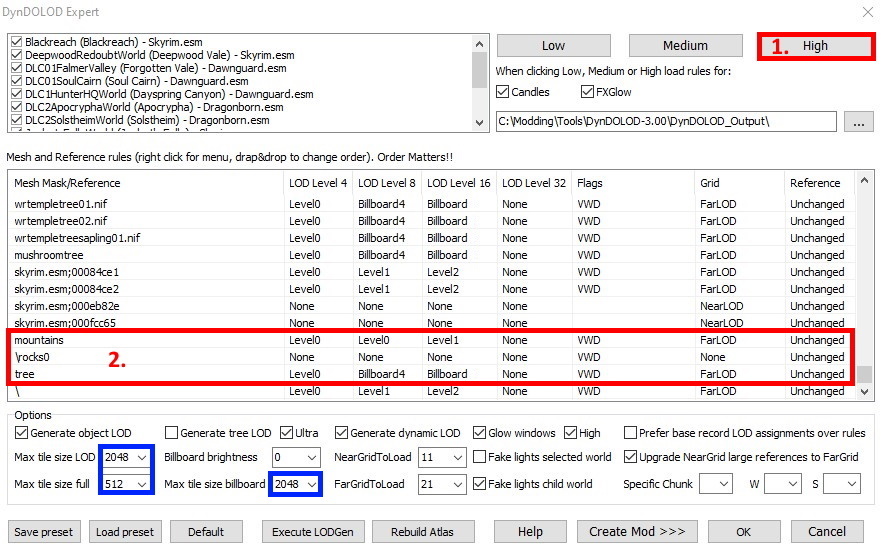
- Run DynDOLOD from the MO executable drop-down list to open the GUI configuration in 'expert' mode (if the DynDOLOD INI modification was set as described previously).
- Select all worldspaces.
- Configure as follows, or make performance modifications as instructed further below:

NOTE
SkyrimSE:Aspens Ablaze Will have tree LOD by way of SkyrimSE:Aspens Ablaze Add-On - DynDOLOD 3. Note that this is a FPS-taxing mod with LOD that can tank performance, due to the complexity of these trees (costs upwards of 20 FPS in the Rift with 3D tree LOD). Consider creating a mesh rule that matches all aspens to mitigate this by using the following settings at each level (copy all other settings from the default 'tree' mesh rule):
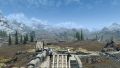
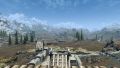
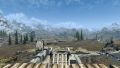
treeaspen | LOD4/Billboard4 | LOD8/Billboard4 | LOD16/Billboard4- The following gallery shows visual compares and performance snapshots (reference testing PC specs) for the cost of LOD and DynDOLOD using a number of custom presets, each having a caption from which the corresponding preset can be downloaded. Presets should be placed under
../DynDOLOD/Edit Scripts/DynDOLOD/Presets/and can be loaded by clicking [Load Preset] in the DynDOLOD GUI configuration. Keep in mind that 4k and greater resolutions can increase the "Max tile size" values as indicated in the above images as performance allows:
- The following gallery shows visual compares and performance snapshots (reference testing PC specs) for the cost of LOD and DynDOLOD using a number of custom presets, each having a caption from which the corresponding preset can be downloaded. Presets should be placed under
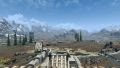
No LOD
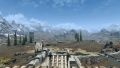
Terrain LOD (no DynDOLOD)
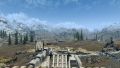
Performance Preset ('Medium' preset w/Billboard2 trees)
Optimal Preset ('High' preset with Level0/Billboard2/Billboard2 trees and Level0/0/1 mountains)
Ultra Preset ('High' preset with Level0/1/2 trees and Level0/0/1 mountains)
Optimal Preset (grass LOD stating at uGridsToLoad) - Also set
OverwriteGrassDistance = 12000andOverwriteGrassFadeRange = 6000in NGIO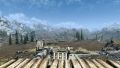
Optimal Preset (no grass LOD)


- Once the configuration is finalized, click [OK], and get a cup of coffee.
- When the completed message has appeared, click [Save & Exit].
Wrap Up
- Navigate to the
../DynDOLODfolder location (e.g.../Modding/Tools/DynDOLOD). - Copy or cut the files from the
../DynDOLOD_Outputfolder. - In MO, hold down the Ctrl key and double-click on the Step SkyrimSE - DynDOLOD Output mod created above.
- Paste the files into the mod's folder and close the window.
- In MO, enable the mod.
- Ensure the DynDOLOD.esm and DynDOLOD.esp files are ticked in the right pane.
- Sort with LOOT.
Occlusion
xLODGen will be used to update the occlusion data for the new mod list. This fixes holes in the distant landscape that are notoriously bad over water cells:
- Run xLODGen from the MO executable drop-down list.
- Select only the Tamriel and DLC2SolstheimWorld worldspaces.
- Ensure only the Occlusion box is ticked.
- Use the following settings:
- Quality: 3
- Height: 0
- Radius: 100
- Mode: -Flat +Borders
- Click [Generate] to run the process.
- Once the completed message has appeared, click the red X to close xLODGen.
- Occlusion.esp is saved automatically and will be placed in the Overwrite folder in MO.
- Right-click on the Overwrite mod listing and select, [Create new mod].
- Name it
Step SkyrimSE - Occlusionor anything unique. - Ensure the new mod is active (ticked).
- Ensure the Occlusion.esp is the last plugin in the load order just after DyDOLOD.esp and that it is enabled, else run LOOT and sort plugins.
When to Regenerate LOD
- xLODGen
- Whenever there are changes to the mod list that affect the underlying landscape: height, shape, textures, etc. This does not include grass, mountains or other objects on the landscape.
- Re-caching Grass
- Whenever there is a change in the mod list that affects grass rendering: grass diversity, grass density,
DynDOLODGrassModesetting, grass mods, any mods affecting grass placement, etc. Change to grass distance and fade settings do not require re-caching.
- TexGen
- Whenever there are changes to the mod list that affect objects with LOD: new objects, moved structures or objects, removed structures or objects, changes to grass (only when using grass LOD), changes to trees and/or landscape height, when its master plugins order is changed (out of order masters), etc. When grass is re-cached, TexGen should also be run again to update grass billboards.
- DynDOLOD
- Whenever there are changes to the mod list that affect objects with LOD: new objects, moved structures or objects, removed structures or objects, changes to grass (only when using grass LOD), changes to trees and/or landscape height, when its master plugins order is changed (out of order masters), etc. When LOD textures are updated with TexGen, DynDOLOD should also be run again to update all affected object LOD.
- Occlusion
- Only with noticeable changes to geography of Tamriel and/or Solstheim. For Step, this should only need to be run once.
STEP 6
Step Skyrim SE is fully installed and working at this point, but if FPS are < 60 or > 80, some adjustments may be beneficial to performance or quality. A final consideration is customizing BethINI. Refer to the Skyrim Configuration Guides for more information.
STEP 7
The game is now ready to be loaded to configure mods in the Mod Configuration Menu (MCM). The MCM is a feature of SkyUI that allows mod authors to provide custom, game-accessible settings for their mods. Recommendations are provided below for select mods. The remainder are user preference.
First Launch
To run the game, select the SKSE Skyrim Launcher executable from the drop-down list and click the Run button. Keep the following in mind when first launching from a fresh Guide installation:
- A new game is required!
- In other words, don't load from a save when first launching after a fresh guide install to avoid issues. Review the changelog before upgrading from a previous version of this Guide to determine whether or not a new game is advisable.
- When launching the game for the first time after a Guide install, the load could take significantly longer than normal. This will only be a one-time wait as all the installed mods are being initialized. Subsequent load times should be shorter.
- Finally, INI files may appear in the Overwrite folder after closing the game (e.g.
../SKSE/Plugins/SkyrimUncapper.ini). These files should be moved to their respective mod folders, respecting their folder structure during the move.
Alternate Start
Upon starting a new game, the Alternate Start - Live Another Life is the first mod in play. Lets face it, Skyrim is old and the vanilla start quest is the last thing many want to play through. Alternate Start provides a variety of ways to start the game. Once a new game is started, a locked cell is loaded. Simply talk to the statue in the room, choose a preference for starting the game (the vanilla start is provided as an option), and then sleep in the bed to start your new life. When using an alternate start location, the main quest line can be initialized by simply visiting Helgen.
Mod Configuration Menu Settings
Cathedral Weathers
Users who have installed the optional Lighting & Weathers mod group should set Interior Vision to "Darker" in order for Luminosity to have the correct interior brightness.
Complete Crafting
The following screenshots display the recommended settings for the mod's MCM:
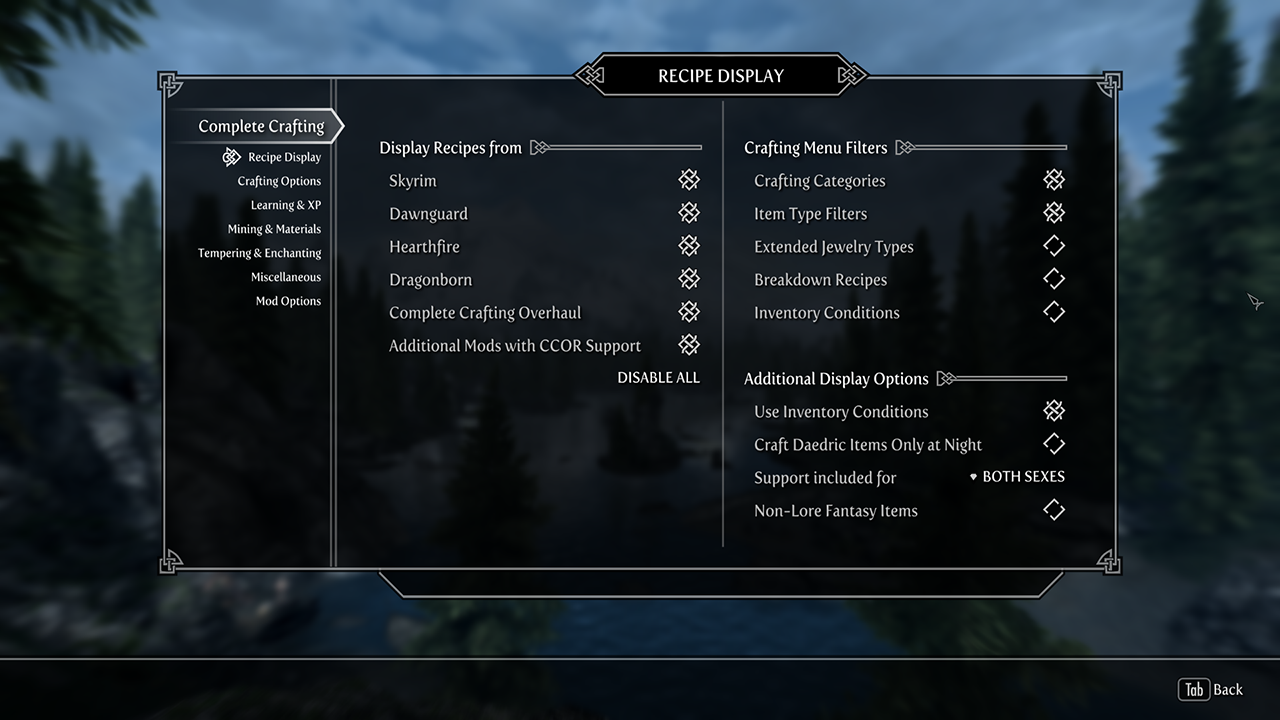 Recipe Display
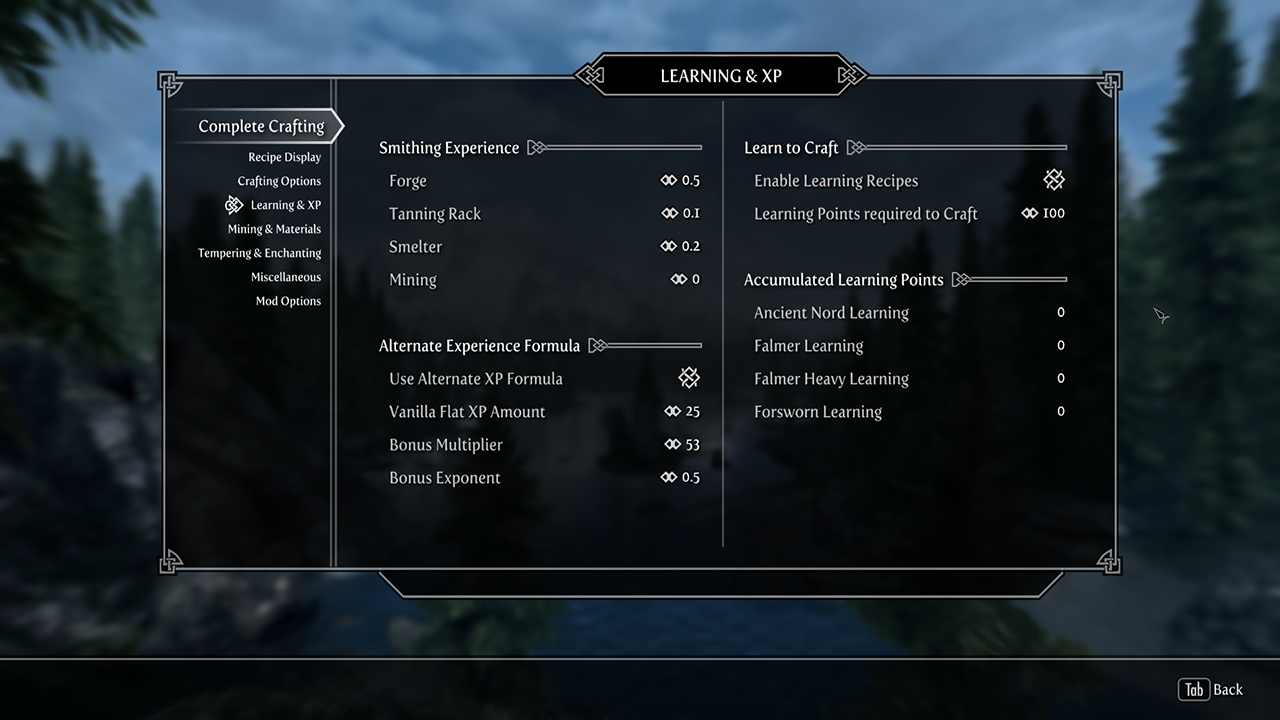 Learning & XP
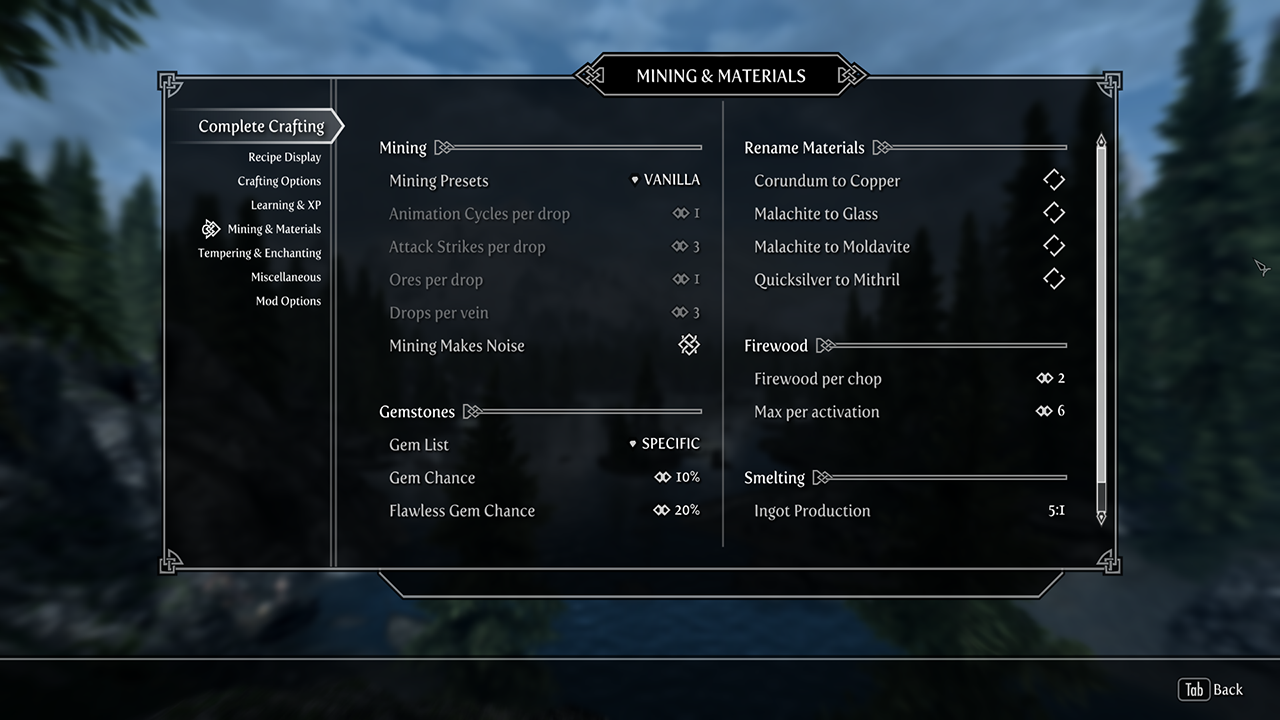 Mining & Materials
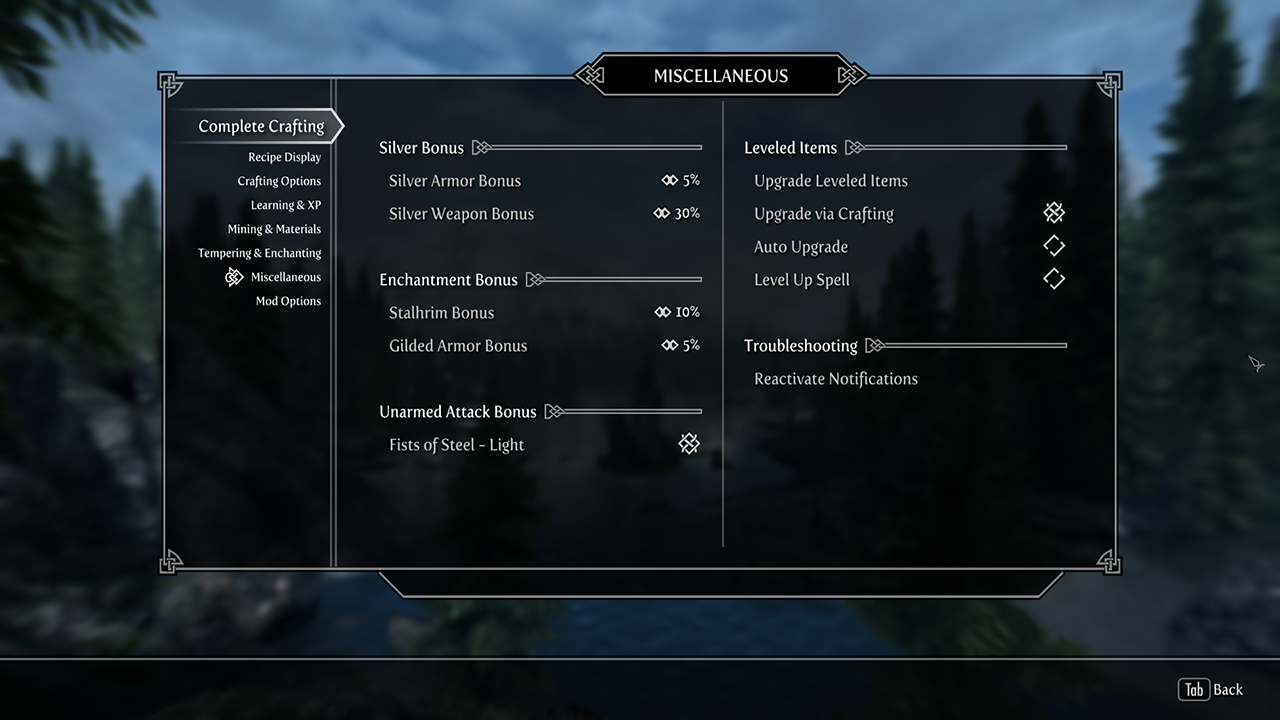 Miscellaneous
Farmhouse Chimneys SE
Vanilla villages should all be ticked on the first page. The following screenshot displays the recommended settings for the Mod Support page:
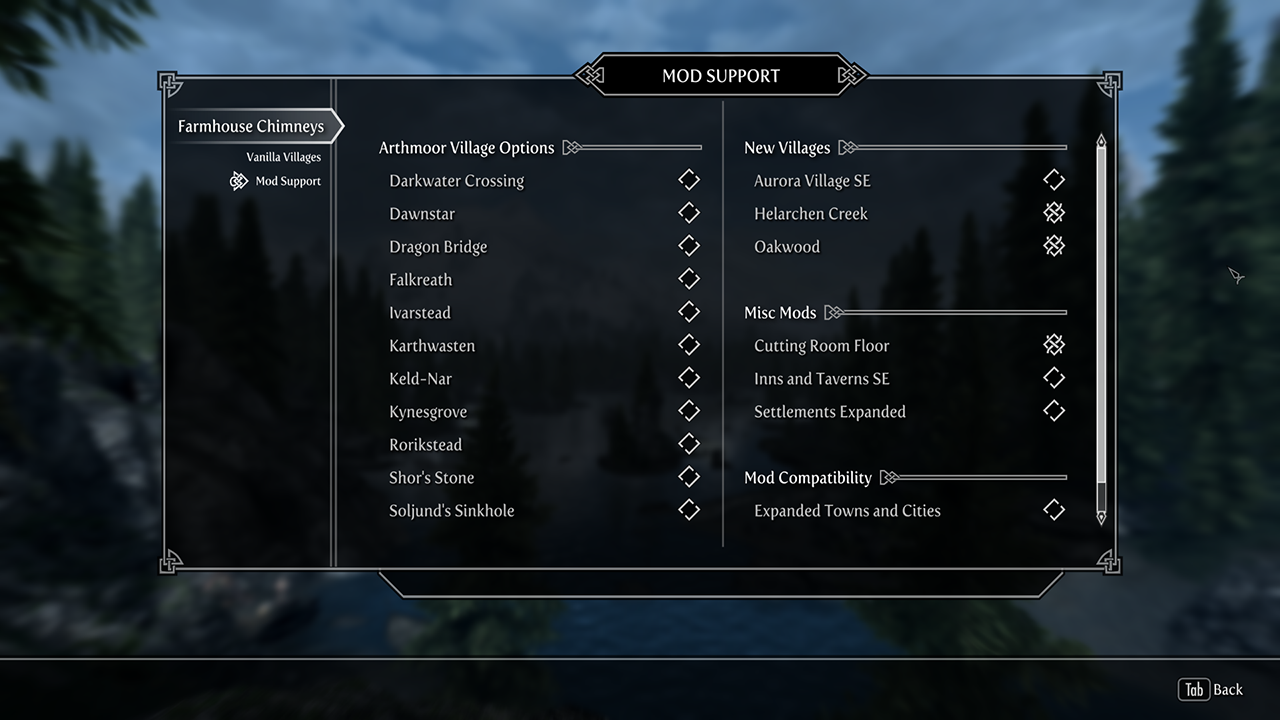 Mod Support
Lock Overhaul
This mod must be activated to work. Once enabled, the settings are user preference.
Storm Lightning
The Minimal preset in the MCM is recommended.
Timing is Everything
Timing is Everything is set up in a way that integrates DLC content and balances the game's quests. Vampires and werewolves will show up early in the game because they are a part of the world. Dragonborn will not start until the news of your deeds has time to reach the island, and the player becomes something that must be dealt with. Attack chances are lowered from 100% so there will be less of a chance to predict an attack. Other things are active that make sense, such as not being able to do the Break of Dawn quest if the player is a vampire, Thalmor won't attack until after engaging their quest line, etc. The following screenshots display the recommended settings for the mod's MCM:
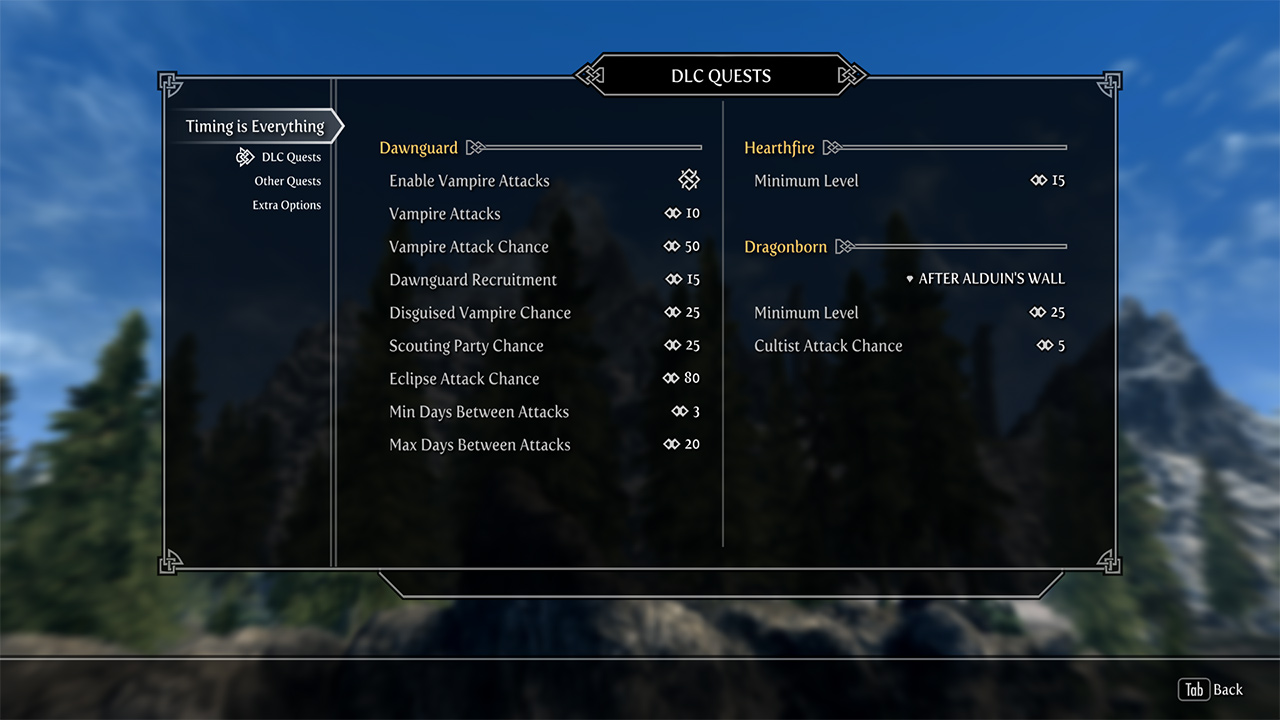 DLC Quests
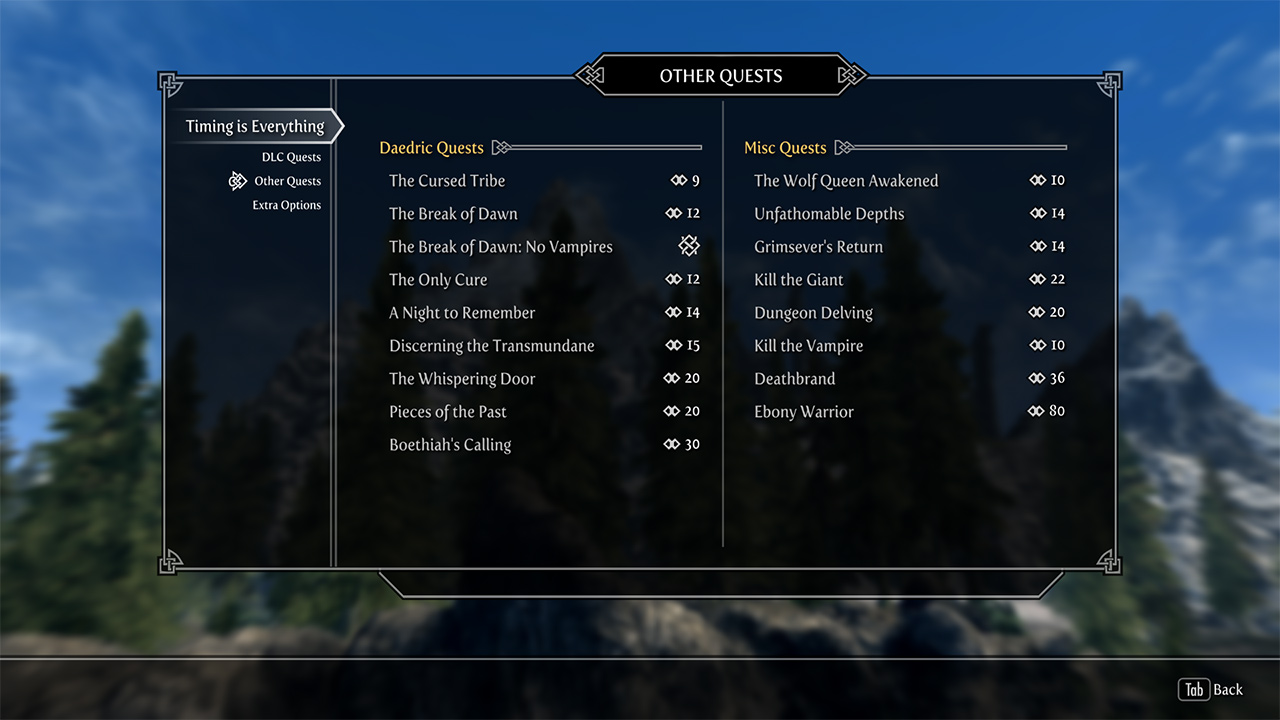 Other Quests
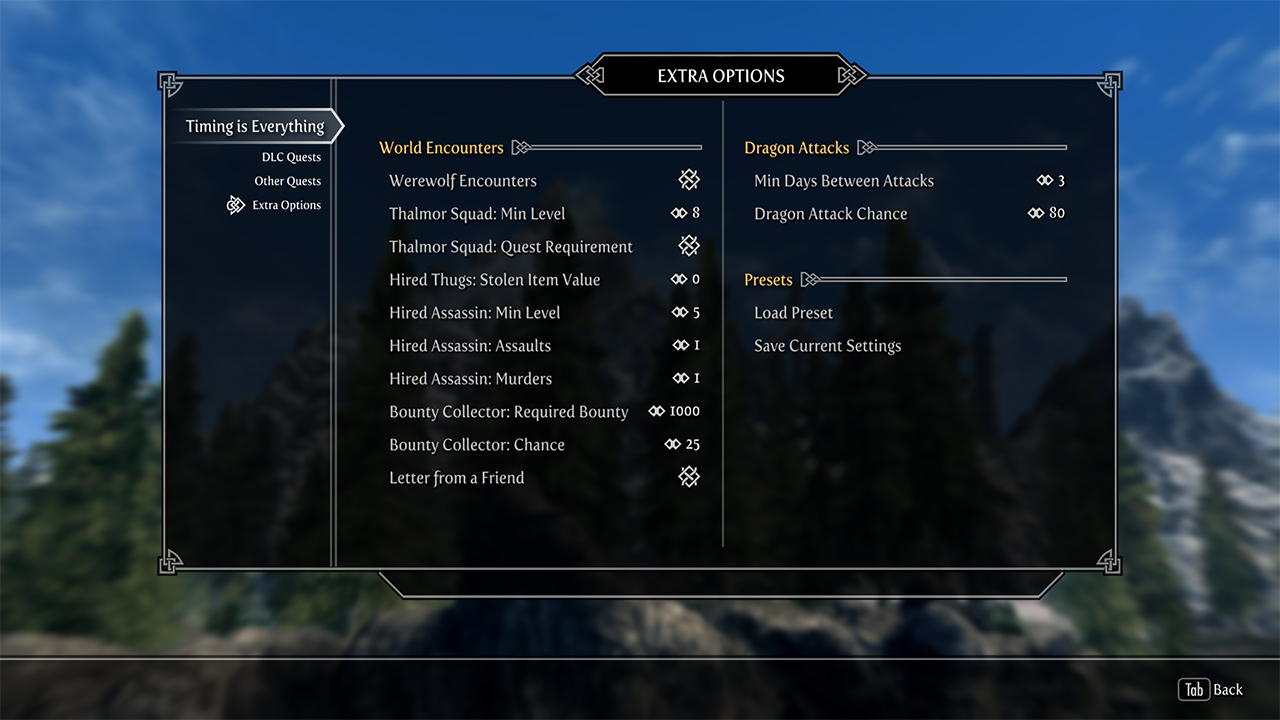 Extra Options
Remaining Mod Configurations
The remaining mod configurations are recommended to be left at their defaults for the most enhanced, vanilla experience. However, users may adjust the settings for these mods to their preference.
COMMUNITY CONTRIBUTIONS
STEP can only get bigger and better with help from the community. It is very time consuming for the STEP team to ensure that the Guide is consistently maintained at the highest quality possible. We need people to help us identify mods that improve the vanilla game while adhering to our Mandate. We also need ongoing bug reports, reviews, and updates on mods that may cause problems or that stray from the Mandate.
In order to suggest a mod for inclusion, visit the Mods section of the Forums.
Call for Mod Testers
Community members interested in becoming Mod Testers, please contact TechAngel85 via PM on the forums. Once registered, Mod Testers will be given access to Staff forums that houses useful information. For more information about our mod testing process, read through the Mod Testing Guide to get a sense of what's involved.
Call for Forum Moderators
Regular community members interested in becoming moderators, please contact TechAngel85 via PM on the forums. Forum Moderators will be determined based upon level and quality of activity within our community.
Credits
The STEP administrators would sincerely like to thank (from the bottoms of our fuzzy little hearts):
- The authors of mods recommended within our Guides
- The authors of mods who granted permission for their mods to be incorporated into the STEP Patches
- The core Community for feedback, suggestions and input
- The Beta and Mod Testers for their good humor and rigorous analyses
- The Nexus community
- Bethesda Softworks for their games
- Tannin for the gift that is Mod Organizer
- All the developers that kept MO alive to create MO
Step Staff
Administrators
- TechAngel85
- Lead Release Coordinator, Patch Coordinator, Lead Forum Administrator, Mod Author
- z929669
- Project Founder, Lead Site Developer, Lead Site Administrator
Step Admin
- DoubleYou
- Greg
Honorary Staff
Retired Founders, Administrators, and Staff:
- Aiyen
- Bealdwine
- deathneko11
- EisDrache
- EssArrBee
- Farlo
- frihyland
- GSDfan (still active: MO Support)
- GrantSP
- hishutup
- Kelmych
- MontyMM
- Nebulous112
- oqhansoloqo
- phazer11
- rootsrat
- stoppingby4now
- TheCompiler
- torminater
- Uhuru
- WilliamImm
- wolverine2710