
SkyrimSE:2.3: Difference between revisions
m (→This Release) |
|||
| (29 intermediate revisions by the same user not shown) | |||
| Line 1: | Line 1: | ||
{{GuideTitle|releasedate=July ##, 2024}} | {{GuideTitle|releasedate=July ##, 2024}} | ||
{{VersionHeader}} | {{VersionHeader}} | ||
{{Alert|type=warn|text=This | {{Alert|type=warn|text=This guide was designed to support (and therefore requires) '''Skyrim Special Edition v1.6.1170'''. Additionally ... | ||
* {{Fc|highlight|'''Requires ''SE Anniversary Upgrade DLC'''''}} ([https://store.steampowered.com/app/1746860/The_Elder_Scrolls_V_Skyrim_Anniversary_Upgrade/ Anniversary Upgrade - AU]). | * {{Fc|highlight|'''Requires ''SE Anniversary Upgrade DLC'''''}} ([https://store.steampowered.com/app/1746860/The_Elder_Scrolls_V_Skyrim_Anniversary_Upgrade/ Anniversary Upgrade - AU]). All 77 DLC + Creation Club (CC) masters required by the Step Patches must be visible as mods in the MO left pane. | ||
* In-game activation of Survival Mode is optional.}} | * In-game activation of Survival Mode is optional.}} | ||
<div class="nonumtoc">{{TOC|limit=4}}</div> | <div class="nonumtoc">{{TOC|limit=4}}</div> | ||
| Line 8: | Line 8: | ||
==This Release== | ==This Release== | ||
The most noteworthy changes are listed below. See the [[STEP:Versioning|Step Versioning Documentation]] for more information on Step's versioning methodology. | The most noteworthy changes are listed below. See the [[STEP:Versioning|Step Versioning Documentation]] for more information on Step's versioning methodology. | ||
* | * Upgraded guide and modlist to exclusively support the latest game runtime, v1.6.1170 with the Anniversary Upgrade | ||
* Added [[{{NAMESPACE}}: | ** Contributed the v1.6.1170 cleaning data to the LOOT masterlist, including all relevant Creation Club (CC) Anniversary Upgrade masters | ||
* | ** Modified guide instructions for cleaning the updated vanilla masters based upon the updated LOOT masterlist | ||
* Moved from BethINI to BethINI Pie for game configuration file (INI) management | |||
* Added [[{{NAMESPACE}}:Grass Cache Helper NG|Grass Cache Helper NG]] and [[{{NAMESPACE}}:No Grass In Objects|No Grass In Objects]] with updated instructions to generate the grass cache | |||
* | * Removed [[{{NAMESPACE}}:Faction Fixes SE|Faction Fixes]], since it has [https://stepmodifications.org/forum/topic/15394-faction-fixes-se-by-acidzebra/ reported issues], is no longer maintained, and posts/bugs pages are disabled on Nexus | ||
* | * Replaced [[{{NAMESPACE}}:Wonders of Weather|Wonders of Weather]] (WoW) with a mod assemblage that provides the WoW effects without the associated script-overload problems | ||
* | * Updated all Step patches and added leveled-list patches to support optional use of [[{{NAMESPACE}}:Complete Crafting Overhaul Remastered/{{ROOTPAGENAME}}|CCOR]], [[{{NAMESPACE}}:Complete Alchemy and Cooking Overhaul/{{ROOTPAGENAME}}|CACO]], and [[{{NAMESPACE}}:Weapons Armor Clothing and Clutter Fixes/{{ROOTPAGENAME}}|WACCF]] | ||
* Various guide-instruction changes to support added/removed and updated mods/tools | |||
{{Fc|salmon|''See the [{{canonicalurl:{{NAMESPACE}}:{{PAGENAME}}/changelog}} changelog] for more details and to determine if upgrading from a previous version is advisable.''}} | {{Fc|salmon|''See the [{{canonicalurl:{{NAMESPACE}}:{{PAGENAME}}/changelog}} changelog] for more details and to determine if upgrading from a previous version is advisable.''}} | ||
| Line 131: | Line 131: | ||
#* "-IKnowWhatImDoing": This turns off a warning presented when users make edits. | #* "-IKnowWhatImDoing": This turns off a warning presented when users make edits. | ||
#* "-AllowMasterFilesEdit": By default xEdit will not allow master file editing. This enables that. | #* "-AllowMasterFilesEdit": By default xEdit will not allow master file editing. This enables that. | ||
# Tick the '''Create files in mod instead of overwrite''' box. Select the ''xEdit Output'' mod from the drop-down. | # Tick the '''Create files in mod instead of overwrite''' box. Select the '''''xEdit Output''''' mod from the drop-down. | ||
# Tick the '''Use applications icon for desktop shortcuts''' box. | # Tick the '''Use applications icon for desktop shortcuts''' box. | ||
# Click {{ui|Apply}}. | # Click {{ui|Apply}}. | ||
| Line 293: | Line 293: | ||
=== Move the Cleaned Vanilla Masters === | === Move the Cleaned Vanilla Masters === | ||
After the vanilla master files are cleaned, they should be moved into the | After the vanilla master files are cleaned, they should be moved into the '''''Cleaned Vanilla Masters''''' mod in MO, and the original files should be restored into the "Data" directory in the game folder (e.g., <code>C:\Games\Steam\steamapps\common\Skyrim Special Edition\Data\</code>. This makes Steam happy when "validating" files so that it remains unaware of changes. | ||
{{Spoiler|shown=Steps - Move the Cleaned Vanilla Masters|hidden= | {{Spoiler|shown=Steps - Move the Cleaned Vanilla Masters|hidden= | ||
# In MO, open the '''Cleaned Vanilla Masters''' mod in Windows Explorer (right-click '''Cleaned Vanilla Masters''', then click '''Open in Explorer'''). | # In MO, open the '''''Cleaned Vanilla Masters''''' mod in Windows Explorer (right-click '''''Cleaned Vanilla Masters''''', then click '''Open in Explorer'''). | ||
# Click the {{icon|type=moopenfolders|size=30}} button above the MO mod list (left) pane, and select '''Open Game Folder''' to open the game folder in Windows Explorer. | # Click the {{icon|type=moopenfolders|size=30}} button above the MO mod list (left) pane, and select '''Open Game Folder''' to open the game folder in Windows Explorer. | ||
# '''{{Fc|highlight|Move}}''' all the cleaned master files from <code>..\Data</code> into <code>..\Cleaned Vanilla Masters</code> folder. | # '''{{Fc|highlight|Move}}''' all the cleaned master files from <code>..\Data</code> into <code>..\Cleaned Vanilla Masters</code> folder. | ||
#: '''Tip:''' Set the Explorer View to ''Details'', and sort by the ''Date modified'' column. This will sort all the recently modified files to the top of the file list. ([[:File:MoveMastersRef01.png|reference image]]) | #: '''Tip:''' Set the Explorer View to ''Details'', and sort by the ''Date modified'' column. This will sort all the recently modified files to the top of the file list. ([[:File:MoveMastersRef01.png|reference image]]) | ||
#: '''Tip:''' Create a backup of the cleaned masters in case they are somehow lost. | #: '''Tip:''' Create a backup of the cleaned masters in case they are somehow lost. | ||
# Leave the game folder open, close the ''Cleaned Vanilla Masters'' folder | # Leave the game folder open, and close the ''Cleaned Vanilla Masters'' folder | ||
#: {{Fc|salmon|'''''NOTE: '''DO NOT enable the '''Cleaned Vanilla Masters''' mod yet. It should remain disabled for now }}.}} | |||
=== Restore the Original Vanilla Masters === | === Restore the Original Vanilla Masters === | ||
To restore the original masters, simply copy and rename the official, uncleaned vanilla masters now located as backups in the xEdit Output mod. The original vanilla masters can also be restored by using [https://stepmodifications.org/wiki/Guide:System_Setup_Guide#Verify_Integrity_of_Game_Files Verify integrity of game files] in Steam. If | To restore the original masters, simply copy and rename the official, uncleaned vanilla masters now located as backups in the xEdit Output mod (recommended). The original vanilla masters can also be restored by using [https://stepmodifications.org/wiki/Guide:System_Setup_Guide#Verify_Integrity_of_Game_Files Verify integrity of game files] in Steam. | ||
: {{Fc|salmon|If the game presents the message to download CC content again, force quit the game via the console by pressing <kbd>~</kbd>, typing <code>qqq</code>, and pressing <kbd>Enter</kbd>. This will prevent the game from reacquiring the CC plugins, which was previously done in Step 1 via the System Setup Guide.}} | |||
{{Spoiler|shown=Steps - Restore the Original Vanilla Masters|hidden= | {{Spoiler|shown=Steps - Restore the Original Vanilla Masters|hidden= | ||
# In MO, open the '''xEdit Output''' mod in Windows Explorer (right-click '''xEdit Output''', then click '''Open in Explorer'''). | # In MO, open the '''''xEdit Output''''' mod in Windows Explorer (right-click '''xEdit Output''', then click '''Open in Explorer'''). | ||
#: '''Tip:''' Set the Explorer View to ''Details'', and sort by the ''Date modified'' column. This will sort all the recently modified files to the top of the file list beginning with ... | #: '''Tip:''' Set the Explorer View to ''Details'', and sort by the ''Date modified'' column. This will sort all the recently modified files to the top of the file list beginning with ... | ||
#:: <code>ccasvsse001-almsivi.esm.backup.YYYY_MM_DD_HH_MM_SS</code> and ending with ... | #:: <code>ccasvsse001-almsivi.esm.backup.YYYY_MM_DD_HH_MM_SS</code> and ending with ... | ||
| Line 315: | Line 317: | ||
#:: <code><nowiki>Get-ChildItem *.backup.* | Rename-Item -NewName { $_.Name -replace '(.*es.).*','$1' }</nowiki></code> | #:: <code><nowiki>Get-ChildItem *.backup.* | Rename-Item -NewName { $_.Name -replace '(.*es.).*','$1' }</nowiki></code> | ||
# Close all Explorer windows.}} | # Close all Explorer windows.}} | ||
{{alert|type=mo|text=Any time Bethesda updates these master files, they will likely need to be cleaned again and replaced in MO. Any previously cleaned versions of these same files that exist in the MO mod list must be either disabled or deleted first, because xEdit will see only the cleaned versions | {{alert|type=mo|text=Any time Bethesda updates these master files, they will likely need to be cleaned again and replaced in MO. Any previously cleaned versions of these same files that exist in the MO mod list must be either disabled or deleted first, because xEdit will see only the cleaned versions when launched from MO.}} | ||
The Bethesda masters should be cleaned and essentially hidden from the game inside the disabled '''''Cleaned Vanilla Masters''''' mod. The mod list prioritization in the left pane should reflect as follows (ignore the plugin prioritization in the right pane for now): | |||
<ol><li>DLC: Dawnguard</li> | <ol><li>DLC: Dawnguard</li> | ||
<li>DLC: HearthFires</li> | <li>DLC: HearthFires</li> | ||
| Line 325: | Line 327: | ||
</ol> | </ol> | ||
=== Verify the Original and Cleaned Vanilla Masters === | |||
# With the '''''Cleaned Vanilla Masters''''' mod still disabled, run LOOT via MO, and confirm that the 44 vanilla masters are still flagged by LOOT (44 warnings). | |||
# Close LOOT and ENABLE the '''''Cleaned Vanilla Masters''''' mod. To verify the vanilla mods have been cleaned. | |||
# Run LOOT again via MO, and no warnings should be apparent. If this is the case, leave the '''''Cleaned Vanilla Masters''''' mod enabled going forward. | |||
<br> | <br> | ||
<br> | <br> | ||
| Line 373: | Line 378: | ||
! class="bluebg" style="width: 0.25rem; border-bottom: 1px solid #666C71; border-top: 1px solid #666C71; padding: 0;" | | ! class="bluebg" style="width: 0.25rem; border-bottom: 1px solid #666C71; border-top: 1px solid #666C71; padding: 0;" | | ||
| style="width: 9%; border-bottom: 1px solid #666C71; border-top: 1px solid #666C71; padding: 0 0.5rem;" | '''Table Flags''' | | style="width: 9%; border-bottom: 1px solid #666C71; border-top: 1px solid #666C71; padding: 0 0.5rem;" | '''Table Flags''' | ||
| style="border-bottom: 1px solid #666C71; border-top: 1px solid #666C71;" | {{Fc|red|A red vertical bar indicates that the mod is required by ''Step Patch - Conflict Resolution''.}}<br>{{Fc|yellow|A yellow bar indicates that the mod is required by ''Step Patch - Lighting and Weather''.}}<br>{{Fc|green|A green bar indicates that the mod is required by ''Step Patch - Post-Processing''.}}<br>{{Fc|blue|A blue bar indicates the mod supports or otherwise relates to mods in the 21-Post-Processing ModGroup.}} | | style="border-bottom: 1px solid #666C71; border-top: 1px solid #666C71;" | {{Fc|red|A red vertical bar indicates that the mod is required by ''Step Patch - Conflict Resolution''.}}<br>{{Fc|yellow|A yellow bar indicates that the mod is required by '''''Step Patch - Lighting and Weather'''''.}}<br>{{Fc|green|A green bar indicates that the mod is required by '''''Step Patch - Post-Processing'''''.}}<br>{{Fc|blue|A blue bar indicates the mod supports or otherwise relates to mods in the 21-Post-Processing ModGroup.}} | ||
|- | |- | ||
| style="border-bottom: 1px solid #666C71;" | | | style="border-bottom: 1px solid #666C71;" | | ||
| Line 768: | Line 773: | ||
}}<br> | }}<br> | ||
== Performance Tuning | = STEP 5 = | ||
<div>Grass Cache</div><br> | |||
=== Generating the Grass Cache === | |||
A pregenerated grass cache ensures maximum performance and is also required for generating grass LOD. The grass cache for this Step build is included on Nexus under Miscellaneous Files, but the instructions for generating the grass cache are included here for posterity. This process takes 20-60 minutes to complete, depending on hardware and installed mods. The game will typically crash during grass generation, but the operation will gracefully resume the process automatically until complete. | |||
{{Alert|text=Depending upon graphics hardware and software, generation time can be significantly impacted by graphics-related background processes. It's good practice to terminate these processes via the Windows Task Manager before invoking generation. Only the graphics drivers are needed. Relevant processes names will usually begin with 'AMD' or 'NVIDIA'. These processes can be safely killed (right click > "End Task"), and they will be restarted again on Windows reboot.}} | |||
# Click the {{Icon|type=motools}} button in MO, and select ''Precache Grass'' to begin the process. | |||
# When the game displays the error "Grass generation finished successfully!", click {{Ui|OK}}. | |||
# Click {{Ui|OK}} if a similar message is waiting in MO. | |||
The grass data files will be in the '''''SKSE64 Output''''' mod and will consume about 2 Gb. They will used by the game henceforth without any further maintenance required (unless any mods affecting worldspace landscapes are added, removed, or altered). | |||
<br> | |||
<br> | |||
= STEP 6 = | |||
<div>Performance Tuning</div><br> | |||
It's necessary to determine the available performance headroom prior to generating LOD or setting up ENB, because the full LODGen setup can cost upwards of 20 FPS on average in exteriors, and ENB can cost upwards of an additional 40 FPS. {{Fc|instruction|The goal at this point is to have at ''least 120 FPS'' (≥ 140 recommended) on average in the tundra with clear weather (and ideally the Rift as well). Keep in mind that decreasing game resolution can drastically improve performance.}} | It's necessary to determine the available performance headroom prior to generating LOD or setting up ENB, because the full LODGen setup can cost upwards of 20 FPS on average in exteriors, and ENB can cost upwards of an additional 40 FPS. {{Fc|instruction|The goal at this point is to have at ''least 120 FPS'' (≥ 140 recommended) on average in the tundra with clear weather (and ideally the Rift as well). Keep in mind that decreasing game resolution can drastically improve performance.}} | ||
| Line 802: | Line 820: | ||
}} | }} | ||
=== Performance/Quality Optimization === | |||
This process will optimize the performance-quality trade off prior to configuration of ENB and LOD. | This process will optimize the performance-quality trade off prior to configuration of ENB and LOD. | ||
* If the average FPS is approx. 140 +/- 10 FPS, stop here and continue to [[#21-Post-Processing|21-Post-Processing]] and/or [[#STEP_5|Step 5 - LOD]]. | * If the average FPS is approx. 140 +/- 10 FPS, stop here and continue to [[#21-Post-Processing|21-Post-Processing]] and/or [[#STEP_5|Step 5 - LOD]]. | ||
* Otherwise, continue below to optimize performance/quality by [https://stepmodifications.org/wiki/SkyrimSE:2.3#BethINI_Setup revisiting the BethINI setup] to make changes accordingly: | * Otherwise, continue below to optimize performance/quality by [https://stepmodifications.org/wiki/SkyrimSE:2.3#BethINI_Setup revisiting the BethINI setup] to make changes accordingly: | ||
*# '''If the average FPS is lower than 120 FPS''', use of both DynDOLOD and ENB will probably not be practical, even with 'performance' settings for both. Consider gaining more frames by using a higher performance BethINI preset. | *# '''If the average FPS is lower than 120 FPS''', use of both DynDOLOD and ENB will probably not be practical, even with 'performance' settings for both. Consider gaining more frames by using a higher performance BethINI preset. | ||
*#* Revisit the BethINI setup using the {{Ui|Medium}} preset this time, and consider increasing | *#* Revisit the BethINI setup using the {{Ui|Medium}} preset this time, and consider increasing ''Grass Density'' by 5. | ||
*#* Rerun the benchmark. | *#* Rerun the benchmark. | ||
*#* If average FPS is still not ≥ 120, try the BethINI {{Ui|Low}} preset and/or adjust | *#* If average FPS is still not ≥ 120, try the BethINI {{Ui|Low}} preset and/or adjust ''Grass Density'' accordingly. | ||
*# '''If the average FPS is higher than 150 FPS:''' | *# '''If the average FPS is higher than 150 FPS:''' | ||
*#* Revisit the BethINI setup using the {{Ui|Ultra}} preset this time, and consider decreasing the | *#* Revisit the BethINI setup using the {{Ui|Ultra}} preset this time, and consider decreasing the ''Grass Density'' by 5. | ||
*#* Rerun the benchmark. | *#* Rerun the benchmark. | ||
* Either way, once the average FPS is in the range of 140 +/- 10 FPS, continue to [[#21-Post-Processing|21-Post-Processing]] and/or [[#STEP_5|Step 5 - LOD]]. | * Either way, once the average FPS is in the range of 140 +/- 10 FPS, continue to [[#21-Post-Processing|21-Post-Processing]] and/or [[#STEP_5|Step 5 - LOD]]. | ||
| Line 948: | Line 966: | ||
== {{#show:Category:ModGroup_21-Post-Processing|?ModGroupName}} == | == {{#show:Category:ModGroup_21-Post-Processing|?ModGroupName}} == | ||
Decide whether or not to install the Post-Processing ModGroup | :{{fc|#E6B69E|{{#show:Category:ModGroup_21-Post-Processing|?ModGroupDescription}} }} | ||
Decide whether or not to install the Post-Processing ModGroup to support ENB. | |||
{{Alert|text=Keep in mind that LOD generation is more fundamentally important to visual enhancement than ENB, so if average frame rate from the previous benchmark is consistently below 100 FPS at this point, consider skipping 21-Post-Processing, and continuing on to [[SkyrimSE:{{ROOTPAGENAME}}#Final Sorting and Cleaning|Final Sorting and Cleaning]].}} | {{Alert|text=Keep in mind that LOD generation is more fundamentally important to visual enhancement than ENB, so if average frame rate from the previous benchmark is consistently below 100 FPS at this point, consider skipping 21-Post-Processing, and continuing on to [[SkyrimSE:{{ROOTPAGENAME}}#Final Sorting and Cleaning|Final Sorting and Cleaning]].}} | ||
{{Fc|salmon|'''''NOTE:''' If ENB will be used, revisit the [https://stepmodifications.org/wiki/SkyrimSE:{{#show:STEP:Main/GuideVersioning|?SkyrimLECurrentRelease#}} BethINI | {{Fc|salmon|'''''NOTE:''' If ENB will be used, revisit the [https://stepmodifications.org/wiki/SkyrimSE:{{#show:STEP:Main/GuideVersioning|?SkyrimLECurrentRelease#BethINI_Pie}} BethINI Pie setup] to disable: '''Display''' > ''Lens Flare'', ''Anamorphic Lens Flare'', and ''Ambient Occlusion''. Also consider modifying the sun size as instructed under '''Custom'''.''}} | ||
https://stepmodifications.org/wiki/SkyrimSE:2.3#BethINI_Pie | |||
=== Optional Post-Processing Mods === | === Optional Post-Processing Mods === | ||
Beginning at [[#04-Foundation|04-Foundation]], confirm that all mod rows prefixed with a <u>blue vertical bar</u> are configured with Post-Processing options. | Beginning at [[#04-Foundation|04-Foundation]], confirm that all mod rows prefixed with a <u>blue vertical bar</u> are configured with Post-Processing options. | ||
{{ModTable|ModTableRow= | {{ModTable|ModTableRow= | ||
{{#ask:[[Game::{{NAMESPACE}}]][[Version::{{PAGENAME}}]][[ModGroup::21-Post-Processing]] | {{#ask:[[Game::{{NAMESPACE}}]][[Version::{{PAGENAME}}]][[ModGroup::21-Post-Processing]] | ||
| Line 983: | Line 1,000: | ||
<br> | <br> | ||
= STEP | = STEP 7 = | ||
<div>Level of Detail (LOD)</div><br> | <div>Level of Detail (LOD)</div><br> | ||
Now that all mods and patches have been installed/sorted and performance margins are acceptable, the next step is to generate custom LOD data for the mod list. Recommended settings correspond to rendered game resolutions that will benefit from those settings. | Now that all mods and patches have been installed/sorted and performance margins are acceptable, the next step is to generate custom LOD data for the mod list. Recommended settings correspond to rendered game resolutions that will benefit from those settings. | ||
| Line 995: | Line 1,012: | ||
# Place these new mods directly after '''''Step {{GameAbbrTag|{{NAMESPACE}}}} - xLODGen Output'''''. | # Place these new mods directly after '''''Step {{GameAbbrTag|{{NAMESPACE}}}} - xLODGen Output'''''. | ||
# Find the '''''(TEMP) Cathedral Landscapes - xLODGen''''' mod from the [[#04-Foundation|04-Foundation]] mod group and enable it, if necessary. | # Find the '''''(TEMP) Cathedral Landscapes - xLODGen''''' mod from the [[#04-Foundation|04-Foundation]] mod group and enable it, if necessary. | ||
#: This mod | #: This mod should ONLY be enabled for terrain LOD generation. If it is not disabled before generating object LOD and/or playing the game, it will cause visual glitches. | ||
# Sort with LOOT. | # Sort with LOOT. | ||
<br> | <br> | ||
The last few mods in the mod list should now reflect the following | The last few mods in the mod list should now reflect the following, which reflects the number of mods used in this guide and is a lower limit, since many mods have multiple files: | ||
<ol start=1> | <ol start=1> | ||
<li> DLC: Dawnguard</li></ol> | <li> DLC: Dawnguard</li></ol> | ||
| Line 1,019: | Line 1,036: | ||
# Run xLODGen from the MO executable drop-down list. | # Run xLODGen from the MO executable drop-down list. | ||
# Select all worldspaces. | # Select all worldspaces. | ||
# Ensure that ONLY the | # Ensure that ONLY the '''Terrain LOD''' box is ticked in the right pane. | ||
# Use the following settings, which have been verified in extensive [https://stepmodifications.org/forum/topic/15184-xlodgen-terrain-settings-compare/page-3#entry242523 testing]: | # Use the following settings, which have been verified in extensive [https://stepmodifications.org/forum/topic/15184-xlodgen-terrain-settings-compare/page-3#entry242523 testing]: | ||
#: {{Fc|salmon|'''''NOTE:''' Unless you are running {{AbbreviationTagged|{{NAMESPACE}}}} at ≥ 4k resolution, resist the urge to wastefully increase the texture resolutions shown, which will only reduce FPS with NO BENEFIT. Those running ≥ 4k resolution WILL benefit by doubling the resolution for LOD4, LOD8, and LOD16 from 256 to 512.''}} | #: {{Fc|salmon|'''''NOTE:''' Unless you are running {{AbbreviationTagged|{{NAMESPACE}}}} at ≥ 4k resolution, resist the urge to wastefully increase the texture resolutions shown, which will only reduce FPS with NO BENEFIT. Those running ≥ 4k resolution WILL benefit by doubling the resolution for LOD4, LOD8, and LOD16 from 256 to 512.''}} | ||
| Line 1,060: | Line 1,077: | ||
# Once the completed message has appeared (1-5 minutes, depending on the PC), click {{ui|Exit}}. | # Once the completed message has appeared (1-5 minutes, depending on the PC), click {{ui|Exit}}. | ||
# Navigate to the DynDOLOD ''TexGen_Output'' folder location (e.g. <code>../Modding/Tools/DynDOLOD/TexGen_Output</code>). | # Navigate to the DynDOLOD ''TexGen_Output'' folder location (e.g. <code>../Modding/Tools/DynDOLOD/TexGen_Output</code>). | ||
# Move the files from the ''TexGen_Output'' folder into the '''Step {{GameAbbrTag|{{NAMESPACE}}}} - TexGen Output''' mod: | # Move the files from the ''TexGen_Output'' folder into the '''''Step {{GameAbbrTag|{{NAMESPACE}}}} - TexGen Output''''' mod: | ||
#: In MO, hold down the '''Ctrl''' key and double-click the '''Step {{GameAbbrTag|{{NAMESPACE}}}} - TexGen Output''' mod. Alternatively, right click the mod to open it in an Explorer window. | #: In MO, hold down the '''Ctrl''' key and double-click the '''''Step {{GameAbbrTag|{{NAMESPACE}}}} - TexGen Output''''' mod. Alternatively, right click the mod to open it in an Explorer window. | ||
# Enable the '''Step {{GameAbbrTag|{{NAMESPACE}}}} - TexGen Output''' mod in MO. | # Enable the '''''Step {{GameAbbrTag|{{NAMESPACE}}}} - TexGen Output''''' mod in MO. | ||
=== Run DynDOLOD === | === Run DynDOLOD === | ||
| Line 1,106: | Line 1,123: | ||
# Navigate to the DynDOLOD ''DynDOLOD_Output'' folder location (e.g. <code>..\Modding\Tools\DynDOLOD\DynDOLOD_Output</code>). | # Navigate to the DynDOLOD ''DynDOLOD_Output'' folder location (e.g. <code>..\Modding\Tools\DynDOLOD\DynDOLOD_Output</code>). | ||
# Move the files the ''DynDOLOD_Output'' folder into the '''Step {{GameAbbrTag|{{NAMESPACE}}}} - DynDOLOD Output''' mod: | # Move the files the ''DynDOLOD_Output'' folder into the '''Step {{GameAbbrTag|{{NAMESPACE}}}} - DynDOLOD Output''' mod: | ||
#: In MO, hold down the '''Ctrl''' key and double-click the '''Step {{GameAbbrTag|{{NAMESPACE}}}} - DynDOLOD Output''' mod. Alternatively, right click the mod to open it in an Explorer window. | #: In MO, hold down the '''Ctrl''' key and double-click the '''''Step {{GameAbbrTag|{{NAMESPACE}}}} - DynDOLOD Output''''' mod. Alternatively, right click the mod to open it in an Explorer window. | ||
# Enable the '''Step {{GameAbbrTag|{{NAMESPACE}}}} - DynDOLOD Output''' mod in MO. | # Enable the '''''Step {{GameAbbrTag|{{NAMESPACE}}}} - DynDOLOD Output''''' mod in MO. | ||
# Ensure the ''DynDOLOD.esm'' and ''DynDOLOD.esp'' plugins are ticked in the right pane. | # Ensure the ''DynDOLOD.esm'' and ''DynDOLOD.esp'' plugins are ticked in the right pane. | ||
# Sort with LOOT. | # Sort with LOOT. | ||
| Line 1,130: | Line 1,147: | ||
<br> | <br> | ||
= STEP | = STEP 8 = | ||
<div>Mod Configuration (MCM)</div><br> | <div>Mod Configuration (MCM)</div><br> | ||
The game is now ready to be loaded to configure mods in the Mod Configuration Menu (MCM). The MCM is a feature of SkyUI that allows mod authors to provide custom, game-accessible settings for their mods. Recommendations are provided below for select mods. The remainder are user preference. | The game is now ready to be loaded to configure mods in the Mod Configuration Menu (MCM). The MCM is a feature of SkyUI that allows mod authors to provide custom, game-accessible settings for their mods. Recommendations are provided below for select mods. The remainder are user preference. | ||
=== First Launch === | === First Launch === | ||
To run the game, select the '''SKSE''' executable from the drop-down list and click | To run the game, select the '''SKSE''' executable from the drop-down list and click {{Ui|Run}}. Keep the following in mind when first launching from a fresh Guide installation: | ||
* {{fc|highlight|'''Test the build on a new game'''}} | * {{fc|highlight|'''Test the build on a new game'''}} | ||
*: In other words, don't load from a save after a fresh Guide install to avoid false flags caused by savegame incompatibility. {{fc|salmon|''See the [{{canonicalurl:{{NAMESPACE}}:{{PAGENAME}}/changelog}} changelog] before upgrading from a previous version of this Guide to determine whether or not a new game is advisable.''}} | *: In other words, don't load from a save after a fresh Guide install to avoid false flags caused by savegame incompatibility. {{fc|salmon|''See the [{{canonicalurl:{{NAMESPACE}}:{{PAGENAME}}/changelog}} changelog] before upgrading from a previous version of this Guide to determine whether or not a new game is advisable.''}} | ||
Latest revision as of 01:57, July 21, 2024
WARNING
This guide is in the development phase and is NOT supported. The contents of this page can change at any time, so please DO NOT request support for this guide on the forums!Go to the latest supported SkyrimSE Guide
WARNING
This guide was designed to support (and therefore requires) Skyrim Special Edition v1.6.1170. Additionally ...
- Requires SE Anniversary Upgrade DLC (Anniversary Upgrade - AU). All 77 DLC + Creation Club (CC) masters required by the Step Patches must be visible as mods in the MO left pane.
- In-game activation of Survival Mode is optional.
This Release
The most noteworthy changes are listed below. See the Step Versioning Documentation for more information on Step's versioning methodology.
- Upgraded guide and modlist to exclusively support the latest game runtime, v1.6.1170 with the Anniversary Upgrade
- Contributed the v1.6.1170 cleaning data to the LOOT masterlist, including all relevant Creation Club (CC) Anniversary Upgrade masters
- Modified guide instructions for cleaning the updated vanilla masters based upon the updated LOOT masterlist
- Moved from BethINI to BethINI Pie for game configuration file (INI) management
- Added Grass Cache Helper NG and No Grass In Objects with updated instructions to generate the grass cache
- Removed Faction Fixes, since it has reported issues, is no longer maintained, and posts/bugs pages are disabled on Nexus
- Replaced Wonders of Weather (WoW) with a mod assemblage that provides the WoW effects without the associated script-overload problems
- Updated all Step patches and added leveled-list patches to support optional use of CCOR, CACO, and WACCF
- Various guide-instruction changes to support added/removed and updated mods/tools
See the changelog for more details and to determine if upgrading from a previous version is advisable.
Step SkyrimSE Guide
This is the official Step modding guide for Skyrim: Aniversary Edition. Its goal is to provide an "enhanced vanilla" look and feel with a focus on exploration gameplay. It is built for Skyrim on the PC without VR.
- Visit the forums to learn more or contribute.
- Also follow Step Modifications on Facebook.
- To support hosting and maintenance of this website, consider donating to the project.
New to Modding?
We recommend that you review this entire guide before attempting installation, especially if this is your first exposure to a Step Game Guide. We and the community, have consolidated a lot of information into our guides for use as a free resource for all. New and experienced modders alike will find many answers within these guides and linked resources. This guide is written in such a way that it expects users to know the basics of modding and related tools (e.g. mod managers, LOD optimizers, configuration utilities, etc.). However our support forums are always available for Q&A.
Nomenclature and Instructions
The following nomenclature is used throughout this guide and should be understood before proceeding.
- 'tick' means 'check': Frequently, the word 'check' or 'checked' can mean 'ensure' in addition to "check mark", so 'check' is not used where it is synonymous with 'tick' to avoid any mistakes that can (and have) happened from this conflation.
- Baseline: The recommended install option is shown within the Baseline column of the mod tables below.
- Step Patches: Custom patches created for the respective Step Guides. Always use them!
Expand Instructions!
Click the heading below to expand detailed instructions that are collapsed by default for readability:
Expand mod table detailed instructions:

Not Safe For Work Content
Installing this Guide in the manner intended results in no not safe for work (NSFW) content in-game. However, there may be mod pages linked within the Guide that do include NSFW content; namely images. In the past, mod instructions included direct links to download files; bypassing these pages. However, when Nexus Mods implemented a unique MD5 hash to every download request it prevented Step from providing links directly to specific files. As such, these mod pages are indicated with warning text.
- Example:
-
- This is a Not Safe For Work (NSFW) mod page!
System Requirements
SkyrimSE should be run on a relatively modern Windows 10/11 64-bit desktop or laptop, gaming capable PC. While CPU specs and performance are important factors, they matter only to a point beyond which is diminishing return on investment. Smooth gameplay, LODGen-related tools, and ENBSeries post-processing are most limited by the GPU performance coupled to the resolution at which the game is run.
- The minimum specs assume that the recommended 'baseline' mod options will be installed, which are biased towards 'performance' options when available.
- The recommended specs assume a bias toward 'quality' and assume higher quality mod options will be installed when available.
- CPU/GPU Marks should be within the ranges listed below. Refer to the links for examples.
| Hardware | Minimum | Recommended |
|---|---|---|
| CPU CPU Mark Range | 4,000 - 7,000 | > 7,000 |
| System RAM | 8GB | 16GB |
| GPU G3D Mark Range | 8,000 - 10,000 | > 10,000 |
| Video RAM | at least 4GBs | 8GBs or higher |
| Game Drive | HDD | SSD |
| Resolution | 1080p (HD) | 1440p (QHD) |
Time Commitment
Be aware it will take anywhere from several hours to a several days to complete this build from start to finish. This time will vary greatly depending on internet download speed and user experience. Following are cumulative time estimates on average:
- 3-6 hours : Steps 1 - 3 (modding-environment setup)
- 10-12 hours : Step 4 (mod download, installation)
- 4-6 hours : Steps 5 - 7 (LODGen, post-build configuration, and fine-tuning the build)
STEP 1
Follow the System Setup Guide!
Those who have not completed the System Setup Guide (SSG) should STOP and do so now BEFORE beginning Step 2! This is a perquisite for completing this guide, as many of the following instructions reference concepts, tools, and even file paths established in the SSG.
NOTE
Since the BGS game update to SkyrimSE 1.6.1170, many people have spurious game files from downgrading the game or not keeping the game updated. This guide expects a clean install of Steam SkyrimSE v1.6.1170. It's highly recommended to revert to vanilla, validate the game data, and reinitialize the game before continuing with this guide.
STEP 2
Mod Organizer
It's recommended to create a new MO instance for each Step build. Revisit the SSG - MO First-Launch Setup if a Step SkyrimSE 2.3 instance wasn't created previously.
Tool Setup
All modding tools needed should already be installed according to the System Setup Guide. Some tools will have been auto-detected and added; nevertheless, ensure the settings are correct for all tools. xEdit is used in the following example. 'SSEEdit', TES5Edit, FO4Edit, etc. are all 'xEdit', which applies to all Bethesda games.:
- For xEdit, it is useful to create a mod into which all xEdit ouput can be directed in order to keep it all together:
- Click
 at the top of the left pane in MO, and select "Create empty mod".
 - Type
xEdit Output, and select [OK]. - Place this mod at the top of the mod list just below the vanilla game files, and enable it.
- Click
- Click
 at the top of the main Mod Organizer window.
 - In the left pane of the executables config, click the [+] to add a new executable, and then [Add from file...].
- Browse to the SSEEdit.exe file (e.g.
..Modding/Tools/xEdit/SSEEdit.exe).- This should auto-fill most of the fields.
- Change the title to xEdit.
- Input the following in the Arguments field separated by a single space:
- e.g.
-IKnowWhatImDoing -SSE -AllowMasterFilesEdit - "-IKnowWhatImDoing": This turns off a warning presented when users make edits.
- "-AllowMasterFilesEdit": By default xEdit will not allow master file editing. This enables that.
- e.g.
- Tick the Create files in mod instead of overwrite box. Select the xEdit Output mod from the drop-down.
- Tick the Use applications icon for desktop shortcuts box.
- Click [Apply].
- Repeat these steps to add the remaining executables as indicated in the table following.
- Arrange the tools in any order using the up and down buttons above the list. This will dictate the order that tools are listed in the MO "Run" dropdown menu. Close the window by clicking [OK].
NOTE
For tools previously installed, adjust the arguments below for use with SkyrimSE. Also note that the SKSE configuration was created automatically by MO, so simply modify that accordingly.| Application Title | Executable | Argument(s) & Special Instructions |
|---|---|---|
| BethINI Pie | Bethini.exe | no arguments |
| LOOT | LOOT.exe | --game="Skyrim Special Edition"
|
| SKSE Skyrim Launcher | skse64_loader.exe | no arguments Tick the Create files in mod instead of overwrite box and select the SKSE Output mod from the drop-down. |
| xEdit | xEdit.exe | -SSE -IKnowWhatImDoing -AllowMasterFilesEditTick the Create files in mod instead of overwrite box and select the xEdit Output mod from the drop-down. |
| xEditQuickAutoClean | xEditQuickAutoClean.exe | -SSETick the Create files in mod instead of overwrite box and select the xEdit Output mod from the drop-down. |
| xLODGen | xLODGenx64.exe | -lodgen -SSE -o:"DriveLetter:\Modding\Tools\xLODGen\xLODGen_Output"Replace DriveLetter with the drive letter containing the 'Modding' folder.
|
MO executables can be arranged in any order using the up and down buttons above the list or drag & drop. This will dictate the order they are listed in the MO "Run" dropdown menu. When complete, close the window by clicking the [OK] button.
BethINI Pie
MO2
Unlike the previous version of BethINI used in past Step guides, BethINI Pie should be run as an MO executable%LOCALAPPDATA%\<gameFolder>). See the Tools configuration table in the previous section.- The goal before mods are installed is to establish a common baseline referenced below. This will be used as a basis for #2.
- Those revisiting during Performance Tuning will want to test the [High] or [Ultra] preset under the 'Basic' configuration. Once the targeted changes are made, close BethINI, and click [Yes] at all prompts.
BethINI Pie Settings
Configure BethINI as reflected in the images below under each expandable heading. The optimal settings will be applied --and scaled sensibly according to the quality preset chosen, but circumstantial instructions are provided in case they apply to the modding environment.
Many settings are expected for Performance Tuning later in this guide, so please don't deviate from the High preset until that point.
| [ Basic ]Click to show/hide |
|---|

|
| [ General ]Click to show/hide |
Screenshots Directory, Filename, and Index can be set as desired. Screenshots are taken by pressing Prt Screen on the keyboard.

|
| [ Gameplay ]Click to show/hide |

|
| [ Interface ]Click to show/hide |

|
| [ Environment ]Click to show/hide |

|
| [ Shadows ]Click to show/hide |
If ENB or other post-processing will be used, untick Ambient Occlusion.

|
| [ Visuals ]Click to show/hide |

|
| [ View Distance ]Click to show/hide |

|
STEP 3
Sorting Plugins With LOOT
At any time during the mod installation process, LOOT should be used to sort plugins before running the game. This is necessary to ensure proper plugin priority (load order), which can have a dramatic impact on the game:
- Launch LOOT via MO from the executables launch dropdown at the top of the right pane.
- If LOOT cannot find the game directory, click File > Settings > "TESV:Skyrim Special Edition", and set Install Path to the actual path of the game folder.
- If LOOT fails to start, close LOOT, open the MO executables configuration , and modify the arguments:
--single-process --game="Skyrim Special Edition"
- Click [Sort Plugins].
- Several plugins will show warnings in yellow. This will be fixed shortly.
- Click [Apply Sorted Load Order].
- Close LOOT.
Up to this point, only the following plugins should be listed in the MO right pane in the order listed. (If not, run LOOT again):
- Skyrim.esm
- Update.esm
- Dawnguard.esm
- HearthFires.esm
- Dragonborn.esm
- Creation Club Plugins
- _ResourcePack.esl
Cleaning Vanilla Master Plugins
To resolve potential issues later, the vanilla plugin masters should be cleaned with xEdit. Step is aware of the debate regarding whether or not it's necessary to clean vanilla masters. While it may or may not matter for general references, that is not the case regarding large references. Any large reference that is deleted, "initially disabled", or overwritten triggers large reference bugs. See the relevant posts for details and further reading.
Prior to getting started, create an empty mod in MO:
- Click at the top of the left pane in MO, and select "Create empty mod".
- Type
Cleaned Vanilla Masters, and select [OK]. - This mod should appear at priority 78 in the MO left pane if all instructions were followed correctly.
Clean the Vanilla Masters
Use the following procedure for cleaning the vanilla plugins (including Creation Club masters), which involves exactly 44 'dirty' vanilla masters (including plugins from the base game, the original DLC, the base Creation Club DLC, and the Anniversary Upgrade DLC, all of which are required). Use LOOT as a reference to determine which specific vanilla plugins should undergo cleaning. Following the provided cleaning and housekeeping instructions ensures that this process only needs to be performed once, unless a master is updated by Bethesda.
- Run LOOT from the drop-down executable list in MO, sort the plugins, and apply the changes. Do not close LOOT.
- NOTE: that any dirty plugins plugins will have yellow "warning" blocks. These are the plugins that should be cleaned.
- Leaving the LOOT window open, click on the MO window and note the "Mod Organizer is locked ...." message in the center of the MO window. Click [Unlock].
- This allows the LOOT window to remain open as a reference for the plugins that should be cleaned. The vanilla plugins with 'dirty' warnings should be cleaned in order listed.
- Run xEditQuickAutoClean from the drop-down executable list in MO.
- In the xEdit plugin selection window, double-click on the first dirty plugin (e.g., Update.esm).
- Once xEdit is finished, close xEdit. A backup of the original plugin will automatically be saved to the xEdit Output mod created previously (e.g.,
Update.esm.backup.YYYY_MM_DD_HH_MM_SS). - Repeat this procedure on the remaining dirty plugins indicated by LOOT.
- When all of the vanilla plugins have been cleaned, close the LOOT window and rerun LOOT from MO to verify that no warnings appear.
Move the Cleaned Vanilla Masters
After the vanilla master files are cleaned, they should be moved into the Cleaned Vanilla Masters mod in MO, and the original files should be restored into the "Data" directory in the game folder (e.g., C:\Games\Steam\steamapps\common\Skyrim Special Edition\Data\. This makes Steam happy when "validating" files so that it remains unaware of changes.
- In MO, open the Cleaned Vanilla Masters mod in Windows Explorer (right-click Cleaned Vanilla Masters, then click Open in Explorer).
- Click the
 button above the MO mod list (left) pane, and select Open Game Folder to open the game folder in Windows Explorer.
 - Move all the cleaned master files from
..\Datainto..\Cleaned Vanilla Mastersfolder.- Tip: Set the Explorer View to Details, and sort by the Date modified column. This will sort all the recently modified files to the top of the file list. (reference image)
- Tip: Create a backup of the cleaned masters in case they are somehow lost.
- Leave the game folder open, and close the Cleaned Vanilla Masters folder
- NOTE: DO NOT enable the Cleaned Vanilla Masters mod yet. It should remain disabled for now .
Restore the Original Vanilla Masters
To restore the original masters, simply copy and rename the official, uncleaned vanilla masters now located as backups in the xEdit Output mod (recommended). The original vanilla masters can also be restored by using Verify integrity of game files in Steam.
- If the game presents the message to download CC content again, force quit the game via the console by pressing ~, typing
qqq, and pressing Enter. This will prevent the game from reacquiring the CC plugins, which was previously done in Step 1 via the System Setup Guide.
- In MO, open the xEdit Output mod in Windows Explorer (right-click xEdit Output, then click Open in Explorer).
- Tip: Set the Explorer View to Details, and sort by the Date modified column. This will sort all the recently modified files to the top of the file list beginning with ...
ccasvsse001-almsivi.esm.backup.YYYY_MM_DD_HH_MM_SSand ending with ...Update.esm.backup.YYYY_MM_DD_HH_MM_SS.
- Tip: Set the Explorer View to Details, and sort by the Date modified column. This will sort all the recently modified files to the top of the file list beginning with ...
- Copy the 44 backed up masters into the game "Data" directory.
Dawnguard.esm.backup.YYYY_MM_DD_HH_MM_SSwill have two backups. Copy the one with the earliest timestamp (the original).
- Inside the game "Data" directory, rename the files by stripping
.backup.YYYY_MM_DD_HH_MM_SSfrom the end of each file name.- Tip: To rename all of the files instantly, open a Windows Powershell session in this directory and run the following command:
Get-ChildItem *.backup.* | Rename-Item -NewName { $_.Name -replace '(.*es.).*','$1' }
- Tip: To rename all of the files instantly, open a Windows Powershell session in this directory and run the following command:
- Close all Explorer windows.
MO2
Any time Bethesda updates these master files, they will likely need to be cleaned again and replaced in MO. Any previously cleaned versions of these same files that exist in the MO mod list must be either disabled or deleted first, because xEdit will see only the cleaned versions when launched from MO.The Bethesda masters should be cleaned and essentially hidden from the game inside the disabled Cleaned Vanilla Masters mod. The mod list prioritization in the left pane should reflect as follows (ignore the plugin prioritization in the right pane for now):
- DLC: Dawnguard
- DLC: HearthFires
- DLC: Dragonborn
- ...Creation Club Mods...
- Cleaned Vanilla Masters
- xEdit Output
Verify the Original and Cleaned Vanilla Masters
- With the Cleaned Vanilla Masters mod still disabled, run LOOT via MO, and confirm that the 44 vanilla masters are still flagged by LOOT (44 warnings).
- Close LOOT and ENABLE the Cleaned Vanilla Masters mod. To verify the vanilla mods have been cleaned.
- Run LOOT again via MO, and no warnings should be apparent. If this is the case, leave the Cleaned Vanilla Masters mod enabled going forward.
STEP 4
At this point, the modding environment should be fully configured and ready for mod installation.
IMPORTANT: Please read ALL of the following carefully BEFORE requesting support on the forums!
- This guide can be installed in one of three (3) ways:
- All mods from all ModGroups (mod tables) installed. This is recommended, due to the coordination of this build in terms of lighting, weather, and ENB. These are usually the most difficult aspects of a build to get right, given vanilla Skyrim's rather wonky lighting 'incoherence'.
- All mods from all ModGroups EXCEPT for the optional ModGroup, 21-Post-Processing. Like the default recommended option, this is most useful for those that cannot afford the performance cost of running with post-processing mods like ENBSeries. For those that want to use a custom ENB setup, we obviously cannot support that, but feel free to try any ENBs that are compatible with the 18-Lighting and Weather ModGroup.
- All mods from all ModGroups EXCEPT for the optional ModGroups, 18-Lighting and Weather and 21-Post-Processing. Use this approach if a custom lighting/weather/post-processing solution will be applied, which are not supported.
Understanding the Step Patches
The Step Patches will be installed much later in the guide, but it's worth mentioning them here to emphasize the importance of sticking to the guide without deviation at least until the build is complete and confirmed to be in good working order.
A “conflict resolution” patch is a plugin that resolves conflicts between various active plugins. They allow using various mods together that would otherwise be suboptimal or even incompatible. The Step Patches are built exclusively for the Step SkyrimSE:2.3 build. They are required and dependent on specific mods as noted by indicators in the mod tables in Step 4. These patches will not resolve conflicts with any conflicting mod plugins that are not in this guide.
Step Patches
- Step Patch - Conflict Resolution (CR) - required
- Patches all conflicting plugins except for optional mods and ModGroups noted below.
- The "Step Patch - WACCF.esp" plugin is a component of the CR patch files and is maintained independently. This way, WACCF can be disabled by advanced guide followers that don't want to use it. (disabling WACCF is NOT officially supported.)
- The following patches accommodate corresponding mods that do not strictly adhere to the Step Mandate. These mods are exceptions to the Mandate, because we think they are important for enriching the game in a vanilla-friendly manner. Thus, these mods and their corresponding Step patches are optional.
- Step Patch - CACO - optional - only required if CACO is installed per guide instructions
- Step Patch - CCOR - optional - only required if CCOR is installed per guide instructions
- Step Patch - TCIY - optional - only required if TCIY is installed per guide instructions
- Step Patch - CACO+CCOR - optional leveled-list patch - recommended if both CACO and CCOR are installed per guide instructions
- Step Patch - WACCF+CACO - optional leveled-list patch - recommended if both WACCF and CACO are installed per guide instructions
- Step Patch - WACCF+CCOR - optional leveled-list patch - recommended if both WACCF and CCOR are installed per guide instructions
- Step Patch - Lighting and Weather (LW) - optional
- Only required if the LW ModGroup is installed per guide instructions
- Patches the 18-Lighting and Weather ModGroup
- Step Patch - Post-Processing (PP) - optional
- Requires the Step LW Patch
- Only required if the PP ModGroup is installed per guide instructions
- Patches the 18-Lighting and Weather AND 21-Post-Processing ModGroups for use with ENB
Mod Table Reference
Below is the legend and reference for the mod tables used in this guide.
Mod Table Legend
| Table Flags | A red vertical bar indicates that the mod is required by Step Patch - Conflict Resolution. A yellow bar indicates that the mod is required by Step Patch - Lighting and Weather. A green bar indicates that the mod is required by Step Patch - Post-Processing. A blue bar indicates the mod supports or otherwise relates to mods in the 21-Post-Processing ModGroup. | ||||
| Mod Name | Nexus mod name presented as a link to Nexus for download. | ||||
| Link to the mod's wiki page, which includes various information about the mod. | |||||
| Baseline | This notes the Step Baseline version or option of the corresponding mod that should be installed, and usually refers to options affecting performance/quality. General suggestions are located in the "Notes" column; see below. | ||||
| Instructions | Brief note specifying a recommended install option. In some cases, mods will have several options. In such cases, click [Expand] to expand the mod row to reveal detailed instructions. |
Quick Reference
| Mod Name | Baseline | Instructions | ||||
|---|---|---|---|---|---|---|
| Master to NO patches with NO ENB option |
Baseline | Notes | ||||
| Master to all patches with ENB option |
Baseline | Notes |
Mod Installation Considerations
- If no Notes or Step recommendations are provided for a particular mod, always install the Main File, any Update Files, and all Optional Files are valid.
- After installing a mod, ALWAYS enable the mod and any related plugins in MO unless otherwise instructed.
- Mods are listed in alphabetical order within each ModGroup and any deviations from this are purposeful to achieve the desired outcome.
- Mods should be arranged in MO in the order that they are listed to ensure other mods further down the list overwrite/override those occurring before them.
- Always install plugins (ESLs/ESMs/ESPs), unless otherwise noted. When there is a choice to use an ESL, always choose that UNLESS continuing a playthrough using a previously-existing savegame (ESL-flagged plugins can 'break' a save that relies on a ESP or ESM version of the same plugin!).
- Always follow LOOT's advice in regards to mod cleaning and sorting unless otherwise noted.
- Do not extract BSAs unless specifically instructed to do so.
ModGroup Separators
Mod Organizer features the ability to create separators within the mod list to group mods for easier visual reference. Step recommends using these separators for each ModGroup below:
- Click at the top of the mod list pane.
- Select [Create Separator], and give the separator a name. Step recommends using the Mod Group names (i.e., Extensions, Resources, Lighting and Weather, etc.).
- Create a new separator for each new Mod Group while working through the Guide.
- Separator colors can be customized by right-clicking on any separator and selecting Select Color.
Reference Image:

02-Extenders
- Mods that expand on the inherent functionality of a game or another mod without themselves affecting content
| Mod Name | Baseline | Instructions |
|---|
| Address Library for SKSE Plugins |
Install the All in one (Anniversary Edition) main file. |
| Crash Logger SSE AE VR - PDB support |
| Grass Cache Helper NG |
| Papyrus Tweaks NG |
Install the main file and merge the INI file for reference miscellaneous file. |
| PapyrusUtil SE |
Install PapyrusUtil AE SE - Scripting Utility Functions main file. |
| Scaleform Translation Plus Plus NG |
| SKSE64 |
Detailed Instructions available | |||||
Root Files Installation
Data Files Installation
INI File
[Display] iTintTextureResolution=2048 [General] ClearInvalidRegistrations=1 Reference Image: Scripts
Once complete, the SKSE64 mod's folder structure should be:
Launcher Configuration
Normally, MO should auto-detect that SKSE is installed upon a restart of the program, and it will auto-generate the SKSE game launcher. This should be used for launching Skyrim going forward. Below are some recommendations for further configuration of the SKSE launcher ... or, if for some reason MO fails to configure this. Please ensure the following is correct for SKSE in MO:
Reference Image: | ||||||


| SSE Display Tweaks |
Detailed Instructions available | |||||
As stated in the mod's Description, this mod will stabilize the display of rendered content for smooth gameplay without limiting frame rates, and this should be the case for almost all modern PCs running SSE.
[Render] FramerateLimit=?? UIFramerateLimit=?? [OSD] Enable=true InitiallyOn=false
For more general information, see the SSE Display Settings guide. Advanced Configuration
As with any mod with an INI configuration, Step recommends creating an 'empty' mod to contain a customizable configuration that will not be overwritten when the mod is updated. The INI file will not be generated until the game is launched, and it should appear in Overwrite. Once that is done later in the guide, revisit this mod and complete the following if it will be customized:
Example Custom Configuration Override
[Render] ; EnableVSync=false ; Uncomment to disable Vsync from this mod. Useful for those with G-SYNC/Freesync-compatible hardware ; EnableTearing=true ; Uncomment to disable Vsync/frame limits in bordered windowed mode FramerateLimit=141 ; Uncomment to set a specific in-game frame limit UIFramerateLimit=141 ; Uncomment to set a specific UI frame limit (i.e., in-game menus) ; LoadingScreenFramerateLimit=60 ; Uncomment to set a specific loading-screen frame limit [HAVOK] MinimumFramerate=50 ; Uncomment to set a specific loading-screen frame limit MaximumFramerate=141 ; Uncomment to set a havok frame limit (should be equal to FramerateLimit) OSDStatsEnabled=true ; uncomment to enable havok stats in the in-game screen display [Papyrus] DynamicUpdateBudget=true BudgetMaxFPS=141 ; Uncomment to set a papyrus budget frame limit (should be equal to FramerateLimit) OSDStatsEnabled=true ; Uncomment to enable papyrus budget stats in the in-game screen display [OSD] Enable=true ; Uncomment to enable the in-game screen display using the default toggle (Left Shift + Insert by default) InitiallyOn=false ; uncomment to enable the in-game screen display on by default | ||||||
| SSE Engine Fixes |
Detailed Instructions available | |||||
Once installed, double-click on the mod to open up the information window, and ensure the following settings in EngineFixes.toml ("Text Files" tab): [Patches] EnableAchievementsWithMods = false SaveAddedSoundCategories = false WaterflowAnimation = true WaterflowSpeed = 16.0 [Fixes] SaveScreenshots = false Leave the remainder of the settings at their defaults. | ||||||
| Unique Map Weather Framework |
Game-Launch Smoke Test
At this stage, the preliminary build should be tested to confirm that there are no issues with the modding environment or engine-level mod configurations:
- Start the game by running the SKSE launcher from Mod Organizer. The game should load to the main menu without issue.
- Open the console (~), type in coc riverwood, and press Enter/Return. The game should load at Riverwood without issue.
- Exit the game using the
qqqconsole command or the standard menu options.
If the game launched and loaded as expected, continue forward. Otherwise, all instructions were not followed, and something was missed. Revisit the installation steps above starting with the System Setup Guide in Step 1. If a careful review of the previous instructions does not resolve the issue, post on the guide support forums for help.
WARNING
Beyond this point, DO NOT launch the game again until instructed to do so.Many of the following mods are interdependent, and launching the game prematurely will most likely result in issues or failures. Please DO NOT post on the forums for support of non-issues relating to preemptive or premature test launches.
03-Resources
- Mods solely providing assets intended specifically for use by other mods without themselves affecting content
| Mod Name | Baseline | Instructions |
|---|
| MCM Helper |
Detailed Instructions available | |||||||
Install the Main File.
| ||||||||
| Sound Record Distributor |
| Spell Perk Item Distributor |
Detailed Instructions available | |||||||
| ||||||||
04-Foundation
- Baseline mods that should be overridden by other mods AND/OR that make widely-accepted programmatic changes expected by other mods
| Mod Name | Baseline | Instructions |
|---|
| Unofficial High Definition Audio Project |
Download and install all Main Files. Merge when asked. |
| Unofficial Skyrim Special Edition Patch |
| Cathedral - Plants |
| Particle Patch |
Detailed Instructions available | |||||||
| Install ONLY the Particle Patch for ENB Main file. This applies regardless of whether or not ENB or other post processing will be used.
21 Post-Processing
For "Light Shafts" option, select 'Yes' if using ENB.
Particle patch for ENB.esp | ||||||||
| DynDOLOD Resources SE 3 |
Detailed Instructions available | |||||||
| ||||||||
| DynDOLOD DLL NG |
| Far Object LOD Improvement Project SSE |
| Static Mesh Improvement Mod |
Detailed Instructions available | |||||||
| ||||||||
| Skyrim Realistic Overhaul |
Detailed Instructions available | |||||
Hide the following files/folders (instructions for hiding files/folders): Textures\architecture\whiterun\wrfieldgrass01_n.dds | ||||||
| Major Cities Mesh Overhaul |
Detailed Instructions available | |||||
| Install the Main File.
Also install the Optional File as a separate mod. Installing additional files not under Nexus' "Main Files" section as separate mods preserves their version tracking to keep pace with updates. | ||||||
| Enhanced Lights and FX |
Detailed Instructions available | |||||||
Only the meshes from this mod will be used.
EnhancedLightsandFX.esp ELFX - Exteriors.esp | ||||||||
| ELFX Fixes |
Detailed Instructions available | |||||||
ELFX Fixes.esp ELFX Fixes Ragged Flagon Fix.esp | ||||||||
| ELFX Dwemer Floor Footsteps Fix |
| ELFX - Exteriors Fixes |
Detailed Instructions available | |||||
| Choose only 'one' Main File.
ELFX - Exteriors.esp 21-Post-Processing
Those installing this ModGroup should choose the ENB version. | ||||||
| Static Mesh improvement Mod - SMIM - Quality Addon |
| Static Mesh Improvement Mod Improvement Mod |
Detailed Instructions available | |||||||
| ||||||||
| Assorted mesh fixes |
| Unofficial Material Fix |
Install the Unofficial Material Fix main file. |
| Majestic Mountains |
Detailed Instructions available | |||||||||
Main File
Optional File
Install the Optional File as a separate mod.
| ||||||||||
| Majestic Mountains Double-Sided Patch |
Install the Main File v4.02 (NOT the parallax v1.3) |
| Flickering Meshes Fix |
Detailed Instructions available | |||||||
| ||||||||
| Cathedral Landscapes |
Detailed Instructions available | |||||||
This mod deviates to small degree from the vanilla style with respect to some landscape textures. Nevertheless, the deviations are exceptional to the Step Mandate.
| ||||||||
| Mesh Patch for Various Mods |
Detailed Instructions available | |||||
Install the following Main Files, in the order listed, and merge when asked:
| ||||||
| RUSTIC CLOTHING - Special Edition |
2K |
05-Animation and Physics
- Mods that affect animations or physics
| Mod Name | Baseline | Instructions |
|---|
| D13 Faster GET UP STAND UP Animation |
Loose |
| Dual Wield Improved Animation SSE |
| Ice skating fixed for real - No more attack sliding movement |
Applies to 3rd-person play. Requires Nemesis. |
| Realistic Boat Bobbing SE |
Detailed Instructions available | |||||
| ||||||
| Run Sprint and Jump SE |
| Stronger Swimming Animation SE |
Install version 1.0 from Old Files. |
| XP32 Maximum Skeleton Special Extended |
Detailed Instructions available | |||||||
| This is a Not Safe For Work (NSFW) mod page! NOTE: Since the weapon styles features aren't used in the guide, only the meshes are needed and not the plugin. This avoids constant and relatively inefficient triggering of the associated scripts to improve game performance in some situations and reduce associated save-game bloat. If you wish to use these, leave the plugin enabled. Install the Main File:
XPMSE.esp | ||||||||
06-Models and Textures
- Mods that replace existing models or textures
| Mod Name | Baseline | Instructions |
|---|
| 3D Junipers - Trees and Berries |
| 3D Snowberries |
| 3D Snowberries HD Texture Option |
| 8K Night Skies - Stars and Galaxies |
Step recommends: Night Skies - Vanilla Blue (8K) - CP |
| AMidianBorn Book of Silence |
Detailed Instructions available | |||||||||||||
| This mod has two install options. Choose ONLY one.
Option 1 (Recommended - CCOR WILL be used)
Install ONLY the 2) aMidianBorn Book of Silence SE -- CCOR CONTENT ADDON Main File. Option 2 (CCOR will NOT be used)
The best solution is to follow the 2.1.0 SkyrimSE guide mod recommendations: Download the following files:
Step recommends: Merge all files into single mod listing named aMidianBorn Book of Silence SE The instructions below are for the most vanilla-like replacements.
aMidianborn_Skyforge_Weapons.esp
textures/clothes | ||||||||||||||
| AMidianBorn Content Addon |
Detailed Instructions available | |||||||
| ||||||||
| AMidianBorn imperial light and studded |
2K | This is a SkyrimLE mod, and the MO warning indicator in the left pane can be ignored. |
| AMidianBorn stormcloak officer armour |
2K | This is a SkyrimLE mod, and the MO warning indicator in the left pane can be ignored. |
| Arctic - Frost Effects Redux |
Lite | Detailed Instructions available | ||||||
| ||||||||
| Armor and Clothing Extension |
2K | Detailed Instructions available | ||||
| NOTE: This mod extends WACCF, which is itself a hard requirement for the Step SkyrimSE build.
Install the Main File. Also install the Armor and Clothing Extension - Spell Perk Item Distributor (SPID) Patch Optional File as a separate mod. Installing additional files not under Nexus' "Main Files" section as separate mods preserves their version tracking to keep pace with updates. | ||||||
| Armor Mesh Fixes SE |
Detailed Instructions available | |||||
Installing additional files not under Nexus' "Main Files" section as separate mods preserves their version tracking to keep pace with updates. | ||||||
| Barenziahs Glory SE |
1k | Detailed Instructions available | ||||||
| ||||||||
| Bellyaches Animal and Creature Pack Revamp |
Detailed Instructions available | |||||||
| ||||||||
| Better Dynamic Ash SE |
| Better Dynamic Snow SE |
Detailed Instructions available | |||||||
Install the Main File.
| ||||||||
| Better Falmer Cave Ceiling Glow |
STEP Recommends: BetterFalmerCaveCeilingGlow_Cyan |
| Blackreach Tentacle Mesh Fix |
| Blue Palace Dome Windows |
Detailed Instructions available | |||||
| Install the Main File.
Also install the Optional File as a separate mod. Installing additional files not under Nexus' "Main Files" section as separate mods preserves their version tracking to keep pace with updates. | ||||||
| Book Covers Skyrim |
STEP Recommends: Book Covers Skyrim SE - Desaturated |
| Book Covers Skyrim - Lost Library |
STEP Recommends: Book Covers Skyrim SE - Lost Library - Desaturated |
| Creation Club Open Helmets |
Detailed Instructions available | |||||||
| ||||||||
| Dark Brotherhood Tenets Restored |
1K | This is a SkyrimLE mod, and the MO warning indicator in the left pane can be ignored. |
| Deadly Spell Impacts |
Detailed Instructions available | |||||||
| ||||||||
| Deathbell HD |
1K |
| Ruins Clutter Improved |
Detailed Instructions available | |||||
| ||||||
| Detailed Rugs |
| Detailing the Eldrich - Higher-Res Riekling Architecture |
| Dragon Masks Retextured SE |
2K |
| DRAGON PRIEST |
2K | Detailed Instructions available | ||||||
| ||||||||
| Frankly HD Dragonbone and Dragonscale |
2K | Detailed Instructions available | ||||
| Install the Main File, and merge the Update File. Merging should be fine for this one, since it will almost certainly never be updated again. | ||||||
| LeanWolfs Better-Shaped Weapons SE |
Detailed Instructions available | |||||||
| Install the LeanWolfs Better-Shaped Weapons Installer v2.1.03 SE main file. NOTE: If selecting Greatsword Sheaths on page 2A, also install the LWs BSW Orcish Greatsword inventory fix - sheath Update File. 21-Post-Processing
Choose Dawnbreaker for ENB option if ENB will be used.
| ||||||||
| Dragonbone Mastery |
2k/1k | Detailed Instructions available | ||||||
| Step recommends: Dragonbone Mastery - WITHOUT Engravings This recommendation is for the vanilla experience. Users can install whichever version they desire and adjust the instructions below to suit their preferences.
NOTE: The archive is missing is an empty "99 None" folder so click Install Anyway when prompted. | ||||||||
| DRAUGR |
2K |
| DROPS |
512 | Detailed Instructions available | ||||
| Step recommends: Version 3
Hide the following files/folders (instructions for hiding files/folders): meshes\effects\fxdrips01.nif meshes\effects\fxdrips01_more.nif meshes\effects\fxdrips01_more_wider.nif meshes\effects\fxdrips01tall.nif | ||||||
| EASIER LOCKPICKING |
This is a SkyrimLE mod, and the MO warning indicator in the left pane can be ignored. |
| Elemental Staffs SE |
2K | Detailed Instructions available | ||||
| Install the Main File, and merge the Elemental Staffs SE Basic Optional File, since it will almost certainly never be updated. | ||||||
| ElSopa HD - Ants SE |
1K |
| ElSopa HD - Briar Heart |
1K | Step recommends: ElSopa HD - Briarheart Red 1k |
| ElSopa HD - Dirt Blast SE |
2K | Step recommends: 2K ElSopa HD - Dirt Blast |
| ElSopa - HD Keys Redone SE |
512 |
| Embers XD |
Optimized | Detailed Instructions available | ||||||
Install Embers XD 2K main file.
| ||||||||
| Enhanced Blood Textures SE |
Detailed Instructions available | |||||
| ||||||
| Enhanced Vanilla Textures Shrines |
| Enhanced Vanilla Trees SE |
Detailed Instructions available | |||||||
| Install one Main File of choice.
Enhanced Vanilla Trees SE-Basic is the most vanilla-like experience, but all are vanilla 'friendly'. The images on the Step SE Nexus page show the Lush Trees version.
| ||||||||
| Aspens Ablaze |
Detailed Instructions available | |||||||
Install the Main File. The selections below are the most vanilla-like options, however, users can select options according to preferences:
| ||||||||
| Aspens Ablaze Add-On - DynDOLOD 3 |
Detailed Instructions available | |||||||
If the instructions from Aspen Ablaze were followed as recommended, then install using the instructions below. Otherwise, install the version that matches the version and options selected when installing Aspen Ablaze.
| ||||||||
| ETHEREAL CLOUDS - Special Edition |
1K |
| FALMER |
2K |
| Fixed Mesh Lighting |
Detailed Instructions available | |||||||
| ||||||||
| Cathedral - 3D Lavender |
Install the Cathedral - 3D Lavender - Vanilla Size main file. |
| Footprints |
Detailed Instructions available | |||||
| Install the Main File.
21-Post-processing
Those installing this ModGroup should also install the Footprints - ENB Optional File as a separate mod. Installing additional files not under Nexus' "Main Files" section as separate mods preserves their version tracking to keep pace with updates. | ||||||
| Frankly HD Thieves Guild Armors |
2K | Detailed Instructions available | ||||||
| ||||||||
| Gemling Queen Jewelry SE |
1K | Detailed Instructions available | ||||||
GQJ_DG_vampireamuletfix.esp | ||||||||
| GIANT |
2K |
| Glacier LOD Meshes |
Install ONLY the Glacier LOD Meshes Main File. |
| HAGRAVEN |
2K |
| Hardy Hares |
| HD Dark brotherhood door |
Step recommends: No glowing eyes version. This is a SkyrimLE mod, so ignore any MO warnings. |
| HD Executioners Block SE |
Step recommends: Darker Dried Blood version |
| HD Misc |
This is a SkyrimLE mod, and the MO warning indicator in the left pane can be ignored. |
| HD Pondfish |
| HD Reworked Horses |
2K-1K |
| HD Road Signs |
2K | Install one Main File, and merge both Optional Files. |
| HD Stone Quarry and Clay Deposit |
2K | Detailed Instructions available | ||||
| ||||||
| High-Res Dartwing Texture |
| High Hrothgar Fixed |
Install the High Hrothgar Fixed main file. |
| High Quality Food and Ingredients SE |
Detailed Instructions available | |||||||
| ||||||||
| Highland Cows More Wooly - Cut Content Restoration |
| HORNCANDLES |
2K-1K |
| Hybrids HD Plants and Herbs Retexture |
Detailed Instructions available | |||||
| Hide the following files (instructions for hiding files/folders):
Textures/Plants/FloraNirnroot01.dds Textures/Plants/MountainFloweringPurple.dds Textures/Plants/MountainFloweringPurple_n.dds Textures/Plants/Snowberry01.dds Textures/Plants/SnowberrySnow01.dds Textures/Plants/TundraCotton01.dds | ||||||
| Iconics Real Hay |
2K Alt |
| Iconic's Remastered Paragon Gems |
Detailed Instructions available | |||||||
meshes\dlc01\clutter\animated\portalgem01\portalgemstand01.nif | ||||||||
| Immersive Dragons |
| Immersive Smilodons |
| Improved closefaced helmets |
| Improved Sparks |
Detailed Instructions available | |||||
| Step recommends: Grindstones - Vanilla Sparks and Impact Effects - Vanilla Sparks.
Install as a separate mods to preserve their version tracking to keep pace with updates. Consider renaming the files to match the mod name. | ||||||
| Improved Weapon Impact EFFECTS Correct Metal SE |
| Just Ice |
2K |
| LeanWolfs Improved Enchanter Candle Meshes SE |
| MAMMOTH |
2K |
| Markarth - A Reflective Experience |
| Masque of Clavicus Vile for Beast Race SE |
Install the Main File and merge Masque_of_Argonian_and_Khajiit-ESL Optional File. |
| Metallurgy - Ingots and Ore HD |
1K | Step recommends: Metallurgy - Ingots Ore and Veins HD 1K (LOOSE) main file. |
| Nightingale Prime HD |
Leather | This is a SkyrimLE mod, and the MO warning indicator in the left pane can be ignored. |
| Northfires Skidmarks SE 2K-4K |
2K | Install the Main File of choice, and also install the Optional File. |
| N-R HD Display Case |
Clear Glass |
| Obsidian Mountain Fogs Tweaked |
Install either the the Reduced 10% or Reduced 20% Main File. |
| Pilgrims Delight |
| Quality CubeMaps - HD Cube Maps |
Detailed Instructions available | |||||
| Download the main file. Hide the following files/folders (instructions for hiding files/folders):
textures/armor/ebonymail/f/chitin_e_ebony.dds textures/armor/ebonymail/m/chitin_e_ebony.dds textures/cubemaps/chitin_e_ebony.dds textures/cubemaps/ore_obsidian_e.dds | ||||||
| Rallys Hanging Moss |
Desaturated |
| Rallys Hooks and Saws |
Detailed Instructions available | |||||||
Only Install the Rallys Hooks and Saws file.
| ||||||||
| Rallys Instruments |
Detailed Instructions available | |||||||
Install the Main File.
| ||||||||
| Real Wood Textures - Farmhouses |
Detailed Instructions available | |||||
| This is a SkyrimLE mod, and the MO warning indicator in the left pane can be ignored.
Hide the following files/folders (instructions for hiding files/folders): textures/architecture/farmhouse/StoneWall01.dds textures/architecture/farmhouse/StoneWall01_n.dds | ||||||
| Realistic HD Baskets Remastered |
| Realistic HD Pickaxe Remastered |
| Realistic HD Woodcutters Axe Remastered |
| Realistic Water Two SE |
Detailed Instructions available | |||||||
| ||||||||
| Remove Small Rocks |
Install the Remove Small Rocks v1.1 - High Compatibility main file. |
| Retexture for Bread - Hearthfire |
| Retexture for Soup |
Detailed Instructions available | |||||
| This is a SkyrimLE mod, and the MO warning indicator in the left pane can be ignored.
Install SMIM Mesh - Poor Version. | ||||||
| Retexture for The Scroll SE |
Detailed Instructions available | |||||||
Install the Main File. The following options are suggested:
| ||||||||
| RUSTIC AMULETS - Special Edition |
| RUSTIC ANIMATED POTIONS and POISONS |
1K | Detailed Instructions available | ||||
| Install a Main File.
Also install SSE Meshes Update File, merging when asked. Merging is fine, since all files use the global version, and it simplifies the following procedure. Hide the following files/folders (instructions for hiding files/folders):
| ||||||
| RUSTIC ARMOR and WEAPONS SE |
2K |
| RUSTIC AZURAS STAR - Special Edition |
2K |
| RUSTIC COOKING - Special Edition |
1K | Detailed Instructions available | ||||
| Hide the following file (instructions for hiding files/folders):
meshes/_byoh/furniture/ovenmarker.nif | ||||||
| RUSTIC DAEDRA - Special Edition |
2K | Step recommends: RUSTIC DAEDRA SSE - VANILLA - 2K optional file. |
| RUSTIC DEATH HOUND and GARGOYLE - Special Edition |
2K | Step recommends: RUSTIC DEATH HOUND AND GARGOYLE SSE - DARK - 2K main file. |
| RUSTIC DRAGON CORPSE - Special Edition |
2K |
| RUSTIC DRAGONS - Special Edition |
Reduced | Step recommends: RUSTIC DRAGONS SE - Reduced main file. |
| RUSTIC ELDERSCROLL - Special Edition |
2K |
| RUSTIC FROSTBITE SPIDER - Special Edition |
2K |
| RUSTIC RELIEFS |
Detailed Instructions available | |||||
| Hide the following files/folders (instructions for hiding files/folders):
textures/architecture/windhelm/500wall.dds textures/architecture/windhelm/500wall_n.dds textures/clutter/birthsign*.dds (disable all of these, 39 files) textures/dungeons/nordic (entire folder) textures/dungeons/mossdirtpile01.dds textures/dungeons/mossdirtpile01_n.dds textures/dungeons/ridgedstone*.dds (disable all of these, 6 files) textures/dungeons/scrollworktrim01.dds textures/dungeons/scrollworktrim01_n.dds | ||||||
| RUSTIC SOULGEMS - Special Edition |
1K | Detailed Instructions available | ||||||
Install the RUSTIC SOULGEMS - Special Edition - FOMOD - English Only main file.
| ||||||||
| RUSTIC SPRIGGAN - Special Edition |
2K | Install one Main File of choice, and merge the Optional File, since versioning is consistent. |
| RUSTIC WINDOWS - Special Edition |
2K |
| SABRECAT |
2K | Detailed Instructions available | ||||||
| ||||||||
| Security Overhaul SKSE - Lock Variations |
2K | Detailed Instructions available | ||||||
| ||||||||
| Security Overhaul SKSE - Add-ons |
2K | Detailed Instructions available | ||||||
| ||||||||
| Security Overhaul SKSE - Gems Patch - The Cause Chests Secured |
2K | Detailed Instructions available | ||||||
| ||||||||
| Security Overhaul SKSE - Regional Locks |
2K | Detailed Instructions available | ||||||
| ||||||||
| Security Overhaul SKSE - Some More Locks |
Detailed Instructions available | |||||||
| ||||||||
| Soul-Cairn Objects Secured |
| SKELETON |
2K | Detailed Instructions available | ||||||
| ||||||||
| Skygazer Moons SSE |
No Glow |
| Skyrim - A Mountainous Experience |
Detailed Instructions available | |||||
| Hide the following files/folders (instructions for hiding files/folders):
meshes\architecture\solitude\smuseleum.nif meshes\Landscape\unique\markarthcliff02.nif meshes\Landscape\unique\markarthcliff03.nif meshes\Landscape\unique\markarthcliff04.nif | ||||||
| Skyrim Objects SMIMed - Glazed and Nordic Pottery |
| Majestic Mountains - More Accurate Collision |
Detailed Instructions available | |||||
| Install the Main File.
Also install as a separate mod the Majestic Mountains - More Accurate Collision - AME Patch from Optional Files. Installing additional files not under Nexus' "Main Files" section as separate mods preserves their version tracking to keep pace with updates. | ||||||
| Skyrim Redesigned WIP |
Detailed Instructions available | |||||||
| This is a SkyrimLE mod, and the MO warning indicator in the left pane can be ignored.
| ||||||||
| Skyrim SE Improved Puddles |
Detailed Instructions available | |||||||
| Choose one of the following:
21-Post-Processing will NOT be used
Install the Skyrim SE Improved Puddles FOMOD for Non-ENB users Miscellaneous Files. 21-Post-Processing
Install the Skyrim SE Improved Puddles FOMOD vXX for ENB users Main File. With either option, the FOMOD is the same:
| ||||||||
| Skyrim SE Skill Interface Re-Texture |
Detailed Instructions available | |||||||
The instructions below are for the most vanilla-like experience. Users may customize their installations to their preference.
| ||||||||
| Smooth Sky Mesh - SSE |
Only install this mod if 18-Lighting and Weather ModGroup will NOT be installed! |
| SSE - Skyrim Sun Enhanced |
Install the SSE - No lens flare main file. |
| Stalhrim Source |
2K |
| Superior Chaurus - 4k Retexture |
2K | Detailed Instructions available | ||||||
Install the Main File.
| ||||||||
| Superior Mudcrab - 4k Retexture |
2K/1K | Detailed Instructions available | ||||||
Install the Main File:
| ||||||||
| Sweet Mother |
Step recommends: Sweet Mother HD. This is a SkyrimLE mod, and the MO warning can be ignored. |
| The Elder Scrolls V Rewritten - Arvak SE |
Detailed Instructions available | |||||||
Install the Main File.
| ||||||||
| TMD Jars of Skyrim |
| TROLL |
2K | Detailed Instructions available | ||||||
| ||||||||
| Vivid Landscapes - Tundra Moss Revised |
1K Yellow | Detailed Instructions available | ||||
| This is a SkyrimLE mod, and the MO warning indicator in the left pane can be ignored.
STEP Recommends:
To install the Optional File:
| ||||||
| WEBS S.E. |
2K |
| White Phial Replacer SE |
Install White Phial Replacer SE main file. Step recommends: White Phial Replacer 0.5x size optional file. |
| Whiterun Mesh Fixes |
| Whiterun Skyforge - Reforged |
Detailed Instructions available | |||||
| Install the Whiterun Skyforge - Reforged - No ENB Lights or Glow main file.
21-Post-Processing
Consider installing the 'Whiterun Skyforge - Reforged main file, which adds glowing eyes and ENBSeries Complex Particle Lights. | ||||||
| Whiterun Trellis Redesigned SE |
2K |
| WISPMOTHER |
2K-1K | Detailed Instructions available | ||||||
| ||||||||
07-Sounds and Music
- Mods that affect sounds or music
| Mod Name | Baseline | Instructions |
|---|
| Acoustic Space Improvement Fixes |
Detailed Instructions available | |||||||
| ||||||||
| Audio Overhaul - Immersive Sounds Integration |
| Immersive Sounds - Compendium |
Detailed Instructions available | |||||||
| ||||||||
| Audio Overhaul for Skyrim SE |
Detailed Instructions available | |||||||
Install the Main File.
| ||||||||
| Better Animal Footsteps |
Detailed Instructions available | |||||||
This is a SkyrimLE mod, and the MO warning indicator in the left pane can be ignored.
| ||||||||
| Better Horse Pain Sounds |
This is a SkyrimLE mod, and the MO warning indicator in the left pane can be ignored. |
| Dragons Shout with Voice |
Detailed Instructions available | |||||
| This is a SkyrimLE mod, and the MO warning indicator in the left pane can be ignored.
Install the Dragons Shout with Voice - LOOSE main file. | ||||||
| Guard Dialogue Overhaul - UHDAP Patch |
| Heart of the Beast |
Detailed Instructions available | |||||
| This is a SkyrimLE mod, and the MO warning indicator in the left pane can be ignored.
Step recommends: Feral Werewolf sounds - HIGH AGGRESSION | ||||||
| IHSS - Improved Horse Step Sounds |
| Lower Sounding Thieves Guild Door |
This is a SkyrimLE mod, and the MO warning indicator in the left pane can be ignored. |
| Realistic wolf howls |
Detailed Instructions available | |||||
| This is a SkyrimLE mod, and the MO warning indicator in the left pane can be ignored.
Step recommends: Realistic Wolf Howls more barks than howls | ||||||
| Regional Sounds Expansion |
| Reverb Interior Sounds Expansion |
Detailed Instructions available | |||||||
| ||||||||
| Sound Hammering Sounds |
| Thundering Shouts |
Detailed Instructions available | |||||
| Step Recommends: Thundering Shouts main file. | ||||||
| Ultra Realistic Bow Shoot Sounds |
This is a SkyrimLE mod, and the MO warning indicator in the left pane can be ignored. |
| Ultra Realistic Crossbow Shoot Sounds |
This is a SkyrimLE mod, and the MO warning indicator in the left pane can be ignored. |
08-Character Appearance
- Mods that affect the appearance of the player character or NPCs
| Mod Name | Baseline | Instructions |
|---|
| Beards |
1K | Detailed Instructions available | ||||||
| ||||||||
| Brows |
512 | Detailed Instructions available | ||||||
| ||||||||
| Consistent Older People |
Step recommends: Consistent Older People XX Loose optional file |
| Female Vampires Have Fangs |
| Lore Corrected Races |
| More Realistic Hair |
This is a SkyrimLE mod, and the MO warning indicator in the left pane can be ignored. |
| Natural Eyes SSE |
Low Res | Detailed Instructions available | ||||
| The SSE version of this mod was hidden, so the LE version is linked instead. There is no difference, since these are only textures. | ||||||
| Northborn Scars |
| Simple Children |
Detailed Instructions available | |||||||
| Install the Main File using the instructions below. Merge the Update File, selecting the textures of choice.
NOTE: This mod relies on meshes from TK Children, which will be installed later.
This mod's plugin should be cleaned, as it contains an old USSEP forward that will result in the game freezing otherwise.
Reference: | ||||||||

| Superior Lore-Friendly Hair |
1K | Detailed Instructions available | ||||
| This is a SkyrimLE mod, and the MO warning indicator in the left pane can be ignored.
Step recommends: SLF Hair - Rough Hair - Lite 1K | ||||||
| Vanilla Body with UNP Textures |
| Tempered Skins for Females - UNP |
Detailed Instructions available | |||||||
| This is a Not Safe For Work (NSFW) mod page and installer! The instructions below are for the most vanilla-like options. Users are free to customize the options to according to their preferences.
| ||||||||
| Tempered Skins for Males |
Detailed Instructions available | |||||||
| This is a Not Safe For Work (NSFW) mod page and installer! Step recommends: Tempered Skins for Males - Dressed Version Main File. The instructions below are for the most vanilla-like options (A1 - Vanilla Underwear).
textures/actors/character/male/maleunderwear.dds textures/actors/character/male/maleunderwear_n.dds textures/armor/briarheart/briarheart.dds textures/armor/briarheart/briarheart_n.dds | ||||||||
| TK Children SE |
Detailed Instructions available | |||||
| Install the Main File. When installing the FOMOD, use the default options, since all but the TRI meshes will be disabled as indicated below.
Disable the following plugins (instructions for disabling plugins): TKChildren.esm TKChildren.esp Hide the following folders (instructions for hiding files/folders): Textures Meshes/Actors/character/facegendata Meshes/Actors/character/TKChildren | ||||||
| Vanilla Makeup HD |
2K | Step recommends: VMHD - All Races - 2K main file. Merge Update File matching the quality chosen for the Main File. |
| Vanilla Warpaints Absolution |
2K | Detailed Instructions available | ||||||
| ||||||||
09-Fixes
- Mods have a programmatic component that fixes various bugs and/or inconsistencies
| Mod Name | Baseline | Instructions |
|---|
| Battle-Ready Candlelight Fixes |
| Bug Fixes SSE |
Install the second main file "compatible with game version 1.6.629.0 and later on Steam." |
| Butterflies Land True |
Step recommends: Butterflies Land True - ESPFE Alternate Version optional file |
| Critters Aint Snitches |
| Don't Push Me Around |
| Eye Normal Map Fix SSE |
Step recommends: Eye Normal Map Fix SSE BC7 optional file |
| Fires and Embers Clipping Fix |
Detailed Instructions available | |||||||
For now, merge the Relighting Skyrim Patch from Optional Files. This will eventually be included in the Step CR Patch. Select the ESL flagged - Normal version. | ||||||||
| Fix Note Icon for SkyUI (SKSE64 plugin) |
Install the FixNotesForSkyUI Skyrim AE main file. |
| Fuz Ro D-oh - Silent Voice |
Detailed Instructions available | |||||
| Install the Main File. Merge the Optional File.
As with any mod with an INI configuration, Step recommends creating an 'empty' mod to contain a customizable configuration (INI or similar file) that will not be overwritten when the mod is updated. The INI file will not be generated until the game is launched, and it should appear in Overwrite. Rather than moving the content into the original mod, create a custom mod to contain only the INI configuration file:
| ||||||

| Hearthfires Houses Building Fix |
| Hunters Not Bandits |
| I'm walkin' here NG |
| Invisibility and Eyes Mesh Fix |
Detailed Instructions available | |||||||
Install the Invisibility and Eyes Mesh Fix Main File.
| ||||||||
| Labyrinthian Shalidor's Maze Fixes |
| Navigator - Navmesh Fixes |
Detailed Instructions available | |||||||
| ||||||||
| NPC AI Process Position Fix - NG |
Detailed Instructions available | |||||||
| ||||||||
| Powerofthrees Tweaks |
Detailed Instructions available | |||||
| Install the powerofthree's Tweaks main file, choosing "SSE v1.6.629+ (*Anniversary Edition*)" in the FOMOD.
As with any mod with an INI configuration, Step recommends creating an 'empty' mod to contain a customizable configuration that will not be overwritten when the mod is updated. The INI file will not be generated until the game is launched, and it should appear in Overwrite. Once that is done later in the guide, revisit this mod and complete the following if it will be customized:
| ||||||
| Raven Rock - Fix Exit on Horseback |
| SB - Fixed Windhelm Entrance |
| Scrambled Bugs |
Detailed Instructions available | |||||
In ScrambledBugs.json, Step recommends the following change to the 'patches' section: "equipBestAmmunition": true All 'fixes' are applied by default, but most 'patches' are disabled by default. Any other changes are optional, so read the mod page description carefully to fully understand the effects of each setting. NOTE: "Reequipping the Quiver/Bolt" set to 1 in Unequip Quiver SE MCM negates 21-Post-processing
In ScrambledBugs.json, make the following change to the 'patches' section: "attachHitEffectArt": true This is required by Elytra and Bliss Bug ENB Light installed later in the guide. | ||||||
| Shadows Of Sunlight - In Small Exterior World Spaces |
| Skyrim Project Optimization SE |
Install the Skyrim SE - Project Optimization - ESL VERSION. |
| Soft Shadows |
| SPID for Footprints |
| Unlimited Bookshelves |
| Unnecessarily Fixed Fixed Dragon Stalking Fix |
| Waterbreathing Breathless Emerge SSE |
Install Waterbreathing Breathless Emerge USSEP optional file. |
10-Gameplay-General
- Mods that affect general or multiple gameplay mechanics
| Mod Name | Baseline | Instructions |
|---|
| Complete Alchemy and Cooking Overhaul |
Detailed Instructions available | |||||||
This mod makes large changes the alchemy and cooking systems!
Since this mod's changes are widespread and considered overly invasive by some, its installation has been made optional, and a separate Step Patch is provided later in the guide to support this. Installation
Install the Main File with the following options:
| ||||||||
| Complete Crafting Overhaul Remastered |
Detailed Instructions available | |||||
| NOTE: This mod (CCOR) deviates significantly from vanilla in that it overhauls armor, item, and weapon stats. As such, CCOR is optional and is supported by the Step Patches either way.
Nevertheless, Step recommends CCOR as an acceptable deviation from the Mandate and considers CCOR to be equal parts 'fix' and 'enhancement'. | ||||||
| GIST - Genuinely Intelligent Soul Trap SE |
Install the Main File only. |
| Weapons Armor Clothing and Clutter Fixes |
2K-1K | Detailed Instructions available | ||||||
| NOTE: If Greatsword Sheathes option was chosen for LeanWolfs Better-Shaped Weapons SE, select the Leanwolf's BetterShaped Weapons with Greatsword Scabbard option under Patches > "Orcish Weapons" in the FOMOF following. Otherwise, select the Leanwolf's BetterShaped Weapons option.
Installation
Install the Main File.
| ||||||||
11-Gameplay-AI and Combat
- Mods that affect AI, stats, or combat mechanics of NPCs
| Mod Name | Baseline | Instructions |
|---|
| AI Overhaul SSE |
Detailed Instructions available | |||||||
| ||||||||
| Better Stealth AI for Followers |
| Follower Trap Safety |
| Ghosts Mechanics and Shaders Restored |
| Realistic AI Detection SE |
Detailed Instructions available | |||||
| Install the main file, Realistic AI Detection 3 - Medium Interior Medium Exterior. This is recommended for more realistic gameplay with Ambiance.
The Step Patches include changes equivalent to the 'Lite' version for exteriors, so this mod balances well with Cathedral Weathers | ||||||
| Run For Your Lives |
| Simple Offence Suppression |
Install the Simple Offence Suppression AE main file. |
| Spellbreaker Spell Reflection and Ward Visuals Restored |
Step Recommends: EVE - Spellbreaker Spell Reflection and Ward Visuals Restored main file |
| Tavern AI fix |
| Unequip Quiver SE |
Detailed Instructions available | |||||||
| ||||||||
12-Gameplay-Economy
- Mods that affect currency, rewards, values, rates, or any other economy-related mechanics
| Mod Name | Baseline | Instructions |
|---|
| Trade and Barter |
13-Gameplay-Immersion
- Mods that help to improve game immersion and role-playing scenarios
| Mod Name | Baseline | Instructions |
|---|
| Dragons Shout with Voice Update - SSE |
| Butterflies Unchained |
Detailed Instructions available | |||||
| Install the Butterflies Unchained (ESL Version) main file. If CACO will be used, also install the Butterflies Unchained (ESL Version) - Complete Alchemy and Cooking Overhaul Patch from Optional Files. | ||||||
| Disease Descriptions for the Immersive Adventurer SE |
Detailed Instructions available | |||||||
| ||||||||
| Get Snowy |
Detailed Instructions available | |||||
| Install the Main File.
Disable the following plugins (instructions for disabling plugins): getSnowy_ObsidianWeathers_Patch.esp getSnowy_WnC-Ashes Patch.esp 21-Post-Processing
Ignore the Main File, and install the Optional File instead. Disable the plugins as instructed above. | ||||||
| Go On Ahead |
| Guard Dialogue Overhaul SE |
| Immersive Equipment Displays |
Install Immersive Equipment Displays for 1.6.629 and newer from Main Files. |
| Improved Traps |
Detailed Instructions available | |||||
| Install the Improved Traps main file. Merge the Improved Traps - Follower Safety Patch miscellaneous file. Do not install Mining Makes Noise file! | ||||||
| No Lockpick Activate (SKSE) - Updated |
| Point The Way |
| Reasonable Movement Speed |
| Relationship Dialogue Overhaul Lite |
| Simple Drop Lit Torches SE |
| Simple Dual Sheath |
Install Simple Dual Sheath for 1.6.629 and newer from Main Files. |
| Simplest Horses |
14-Gameplay-Quests
- Mods that alter aspects of quests and/or related lore
| Mod Name | Baseline | Instructions |
|---|
| Alternate Start - Live Another Life - SSE |
The latest version is on AFK Mods. Nexus page does not receive updates. |
| At Your Own Pace |
Detailed Instructions available | |||||
Install and merge the following Main Files:
| ||||||
| Even Better Quest Objectives SE |
Detailed Instructions available | |||||||
Install the Main File.
| ||||||||
| Gildergreen Regrown |
| Here We Go Again - World Interactions |
Detailed Instructions available | |||||||
| ||||||||
| Not So Fast - Main Quest |
| Savos Aren's Regrets Restored |
| The Choice is Yours |
Detailed Instructions available | |||||
| This mod causes some vanilla quests to not start pending player interaction or until specific conditions are met. Since these changes can cause downstream compatibility issues, the Step Patches support its installation as optional. Installation
Install the main file. | ||||||
| The Paarthurnax Dilemma |
The latest version is on AFK Mods. Nexus page does not receive updates. |
| Thieves Guild Requirements SE |
Install the Main File. A new game is required, if upgrading from v4 to v5 |
| Timing is Everything SE |
15-Gameplay-Skills and Perks
- Mods that affect the player character's or NPC skills and perks or related leveling
| Mod Name | Baseline | Instructions |
|---|
| Enemy REvolution of Skyrim |
Detailed Instructions available | |||||||
| ||||||||
| FIZZLE |
This is a 'realism' mod that departs slightly from vanilla. Spells will FAIL if PC/NPC is not skilled enough. |
| Lock Overhaul |
Install the Lock Overhaul main file. |
| Odin - Skyrim Magic Overhaul |
| ODIN spells for NPCS |
Install the ODIN Spells For Spell Casters main file. |
| Skyrim Skill Uncapper AE |
Detailed Instructions available | |||||
As with any mod with an INI configuration, Step recommends creating an 'empty' mod to contain a customizable configuration that will not be overwritten when the mod is updated:
| ||||||
| Smart NPC Potions - Enemies Use Potions and Poisons |
| Vokrii - Minimalistic Perks of Skyrim |
Detailed Instructions available | |||||
| Install the Main File.
Also install as a separate mod the Odin - Vokrii Compatibility Patch from Optional Files. Installing additional files not under Nexus' "Main Files" section as separate mods preserves their version tracking to keep pace with updates. | ||||||
| Vokrii Perks For NPCS |
Install the Vokrii Perks For NPCS 50 main file. |
16-Interface
- Mods that affect any aspect of the user interface
| Mod Name | Baseline | Instructions |
|---|
| A Clear Map of Skyrim and Other Worlds |
Detailed Instructions available | |||||||
Also download the ACMOS Road Generator Tool - PART 2 and extract it to the Tools folder (e.g. | ||||||||
| Atlas Map Markers SE - Updated with MCM |
| Better Container Controls for SkyUI |
Install the BCC-SkyUI-ESL-v31 optional file. |
| Better Dialogue Controls |
| Better MessageBox Controls |
| CoMAP - Common Marker Addon Project |
Detailed Instructions available | |||||||
| This mod has several "Undiscovered Marker" options, and all are valid. For more immersive/mysterious gameplay,
Step recommends: Obscured Undiscovered HUD Markers (Diamond or Question Mark) and either of the Author's Cut Options The most enhanced, vanilla-friendly options are as follows:
Configuration
As with any mod with an INI configuration, Step recommends creating an 'empty' mod to contain a customizable configuration that will not be overwritten when the mod is updated. The INI file will not be generated until the game is launched, and it should appear in Overwrite. Once that is done later in the guide, revisit this mod and complete the following if it will be customized:
Make the following changes to the custom configuration file:
[Map] bObscuredUndiscovered=0 ; Set to '1' if a Obscured Undiscovered Option other than "None" was chosen fMarkerScale=0.75 [HUD] bObscuredUndiscovered=0 ; Set to '1' if a Obscured Undiscovered Option other than "None" was chosen | ||||||||
| Convenient Reading UI - SE |
Detailed Instructions available | |||||
| Install the Main File. Merge the Font Overhaul Compatibility Patch optional file. Configure INI
Step recommends using the default for the INI with a change to the 'Steal' font color if the book is not owned or free for the taking, but all INI settings should be adjusted according to user preference.
sBookStealTextColor=0xFF0000 | ||||||
| HD Local Map |
| Horse Stamina HUD - Script-Free |
Install Horse Stamina HUD SE main file for 1.6.x. |
| Immersive HUD - iHUD Special Edition |
| Informed Mail Delivery |
Detailed Instructions available | |||||||
Choose only the Informed Mail Delivery - Vanilla Style Main File.
| ||||||||
| Lore-Based Loading Screens |
| More Informative Console |
Install the More Informative Console 1.x.x AE (1.6.640 plus) main file. |
| MoreHUD Inventory Edition |
Install moreHUD Inventory Edition Loose Version - AE main file. |
| MoreHUD SE |
Install the moreHUD SE Light Master - AE master file. |
| Oxygen Meter 2 |
Detailed Instructions available | |||||||
| ||||||||
| RaceMenu |
| Show Player In Menu |
| Skyrim Character Sheet |
Detailed Instructions available | |||||
| Install the Main File.
Double-click on the mod, and click the Text Files tab. Modify "SkyrimCharacterSheet_Input.json" by setting "inventory_auto_show_inventory" to "false." Then save the file. This will prevent the character sheet from auto-displaying on the inventory screen, obscuring the view in the right pane. To toggle the character sheet, press '0'. "inventory_auto_show_inventory": false, | ||||||
| SkyUI |
Detailed Instructions available | |||||
| Install the Main File.
As a temporary measure to fix an issue introduced with game runtime update 1.6.1130, also install SkyUI SE - Difficulty Persistence Fix as a separate mod at one higher priority than SkyUI. | ||||||
| SkyUI SE - Difficulty Persistence Fix |
| SkyUI - Ghost Item Bug Fix |
| Smaller Vanilla Cursors SE |
Detailed Instructions available | |||||||
| ||||||||
| Font Overhaul - Natural Typefaces for Skyrim |
Detailed Instructions available | |||||||
Install the Main File.
| ||||||||
| Whose Quest is it Anyway NG |
| Wider MCM Menu for SkyUI |
Detailed Instructions available | |||||
| Install one Main File of choice. Step Recommends: Opt. 3 or Opt. 4.
Compares: LINK NOTE: Some display configurations may require a different option if top/bottom of menus are cut off. | ||||||
| Yes Im Sure NG |
17-Locations
- Mods that programmatically add new or alter vanilla locations
| Mod Name | Baseline | Instructions |
|---|
| Bring Out Your Dead |
| Cutting Room Floor - SSE |
| Farmhouse Chimneys SE |
Detailed Instructions available | |||||||
Install the Main File:
Also install the USSEP patch from Optional Files. | ||||||||
| Hearthfire Extended |
Install the Main File. Merge the Hearthfire Extended - Cutting Room Floor Patch optional file. |
| Landscape Fixes For Grass Mods |
Detailed Instructions available | |||||||
| Install the Main File. Install Patches for Arthmoor's Town add-ons FOMOD under Optional Files as a separate mod for independent version tracking:
| ||||||||
| Oblivion Gates Remade |
Detailed Instructions available | |||||||
Install the Main File.
| ||||||||
| Smooth Shores |
| Snowy Landscapes in Snowy Regions |
Detailed Instructions available | |||||||
| ||||||||
| Worldspace Transition Tweaks |
18-Lighting and Weather
- Mods that affect lighting and/or weather systems **installation is optional**
| Mod Name | Baseline | Instructions |
|---|
| Ambiance - A Vanilla(plus) Ambient Lighting Overhaul |
Detailed Instructions available | |||||||
| ||||||||
| Cathedral Weathers MCM |
| Cathedral Weathers and Seasons |
Only install the Main File. |
| Enhanced Volumetric Lighting and Shadows |
| Lanterns of Skyrim SE - MCM version |
Install the Lanterns of Skyrim SE - MCM Version - 1 Original MannyGT main file. |
| Rainbows Remade |
| Relighting Skyrim - SSE |
Detailed Instructions available | |||||||
Install the Main File only.
| ||||||||
| Shooting Stars SE |
| Storm Lightning for SSE |
Detailed Instructions available | |||||||
Install the Main File.
| ||||||||
19-Utilities
- Mods that generate derived mod output from load-order-specific assets
| Mod Name | Baseline | Instructions |
|---|
| No Grass In Objects |
Detailed Instructions available | |||||
| Install the NGIO - Anniversary Edition (1.6.1130 and later) Main File.
Also Download Grass Generation MO2 Plugin v2 and open it in 7-Zip.
Grass Configuration
The following configuration applies to all users, regardless of whether or not grass LOD will be generated using DynDLOD. Precaching grass is necessary for this mod to resolve some specific stuttering issues when loading cells outdoors in grassy areas. Precaching also generally improves performance in these areas. Precaching grass is also required by DynDOLOD to generate grass LOD, but this mod has nothing to do with grass LOD otherwise. Modify Config
Use-grass-cache = true
Extend-grass-distance = true Extend-grass-count = false Ensure-max-grass-types-setting = 15 Overwrite-grass-distance = -1 Overwrite-grass-fade-range = -1 Global-grass-scale = 1.150000 Only-load-from-cache = true Only-pregenerate-world-spaces = AlftandWorld;Blackreach;BlindCliffCaveWorld;BloatedMansGrottoWorld;BluePalaceWingWorld;BrinewaterGrottoWorld;ccBGSSSE031BlackboneIsle;ccBGSSSE067DeadlandsWorld;ccKRTSSE001QNWorld;DarkwaterWorld;DeepwoodRedoubtWorld;DLC01Boneyard;DLC01FalmerValley;DLC01SoulCairn;DLC1AncestorsGladeWorld;DLC1DarkfallPassageWorld;DLC1ForebearsHoldout;DLC1HunterHQWorld;DLC2SolstheimWorld;EastEmpireWarehouse;EldergleamSanctuaryWorld;FallowstoneCaveWorldEnd;FallowstoneCaveWorldStart;FrostmereCryptWorld;JaphetsFollyWorld;KarthspireRedoubtWorld;KatariahWorld;LabyrinthianWorld04;MarkarthWorld;MossMotherCavernWorld;RedEagleRedoubtWorld;RiftenWorld;ShadowgreenCavernWorld;SkuldafnWorld;SolitudeWorld;Sovngarde;Tamriel;WhiterunDragonsreachWorld;WhiterunWorld;WindhelmPitWorldspace;WindhelmWorld DynDOLOD-Grass-Mode = 1 | ||||||
| ACMOS Road Generator |
Detailed Instructions available | |||||
Download and extract to the Tools folder (e.g. ..\Modding\Tools\ACMOS Road Generator). It will be used later in the guide.
| ||||||
| DynDOLOD 3 Alpha |
Detailed Instructions available | ||||||||||||||
Configure MO Executable
Configure as follows (If necessary, revisit the Tool Setup in the guide.):
NOTE: The output paths are defined in the TexGen/DynDOLOD GUI and NOT in the MO executable configurations. Modify INIs
The guide disables grass LOD by default. Instructions for enabling grass LODGen are also provided and may be enabled at a later time as instructed by the guide if adequate performance headroom is available. Navigate to Expert=1
Level32=1 ComplexGrassBillboard=5 ; only necessary when using ENB ComplexGrassBacklightMask=25 ; only necessary when using ENB DoubleSidedTextureMask=mountain,mtn DoubleSidedMeshMask=mountain,mtnNavigate to TreeMSAlphaThreshold=144
ENB post-processing
If ENB will NOT be used, then complex grass will not be used, so also set the following in TexGen_SSE.iniForceComplexGrass=0
| |||||||||||||||
| Nemesis Unlimited Behavior Engine |
Detailed Instructions available | |||||
| Install the Main File.
Add to Mod Organizer Executables
Nemesis is run through Mod Organizer like most other tools. Add Nemesis to the list of executables by doing the following:
Create Mod for Output
It is recommended to create a mod to store output files from Nemesis by doing the following:
Run Nemesis
Nemesis must be run whenever animation/skeleton mods are added/updated. To do so:
| ||||||
20-Patches
- Mods that programmatically resolve load-order conflicts
| Mod Name | Baseline | Instructions |
|---|
| Circlet USSEP Fixes |
Install the Gemling Queen Jewelry SE USSEP Circlet Fix main file. |
| Hearthfires Extended and Creation Club Fishing Patch |
| Kryptopyrs Patch Hub |
Detailed Instructions available | |||||
| Since the FOMOD is not updated as regularly as the individual patches, do not install it. Instead, install the following individual patches under Miscellaneous Files. NOTE: If CACO, CCOR, and/or TCIY will NOT be used, then do not install those of the following that correspond to the omitted mod(s) in the file name.
| ||||||
| Majestic Mountains Creation Club Landscape Patch |
| Realistic Boat Bobbing Patch Hub |
Detailed Instructions available | |||||
Install the following patches.
| ||||||
| Smooth Shores Patches |
Install all files EXCEPT Smooth Shores Patches - Depths of Skyrim Patch. Merge if prompted. |
| Umgak's Vokrii Compatibility Patch Compendium |
Detailed Instructions available | |||||||
| ||||||||
| Unofficial Skyrim Creation Club Content Patches |
Install the Main File. |
| Vokrii - Complete Alchemy and Cooking Overhaul Patch |
Do not install if CACO will NOT be used. |
| Step Patch - Conflict Resolution |
Detailed Instructions available | |||||
| The Step Conflict Resolution Patch is now delivered as separate files to fix MO's update tracking features. Going forward, this will allow each file to be flagged by MO if it has been updated.
First, download Step Patch - Conflict Resolution and any update file, if one exists. (required) Then install the optional files that apply into separate mods just after Step Patch - Conflict Resolution as follows (the sequence doesn't matter): | ||||||
| Step Patch - Lighting and Weather |
Install the Step Patch - Lighting and Weather optional file ONLY if the 18-Lighting and Weather ModGroup is installed. |
STEP 5
Generating the Grass Cache
A pregenerated grass cache ensures maximum performance and is also required for generating grass LOD. The grass cache for this Step build is included on Nexus under Miscellaneous Files, but the instructions for generating the grass cache are included here for posterity. This process takes 20-60 minutes to complete, depending on hardware and installed mods. The game will typically crash during grass generation, but the operation will gracefully resume the process automatically until complete.
NOTE
Depending upon graphics hardware and software, generation time can be significantly impacted by graphics-related background processes. It's good practice to terminate these processes via the Windows Task Manager before invoking generation. Only the graphics drivers are needed. Relevant processes names will usually begin with 'AMD' or 'NVIDIA'. These processes can be safely killed (right click > "End Task"), and they will be restarted again on Windows reboot.- Click the
 button in MO, and select Precache Grass to begin the process.
 - When the game displays the error "Grass generation finished successfully!", click [OK].
- Click [OK] if a similar message is waiting in MO.
The grass data files will be in the SKSE64 Output mod and will consume about 2 Gb. They will used by the game henceforth without any further maintenance required (unless any mods affecting worldspace landscapes are added, removed, or altered).
STEP 6
It's necessary to determine the available performance headroom prior to generating LOD or setting up ENB, because the full LODGen setup can cost upwards of 20 FPS on average in exteriors, and ENB can cost upwards of an additional 40 FPS. The goal at this point is to have at least 120 FPS (≥ 140 recommended) on average in the tundra with clear weather (and ideally the Rift as well). Keep in mind that decreasing game resolution can drastically improve performance.
NOTE
For guidance on additional display settings (e.g., ultra widescreen, FreeSync, G-SYNC, etc.), refer to the SSE Display Settings Guide before continuing.- Temporarily disable A Clear Map of Skyrim and Other Worlds. Keep this mod disabled while performance benchmarks and tuning are performed.
- Uncap frame rates if they are capped (ignore any stuttering, screen tearing, etc. for the time being):
- Double click SSE Display Tweaks in the MO left pane, select the INI Files tab, and adjust the following settings under the [Render] section:
EnableVSync=falseEnableTearing=trueFramerateLimit=300
- If applicable, ensure that G-SYNC or Freesync are properly disabled via NVIDIA Inspector or AMD Adrenalin.
- If applicable, ensure that NVIDIA ultra low latency mode (ULLM) or AMD anti-lag are properly disabled via NVIDIA Inspector or AMD Adrenalin.
- Double click SSE Display Tweaks in the MO left pane, select the INI Files tab, and adjust the following settings under the [Render] section:
- Launch SkyrimSE, and start a NEW game to verify that Skyrim loads without issue. Skyrim should successfully load into the Alternate Start character generation interface.
- At the Statue of Mara, select "I own property in one of the holds".
- Select "Breezehome".
- Proceed to the front door of Breezehome, wait until approx. 11:00, and save the game. This will be the clean save to use for testing performance before and after LODGen.
- Exit Breezehome and exit the Whiterun gate.
- Once outside of Whiterun, approach the tundra, and look West (this is a large expanse showing all LOD levels).
- use the Shift + INS keyboard combo to bring up the SSE Display Tweaks OSD.
- Other third-party applications like FRAPS, Skyrim Performance Monitor (SPM) can also provide OSD.
- Consider testing in the Rift as well, as this is one of the most performance-taxing areas of the game, due to Aspens Ablaze: Open the console and type:
cow tamriel 40 -24, and assess frame rates by moving around the Rift.
Once testing is complete, revert the changes and reapply frame caps:
- Re-enable A Clear Map of Skyrim and Other Worlds.
- Double click SSE Display Tweaks in the MO left pane, select the INI Files tab, and adjust the following settings under the [Render] section:
EnableVSync=trueEnableTearing=falseFramerateLimit=<previousValue>
- If applicable, ensure that G-SYNC or Freesync are properly enabled via NVIDIA Inspector or AMD Adrenalin.
- If applicable, ensure that NVIDIA ultra low latency mode (ULLM) or AMD anti-lag are properly enabled via NVIDIA Inspector or AMD Adrenalin.
Performance/Quality Optimization
This process will optimize the performance-quality trade off prior to configuration of ENB and LOD.
- If the average FPS is approx. 140 +/- 10 FPS, stop here and continue to 21-Post-Processing and/or Step 5 - LOD.
- Otherwise, continue below to optimize performance/quality by revisiting the BethINI setup to make changes accordingly:
- If the average FPS is lower than 120 FPS, use of both DynDOLOD and ENB will probably not be practical, even with 'performance' settings for both. Consider gaining more frames by using a higher performance BethINI preset.
- Revisit the BethINI setup using the [Medium] preset this time, and consider increasing Grass Density by 5.
- Rerun the benchmark.
- If average FPS is still not ≥ 120, try the BethINI [Low] preset and/or adjust Grass Density accordingly.
- If the average FPS is higher than 150 FPS:
- Revisit the BethINI setup using the [Ultra] preset this time, and consider decreasing the Grass Density by 5.
- Rerun the benchmark.
- If the average FPS is lower than 120 FPS, use of both DynDOLOD and ENB will probably not be practical, even with 'performance' settings for both. Consider gaining more frames by using a higher performance BethINI preset.
- Either way, once the average FPS is in the range of 140 +/- 10 FPS, continue to 21-Post-Processing and/or Step 5 - LOD.
- NOTE: Once finished, don't forget to re-enable graphics settings as described at the bottom of the "Benchmarking Steps" spoiler above to reap the benefits of those disabled settings.
Performance Examples
Following are performance results using the approach described previously. This serves as a preview to help in making decisions about ENB/DynDOLOD configurations. Note that with Step's recommended configurations, ENB is more costly than DynDOLOD in terms of performance.
- Reference System
- All ModGroups installed, including Post Processing (installed later by ENB users only)
- Resolution: 2560x1440 (2k/QHD/1440p) - HD/1080p resolution should perform much better ... even on a lesser/cheaper/older GPU.
- Weather: SkyrimClearTU (10A240) - One of the more performance-demanding weathers. With ENB, clear weathers costs more FPS than cloudy.
- Location: Tundra at Whiterun looking west
| Configuration | ||||||||||||||||||||
|---|---|---|---|---|---|---|---|---|---|---|---|---|---|---|---|---|---|---|---|---|
| BethINI | ENB | DynDOLOD | FPS | Note | ||||||||||||||||
| High | n/a | n/a | 121 | Baseline (G/Free-Sync disabled) | ||||||||||||||||
| Ultra | n/a | n/a | 108 | Baseline (G/Free-Sync disabled) | ||||||||||||||||
| Ultra | n/a | n/a | 110 | Baseline (Re-enable G/Free-Sync) | ||||||||||||||||
| Ultra | Heavy | n/a | 53 | |||||||||||||||||
| Ultra | Light | n/a | 63 | |||||||||||||||||
| Ultra | Milk Drinker | n/a | 72 | |||||||||||||||||
| Ultra | Heavy | Ultra | 34 | Max quality | ||||||||||||||||
| Ultra | Heavy | Optimal | 38 | Ideal performance/quality trade-off | ||||||||||||||||
| Ultra | Light | Optimal | 43 | |||||||||||||||||
| High | Light | Optimal | 45 | |||||||||||||||||
| Ultra | Milk Drinker | Performance | 50 | |||||||||||||||||
| High | Milk Drinker | Performance | 53 | |||||||||||||||||
*Based on these data, a few FPS could be gained by running the BethINI 'Medium' preset. Among other things, this will reduce the distance of LOD4 objects.
| ||||||||||||||||||||
- The following gallery shows visual compares and performance snapshots for the cost of DynDOLOD and ENB using a number of Step's supported configurations. Different PCs and game resolutions will yield varying FPS results, but the proportional and relative differences between these presets should be similar:
Step Milk Drinker ENB, DynDOLOD 'Performance', BethINI 'High'
Step Milk Drinker ENB, DynDOLOD 'Performance', BethINI 'Ultra'

Step Light ENB, DynDOLOD 'Optimal', BethINI 'High'
Step Light ENB, DynDOLOD 'Optimal', BethINI 'Ultra'
Step Heavy ENB, DynDOLOD 'Optimal', BethINI 'Ultra'
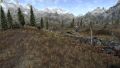
Step Heavy ENB, DynDOLOD 'Ultra', BethINI 'Ultra'


21-Post-Processing
- Mods that affect post-processing graphics **installation is optional**
Decide whether or not to install the Post-Processing ModGroup to support ENB.
NOTE
Keep in mind that LOD generation is more fundamentally important to visual enhancement than ENB, so if average frame rate from the previous benchmark is consistently below 100 FPS at this point, consider skipping 21-Post-Processing, and continuing on to Final Sorting and Cleaning.NOTE: If ENB will be used, revisit the BethINI Pie setup to disable: Display > Lens Flare, Anamorphic Lens Flare, and Ambient Occlusion. Also consider modifying the sun size as instructed under Custom. https://stepmodifications.org/wiki/SkyrimSE:2.3#BethINI_Pie
Optional Post-Processing Mods
Beginning at 04-Foundation, confirm that all mod rows prefixed with a blue vertical bar are configured with Post-Processing options.
| Mod Name | Baseline | Instructions |
|---|
| Cathedral Landscapes Complex Grass for ENB |
Detailed Instructions available | |||||||
21-Post-Processing
Skip this mod if ENB will not be used. This mod requires the ENBSeries runtime. If ENB isn't installed, loaded grass will have purple boxes.
| ||||||||
| Cathedral Weathers and Seasons Unofficial Update |
| Deadly Spell Impacts Transparency Fix for ENB |
| Elytra and Bliss Bug ENB Light |
Detailed Instructions available | |||||
| Install the Elytra and Bliss Bug ENB Light - Scrambled Bugs Version main file.
In ScrambledBugs.json, make the following change to the 'patches' section (see Scrambled Bugs for details): "attachHitEffectArt": true | ||||||
| ENBSeries |
Detailed Instructions available | |||||
| For those unfamiliar with ENB, see the ENBSeries guide for information about ENBSeries post processing. Otherwise, download and install ENB as follows:
Install ENBSeries Binaries
Install the Step ENB
Three versions of the Step ENB preset are available, depending on performance requirements:
NOTE: The Step ENB comes with a recommended
| ||||||
| ENB Helper SE |
Install the ENB Helper SE for SSE 1.6.x main file. |
| ENB Light |
Detailed Instructions available | |||||||
Install the ENB Light 0.98 Alpha 2 update file using the instructions below.
| ||||||||
| ENB Lights For Effect Shaders |
Detailed Instructions available | |||||||
| ||||||||
| ENB Lights for Aetherium Shards |
| ENB Particle Lights Dwemer Lanterns |
| Particle Lights for ENB - Nordic Ruins Candles |
| Particle Lights for ENB Wisps Witchlight |
| Particle Lights For ENB SE - Paragon Gems |
Install the Particle Lights For ENB SE - Paragon Gems - Iconic's Gems Patch main file. |
| Radiant - Candles |
Detailed Instructions available | |||||||
| ||||||||
| Rudy HQ More Lights for ENB SE Glowing Mushrooms |
Detailed Instructions available | |||||
| Hide the following file (instructions for hiding files/folders):
textures\plants\glowingmushrooms01.dds | ||||||
| Rudy HQ More Lights for ENB SE Torchbugs and Moths |
| More Lights for ENB - Blood Splatter Fix |
Detailed Instructions available | |||||||
| ||||||||
| Saints and Seducers Flora ENB Light |
Install the Main File. Merge the Update File. |
| Word Wall Transparency Fix for ENB |
| Step Patch - Post-Processing |
Detailed Instructions available | |||||
| ||||||
Final Sorting and Cleaning
If plugins have not been sorted this session, run LOOT again. Examine the plugins in LOOT for errors or warnings (ignoring the game's default masters at the top of the list). Ignore any reported missing compatibility patches or other warnings. These are either handled by the Step Patches or not of any concern. Perform the standard cleaning procedure on any mods requiring cleaning (except for the game's default masters).
Be aware that the Step Patches are designed to work with a default, LOOT-sorted plugin order. This eliminates the need to set rules on the load order. From this point on:
- Ensure all applicable mods are ticked in the left pane of MO.
- Ensure all plugins are ticked in the right pane of MO.
- Sort the load order using LOOT whenever plugins are added/removed.
- Update LOOT (the program and masterlist) whenever updates are available.
STEP 7
Now that all mods and patches have been installed/sorted and performance margins are acceptable, the next step is to generate custom LOD data for the mod list. Recommended settings correspond to rendered game resolutions that will benefit from those settings.
NOTE
Tip for AMD Users: Consider killing any AMD* named processes via Task Manager to significantly increase LODGen processing time. Right click on the Windows taskbar, select Task Manager, and from the Processes screen, right click > End Task. These processes are not needed for LODGen and can be easily restored by rebooting the OS.LOD Setup
Before moving on, create three empty mods for the LOD output:
- Click on the
 button and select, [Create empty mod].
 - Name it
Step SkyrimSE - xLODGen Output.- This places a new, empty mod at the bottom of the mod list. However if it's not, place it last in the mod list.
- Repeat these steps to create two more mods named:
Step SkyrimSE - TexGen Output, andStep SkyrimSE - DynDOLOD Output. - Place these new mods directly after Step SkyrimSE - xLODGen Output.
- Find the (TEMP) Cathedral Landscapes - xLODGen mod from the 04-Foundation mod group and enable it, if necessary.
- This mod should ONLY be enabled for terrain LOD generation. If it is not disabled before generating object LOD and/or playing the game, it will cause visual glitches.
- Sort with LOOT.
The last few mods in the mod list should now reflect the following, which reflects the number of mods used in this guide and is a lower limit, since many mods have multiple files:
- DLC: Dawnguard
- ...
- (TEMP) Cathedral Landscapes - xLODGen NOTE: This mod can be here or under 04-Foundation with Cathedral Landscapes main mod, but it must be DISABLED later as instructed!
- SkyrimSE - xLODGen Output
- SkyrimSE - TexGen Output
- SkyrimSE - DynDOLOD Output
WARNING
The steps following must be completed in the order presented (terrain LODGen/installation first, followed by object LODGen/installation). Using higher resolutions than recommended for any of the following LOD applications will result in a waste of PC resources with NO BENEFIT.xLODGen
xLODGen is run first to generate updated LOD terrain textures and meshes so that landscape LOD is updated with mod changes:
NOTE
xLODGen gamma settings used here apply to the Step SkyrimSE 2.3 build and probably builds using Cathedral Landscapes. Otherwise, gamma should be 1.00.Generate terrain LOD
- Ensure LOD Setup was completed.
- Run xLODGen from the MO executable drop-down list.
- Select all worldspaces.
- Ensure that ONLY the Terrain LOD box is ticked in the right pane.
- Use the following settings, which have been verified in extensive testing:
- NOTE: Unless you are running SSE at ≥ 4k resolution, resist the urge to wastefully increase the texture resolutions shown, which will only reduce FPS with NO BENEFIT. Those running ≥ 4k resolution WILL benefit by doubling the resolution for LOD4, LOD8, and LOD16 from 256 to 512.
- Click [Generate] to run the process, which will require upwards of 20 minutes, depending on the PC.
- Once the "LOD generation complete" message has appeared, close xLODGen.
- NOTE: If the xLODGen window closes itself, post in the xLODGen topic and include
../Modding/GameName/Tools/xLODGen/bugreport.txtand any logs created.
- NOTE: If the xLODGen window closes itself, post in the xLODGen topic and include
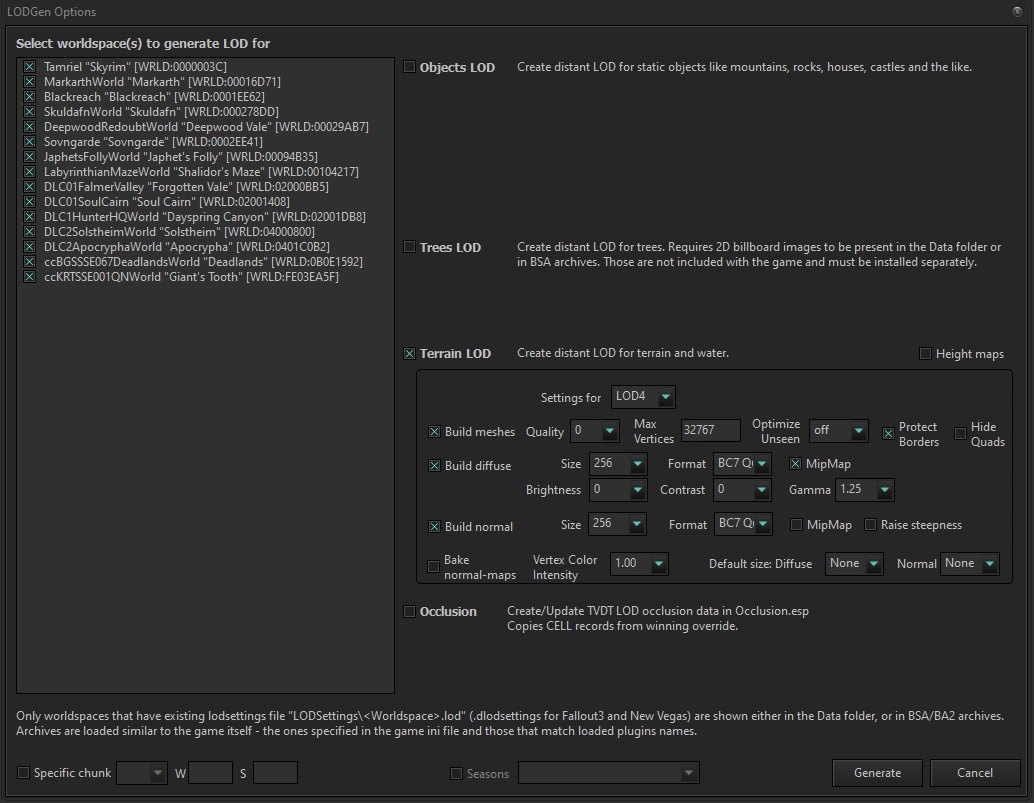
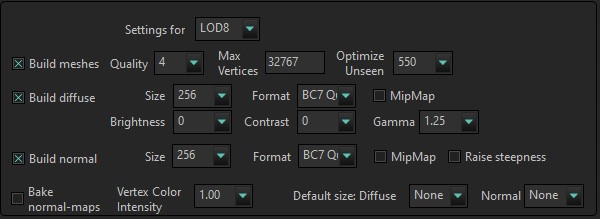
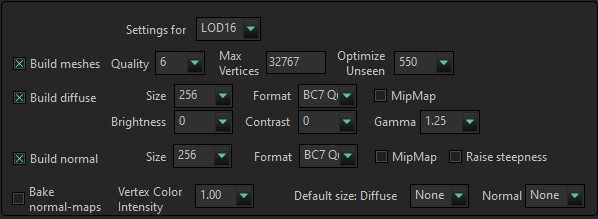
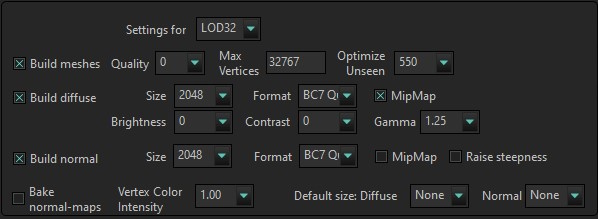
Paint roads on terrain LOD
- Run ACMOS Road Generator which was installed as part of A Clear Map of Skyrim and Other Worlds.
- Ensure Path Only is selected from the Roads dropdown
- For Path to LOD, browse to the xLODGen output folder (e.g.
..Modding/GameName/Tools/xLODGen/xLODGen_Output) - Click Generate
- At the prompt to "Overwrite LOD Textures," choose Yes
- When prompted to "Zip?", choose No
- Wait until it says "All Done!" and then click OK and close
Terrain LOD Wrap-Up
- Browse to the xLODGen output folder (e.g.
..Modding/GameName/Tools/xLODGen/xLODGen_Output). - In MO, open the xLODGen Output mod in Windows Explorer (Ctrl + double-click).
- Cut and paste the files from
../xLODGen_Outputinto the SkyrimSE - xLODGen Output folder, then close both folders. - Enable xLODGen Output mod.
- Disable (TEMP) Cathedral Landscapes - xLODGen mods (only needed as xLODGen resources for terrain generation only).
DynDOLOD
Object LOD will be created using Dynamic Distant Objects LOD (DynDOLOD). At a significant performance cost (upwards of 10 FPS) for a subtle improvement to LOD, DynDOLOD v3+ supports generation of grass billboard LOD. Generate grass LOD ONLY if performance headroom is available per Performance Tuning instructions.
NOTE
TexGen settings used here apply to the Step SkyrimSE 2.3 build and probably builds using Cathedral Landscapes, Cathedral Weathers, Majestic_Mountains, Enhanced Vanilla Trees, and the Step ENB (or no post processing). Settings still vary, depending on the end user's hardware, particularly the monitor and driver-soft settings, which should be optimized in accordance with the SSG.Run TexGen
TexGen 3, shipped with DynDOLOD 3, will generate custom object LOD textures based on enabled mods. TexGen 3 will also generate grass billboards for LOD.
- Run TexGen from the MO executable drop-down list.
- Use the setting corresponding to rendered game resolution: 1080p = HD, 1440p = QHD, 2160p = 4k
- NOTE: If generating grass LOD, be sure to tick "Grass" when replicating the following examples. Whether ENB is used or not, these grass settings apply to presumably any grass mod, since grass tint settings will be normalized later in
DynDOLOD_SSE.ini - Tick Grass only if generating grass without ENB Complex Grass.
- Tick HD grass only if generating grass with ENB Complex Grass.
 HD
HD QHD
QHD 4k
4k
- NOTE: If generating grass LOD, be sure to tick "Grass" when replicating the following examples. Whether ENB is used or not, these grass settings apply to presumably any grass mod, since grass tint settings will be normalized later in
- Click [Start].
- Once the completed message has appeared (1-5 minutes, depending on the PC), click [Exit].
- Navigate to the DynDOLOD TexGen_Output folder location (e.g.
../Modding/Tools/DynDOLOD/TexGen_Output). - Move the files from the TexGen_Output folder into the Step SkyrimSE - TexGen Output mod:
- In MO, hold down the Ctrl key and double-click the Step SkyrimSE - TexGen Output mod. Alternatively, right click the mod to open it in an Explorer window.
- Enable the Step SkyrimSE - TexGen Output mod in MO.
Run DynDOLOD
DynDOLOD will generate the object LOD. IF grass LOD is being generated, also modify grass tint and brightness as follows. This effectively eliminates any RGB color bias so that the grass LOD matches the loaded grass as closely as possible. YES, this is suitable whether or not ENB is used.
Browse to ..\Modding\Tools\DynDOLOD\Edit Scripts\DynDOLOD\DynDOLOD_SSE.ini, and modify the following, which normalizes grass LOD brightness/hue for Cathedral Landscapes and presumably ANY grass mod:
For generating grass without ENB Complex Grass:
; grass LOD brightness multipliers
GrassBrightnessTopR=0.500
GrassBrightnessTopG=0.500
GrassBrightnessTopB=0.500
; make bottom darker to fake shadowing
GrassBrightnessBottomR=0.500
GrassBrightnessBottomG=0.500
GrassBrightnessBottomB=0.500
For generating grass with ENB Complex Grass:
; grass LOD brightness multipliers
ComplexGrassBrightnessTopR=0.500
ComplexGrassBrightnessTopG=0.500
ComplexGrassBrightnessTopB=0.500
; make bottom darker to fake shadowing
ComplexGrassBrightnessBottomR=0.500
ComplexGrassBrightnessBottomG=0.500
ComplexGrassBrightnessBottomB=0.500
Configure and Generate
- Run DynDOLOD from the MO executable drop-down list to open the GUI configuration in 'expert' mode (if the DynDOLOD INI modification was set as described previously).
- Select all worldspaces.
- Tick Candles and FXGlow.
- IMPORTANT - Click the 'High' button to bring in mesh rules for A Clear Map of Skyrim mod and the Step Patch - Conflict Resolution. For slightly better performance with some quality loss, consider clicking on 'Medium' or 'Low' instead.
- Configure by replicating everything in the images following (tick/untick all boxes likewise), or make performance modifications as instructed further below before continuing to the next step:
- ONLY generate Occlusion data on the first run. If DynDOLOD is run again for some reason, leave Occlusion UNticked to speed up generation.
- Tick Grass LOD to generate grass LOD. Otherwise, leave this UNticked.
- 'Optimal' tree & catch-all rules with recommended LOD32 rules for A Clear Map of Skyrim.
 HD / QHD
 4K
4K
- Click [OK].
- Once the completed message has appeared (15-30 minutes [25-50 minutes with Occlusion ticked], depending on the PC), click [Save & Exit].
- Navigate to the DynDOLOD DynDOLOD_Output folder location (e.g.
..\Modding\Tools\DynDOLOD\DynDOLOD_Output). - Move the files the DynDOLOD_Output folder into the Step SkyrimSE - DynDOLOD Output mod:
- In MO, hold down the Ctrl key and double-click the Step SkyrimSE - DynDOLOD Output mod. Alternatively, right click the mod to open it in an Explorer window.
- Enable the Step SkyrimSE - DynDOLOD Output mod in MO.
- Ensure the DynDOLOD.esm and DynDOLOD.esp plugins are ticked in the right pane.
- Sort with LOOT.
NOTE
Multiple DynDOLOD outputs at varying quality settings can be created and stored in different mods. If this is done, generate occlusion only on the first run and copy this into a separate mod (e.g., 'DynDOLOD Occlusion') to reduce the generation time of subsequent outputs. Likewise, consider generating only for the Tamriel worldspace before settling on the chosen output and generating for all worldspaces.When to Regenerate LOD
- xLODGen
- Whenever changes are made to textures to files (not folders) at ..\Textures\landscape\ or when changes are made to the underlying landscape via a plugin (LAND and LTEX records). This does not include mountains and other objects over the landscape.
- Whenever there is a change in the mod list that affects grass rendering: grass diversity, grass density,
DynDOLODGrassModesetting, grass mods, any mods affecting grass placement (landscape mods), etc. Changes to grass distance and fade settings do not require re-caching.
- TexGen
- Whenever there are changes to the mod list that affect objects with LOD: new objects, moved structures or objects, removed structures or objects, changes to grass (only when using grass LOD), changes to trees and/or landscape height, when its master plugins order is changed (out of order masters), etc. When grass is re-cached, TexGen should also be run again to update grass billboards.
- DynDOLOD
- Whenever there are changes to the mod list that affect objects with LOD: new objects, moved structures or objects, removed structures or objects, changes to grass (only when using grass LOD), changes to trees and/or landscape height, when its master plugins order is changed (out of order masters), etc. When LOD textures are updated with TexGen, DynDOLOD should also be run again to update all affected object LOD.
- Occlusion
- Only with noticeable changes to geography of Tamriel and/or Solstheim via a plugin (changes to TVDT - Occlusion Data on CELL records). For Step, this should only need to be run once.
STEP 8
The game is now ready to be loaded to configure mods in the Mod Configuration Menu (MCM). The MCM is a feature of SkyUI that allows mod authors to provide custom, game-accessible settings for their mods. Recommendations are provided below for select mods. The remainder are user preference.
First Launch
To run the game, select the SKSE executable from the drop-down list and click [Run]. Keep the following in mind when first launching from a fresh Guide installation:
- Test the build on a new game
- In other words, don't load from a save after a fresh Guide install to avoid false flags caused by savegame incompatibility. See the changelog before upgrading from a previous version of this Guide to determine whether or not a new game is advisable.
- When launching the game for the first time after a Guide install, the load could take significantly longer than normal. This will only be a one-time wait as all the installed mods are being initialized. Subsequent load times should be shorter.
- Finally, INI files may appear in the Overwrite folder after closing the game (e.g.
../SKSE/Plugins/SkyrimUncapper.ini). These files should be moved to their respective mod folders, respecting their folder structure during the move.
Alternate Start
Upon starting a new game, Alternate Start - Live Another Life is the first mod in play. Let's face it, Skyrim is old and the vanilla start quest is the last thing many people want to play through. Alternate Start provides a variety of ways to start the game and begins in a locked cell, so this is a good time to configure the Mod Configuration menu (MCM).
- Create a character.
- Stop! Press, Esc to open the Settings Menu.
- Select the [Mod Configuration] menu (MCM) and configure all of the installed mods using the instructions in the next section of the guide.
- Some mod configurations must first be enabled in the MCM prior to configuring, so fully exit Settings and return to the MCM to complete the remainder.
- Once the MCM configuration is completed, save the game to allow another Alternate Start option without having to reconfigure the MCM.
- Finally, talk to the statue in the room and choose an option (the vanilla start is also provided), and then sleep in the bed to start the game.
Mod Configuration Menu Settings
| ⟡ Cathedral Weathers ⟡Click to show/hide |
|---|
If the 18-Lighting and Weather ModGroup was installed, it is user preference on whether or not to set Interior Vision to Darker. The Step ENB was designed for Normal.
|
| ⟡ Complete Crafting ⟡Click to show/hide |
The following screenshots display the recommended settings for the mod's MCM:
  
|
| ⟡ Farmhouse Chimneys SE ⟡Click to show/hide |
Vanilla villages should all be ticked on the first page. The following screenshot displays the recommended settings for the New Locations page:

|
| ⟡ Lock Overhaul ⟡Click to show/hide |
This mod must be activated to work. Once enabled, the settings are user preference.
|
| ⟡ Smart NPC Potions ⟡Click to show/hide |
It's suggested to reduce the maximum an NPC can use, but it's user preference.

|
| ⟡ Storm Lightning ⟡Click to show/hide |
The Minimum preset in the MCM is recommended.
|
| ⟡ Timing is Everything ⟡Click to show/hide |
Timing is Everything is set up in a way that integrates DLC content and balances the game's quests. Vampires and werewolves will show up early in the game because they are a part of the world. Dragonborn will not start until the news of your deeds has time to reach the island, and the player becomes something that must be dealt with. Attack chances are lowered from 100% so there will be less of a chance to predict an attack. Other things are active that make sense, such as not being able to do the Break of Dawn quest if the player is a vampire, Thalmor won't attack until after engaging their quest line, etc. The following screenshots display the recommended settings for the mod's MCM:
  
|
Remaining Mod Configurations
The remaining mod configurations are recommended to be left at their defaults.
COMMUNITY CONTRIBUTIONS
About Step
Created by TheCompiler (Daniele Ferraro), Step is a collaborative project with input from the modding community, technical volunteers, and project administrators. The goal is to provide tested and validated methods for establishing and maintaining an enhanced, modded game. Thus, the Step Guides provide detailed, well-tested build instructions for a solid, modded game that achieves an enhanced, vanilla experience.
The Step team collects information from the modding community through extensive mod testing, detailed reviews, feedback, and suggestions exchanged on the Step Community Forums. Posting rules apply, so be sure to read and follow them. Engage and enjoy a warm welcome and plenty of high-quality support from a large community of experienced members.
Step Modifications can only get better with contributions and help from the community. It is very time consuming for the Step team to ensure that Step's Game Guides are consistently maintained at the highest quality possible. As such, we rely on the community. Whether a regular user or a knowledgeable modder, below are some ways to contribute in maintaining Step as a reliable, high-quality resource:
The Community
All members of the community can help build the Guides they love and utilize for their own games. Step relies on the community (e.g., you) to help identify mods that improve the vanilla game while adhering to our Mandate through mod suggestions. We also need ongoing bug reports, feedback, reviews, and updates on included mods that may cause problems or that stray from the Mandate. This help can be as simple as reporting an encountered bug or as extensive as providing a one-off review of a mod based from personal experience with it.
In order to suggest a mod for inclusion in this Guide, visit the Mods section of the forums and use the Create Mod Topic button on the editor toolbar.
Staff Roles
There are official staff roles that are almost always open for new candidates.
Community members interested in becoming a member of the Step staff, please contact any Administrator or Step Staff member on the forums. Please include some idea of the role desired and include strengths and weaknesses within that role! For example, if applying for a Curator include the game desired to curate, strengths (xEdit, conflict resolution, texture editing), and weaknesses (mesh work, CK, scripting). This gives Step some initial idea of the candidate's skill sets.
Forum Moderators
Most of the moderation work for our Moderators is simply to keep topics on track and do general forum maintenance; such as moving topics to the correct forum and handling spammers. Very rarely does moderation on the Step forums end up in warnings and bannings (and we all like it that way). To be effective Moderators, community members who desire this role are expected to be familiar with the Step community and actively involved. As such, Moderator criteria is be based upon level and quality of activity within our community. Moderators will be expected to be more familiar with the Community Guidelines than the average member and be able to remain unbiased in their moderating.
Guide Curators
Guide Curators are the super-stars of the staff at Step Modifications. They are those who curate the Guides for members. Guide creation, growth, and maintenance takes a lot of time, effort, and skill. As such, Curators are generally required to be of a higher skill-level than the average modder. In an ideal world there would be 2-4 Curators per Guide. However, Curators are often working alone on Guides; thus, they require the knowledge and skills to be able to follow Mandate while building mod lists, patches, and writing all Guide and ancillary content in a way members can easily follow. This is no small feat for a single staff member to do! For more information about Guide Curation, see Game Guide Curation.
Testers
Generally, Testers are required to maintain a non-deviated Guide installation from which to install and test mods that are tagged for testing on the forums, as well as, general testing of Guides as a whole with the goal of finding bugs, issues, possible improvements, etc. Testers will be given access to Staff forums that house useful information on the Guides they test for. For more information about our testing process, read through the Mod Testing Guide to get a sense of what's involved.
Credits
The STEP administrators would sincerely like to thank (from the bottoms of our fuzzy little hearts):
- The authors of mods recommended within our guides
- The authors of mods who granted permission for their mods to be incorporated into the Step Patches
- The core Community for feedback, suggestions and input
- The Beta and Mod Testers for their good humor and rigorous analyses
- sheson for DynDOLOD and all things LODGen
- The Nexus community
- Bethesda Softworks for their games
- Tannin for the gift that is Mod Organizer
- All the developers that kept MO going
Personnel
Testers
- D1Z4STR
- Mercury71
- Mousetick
LODGen Support
- sheson
MO Support
- GSDfan
Step Administrators
- DoubleYou
- Greg
- TechAngel85
- z929669
Retired Staff
|
|
|
|
|