
FalloutNV:Unofficial-EssArrBee-1.0.0: Difference between revisions
m (Text replacement - "{{PageBackground\|.*}}" to "") |
|||
| Line 1: | Line 1: | ||
{{ | {{#set: Game={{NAMESPACE}} | ||
|GuideMaintenance=Unofficial | |||
'' | |GuideTitle={{NAMESPACE}} - EssArrBee | ||
}}__NOTITLE__[[Category:FalloutNV Mod-Build Guides]][[Category:Unofficial Mod-Build Guides]]{{DISPLAYTITLE:{{NAMESPACE}} - EssArrBee}} | |||
<br><center>Check out the official [https://stepmodifications.org/wiki/FalloutNV:Wiki Step Fallout: New Vegas - {{NAMESPACE}} - Guide], which is based on this guide<br> | |||
[[File:Fearandloathingtitle.png]]<br> | |||
{{Fs|15px|''"What? No. We can't stop here. This is bat country." - Raoul Duke''}}<br> | |||
[[File:VaultBoyHST.png]]<br> | |||
</center> | |||
[https://stepmodifications.org/forum/forum/81-fear-loathing-in-new-vegas-fallout-nv/ '''GUIDE FORUMS''']<br /> | |||
'''Announcement''': [[User:Kelmych/Fallout3|Clear and Present Danger]], a guide for modding Fallout 3 has been released. It is heavily based on F&L, so it will be easy to use. Take a look and get back into the capital wasteland. | |||
<!-- | |||
* Also, check [https://www.youtube.com/playlist?list=PLPRcHsdqNmuAw_grALopqa6HvdLsltSv- GamerzCam's Fear and Loathing Let's Play]. | |||
[https://copy.com/NZiz4DKdEjKd '''PDF Version'''] | |||
* The PDF will not be updated every time the guide is updated, but will remain current enough for use. Updates to the PDF will be listed in the changelog linked below. Last update Feb 8 2015. | |||
--> | |||
'''CURRENT USERS''': The updates made during the latest revision (prior revisions can be found [[User:EssArrBee/FalloutNewVegas_Changelog|here]]): | |||
*August 26th, 2018 | |||
# | *#Made several version updates. | ||
# | *#Added [[#Darnified UI Extension|Darnified UI Extension]] to User Interface section. | ||
# | *#Added [[#Project FNVIcons|Project FNVIcons]] to Supplemental UI section. | ||
# | *#Added [[#New T-51b Icons New Vegas|New T-51b Icons New Vegas]] to Supplemental UI section. | ||
# | *#Added a merge for icon mods (three) to the end of said section. | ||
*#Removed the classic world map mod because it looks out of place. | |||
== Pre-Installation Checklist == | * June 19th, 2017 | ||
*# As of today, the guide author EssArrBee, will only be providing maintenance for the guide. Consider the current guide to be complete unless others decide to take over development. | |||
*# Added [[#LOD Resources for Vurts WFO - Fertile Edition v2.9a|LOD Resources for Vurts WFO - Fertile Edition v2.9a]] to LOD section. | |||
* March 27th, 2017 | |||
*# Added [[#EXE - Effect teXtures Enhanced|EXE - Effect teXtures Enhanced]] to Poosh. | |||
* March 21st, 2017 | |||
*# Removed Lutana NVSE Plugin. Integrated into JIP LN NVSE Plugin. | |||
* March 17th, 2017 | |||
*# Removed Enclave Power Armors Retextured. Book of Steel - Compatibility Edition was updated so that it is not required anymore. Mod may return at another date. | |||
* March 16th, 2017 | |||
*# Added [[#Enclave Power Armors Retextured|Enclave Power Armors Retextured]] to Clothing Is Not Optional. | |||
*# Added [[#Book of Steel - Compatibility Edition|Book of Steel - Compatibility Edition]] to Clothing Is Not Optional. | |||
*# Added [[#Tops Casino Neon Restored|Tops Casino Neon Restored]] to Poosh. | |||
*# Added [[#weijiesen's HD Fog|weijiesen's HD Fog]] to Poosh. | |||
*# Updated [[#CaliberX|CaliberX]] to v5.04. | |||
* March 15th, 2017 | |||
*# Added [[#Unofficial Patch Plus|Unofficial Patch Plus]] to Fixes section. | |||
*# Removed ''Reload Speed Game Start Fix'' from Fixes section. Included in [[#Unofficial Patch Plus|Unofficial Patch Plus]]. | |||
*# Removed ''Dead Money - Christine Has More Skills'' and ''Improved Transportalponder - Old World Blues'' from [[User:EssArrBee/FalloutNewVegas YukichigaiGameplayTweaks|Yukichigai Gameplay Tweaks]]. Returning users should not update their merged version. Included in [[#Unofficial Patch Plus|Unofficial Patch Plus]]. | |||
*# Removed Merging Fixes section. No longer needed. | |||
* March 13th, 2017 | |||
*# General guide maintenance is underway, mods will be updated to current versions and install instructions will be updated as well. | |||
*# Removed No more giant manhole covers. Now included in YUP. | |||
*# Added [[#YUP-Spice of Life Patch|YUP-Spice of Life Patch]]. | |||
{{TOC|limit=3}} | |||
== ''We were somewhere around Barstow...'' == | |||
''...on the edge of the desert, when the mods began to take hold.'' '''Fallout New Vegas''' has been out for a number of years now and there is a truly amazing community that has supported the game with really creative mods since the game's release. This guide will help make ''New Vegas'' look as good as possible while maintaining a setup that adds to gameplay and re-playability. With that in mind, New Vegas is old enough that only the Ultimate Edition will be supported, so all DLC will be required. Users with all the major DLC and not the pre-order packs can still use the guide, but without a couple mods or patches. STEP officially supports the use of Mod Organizer and everyone who uses it for a long enough period will see why. This guide will use Mod Organizer as its main mod manager, but Wrye Flash NV will be used to generate a Bashed Patch. | |||
Users already familiar with [[STEP:Guide|STEP]] and [[User:Neovalen/Skyrim_Revisited_-_Legendary_Edition|Skyrim Revisited]] will notice that this takes queues from the styles of both guides. Also, due to the somewhat campy humor of the Fallout series, this guide will not take itself too serious, and will have a ''Fear and Loathing in Las Vegas'' theme. STEP changed the way so many people mod video games and really gave birth to new type of mod community that was very strict in its pursuit for a better experience of Skyrim. It only makes sense to extend some of STEP and Skyrim Revisited's ideals to other great games and that is the very thing this guide will set out to do. | |||
While going through the guide remember that there is a [https://stepmodifications.org/forum/forum/82-flnv-support/ F&LNV - Support] forum to post any questions that might arise. This guide also has an official thread [https://stepmodifications.org/forum/topic/4727-fear-and-loathing-in-new-vegas-feedback/ here]. This guide will probably never be the size and scope of the STEP guide, but the current mods listed should work together without compatibility issues. | |||
The guide is listed from top down and it is advised to install the mods in that order to make sure that all directions are followed correctly and no mods are missed. Keep in mind, there are very specific directions to install the interface mods and those directions are very important to make sure there are no problems when starting ''New Vegas''. | |||
Without the support of STEP, this guide would not be possible. If you would like to make a donation, that would be awesome! Do so with Paypal.<br> | |||
<div style="text-align: center;">[https://www.paypal.com/cgi-bin/webscr?cmd=_s-xclick&hosted_button_id=N5TLCEMXY7KQU https://www.paypalobjects.com/en_US/i/btn/btn_donate_LG.gif]<br> | |||
{{fs|0.8em|{{fc|#e0dfff|ALL donations are applied to hosting expenses.}}}}</div><br> | |||
<center>[[File:TaketheRide.jpg]][[File:BuytheTicket.png]][[File:TaketheRide1.jpg]]</center> | |||
=== Pre-Installation Checklist === | |||
Make sure that everything is ready to install before proceeding with this guide. | Make sure that everything is ready to install before proceeding with this guide. | ||
:# Fallout New Vegas and Steam in general should not be installed in the Program Files or Program Files (x86) folder. | |||
:#* Either Google how to move the Steam folder or watch video on YouTube, [https://www.youtube.com/results?search_query=move+steam+folder here]. | |||
:# Make sure Fallout New Vegas directory is clean from any other modding previously done. | :# Make sure Fallout New Vegas directory is clean from any other modding previously done. | ||
:#* A good way to make sure is to delete everything in the New Vegas folder except the Data folder. | :#* A good way to make sure is to delete everything in the New Vegas folder except the Data folder. | ||
| Line 25: | Line 87: | ||
:# Delete the Fallout.ini and FalloutPrefs.ini from My Games in the Documents folder and start the Fallout launcher so new ones can regenerate. This will allow the INIs to revert back to vanilla before starting. | :# Delete the Fallout.ini and FalloutPrefs.ini from My Games in the Documents folder and start the Fallout launcher so new ones can regenerate. This will allow the INIs to revert back to vanilla before starting. | ||
:# Set the ''Fallout New Vegas'' launcher settings to max for the system being used to play the game. ''Fallout New Vegas'' should be able to perform well on any modern hardware. | :# Set the ''Fallout New Vegas'' launcher settings to max for the system being used to play the game. ''Fallout New Vegas'' should be able to perform well on any modern hardware. | ||
{{RelatedVideos| | |||
*{{Video|IYm4HuqFC10|Fallout New Vegas : Installation & Setup|GamerPoets' {{NAMESPACE}} install video.}} | |||
}} | |||
=== A Word About Gamebryo and Plugin Limits === | |||
The game engine for Fallout New Vegas has quite a few issues, but instead of working to solve those problems, a limit on the number of plugins was instituted during one of the patches. There is now an ~140 plugin limit for Gamebryo which will cause the function incorrectly or just not load at all if this number is reached. In addition to that, the stability of New Vegas will decrease as the number of plugins start to approach the 140 count. This means this guide will never grow out of control and the goal will always be to have, at most, 135 plugins. This, of course, is just a number to aim for so it keeps the guide in a state that promotes a stable New Vegas. If adding mods on top of the guide, be aware of the plugin cap and learn to use the FNVEdit merge script to lower the count. This is also the reason that Wrye Flash NV is so essential, since the Bashed Patch will lower plugin count. | |||
=== Video Tutorials === | |||
There are a few video tutorial series for Mod Organizer and Fallout New Vegas. All of them are recommended for users that prefer watching videos. | |||
* [https://youtu.be/n6UPIWX-hIo?list=PLlN8weLk86XjVOwlGpeKFnHLlBLlwo73A Official STEP Mod Organizer Video Series] by Gamer Poets | |||
** Covers Mod Organizer and STEP thoroughly with emphasis on Skyrim, but all directions can be applied to Fallout games. Many of the videos were reviewed by the author of this guide. | |||
* [https://youtu.be/TP7I3TGG580?list=PLE7DlYarj-DftnSdXdqTuSGU06G2O90LL Fallout New Vegas Mod Organizer Series] by Gopher. | |||
** Covers Mod Organizer and Fallout New Vegas with great examples of very popular mod installations. Reviewed by the author of this guide. | |||
* [https://youtu.be/fURXOKKzy10?list=PLWMvEg2LxwXYgN9UIEFAEGxfmT5ondfIi Mod Organizer for Fallout New Vegas Series] by Dirty Weasel Media. | |||
** Covers Mod Organizer and Fallout New Vegas and uses Fear and Loathing examples. Video maker has had an open dialogue about MO for {{NAMESPACE}} with the author of this guide. | |||
== Utilities == | == Utilities == | ||
There are a few tools that are necessary to mod Fallout New Vegas and should be downloaded and installed | There are a few tools that are necessary to mod Fallout New Vegas and they should be downloaded and installed before any modding starts. | ||
<!-- | |||
===== [ | ===== [https://boss-developers.github.io BOSS] ===== | ||
* '''Author''': The BOSS Development Team | * '''Author''': The BOSS Development Team | ||
* '''Version''': v2. | * '''Version''': v2.3.0 | ||
* '''Installation''': {{Video|CAXPy7cV1P0|BOSS Install Video|Works for {{NAMESPACE}} too.}} | |||
BOSS is the best way to sort the load order of any plugins for all the Bethesda games. Without it the community would be lost. There is a drop down menu that allows switching between different games, so a different installation for ''New Vegas'', ''Fallout 3'', ''Oblivion'', or ''Skyrim'' is unnecessary. | BOSS is the best way to sort the load order of any plugins for all the Bethesda games. Without it, the community would be lost. There is a drop down menu that allows switching between different games, so a different installation for ''New Vegas'', ''Fallout 3'', ''Oblivion'', or ''Skyrim'' is unnecessary. | ||
===== [ | ===== [https://www.nexusmods.com/newvegas/mods/44745//? BUM] ===== | ||
* '''Author''': Surazal | * '''Author''': Surazal | ||
* '''Versions''': v6. | * '''Versions''': v6.7.2 | ||
Opens up BOSS userlist functions not available by using BOSS alone. Creating custom load orders or adding plugins not yet part of the masterlist is much easier with BUM. | Opens up BOSS userlist functions not available by using BOSS alone. Creating custom load orders or adding plugins not yet part of the masterlist is much easier with BUM. | ||
--> | |||
{{alert|type=notice|text=DDSOpt is optional. If texture optimization is desired at the end of the guide, then install this program.}} | |||
===== [https://www.nexusmods.com/skyrim/mods/5755/? DDSopt] ===== | |||
* '''Author''': Ethatron | |||
* '''Version''': v0.8.0.upd4 | |||
* '''Installation''': The program is portable so it should be extracted to a folder that is easy to access, like C:/Games/DDSopt. Also, it may be easier to make a shortcut on the desktop and the program should be set to 'Run as Administrator'. The default ddsopt.ini needs changed, so get the latest version [https://stepmodifications.org/wiki/Guide:DDSopt_%26_Texture_Overhauls/DDSoptINI here] and overwrite the ddsopt.ini in the DDSopt folder. | |||
* '''Note''': Detailed information on installation and use of DDSopt for ''Fallout New Vegas'' can be seen in the [[Guide:DDSopt#tab=Fallout_QUICK-START_GUIDE|Fallout Quick Start Tab]] of the DDSopt Guide. | |||
===== [ | Needed to optimize and/or reduce textures and the resolution of textures for increased quality and performance. | ||
<!-- | |||
{{alert|type=notice|text=FOMM is now optional since it is not needed for installation anymore. It has some advanced features that experienced users may want.}} | |||
===== [https://www.nexusmods.com/newvegas/mods/54991/? Fallout Mod Manager - FOMM - Fork] ===== | |||
* '''Author''': Q Timeslip and kaburke | |||
* '''Version''': v0.14.11.12 | |||
* '''Note''': When Installing MODS with FOMM - Fork, they will go into Mod Organizer's "/Overwrite" folder. Follow the instructions for FOMM if used for a mod. | |||
This is a continuation of the FOMM development. Mod Organizer had problems running the original FOMM, but this version works well. Mostly here for modders that might use it instead of regular users. | |||
--> | |||
===== [https://www.nexusmods.com/newvegas/mods/34703//? FNVEdit] ===== | |||
* '''Author''': ElminsterAU | * '''Author''': ElminsterAU | ||
* '''Version''': | * '''Version''': v4.0.2 | ||
* '''Fallout 3 Equivalent''': [https://www.nexusmods.com/fallout3/mods/637/? FO3Edit] | |||
* '''Installation''': Make sure the FNVEdit folder is put into the ''Fallout New Vegas'' root folder. This video can be applied to any xEdit version: {{Video|0JUfK_RfMT4|TES5Edit Installation|TES5Edit}} | |||
*:::* Install additional xEdit scripts: | |||
*:::*# Download [https://mega.nz/#!0QRVAQKa!6dDsprHGy9iuI85k0QYzNtGzH4vZO4uh_tc7L_671ME Generate Bash Tags.pas] and the scripts from [https://github.com/matortheeternal/TES5EditScripts TES5EditScripts]. | |||
*:::*# Navigate to the scripts in windows explorer and move the scripts to the "...FNVEdit/Edit Scripts" folder. | |||
{{AlertSmall|type=notice|text=There is a [https://github.com/matortheeternal/TES5EditScripts/issues/20 bug] in one of the scripts from [https://github.com/matortheeternal/TES5EditScripts TES5EditScripts] which causes ''Generate Bash Tags.pas'' to fail on certain plugins. Download the fixed version [[Media:MteFunctions.7z|here]], then extract ''mteFunctions.pas'' to the "...FNVEdit/Edit Scripts" folder and overwrite the existing script. }} | |||
It would really be impossible to have a heavily modded game without this amazing little tool. Essential for anyone wanting to mod a Bethesda game. | It would really be impossible to have a heavily modded game without this amazing little tool. Essential for anyone wanting to mod a Bethesda game. | ||
===== [ | ===== [https://www.nexusmods.com/newvegas/mods/58562/? FNVLODGen] ===== | ||
* '''Author''': | * '''Author''': Ehamloptiran Sheson zilav and FNVEdit Team | ||
* '''Version''': | * '''Version''': v3.2.1 | ||
* '''Installation''': | * '''Fallout 3 Equivalent''': [https://www.nexusmods.com/fallout3/mods/21174/? FO3LODGen] | ||
* '''Installation''': Download the FNVLODGen file. Make a folder named FNVLODGen in the''Fallout New Vegas'' root folder and extract the contents into it. | |||
This amazing tool allows users to regenerate LOD meshes and textures based on your installed mods. | |||
===== [https://loot.github.io LOOT] ===== | |||
* '''Author''': LOOT Team | |||
* '''Version''': v0.14.3 | |||
* '''Installation''': {{Video|Pts-Yd6hbWI|LOOT Installation Video|LOOT}} | |||
* '''Note''': Mod Organizer has a sort button that uses LOOT, but this is still required. | |||
Originally BOSS v3.0, but it is so different that a new name was required. | |||
===== [https://www.nexusmods.com/skyrim/mods/69905/? Merge Plugins Standalone] ===== | |||
* '''Author''': matortheeternal | |||
* '''Version''': v2.3.1 | |||
* '''Installation''': Download the main file. Extract the contents to a folder, i.e. C:/Games/Utilities/Merge Plugins. Start Merge Plugins Standalone from its folder to make sure that the game profiles are identified. If not, then point Merge Plugins to the game's location. | |||
===== [ | This is a standalone version of the merge plugin script. | ||
* '''Author''': | <!-- | ||
* '''Version''': | ===== [https://www.nexusmods.com/skyrim/mods/37981/? Merge Plugins xEdit Script] ===== | ||
* ''' | * '''Author''': matortheeternal | ||
* '''Version''': v1.9 | |||
* '''Requirements''': FNVEdit, mteFunctions | |||
* '''Installation''': Unpack the archive directly to the ''FNVEdit'' folder. | |||
* '''Note''': This mod is being replaced by the standalone version and will be dropped soon. | |||
: | |||
Allows mods to be merged to lower plugin count. | |||
== | ===== [https://github.com/fireundubh/xEditScripts/blob/master/Scripts/Generate%20Bash%20Tags.pas Generate Bash Tags Script] ===== | ||
* '''Author''': fireundubh | |||
* '''Version''': v1.5.1.1 | |||
* '''Installation''': This script needs to be created manually, follow these instructions: | |||
Open up a text editor, like Notepad++ | |||
From the GitHub page, click [Raw] | |||
Press Ctrl-A to highlight everything on the page, then Ctrl-C to copy the script | |||
Go to the text editor and paste the script, Ctrl-V, into a new document | |||
Save the script as Generate Bash Tags.pas | |||
For some text editors, saving .pas will be listed under the "Save as type" dropdown. Find the Pascal filetype. | |||
===== [ | ===== [Mator Smash] ===== | ||
* '''Author''': | * '''Author''': matortheeternal | ||
* '''Version''': | * '''Version''': v2.2.2 | ||
* '''Installation''': Download | * '''Installation''': Download, extract to folder. | ||
This is the next iteration in patching an entire load order. | |||
--> | |||
===== [ | ===== [https://www.nexusmods.com/skyrimspecialedition/mods/6194/? Mod Organizer] ===== | ||
* '''Author''': | * '''Author''': Tannin | ||
* '''Version''': v1. | * '''Version''': v1.3.11 | ||
* '''Installation''': Download | * '''Installation''': Download the Mod Organizer 1 Legacy file. | ||
To use MO for multiple games it must have multiple installs in different locations. It is recommended to put each install of MO into the game directory of each game that it will be installed for. For ''New Vegas'', it should go into .../Steam/steamapps/common/Fallout New Vegas. {{Video|I-yJ_9uBUBQ|MO Install Video|Works for Skyrim/FNV/FO3/Oblivion}} | |||
* '''Note''': There is some information to be aware of when installing Mod Organizer: | |||
*# The newer versions of Mod Organizer have introduced a new system of handling mods not installed by Mod Organizer and the official DLC. They will now be listed in the left pane of MO and can be moved around so those files will become part of the file priority. | |||
*#* Left Pane should have the official content listed first, without check boxes to tick and the category should say ''Non-MO''. Any mods installed in the Data folder will also be listed the same way. | |||
*# For more information, see the [[Guide:Mod_Organizer|Mod Organizer Guide]]. | |||
*# [https://www.youtube.com/playlist?list=PLlN8weLk86XhKKC5c-XgOcOqR5VjPuHCl Official STEP Mod Organizer Video Series] by Gamer Poets. | |||
' | MO is a powerful mod manager that does not install mods into the game's data folder like other mod managers. Instead, MO uses a virtual directory which gives modders the ability to switch between profiles very easily without having to install and uninstall mods. | ||
{{AlertSmall|type=notice|text=Often throughout this guide the installation with MO will be simple and automated, other times may require a 'manual install'. | |||
The [[Guide:Mod_Organizer#Manual_Install|Mod Organizer Guide]] has an explanation on how to do this correctly and something all modders should know.}} | |||
''' | ===== [https://www.nexusmods.com/newvegas/mods/35003//? Wrye Flash NV] ===== | ||
* '''Author''': valda and Sharlikran | |||
* '''Version''': v18.0 | |||
* '''Fallout 3 Equivalent''': [https://www.nexusmods.com/fallout3/mods/11336/? Wrye Flash] | |||
* '''Installation''': This program is '''NOT''' optional. Get the ''Wrye Flash 18.0 - Standalone Executable'' main file. Follow these instructions: | |||
Open up the ''Wrye Flash 18.0 - Standalone Executable'' archive from where ever it was downloaded to. | |||
Extract the entire contents to the ".../Steam/steamapps/common/Fallout New Vegas" folder, not the "Data" folder. | |||
Start Wrye Flash NV right now to correct an annoying setting: | |||
From the Mods tab, right click the ''header'' on the top bar and make sure Lock Times is '''UNTICKED'''. | |||
Wrye Flash NV is only going to be used for its Bashed Patch abilities to merge mods or parts of mods to increase compatibility while using many mods. Sharlikran has started developing Wrye Flash NV again, but he is only one person, so anyone with python experience should consider lending a hand on Wrye Bash/Flash/Flash NV/Smash coding. | |||
== Setting up Mod Organizer == | === Setting up Mod Organizer === | ||
Now that all the programs necessary to mod ''New Vegas'' are installed, it is time to set them up for installing mods and running ''New Vegas'' with Mod Organizer. | Now that all the programs necessary to mod ''New Vegas'' are installed, it is time to set them up for installing mods and running ''New Vegas'' with Mod Organizer. | ||
# Start MO and click the | # Start MO and click the Profiles button[[File:profiles MO.png]]. | ||
## Now highlight the Default profile, make sure Archive Invalidation is checked, and click Copy. | ## Now highlight the Default profile, make sure Archive Invalidation is checked, and click {{ui|Copy}}. | ||
## Rename the profile to the desired name | ## Rename the profile to the desired name (''Fear and Loathing'' would be a good choice), and click {{ui|Okay}} then {{ui|Close}}. | ||
##* This procedure can be repeated for copying any profile in the future. | ##* This procedure can be repeated for copying any profile in the future. | ||
# Setup | # Setup MO to download mods from the Nexus, follow the directions provided on the [https://stepmodifications.org/wiki/Guide:Mod_Organizer#tab=Downloading_Mods Mod Organizer Guide]. {{Video|nk7wY9le6mo|Linking to Nexus}} | ||
# Click the Executables | # Click the Executables button[[File:Gear MO.png]] and set up the programs that will be run from the MO launcher using directions from the [https://stepmodifications.org/wiki/Guide:Mod_Organizer#tab=Third_Party_Programs Mod Organizer Guide]. {{Video|SpeC9OSO3OI|Third Party Programs}} | ||
# | ## For this guide you will need to add: LOOT, FNVEdit, FNVLODGen, Merge Plugins Standalone, and Wrye Flash NV. Only add the GECK and FOMM - Fork if necessary. | ||
##* {{Video|Rz6xR1Q1zuE|MO LOOT Installation}}. Other programs can be installed similarly. | |||
##* LOOT has one extra instruction to setup | |||
##*# In the Executables menu select LOOT. | |||
##*# Next to the ''Arguments'' text field, type "--game=FalloutNV", without quotations. | |||
##*# Click {{ui|Modify}}, then {{ui|Close}}. | |||
##* FNVLODGen has one extra instruction to setup | |||
##*# In the Executables menu select FNVLODGen. | |||
##*# Next to the ''Arguments'' text field, type " -o:"C:/FNVLODGenOutput" ", without quotations. Additionally, any location outside of MO's virtual directory can be chosen. | |||
##*# Click {{ui|Modify}}, then {{ui|Close}}. | |||
##* Merge Plugin Standalone has one extra instruction to setup | |||
##*# In the Executables menu select Merge Plugins Standalone. | |||
##*# Next to the ''Arguments'' test field, type "-profile FNV", without quotations. | |||
##* Merge Plugin Standalone must be setup for MO use {{Video|0S6cpCwTezE|Merge Plugins|Installation starts at 5:34}} | |||
##*# Start Merge Plugin Standalone through MO and then click [OK]. | |||
##*# Select the Settings (gear icon). | |||
##*## Go to the Integrations tab. | |||
##*## Tick the "I'm using Mod Organizer" checkbox. | |||
##*## Set the "mod manager path" to MO's installation folder. | |||
##*## Click {{ui|OK}} | |||
##*# Close Merge Plugins Standalone. | |||
<!-- | |||
##* Mator Smash has one extra instruction to setup | |||
##*# In the Executables menu select Mator Smash. | |||
##*# Next to the ''Arguments'' text box, type "-profile FalloutNVProfile", without quotations. | |||
--> | |||
##* FNVEdit has one extra instruction to setup | |||
##*# In the Executables menu select FNVEdit. | |||
##*# Next to the ''Arguments'' text field, type "-IKnowWhatImDoing", without quotations. | |||
##*# Click {{ui|Modify}}, then {{ui|Close}}. | |||
# Set up optional settings as desired: | # Set up optional settings as desired: | ||
## Click Settings | ## Click the Settings button[[File:Wrench MO.png]]. {{Video|XpNPIZzIX8c|General Settings}} | ||
## Choose style, language, mod folders, customize mod categories among other things. | ## Choose style, language, mod folders, customize mod categories among other things. | ||
# Check that the official DLC is sorted correctly. | |||
## In the left pane make sure the official DLC are listed as the first mods when sorted by priority. {{Video|__14CIMBXgQ?|Left Pane: Columns}} | |||
##* New users should have something that looks like the image [[:File:FNV Non-MO.png|here]]. | |||
##* Users updating from older versions of MO may have to drag the DLC into place. Put them at the top as shown in the image [[:File:FNV Non-MO.png|here]], but the rest of the mods will be listed underneath. | |||
##*FalloutNV may or may not show as a mod in the left pane. | |||
Mod Organizer should now be installed and properly set up for modding from this point forward. | Mod Organizer should now be installed and properly set up for modding from this point forward. | ||
== | ==== BSAs and Mod Organizer ==== | ||
The | Bethesda Software Archives (BSA) can be used to store mod files in an attempt to reduce file sizes. The added benefit is the reducing in file system fragmentation caused by having many loose, small files. Although this is the case, it may be desirable to extract the contents of a BSA for various reasons, such as: if the user does not wish to install the entire contents of the BSA, if textures within the BSA need to be optimized, or simply if the user wishes to view the contents of the BSA. | ||
'''VERY IMPORTANT - make sure to follow the directions in this paragraph:''' First of all, go to the ''Archives'' tab on the right pane of MO. Checking the BSAs under this tab allows MO to read their contents. Then make sure that ''Have MO manage archives'' is checked. Next, be aware that the ''Fallout - Invalidation.bsa'' file ''must'' be the top file in the list, just under ''data''. If is not the top file in the list it will cause many mods to not function properly. Perhaps the easiest way to recognize this is that the textures of many objects in the game will look vanilla. In addition to this, make sure that all BSAs in the list are checked. If there are any that aren't, then make them so. Greyed out BSAs will be checked no matter what due to their plugin requiring that BSA to load. | |||
For various reasons, the guide may give instructions to extract certain BSAs. The instructions given in the guide would explain how to that after they have been already installed. An alternative method to extracting BSAs after installing them is to change the setting for the {{Fc|#ddd|BSA Extractor}} plugin. Open the '''Settings''' and change ''false'' to ''true''. Each time a mod that has a BSA is installed a dialog will be presented offering to extract the included BSA. | |||
In versions of MO prior to v1.3.x there was a limit to how many characters are allowed by the game engine when loading BSAs. If the names of all the BSAs being loaded are more than 254 characters, the game will not load or if there are just too many files in the data folder directory, thrashing can take place which causes the game not to load either. This creates an issue that either causes users to rename BSAs or extract some of them to remain under the 255 character limit. This (and other potential reasons) is why when following this guide it is ''very important'' to make sure that your installed version of MO is up to date with the guide's listed MO version. | |||
== ''"We are all wired into a survival trip now"'' == | |||
=== INI Tweaks === | |||
The Fallout INIs are used for a few different reasons, from disabling mouse acceleration to increasing grass render distance. This section will cover the necessary tweaks for Fear and Loathing to operate with all the mods in the guide. | |||
The ''INI Editor'' will be used for this section. To access it, click the MO puzzle icon[[File:puzzle mo.png]] and choose ''INI Editor''. | |||
* When the editor is open, use the find function (ctrl-f) to quick find the line that needs to be edited. | |||
===== Fallout.ini Tweaks ===== | |||
* Remove mouse acceleration | |||
[Controls] | |||
fForegroundMouseAccelBase=0 | |||
fForegroundMouseAccelTop=0 | |||
fForegroundMouseBase=0 | |||
fForegroundMouseMult=0 | |||
* Light distance fade | |||
Copy-paste the following under [Display] | |||
[Display] | |||
fLightLODDefaultStartFade=10240.0 | |||
fLightLODRange=10240.0 | |||
fLightLODMinStartFade=10240.0 | |||
fLightLODMaxStartFade=10240.0 | |||
fShadowLODDefaultStartFade=200.0 | |||
fShadowLODRange=200.0 | |||
fShadowLODMinStartFade=100.0 | |||
fShadowLODMaxStartFade=1000.0 | |||
fSpecularLODDefaultStartFade=10240.0 | |||
fSpecularLODRange=10240.0 | |||
fSpecularLODMinStartFade=10240.0 | |||
fSpecularLODMaxStartFade=10240.0 | |||
<!--* Darnified UI Font Tweak (This tweak will crash the game without DarnUI installed) | |||
Copy-paste the following: | |||
[Fonts] | |||
;sFontFile_1=Textures/Fonts/Glow_Monofonto_Large.fnt | |||
sFontFile_1=Textures/Fonts/DarN_FranKleinBold_14.fnt | |||
;sFontFile_2=Textures/Fonts/Monofonto_Large.fnt | |||
sFontFile_2=Textures/Fonts/DarN_FranKleinBold_16.fnt | |||
sFontFile_3=Textures/Fonts/Glow_Monofonto_Medium.fnt | |||
;sFontFile_4=Textures/Fonts/Monofonto_VeryLarge02_Dialogs2.fnt | |||
sFontFile_4=Textures/Fonts/DarN_Sui_Generis_Otl_10.fnt | |||
sFontFile_5=Textures/Fonts/Fixedsys_Comp_uniform_width.fnt | |||
;sFontFile_6=Textures/Fonts/Glow_Monofonto_VL_dialogs.fnt | |||
sFontFile_6=Textures/Fonts/DarN_Sui_Generis_Otl_13.fnt | |||
;sFontFile_7=Textures/Fonts/Baked-in_Monofonto_Large.fnt | |||
sFontFile_7=Textures/Fonts/DarN_Libel_Suit_Otl_24.fnt | |||
sFontFile_8=Textures/Fonts/Glow_Futura_Caps_Large.fnt | |||
sFontFile_9=Textures/Fonts/NVFont_Test.fnt--> | |||
* Remove the startup splash screens for the most efficient transition to the main menu | |||
[General] | |||
SMainMenuMovieIntro=0 | |||
* Allow facial morphs from mods to work correctly (needed in both INIs) | |||
[General] | |||
bLoadFaceGenHeadEGTFiles = 1 | |||
===== FalloutPrefs.ini Tweaks ===== | |||
* Allow additional plugins to be loaded. | |||
[Launcher] | |||
bEnableFileSelection = 1 | |||
* Increase Grass Render distance from 3 to 5 cells. | |||
[Grass] | |||
fGrassStartFadeDistance = 17000 | |||
* Allow facial morphs from mods to work correctly (needed in both INIs) | |||
[General] | |||
bLoadFaceGenHeadEGTFiles = 1 | |||
* Change to your Screen Resolution | |||
[Display] | |||
iSize W=1920 <-- Monitor horizontal resolution | |||
iSize H=1080 <-- Monitor vertical resolution | |||
Remember to click [Save] before exiting the ''INI Editor''. | |||
=== Extenders === | |||
Fallout New Vegas will need to take advantage of a couple extenders to open up functionality for certain mods. | |||
===== [https://nvse.silverlock.org NVSE] ===== | |||
* '''Author''': Ian Patterson, Stephen Abel and Paul Connelly, hlp | |||
* '''Version''': v5.1b4 | |||
* '''Fallout 3 Equivalent''': [https://fose.silverlock.org FOSE] | |||
* '''Installation''': Download the stable 5.1b4 file. Follow these instructions: | |||
Extract the files from the archive into the ''Fallout New Vegas'' folder, NOT into the Data folder. The src folder and text files are not needed. | |||
In the ''Data'' folder "right click->New->Folder", then name it "NVSE". Only do this if the folder '''DOES NOT''' exist. | |||
Open up the ''Data/NVSE'' folder and "right click->New->Text Document", then name the file "nvse_config.ini". | |||
Open ''nvse_config.ini'' and add the following: | |||
[Memory] | |||
DefaultHeapInitialAllocMB=400 | |||
scrapheapsizeMB=128 | |||
Save and close. | |||
The value for <code>DefaultHeapInitialAllocMB</code> must be between 200 and <500. 400 seems to be the best value for Fallout New Vegas, but it is recommended to play around with it a bit. | |||
Without NVSE, many mods that add incredible features to ''New Vegas'' cannot be used. This is an essential mod for any gamer. | |||
===== [https://www.nexusmods.com/newvegas/mods/58277/? JIP LN NVSE Plugin] ===== | |||
* '''Author''': jazzisparis, LuthienAnarion | |||
* '''Version''': v55.10 or latest version | |||
* '''Requirements''': NVSE | |||
NVSE extension that is required for some other mods to function. | |||
<!--===== [https://www.gribbleshnibit.com/lutana Lutana NVSE Plugin] ===== | |||
* '''Author''': Luthien Anarion | |||
* '''Version''': v19.0b5 | |||
* '''Fallout 3 Equivalent''': [https://www.nexusmods.com/fallout3/mods/20203/? Lutana FOSE Plugin] <-- Possibly removed as well | |||
* '''Requirements''': NVSE | |||
* '''Installation''': '''WARNING''' - The current download site is a direct download of the DLL file. Anti-virus applications may quarantine the file as soon as it is downloaded. Turn AV off during installation of this plugin. | |||
Download the v19.0b5 Main File to any location and follow these instructions: | |||
Go to the download location for the plugin | |||
Create a folder and name it ''Plugins'', then drag the file into the ''Plugins'' folder | |||
Create a folder and name it ''NVSE'', then drag the ''Plugins'' folder into the ''NVSE'' folder | |||
Create an archive out of the ''NVSE'' folder named "Lutana NVSE" | |||
Click the install from archive button [[File:Archive MO.png]] in MO and select the file from the location of the archive that was just created. | |||
Continue installing like any other mod. | |||
NVSE extender for extra functions. | |||
--> | |||
{{AlertSmall|type=notice|text=Users that have the GOG version can skip the 4GB Patcher}} | |||
===== [https://www.nexusmods.com/newvegas/mods/62552/? {{NAMESPACE}} 4GB Patcher] ===== | |||
* '''Author''': Roy Batty, LuthienAnarion | |||
* '''Version''': v1.3 | |||
* '''Installation''': Download and extract the contents into the ''Fallout New Vegas'' folder, NOT into any other folder. | |||
* '''Patching''': Run the patcher to "patch" the game's executable. | |||
Use MO to call the game executable, not NVSE or the launcher. The game is now "patched" to see 4GB of memory and will automatically load NVSE if present. | |||
==== ENB Series ==== | |||
As this guide grows, the section on ENB Series Graphics Modification and ENBoost will too. Eventually there will just be separate pages linking to the directions of how to install different versions ENB, based on hardware or whether the ENB Series Graphics are being used. The following instructs the setup for ENBoost using the Wrapper method. | |||
ENBoost may cause performance issues for some users. Try it out and if performance drops, then just remove the d3d9.dll from the Fallout New Vegas folder. | |||
===== [https://enbdev.com/download_mod_falloutnv.htm ENBoost] ===== | |||
* '''Author''': Boris Voronstov | |||
* '''Version''': v0.322 or whatever version is available | |||
* '''Installation''': ENB recommendations are yet to come, but ENBoost is still usable by everyone until then. Follow these instructions: | |||
Choose the latest version of ENB, currently v0322, and click the black arrow [[File:Down1.gif]] at the bottom of the page to download. | |||
Open the archive and the Wrapper folder then extract everything except the text files to the ''Fallout New Vegas'' folder. | |||
Go to the ''Fallout New Vegas'', open enblocal.ini in a text editor, like Notepad++, and edit the following lines: | |||
[GLOBAL] | |||
UseENBoostWithoutGraphics=true | |||
[MEMORY] | |||
ExpandSystemMemoryX64=false | |||
ReduceSystemMemoryUsage=true | |||
DisableDriverMemoryManager=false | |||
DisablePreloadToVRAM=false | |||
EnableUnsafeMemoryHacks=false <-- As a last resort, setting this to 'true' may actually benefit some people getting stutter otherwise. Beware that it could potentially cause CTDs on some systems. | |||
ReservedMemorySizeMb= <-- Possible values include 128, 256, or 512. It may require some tweaking depending on system hardware, but 256 is a good starting point. | |||
VideoMemorySizeMb= <-- Go [https://enbdev.com/download_vramsizetest.htm here] to get the vramsizetest tool. Run the vramsizedx9.exe. Note the number it reports back. For Windows 7/XP, subtract 170 from the reported number to get your final value. For Windows 8.1/10, subtract 350 from the reported number to get your final value. The final value is what you want to enter here. | |||
EnableCompression=true <-- Weaker systems may benefit from this setting being false. | |||
AutodetectVideoMemorySize=false <-- Set the VRAM manually. | |||
:* Users with Nvidia Optimus enabled laptops may need to use the Injector version. Follow these instructions: | |||
Use the above directions, except for extracting from the Wrapper folder, use the Injector folder and extract everything to the ''Fallout New Vegas'' folder. | |||
Do not move anything to the "exes" folder, then follow all the other directions the same. | |||
:* Optional use of borderless window, follow these instructions: | |||
Open enblocal.ini in a text editor, like Notepad++, and edit the following lines: | |||
[WINDOW] | |||
ForceBorderless=true | |||
ForceBorderlessFullscreen=true | |||
Save and close. Both settings must be set to true for it to work correctly. | |||
:* Optional Anisotropic Filtering and Anti-Aliasing through ENBoost, follow these instructions: | |||
Open enblocal.ini in a text editor, like Notepad++, and edit the following lines: | |||
[ENGINE] | |||
ForceAnisotropicFiltering=true | |||
MaxAnisotropy=16 | |||
[ANTIALIASING] | |||
EnableEdgeAA=true | |||
EnableAccumulativeAA=true | |||
Save and close. | |||
In Mod Organizer, click the plugin icon [[File:puzzle mo.png]] and select ''INI Editor''. | |||
Change iMultiSample= and iMaxAnisotropy= to '0' in falloutpref.ini under [Display] | |||
Save and close. To use AF and AA with ENBoost, the games default AF and AA must be turned off. | |||
:* Optional Proxy use through ENBoost, follow these instructions: | |||
Open enblocal.ini in a text editor, like Notepad++, and edit the following lines: | |||
[PROXY] | |||
EnableProxyLibrary=true | |||
InitProxyFunctions=true | |||
ProxyLibrary=other_d3d9.dll <-- This should be set the name of the d3d9.dll that is being installed. | |||
Save and close. | |||
Open the folder where the other injector is located and change the name of the d3d9.dll to what was put on the <code>Proxy Library</code> line. | |||
Extract all the files to the ''Fallout New Vegas''. | |||
* '''Note''': A couple things to be aware of: | |||
** If already using an ENB, disregard the installation of these files and since ENBoost is already included in ENB. The optional settings can be followed for users that need borderless window or help with setting up the AF and AA settings. | |||
** If setting up the Proxy Library be sure to rename the d3d9.dll from the additional injector or it will overwrite the ENB ''d3d9.dll''. | |||
Users that are running out of memory may be able to solve their issues with ENBoost. Also, the borderless window function and setting up a proxy for using other AA methods may be of interest to others. | |||
<!--=== Clean the Bethesda ESMs === | |||
: '''Note''': Anyone attempting TTW with this guide should skip this section. | |||
# Open FNVEdit through MO. | |||
# Make sure "DeadMoney.esm" is ticked and click [OK]. | |||
# When FNVEdit is loaded right click any plugin on the left pane and select ''Apply Filter for Cleaning''. | |||
# When FNVEdit is done filtering right click "DeadMoney.esm" and select ''Remove "Identical to Master" records''. | |||
# Right click "DeadMoney.esm" again and select ''Undelete and Disable References''. | |||
# Close FNVEdit and make sure to save the plugins, but untick ''Backup Plugins'' and click [Okay]. | |||
# Repeat steps 1 through 6 for "HonestHearts.esm", "OldWorldBlues.esm", "LonesomeRoad.esm", and "GunRunnersArsenal.esm" individually. | |||
#* The Pre-Order Packs do not need cleaning. | |||
:: Gopher has a great video on his youtube channel about the basics of FNVEdit, {{Video|qVKe51dRm2M|here}}. | |||
--> | |||
== Fixes == | |||
The comprehensive patches for ''New Vegas'' have seen many changes since release. There have been a few different groups that have tried to take on the task of fixing most of the bugs in ''New Vegas'', but some have disappeared or lead their projects in directions away from just fixing bugs. Enter the Yukichigai Unofficial Patch which is just fixes and nothing else. The project has been quickly adopted by many ''New Vegas'' users and is still supported by Yukichigai and community members bringing even more bugs to be fixes constantly. Other projects that may have more to offer than just fixes will not be used in this guide. Other than that, there are few other fixes and some excellent utilities to increase stability and performance. | |||
===== [https://www.nexusmods.com/newvegas/mods/53635/? New Vegas Anti-Crash] ===== | |||
* '''Author''': Queue | |||
* '''Version''': v7.5.1.0 | |||
* '''Requirements''': NVSE | |||
* '''Note''': The Grass Rendering Distance INI tweak will not work without this mod. | |||
This mod helps with some of the offsets and structures the exception handling of ''New Vegas'' to reduce crashes for the supported addresses. This mod will be updated frequently and should be followed for updates. | |||
===== [https://www.nexusmods.com/newvegas/mods/34832//? New Vegas Stutter Remover] ===== | |||
* '''Author''': SkyRanger-1 | |||
* '''Version''': v4.1.36 | |||
* '''Fallout 3 Equivalent''': [https://www.nexusmods.com/fallout3/mods/8886/? Fallout Stutter Remover] | |||
* '''Requirements''': NVSE | |||
* '''Installation''': This mod is packaged incorrectly, follow these instructions: | |||
During install right click ''Data'' and select "Set data directory". | |||
This mod has an INI file that has some options users should be aware of. Changes should made by double-clicking NVSR in the left pane of MO and selecting the ''INI-Files'' tab. "NVSE/plugins/sr_New_Vegas_Stutter_Remover.ini" should be listed in the top left box, click it, and use the following to make changes accordingly: | |||
{{alert|type=notice|text=Windows 10 Fall Creator's Update completely broke some core functions in this. If you have that OS you must disable 2 core functions.}} | |||
If you are on Windows 10 you must do this: | |||
<pre> bHookCriticalSections=0 | |||
bHookLightCriticalSections=0 | |||
</pre> | |||
All other users can continue with the following settings. | |||
Master section (Enable/Disable NVSR functions): | |||
<pre>Master = { | |||
_comment = You can turn on or off each distinct feature from here. | |||
bManageFPS = 1 | |||
bHookCriticalSections = 1 | |||
bHookLightCriticalSections = 0 <-- Default is 1, but that setting has been known to cause major stuttering on some systems | |||
bHookHashtables = 1 | |||
bReplaceHeap = 1 <-- Needed for heap replacement, only for advanced users, detailed info in the readme. Modern systems will want to make use of this so it is recommended to enable this. | |||
bReplaceGetTickCount = 1 | |||
bLogToConsole = 0 | |||
bFastExit = 1 | |||
bFlushLog = 1 | |||
iSchedulingResolution = 1 | |||
bReplaceRandom = 1 | |||
bExperimentalStuff = 0 | |||
iMainHookPoint = 1 | |||
}</pre> | |||
<!-- Experimental section (needed if using heap replacement algorithms #3, #5, or #6, more info during Heap section): | |||
<pre>Experimental = { | |||
iReduceLongSleep = 0 | |||
bRemoveShortSleep = 0 | |||
iThreadsFixedToCPUs = 0 | |||
bSuppressRandomSeeding = 0 | |||
bBenchmarkHeap = 0 | |||
bAlternateHeapHooks = 0 | |||
iHeapMainBlockAddress = 0 | |||
}</pre>--> | |||
FPS section: | |||
<pre>FPS_Management = { | |||
bInject_iFPSClamp = 1 | |||
fMaximumFPS = 60 <-- Default is 30, but should bet set to monitor refresh rate or either 1/2 or 1/3 refresh rate | |||
fMinimumFPS = 20 | |||
iFPS_Report_Period = 4000 | |||
fExtraSleepPercent =0.05 | |||
}</pre> | |||
Heap Section (used for Heap replacement): | |||
<pre>Heap = { | |||
_comment = Heap replacement can produce MAJOR improvements in performance on Oblivion at a significant cost in stability | |||
_comment = It crashes instantly on Fallout3 last I remember checking | |||
_comment = It seems to work on Fallout: New Vegas ? | |||
_comment = Algorithms: 1=FastMM4, 2=Microsoft (slow on XP), 3=SimpleHeap1, 4=TBBMalloc, 5=ThreadHeap2, 6=ThreadHeap3, 8=tcmalloc | |||
_comment = Algorithms numbers 1, 4, and 8 require external DLL files in the Data/OBSE/Plugins/ComponentDLLs folder | |||
iHeapAlgorithm = 6 <-- Only #2, #3, #5, and #6 are the only methods supported by {{NAMESPACE}} at the moment | |||
#3, #5, and #6 require a change to iHeapMainBlockAddress in Experimental section | |||
From NVSR Readme: | |||
1: FastMM4 heap. This requires an external dll (BorlndMM.dll) to be present in | |||
Data/nvse/plugins/ComponentDLLs, otherwise it will prevent the game from starting up. | |||
2: Windows standard heap. OS dependant. A really bad idea on XP, but okay on Vista and Windows 7. | |||
3: SimpleHeap1, made by me. | |||
4: TBBMM, aka TBBMalloc. Made by Intel. Fast. This requires an external dll (tbbmalloc.dll) to be present | |||
5: ThreadHeap2, made by me. Fast. | |||
6: ThreadHeap3, made by me. Fast. | |||
8: tcmalloc. Made by Google. Usually fast. This requires an external dll (libtcmalloc_minimal.dll) to be | |||
present. | |||
Note that heap algorithms 3, 5, and 6 are statically sized based upon the iHeapSize setting. Heap algorithms | |||
1, 2, 4, and 8 will resize themselves as needed. The fastest algorithms tend to be 6, 4, 5, and 8, but it | |||
varies from computer to computer. | |||
bEnableProfiling = 0 | |||
iHeapSize = 450 <-- This only affects heap algorithms #3, #5, and #6, default is 450 | |||
bEnableMessages = 0 | |||
bZeroAllocations = 0 | |||
}</pre> | |||
Cannot recommend this plugin enough. In addition to the fix for the stutter bug, it can do so many more things. Many of them are really advanced for even advanced modders. To understand some of these functions a decent knowledge of software architecture and imperative, procedural, or declarative programming is required. This does not mean that those advanced features should be avoided. Overtime this section will expand with more details and suggestions for general users. Right now all the information is made directly from the readme which is the best source of information for the mod. | |||
===== [https://www.nexusmods.com/newvegas/mods/36175/? Armor Replacer Child NPC Fix] ===== | |||
* '''Atuhor''': HanzoTheRazor | |||
* '''Version''': v1.0 | |||
Fix armor that children wear if a body replacer is used so the kids do not look weird. Shout out to WilliamImm for recommending this mod. | |||
<!-- | |||
===== [https://www.nexusmods.com/newvegas/mods/42836/? Reload Speed Game Start Fix] ===== | |||
* '''Author''': sergelac | |||
* '''Version''': v2 | |||
* '''Requirements''': NVSE | |||
Fixes a problem with reload speed when game starts. | |||
===== [https://www.nexusmods.com/newvegas/mods/41114/? REPCONN Test Site Fixes] ===== | |||
* '''Author''': Yukichigai | |||
* '''Version''': v0.2 | |||
This was accidentally left out of YUP. Should be in the next version. | |||
===== [https://www.nexusmods.com/newvegas/mods/38927/? Rifle 1st person Accuracy Fix] ===== | |||
* '''Author''': joefoxx082 | |||
* '''Version''': v1.0 | |||
===== [https://www.nexusmods.com/newvegas/mods/45717/? Safe ShowRaceMenu] ===== | |||
* '''Author''': MystykStar | |||
* '''Version''': v1.1 | |||
* '''Installation''': Get the ''Safe ShowRaceMenu - Mirrors'' file and appearance can be changed in game by using mirrors in bathrooms (there is a picture of which mirrors work on the nexus page). The other version is good if using the console is preferred. | |||
Using ''showracemenu'' console command will reset certain stats or perks, so this mod fixes that issue. | |||
--> | |||
===== Game Tweaks ===== | |||
* '''Author''': EssArrBee | |||
* '''Version''': v1.0 | |||
* '''Installation''': There are two ways get the file. Create it using FNVEdit or by downloading the pre-made version. Choose one of the following: | |||
# Create plugin manually with FNVEdit [[User:EssArrBee/FalloutNewVegas_GameTweaks#Game_Tweaks|here]]. | |||
#* The FNVEdit instructions are provided to users looking to learn how more about using FNVEdit. | |||
# Download plugin [https://mega.nz/#!IJAlEQbb!BWC-DaTkyZ5UVwkvnBU6TaXXK7NRqie8H4uPaI4kWx4 here]. | |||
#* Go to download location and drag the archive to the Downloads tab in MO. | |||
#* This is for users that just want to install the mod. | |||
Small game setting tweaks that will change the kill cams and size of the Moon. | |||
<!-- | |||
===== Merging Fixes ===== | |||
To reduce the number of plugins the Merge Plugins Standalone is very useful. It can merge a number of mods, even some extremely complex mods. Since the goal of the fixes are all related, it is a good idea to merge them into one plugin. | |||
# Open Merge Plugins Standalone through MO and click {{ui|OK}}. | |||
# Hold <code>ctrl</code> and click every plugin listed below: {{AlertSmall|type=notice|size=31|text=If the plugins are contiguous hold <code>shift</code> and click the first then the last.}} | |||
#* Armor Replacer Child NPC Fix.esp | |||
#* Reload Speed Game Start Fix.esp | |||
#* Game Tweaks.esp | |||
# Right click one of the highlighted plugins and goto "Add to merge", then select "<New Merge>". | |||
#* In the popup, type the name of the merge and the plugin, then click {{ui|OK}}. ''Tweaks and Fixes'' is recommended for both. | |||
# Open the Merges tab and right click "Tweaks and Fixes" and goto "Plugins", then select "Check plugins for errors". | |||
#* {{Fc|red|'''TICK'''}} "Copy general assets" in the Settings->Integration tab. | |||
# Right click "Tweaks and Fixes" again and select "Build Merge". | |||
# When complete click {{ui|Close}}, then close Merge Plugins Standalone. | |||
# The mod now resides in the ''Tweaks and Fixes'' folder. | |||
#* It may not show in MO's left panel, so click the small tool icon dropdown above the left panel and select "Refresh". | |||
# Move the folder right below ''Game Tweaks'' and make sure it is ticked. | |||
# Untick all the mods that were merged from the list above. | |||
#* The plugin that was just created will be used again in other parts of the guide for additional patching, fixes, and tweaks. | |||
# Bash tags need to be added for the plugin. It is a good idea to do it now by starting FNVEdit and following these instructions: | |||
## From the list of plugins double click "Tweaks and Fixes.esp" | |||
## When FNVEdit loads, right click "Tweaks and Fixes.esp" and select "Apply Script" | |||
## Choose "Generate Bash Tags" from the dropdown and click {{ui|OK}} | |||
## When asked to add the tags to the header, select {{ui|Yes}} | |||
##* Only 'Invent' should have been added. | |||
## Close and save. | |||
===== Merged Tweaks and Fixes ===== | |||
* '''Author''': The Mod Authors (99%) and You (1%) | |||
* '''Version''': v6 | |||
* '''Changelog''': This tiny changelog is provided for users that may have already done an older version of this section. | |||
*::::* v1: Initial version | |||
*::::* v2: Updated to follow new procedure require from xEdit Merge Plugins Script. | |||
*::::* v3: Dropped Safe ShowRaceMenu to save plugin slot. | |||
*::::* v4: Dropped REPCONN Test Site Fixes, no longer needed. | |||
*::::* v5: Ported instructions over to Merge Plugins Standalone and changed name to Tweaks and Fixes since the resulting plugin will be used over again in the guide. | |||
*::::* v6: Added Game Tweaks. | |||
This is a placeholder for the mod created when using the merge script from above and the first use of the merged plugin script in the guide. It is a simple merge of three mods, but is a good starter for the procedure that go into using the merged plugin script. Shout out to Audley for the reminder that these mods could easily be merged! | |||
===== [https://www.nexusmods.com/newvegas/mods/57782/? OWB Sonic Emitter Projectile Fix] ===== | |||
* '''Author''': EssArrBee | |||
* '''Version''': v1.0 | |||
* '''Note''': Not added to the merging instructions because it is mergeable to the Bashed Patch. | |||
Small fixes to OWB Sonic Emitter projectiles. --> | |||
===== [https://www.nexusmods.com/newvegas/mods/51664//? Yukichigai Unofficial Patch - YUP] ===== | |||
* '''Author''': Yukichigaki, sandbox6 | |||
* '''Version''': v11.6 | |||
* '''Installation''': Install the ''YUP - Base Game and All DLC'' main file. | |||
This mod can be consider the main unofficial patch for New Vegas and is still being actively supported by Yukichigai and New Vegas players. | |||
===== [https://www.nexusmods.com/newvegas/mods/62953/? Unofficial Patch Plus] ===== | |||
* '''Author''': PushTheWinButton and others | |||
* '''Version''': v2.04 | |||
* '''Installation''': Install both the main file and the ''Unofficial Patch Plus - Project Nevada Patch'' optional file. When installing the optional file, select {{ui|Merge}}, not {{ui|Replace}}. | |||
This mod expands on fixes outside the bound of YUP by combining things that can only be fixed with NVSE and functions created for use with NVSE. | |||
== Quests & Cut Content == | |||
Nothing really breathes new life into a game like additional content. This section will add content mods to open up new areas and quests for users that have playthrough the game a few times and might be looking for something new. | |||
==== New Vegas Uncut ==== | |||
This series was made by MoBurma to reintroduce some of the cut content that was still inside the game files. Some of it restores really good pieces of ''Fallout New Vegas'' and the other mods are just tiny parts that are forgettable. These mods are able to be merged to together using a FNVEdit merge script. Instructions for that are yet to come for users not familiar with using that advanced feature of FNVEdit. | |||
===== [https://www.nexusmods.com/newvegas/mods/45799/? New Vegas Uncut 1 - Rotface to Riches] ===== | |||
* '''Author''': MoBurma | |||
* '''Version''': v1.2 | |||
* '''Note''': The ''Count Fix'' optional file is for users that are installing the mod to a game in progress and have gotten tips from Rotface. | |||
Rotface will now use those caps for stuff. | |||
===== [https://www.nexusmods.com/newvegas/mods/45886/? New Vegas Uncut 2 - A Koch and Bohr Story] ===== | |||
* '''Author''': MoBurma | |||
* '''Version''': v1.1 | |||
Very small restoration of two robots who miss their master. | |||
===== [https://www.nexusmods.com/newvegas/mods/45991/? New Vegas Uncut 3 - A Van Graff Scorned] ===== | |||
* '''Author''': MoBurma | |||
* '''Version''': v1.1 | |||
* '''Installation''': LOOT reports this mod needs to cleaned with FNVEdit: | |||
:* avangraffscorned.esp | |||
Contains dirty edits: 1 ITM, 0 UDR records. Follow instructions for cleaning [[User:EssArrBee/FNVEdit Mod Cleaning|here]]. | |||
Really nice piece of content, but very small. | |||
===== [https://www.nexusmods.com/newvegas/mods/46048/? New Vegas Uncut 4 - A Thorny Situation] ===== | |||
* '''Author''': MoBurma | |||
* '''Version''': v1.0 | |||
* '''Installation''': LOOT reports this mod needs to cleaned with FNVEdit: | |||
:* athornysituation.esp | |||
Contains dirty edits: 10 ITM, 0 UDR records. Follow instructions for cleaning [[User:EssArrBee/FNVEdit Mod Cleaning|here]]. | |||
Opens up a new option for The Thorn quest. | |||
===== [https://www.nexusmods.com/newvegas/mods/46158/? New Vegas Uncut 5 - A Wilder Wasteland] ===== | |||
* '''Author''': MoBurma | |||
* '''Version''': v1.0 | |||
* '''Installation''': LOOT reports this mod needs to cleaned with FNVEdit: | |||
:* awilderwasteland.esp | |||
Contains dirty edits: 9 ITM, 0 UDR records. Follow instructions for cleaning [[User:EssArrBee/FNVEdit Mod Cleaning|here]]. | |||
Make the Wild Wasteland perk even more wild. | |||
<!-- | |||
===== [https://www.nexusmods.com/newvegas/mods/59265/? New Vegas Uncut 6 - If It Wasn't For Betsy Remastered] ===== | |||
* '''Author''': Lexx | |||
* '''Version''': v2.1 | |||
* '''Installation''': After installation | |||
LOOT reports this mod needs to cleaned with FNVEdit: | |||
:* lexx_brahmin-betsy.esp | |||
Contains dirty edits: 17 ITM, 0 UDR records. Follow instructions for cleaning [[User:EssArrBee/FNVEdit Mod Cleaning|here]].--> | |||
===== [https://www.nexusmods.com/newvegas/mods/46584/? New Vegas Uncut 7 - Pacers Gambit] ===== | |||
* '''Author''': MoBurma | |||
* '''Version''': v1.0 | |||
* '''Installation''': LOOT reports this mod needs to cleaned with FNVEdit: | |||
:* Pacersgambit.esp | |||
Contains dirty edits: 1 ITM, 0 UDR records. Follow instructions for cleaning [[User:EssArrBee/FNVEdit Mod Cleaning|here]]. | |||
Adds a new part of the Kings and NCR feud. | |||
<!-- | |||
===== [https://www.nexusmods.com/newvegas/mods/46585/? New Vegas Uncut 8 - Welcome to Fabulous New Vegas] ===== | |||
* '''Author''': MoBurma | |||
* '''Version''': v1.1 | |||
* '''Installation''': Get the ''Welcome to Fabulous New Vegas Extended Cut v1-0'' main file. LOOT reports this mod needs to cleaned with FNVEdit: | |||
:* originalintroExtended.esp | |||
Contains dirty edits: 4 ITM, 0 UDR records. Follow instructions for cleaning [[User:EssArrBee/FNVEdit Mod Cleaning|here]]. | |||
Restores the extended intro movie with lots of good stuff not included in the original. | |||
===== Merging New Vegas Uncut ===== | |||
To reduce the number of plugins the Merge Plugins xEdit Script is very useful. It can merge a number of mods, even some extremely complex mods. Since the goal of the NV Uncut Series mods are all related, it is a good idea to merge them into one plugin. | |||
# Open FNVEdit through MO. | |||
# Right click the list of mods and "Select None". | |||
# Now tick the following mods and click [OK]: | |||
#* kochandbohr.esp | |||
#* rotfacetoriches.esp | |||
#* avangraffscorned.esp | |||
#* athornysituation.esp | |||
#* awilderwasteland.esp | |||
#* Pacersgambit.esp | |||
#* originalintroExtended.esp | |||
# After FNVEdit loads, right click on kochandbohr.esp and select "Apply Script". | |||
## From the top dropdown select Merge Plugins v1.9 and click [OK]. | |||
##* The merge plugin script may need to be setup. Use the settings found [[:File:Merge Script Options.png|here.]] | |||
## In the Merge Plugins pop up, tick all the plugins listed above and click [OK]. | |||
## In the next pop up click [OK], then give the merged plugin a name and click [OK]. ''NewVegasUncutSeries'' is recommended. | |||
# Close FNVEdit and save '''ONLY''' the new plugin. | |||
# The new mod now resides in the ''Overwrite'' folder, so right click ''Overwrite'' and "Create Mod". | |||
#* Name the folder "New Vegas Uncut Series Merged" and make sure it is listed right after ''Pacers Gambit'' in the left pane. | |||
# In the left pane of MO, untick all the mods that were merged. | |||
# Now make sure the new mod is ticked and open FNVEdit through MO. | |||
## Right click the list and "Select None". | |||
## Tick "YUP - Base Game + All DLC.esm" and "NewVegasUncutSeries.esp", then expand "NewVegasUncutSeries.esp" and the record <code>Armor</code>. | |||
## Click record <code>00134094</code>, then drag line <code>BMDT - Biped Data</code> from the ''YUP - Base Game + All DLC.esm'' column, to the right, ''NewVegasUncutSeries.esp'' column. | |||
## Now do the same for line <code>DATA - Data</code> and <code>DNAM -</code>. | |||
## Now expand <code>Dialog Topic->0010E028</code>. | |||
## Click record <code>001205A6</code>, and then drag line <code>Responses->Response->NAM1 - Response Text</code> from the ''YUP - Base Game + All DLC.esm'' column to the ''NewVegasUncutSeries.esp'' column. | |||
## Repeat the exact same operation for record <code>001547A4</code>. | |||
# Close FNVEdit and save ''NewVegasUncutSeries.esp''. | |||
# Bash tags need to be added for the plugin. It is a good idea to do it now by starting Wrye Flash NV and following these instructions: | |||
## Select "NewVegasUncutSeries.esp" and then right click the Bash Tags box in the bottom right and add each these tags: | |||
##* Actors.ACBS | |||
##* Actors.AIPackages | |||
##* Actors.DeathItem | |||
##* Actors.Stats | |||
##* Factions | |||
##* Graphics | |||
##* Names | |||
##* Relations | |||
##* Scripts | |||
##* Stats | |||
===== New Vegas Uncut Series Merged ===== | |||
* '''Author''': MoBurma (99%) and You (1%) | |||
* '''Version''': v4 | |||
* '''Changelog''': This tiny changelog is provided for users that may have already done an older version of this section. | |||
*::::* v1: Original version with NV Uncut 1, 2, and 3. | |||
*::::* v2: Added NV Uncut 4, 5, 6, and 7. NV Uncut 6 was removed because of conflict with Nevada Skies. | |||
*::::* v3: Added directions for forwarding YUP fixes to merged plugin. | |||
*::::* v4: Updated to follow new procedure require from xEdit Merge Plugins Script. | |||
This is the second example of how the merge plugin script and demonstrates a more difficult merging procedure than the first. Additionally, there was also some instructions to solve conflicts with YUP, this is known as forwarding fixes. For the rest of the guide, any place that there is a mod or section to merge plugins and add fixes, it will have similar instructions. | |||
--> | |||
==== More Cut Content ==== | |||
Sandbox6 is another author that has restored some really good little pieces all over the map. These mods are also good candidates to be merged together after installation to save some plugin spots. | |||
===== [https://www.nexusmods.com/newvegas/mods/55956/? Cut Sewers Restored] ===== | |||
* '''Author''': sandbox6 | |||
* '''Version''': v0.2 | |||
Adds two sewers cut from the game with some something to shoot at. | |||
<!--===== [https://www.nexusmods.com/newvegas/mods/55946/? No more giant manhole covers] ===== | |||
* '''Author''': sandbox6 | |||
* '''Version''': v1.0 | |||
* '''Note''': The collision is off on the grates, so do not run into them. | |||
Probably not cut content technically, but any guide based on a Hunter Thompson story and Terry Gilliam movie should not be worried about technicalities. Makes the big sewer openings into grates since water does not flow through a big manhole. | |||
--> | |||
===== [https://www.nexusmods.com/newvegas/mods/56257/? Strip Wall Billboards] ===== | |||
* '''Author''': sandbox6 | |||
* '''Version''': v1.0 | |||
Great little restoration of The Strip wall billboards. Adds a little something that was missing. | |||
===== [https://www.nexusmods.com/newvegas/mods/56625/? Uncut Wasteland] ===== | |||
* '''Author''': sandbox6 | |||
* '''Version''': v0.91b | |||
* '''Installation''': Install the ''Uncut Wasteland plus NPCs'' main file. | |||
This mod adds back in tons of little things left out of the game that were not very performance friendly. Moore's Law has taken care of that years later, so this gem adds all that stuff back in. | |||
===== Merging Cut Content Mods ===== | |||
# Open Merge Plugins Standalone through MO and click {{ui|OK}}. | |||
#* {{Fc|red|'''TICK'''}} "Copy general assets" in the Settings->Integration tab. | |||
# Hold <code>ctrl</code> and click every plugin listed below:{{AlertSmall|type=notice|size=31|text=If the plugins are contiguous hold <code>shift</code> and click the first then the last.}} | |||
#* {{Fc|white|rotfacetoriches.esp}} | |||
#* {{Fc|white|kochandbohr.esp}} | |||
#* {{Fc|white|avangraffscorned.esp}} | |||
#* {{Fc|white|athornysituation.esp}} | |||
#* {{Fc|white|awilderwasteland.esp}} | |||
#* {{Fc|white|Pacersgambit.esp}} | |||
#* {{Fc|white|Cut Sewers Restored.esp}} | |||
#* {{Fc|white|Strip Wall Billboards.esp}} | |||
#* {{Fc|white|Uncut Wasteland.esp}} | |||
# Right click one of the highlighted plugins and goto "Add to merge", then select "<New Merge>". | |||
#* In the popup, type the name of the merge and the plugin, then click {{ui|OK}}. ''Cut Content Merged'' is recommended for both. | |||
# Open the Merges tab and right click "Cut Content Merged" and goto "Plugins", then select "Check plugins for errors". | |||
## There will be errors, so right click "Cut Content Merged" and goto "Plugins", then select "Resolve issues". | |||
## Right click Uncut Wasteland.esp and select "Ignore errors", then click {{ui|OK}}. | |||
# Right click "Cut Content Merged" again and select "Build Merge". | |||
# When complete click {{ui|Close}}, to close Merge Plugins Standalone. | |||
# The mod now resides in the ''Cut Content Merged'' folder. | |||
#* It may not show in MO's left panel, so click the small tool icon dropdown above the left panel and select "Refresh". | |||
# Move the folder right below ''Uncut Wasteland'' and make sure it is ticked. | |||
# Untick all the mods that were merged from the list above. | |||
# Bash tags need to be added for the plugin and there are a couple fixes to be forwarded. It is a good idea to do it now by starting FNVEdit and following these instructions: | |||
## Right click the list and "Select None". | |||
## Tick "YUP - Base Game + All DLC.esm" and "Cut Content Merged.esp", then hold <code>shift</code> and click {{ui|OK}}. | |||
## After xEdit loads, copy and paste the record ID <code>00134094</code> into the field "FormID" and press ENTER to open the associated record. | |||
## Drag the line <code>BMDT - Biped Data</code> from the ''YUP - Base Game + All DLC.esm'' column into the right ''Cut Content Merged.esp'' column. | |||
## Do the same for the lines <code>DATA - Data</code> and <code>DNAM -</code>. | |||
## Open record <code>001205A6</code>, and then drag the line <code>Responses->Response->NAM1 - Response Text</code> from the ''YUP - Base Game + All DLC.esm'' column into the ''Cut Content Merged.esp'' column. | |||
## Repeat the exact same operation for record <code>001547A4</code>. | |||
## Now right click "Cut Content Merged.esp" and select "Apply Script" | |||
## Choose "Generate Bash Tags" from the dropdown and click {{ui|OK}} | |||
## When asked to add the tags to the header, select {{ui|Yes}} | |||
##* Tags that should be added: | |||
##** {{Fc|white|Actors.ACBS}} | |||
##** {{Fc|white|Actors.AIPackages}} | |||
##** {{Fc|white|Actors.DeathItem}} | |||
##** {{Fc|white|Actors.Stats}} | |||
##** {{Fc|white|C.Light}} | |||
##** {{Fc|white|C.Water}} | |||
##** {{Fc|white|Factions}} | |||
##** {{Fc|white|Graphics}} | |||
##** {{Fc|white|Invent}} | |||
##** {{Fc|white|Names}} | |||
##** {{Fc|white|Relations}} | |||
##** {{Fc|white|Scripts}} | |||
##** {{Fc|white|Stats}} | |||
## Close and '''ONLY''' save "Cut Content Merged.esp". | |||
===== Cut Content Merged ===== | |||
* '''Author''': MoBurma, sandbox6 (99%), and You (1%) | |||
* '''Version''': v1 | |||
* '''Changelog''': This tiny changelog is provided for users that may have already done an older version of this section. | |||
*::::* v1: Original version | |||
This is the second example of how the merge plugin script and demonstrates a more complex merging procedure than the first. Additionally, there was also some instructions to solve conflicts with YUP, this is known as forwarding fixes. For the rest of the guide, any place that there is a mod or section to merge plugins and add fixes, it will have similar instructions. This is a great set of mods to use with the merge script. It restores lots of little parts that were left out of New Vegas that can now be added back in and enjoyed. Try going to the Hoover Dam and seeing some of the missing detail added by Uncut Wasteland or check out the billboard wall that surrounds The Strip. | |||
==== ''"And that, I think, was the handle..."'' ==== | |||
''"...that sense of inevitable victory over the forces of old and evil."'' - Raoul Duke. These mods will continue the triumph over evil by hunting down scum for money or avenging the death of a friend only ever known from a distance. | |||
===== [https://www.nexusmods.com/newvegas/mods/41142/? Sortomatic - Modders Resource] ===== | |||
* '''Author''': tunaisafish and Gribbleshnibit8 | |||
* '''Version''': v1.3 | |||
* '''Requirements''': NVSE | |||
This mod sorts inventory into separate containers for houses that support it. Very useful for hoarders, like me, you, and everyone that has every played a Bethesda game. Shout out to Kelmych for recommending this mod. It is a UI mod that is needed to support "Afterschool Special", and another mod later in the guide. | |||
===== [https://www.nexusmods.com/newvegas/mods/43757/? Afterschool Special] ===== | |||
* '''Author''': Mike Hancho | |||
* '''Version''': v2.01 | |||
* '''Requirements''': NVSE, Sortomatic | |||
* '''Installation''': Get the ''Afterschool Special V 2O1 - Sortomatic V4 Full'' main file. This mod is not packaged properly, follow these instructions: | |||
During the install, expand "Afterschool_Special_V201_Sortomatic_V4" and right click "DATA", then select "Set data directory" and click [OK]. | |||
Probably the best school house mod ever made? | |||
: | ===== [https://www.nexusmods.com/newvegas/mods/46907/? Beyond Boulder Dome] ===== | ||
: | * '''Author''': The Beyond Boulder Dome Team | ||
* '''Version''': v1.2 | |||
* '''Installation''': Install all five main files and then install the update file, click [Merge] not [Replace] for all. | |||
===== [ | This mod is the closest to a third party DLC that exists for New Vegas. It is a separate worldspace in Colorado with tough enemies and lots of radiated areas. | ||
===== [https://www.nexusmods.com/newvegas/mods/43411/? D.E.I.M.O.S.] ===== | |||
* '''Author''': Alexander J Velicky | |||
* '''Version''': v1.05 | |||
Nice quest, not very long, but the voice acting and story are good. Take a shotgun and energy weapon with you, but you must leave companions behind and go ahead alone at an obvious point. | |||
===== [https://www.nexusmods.com/newvegas/mods/40433/? The New Bison Steve Hotel and Lucky Casino] ===== | |||
* '''Author''': Mike Hancho | |||
* '''Version''': v107 | |||
* '''Requirements''': NVSE, Sortomatic | |||
* '''Installation''': Get the ''New Bison Steve Version 107 MASTER FILE VERSION'' main file and the ''New Bison Steve Version 107 - SORTOMATIC VERSION'' optional file. This mod is packaged incorrectly, follow these instructions: | |||
During main file install, expand "New_Bison_Steve_V107_Master", then right click "Data" and select "Set data directory" and click [OK]. | |||
During optional file install, expand "New Bison Steve Hotel - Sortomatic->ESM version", then right click "Data" and select "Set data directory" and click [OK], select [Merge] not [Replace]." | |||
Give some extra life to Primm. | |||
===== [https://www.nexusmods.com/newvegas/mods/48925/? The Someguy Series] ===== | |||
* '''Author''': someguy2000 | |||
* '''Version''': v2.0 | |||
* '''Installation''': This mod is not packaged correctly, follow these instructions: | |||
During the install, expand "Someguy Series 2.0" and right click "DATA", then select "Set data directory" and click [OK]. | |||
This is a master file that lets all the someguy mods work together. NV Bounties I & II are already included in the guide and others will be added as their testing is completed. | |||
===== [https://www.nexusmods.com/newvegas/mods/37310/? New Vegas Bounties I] ===== | |||
* '''Author''': someguy2000 | |||
* '''Version''': v1.55 | |||
* '''Requirements''': The Someguy Series | |||
Great set of bounties with decent voice acting. They are fun to do for some quick cash. | |||
===== [https://www.nexusmods.com/newvegas/mods/41184/? New Vegas Bounties II] ===== | |||
* '''Author''': someguy2000 | |||
* '''Version''': v1.47 | |||
* '''Requirements''': The Someguy Series, New Vegas Bounties I | |||
* '''Installation''': This mod is not packaged correctly, follow these instructions: | |||
During the install, expand "NVBII Version 1.47" and right click "DATA", then select "Set data directory" and click [OK]. | |||
NOTE: Some Bounty Quests will make the game Crash/CTD IF companions are present. Excluding "Willow". Leave the Kids @home. | |||
This mod really shows how someone can grow as a developer. Someguy added in options to kill or capture criminals with bounties on their head. Lots of new areas added to the game and you might have to think about how to approach some of the quests instead of just running in guns blazing and retrieving a finger. | |||
===== [https://www.nexusmods.com/newvegas/mods/37172/? Tales from the Burning Sands] ===== | |||
* '''Author''': Puce Moose | |||
* '''Version''': v1.31b | |||
* '''Installation''': Get the ''Tales from the Burning Sands 1.31b FULL version - all three chapters'' main file '''ONLY'''. | |||
LOOT reports this mod needs to cleaned with FNVEdit: | |||
* Tales from the Burning Sands.esm | |||
Contains dirty edits: 17 ITM, 0 UDR records. Follow instructions for cleaning [[User:EssArrBee/FNVEdit Mod Cleaning|here]]. | |||
This one is for the people that like the old school RPGs where quests require lots of reading and actually paying attention because quest markers are not part of the mix. Lots of detail is added to this mod and it is easy to overlook at lot of it, so keep an eye out. | |||
== User Interface == | |||
The interface section will be the first section where mods that affect the actually in game elements are installed. | |||
==== UI Mods Requiring a Specific Installation Procedure ==== | |||
UI Organizer (UIO) is a NVSE plugin that allows UI mods to be installed and uninstalled without having to worry if they have UI elements. If following this guide, it is required. Download the file but DON'T INSTALL / ACTIVATE UI ORGANIZER YET. It will be installed at the end of the section after Flashlightnvse. The reason for this is UIO will correct any conflicts and/or overwrites of all the previously installed UI mods. | |||
<!-- | |||
Also important to keep in mind. Many of the mods in this section need to 'see' Darnified UI when installed, but UIO will need to 'see' it in a different spot in the load order. Remember this if you later reinstall any of the mods prior to that spot in the guide, because you will have to reposition Darnified UI again to its original installation load order position prior to doing that and then put it back again down to the other spot afterwards. | |||
--> | |||
<!--{{alert|type=construction|text=This section is currently a work in progress. Only the experienced users should attempt to get it working. Use the PDF at the top for a complete version of the guide.}}--> | |||
===== [https://www.nexusmods.com/newvegas/mods/57174/? UIO - UI Organizer] ===== | |||
* '''Author''': jazzisparis | |||
* '''Version''': v1.31 | |||
*'''Note''': Do NOT install / activate UIO yet. If you activate the file now, your UI will most certainly be bugged or malfunction. Install / activate UIO after Flashlightnvse. | |||
* '''Note 2''': There may some files or folders in the ''Overwrite'' folder after exiting the game or after a crash. This is not a problem, those files can be ignored or deleted without issue. The mod will regenerate those files every time the game loads. | |||
The next great HUD management mod. | |||
===== [https://ui.darnified.net/wip/DUIFONV/v1/DUINVv04.7z Darnified UI] ===== | |||
* '''Author''': Darn | * '''Author''': Darn | ||
* '''Version''': v04beta | * '''Version''': v04beta | ||
* '''Fallout 3 Equivalent''': [https://forums.bethsoft.com/topic/1045221-wipzbeta-darnified-ui-f3/ Darnified UI] | |||
* '''Installation''': To install this mod with MO click [Manual], then [Okay] during the installation or the default installer will skip a very important file. | |||
* '''Alternate Download'''; This file is also hosted on [https://www.moddb.com/games/fallout-new-vegas/addons/darnified-ui-v04 ModDB]. Until another location is made available you can access it there. As of 15th January 2017 it appears the original site is back in Darn's control and you should use that. | |||
Even though this mod never made it out of beta it is still complete enough to be used for all interface text. Some other modders have also expanded the Darnified font to other parts of the game. | |||
[https://forums.bethsoft.com/topic/1135390-wipzbeta-darnified-ui-nv/ Author's Page] | |||
===== [https://www.nexusmods.com/newvegas/mods/63560/? DarNified UI Font Dummies] ===== | |||
* '''Author''': Axonis | |||
* '''Version''': v1.0 | |||
Makes the Darnified UI fonts work without ini editing. | |||
===== [ | ===== [https://www.nexusmods.com/newvegas/mods/65459/? Darnified UI Extension] ===== | ||
* '''Author''': | * '''Author''': Jesus H Christ | ||
* '''Version''': v1. | * '''Version''': 0.9 | ||
* ''' | * '''Installation''': Get all main files. Install them in any order, but for the second and third file, click {{ui|Merge}}, not {{ui|Replace}}. | ||
This extension allows the colour of fonts in the main menu to match the one you've set in Darnified UI, adds a useful preload function to UI textures, and support for upscaled icons. | |||
<!-- | |||
===== [https://www.nexusmods.com/newvegas/mods/55303/? Darnified UI Add-on - DT and DR] ===== | |||
* '''Author''': Slippy | |||
* '''Version''': 1.1 | |||
* '''Installation''': Get the ''Darnified UI - DT and DR'' main file. | |||
This allows DT & DR to display at the same time while using Darnified UI. | |||
--> | |||
===== [https://www.nexusmods.com/newvegas/mods/34814/? Ambient Temperature] ===== | |||
* '''Author''': Imp of the Perverse | |||
* '''Version''': v1.2.1 | |||
This mod allows other mods to use temperature to affect how the world works. {{Fc|#ddd|Powered Power Armor}} is the mod in this guide that will make use of it. | |||
===== [https://www.nexusmods.com/newvegas/mods/39997/? FPS Weapon Wheel] ===== | |||
* '''Author''': vivanto | |||
* '''Version''': v1.13 | |||
Transform the mouse scroll wheel into a weapon selector, just like a real FPS. | |||
===== [https://www.nexusmods.com/newvegas/mods/49892/? JIP Realistic Weapon Overheating] ===== | |||
* '''Author''': jazzisparis | |||
* '''Version''': v0.90 | |||
This mod adds in weapon overheating so play and spray is a little less easy in big fire fights. Also, adds to weapon degradation if the weapon is hot constantly. | |||
===== [https://www.nexusmods.com/newvegas/mods/49478/? JIP Selective-Fire] ===== | |||
* '''Author''': jazzisparis | |||
* '''Version''': v1.21 | |||
* '''Requirements''': NVSE, JIP NVSE Plugin | |||
===== [ | Changes the firing mode of the guns in game. It is compatible with any gun added by mods, and has an MCM menu to customize the options. | ||
<!-- | |||
===== [https://www.nexusmods.com/newvegas/mods/38808/? Grenade Hotkey] ===== | |||
* '''Author''': vivanto | * '''Author''': vivanto | ||
* '''Version''': v1.3.0 | * '''Version''': v1.3.0 | ||
| Line 136: | Line 1,060: | ||
Adds hotkeys for grenade, grenade swapping, and melee attack. If going to add in Project Nevada make sure to skip this mod, since PN has a grenade hotkey feature. | Adds hotkeys for grenade, grenade swapping, and melee attack. If going to add in Project Nevada make sure to skip this mod, since PN has a grenade hotkey feature. | ||
--> | |||
===== [https://www.nexusmods.com/newvegas/mods/50468/? JIP Companions Command and Control] ===== | |||
* '''Author''': jazzisparis | |||
* '''Version''': v2.60 | |||
* '''Requirements''': NVSE, JIP LN NVSE Plugin | |||
Does a ton of Companion stuff. It's so much that most people probably will not even use half the features. | |||
===== [https://www.nexusmods.com/newvegas/mods/59638/? JIP Improved Recipe Menu] ===== | |||
* '''Author''': jazzisparis | |||
* '''Version''': v1.10 | |||
* '''Requirements''': NVSE, JIP NVSE Plugin | |||
Makes the crafting menus less painful to navigate, and keeps it from closing every time you make something. | |||
===== [https://www.nexusmods.com/newvegas/mods/37983/? Powered Power Armor] ===== | |||
* '''Author''': Imp of the Perverse | |||
* '''Version''': vBeta3A | |||
* '''Installation''': Get the ''Powered Power Armor NV Beta3'' main file and the ''Beta 3 Hotfix A'' optional file. Install in that order and click [Merge] not [Replace]. | |||
* '''Note''': This mod will override your console/.ini FOV settings (always resetting to FOV 75) but the in-game item for configuring Powered Power Armor lets you specify a new FOV. | |||
Makes power armor much more complex to own and operate. Reading the read me and nexus page are highly recommend so something is not missed. | |||
===== [ | ===== [https://www.nexusmods.com/newvegas/mods/61407/? Mojave Patch Outpost - YUP-PPA Patch] ===== | ||
* '''Author''': EssArrBee | |||
* '''Version''': v1.0 | |||
* '''Installation''': Get the ''YUP-PPA Patch'' main file. During install rename the file to "YUP-PPA Patch" since the page will be used again for other patches. | |||
Patch for YUP and PPA. | |||
===== [https://www.nexusmods.com/newvegas/mods/40040/? Project Nevada] ===== | |||
* '''Author''': PN Team | |||
* '''Version''': v2.5 | |||
* '''Requirements''': NVSE, DarnUI | |||
Major overhaul of ''Fallout New Vegas'' gameplay and equipment. Adds many new features from sprinting to nightvision. | |||
===== [https://www.nexusmods.com/newvegas/mods/47285/? Project Nevada - Extra Options] ===== | |||
* '''Author''': Gribbleshnibit8 and Roy Batty | |||
* '''Version''': v1.3 | |||
* '''Requirements''': NVSE, Project Nevada | |||
* '''Installation''': Project Nevada {{fc|#ddd|MUST}} be activated first. During the installer, '''DO NOT''' tick the Equipment module or the installer will not work. There is no Equipment module for PN - EO. | |||
Further extension of Project Nevada features. Also, includes a merged DLC patch. | |||
===== [https://www.nexusmods.com/newvegas/mods/42507//? The Mod Configuration Menu] ===== | |||
* '''Author''': Pelinor | |||
* '''Version''': v1.5 | |||
* '''Requirements''': NVSE | |||
* '''Installation''': Get ''The Mod Configuration Menu'' main file and the ''MCM BugFix 2'' update file. | |||
This mod will allow other mods to have advanced functionality by accessing the in game menu for customizable settings. Project Nevada has its own version of this mod so it should be installed before this mod. | |||
===== [https://www.nexusmods.com/newvegas/mods/44515//? The Weapon Mod Menu] ===== | |||
* '''Author''': Pelinor | |||
* '''Version''': v1.2 | |||
* '''Requirements''': NVSE, MCM | |||
* '''Note''': If reinstalling the first part of the User Interface section this mod will need to be uninstalled and reinstalled as well. | |||
Opens up new features to the weapon modding interface used in game, so it is more intuitive. | |||
===== [https://www.nexusmods.com/newvegas/mods/44757//? One HUD - oHUD] ===== | |||
* '''Author''': Gopher | * '''Author''': Gopher | ||
* '''Version''': v1 | * '''Version''': v1.1 | ||
* '''Requirements''': NVSE and | * '''Requirements''': NVSE, MCM | ||
* '''Installation''': Get the ''One HUD (oHUD)'' main file and the ''One HUD (oHUD) Darnified Patch'' optional file. | |||
This mod combines ImmersiveHUD, AdjustableHUD, and Primary Needs HUD into one version for easy installation. | This mod combines ImmersiveHUD, AdjustableHUD, and Primary Needs HUD into one version for easy installation. | ||
===== [ | : For some reason the little arrow on the rad meter is hidden. | ||
After installation, open up "/menus/main/hud_main_menu.xml" and navigate to line 713. | |||
Either comment out the line or delete it | |||
===== [https://www.nexusmods.com/newvegas/mods/39968/? Flashlight NVSE] ===== | |||
* '''Author''': vivanto | |||
* '''Version''': 1.22 | |||
Great mod to use with darker nights. This really helps navigate the wastes for users that do not want to use the Project Nevada vision modes. | |||
{{Sidebox|float=left|width=350px|Vault Boys Say...|[[File:VaultBoyIcon.png|left]]{{Fs|15px|...this would be a good place to start up Fallout New Vegas and see if everything is A-Okay. | |||
:* Start the game, and load up a clean save. Then try the menu and if there is a pop-up message saying there is a problem with MCM or DarnifiedUI, then check if the install has been followed correctly.}} | |||
}} | |||
<div style="clear: both;"></div> | |||
==== Gopher's Advanced Recon ==== | |||
Gopher's Advanced Recon mods will add advanced tactical and stealth gear to the game. This subsection covers the mods and their patches with a small merging section, but it is all still within the UI section. | |||
===== [https://www.nexusmods.com/newvegas/mods/39476/? Advanced Recon Trap Detection] ===== | |||
* '''Author''': Gopher | |||
* '''Version''': v2.7.1 | |||
* '''Fallout 3 Equivalent''': [https://www.nexusmods.com/fallout3/mods/15641/? Advanced Recon Trap Detection] | |||
* '''Installation''': Get the ''Adv Recon Trap Detection'' main file only. | |||
This mod will add some very cool ways to detect traps. This is very helpful when using darker interiors and nights. | |||
===== [https://www.nexusmods.com/newvegas/mods/40051/? Advanced Recon Range Finder] ===== | |||
* '''Author''': Gopher | |||
* '''Version''': v1.2.1 | |||
* '''Fallout 3 Equivalent''': [https://www.nexusmods.com/fallout3/mods/15744/? Advanced Recon Range Finder FO3] | |||
This mod will add a range finder to scoped weapons up to 200 meters. | |||
===== [https://www.nexusmods.com/newvegas/mods/34683/? Advanced Recon Stealth Armor] ===== | |||
* '''Author''': Gopher | * '''Author''': Gopher | ||
* '''Version''': v3. | * '''Version''': v1.4.5 | ||
More recon armors, more combat armors, more fun! | |||
===== [https://www.nexusmods.com/newvegas/mods/38328/? Advanced Recon Thermal Nightvision] ===== | |||
* '''Author''': Gopher | |||
* '''Version''': v3.3.1 | |||
* '''Installation''': Get the ''Adv Recon Thermal Nightvision'' main file only. | |||
Adds in more nightvision gear, which goes great with the other Advanced Recon mods. | |||
==== | ===== [https://www.nexusmods.com/newvegas/mods/61517/? Advanced Recon and Project Nevada Patches (DLC - TTW - Legacy of X-13 Support)] ===== | ||
* '''Author''': darthbdaman | |||
* | * '''Version''': v1.5 | ||
This great mod patches Advanced Recon and Project Nevada with all the appropriate mods in F&L through the wonders of NVSE. | |||
== | {{AlertSmall|type=notice|text=This replaces a number of plugins, such as the "Advanced Recon Tech.esp" which is why that file is not included in the next step.}} | ||
===== Merging Advanced Recon ===== | |||
# Plugin order matters for this merge, so make sure the plugins are listed in MO's right panel the in the order they are listed below. | |||
# Open Merge Plugins Standalone through MO and click {{ui|OK}}. | |||
# Hold <code>ctrl</code> and click every plugin listed below:{{AlertSmall|type=notice|size=31|text=If the plugins are contiguous hold <code>shift</code> and click the first then the last.}} | |||
#* {{Fc|white|Advanced Recon Gear.esp}} | |||
#* {{Fc|white|Advanced Recon Armor.esp}} | |||
#* {{Fc|white|Detect Traps - Perk.esp}} | |||
#* {{Fc|white|Detect Traps - Traponator 4000.esp}} | |||
#* {{Fc|white|Advanced Recon Range Finder.esp}} | |||
#* {{Fc|white|Advanced Recon Patches.esp}} | |||
# Right click one of the highlighted plugins and go to "Add to merge", then select "<New Merge>". | |||
#* In the popup, type the name of the merge and the plugin, then click {{ui|OK}}. ''Advanced Recon Merged'' is recommended for both. | |||
# Open the Merges tab and right click "Advanced Recon Merged" and goto "Plugins", then select "Check plugins for errors". | |||
#* {{Fc|red|'''UNTICK'''}} "Copy general assets" in the Settings->Integration tab. | |||
# Right click "Advanced Recon Merged" again and select "Build Merge". | |||
# When complete click {{ui|Close}}, then close Merge Plugins Standalone. | |||
# The mod now resides in the ''Advanced Recon Merged'' folder. | |||
#* It may not show in MO's left panel, so click the small tool icon dropdown above the left panel and select "Refresh". | |||
# Move the folder right below ''Advanced Recon and Project Nevada Patches (TTW - ADAM - X-13 Support)'' and make sure it is ticked. | |||
# In the left pane of MO, double click ''Advanced Recon Trap Detection''. | |||
# Now go to the "Optional ESPs" tab and move the "Detect Traps - Perk.esp" and "Detect Traps - Traponator 4000.esp" to the Optional ESPs box. | |||
# In the left pane of MO, double click ''Advanced Recon Range Finder''. | |||
# Now go to the "Optional ESPs" tab and move the "Advanced Recon Range Finder.esp" to the Optional ESPs box. | |||
# In the left pane of MO, double click ''Advanced Recon Thermal Nightvision''. | |||
# Now go to the "Optional ESPs" tab and move the "Advanced Recon Gear.esp" and "Advanced Recon Tech.esp" to the Optional ESPs box. | |||
# In the left pane of MO, double click ''Advanced Recon Stealth Armor''. | |||
# Now go to the "Optional ESPs" tab and move the "Advanced Recon Armor.esp" to the Optional ESPs box. | |||
# In the left pane of MO, untick ''Advanced Recon and Project Nevada Patches (TTW - ADAM - X-13 Support)''. | |||
# Bash tags need to be added for the plugin. It is a good idea to do it now by starting FNVEdit and following these instructions: | |||
## From the list of plugins double click "Advanced Recon Merged.esp" | |||
## When FNVEdit loads, right click "Advanced Recon Merged.esp" and select "Apply Script" | |||
## Choose "Generate Bash Tags" from the dropdown and click {{ui|OK}} | |||
## When asked to add the tags to the header, select {{ui|Yes}} | |||
## Close and save. | |||
===== | ===== Advanced Recon Merged ===== | ||
* '''Author''': | * '''Author''': Gopher (85%), darthbdaman (14%), and you (1%) | ||
* '''Version''': | * '''Version''': v2 | ||
* ''' | * '''Changelog''': This tiny changelog is provided for users that may have already done an older version of this section. | ||
*:::* v1: Initial version. | |||
*:::* v2: Added "Advanced Recon and Project Nevada Patches (TTW - ADAM - X-13 Support)" to the merge. | |||
This mod | <!-- | ||
===== [https://www.nexusmods.com/newvegas/mods/38961/? Unified HUD Project - uHUD] ===== | |||
* '''Author''': Gopher | |||
* '''Version''': v3.7 | |||
* '''Fallout 3 Equivalent''': [https://www.nexusmods.com/fallout3/mods/15771/? Unified HUD Project] | |||
* '''Installation''': This mod requires installation with FOMM - Fork, follow these instructions: | |||
Select FOMM from the executables dropdown in MO and run it. | |||
When FOMM - Fork starts click [Package Manager]. | |||
From the Package Manager click [Add FOMod]. | |||
Select ''Unified HUD Project v 3_7-38961-3-7.zip'' and click [Open]. | |||
Select ''Unified HUD Project - uHUD'' from the Mod List and click [Activate]. | |||
When the installer pops up, click [Install]. | |||
When asked, click [Yes to all] then close FOMM - Fork. | |||
In the left pane of MO, go to the bottom of the mod list and ''right click->Create Mod'' on "Overwrite". | |||
Type in ''Unified HUD Project'' and click [OK]. Drag the newly created mod folder right behind ''OneHUD'' if need be. | |||
If installing any mods not listed in this guide, check this mod's Nexus page to see if those mods are supported by Unified HUD so they can be installed before Unified HUD. Any mod that is listed on the Unified HUD page needs to have xml file date combined and that is why it must be installed prior to Unified HUD. CINEMATECH or Directors Chair, for example, will have to be installed before uHUD. | |||
--> | |||
==== Supplemental UI ==== | |||
The rest of the User Interface section does not change HUD elements, so they can be installed after UI Organizer and do not require a specific install order. | |||
===== [ | ===== [https://www.nexusmods.com/newvegas/mods/45652/? CASM with MCM] ===== | ||
* '''Author''': | * '''Author''': Cipscis and Gribbleshnibit8 | ||
* '''Version''': | * '''Version''': v1.9 | ||
* '''Requirements''': NVSE | * '''Fallout 3 Equivalent''': [https://www.nexusmods.com/fallout3/mods/3729/? CASM] | ||
* '''Requirements''': NVSE, Lutana NVSE Plugin | |||
Autosave ability to prevent losing progress if game crashes. Use MCM menu to customize. | |||
===== [https://www.nexusmods.com/newvegas/mods/34744//? Centered 3rd Person Camera] ===== | |||
===== [ | |||
* '''Author''': Jahandar | * '''Author''': Jahandar | ||
* '''Version''': v5 | * '''Version''': v5 | ||
* '''Note''': In Mod Organizer, in the left panel, right click and select "Information" or Double Click the Mod. Go to Tab "Optional Plugins" and put the one you DO NOT want in "optional ESPs". Choices are: "Centered 3rd Person Camera.esp" '''OR''' "Centered 3rd Person Camera - Unraised.esp" | |||
Every game has a crappy over the shoulder camera and modders always fix that problem. | Every game has a crappy over the shoulder camera and modders always fix that problem. | ||
===== [ | Quote from Nexus site on v5: "By request, I've included a version that does not raise the camera/crosshair. The "unraised" version includes only the centered camera and the increased max camera distance (the crosshair will float roughly at your character's neck). Both ESM files are included in the download, just choose which one you want." | ||
<!-- | |||
===== [https://www.nexusmods.com/newvegas/mods/36946//? {{NAMESPACE}} Classic Worldmap] ===== | |||
* '''Author''': Colored | * '''Author''': Colored | ||
* '''Version''': v1.0 | * '''Version''': v1.0 | ||
| Line 213: | Line 1,271: | ||
Pip-Boy map replacer that adds in more detail to the terrain. | Pip-Boy map replacer that adds in more detail to the terrain. | ||
===== [ | ===== [https://www.nexusmods.com/newvegas/mods/51524/? Project Nevada - Med-X Fix] ===== | ||
* '''Author''': Zenball | |||
* '''Version''': v1.0 | |||
Just a small fix for Med-X, so addiction is not automatic after the first dose. | |||
===== [https://www.nexusmods.com/newvegas/mods/50889/? Project Nevada - Extra Options -- Implant box texture fix] ===== | |||
* '''Author''': AltDunmer and Gribbleshnibit8 | |||
* '''Version''': v1.0 | |||
* '''Requirements''': NVSE, MCM, Project Nevada, Project Nevada - Extra Options | |||
Anyone that has ever been found this will know why it is needed. | |||
--> | |||
===== [https://www.nexusmods.com/newvegas/mods/50958/? Sortomatic for Tales from the Burning Sands] ===== | |||
* '''Author''': kelwyn and Sarcophski | |||
* '''Version''': v1.1 | |||
* '''Requirements''': NVSE, Sortomatic, Tales from the Burning Sands | |||
Extend Sortomatic to the house from Tales from the Burning Sands. Very useful. Shout out to Kelmych for recommending this and mod as well as making it. | |||
===== [https://www.nexusmods.com/newvegas/mods/50657/? Traits Menu DarNified] ===== | |||
* '''Author''': DarN and Mama Stankum | |||
* '''Version''': v1.0 | |||
* '''Requirements''': DarnifiedUI | |||
* '''Note''': If reinstalling the first part of the User Interface section this mod will need to be uninstalled and reinstalled as well. | |||
Extends the DarnUI to the traits menu. Shout out to Kelmych for suggesting this mod. | |||
===== [https://www.nexusmods.com/newvegas/mods/34737/? Misc Item Icons - New Vegas] ===== | |||
* '''Author''': The 3rd Type and DekoMan91 | * '''Author''': The 3rd Type and DekoMan91 | ||
* '''Version''': v0.9 | * '''Version''': v0.9 | ||
* '''Fallout 3 Equivalent''': [https://www.nexusmods.com/fallout3/mods/9053/? T3T Misc Item Icons] | |||
Replaces many of the icons in the Pip-Boy menu for more diversity. | |||
===== [ | ===== [https://www.nexusmods.com/newvegas/mods/38903/? Project FNVIcons] ===== | ||
* '''Author''': | * '''Author''': bro_nod | ||
* '''Version''': v1. | * '''Version''': v1.3 | ||
* ''' | * '''Note''': Get the ''Project FNVIcons - Challenge'' optional file. | ||
One of the optional files of this mod adds new icons to the various challenge perks that previously shared the same icon. | |||
===== [https://www.nexusmods.com/newvegas/mods/59065/? New T-51b Icons New Vegas] ===== | |||
* '''Author''': Captain-Ultima | |||
* '''Version''': v1.0 | |||
The T-51b icons in vanilla are quite uninspiring. This mod adds much better-looking icons for both armor and helmet. | |||
===== Merging Icon Mods ===== | |||
# Open Merge Plugins Standalone through MO and click {{ui|OK}}. | |||
# Hold <code>ctrl</code> and click every plugin listed below:{{AlertSmall|type=notice|size=31|text=If the plugins are contiguous hold <code>shift</code> and click the first then the last.}} | |||
#* {{Fc|white|MiscItemIconsNV.esp}} | |||
#* {{Fc|white|Project FNVIcons - Challenge.esp}} | |||
#* {{Fc|white|New Icons For T-51B FONV Edition.esp}} | |||
# Right click one of the highlighted plugins and goto "Add to merge", then select "<New Merge>". | |||
#* In the popup, type the name of the merge and the plugin, then click {{ui|OK}}. ''Icon Mods Merged'' is recommended for both. | |||
# Open the Merges tab and right click "Icon Mods Merged" and go to "Plugins", then select "Check plugins for errors". | |||
#* {{Fc|red|'''UNTICK'''}} "Copy general assets" in the Settings->Integration tab. | |||
# Right click "Icon Mods Merged" again and select "Build Merge". | |||
# When complete click {{ui|Close}}, then close Merge Plugins Standalone. | |||
# The mod now resides in the ''Icon Mods Merged'' folder. | |||
#* It may not show in MO's left panel, so click the small tool icon dropdown above the left panel and select "Refresh". | |||
# Move the folder right below ''New T-51b Icons New Vegas'' and make sure it is ticked. | |||
# In the left pane of MO, double click ''Misc Item Icons - New Vegas''. | |||
# Now go to the "Optional ESPs" tab and move the "MiscItemIconsNV.esp" to the Optional ESPs box. | |||
# Repeat the process for the plugins in the two other mods. | |||
# Bash tags need to be added for the plugin. It is a good idea to do it now by starting FNVEdit and following these instructions: | |||
## From the list of plugins double click "Icon Mods Merged.esp" | |||
## When FNVEdit loads, right click "Icon Mods Merged.esp" and select "Apply Script" | |||
## Choose "Generate Bash Tags" from the dropdown and click {{ui|OK}} | |||
## When asked to add the tags to the header, select {{ui|Yes}} | |||
## Close and save. | |||
===== Icon Mods Merged ===== | |||
* '''Author''': The 3rd Type and DekoMan91 (33%), bro_nod (33%), Captain-Ultima (33%) and you (1%) | |||
* '''Version''': v1 | |||
* '''Changelog''': This tiny changelog is provided for users that may have already done an older version of this section. | |||
*:::* v1: Initial version. | |||
==== HUD and Pip Boy Optional Additions ==== | |||
Sometimes it is easy to get bored with Darnified UI after a few playthroughs. Also, some players might play as a female and want the pip-boy to be a pip-girl. This additional page will include cellHUD and Complete Vault Girl Interface, plus a patch if both are being used. This completely optional and both mods can be safely installed or uninstalled at any time. | |||
[[User:EssArrBee/FalloutNewVegas OptionalHUDandUI|Optional HUD and UI]] | |||
== Covering the Mojave == | == Covering the Mojave == | ||
=== Texture Overhauls === | |||
===== [ | <!--===== [https://www.nexusmods.com/newvegas/mods/44879/? Hall Of Equipment] ===== | ||
* '''Author''': Deblazkez | |||
* '''Version''': X2 | |||
* '''Fallout 3 Equivalent''': [https://www.nexusmods.com/fallout3/mods/17145/? Hall of Equipment] | |||
* '''Installation''': Get the main file and all four optional files. Install the main file, then install the four optional files in any order into the same folder as the main file and when asked click [Merge], not [Replace]. | |||
* '''Note''': If texture reduction is needed for armor and weapons to gain performance then remove this mod. | |||
This mod will enhance the vanilla textures to higher resolution versions. It is a good base to use and let other equipment mods overwrite. | |||
--> | |||
===== [https://www.nexusmods.com/newvegas/mods/42551/? MGs Neat Clutter Retextures] ===== | |||
* '''Author''': Mental Gear | |||
* '''Version''': v7.0 | |||
* '''Installation''': Get the ''MGs NCR Pack Ojo friendly 7'' main file. | |||
This mod retextures a lot of the clutter missed by the larger packs. NMCs textures are generally of a higher quality however, hence the mod is installed here, allowing the other packs to overwrite it. | |||
: Some included textures need to be hidden in MO: | |||
Double click on the mod in MO's left pane and click on the "Filetree" tab. | |||
Navigate to "textures/architecture/helios_one" and right click on ''solar_reflector_lod.dds''. | |||
Select {{ui|Hide}}. | |||
Navigate to "textures/armor/headgear" and right click on ''slavecollar_g.dds''. | |||
Select {{ui|Hide}}. | |||
===== [https://www.nexusmods.com/newvegas/mods/43135/? NMCs Texture Pack For New Vegas] ===== | |||
* '''Author''': NeilMc_NMC | |||
* '''Version''': v1.0 | |||
* '''Fallout 3 Equivalent''': [https://www.nexusmods.com/fallout3/mods/12056/? NMCs_Texture_Pack_for_FO3] | |||
* '''Installation''': Install both Medium files. Users that need performance can install the Small file instead of the Medium files. | |||
* '''Note''': Large files on the Nexus can get corrupted during download and the only fix is to retry the download until it works. | |||
The largest texture pack for ''New Vegas'' and with Poco Bueno is a great base to build from. There are three sizes of this texture pack, the Medium is a mix of different sized textures matched together really well. The large is mostly 2k and 4k textures, so too much for a heavily modded setup. | |||
===== [https://www.nexusmods.com/newvegas/mods/42028/? POCO BUENO Texture Pack] ===== | |||
* '''Author''': Ojo Bueno aka tapioks | * '''Author''': Ojo Bueno aka tapioks | ||
* '''Version''': v5 | * '''Version''': v5 | ||
* '''Installation''': Get the main file and the ''PocoBueno Skeleton Transparency Fix'' optional file. The main file does not install correctly with MO, follow these instructions: | |||
Open Windows Explorer and navigate to the ".../<Mod Organizer>/downloads" folder and select ''PocoBuenoTexturePackV5-42028-5.zip''. | |||
Extract the ''PocoBuenoV5.fomod'' to the "downloads" folder. | |||
Return to MO and install the FOMOD, click on {{ui|Manual}}. | |||
Expand "PocoBuenoV5" (not "pocobuenov5"), right click on "data" and select {{ui|Set data directory}}. | |||
Click {{ui|OK}}. | |||
Install the optional file, adding it to the same folder as the main file, and click {{ui|Merge}}, not {{ui|Replace}}. | |||
Excellent texture pack that covers | Excellent texture pack that covers everything from robots to dirt. | ||
===== [ | ===== [https://www.nexusmods.com/newvegas/mods/41101/? Textures Over Time] ===== | ||
* '''Author''': | * '''Author''': DonKnotts | ||
* '''Version''': v1.0 | * '''Version''': v1.0 | ||
* '''Installation''': Install | * '''Installation''': Get the ''FlagStoneWalls'', ''HH_Sandstone'', and ''Sandbags'' main files '''ONLY'''. Install them in any order, but for the second and third file, click {{ui|Merge}}, not {{ui|Replace}}. | ||
The sandstone textures for Honest Hearts are really amazing. Zion National Park never looked so good, unless you actually go to Zion National Park, but who goes outside anymore? | |||
===== [https://www.nexusmods.com/newvegas/mods/59149/? Collision Meshes] ===== | |||
* '''Author''': KiCHo666 | |||
* '''Version''': 1.5.2 | |||
Technically this is just meshes, no textures, but there is no meshes sections. Anyways nitpickers, this mod makes the in game meshes work much better for projectiles, since bullets can now go through the guard tower rails, the holes between the wood beams in the farmhouses, and cars have much better collision meshes. Great mod from a modder that is really making some essential stuff for FNV. | |||
The | === Weather & Lighting === | ||
===== [https://www.nexusmods.com/newvegas/mods/37908/? ELECTRO-CITY - Relighting the Wasteland] ===== | |||
* '''Author''': MyGoodEye | |||
* '''Version''': v12A | |||
Adds a bunch of lights to the wasteland. This helps with the darker nights in Nevada Skies. | |||
When installing the mod, select {{ui|Manual}}. | |||
Expand the top level. | |||
Deselect the two optional & compatibility folders and install just the '''''meshes''''','''''textures''''' & '''''ELECTRO CITY-*.esm files'''''. | |||
<!--===== [https://www.nexusmods.com/newvegas/mods/35998/? Nevada Skies - Weather Effects] ===== | |||
* '''Author''': Yossarian | |||
* '''Version''': v1.4.2 | |||
* '''Installation''': Follow these instructions: | |||
Install the main file. | |||
In the left pane of MO, right click ''Nevada Skies - Weather Effects'' and select "Information". | |||
Move "NevadaSkies - TTW Edition.esp" and "NevadaSkies - Basic Edition.esp" to the ''Optional ESPs'' box. | |||
Nevada Skies is a an excellent weather and lighting overhaul. It adds many new weather effects like rain and sand storms. It also makes the nights very dark. Almost too dark, certain areas right next to The Strip are way too dark with the Hotel lights that close, but overall the mod is great. Some in game recommendations for the settings will come soon. The settings are accessed by equipping the "Thermo-Hygrograph" then exiting the Pip Boy menu. | |||
--> | |||
===== [https://www.nexusmods.com/newvegas/mods/43534/? NVInteriors Project] ===== | |||
* '''Author''': chucksteel and Bigcrazewolf | |||
* '''Version''': v2.0 | |||
* '''Fallout 3 Equivalent''': [https://www.nexusmods.com/fallout3/mods/17145/? DCInteriors Project] | |||
* '''Installation''': Get the ''NVInteriors Core'' and ''NVInteriors_Combo Edition'' main files and the ''NMC_NVInteriors Compatibility patch Medium'' optional file. Install the ''NVInteriors Core-43534-2-0.7z'' first then install the other two files in any order, but make sure to install in the same folder as the main file and when asked click {{ui|Merge}}, not {{ui|Replace}}. | |||
This mod adds many new interiors to the game for exploration and looting. Perfectly fits into the game world. | |||
===== [https://www.nexusmods.com/newvegas/mods/61125/? NVInteriors Rewritten] ===== | |||
* '''Author''': MonoAccipiter | |||
* '''Version''': v1.31 | |||
* '''Installation''': Get the ''NVInteriors_Rewritten_ESMReplacer'' main file and the ''NVInteriors_Rewritten_ILO-Patch'' optional file. | |||
Make sure to install the patch into the same folder as the main file and when asked click {{ui|Merge}}, not {{ui|Replace}}. | |||
This mod rewrites all of the terminal entries and notes in NVInteriors, correcting many grammatical errors and making them a bit more lore-friendly. | |||
===== [https://www.nexusmods.com/newvegas/mods/56752/? NV InteriorsProject A Room With A View] ===== | |||
* '''Author''': Chucksteel | |||
* '''Version''': v2.1 | |||
Great overhaul of the Suites from the Strip. There are actual windows. | |||
===== [https://www.nexusmods.com/newvegas/mods/35794/? Interior Lighting Overhaul] ===== | |||
* '''Author''': Sarge198 and Killergrimm | |||
* '''Version''': v6.9 | |||
* '''Installation''': Get the ''Interior Lighting Overhaul 6-9 - Mod Organizer'' optional file and follow these instructions: | |||
Navigate to where you downloaded the archive in an explorer window and unpack the *.fomod file. | |||
Click the install from archive button [[File:Archive MO.png]] in MO and select the FOMOD file you just unpacked in the pop-up. | |||
{{FOMOD Instructions | |||
|file=Interior Lighting Overhaul | |||
|{{FomodPage | |||
|Core | |||
|{{Fieldset | |||
|Core | |||
|bullet=yes|Ultimate Edition}} | |||
|button=yes | |||
|buttonText=Install}} {{FomodPage | |||
|Extras | |||
|{{Fieldset | |||
|Extras | |||
|bullet=yes|Lucky 38 Suite}} | |||
|button=yes | |||
|buttonText=Next}} {{FomodPage | |||
|Mod Support | |||
|{{Fieldset | |||
|Mod Support | |||
|bullet=yes|D.E.I.M.O.S.; New Vegas Bounties I; New Vegas Bounties II}} | |||
|button=yes | |||
|buttonText=Next}} {{FomodPage | |||
|Compatibility Patches | |||
|{{Fieldset | |||
|Compatibility Patches | |||
|bullet=yes|Yukichigai Unofficial Patch - YUP}} | |||
|button=yes | |||
|buttonText=Install}} }} | |||
Double click ''Interior Lighting Overhaul'' in the left pane and go to the {{ui|Optional ESPs}} tab. | |||
Move "Interior Lighting Overhaul - Ultimate Edition.esp" to the "Optional ESPs" box. | |||
: The patches from this mod can be merged with the one from [[#NVInteriors Rewritten|NVInteriors Rewritten]], so follow these instructions: | |||
# Open Merge Plugins Standalone through MO and click {{ui|OK}}. | |||
#* {{Fc|red|'''UNTICK'''}} "Copy general assets" in the Settings->Integration tab. | |||
# Hold <code>ctrl</code> and click every plugin listed below:{{AlertSmall|type=notice|size=31|text=If the plugins are contiguous hold <code>shift</code> and click the first then the last.}} | |||
#* {{Fc|white|ILO - D.E.I.M.O.S.esp}} | |||
#* {{Fc|white|ILO - NVInteriors Project.esp}} | |||
#* {{Fc|white|ILO - New Vegas Bounties.esp}} | |||
#* {{Fc|white|ILO - New Vegas Bounties II.esp}} | |||
#* {{Fc|white|ILO - YUP Patch.esp}} | |||
# Right click one of the highlighted plugins and goto "Add to merge", then select "<New Merge>". | |||
#* In the popup, type the name of the merge and the plugin, then click {{ui|OK}}. ''ILO Merged'' is recommended for both. | |||
# Open the Merges tab and right click "ILO Merged" and goto "Plugins", then select "Check plugins for errors". | |||
# Right click "ILO Merged" again and select "Build Merge". | |||
# When complete click {{ui|Close}}, then close Merge Plugins Standalone. | |||
# The mod now resides in the ''ILO Merged'' folder. | |||
#* It may not show in MO's left panel, so click the small tool icon dropdown above the left panel and select "Refresh". | |||
# Move the folder right below ''Interior Lighting Overhaul'' and make sure it is ticked. | |||
# In the left pane of MO, double click ''NVInteriors Rewritten''. | |||
# Now go to the "Optional ESPs" tab and move the "ILO - NVInteriors Project.esp" to the Optional ESPs box. | |||
# In the left pane of MO, double click ''Interior Lighting Overhaul''. | |||
# Now go to the "Optional ESPs" tab and move the "ILO - D.E.I.M.O.S.esp", "ILO - New Vegas Bounties.esp", "ILO - New Vegas Bounties II.esp", and "ILO - YUP Patch.esp" to the Optional ESPs box. | |||
<br> | |||
:LOOT does not sort the ILO - Merged.esp plugin properly, follow these instructions: | |||
<pre> | |||
Run LOOT through MO executable dropdown. | |||
Find "ILO - Merged.esp" in the left pane and click the three dots on the right of the plugin, then select [Edit Metadata], and the [LOAD AFTER] tab. | |||
Enter "RaestlozFactionArmorEnhancement.esp" into the ''Filename'' textbox. | |||
Enter "TrooperOverhaul-Dragbody.esp" into the ''Filename'' textbox. | |||
Click the save icon next to ILO - Merged.esp. | |||
</pre> | |||
This adds light switches to the interiors of building, but also so much more. | |||
===== [https://www.nexusmods.com/newvegas/mods/43485/? Old World Blues - Path Lighting] ===== | |||
* '''Author''': Sarge198 | |||
* '''Version''': v1.1 | |||
* '''Installation''': This mod has an extra plugin, follow these instructions: | |||
Double click ''Old World Blues - Path Lighting'' in the left pane of MO, and go to the "Optional ESPs" tab. | |||
Move "OWB-Path Lights - Darker Nights.esp" to the "Optional ESPs" box. | |||
Make all the ground lights in OWB light up at night. Used with darker nights in Nevada Skies, it really makes the Big Empty look great. | |||
===== [https://www.nexusmods.com/newvegas/mods/59591/? Realistic Wasteland Lighting Enhancement] ===== | |||
* '''Author''': xCamoLegend, Sal203, and RoyBatty | |||
* '''Version''': v0.96 | |||
* '''Installation''': Get the "FNV Realistic Wasteland Lighting - Enhancement" main file and the "RWLE - Someguy's Mods Patch Collection" optional file. Follow these instructions: | |||
Install the main file. | |||
Now for the optional file, select [Manual] at the installation popup. | |||
Right click on "RWLE - Someguy's Mods Patch Collection" and select "Select data directory", untick "TTW and "FNV", then click {{ui|OK}}. | |||
Select {{ui|Merge}}, not {{ui|Replace}}. | |||
Weather mod that actually makes the desert look like one. | |||
'''Not crazy about RWLE?''' Additional information and weather mods can be found on the [[User:EssArrBee/FalloutNewVegas_Weather_Mods|Weather Mods]] page. | |||
==== Plants & Stuff ==== | ==== Plants & Stuff ==== | ||
The deserts of the Southwestern United States have the second highest plant density of any habitat in the world, only behind the | The deserts of the Southwestern United States have the second highest plant density of any habitat in the world, only behind the rain forest regions of Earth. Chernobyl only a few decades removed from the second biggest nuclear meltdown in history is completely covered in vegetation, radioactive vegetation, but still covered in the stuff. The point being that nuclear war would allow for plants to just cover the Mojave and make the world feel much less empty and devoid of life. Hopefully this section can address that problem. | ||
===== [ | ===== [https://www.nexusmods.com/newvegas/mods/39856/? Wasteland Flora Overhaul] ===== | ||
* '''Author''': vurt | * '''Author''': vurt | ||
* '''Version''': v1.0 | * '''Version''': v2.9a for Dead and Fertile versions, v1.0 for esp-less version | ||
* '''Installation''': Install the | * '''Fallout 3 Equivalent''': [https://www.nexusmods.com/fallout3/mods/19864/? Flora Overhaul] | ||
* '''Installation''': Use the Fertile or Dead version as preferred. If using the Dead version, download the ''Update for the latest Dead version'' update file. Also, get the ''LOD Patches v1dot2'' optional file no matter what version you chose. Follow these instructions: | |||
Install the main file version of choice normally. | |||
If using the Dead version, install the ''Update for the latest Dead version'', select {{ui|Merge}}, not {{ui|Replace}}. | |||
Now during install for the LOD file it is recommended to install to a separate folder so it can be reverted easily. | |||
Where "Name" is shown type "Wasteland Flora Overhaul POCO Bueno LOD". | |||
Now expand "Vurts WFO - LOD Patches v1_2->--CHOOSE YOUR PACK--->POCO and OJO BUENO - LOD Patch", then right click "Data" and select "Set data directory". | |||
Click {{ui|OK}}. | |||
: LOOT reports this about these plugins: | |||
Do not clean, otherwise, the game will crash on startup. | |||
Of course, this is the best floral mod for FNV. Did you expect anything less from Vurt? | |||
===== [ | ===== [https://www.nexusmods.com/newvegas/mods/44025//? Hectrol FX DUSTSTORM Deluxe HighRes Retex] ===== | ||
* '''Author''': Hectrol | * '''Author''': Hectrol | ||
* '''Version''': v1.0 | * '''Version''': v1.0 | ||
* '''Installation''': There are multiple versions, follow these instructions: | |||
Expand "Hectrol_FX_Duststorm_Deluxe_HighRes_Retex" and then right click "1024" and select "Set data directory". | |||
Click {{ui|OK}}. | |||
* '''Note''': The "2048" or "4096" version can also be chosen for high end systems. | |||
Hectrol is the man and makes wonderful little mods that address many eye sores. | Hectrol is the man and makes wonderful little mods that address many eye sores. | ||
===== [ | ===== [https://www.nexusmods.com/newvegas/mods/40333//? Hectrol Tumbleweed Deluxe HighRes Retex] ===== | ||
* '''Author''': Hectrol | * '''Author''': Hectrol | ||
* '''Version''': v1.0 | * '''Version''': v1.0 | ||
===== [ | ===== [https://www.nexusmods.com/newvegas/mods/41776/? HiRes Raider Graffiti] ===== | ||
* '''Author''': tvs_frank | * '''Author''': tvs_frank | ||
* '''Version''': v1.0 | * '''Version''': v1.0 | ||
===== [ | ===== [https://www.nexusmods.com/newvegas/mods/46451//? Improved LOD Noise Texture] ===== | ||
* '''Author''': Cyberlazy | * '''Author''': Cyberlazy | ||
* '''Version''': v1.00 | * '''Version''': v1.00 | ||
* '''Fallout 3 Equivalent''': [https://www.nexusmods.com/fallout3/mods/17145/? Improved LOD Noise Texture] | |||
This is one of those mods that you did not know you needed until you had it and now you cannot play without it. | This is one of those mods that you did not know you needed until you had it and now you cannot play without it. | ||
===== [ | ===== [https://www.nexusmods.com/newvegas/mods/41961/? Laurens Bathroom Poetry] ===== | ||
* '''Author''': lauren_dr | |||
* '''Version''': v1 | |||
* '''Fallout 3 Equivalent''': [https://www.nexusmods.com/fallout3/mods/16160/? Laurens Bathroom Poetry] | |||
The highest form of art in the future. | |||
===== [https://www.nexusmods.com/newvegas/mods/44381/? Mojave Nights - a moon and stars replacer] ===== | |||
* '''Author''': CptJoker | * '''Author''': CptJoker | ||
* '''Version''': v1.0 | * '''Version''': v1.0 | ||
* '''Installation''': | * '''Fallout 3 Equivalent''': [https://www.nexusmods.com/fallout3/mods/442/? Enhanced Night Sky] | ||
* '''Installation''': If you choose the FOMOD version, select 100% (vanilla) for moon size, the size will adjusted manually later in the guide. Choose default Moon glow. Using the non-FOMOD version will mean setting '''"Mojave Nights 1.0"''' folder as the Data directory folder correctly in MO's 'Manual' installer. | |||
* '''Note''': Installation instructions are given to avoid using a plugin for this mod to reduce plugin count. Further instructions are found in the [[#Game Tweaks|Game Tweaks]] section. | |||
What color do you think the moon and stars would be through an atmosphere that went through a nuclear war? I think it would be rainbow colored. | What color do you think the moon and stars would be through an atmosphere that went through a nuclear war? I think it would be rainbow colored. | ||
== People | ===== [https://www.nexusmods.com/newvegas/mods/54472/? Vault 22 Flora Overhaul] ===== | ||
==== | * '''Author''': Macintroll | ||
The | * '''Version''': v1.1 | ||
* '''Installation''': This mod is not packaged correctly, follow these instructions: | |||
When the installation window pops up, expand "Vault22FloraOverhaul-mod". | |||
Right click "data" and select ''Set data directory'' and click {{ui|OK}} | |||
: LOOT reports this: | |||
Do not clean, otherwise, the game will crash on startup. | |||
''[https://youtu.be/o1tj2zJ2Wvg "Welcome to the jungle..."]'' Crank up volume to 11 on Vault 22. | |||
== People and Mutants == | |||
<center>{{Fs|1.5em|''"There he goes. One of God's own prototypes. A high-powered mutant of some kind never even considered for mass production.<br>Too weird to live, and too rare to die." - Raoul Duke''}}<br> | |||
[[File:Cropped-romero-ralph-steadman-7018861.jpg]]</center> | |||
==== ''"If you'll be my bodyguard...'' ==== | |||
''...[https://youtu.be/uq-gYOrU8bA I can be your long lost pal".]'' The wasteland can be a lonely hellhole that leads you to soul crushing depression and complete shellshock. It is probably better if you partner up and spread the misery with a friend. Willow seems as good a companion as any and the mod comes with a quest, dog, and player home. Also, in this section are mods that cover the other NPCs in game until more companions are added so a new section makes sense. | |||
===== [https://www.nexusmods.com/newvegas/mods/41779/? Willow - A Better Companion Experience] ===== | |||
* '''Author''': llamaRCA and Nivea | |||
* '''Version''': v1.10 | |||
* '''Installation''': Get the ''NVWillow v1.10'' main file and the ''NVWillow v1.0 and above - Project Nevada Rebalance Patch'' miscellaneous file. Follow these instructions: | |||
Install the ''NVWillow v1.10'' file. | |||
Install the ''NVWillow v1.0 and above - Project Nevada Rebalance Patch'' file, select {{ui|Merge}}, not {{ui|Replace}}. | |||
She's funny, cute, and has way more lines of dialogue that do not become annoying after an hour. Hint: Talk to Willow about her dog right away. | |||
<!-- | |||
===== [https://www.nexusmods.com/newvegas/mods/57006/? Animated Sweat Effect] ===== | |||
* '''Author''': Drumber, Weijesen, Jazzisparis | |||
* '''Version''': v1.0 | |||
* '''Installation''': Get the ''Animated Sweat Effect (Vanilla)'' main file unless using an ENB. | |||
Would it be hotter or colder in Nevada centuries after a nuclear war? Either way, it would not stop people from sweating. | |||
--> | |||
===== [https://www.nexusmods.com/newvegas/mods/41974/? Authentic Burned Man] ===== | |||
* '''Author''': Rocket | |||
* '''Version''': v1.0 | |||
Bandages look like used bandages and much better head mesh. | |||
===== [https://www.nexusmods.com/newvegas/mods/49449/? Ghouls Hires retexture] ===== | |||
* '''Author''': Macintroll | |||
* '''Version''': v1.2 | |||
* '''Fallout 3 Equivalent''': [https://www.nexusmods.com/fallout3/mods/18681/? Ghouls Hires retexture] | |||
* '''Installation''': Get '''ONLY''' the ''Ghoul retexture for Roberts Male Body replacer'' optional file. The main file is not needed. | |||
Great little retexture of the Ghouls. Shout out to Brainfever for suggesting this mod. | |||
<!-- | |||
===== [https://www.nexusmods.com/newvegas/mods/44820//? Hall Of Face] ===== | |||
* '''Author''': Deblazkez | |||
* '''Version''': X2 | |||
High resolution face replacer. | |||
{{Notice|The following instruction are for users that may already have the NVR3 assets from FCO. That file is no longer available, so users without the NVR3 Assets file will need to install FCO only and do not follow the instructions to modify FCOMater.esm with FNVEdit. Install FCO up until that part and skip NVR3 until the further notice.}} | |||
--> | |||
===== [https://www.nexusmods.com/newvegas/mods/54460/? Fallout Character Overhaul] ===== | |||
* '''Author''': Drumber | |||
* '''Version''': v3.01 | |||
* '''Fallout 3 Equivalent''': [https://www.nexusmods.com/fallout3/mods/20004/? Fallout Character Overhaul - Races] | |||
* '''Requirements''': The New Bison Steve Hotel, Afterschool Special, Roberts Males, Beyond Boulder Dome, Willow | |||
* '''Installation''': Get the ''Fallout Character Overhaul 3.0'' main file and the ''Fallout Character Overhaul 3.01'' update, then follow these instructions: | |||
{{FOMOD Instructions | |||
|file=Fallout Character Overhaul 3.0 | |||
|{{FomodPage | |||
|Fallout Character Overhaul 3.0 | |||
|{{Fieldset | |||
|Addons | |||
|checkmark=yes|Animated Sweat Effect}} {{Fieldset | |||
|Teeth Textures | |||
|checkmark=yes|Dirty Textures}} {{Fieldset | |||
|Options | |||
|checkmark=yes|ENB Hair Meshes - ONLY if installing an ENB; Hair Textures; Roberts Patch}} | |||
|button=yes | |||
|buttonText=Next}} {{FomodPage | |||
|Fallout Character Overhaul 3.0 | |||
|{{Fieldset | |||
|Patches | |||
|checkmark=yes|Afterschool Special; Beyond Boulder Dome; The New Bison Steve Hotel and Lucky Casino}} {{Fieldset | |||
|NPC Addons | |||
|checkmark=yes|Willow}} | |||
|button=yes | |||
|buttonText=Install}} }} | |||
Install the Fallout Character Overhaul 3.01 update file and click {{ui|Merge}}, not {{ui|Replace}}. | |||
: The installer has a tendency to install more .esp files than selected, follow these instructions: | |||
In MO's left pane, double click "Fallout Character Overhaul" and select the "Optional ESPs" tab. | |||
Move the "FCO - OHSB NPC Edits.esp", "FCO - Russel.esp" and "FCO - Willow (Cazy).esp" to the "Optional ESPs" box. | |||
Great character edit of just about every NPC in game. Amazing amount of time and dedication went into this mod. | |||
<!-- | |||
===== [https://www.nexusmods.com/newvegas/mods/56312/? New Vegas Redesigned 3] ===== | |||
* '''Author''': Dracomies and Weijiesen | |||
* '''Version''': v3.0 | |||
* '''Fallout 3 Equivalent''': | |||
* '''Requirements''': Fallout Character Overhaul | |||
* '''Installation''': Get the ''New Vegas Redesigned Version 2.9'' and ''UPDATE TO VERSION 3.0 (Critical fixes)'' main files and the ''Compatibility with other mods'' optional file. Follow these instructions: | |||
Install the ''New Vegas Redesigned Version 2.9'' main file. | |||
Install the ''UPDATE TO VERSION 3.0 (Critical fixes)'' main file and click [Merge], not [Replace]. | |||
For the ''Compatibility with other mods'' file, expand "Compatibility->Robert's Males" and then right-click "Data" and select "Set data directory" and when asked click [Merge], not [Replace]. | |||
: Two plugins from this mod are not needed, follow these instructions: | |||
Double click ''New Vegas Redesigned 3'' in the left pane of MO and go to the "Optional ESPs" tab. | |||
Move "Cass alternate version.esp" and "Gomorah Redesigned.esp" to the "Optional ESPs" box. | |||
===== [ | : Don't forget to set ''bInvalidateOlderFiles=1'' and ''bLoadFaceGenHeadEGTFiles=1'' in both fallout.ini and falloutprefs.ini, otherwise you will get black bodies with white heads on some NPCs. Note that fallout.ini is read-only by default, so you will need to clear the read-only flag before you can make changes to it. | ||
This mod does so many little things most of which are character redesigns. There is also a bunch more stuff as well. The mod makes the game a bit more hardcore, so be aware that the wasteland is a bit more wastes. | |||
--> | |||
==== ''"Looking good, Billy Ray."'' ==== | |||
''"Feeling Good, Louis"'' Sorry to change up the movie references, but it works. The vanilla bodies in Bethesda games tend to be weird and ugly. Lucky for us some excellent modders have made much better bodies to conquer the wasteland with. Exeter not only offers a version of the Type3 female body by Dimon99, but also redid all the meshes for female outfits. On the other side Nivea has taken over Robert's Males body replacer, so all the bases are covered for just about every character. | |||
===== [https://www.nexusmods.com/newvegas/mods/34825/? Type3 Body and Armor Replacer] ===== | |||
* '''Author''': Exeter, Dimon99 | * '''Author''': Exeter, Dimon99 | ||
* '''Version''': v2.1 | * '''Version''': v2.1 | ||
* '''Installation''': Install the ''New Vegas Type3 Armor Complete'' main file. | * '''Installation''': Install the ''New Vegas Type3 Armor Complete'' main file and the ''Business Suit Fix'', ''CombatMk1'', ''CombatMk2'', ''Fieldhand outfit Fix'', ''Leather Armor Wrist fix'' update files. During install click {{ui|Merge}}, not {{ui|Replace}}, when asked. | ||
This is the non-nude version of the Type3 female body replacer and the armor meshes to go along with them. Vanilla body type are really weird looking in the Fallout series, and Type3 is the solution for females. If you prefer the nude body then get the other main file for Armors only and use the original Type3 body replacer. | This is the non-nude version of the Type3 female body replacer and the armor meshes to go along with them. Vanilla body type are really weird looking in the Fallout series, and Type3 is the solution for females. If you prefer the nude body then get the other main file for Armors only and use the original Type3 body replacer. | ||
===== [ | ===== [https://www.nexusmods.com/newvegas/mods/40595/? Dead Money Type3 Outfits] ===== | ||
* '''Author''': | * '''Author''': Exeter | ||
* '''Version''': | * '''Version''': v1.0 | ||
* '''Installation''': | * '''Requirements''': Type3 Body | ||
* '''Installation''': Install the main file and the ''Type3 Dean Domino Tuxedo -Fixed'' file. Also there is the ''Reversed Vera Dress'' optional file for users that install holster mods (recommended, since the guide does include a holster mod). | |||
Convert the Dead Money clothing to Type3 body. | |||
===== [ | ===== [https://www.nexusmods.com/newvegas/mods/41884/? Type 3 Honest Heart Tribal Armors] ===== | ||
* '''Author''': | * '''Author''': Exeter | ||
* '''Version''': | * '''Version''': v2.5 | ||
* '''Requirements''': Type3 Body | |||
* '''Installation''': Install the main file and the ''Fix for Graham outift'' file (filename has typo) and the ''Fix for Sorrows body'' file. | |||
Convert the Honest Hearts clothing to Type3 body. | |||
===== [ | ===== [https://www.nexusmods.com/newvegas/mods/42952/? Old World Blues Armors for Type 3] ===== | ||
* '''Author''': | * '''Author''': Exeter | ||
* '''Version''': v1.0 | * '''Version''': v1.0 | ||
* '''Requirements''': Type3 Body | |||
* '''Installation''': Install the main file and the ''Patch for StealthSuit- Fixed'' file. | |||
Convert the Old World Blues clothing to Type3 body. | |||
===== [https://www.nexusmods.com/newvegas/mods/44034/? Lonesome Road Armors for Type 3] ===== | |||
* '''Author''': Exeter | |||
* '''Version''': v1.1 | |||
* '''Requirements''': Type3 Body | |||
Converts the Lonesome Road clothing to Type3 body. | |||
===== [https://www.nexusmods.com/newvegas/mods/54731/? Roberts Male Body] ===== | |||
* '''Author''': Nivea and Favoredsoul | |||
* '''Version''': v3.4 | |||
* '''Fallout 3 Equivalent''': [https://www.nexusmods.com/fallout3/mods/3671/? Roberts Male Body for Fallout 3] | |||
* '''Installation''': This mod is divided into many files, get the following: | |||
* Main files: | |||
:* {{Fc|white|Roberts New Vegas Main - Underwear 3_4}} | |||
* Optional files: | |||
:* {{Fc|white|Roberts Courier's Stash DLC Patch 3_3}} | |||
:* {{Fc|white|Roberts Dead Money DLC Patch 3_3}} | |||
:* {{Fc|white|Roberts Honest Hearts DLC Patch-Underwear 3_4}} | |||
:* {{Fc|white|Roberts Lonesome Road DLC Patch 3_3}} | |||
:* {{Fc|white|Roberts Old World Blues DLC Patch-Underwear 3_3}} | |||
* Miscellaneous files: | |||
:* {{Fc|white|Roberts Pipboy Fix 3_3}} | |||
:* {{Fc|white|Roberts Hairy Patch 3_3}} | |||
:* {{Fc|white|Roberts Dirty Raiders 3_3}} | |||
Install the files in the order just given, and select {{ui|Merge}}, not {{ui|Replace}}. | |||
The male hand textures and meshes included with Robert's are problematic. Follow these instructions to revert to vanilla meshes using FCO hand textures. | |||
Double click on the ''Roberts Male Body FNV'' mod in MO's left pane and click on the "Filetree" tab. | |||
Navigate to "meshes/characters/_male" and right click on ''lefthand.nif''. | |||
Select {{ui|Hide}}. | |||
Repeat this step for ''lefthand1st.nif'', ''righthand.nif'', and ''righthand1st.nif'', found in the same location. | |||
* '''Note''': If black bars are showing on male bodies in game, try ticking or unticking the BSA for Roberts Males. If that does not work check that no other mod than aMidianBorn Book of Water, ALR - Aptom's Legion Retextured, Ghouls Hires retexture, or Wasteland clothing Hires retexture overwrite Roberts Males. | |||
Robert's Males is the best male body made for Fallout games, if using mods that require Breeze's Males, then they are usually compatible with Robert's too. Too bad he never finished his Skyrim body replacer. If you prefer the nude body then get the respective "Nude" versions when available instead of the "Underwear" versions and also get and install the ''Roberts Sexy Legion Patch 3_3'', and select {{ui|Merge}}, not {{ui|Replace}}. | |||
==== Uhh... That's Not a Bug ==== | ==== Uhh... That's Not a Bug ==== | ||
An author's note: The Cazador is based on a real monster known as the [ | An author's note: The Cazador is based on a real monster known as the [https://en.wikipedia.org/wiki/Tarantula_hawk Tarantula Hawk]. They are huge black spider wasps with orange wings that have the second most painful sting or bite in the world. They usually sting tarantulas and their venom flips over the spider and paralyzes it. Then they lay their eggs in the tarantula's stomach and when the eggs hatch a [https://www.gocomics.com/calvinandhobbes/1989/07/04#.UomAR3RWKxg feast] ensues, while the spider is alive. They are the state insect of New Mexico, the state which the author is a former resident and now lives about 10 minutes from. Nightmares, check. Remember that like Australia, everything in the Mojave wants to kill you. | ||
===== [ | ===== [https://www.nexusmods.com/newvegas/mods/39873//? aMidianBorn NV Book Of Water] ===== | ||
* '''Author''': CaBaL | * '''Author''': CaBaL | ||
* '''Version''': vOmni2 | * '''Version''': vOmni2 | ||
| Line 327: | Line 1,802: | ||
Cabal is clearly a master of the dark arts. It is the only explanation for the level of quality his work produces. | Cabal is clearly a master of the dark arts. It is the only explanation for the level of quality his work produces. | ||
===== [ | ===== [https://www.nexusmods.com/newvegas/mods/38727//? Feral Ghoul Retexture by Koldorn] ===== | ||
* '''Author''': Koldorn | * '''Author''': Koldorn | ||
* '''Version''': v1.0 | * '''Version''': v1.0 | ||
| Line 333: | Line 1,808: | ||
The Ghouls will now look much more like rotting, radiation ridden zombies, and that is a good thing. | The Ghouls will now look much more like rotting, radiation ridden zombies, and that is a good thing. | ||
===== [ | ===== [https://www.nexusmods.com/newvegas/mods/48008//? Hectrol ED-E Deluxe HR Retex EVOLUTION PACK] ===== | ||
* '''Author''': hectrol | |||
* '''Version''': v1.0 | |||
* '''Installation''': During the FOMOD installer choose ''High Res [2048x2048]'' and ''Spooky ED-E by archerarcher''. | |||
Excellent ED-E retexture and ED-E will now change to a new texture after upgrade from follower quest. | |||
===== [https://www.nexusmods.com/newvegas/mods/56759/? Improved Robots Textures] ===== | |||
* '''Author''': Tau34RUS | |||
* '''Version''': v1.0 | |||
* '''Installation''': Get the ''Improved Main Robots Textures'', ''Improved OWB Robot Textures'', and ''Improved LR Robot Textures'' main files. Follow these instructions: | |||
During install of the ''Improved Main Robots Textures'' file, right click "Data" and select "Set data directory". | |||
During install of the ''Improved OWB Robot Textures'' file, right click "Data" and select "Set data directory", then click {{ui|Merge}}, not {{ui|Replace}}. | |||
During install of the ''Improved LR Robot Textures'' file, right click "Data" and select "Set data directory", then click {{ui|Merge}}, not {{ui|Replace}}. | |||
Beep boop. | |||
===== [https://mega.nz/#!9cQXGbQS!GdWRCNZtmEWl_8RSouF70dD8MIQGrWIsFax6mtIRzM0 Super Mutant Mesh Replacer] ===== | |||
* '''Author''': TheNeglected | * '''Author''': TheNeglected | ||
* '''Version''': v1.3 | * '''Version''': v1.3 | ||
* '''Installation''': Add the file to the MO download folder to install. | |||
Much better meshes for the Super Mutants. | Much better meshes for the Super Mutants. Old link for reference is [https://www.nexusmods.com/newvegas/mods/49178/? here]. | ||
===== [ | ===== [https://www.nexusmods.com/newvegas/mods/50377/? Securitron Hires retexture] ===== | ||
* '''Author''': | * '''Author''': Macintroll | ||
* '''Version''': v1.0 | * '''Version''': v1.0 | ||
* '''Installation''': Get the ''Securitron Hires retexture 2048x2048px'' optional file. | |||
Who said Securitrons couldn't look old, comical and badass all at once? | |||
== The Most Dangerous Game == | == The Most Dangerous Game == | ||
==== | ==== Clothing Is Not Optional ==== | ||
Why did the neck collars of the Ranger Armor get left out? No one knows, but these will fix that and a bunch of other stuff. | ... or maybe it is? There is no sunscreen in the wasteland though. Why did the neck collars of the Ranger Armor get left out? No one knows, but these will fix that and a bunch of other stuff. | ||
===== [ | ===== [https://www.nexusmods.com/newvegas/mods/54478/? Wasteland clothing Hires retexture] ===== | ||
* '''Author''': Macintroll | * '''Author''': Macintroll | ||
* '''Version''': v1.3A | * '''Version''': v1.3A | ||
* '''Installation''': Install the ''Wasteland Clothing HD V1-3 FULL PACK'' main file and the ''Wasteland Clothing HD V1-3 POWDERGANG FIX -IMPORTANT-'' optional file. | * '''Installation''': Install the ''Wasteland Clothing HD V1-3 FULL PACK'' main file and the ''Wasteland Clothing HD V1-3 POWDERGANG FIX -IMPORTANT-'' optional file. Both files are packaged incorrectly, follow these instructions: | ||
During main file install, expand "wastelandclothing-HD-v1.3", then right click "data" and select "Set data directory", click {{ui|OK}}. | |||
During optional file install, expand "wastelandclothing-HD-Powdergang-FIX", then right click "data" and select "Set data directory", click {{ui|OK}}, then select {{ui|Merge}}, not {{ui|Replace}}. | |||
High res retexture of the clothing from the Mojave. | High res retexture of the clothing from the Mojave. | ||
===== [https://www. | ===== [https://www.nexusmods.com/newvegas/mods/49558/? Faction Armor Usage Enhancement] ===== | ||
* '''Author''': | * '''Author''': Raestloz | ||
* '''Version''': | * '''Version''': v0.8b | ||
This mod helps the faction armor hide your character if the face is covered, who would have thought? | |||
===== [ | ===== [https://www.nexusmods.com/newvegas/mods/61390/? ADAM Reborn] ===== | ||
* '''Author''': | * '''Author''': MonoAccipiter & darthbdaman | ||
* '''Version''': | * '''Version''': v4.4.3 | ||
* '''Installation''': Install the The | * '''Installation''': Grab the ''ADAM All-in-one Installer 4.4.1'' main file and the ''Defaced Ranger Armor Hotfix'' updates file. Follow the fomod install for the main file, then install the update file and select [Merge], not [Replace]. | ||
{{FOMOD Instructions | |||
|file=ADAM Reborn | |||
|{{FomodPage | |||
|Main | |||
|{{Fieldset | |||
|Complete Version or Custom Install | |||
|bullet=yes|Complete Version}} | |||
|button=yes | |||
|buttonText=Install}} {{FomodPage | |||
|Alternate Riot Gear Helmet | |||
|{{Fieldset | |||
|Do you want to install alternate Riot Gear Helmet? | |||
|bullet=yes|No}} | |||
|button=yes | |||
|buttonText=Next}} {{FomodPage | |||
|NCR Trooper | |||
|{{Fieldset | |||
|Do you want to install NCR Trooper module? | |||
|bullet=yes|No}} | |||
|button=yes | |||
|buttonText=Install}} | |||
}} | |||
Original mod page is [https://www.nexusmods.com/newvegas/mods/43192/? here]. Pretty much the go-to overhaul for the game's most iconic equipment. The linked version includes improvements upon AI99's updated version and a FOMOD installer. | |||
===== [https://www.nexusmods.com/newvegas/mods/44248/? ALR - Aptoms Legion Retextured] ===== | |||
* '''Author''': Aptom | |||
* '''Version''': v1.1 | |||
Better gear for Legion. Ave, Hail Caesar! | |||
===== [https://www.nexusmods.com/newvegas/mods/48068/? Bornagain Combat Armor] ===== | |||
===== [ | |||
* '''Author''': EmeraldReign and Cabal120 | * '''Author''': EmeraldReign and Cabal120 | ||
* '''Version''': v1.0 | * '''Version''': v1.0 | ||
| Line 387: | Line 1,899: | ||
Combat armor is big, bulky, and makes soldiers look ridiculous, which is the most accurate representation of combat armor. This will just make it look more big, bulky, and ridiculous. | Combat armor is big, bulky, and makes soldiers look ridiculous, which is the most accurate representation of combat armor. This will just make it look more big, bulky, and ridiculous. | ||
===== [ | ===== [https://www.nexusmods.com/newvegas/mods/39873/? aMidianBorn NV Book Of Water] ===== | ||
* '''Author''': CaBaL | |||
* '''Version''': vOmni2 | |||
* '''Installation''': During installation, rename the file "Book of Steel" so it does not end up in the same file as the other Book of Water file. | |||
After installation, double-click the mod and go to the Optional ESPs tab | |||
Move both plugins to the Optional ESPs box | |||
Again, these textures are dark magic, use at your own risk. | |||
<!--===== [https://www.nexusmods.com/fallout3/mods/18370/? Enclave Power Armors Retextured] ===== | |||
* '''Author''': d_seven aka id2301 | |||
* '''Version''': v1 | |||
* '''Installation''': This mod is from the Fallout 3 Nexus, so MO will not download it for use with FNV. Download all three main files manually and follow these instructions: | |||
Locate the where the files were downloaded, then drag and drop the archives in the Downloads tab in MO. | |||
Since MO cannot read the FO3 meta data, all three files will need to be renamed manually during installation to Enclave Power Armors Retextured. | |||
Install each file, enter the correct name and the click {{ui|OK}}, for last two make sure to select {{ui|Merge}}, not {{ui|Replace}}. | |||
After installation, double-click the mod and go to the Optional ESPs tab | |||
Move both plugin to the Optional ESPs box | |||
Nice retexture of the Tesla Armors. | |||
--> | |||
===== [https://www.nexusmods.com/newvegas/mods/60666/? Book of Steel - Compatibility Edition] ===== | |||
* '''Author''': darthbdaman | |||
* '''Version''': v2.0 | |||
Simplifies the installation of the last two mods. | |||
<!-- | |||
===== [https://www.nexusmods.com/newvegas/mods/42383/? Dead Money Assassin Suit Retexture] ===== | |||
* '''Author''': EmeraldReign | * '''Author''': EmeraldReign | ||
* '''Version''': v1.0 | * '''Version''': v1.0 | ||
Really nice retexture of the Dead Money Assassin Suit. | Really nice retexture of the Dead Money Assassin Suit. | ||
--> | |||
===== [ | ===== [https://www.nexusmods.com/newvegas/mods/56198/? Distributed Necklaces and Chains Neck Seam Concealer (MCM and JIP NVSE) (DLC and TTW Support)] ===== | ||
* '''Author''': | * '''Author''': AcidicMind - Gallahorn - TJ - arkngt - darthbdaman - thaiusmle | ||
* '''Version''': v2.8 | |||
* '''Requirements''': NVSE, JIP NVSE Plugin | |||
Getting rid of neck seams with the power of NVSE, this update keeps the more feminine necklaces from popping up on males. | |||
===== [https://www.nexusmods.com/newvegas/mods/36152/? Dragonskin Tactical Outfit] ===== | |||
* '''Author''': antistar | |||
* '''Version''': v1.1 | * '''Version''': v1.1 | ||
* '''Installation''': Install the ''Dragonskin Tactical Outfit v1_1'' main file and the ''DTO - Project Nevada Support v1_0_1'' optional file. This mod has an extra plugin, follow these instructions: | |||
Double click ''Dragonskin Tacitical Outfit'' in the left pane of MO and go to the "Optional ESPs" tab. | |||
Move ''DragonskinNCRPersonnelWearingOutfits.esp'' and close the window. Next, double click ''DTO - Project Nevada | |||
Support'' in the left pane. Click "Optional ESPs" tab and move ''DTOBP-ProjectNevada.esp'' to the "Optional ESPs" | |||
box. | |||
Great military style armor mod. The outfits can be bought at vendors, but they are expensive to maintain some balance. Also, find them in special locations around New Vegas. | |||
===== [https://www.nexusmods.com/newvegas/mods/42911/? The Legacy of X13 - An Armor Overhaul] ===== | |||
* '''Author''': EmeraldReign | |||
* '''Version''': v3.2 | |||
* '''Installation''': Get the ''3-2 Patch'', ''Dead Money Assassin Suit'', and the ''FULL - Old World Blue'' main files and the ''Type 3 Mesh'' optional file. Follow these instructions: | |||
Install the ''Dead Money Assassin Suit'' file. | |||
During install of the ''FULL - Old World Blue'' file, right click "Data" and select "Set data directory", the click {{ui|Merge}}, not {{ui|Replace}}. | |||
During install of the ''3-2 Patch'' file, right click "Data" and select "Set data directory", the click {{ui|Merge}}, not {{ui|Replace}}. | |||
During install of the ''Type 3 Mesh'' file, right click "Data" and select "Set data directory", the click {{ui|Merge}}, not {{ui|Replace}}. | |||
The stealth suit on steroids is a good thing. | |||
===== [https://www.nexusmods.com/newvegas/mods/34854/? Holster] ===== | |||
* '''Author''': Heavensturkey | |||
* '''Version''': v1.0 | |||
Gun holsters are these things that hold guns while they are not being shot. Take note Bethesda. | |||
===== [https://www.nexusmods.com/newvegas/mods/37718/? Holster - new mesh for Heavensturkey] ===== | |||
* '''Author''': pat | |||
* '''Version''': v1.2a | |||
* '''Requirements''': Holster | |||
* '''Installation''': Install the ''holster - thigh and cowboy 1_2'' and ''holster unequip kf 1_2a'' main files. Follow these instructions: | |||
Install the ''holster - thigh and cowboy 1_2'' main file. This will require you to correctly set the data folder in MO's manual install dialog. | |||
For the ''holster unequip kf 1_2a'' main file, right click "data" and select "Create directory...". | |||
Name the new folder "meshes". Select this new folder and create a new folder called "characters". Lastly select this new folder and create one named "_male". | |||
This process will result in a nested folder structure like this '''meshes/characters/_male'''. | |||
Expand this folder tree so "_male" is visible and drag the ''1hpunequip.kf'' file into this folder. Press {{ui|OK}}. | |||
When asked select {{ui|Merge}}, not {{ui|Replace}}. | |||
Better female mesh for Holster. | |||
===== [https://www.nexusmods.com/newvegas/mods/49675/? NCR Civilian Clothing] ===== | |||
* '''Author''': Darziak | |||
* '''Version''': v1.0 | |||
===== [ | Make nice tweaks to the NCR clothing and bring a bit color to the their wardrobe. | ||
===== [https://www.nexusmods.com/newvegas/mods/52721/? NCR Trooper Overhaul_beta] ===== | |||
* '''Author''': EmeraldReign, Nekronom, CaBaL, wjs, and dragbody | * '''Author''': EmeraldReign, Nekronom, CaBaL, wjs, and dragbody | ||
* '''Version''': vbeta | * '''Version''': vbeta | ||
* '''Installation''': This mod's plugin | * '''Installation''': Get the ''Main File Beta 7_2'' main file and ''Sapper Leg Fix'' optional file. This mod's plugin is not needed, follow these instructions: | ||
Double click ''NCR Trooper Overhaul'' in the left pane of MO and click the ''Optional ESPs'' tab. | |||
Move the "NCRTrooperOverhaul.esp" to the ''Optional ESPs'' box. | |||
This is much like ADAM except that it covers the NCR troopers and it does not come packaged in such a ridiculous way. | This is much like ADAM except that it covers the NCR troopers and it does not come packaged in such a ridiculous way. | ||
===== [ | ===== [https://www.nexusmods.com/newvegas/mods/54978/? NCR Trooper Overhaul - Distributed] ===== | ||
* '''Author''': pwinkle | * '''Author''': pwinkle | ||
* '''Version''': v1.0 | * '''Version''': v1.0 | ||
* '''Installation''': This mod | * '''Requirements''': NCR Trooper Overhaul beta | ||
* '''Installation''': LOOT reports this mod needs to cleaned with FNVEdit: | |||
:* TrooperOverhaul-Dragbody.esp | |||
Contains dirty edits: 6 ITM records. Follow instructions for cleaning [[User:EssArrBee/FNVEdit Mod Cleaning|here]]. | |||
This mod takes the added trooper models and textures from NCR Trooper Overhaul and distributes them across the wasteland. | |||
===== [https://www.nexusmods.com/newvegas/mods/39859/? Omnis Hi-Res Pip-Boy 3000] ===== | |||
* '''Author''': OmniDeath | |||
* '''Version''': v1.0 | |||
* '''Fallout 3 Equivalent''': [https://www.nexusmods.com/fallout3/mods/8302/? Omnis Hi-Res Pip-Boy 3000 - FIXED] | |||
* '''Installation''': This mod is packaged incorrectly, follow these instructions: | |||
During install, expand "omni's hi-res pip-boy 3000 v1.0", then right click "Data" and select "Set data directory" and click {{ui|OK}}. | |||
Make that bling bling look good. Shout out to Brainfever for this one. | |||
===== [https://www.nexusmods.com/newvegas/mods/56523/? Pip-Boy Light Colours] ===== | |||
* '''Author''': Sarge198 | |||
* '''Version''': v1.4 | |||
* '''Installation''': Select the preferred settings during install. Recommendations are as follows: | |||
{{FOMOD Instructions | |||
|file=Pip-Boy Light Colours | |||
|{{FomodPage | |||
|Select Radius | |||
|{{Fieldset | |||
|Pip-Boy Light Radius | |||
|bullet=yes|1024}} | |||
|button=yes | |||
|buttonText=Next}} {{FomodPage | |||
|Select Magnitude | |||
|{{Fieldset | |||
|Pip-Boy Light Magnitude | |||
|bullet=yes|45}} | |||
|button=yes | |||
|buttonText=Next}} {{FomodPage | |||
|Radius: 1024; Magnitude: 45 | |||
|{{Fieldset | |||
|Radius: 1024; Magnitude: 45 | |||
|bullet=yes|Vanilla}} | |||
|button=yes | |||
|buttonText=Install}} }} | |||
Better Pip-Boy light. | |||
===== [https://www.nexusmods.com/newvegas/mods/44476/? Spice of Life - Variety Armor and Clothing] ===== | |||
* '''Author''': Nivea | |||
* '''Version''': v1.2 | |||
* '''Requirements''': Type3 Body, Roberts Male Body, Project Nevada | |||
* '''Installation''': Get the main file and the ''NivSpiceofLife-PN Patch 1_2'' optional file and install both. | |||
* '''Note''': For users that installed ENB/ENBoost, there is a bug that turns some outfits invisible, follow these instructions: | |||
Open enblocal.ini in a text editor, like Notepad++, and edit the following lines: | |||
[FIX] | |||
FixTransparencyBugs=false | |||
Save and close. | |||
Adds lots of clothes, head pieces, and backpacks. Make the people of the wasteland look a lot more like survivalists, which is what everyone is. | |||
===== [https://mega.nz/#!gcFX1K5b!Iy0XbH06XUbJpXuKYXE2Lo2ImnIZfnySDmShK9Mev38 PN_SoL Backpacks Compatibility] ===== | |||
* '''Author''': MonoAccipiter and darkside | |||
* '''Version''': v1 | |||
* '''Requirements''': Project Nevada, Spice of Life | |||
Adds the PN effects to Spice of Life backbacks. Inspired by DEATHSHOCK's mod found [https://www.nexusmods.com/newvegas/mods/61045/? here], which unfortunately had some unresolved issues. | |||
===== [https://www.nexusmods.com/newvegas/mods/61407/? YUP-Spice of Life Patch] ===== | |||
* '''Author''': EssArrBee | |||
* '''Version''': v1 | |||
* '''Requirements''': Yukichigai Unofficial Patch, Spice of Life | |||
* '''Instructions''': Get the ''YUP-Spice of Life Patch'' main file. During installation change the name to "YUP-Spice of Life Patch". | |||
Patch for YUP and Spice of Life to forward a few sound fixes from YUP. | |||
==== Do You Feel Lucky? ==== | ==== Do You Feel Lucky? ==== | ||
Well, do you punk? America may be dead and gone, but the 2nd Amendment is alive and well in the Mojave, so make sure that rifle is real nice and shiny when you stand your ground. | Well, do you punk? America may be dead and gone, but the 2nd Amendment is alive and well in the Mojave, so make sure that rifle is real nice and shiny when you stand your ground. | ||
===== [ | ===== [https://www.nexusmods.com/newvegas/mods/55008/? Weapons of the New Millenia] ===== | ||
* '''Author''': Millenia, Naky, MediocrityGoggles, and many others | |||
* '''Version''': v1.1a | |||
* '''Installation''': Get the main file, follow these instruction to install manually since the fomod does not work for Mod Organizer: | |||
In the pop up for manual installation right click "Premade Weapons.of.the.New.Millenia" and select "Set data directory". | |||
Click the arrow next to "Optional Store" and highlight "Sound, meshes, textures" and drag them to "data". | |||
Uncheck "Optional Store, _OPTIONAL, fomod, images, Weapons.of.the.New.Millenia.Cheat.Cabinet.esp, and Weapons.of.the.New.Millenia.Honest.Hearts.Grunt.Patch.esp". | |||
Click {{ui|OK}}. | |||
: LOOT reports that this mod needs to be cleaned with FNVEdit: | |||
:* Weapons.of.the.New.Millenia.esm | |||
Contains dirty edits: 10 ITM records. Follow instructions for cleaning [[User:EssArrBee/FNVEdit Mod Cleaning|here]]. | |||
* '''Note''': The store and CaliberX plugins will be provided by CaliberX. | |||
{{RelatedVideos| | |||
*{{Video|RtpZmzUkIRg|WotNM Intallation|Dirty Weasel demonstrates installation.}} | |||
}} | |||
This is a full compilation of the Millenia's weapon mods. The awesomeness of these textures and models are based on real guns and the work is so good it may melt your face off. You've been warned. Dr. Thompson would approve. | |||
===== [https://www.nexusmods.com/newvegas/mods/39981/? CaliberX] ===== | |||
* '''Author''': Earache42, Fluidfire, odin_ml, Maintainers Brigand231, WhiskeyRiver2, Roy Batty | |||
* '''Version''': v5.04 | |||
* '''Fallout 3 Equivalent''': [https://www.nexusmods.com/fallout3/mods/11684/? eXcalibr - ammo eXpansion pack] | |||
* '''Requirements''': Weapons of the New Millenia | |||
* '''Note''': Version v5.04 was removed until JIP NVSE Plugin was updated. The 4.017 version is the current version until then. | |||
* '''Installation''': Get the ''CaliberX v5.04'' main file and the ''WotNM_CaliberX 5.0 Patches'' optional file. | |||
Install the main file normally, then navigate to your downloads folder and drag the ''WotNM_CaliberX 5.0 Patches'' zip-file to MO's downloads tab. | |||
Double click on the dropped file to install. Rename the mod to match the main file and click {{ui|Manual}}. | |||
In the pop up for manual installation, right click "WotNM-CalXVer5.0-Patches" and select "Set data directory". | |||
Untick everything except ''Weapons.of.the.New.Millenia.Leveled.Lists.esp'', ''Weapons.of.the.New.Millenia.Store.esp'' and ''WotNM-CalXVer5-Patch.esp''. | |||
Click {{ui|OK}}, then click {{ui|Merge}}, not {{ui|Replace}}. | |||
:Only the following plugins should be in the "Available ESPs" pane: | |||
:* {{Fc|white|Caliber.esm}} | |||
:* {{Fc|white|Weapons.of.the.New.Millenia.Levelled.Lists.esp}} | |||
:* {{Fc|white|Weapons.of.the.New.Millenia.Store.esp}} | |||
:* {{Fc|white|WotNM-CalXver5-Patch.esp}} | |||
The go-to ammunition overhaul for Fallout: New Vegas. | |||
===== [https://www.nexusmods.com/newvegas/mods/44429/? Retextured FALLOUT Ordnance - RFO] ===== | |||
* '''Author''': EmeraldReign | * '''Author''': EmeraldReign | ||
* '''Version''': v0.2 | * '''Version''': v0.2 | ||
| Line 433: | Line 2,121: | ||
Heavy Weapons face lift, covers most of the larger guns. | Heavy Weapons face lift, covers most of the larger guns. | ||
===== [ | ===== [https://www.nexusmods.com/newvegas/mods/38285/? Weapon Retexture Project - WRP] ===== | ||
* '''Author''': Millenia | * '''Author''': Millenia | ||
* '''Version''': v1.95 | * '''Version''': v1.95 | ||
* '''Installation''': Install | * '''Fallout 3 Equivalent''': [https://www.nexusmods.com/fallout3/mods/18133/? FO3-WRP - Weapon Retexture Project] | ||
* '''Installation''': Install ''weapon_retexture_project_1dot95'' main file, the ''New 12_7mm SMG'' update file, and the ''ChristineCOSRifle'' optional file. Install the main and update files first and save the ''ChristineCOSRifle'' file for later. | |||
There is not a whole lot to say about this mod that has not already been said. Millenia is a gun nut who is also the best texture artist making mods ever. We are just lucky that he was making mods and not scooped up by a studio earlier. | There is not a whole lot to say about this mod that has not already been said. Millenia is a gun nut who is also the best texture artist making mods ever. We are just lucky that he was making mods and not scooped up by a studio earlier. | ||
===== [ | ===== [https://www.nexusmods.com/newvegas/mods/47714/? 357 Revolver Re-Retextured] ===== | ||
* '''Author''': Millenia | |||
* '''Version''': v1.2 | |||
* '''Installation''': The plugin for this mod is not necessary, follow these instructions: | |||
Install the mod. | |||
In Mod Organizer's left pane double-click the mod and in the pop-up box select the "Optional ESPs" tab. | |||
Move "357retex.esp" to the "Optional ESPs" box. | |||
This gun is included in the Weapon Retexture Project, but has an issue, so this file will fix that. Shout out to STEP member Janzzze for pointing out the need for this mod even with WRP. | |||
===== [https://www.nexusmods.com/newvegas/mods/48049/? Single Shotgun Re-Retexture] ===== | |||
* '''Author''': Millenia | |||
* '''Version''': v1.0 | |||
* '''Installation''': The plugin for this mod is not necessary, follow these instructions: | |||
Install the mod. | |||
In Mod Organizer's left pane double-click the mod and in the pop-up box select the "Optional ESPs" tab. | |||
Move "singleshot_retex.esp" to the "Optional ESPs" box. | |||
This another gun that has an issue from Weapon Retexture Project. Shout out to STEP member Janzzze for pointing out the need for this mod even with WRP. | |||
===== [https://www.nexusmods.com/newvegas/mods/56477/? Bozar retexture] ===== | |||
* '''Author''': Millenia | |||
* '''Version''': v1.1 | |||
* '''Installation''': Get the ''Bozar_retexture_2k_maps'' main file. | |||
Bozar is a Fallout 2 weapon that was supposed to be a sniper rifle, but someone messed up and gave it the wrong stats. Obsidian kept that wonderful mistake alive with GRA. | |||
===== [https://www.nexusmods.com/newvegas/mods/50279/? GRA WRP Unofficial Patch V2] ===== | |||
* '''Author''': Millenia and micalov | * '''Author''': Millenia and micalov | ||
* '''Version''': v2.1 | * '''Version''': v2.1 | ||
* ''' | * '''Requirements''': WRP | ||
Continued work on WRP for GRA integration. | Continued work on WRP for GRA integration. | ||
<!-- | |||
===== [https://www.nexusmods.com/newvegas/mods/56108/? PB-6P9] ===== | |||
* '''Author''': Millenia, GR3B3N, Naky | |||
* '''Version''': v1.0 | |||
* '''Installation''': The plugin for this mod is not needed, follow these instructions: | |||
Install the mod. | |||
In Mod Organizer's left pane double-click the mod and in the pop-up box select the "Optional ESPs" tab. | |||
Move "PB6P9.esp" to the "Optional ESPs" box. | |||
This mod fixes a problem with the PB-6B9 in WotNM. | |||
---> | |||
===== [https://www.nexusmods.com/newvegas/mods/42666/? EVE - Essential Visual Enhancements] ===== | |||
* '''Author''': weijiesen and jonnyeah | |||
* '''Version''': v1.18 | |||
* '''Fallout 3 Equivalent''': [https://www.nexusmods.com/fallout3/mods/8340/? EVE - Energy Visuals Enhanced] | |||
* '''Installation''': Get the ''EVE v1.18 - Alternate'' main file and follow these install instructions: | |||
Install the main file and select the "All 5 DLCs" option in the installer. | |||
EVE is just better at energy weapons than anything else. Many great modders contributed to the project and that means it is essential to any mod list. | |||
===== [https://www.nexusmods.com/newvegas/mods/39651/? Weapon Mods Expanded - WMX] ===== | |||
* '''Author''': antistar | |||
* '''Version''': v1.1.4 | |||
* '''Installation''': Get the ''Weapon Mods Expanded v1_1_4'' main file and ''WMX - EVE Compatibility v1.0.10'', ''WMX - Weapon Retexture Project compatibility v1.2.4'', and ''WMX-DLC v1_0_2''. Follow these install instructions: | |||
Install the ''Weapon Mods Expanded v1_1_4'' file normally. | |||
Install the ''WMX-DLC v1_0_2'' file and during the installer select "WMX-DLCMerged" and "WMX-POPMerged", then click {{ui|Next}}, {{ui|Install}} and when asked select {{ui|Merge}}, not {{ui|Replace}}. | |||
Install the ''WMX - EVE Compatibility v1.0.10'' file and select "WMX-EVE-AllDLCMerged", click {{ui|Install}} and when asked select {{ui|Merge}}, not {{ui|Replace}}. | |||
Install the ''WMX - Weapon Retexture Project compatibility v1.2.4'' file and select {{ui|Merge}}, not {{ui|Replace}}. | |||
In the left pane of MO, double click "Weapon Mods Expanded - WMX" and select the "Optional ESPs" tab. | |||
Move the "WMX-POPMerged.esp" to the "Optional ESPs" box. | |||
Adds many new weapon mods for guns and melee weapons. | |||
===== [https://www.nexusmods.com/newvegas/mods/42363/? Project Nevada Patches] ===== | |||
* '''Author''': PN Team | |||
* '''Version''': v1.0 | |||
* '''Requirements''': Project Nevada, EVE, WMX | |||
* '''Installation''': Get the ''Project Nevada - EVE Support 1_2'' and ''Project Nevada - WMX Support 1_3'' files only. Install each into its own folder. | |||
When installing these mods they will automatically install into a folder named by the first mod, e.g. if ''Project Nevada - EVE Support 1_2'' is installed first then MO will install it as '''Project Nevada - EVE Support'''. | |||
The next install will then ask to {{ui|Merge, Replace, Rename or Cancel}}. | |||
If you wish to have two separate mods in MO choose {{ui|Rename}} and type the desired name in the field presented. | |||
These patches will make Project Nevada compatible with EVE and WMX. Praise be. | |||
===== [https://www.nexusmods.com/newvegas/mods/61407/? Mojave Patch Outpost - YUP-WMX-PN-PNEO Patch] ===== | |||
* '''Author''': EssArrBee | |||
* '''Version''': v2.0 | |||
* '''Installation''': Get the ''YUP-WMX-PN-PNEO Patch'' main file. During install rename the file to "YUP-WMX-PN-PNEO Patch" since there are multiple patches from this page used in the guide. | |||
Combines all your favorites. ;) | |||
===== [https://www.nexusmods.com/newvegas/mods/50547/? Half Hansified Holorifle] ===== | |||
* '''Author''': MadCat221 | |||
* '''Version''': v1 | |||
* '''Requirements''': WRP, WMX | |||
* '''Installation''': Install the ''Half Hansified Holorifle WMX DLC'' file only. | |||
===== [ | Add one more gun with Millenia textures to the game, with bonus WMX compatibility. | ||
===== [https://www.nexusmods.com/newvegas/mods/45042/? LAER Retexture] ===== | |||
* '''Author''': The Riff | * '''Author''': The Riff | ||
* '''Version''': v1.1 | * '''Version''': v1.1 | ||
* '''Installation''': This mod is not packaged correctly, follow these instructions: | |||
During install, right click "data" and select "Set data directory", untick "before.png" and "after.png", then click {{ui|OK}}. | |||
Only one gun, but proper energy weapon retextures are few and far between. At least the LAER is done correctly. | Only one gun, but proper energy weapon retextures are few and far between. At least the LAER is done correctly. | ||
<!-- | |||
===== [ | ===== [https://www.nexusmods.com/newvegas/mods/35678/? Plasma Rifles Awesomefied] ===== | ||
* '''Author''': MadCat221 | * '''Author''': MadCat221 | ||
* '''Version''': v1.32 | * '''Version''': v1.32 | ||
Added effects to plasma rifles hard to see while shooting, but excellent for screenshots and to see working on other's guns. | Added effects to plasma rifles hard to see while shooting, but excellent for screenshots and to see working on other's guns. | ||
--> | |||
===== [ | ===== [https://www.nexusmods.com/newvegas/mods/42509/? HD One Hand Melee by Insanity Sorrow] ===== | ||
* '''Author''': InsanitySorrow and 2cooldays | * '''Author''': InsanitySorrow and 2cooldays | ||
* '''Version''': v1.0 | * '''Version''': v1.0 | ||
* '''Installation''': Install | * '''Installation''': Install the ''One Hand Melee HD'' main file and the ''Gun Runner Box HD'' optional file. | ||
One-Handed melee weapons get a face lift from one of the best. | One-Handed melee weapons get a face lift from one of the best. | ||
===== [ | ===== [https://www.nexusmods.com/newvegas/mods/39495/? Fire Axe - Retextured] ===== | ||
* '''Author''': d_seven | * '''Author''': d_seven | ||
* '''Version''': v2 | * '''Version''': v2 | ||
* '''Installation''': Install Fire Axe and Knock Knock retextures. | * '''Installation''': Install ''Fire Axe'' and ''Knock Knock'' retextures. | ||
Give the chop in style. | Give the chop in style. | ||
===== [https://www.nexusmods.com/fallout3/mods/21245/? Fallout 3 Weapon Enhancement Pack] ===== | |||
* '''Author''': ChristopherWallace & Madcat221 | |||
* '''Version''': v1.0 | |||
* '''Installation''': Get the ''Weapon Enhancement Pack'' main file only. This is a Fallout 3 mod, so MO will not be able to download the file. Follow these instructions: | |||
In Windows Explorer, navigate to the archive. | |||
Drag the archive over to the downloads tab of MO and drop it. MO will copy the file over. | |||
Install the file. | |||
This will improve upon the Fallout 3 weapons added by Project Nevada. | |||
===== [https://www.nexusmods.com/newvegas/mods/38285/? WRP Christine's COS Rifle Replacer] ===== | |||
* '''Author''': Millenia | |||
* '''Version''': v1.0 | |||
* '''Installation''': Install the ''ChristineCOSRifle'' file downloaded earlier as a separate file and follow these instructions: | |||
Right click the "WRP Christine's COS Rifle Replacer" file in MO's left panel and select "Open in explorer". | |||
In the explorer window navigate to "textures/weapons/2handrifle" and duplicate the ''christinecos.dds'' file until there are four in total. | |||
Rename the four files to ''1stpersonsniperriflecarbonurban.dds, 1stpersonsniperrifleurban.dds, sniperriflecarbonurban.dds, sniperrifleurban.dds'' respectively. | |||
Keep the explorer window open. | |||
Open MO again and right click on the ''Fallout 3 Weapon Enhancement Pack'' file and select "Open in explorer" | |||
In the explorer window navigate to "textures/Weapons/2HandAutomatic/" | |||
Find and copy the ''1stPersonG3AssaultRifleClip.dds'' and ''G3AssaultRifleClip.dds'' | |||
Paste the two files into the other explorer window | |||
Rename ''1stPersonG3AssaultRifleClip.dds'' to ''1stpersonsniperrifleurbanextmag.dds'' and ''G3AssaultRifleClip.dds'' to ''sniperrifleurbanextmag.dds'', overwriting any existing textures. | |||
Close the explorer windows. | |||
This workaround allows Millenia's textures to work with WMX. | |||
==== Additional Weapons ==== | |||
This optional section will link to a separate pages with instructions to install mods with only one or a few weapons. It will also include merging instructions for those mods to save plugin slots. Any user can make a page with weapons and have it linked in this section, just create the page and let EssArrBee know about it. The idea is to make this small section a place where users can choose one or two sets of additional weapons to add into their game. It is also a good way to teach users to build their pack and merge them together for others to use. | |||
[[User:EssArrBee/FalloutNewVegas_MilleniasAdditionalWeapons|Millenia's Additional Weapons]] - Weapons from Millenia, not included in Weapons of the New Millenia. | |||
[[User:EssArrBee/FalloutNewVegas_AdditionalWeapons|EssArrBee's Recommended Weapons]] - WIP page for some extra weapons EssArrBee recommends, expect this page to add a few weapons over the next couple of weeks. | |||
==== Packrat Mentality ==== | ==== Packrat Mentality ==== | ||
Let's be honest, there is a ton of ugly, rundown crap in the wasteland. This section will help that crap look as good as possible. | |||
===== [ | ===== [https://www.nexusmods.com/newvegas/mods/58318/? Audleys Misc Textures] ===== | ||
* '''Author''': audley | |||
* '''Version''': v1.1b | |||
* '''Installation''': Get the ''Audleys Misc Textures - Fear and Loathing'' optional file. | |||
Eggs for protein, smokes to look cool, and shovels to bury the bodies. | |||
<!--===== [https://www.nexusmods.com/newvegas/mods/57484/? A Quick Shovel Retex] ===== | |||
* '''Author''': audley | |||
* '''Version''': v1.0 | |||
* '''Installation''': During installation, expand "Shovel Retexture", then right click "1024x1024" and select "Set data directory" and click [OK]. | |||
Much needed upgrade of the shovel. | |||
--> | |||
===== [https://www.nexusmods.com/newvegas/mods/39945/? Hectrol Lockinterface Deluxe HighRes Retex] ===== | |||
* '''Author''': hectrol | * '''Author''': hectrol | ||
* '''Version''': v1.0 | * '''Version''': v1.0 | ||
* '''Fallout 3 Equivalent''': [https://www.nexusmods.com/fallout3/mods/15700/? Hectrol Lockinterface Deluxe HighRes Retex] | |||
* '''Installation''': 1024 | * '''Installation''': 1024 | ||
Wouldn't shooting locks be more fun? Oh well, this will help it look good. | Wouldn't shooting locks be more fun? Oh well, this will help it look good. | ||
===== [ | ===== [https://www.nexusmods.com/newvegas/mods/40223/? Hectrol Vegas Sewer Deluxe HighRes Retex] ===== | ||
* '''Author''': hectrol | * '''Author''': hectrol | ||
* '''Version''': v1.0 | * '''Version''': v1.0 | ||
| Line 495: | Line 2,316: | ||
In the future the whole world will be a sewer, so do not forget where the Ninja Turtles live. | In the future the whole world will be a sewer, so do not forget where the Ninja Turtles live. | ||
===== [ | ===== [https://www.nexusmods.com/newvegas/mods/40302/? HI-RES Chems and Health Re-Texture] ===== | ||
* '''Author''': clintmich | * '''Author''': clintmich | ||
* '''Version''': v1.2 | * '''Version''': v1.2 | ||
''"We had two bags of grass, seventy-five pellets of mescaline, five sheets of high-powered blotter acid, a saltshaker half-full of cocaine, and a whole galaxy of multi-colored uppers, downers, screamers, laughers... Also, a quart of tequila, a quart of rum, a case of beer, a pint of raw ether, and two dozen amyls. Not that we needed all that for the trip, but once you get locked into a serious drug collection, the tendency is to push it as far as you can." - Raoul Duke | |||
===== [ | ===== [https://www.nexusmods.com/newvegas/mods/42681/? Magazine Redux] ===== | ||
* '''Author''': razzy1319 | * '''Author''': razzy1319 | ||
* '''Version''': v1. | * '''Version''': v1.1 | ||
* '''Installation''': Get the ''MagRedux 1024x1024'' main file and the ''MagRedux QuickFix'' file, and when installing the optional file, click [Merge], not [Replace]. | |||
If magazines gave bonuses in real life then I'd be King of the World. | If magazines gave bonuses in real life then I'd be King of the World. | ||
===== [ | ===== [https://www.nexusmods.com/newvegas/mods/50812/? Minimod - High Resolution Newspapers] ===== | ||
* '''Author''': Tagaziel and LadySinestro | |||
* '''Version''': v1.5 | |||
* '''Installation''': This mod is not packaged correctly, follow these instructions: | |||
During install, right click "data" and select "Set data directory", then click {{ui|OK}}. | |||
You can almost see the industry dying in these retextures. | |||
===== [https://www.nexusmods.com/newvegas/mods/40792/? Money Higher Quality Retex 1_2] ===== | |||
* '''Author''': Lord Inquisitor | * '''Author''': Lord Inquisitor | ||
* '''Version''': v1.2 | * '''Version''': v1.2 | ||
| Line 513: | Line 2,343: | ||
Caps are really hard to see, but this makes them stand out. | Caps are really hard to see, but this makes them stand out. | ||
===== [ | ===== [https://www.nexusmods.com/newvegas/mods/56328/? OJO BUENO NUKA-COLA MACHINE] ===== | ||
* '''Author''': tapioks and weijiesen | |||
* '''Verison''': v6a | |||
* '''Installation''': Get the ''Ojo Bueno Nuka-Cola Machine 2K Lite'' main file. | |||
* '''Note''': This mod can potentially cause a drop in framerate. It is suggested that you test this by going to a Nuka-Cola machine and monitoring your FPS when facing the machine. A good place for this test is in Goodsprings. After leaving Doc Mitchell's house turn left and face the gas station. If you get a noticeable drop in framerate, it may be best to use this mod only for texture replacer. To do this, re-installing the mod by select [Manual] and tick only textures folder. | |||
Yep, Nuka-Cola is that important. | |||
===== [https://www.nexusmods.com/newvegas/mods/36718/? Pre-War Money Retexture] ===== | |||
* '''Author''': RedRoomService | * '''Author''': RedRoomService | ||
* '''Version''': v1.2 | * '''Version''': v1.2 | ||
* '''Fallout 3 Equivalent''': [https://www.nexusmods.com/fallout3/mods/1794/? Pre-War Money Retexture - RRS] | |||
* '''Installation''': Choose "$5 Light Distress" during the installer. | |||
Money will survive the apocalypse and this mod will make sure it does it in style. | Money will survive the apocalypse and this mod will make sure it does it in style. | ||
===== [ | ===== [https://www.nexusmods.com/newvegas/mods/55228/? Teddy Bear Retextures] ===== | ||
* '''Author''': MisterGibson | |||
* '''Version''': v1.0 | |||
* '''Installation''': This mod is not packaged correctly, follow these instructions: | |||
Expand the teddy bear retexture of choice, "Pink Bear" is recommended. | |||
Right click on the preferred resolution, 1024 is recommended, and select ''Set data directory'', then click {{ui|OK}}. | |||
Why the pink bear? Because Breaking Bad, Dammit!!! | |||
<!-- | |||
===== [https://www.nexusmods.com/newvegas/mods/57404/? The Ultimate Cigarette Retexture] ===== | |||
* '''Author''': Audley | |||
* '''Version''': v1.0 | |||
* '''Installation''': This mod is packaged incorrectly, follow these instructions: | |||
During the installation pop up, expand Cigarette_Retex_Alt_Manual->1024x256. | |||
Right click Data and select "Set data directory". | |||
Smoke em if you got em. | |||
===== [https://www.nexusmods.com/newvegas/mods/57400/? The Ultimate Fire Gecko Egg Retex] ===== | |||
* '''Author''': audley | |||
* '''Version''': v1.0 | |||
* '''Installation''': During installation expand "FireGeckoEggRetex_Manual->1024x1024" and right click "Data" and select "Set data directory", then click [OK]. | |||
Egg worthy of giant fire breathing lizards. | |||
--> | |||
===== [https://www.nexusmods.com/newvegas/mods/40329/? Tweaked Cashregister] ===== | |||
* '''Author''': Lord Inquisitor | * '''Author''': Lord Inquisitor | ||
* '''Version''': v1.0 | * '''Version''': v1.0 | ||
===== [ | ===== [https://www.nexusmods.com/newvegas/mods/43919/? Urban Food Re-Tex] ===== | ||
* '''Author''': clintmich | * '''Author''': clintmich | ||
* '''Version''': v1.0 | * '''Version''': v1.0 | ||
Ever wonder what food that can last over 200 years looks like? This mod has the answer. | Ever wonder what food that can last over 200 years looks like? This mod has the answer. | ||
===== [https://www.nexusmods.com/newvegas/mods/61186/? Cherry Bomb HD retexture and remodel] ===== | |||
* '''Author''': legandalfo & Jokerine | |||
* '''Version''': Not specified | |||
* '''Installation''': Download the "Round mesh for cherry bomb" optional file and the "512x512 textures", install in that order. | |||
When installing the "512x512 textures" right click the preferred retexture (default is recommended) and select ''Set data directory'', then click {{ui|OK}}. | |||
If the BAIN installer is used simply select the '''Default''' option. | |||
== Poosh == | == Poosh == | ||
Not sure you're gonna make it, but that sure is a pretty shade of red. Make sure that some of the special effects look special with this section. | Not sure you're gonna make it, but that sure is a pretty shade of red. Make sure that some of the special effects look special with this section. | ||
===== [ | ===== [https://www.nexusmods.com/newvegas/mods/34917/? Enhanced Blood Textures for NV v2_22c] ===== | ||
* '''Author''': dDefinder | * '''Author''': dDefinder | ||
* '''Version''': v2.22c | * '''Version''': v2.22c | ||
* '''Installation''': Download Enhanced Blood Texture main file, Alternate Textures | * '''Fallout 3 Equivalent''': [https://www.nexusmods.com/fallout3/mods/101/? Enhanced Blood Textures v2_22b] | ||
* '''Installation''': Download the ''Enhanced Blood Texture'' main file, as well as the ''Alternate Textures'' and ''Low Res Textures'' optional files. Follow these instructions: | |||
Install the main file first. | |||
Install "Low Res textures" file, in its own folder or into the Enhanced Blood Textures, but make sure to use {{ui|Merge}}, not {{ui|Replace}}. | |||
Open downloads folder in windows explorer to find Alternate Textures-34917.rar and extract Alt Blur Screen Blood.zip and Alt v2.0 Blood splatter.rar to download folder. | |||
Go back to MO and install Alt Screen Blood Blur and Alt v2.0 Blood splatter, in their own folders or into Enhanced Blood Textures, but make sure to use {{ui|Merge}}, not {{ui|Replace}}. | |||
Install Low Res | |||
Open downloads folder in windows explorer to find Alternate Textures-34917.rar and extract Alt Screen Blood | |||
Go back to MO and install Alt Screen Blood Blur and Alt v2.0 Blood splatter, in their own folders or into Enhanced Blood Textures, but make sure to use Merge, not Replace. | |||
Probably the only blood mod for ''New Vegas'' that matters. | Probably the only blood mod for ''New Vegas'' that matters. | ||
<!--===== [https://www.nexusmods.com/newvegas/mods/47343/? Alternative Blood Spout] ===== | |||
===== [ | |||
* '''Author''': midtek | * '''Author''': midtek | ||
* '''Version''': v1.00 | * '''Version''': v1.00 | ||
* '''Installation''': Compatible with Enhanced Blood Textures version. | * '''Installation''': Compatible with Enhanced Blood Textures version. | ||
===== [https://www.nexusmods.com/newvegas/mods/56093/? Animated Fan] ===== | |||
* '''Author''': KiCHo666 | |||
* '''Version''': v1.2 | |||
* '''Fallout 3 Equivalent''': [https://www.nexusmods.com/fallout3/mods/20452/? Animated Fan] | |||
* '''Installation''': BOSS does not recognize this mod's plugin, follow these instructions: | |||
Open Boss Userlist Manager. | Open Boss Userlist Manager. | ||
Select the " | Select the "AnimatedFan.esp" to be ordered in the lower-left pane. | ||
In the selection box below "ADD", select "BOTTOM". | In the selection box below "ADD", select "BOTTOM". | ||
In the adjacent text box, type "Later Misc" and click [Save Rule]. | |||
Close Boss Userlist Manager and click [Yes] when prompted to save. | Close Boss Userlist Manager and click [Yes] when prompted to save. | ||
Just a nice little mod that adds in something nice to a world of garbage. One thing though, where are all the power cords? | |||
--> | |||
===== [ | ===== [https://www.nexusmods.com/newvegas/mods/55606/? Better Gas Leak Effect] ===== | ||
* '''Author''': KiCHo666 | |||
* '''Version''': v1.1 | |||
This is not just for gas leaks, it will also make the exhaust coming out of the Mr. Handy's glorious. | |||
===== [https://www.nexusmods.com/newvegas/mods/50804/? Better Posture] ===== | |||
* '''Author''': JW1 | * '''Author''': JW1 | ||
* '''Version''': v1.0 | * '''Version''': v1.0 | ||
* '''Fallout 3 Equivalent''': [https://www.nexusmods.com/fallout3/mods/18833/? Better Posture] | |||
* '''Installation''': This mod is packaged incorrectly, follow these instructions: | |||
During install, right click "Data" and select "Set data directory", then click {{ui|OK}}. | |||
Stand up straight soldier! | Stand up straight soldier! | ||
<!-- | |||
===== [https://www.nexusmods.com/newvegas/mods/55868/? Better Metal Impact VFX] ===== | |||
* '''Author''': by KiCHo666 | |||
* '''Version''': v1.1 | |||
===== [ | Better bullet-on-metal impact effect that can make fire fights look a bit nicer, especially at night. | ||
--> | |||
===== [https://www.nexusmods.com/newvegas/mods/40159/? Hectrol Binocular Scope Deluxe HighRes Retex] ===== | |||
* '''Author''': hectrol | * '''Author''': hectrol | ||
* '''Version''': v1.0 | * '''Version''': v1.0 | ||
* '''Installation''': 1024 Version, | * '''Installation''': Get the ''Hectrol Binocular Scope Deluxe 1024 Retex'' optional file. This mod is packaged incorrectly, follow these instructions: | ||
During install, expand "Hectrol_Binocular_Scope_Deluxe_HighRes_Retex", right click "Military Version" and select "Set data directory", then click {{ui|OK}}. | |||
Looking through binocular scope will look so much better. | Looking through binocular scope will look so much better. | ||
== In the Wasteland No One Can | ===== [https://www.nexusmods.com/newvegas/mods/59147/? Ragdolls] ===== | ||
* '''Author''': KiCHo666 | |||
* '''Version''': v3.02 | |||
* '''Requirements''': NVSE, MCM | |||
* '''Fallout 3 Equivalent''': [https://www.nexusmods.com/fallout3/mods/20143/? Ragdoll Overhaul FO3 Edition] | |||
This mod overhauls almost all ragdolls in the game, as well as adding headtracking to a lot of creatures that lacked it. | |||
===== [https://www.nexusmods.com/newvegas/mods/61819/? Tops Casino Neon Restored] ===== | |||
* '''Author''': SuBNeRoCL | |||
* '''Version''': v1 | |||
Restores some cut neon lights for the coolest cats on the whole Strip. | |||
===== [https://www.nexusmods.com/newvegas/mods/55334/? New Vegas - Enhanced Camera] ===== | |||
* '''Author''': LogicDragon | |||
* '''Version''': v1.4b | |||
* '''Requirements''': NVSE | |||
We should have bodies in every first person game by now. | |||
===== [https://mega.nz/#!ABxEGJwQ!JspsAM7TC7_zGZEfiKreGFgxe6Vx3QKoIKD_FmYcdrk Weapon Animation Replacers] ===== | |||
* '''Author''': joefoxx082 | |||
* '''Version''': vWAR2.0 | |||
* '''Installation''': Choose the recommended options: | |||
{{FOMOD Instructions|file=Weapon Animation Replacers| | |||
{{FomodPage|Aimed Pistol|{{Fieldset|bullet=yes||The Professional}}}} | |||
{{FomodPage|Assault Rifles|{{Fieldset|bullet=yes|1st Person|Option 2}}}} | |||
{{FomodPage|Assault Rifles|{{Fieldset|bullet=yes|3rd Person|Option 2}}}} | |||
{{FomodPage|Rifles|{{Fieldset|bullet=yes|1st Person|Option 1}}}} | |||
{{FomodPage|Rifles|{{Fieldset|bullet=yes|3rd Person|Option 1}}}} | |||
{{FomodPage|Pistols|{{Fieldset|bullet=yes|1st Person|Option 4}}}} | |||
{{FomodPage|Pistols|{{Fieldset|bullet=yes|3rd Person|Option 4}}}} | |||
{{FomodPage|Stance|{{Fieldset|bullet=yes||Relaxed Stance}}}} | |||
|buttonText=Install}} | |||
* '''Note''': With Enhanced Camera the 1st Person Animations do not matter, so no choices have to made. They are simply recommended here for anyone that does not use Enhanced Camera. | |||
Nexus site mod page is [https://www.nexusmods.com/newvegas/mods/38527/? here]. Shout out to Will for the combined installer version. | |||
This mod will fix many of the weird looking animations that the vanilla game has with weapon animations. It is also what the Millenia weapon mods are designed to work with. | |||
===== [https://www.nexusmods.com/newvegas/mods/55648/? WAR-Enhanced Camera compatibility pack] ===== | |||
* '''Author''': 11meister, Joefoxx082 | |||
* '''Version''': v2.0 | |||
* '''Requirements''': New Vegas - Enhanced Camera, WAR | |||
* '''Installation''': Get both main files, follow these instructions: | |||
Install the ''Release 2 - 2hand Rifle Reanimations'' file first. | |||
During installation, expand "Release 2 - 2handrifle animations->Raw Files". | |||
Right click "Data" and select "Set data directory", then click {{ui|OK}}. | |||
Install the ''Release 3 - 2hand auto reanimations - v2 with animated fingers'' file next. | |||
During installation, expanded "Release 3 - 2handauto update v2.0->2handauto v2.0->Data". | |||
Right click "Data" and select "Create Directory", then name it NVSE. | |||
Right click "NVSE" and select "Create Directory", then name it Plugins. | |||
Drag and drop "NVSE_EnhancedCamera.ini" into "Plugins". | |||
Right click "Data" and select "Set data directory", then click {{ui|OK}}. | |||
When asked select {{ui|Merge}}, not {{ui|Replace}}. | |||
: This mod has some INI settings that all users should be aware of. Double click the mod in the left pane of MO and go the INI-Files tab. | |||
:* This setting is for head bobbing while running. It is on by default, but recommended to be turned off. | |||
; Enables the head bob when in first person | |||
; Note: This overrides the camera position and may not be as compatible with some animations | |||
bEnableHeadBob= <----- Set to 1 to turn on, set to 0 to turn off. | |||
:* First person shadow is cast by the player. This is off by default and may cause performance issues, but it is recommended to turn it on. If there are performance issues just turn it off. | |||
; Enables shadows on the player when in first person | |||
bFirstPersonShadows= <----- Set to 1 to turn on, set to 0 to turn off. | |||
===== [https://www.mediafire.com/file/2k33ctx720pc81k/HDFog.7z weijiesen's HD Fog] ===== | |||
* '''Author''': weijiesen | |||
* '''Version''': v1.0 | |||
===== [https://www.nexusmods.com/newvegas/mods/62989/? EXE - Effect teXtures Enhanced] ===== | |||
* '''Author''': weijiesen | |||
* '''Version''': v1.0 | |||
The VFX-god has overhauled every last visual effect texture in the game. We better start writing some fire sermons now. | |||
== In the Wasteland No One Can Hear You Scream == | |||
Oh wait... that's space. Anyways, there are some annoying sounds in the wasteland, but this section will help with that. | Oh wait... that's space. Anyways, there are some annoying sounds in the wasteland, but this section will help with that. | ||
===== [ | ===== [https://www.nexusmods.com/newvegas/mods/40183/? Ambient Wasteland 2] ===== | ||
* '''Author''': Leviathan1753 | |||
* '''Version''': v1.1 | |||
* '''Fallout 3 Equivalent''': [https://www.nexusmods.com/fallout3/mods/12602/? Ambient Wastleand 2] | |||
* '''Note''': The WAV version is the best solution for Audiophiles, sorry no FLAC. The OGG version is the best solution for everyone else. Be warned that the WAV files will take up significant amounts of RAM and VRAM due to their size. | |||
Adds many new ambient sounds to the wasteland. | |||
===== [https://www.nexusmods.com/newvegas/mods/35061/? CONELRAD 640-1240 - Civil Defense Radio] ===== | |||
* '''Author''': Macabre Productions | |||
* '''Version''': v1.4 | |||
* '''Fallout 3 Equivalent''': [https://www.nexusmods.com/fallout3/mods/6104/? CONELRAD 640-1240 - Civil Defense Radio] | |||
* '''Installation''': This mod is packaged incorrectly, follow these instructions: | |||
During install, right click "Data" and select "Set data directory", then click {{ui|OK}}. | |||
''"What kind of rat bastard psychotic would play that song right now, at this moment?" - Raoul Duke.'' Great selection of songs that fit right in with the Fallout theme. | |||
===== [https://www.nexusmods.com/newvegas/mods/35293/? Improved Sound FX v0821] ===== | |||
* '''Author''': dDefinder | * '''Author''': dDefinder | ||
* '''Version''': v0.821 | * '''Version''': v0.821 | ||
* '''Fallout 3 Equivalent''': [https://www.nexusmods.com/newvegas/mods/35293/? Improved Sound FX v1_3] | |||
* '''Requirements''': Project Nevada | |||
* '''Installation''': Get the main file and the ''PN esp'' optional file. Follow these instructions: | |||
For the ''Improved Sound FX v0821'' tick both "DLC esps" and "Data". | |||
Install the ''PN esp'' file into the ''Improved Sound FX'' mod and select {{ui|Merge}} when asked. | |||
In the left pane of MO, right click ''Improved Sound FX'' and select "Information". | |||
Under the ''Optional ESPs'' tab, move all plugins '''EXCEPT''' "Improved Sound FX.esp" and "Improved Sound FX - Project Nevada.esp" to ''Optional ESPs''. | |||
A rebalance of just about every in game sound. Even makes some of the more annoying sounds, i.e. Cazador poison, less so. | A rebalance of just about every in game sound. Even makes some of the more annoying sounds, i.e. Cazador poison, less so. | ||
===== [ | ===== [https://www.nexusmods.com/newvegas/mods/55256/? Improved Sound FX - WMX Patch] ===== | ||
* '''Author''': | * '''Author''': dDefinder1 and EssArrBee | ||
* '''Version''': v1.1 | * '''Version''': v1.1 | ||
* '''Requirements''': Improved Sounds, WMX | |||
Updated version of the Improved Sound FX patch for WMX to work with the WMX-MergedDLCs.esp. | |||
===== [https://www.nexusmods.com/newvegas/mods/61815/? Immersive Pickup Sounds {{NAMESPACE}} Edition] ===== | |||
* '''Author''': TheKetzku and pintocat | |||
* '''Version''': v1.0 | |||
* '''Installation''': Get the ''Immersive Pickup Sounds - Compatibility Version'' main file. | |||
Adds pick-up sounds determined by item type to lots of different items. | |||
===== [https://www.nexusmods.com/newvegas/mods/44139/? Mojave Music Radio - Extended] ===== | |||
* '''Author''': ZeroDiamond | |||
* '''Version''': v1.0 | |||
* '''Installation''': Get the ''MMRE ESPs'' main file and the music packs required for the plugin of your choosing. Follow these instructions: | |||
The pack includes plugins for 20, 40, 60, 80, 100 songs. The vanilla radio has 15 songs. | |||
Choose the plugin you want and untick all the others when installing. ''MojaveExtended60.esp'' is recommended. | |||
Adds | Adds lots of new thematically appropriate songs to the Mojave Music Radio. | ||
== Gameplay == | == Gameplay == | ||
==== Yukichigai Gameplay Tweaks ==== | |||
Yuki is a ridiculous modder. He has well over a hundred mods for {{NAMESPACE}} and FO3 as well as the excellent YUP mod, which is the unofficial patch used in this guide. Many of the mods here are nice gameplay tweaks that fit in the 'Should of been in the vanilla game' category. The entire section has grown so large now that it has been spun off to its own page. | |||
===== [ | Even though it is on its own page now, this section is required unlike the [[User:EssArrBee/FalloutNewVegas#Additional Weapons|Additional Weapons]] Section which is optional. | ||
[[User:EssArrBee/FalloutNewVegas YukichigaiGameplayTweaks|Yukichigai Gameplay Tweaks]] | |||
<!-- | |||
===== [https://www.nexusmods.com/newvegas/mods/49609/? Craft and Cook at Camp and Barbecue Grills] ===== | |||
* '''Author''': Yukichigai | * '''Author''': Yukichigai | ||
* '''Version''': | * '''Version''': v2 | ||
* '''Installation''': Get the ''Craft at Camp and BBQ Grills v2'' main file and the ''Camp and BBQ Grills - Honest Hearts'' optional file. | |||
Grill food at a grill. Another 'Who woulda thought?' mod. | |||
===== [ | ===== [https://www.nexusmods.com/newvegas/mods/49703/? Dead Money - Surprise Vending Items Restoration] ===== | ||
* '''Author''': Yukichigai | * '''Author''': Yukichigai | ||
* '''Version''': v1 | * '''Version''': v1 | ||
Restores some content cut from Dead Money to add in surprise items in Dead Money. | Restores some content cut from Dead Money to add in surprise items in Dead Money. | ||
===== [ | ===== [https://www.nexusmods.com/newvegas/mods/42869/? Dead Money - More and Better Crafted Knives] ===== | ||
* '''Author''': Yukichigai | |||
* '''Version''': v0.3 | |||
* '''Installation''': It is a good idea to extract the BSA of this mod, follow these instructions: | |||
After installation, go to the "Archives" tab on the right pane of MO. | |||
Right click the DeadMoneyMoreCraftedKnifeVariants.bsa and click "Extract...", navigate to the "Dead Money - More and Better Crafted Knives" mod folder in the "...Mod Organizer/mods/" folder and click [Select Folder]. | |||
Double click "Dead Money - More and Better Crafted Knives" in the left pane of MO and select the "Filetree" tab. | |||
Right click on the DeadMoneyMoreCraftedKnifeVariants.bsa and select "Hide". | |||
Wider variety of the awesome knives from Dead Money. | |||
===== [https://www.nexusmods.com/newvegas/mods/49785/? Improved Transportalponder - Old World Blues] ===== | |||
* '''Author''': Yukichigai | |||
* '''Version''': v1 | |||
* '''Installation''': Get the ''Improved Transportalponder - Use Anywhere version'' optional file. | |||
Open the teleportation between the The Big MT and everywhere else. | |||
===== [https://www.nexusmods.com/newvegas/mods/41247/? More Caravan Players - Restoration] ===== | |||
* '''Author''': Yukichigai | |||
* '''Version''': v0.1 | |||
* '''Installation''': It is a good idea to extract the BSA of this mod, follow these instructions: | |||
After installation, go to the "Archives" tab on the right pane of MO. | |||
Right click the RestoredCaravanPlayers.bsa and click "Extract...", navigate to the "More Caravan Players - Restoration" mod folder in the "...Mod Organizer/mods/" folder and click [Select Folder]. | |||
Double click "More Caravan Players - Restoration" in the left pane of MO and select the "Filetree" tab. | |||
Right click on the RestoredCaravanPlayers.bsa and select "Hide". | |||
Adds a few more Caravan players to the world. | |||
===== [https://www.nexusmods.com/newvegas/mods/49987/? Old World Blues - Keep Big MT Active] ===== | |||
* '''Author''': Yukichigai | |||
* '''Version''': v1 | |||
Now Lobotomites and Roboscorpions will continue to spawn in The Big MT. | |||
=====[https://www.nexusmods.com/newvegas/mods/49938/? Pickable Cave Fungus outside of Zion] ===== | |||
* '''Author''': Yukichigai | |||
* '''Version''': v1 | |||
You know you want some mushrooms. | |||
===== [https://www.nexusmods.com/newvegas/mods/45125/? Radscorpion Egg - Restoration] ===== | |||
* '''Author''': Yukichigai | |||
* '''Version''': v0.1 | |||
Adds Radscorpion eggs to the loot of radscorpions. | |||
===== [https://www.nexusmods.com/newvegas/mods/56580/? Removeable Pip-Boy Glove] ===== | |||
* '''Author''': Yukichigai | |||
* '''Version''': v2 | |||
Some people think that a Pip-Boy should have a glove. Now those people can stop dreaming. | |||
===== [https://www.nexusmods.com/newvegas/mods/56614/? Sentry Bot Toy Attacks] ===== | |||
* '''Author''': Yukichigai | |||
* '''Version''': v2 | |||
* '''Installation''': It is a good idea to extract the BSA of this mod, follow these instructions: | |||
After installation, go to the "Archives" tab on the right pane of MO. | |||
Right click the Sentry Bot Toy Attacks - Essential.bsa.mohidden and click "Extract...", navigate to the "Sentry Bot Toy Attacks" mod folder in the "...Mod Organizer/mods/" folder and click [Select Folder]. | |||
Double click "Sentry Bot Toy Attacks" in the left pane of MO and select the "Filetree" tab. | |||
Right click on the Sentry Bot Toy Attacks - Essential.bsa.mohidden and select "Hide". | |||
Robot toy that shoots BBs. Remember to pick the little guy up before running off, he is not that fast. | |||
===== [https://www.nexusmods.com/newvegas/mods/41248/? Veronica Companion Weapon - Recharger Pistol] ===== | |||
* '''Author''': Yukichigai | |||
* '''Version''': v0.5 | |||
Someone from the Brothehood should have an energy weapon instead of a pistol. | |||
===== [https://www.nexusmods.com/newvegas/mods/36371/? Working Gomorrah Prostitutes - pun intended] ===== | |||
* '''Author''': Yukichigai | |||
* '''Version''': v0.3 | |||
Fills up Gamorrag with hookers, have fun! | |||
===== [https://www.nexusmods.com/newvegas/mods/50053/? Working Grinding Wheel] ===== | |||
* '''Author''': Yukichigai | |||
* '''Version''': v2 | |||
Fix up those melee weapons with a grinding wheel. | |||
===== Yuki Mods Merged ===== | |||
# Open FNVEdit through MO. | |||
# Right click the list of mods and "Select None". | |||
# Now tick the following mods and click [OK]: | |||
#* Camp Grills.esp | |||
#* Camp Grills - Honest Hearts.esp | |||
#* Dead Money Surprise Items.esp | |||
#* DeadMoneyMoreCraftedKnifeVariants.esp | |||
#* RestoredCaravanPlayers.esp | |||
#* OldWorldBlues - Improved Transportalponder Use Anywhere.esp | |||
#* OldWorldBlues - Keep Big MT Active.esp | |||
#* Pickable Cave Fungus with OWB.esp | |||
#* RadscorpionEggRestoration.esp | |||
#* Pip-Boy Glove Removeable.esp | |||
#* Sentry Bot Toy Attacks - Essential.esp | |||
#* VeronicaRechargerPistol.esp | |||
#* GomorrahProstituteEnable.esp | |||
#* Grinding Wheel.esp | |||
# After FNVEdit loads, right click on Camp Grills.esp and select "Apply Script". | |||
## From the top dropdown select Merge Plugins v1.9 and click [OK]. | |||
## In the Merge Plugins pop up, make sure all the plugins listed above are ticked and that "Renumber FormIDs" is ticked, and click [OK]. | |||
## In the next pop up click [OK], then give the merged plugin a name and click [OK]. ''YukiMergedMods'' is recommended. | |||
# Close FNVEdit and save '''ONLY''' the new plugin. | |||
# The plugin now resides in the ''Overwrite'' folder, so right click and "Create Mod". | |||
#* Name the folder "Yuki Merged Mods" and make sure it is listed right after ''Working Grinding Wheel'' in the left pane. | |||
# In the left pane of MO, double click ''Dead Money - More and Better Crafted Knives''. | |||
# Now go to the "Optional ESPs" tab and move the "DeadMoneyMoreCraftedKnifeVariants.esp" to the Optional ESPs box. | |||
# In the left pane of MO, double click ''More Caravan Players - Restoration''. | |||
# Now go to the "Optional ESPs" tab and move the "RestoredCaravanPlayers.esp" to the Optional ESPs box. | |||
# In the left pane of MO, double click ''Sentry Bot Toy Attacks''. | |||
# Now go to the "Optional ESPs" tab and move the "Sentry Bot Toy Attacks - Essential.esp" to the Optional ESPs box. | |||
# In the left pane of MO, untick ''Craft and Cook at Camp and Barbecue Grills'', ''Dead Money Surprise Items'', ''Improved Transportalponder - Old World Blues'', ''Old World Blues - Keep Big MT Active'', ''Pickable Cave Fungus outside of Zion'', ''Radscorpion Egg - Restoration'', ''Removeable Pip-Boy Glove'', ''Veronica Companion Weapon - Recharger Pistol'', ''Working Gomorrah Prostitutes - pun intended'', and ''Working Grinding Wheel''. | |||
# Bash tags need to be added for the plugin. It is a good idea to do it now by starting Wrye Flash NV and following these instructions: | |||
## Select "YukiMergedMods.esp" and then right click the Bash Tags box in the bottom right and add each these tags: | |||
##* Actors.ACBS | |||
##* Actors.AIData | |||
##* Actors.AIPackages | |||
##* Actors.DeathItem | |||
##* Deflst | |||
##* Factions | |||
##* Invent | |||
##* Relations | |||
##* Names | |||
##* Scripts | |||
##* Stats | |||
===== Yuki Merged Mods ===== | |||
* '''Author''': Yukichigai and you | |||
* '''Version''': v2 | |||
* '''Changelog''': This tiny changelog is provided for users that may have already done an older version of this section. | |||
*::::* v1: Initial version. | |||
*::::* v2: Added ''More Caravan Players - Restoration'' and ''Pickable Cave Fungus outside of Zion''. | |||
*::::* v3: Added ''Dead Money - More and Better Crafted Knives'' and ''Sentry Bot Toy Attacks''. | |||
Placeholder for the Yuki Merged Mod. This should save a lot of plugin slots. | |||
--> | |||
==== Machienzo Gameplay Tweaks ==== | |||
Primm is supposed to have a reputation like Goodsprings and Novac... Wha??? Ulysses is supposed to react to the player's faction allegiance... Pssshhh!!! Machienzo has made some mods that are in the category of "This is how the game should have been". This section will add a few of those mods. | |||
===== [https://www.nexusmods.com/newvegas/mods/44042/? Lonesome Road True Faction Allegiance] ===== | |||
* '''Author''': Machienzo | |||
* '''Version''': v1.1.2 | |||
Lonesome Road barely makes sense as it is, but at least now the faction allegiance will not be screwed up. | |||
===== [https://www.nexusmods.com/newvegas/mods/48918/? Primm Reputation Restored] ===== | |||
* '''Author''': Machienzo | |||
* '''Version''': v1.1 | |||
Primm will now have a reputation for associated with the choices the player makes surrounding the town. | |||
===== [https://www.nexusmods.com/newvegas/mods/35289/? Refined Casino People and Suits - Grimy_Dirty_Fixes] ===== | |||
* '''Author''': Machienzo | |||
* '''Version''': v1.3 | |||
* '''Installation''': Install the main file only. | |||
Fixes some of the clothing the Families and casino goers wear. Also, the faces of the dealers will be different instead of just a bunch of clones. | |||
===== Machienzo Merged Mods ===== | |||
# Open Merge Plugins Standalone through MO and click {{ui|OK}}. | |||
#* {{Fc|red|'''TICK'''}} "Copy general assets" in the Settings->Integration tab. | |||
# Hold <code>ctrl</code> and click every plugin listed below:{{AlertSmall|type=notice|size=31|text=If the plugins are contiguous hold <code>shift</code> and click the first then the last.}} | |||
#* {{Fc|white|NVDLC04 Allegiance w Duster.esp}} | |||
#* {{Fc|white|Primm Reputation Restored.esp}} | |||
#* {{Fc|white|RefinedCasinoPeople&Suits.esp}} | |||
# Right click one of the highlighted plugins and goto "Add to merge", then select "<New Merge>". | |||
#* In the popup, type the name of the merge and the plugin, then click {{ui|OK}}. ''Machienzo Merged Mods'' is recommended for both. | |||
# Open the Merges tab and right click "Machienzo Merged Mods" and goto "Plugins", then select "Check plugins for errors". | |||
<!--## There will be errors, so right click "Machienzo Merged Mods" and goto "Plugins", then select "Resolve issues". | |||
## Right click Uncut Wasteland.esp and select "Ignore errors", then click {{ui|OK}}.--> | |||
# Right click "Machienzo Merged Mods" again and select "Build Merge". | |||
# When complete click {{ui|Close}}, to close Merge Plugins Standalone. | |||
# The mod now resides in the ''Machienzo Merged Mods'' folder. | |||
#* It may not show in MO's left panel, so click the small tool icon dropdown above the left panel and select "Refresh". | |||
# Move the folder right below ''Refined Casino People and Suits - Grimy_Dirty_Fixes'' and make sure it is ticked. | |||
# Untick all the mods that were merged from the list above. | |||
# Bash tags need to be added for the plugin. It is a good idea to do it now by starting FNVEdit and following these instructions: | |||
## From the list of plugins double click "Machienzo Merged Mods.esp" | |||
## When FNVEdit loads, right click "Machienzo Merged Mods.esp" and select "Apply Script" | |||
## Choose "Generate Bash Tags" from the dropdown and click {{ui|OK}} | |||
## When asked to add the tags to the header, select {{ui|Yes}} | |||
##* Tags that should be added: | |||
##** {{Fc|white|Graphics}} | |||
##** {{Fc|white|Invent}} | |||
##** {{Fc|white|NpcFaces}} | |||
##** {{Fc|white|Scripts}} | |||
## Close and save "Machienzo Merged Mods.esp". | |||
===== Machienzo Merged Mods ===== | |||
* '''Author''': Machienzo (99%) and You (1%) | |||
* '''Version''': v2 | |||
* '''Changelog''': This tiny changelog is provided for users that may have already done an older version of this section. | |||
*::::* v1: Initial version. | |||
*::::* v2: Ported instructions to Merge Plugin Standalone. | |||
==== Additional Gameplay ==== | |||
===== [https://www.nexusmods.com/newvegas/mods/42503/? Gun Runners Actually Run Guns] ===== | |||
* '''Author''': Ripple | |||
* '''Version''': v1.8 | |||
This adds a caravan of Gun Runners that actually, you know, ''run guns''. Who would'a thought, right? The Gun Runners HQ has been beefed up with more security and living areas. | |||
===== [https://www.nexusmods.com/newvegas/mods/35979/? More Perks] ===== | |||
* '''Author''': Kyung-Bum Lee aka dree74 | |||
* '''Version''': v2.4.6 | |||
* '''Fallout 3 Equivalent''': [https://www.nexusmods.com/fallout3/mods/6190/? More Perks] | |||
* '''Installation''': Get the three main files and the three DLC optional files. Follow these instructions: | |||
Install ''More Perks 2_4_6'', ''More Perks for Dead Money DLC 1_0_9'', ''More Perks for Honest Hearts DLC 1_0_9'', and ''More Perks for Old World Blues DLC 1_0_5'', '' and make sure each mod goes into "More Perks", select {{ui|Merge}}, not {{ui|Replace}}. | |||
In Mod Organizer's left pane double-click the mod and in the pop-up box select the ''Optional ESPs'' tab. | |||
Move all the plugins into the ''Optional ESPs'' box then select the ''Filetree'' tab. | |||
Expand ''Sound->Voice->More Perks for Honest Hearts.esm'' and move the three folders into ''sound->voice->More Perks.esm'' and then delete ''More Perks for Honest Hearts.esm'' folder. | |||
Install ''More Perks for Companions 1_0_6'' into ''More Perks for Companions''. | |||
In Mod Organizer's left pane double-click the mod and in the pop-up box select the ''Optional ESPs'' tab. | |||
Move all the plugins into the ''Optional ESPs'' box then select the ''Filetree'' tab. | |||
Expand ''Sound->Voice->More Perks For Companions.esm'' and rename it to ''More Perks.esm''. | |||
Install ''More Traits 1_1_5'' into ''More Traits''. | |||
In Mod Organizer's left pane double-click the mod and in the pop-up box select the ''Optional ESPs'' tab. | |||
Move all the plugins into the ''Optional ESPs'' box then select the ''Filetree'' tab. | |||
Expand ''Sound->Voice->More Traits.esm'' and rename it to ''More Perks.esm''. | |||
* '''Note''': There should be no plugins left from this mod after following the above directions. The following mod will install a merged ESM for this mod. It is called More Perks Merged, but the file is from the NVEC page. | |||
This excellent mod will give many new perks and traits to players that are every bit as good or better than the vanilla perks and traits. | |||
===== [https://www.nexusmods.com/newvegas/mods/44204/? More Perks Merged] ===== | |||
* '''Author''': Tommy, Freddy, luthienanarion, HunterZ, timeburn, and Waldo67 | |||
* '''Version''': v4 | |||
* '''Installation''': This is from the NVEC page, so ignore everything on this page except the ''More Perks Merged V4'' in the optional section. In Fomod install: pick "DLC". | |||
Merged version of More Perks from above. Reduces load order immensely. | |||
===== [https://www.nexusmods.com/newvegas/mods/45739/? Roleplayers Alternative Start Fallout New Vegas] ===== | |||
* '''Author''': Gribbleshnibit8, pintocat, and scaredwolf | |||
* '''Version''': v1.5 | |||
* '''Requirements''': NVSE | |||
Roleplaying options and start somewhere other than Goodsprings. | |||
===== One Last Merge ===== | |||
By now it should be pretty clear that many mods in this guide end up merged together. Welcome to modding Fallout New Vegas and the plugin limit of 140. | |||
===== [https://www.nexusmods.com/newvegas/mods/35378/? Ammo Ingredients as Loot] ===== | |||
* '''Author''': Moogiefluff | |||
* '''Version''': v1.0 | |||
Reduce the chance to find ammo in the Project Nevada Rebalance menu and this mod will make it so that ammo crafting is a bigger part of the game. And who doesn't like crafting? Shout out to rootsrat for the suggestion. | |||
===== [https://www.nexusmods.com/newvegas/mods/36744/? Armour Repair Kits] ===== | |||
* '''Author''': Antistar | |||
* '''Version''': v1.0.2 | |||
* '''Requirements''': NVSE | |||
Allows player to repair armor just like weapons. Fixes up the equipped piece of armor with the lowest condition. | |||
===== [https://www.nexusmods.com/newvegas/mods/43865/? A Few More Map Markers] ===== | |||
* '''Author''': NeilUK02 | |||
* '''Version''': v2.0 | |||
* '''Installation''': LOOT reports that this mod needs to be cleaned with FNVEdit, follow instructions for the version being used: | |||
:* mapmarkers.esp | |||
Contains dirty edits: 4 ITM records. Follow instructions for cleaning [[User:EssArrBee/FNVEdit Mod Cleaning|here]]. | |||
Adds map markers to The Strip and Freeside. No more three load doors to get to Vault 21 or the NCR Embassy. | |||
===== [https://mega.nz/#!gIkSyDJB!MT1hf8EXG2abFdFvS2fDPWIFd3ZwNwcM83EpzP4Pwxs Burning Campfire] ===== | |||
* '''Author''': Sagittarius22 & MonoAccipiter | |||
* '''Version''': v3.1 | |||
This will light up the fire when using campingfires to cook. This updated version was made compatible with Honest Hearts by MonoAccipiter. | |||
===== [https://www.nexusmods.com/newvegas/mods/35701/? Casino Exchange All] ===== | |||
* '''Author''': pintocat | |||
* '''Version''': v1.5 | |||
* '''Installation''': Get the Fomod installer version. Choose the Pre-War Money option during install. | |||
Better option for exchanging money for chips at the casinos. | |||
===== [https://www.nexusmods.com/newvegas/mods/46251/? Couriers Stash Integration] ===== | |||
* '''Author''': The-Silenced | |||
* '''Version''': v1.3 | |||
* '''Requirements''': NVSE | |||
* '''Installation''': Get the ''Integration - Couriers Stash - Vanilla'' main file and then get the WMX compatible plugin [https://mega.nz/#!kE5GxQxT!FHr11mHCa6rulknPz7ZWXsQJOgjYeLUlFnDZ8_Uk9tw here]. | |||
Install the ''Integration - Couriers Stash - Vanilla'' file. | |||
Install the ''Couriers Stash Integration - WMX'' file and rename it to "Courier Stash Integration", select [Merge], not [Replace]. | |||
In MO's left pane, double click "Couriers Stash Integration" and select the "Optional ESPs" tab. | |||
Move the "Integretion - Couriers Stash.esp" to the "Optional ESPs" box. | |||
This will distribute the pre-order packs gear throughout the game instead letting the player start with them. Shout out to rootsrat for the suggestion. | |||
<!-- | |||
===== [https://www.nexusmods.com/newvegas/mods/44171/? Courier Stash Pre-oreder pack selector] ===== | |||
* '''Author''': Yukichigai | |||
* '''Version''': v0.4 | |||
Getting all the pre-order packs right at the start is game breaking and this mod allows you changes that and only choose what you want. | |||
--> | |||
===== [https://www.nexusmods.com/newvegas/mods/42033/? Delay DLC - TTW] ===== | |||
* '''Author''': Gribbleshnibit8 | * '''Author''': Gribbleshnibit8 | ||
* '''Version''': v2.0 | * '''Version''': v2.0 | ||
| Line 617: | Line 2,922: | ||
The first main file is for TTW, so be careful. | The first main file is for TTW, so be careful. | ||
===== [ | ===== [https://www.nexusmods.com/newvegas/mods/46326/? Extended Dialogue-Vulpes Inculta] ===== | ||
* '''Author''': | * '''Author''': Scorpial | ||
* '''Version''': | * '''Version''': v1.2 | ||
* '''Installation''': | |||
Adds a bit more to one of the Legion's finest. | |||
Select the | |||
In | ===== [https://www.nexusmods.com/newvegas/mods/60246/? Gas Pumps of New Vegas] ===== | ||
* '''Author''': EdibleGrenade12, Thaiauxn, darkside & MonoAccipiter | |||
* '''Version''': v1.5 | |||
Close | * '''Installation''': Get the main file and the ''Gas Pumps of NV Update 1.5'' optional file. | ||
Install the main file first. | |||
Install "Gas Pumps of NV Update 1.5" and click {{ui|Merge}}, not {{ui|Replace}}. | |||
Adds gas (coolant) pumps to the various pit-stops around the Mojave. | |||
<!--===== [https://www.nexusmods.com/newvegas/mods/46138/? Gun Runners Arsenal GRA - The Right to Bear Arms] ===== | |||
* '''Author''': Puce Moose | |||
* '''Version''': v1.032 | |||
Adds GRA weapons to the leveled lists and puts some of the unique weapons into specific locations. Delevels {{NAMESPACE}} a bit, which is a good thing. | |||
--> | |||
===== [https://www.nexusmods.com/newvegas/mods/39358/? Improved Casinos] ===== | |||
* '''Author''': Mr Excitement | |||
* '''Version''': v1.01 | |||
* '''Installation''': There are three versions of the mod, 2X, 3X, and 4X. Choose which ever is preferred, 2X is recommended, and then follow these instructions: | |||
After installing the mod, in the left pane of MO, right-click the mod and select "Information". | |||
Select the ''Optional ESPs'' tab and move the other two plugins that will '''NOT''' be used to the ''Optional ESPs'' box. | |||
Higher stakes gaming and the ability to win more money before getting banned. Works well if the merchant difficulty is increased with Project Nevada. | |||
<!--===== [https://www.nexusmods.com/newvegas/mods/55569/? KFE - Refill Water Bottles] ===== | |||
* '''Author''': KWorld | |||
* '''Version''': v1.0 | |||
* '''Installation''': Get the ''KFE - Refill Water Bottle - Core File'' main file and the ''KFE - PN Patch'' optional file, then follow these instructions: | |||
Install the main file. | |||
Install the optional file and click [Merge], not [Replace]. | |||
In MO's left pane, double click the mod and select the "Optinal ESPs" tab. | |||
Move "PN-Refill Water Bottles Patch.esp" to the "Optional ESPs" box. | |||
* '''Note''': This mod only lets bottles last for two uses. For unbreakable bottles use the ''KFE - Refill Water Bottle - Unbreakable Bottles'' file. | |||
This gem lets the player craft water from the sources around the wasteland. | |||
===== [https://www.nexusmods.com/newvegas/mods/36425/? Less Intrusive Kill Camera] ===== | |||
* '''Author''': reunne_Suuk | |||
* '''Version''': v1.0 | |||
Reduces the kill cam duration and the also reduces the amount that kill cames show in game by half. | |||
===== [https://www.nexusmods.com/newvegas/mods/48056/? Monocyte Breeder Implant Improved] ===== | |||
* '''Author''': romulus2009 | |||
* '''Version''': v0.01 | |||
* '''Installation''': Select the ''Monocyte Breeder Implant Improved One second version'' main file. This mod has a conflict with Project Nevada - Cyberware. Follow these instructions: | |||
Open FNVEdit through MO. | |||
Right click the pop up with the plugins and choose "Select None", then tick "MonocyteImplantImproved.esp" and click [OK]. | |||
Expand "MonocyteImplantImproved.esp" and "Perk". | |||
For the record under "Perk", on the line "Hidden" (under DATA - Data), go to the "MonocyteImplantImproved.esp" column, right click and select "Edit", then type in ''Yes'' and click [OK]. | |||
On the line "Effects", go to the "MonocyteImplantImproved.esp" column, right click and select ''Remove''. | |||
Close and when asked to Save make sure the plugin is ticked and click [OK]. | |||
For 12,000 caps, this implant should work better and this mod does just that.--> | |||
===== [https://www.nexusmods.com/newvegas/mods/53846/? Nipton Fires Extinguished] ===== | |||
* '''Author''': qwerty | |||
* '''Version''': v1.0 | |||
Those fire should burn themselves out eventually right? | |||
===== [ | ===== [https://www.nexusmods.com/newvegas/mods/35369/? Populated Casinos] ===== | ||
* '''Author''': xMrAx | * '''Author''': xMrAx | ||
* '''Version''': v0.96 | * '''Version''': v0.96 | ||
* '''Installation''': Install the main. There is a medium and low version for low end systems. | * '''Installation''': Install the main. There is a medium and low version for low end systems. | ||
: LOOT reports that this mod needs to be cleaned with FNVEdit, follow instructions for the version being used: | |||
:* populatedcasino.esp | |||
Contains dirty edits: 2 UDR 48 ITM records. Follow instructions for cleaning [[User:EssArrBee/FNVEdit Mod Cleaning|here]]. | |||
:* populatedcasino-medium.esp | |||
Contains dirty edits: 8 UDR 47 ITM records. Follow instructions for cleaning [[User:EssArrBee/FNVEdit Mod Cleaning|here]]. | |||
:* populatedcasino-light.esp | |||
Contains dirty edits: 16 UDR 46 ITM records. Follow instructions for cleaning [[User:EssArrBee/FNVEdit Mod Cleaning|here]]. | |||
Reintroduce some life to The Strip by adding in a bunch of gamblers and patrons to the casinos. | Reintroduce some life to The Strip by adding in a bunch of gamblers and patrons to the casinos. | ||
===== [ | ===== [https://www.nexusmods.com/newvegas/mods/35134/? Portable Campsite] ===== | ||
* '''Author''': Antistar | |||
* '''Version''': v1.0.2 | |||
Sleep anywhere. Eat anywhere. Its the 'Merican way. | |||
===== [https://www.nexusmods.com/newvegas/mods/55305/? Tales from the Burning Sands - Project Nevada Patch] ===== | |||
* '''Author''': ddraig | |||
* '''Version''': v1.1b | |||
* '''Requirements''': NVSE, Project Nevada, Tales from the Burning Sands | |||
* '''Installation''': This mod is packaged incorrectly, follow these instructions: | |||
During install, right click "Data" and select "Set data directory", then click [OK]. | |||
Patch the Tales from the Burning Sands ingestibles to work like the ones from Project Nevada. | |||
===== [https://www.nexusmods.com/newvegas/mods/47746/? Tutorial Killer] ===== | |||
* '''Author''': pintocat | * '''Author''': pintocat | ||
* '''Version''': v1. | * '''Version''': v1.3 | ||
You do not need a tutorial to play this game. Kill it with this gem. | You do not need a tutorial to play this game. Kill it with this gem. | ||
===== [ | ===== [https://www.nexusmods.com/newvegas/mods/34963/? You take a sip from your trusty Vault 13 canteen] ===== | ||
* '''Author''': Just Another | * '''Author''': Just Another | ||
* '''Version''': v1.0 | * '''Version''': v1.0 | ||
| Line 659: | Line 3,029: | ||
Even in the wasteland you can't escape pop-ups. Better use this blocker. | Even in the wasteland you can't escape pop-ups. Better use this blocker. | ||
== Post Installation Checklist == | ===== Merging Gameplay Mods ===== | ||
# Run | Most of these smaller gameplay mods only affect one aspect of the game so merging them into one plugin is a good way to reduce the amount of plugins without causing any conflicts. | ||
# Open Merge Plugins Standalone through MO and click {{ui|OK}}. | |||
#* {{Fc|red|'''TICK'''}} "Copy general assets" in the Settings->Integration tab. | |||
# Hold <code>ctrl</code> and click every plugin listed below:{{AlertSmall|type=notice|size=31|text=If the plugins are contiguous hold <code>shift</code> and click the first then the last.}} | |||
#* {{Fc|white|ammoingredientsloot.esp}} | |||
#* {{Fc|white|ArmourRepairKits.esp}} | |||
#* {{Fc|white|mapmarkers.esp}} | |||
#* {{Fc|white|Burning CampFire.esp}} | |||
#* {{Fc|white|Casino Exchange All.esp}} | |||
#* {{Fc|white|Integration - Couriers Stash+WMX.esp}} | |||
#* {{Fc|white|Delay DLC - DM + HH + OWB + LR +GRA.esp}} | |||
#* {{Fc|white|ExtendedDialogueVulpes.esp}} | |||
#* {{Fc|white|GasPumpsOfNV.esp}} | |||
#* {{Fc|white|Improved Casinos 2X.esp}} | |||
#* {{Fc|white|Nipton Fires Extinguished.esp}} | |||
#* {{Fc|white|populatedcasino.esp}} - May also be populatedcasino-medium.esp or populatedcasino-light.esp | |||
#* {{Fc|white|PortableCampsite.esp}} | |||
#* {{Fc|white|Tales PN.esp}} | |||
#* {{Fc|white|Tutorial Killer.esp}} | |||
#* {{Fc|white|You take a sip from your trusty Vault 13 canteen.esp}} | |||
# Right click one of the highlighted plugins and goto "Add to merge", then select "<New Merge>". | |||
#* In the popup, type the name of the merge and the plugin, then click {{ui|OK}}. ''Gameplay Mods Merged'' is recommended for both. | |||
# Open the Merges tab and right click "Gameplay Mods Merged" and goto "Plugins", then select "Check plugins for errors". | |||
# Right click "Gameplay Mods Merged" again and select "Build Merge". | |||
# When complete click {{ui|Close}}, then close Merge Plugins Standalone. | |||
# The mod now resides in the ''Gameplay Mods Merged'' folder. | |||
#* It may not show in MO's left panel, so right click the right pane and go to "All Mods", then select "Refresh". | |||
# Move the folder right below ''You take a sip from your trusty Vault 13 canteen'' and make sure it is ticked. | |||
# Untick the all the mods from the list above. | |||
# Start FNVEdit, the double click "Gameplay Mods Merged.esp". | |||
## Right click "Gameplay Mods Merged.esp" and select "Apply Script" | |||
## Choose "Generate Bash Tags" from the dropdown and click {{ui|OK}} | |||
## When asked to add the tags to the header, select {{ui|Yes}} | |||
# Close and '''ONLY''' save "Gameplay Mods Merged.esp". | |||
===== Gameplay Mods Merged ===== | |||
* '''Author''': Mod Authors (99%) and you (1%) | |||
* '''Version''': v1 | |||
* '''Changelog''': This tiny changelog is provided for users that may have already done an older version of this section. | |||
*:::* v1: Initial version. | |||
*:::* v2: Added Gas Pumps of New Vegas. | |||
<!-- | |||
===== [https://www.nexusmods.com/newvegas/mods/48056/? Monocyte Breeder Implant Improved] ===== | |||
* '''Author''': romulus2009 | |||
* '''Version''': v0.01 | |||
* '''Installation''': Select the ''Monocyte Breeder Implant Improved One second version'' main file. This mod has a conflict with Project Nevada - Cyberware. Follow these instructions: | |||
Open FNVEdit through MO. | |||
Right click the pop up with the plugins and choose "Select None", then tick "MonocyteImplantImproved.esp" and click [OK]. | |||
Expand "MonocyteImplantImproved.esp" and "Perk". | |||
For the record under "Perk", on the line "Hidden" (under DATA - Data), go to the "MonocyteImplantImproved.esp" column, right click and select "Edit", then type in ''Yes'' and click [OK]. | |||
On the line "Effects", go to the "MonocyteImplantImproved.esp" column, right click and select ''Remove''. | |||
Close and when asked to Save make sure the plugin is ticked and click [OK]. | |||
For 12,000 caps, this implant should work better and this mod does just that. | |||
=== Patching Every Mod === | |||
Well, almost every mod. There are a few ways to patch conflicts and every different way gets used with a mod list this long. Wrye Flash NV provides an excellent patcher that not only merges records to solve mod conflicts, but also can merge mods to eliminate plugins entirely. That does not mean it solves every conflict, so some must be done manually with FNVEdit. This section will cover the manual patching that needs to be done with explicit instructions for users. These instructions will be usable for everyone regardless of their knowledge of FNVEdit. | |||
--> | |||
== Running FNVLODGen == | |||
The level of detail in ''Fallout New Vegas'' is extremely lacking. There are a number of reasons for this, but at least there is FNVLODGen to add more objects to the distance. Even though there are trees in FNV, there is no tree LOD for the game so all trees are treated as object LOD. This is different from the other Bethesda titles where LODGen is used. Over time there should better LOD created for {{NAMESPACE}} now that a tool exists for easy LOD generation. | |||
Make sure that FNVLODGen is installed, instructions were in the Utilities section [[#FNVLODGen|here]] and to setup it up for MO [[#Setting up Mod Organizer|here]]. Additionally, you will need to download and install the ''FNVLODGen Resources'' main file from the [https://www.nexusmods.com/newvegas/mods/58562/? FNVLODGen Nexus page]. Install this archive like normal in MO, and after installing move the ''FNVLODGen Resources'' mod just above the ''JIP NVSE Plugin'' mod in the left window of MO. | |||
===== [https://www.nexusmods.com/newvegas/mods/61206/? LOD additions and improvements] ===== | |||
* '''Author''': tomzik | |||
* '''Version''': v1.06 | |||
* '''Requirements''': FNVLODGen | |||
* '''Installation''': Get the ''LODadditions'' main file and the ''LODadditions-NVInterriors'' optional file. Follow these instructions: | |||
Double-click the mod in the left panel of MO, then select the Filetree. | |||
Expand <code>textures->clutter</code> and the right click <code>billboard01blod.dds</code> and select "Hide". | |||
Repeat for <code>billboard01blod_n.dds</code>. | |||
* This mod has a wild edit that needs to be correct or weather mods may have errors. | |||
Open FNVEdit and right click the list of plugins, then select "Select None". | |||
Tick tmzLODadditions.esp and tmzLODadditions-NVInterriors.esp, hold {{ui|shift}} then click {{ui|OK}}. | |||
Expand <code>Fallout.esm->Worldspace</code> and select <code>000DA726</code>. | |||
For the line, <code>INAM - Image Space</code> drag <code>NVDefaultExterior [IMGS:0008809D]</code> to both columns for tmzLODadditions.esp and tmzLODadditions-NVInterriors.esp. | |||
Save and close. | |||
This is an extension for LOD files for LODGen. It does nothing when the original LODGen files aren't enabled. | |||
===== [https://www.nexusmods.com/newvegas/mods/63129/? LOD Resources for Vurts WFO - Fertile Edition v2.9a] ===== | |||
* '''Author''': Skibadaa | |||
* '''Version''': v1.1 | |||
* '''Requirements''': Vurt's WFO Fertile Version, FNVLODGen | |||
* '''Note''': Do not use with the Dead Version of WFO. | |||
This mod is only for use in conjunction with FNVLODGen. It should not be used without LODGen files being enabled. | |||
===== FNVLODGen Instructions ===== | |||
Before starting, make sure that both ''FNVLODGen Resources'' and ''LOD additions and improvements'' are unticked in the left pane of MO. | |||
Run LOOT and sort the load order. | |||
Activate ''FNVLODGen Resources'' and ''LOD additions and improvements'' in the left pane of MO. | |||
In MO, go to the archives tab and make sure "Have MO manage archives" is Unchecked. | |||
Launch FNVLODGen through MO. After a moment of processing a window will popup. | |||
On the left pane, select the worldspace(s) to generate LOD. Right click and choose "Select all" to do all worldspaces (recommended). | |||
On the right side, make sure both {{fc|#ddd|Objects LOD}} and {{fc|#ddd|Tree LOD}} are checked. | |||
Click {{ui|Generate}}. | |||
Once FNVLODGen has finished, a message "LOD Generator: finished (you can close this application now)" will show. Close the program. | |||
Go to the location which that was selected when setting it up (C:/FNVLODGenOutput was suggested). Create an archive of the contents of this folder (should be meshes and textures) | |||
In MO, select the install archive button[[File:Archive MO.png]] and navigate to the archive that was just created, then install it. | |||
Name this after the profile name, example: '''Fear and Loathing LOD'''. It is recommended to use the profile name + LOD since FNVLODGen will need to be run for each profile in MO. | |||
Make sure the archive you just installed is ticked in the left pane of MO. | |||
Go to the Archives tab and tick "Have MO manage archives". Tick all BSAs that have a checkbox. | |||
== Texture Optimization == | |||
''Fallout New Vegas'' can benefit greatly from optimization of both vanilla and mod textures. Mod textures can be even more important for users with low and mid range systems or even users with high end systems that do not have a lot of VRAM available. Texture optimization for {{NAMESPACE}} will be provided on separate pages, but it is highly recommended that the procedure is completed to ensure maximum performance and stability. | |||
The texture optimization process is still quite new for FNV, so there may be some bad textures here and there when the game is started. Just snap a screenshot and report it in the [https://stepmodifications.org/forum/topic/1786-missing-blackpurple-texture-report-it-here/ DDSopt] thread or the [https://stepmodifications.org/forum/topic/5753-bad-texture-report-it-here/ F&L] thread. This will make the process better since the offending textures can be added to the ddsopt.ini for exclusion. | |||
First, follow the [[Guide:DDSopt#tab=Fallout_QUICK-START_GUIDE|Fallout Quickstart Guide]] on the DDSopt Guide, provided by STEP user Kelmych, for vanilla texture optimization. There are still many vanilla textures not overwritten by mods in F&L, so optimization can help performance by correcting mip levels and saving textures in correct formats. Be sure to get the correct batch files for {{NAMESPACE}} and not the Skyrim batch files. {{NAMESPACE}} batch files are v2.76 and Skyrim are v2.75. Also, make sure to get the latest ddsopt.ini which is universal for all games. | |||
Second, follow the instructions for the [[User:EssArrBee/Fear_and_Loathing_Texture_Optimization|F&L Texture Optimization]]. This will provide the process for optimizing a set of mods for performance reasons. This can significantly increase FPS in areas that need it the most, such the Strip, Freeside, and Novac. Exterior textures from Poco Bueno and NMCs Texture Pack can be 2048x2048 resolution and severely impact performance in outdoor locations. This is not such a problem indoors, so the DDSopt batch files can separate out the exterior color maps and normal maps into separate folders where they can be reduced in size to 1024x1024 resolution for systems that need to increase performance. | |||
== ''"The possibility...'' == | |||
''...of physical and mental collapse is now very real. No sympathy for the Devil, keep that in mind. Buy the ticket, take the ride." - Raoul Duke.'' By now fatigue to modding this wacky game is probably setting in, but the end is very near. Just a few post installation errands before killing raiders, running way around Cazadors, and emptying the caps of caravans will be all that awaits. | |||
=== Post Installation Checklist === | |||
# Generate Bash Tags | |||
# Run LOOT | |||
# Create Bashed Patch | # Create Bashed Patch | ||
=== | === Generate Bash Tags === | ||
Open | The purpose of this process is to analyze plugins and recognize the correct bash tags to apply to them. This is a tedious process that involves running a script on all non-vanilla plugins that have been installed, but it is necessary in order to allow a vital patch called a bashed patch to properly combine records from all installed plugins that can benefit from being in that patch. | ||
# Open FNVEdit through MO. | |||
# Right click the list of mods and choose "Select None". | |||
# Scroll down past ''FalloutNV.esm'', ''DeadMoney.esm'', ''HonestHearts.esm'', ''OldWorldBlues.esm'', ''LonesomeRoad.esm'', ''GunRunnersArsenal.esm'', ''ClassicPack.esm'', ''MercenaryPack.esm'', ''TribalPack.esm'', and ''CaravanPack.esm'' (skip the vanilla files) and find the first non-vanilla plugin in the list; it will likely be ''YUP - Base Game + All DLC.esm''. | |||
# Tick that plugin (and that plugin only), then hold <code>shift</code> and click {{ui|OK}}. | |||
# After FNVEdit loads, right click on the previously ticked plugin from the list on the left and select "Apply Script". | |||
# From the top dropdown select Generate Bash Tags and click {{ui|OK}}. | |||
# Click {{ui|Yes}} in the popup. | |||
# After the script is completed, you will see a [Apply Script done] message at the bottom of the right window panel. | |||
# Close FNVEdit and save the plugin. | |||
# Now repeat steps 7-12 on the next plugin in the list. | |||
# Repeat the previous step until you have run the script on all the rest of the plugins in your list (shortcuts will not work - only process one plugin at a time), but don't run the script on your bashed patch if you already have one created. | |||
=== | Remember that this process will need to be redone on any plugin reinstalled in MO. The current version of the script can recognize all known bash tags but one: Deflst. Currently, there is only one plugin in this guide that contains that bash tag and it will have to be treated as a special circumstance; that plugin is ''1nivVSLArmors.esp''. The script would have determined that Deflst was a bad tag in ''1nivVSLArmors.esp'' and improperly removed it. Follow these steps to manually correct the tags for this plugin: | ||
# Open Wrye Flash NV though MO. | |||
# Select "1nivVSLArmors.esp" and then right click the Bash Tags box in the bottom right and add each these tags: | |||
#*Actors.Stats | |||
#*Deflst | |||
#*Graphics | |||
#*Invent | |||
#*Names | |||
#*Relev | |||
#*Stats | |||
# Close Wrye Flash NV. | |||
=== Run LOOT === | |||
Open LOOT through Mod Organizer and sort the mod list. Click [Apply] when the list of mods is presented. Close LOOT. | |||
=== Create a Bashed Patch === | |||
The Bashed Patch is almost as versatile for ''New Vegas'' as it is for Oblivion. This means that many more options exist to merge things to the Bashed Patch. | The Bashed Patch is almost as versatile for ''New Vegas'' as it is for Oblivion. This means that many more options exist to merge things to the Bashed Patch. | ||
# Go to "...Fallout New Vegas/Mopy/Templates" and create an archive containing the "Bashed Patch, 0.esp". Then drop it into the ''Downloads'' tab of MO. | |||
# Install it like any other Mod and use the name ''<Profile Name> Bashed Patch''. | |||
# In the left pane of MO, make sure it is ticked and located just above ''Overwrite''. | |||
#* After you completed these steps, a new Bashed Patch can be generated again and again without having to repeat this process. Wrye Flash will just overwrite this "Bashed Patch, 0.esp" from now on. | |||
# Also UN-tick ''Unofficial Patch Plus''. Otherwise your bashed patch build will fail. | |||
# Run Wrye Flash NV through Mod Organizer. | |||
# When started right click "Bashed Patch,0.esp" and select ''Rebuild Patch''. | |||
=== | #* If there is a pop-up saying that certain mods will be disable because they are mergeable, click [Yes]. If not disregard. | ||
A merged patch can be used | # Go through the left side and click each tag one at a time and stop after Import Weapon Modifications, before Global.[[File:FNVBashedPatch.png|thumb|highslide:]] | ||
## If there are any plugins listed on the right side, tick the highlighted tab on the left side and tick all the plugins on the right side. (image on right) | |||
##* For Import Names, leave FalloutNV.esm unticked. | |||
## Tick Tweak Settings, Content Checker, FormID Lists, Leveled Lists, and Race Records. | |||
### For Tweak Settings, tick Cost Multiplier: Repair and then right click and select '1.5', then tick Terminal Speed Adjustment and then right click and set to 'x 6'. | |||
### For Race Record tick all the plugins on the right side. | |||
# Click Build Patch and wait for it to finish. Wrye Flash should take care of everything from here and ask to activate itself if that is needed. | |||
# After building the Bashed Patch you will notice that all plugins merged into the patch appear {{Fc|green|green}}. Those have been merged into the Bashed Patch and deactivated. In addition to those, there are a couple mods ({{Fc|purple|MiscItemIconsNV.esp}} and {{Fc|purple|WMX-ArenovalisTextures.esp}}) that appear {{Fc|purple|purple}}. These have not been merged into the Bashed Patch due to being flagged NoMerge, but have been deactivated during the process and must be manually re-enabled in order to work as intended. Click the checkbox to the left of these mods (make sure there is a check in the box next to each, rather than a dot) in order to reactivate them. | |||
# When done, close Wrye Flash NV. | |||
# In the left pane of MO, go to the bottom of the mod list and double click on "Overwrite". | |||
# Drag the folder ''Docs'' from the newly opened window onto ''<Profile Name> Bashed Patch'' in the mod list and drop it. | |||
# Tick ''Unofficial Patch Plus'', so it is enabled again. | |||
{{RelatedVideos| | |||
*{{Video|v3tPQKDStTc|Merged and Bashed Patch Creation|Dirty Weasel demonstrates patch creation}} | |||
}} | |||
=== Create a Merged Patch === | |||
A merged patch can be made in xEdit to solve the few remaining issues not handled by the Bashed Patch, there are several instructional videos about it on YouTube. Alternatively you can just use MonoAccipiter's pre-made patch: | |||
===== [https://mega.nz/#!ZYMwDL6B!g58RQ1Ae6HOnqgVUlSSGDJrWAInHmj6GJO8FhS9xB3I Mono's Merged Patch] ===== | |||
* '''Author''': MonoAccipiter | |||
* '''Version''': v1 | |||
* '''Requirements''': YUP, The New Bison Steve Hotel & Casino, WMX, EVE, Improved Sound & FX | |||
* '''Changelog''': This tiny changelog is provided for users that may have used an older version of this patch: | |||
*::::* v1: Initial version | |||
<br> | |||
:Sort this after the Bashed Patch.: | |||
<pre> | |||
Run LOOT through MO executable dropdown. | |||
Find "Merged Patch.esp" in the left pane and click the three dots on the right of the plugin, then select [Edit Metadata], and the [LOAD AFTER] tab. | |||
Enter "Bashed Patch, 0.esp" into the ''Filename'' textbox. | |||
Click the save icon next to ILO - Merged.esp. | |||
</pre> | |||
=== In Game Settings === | |||
The many mods that take advantage of the MCM allow for a [https://youtu.be/tyBUMntP6DI plethora] options to customize the New Vegas experience. The following link has a suggested list of settings for certain MCM settings from a few mods to customize the experience. If any user would like to have their settings listed, just look at the MCM settings page linked below and format it the same way. Also, only include mods that are listed in this guide and make sure the URL is correct. It is very simple, after the "https://stepmodifications.org/wiki" add "/User:<Username>/Fear and Loathing MCM Settings". That is it to start a MCM settings page, when finished just link it in the forum or send a PM to EssArrBee and it will get added below for other users to see. | |||
[[User:EssArrBee/Fear and Loathing MCM Settings|EssArrBee's MCM Settings]] (Unfinished) | |||
=== Controller Support === | |||
Fallout New Vegas supports the Xbox 360 controller natively, but there is no way to change the default button settings other than switching two button's commands. This is a problem when using mods like Project Nevada that add in new hotkeys or for users that have any other type of controller. To solve this issue, the best option is to use an emulator or wait until a modder figures out how to fix the whole thing (which is being worked on, so there is hope). The link below is for a page that will have instructions to setup Xpadder with an Xbox 360 controller and some other instructions for users with different gamepads to create their own profiles. User that are using other emulators can create their own wiki pages and they will be linked to from here. | |||
[[User:EssArrBee/Fear_and_Loathing_Xpadder|Xpadder Setup]] | |||
=== Ultra-Wide Screen (21:9) Support === | |||
Fallout New Vegas needs further tweaks to fully support utra-wide screens (21:9) at 2560X1080 and 3440x1440 resolutions. After applying these tweaks, there will only be a few minor problems left. Loading screen pictures will be slightly stretched, but there's no real way of fixing that. You will have screen cutoff while assigning S.P.E.C.I.A.L. points in Doc Mitchell's house or in the alternative start shack. It is recommended to play in 16:9 through this point. | |||
===== Fallout.ini Tweaks ===== | |||
* Fix 1st person weapon clipping while aiming down sights when using a FOV setting higher than 75: | |||
[Display] | |||
fNearDistance=4 <-- Change to 3 if you still see clipping | |||
* Fix screen cutoff when zooming with scoped weapons: | |||
[Display] | |||
fScopeScissorAmount=0 | |||
===== FalloutPrefs.ini Tweaks ===== | |||
* Change your screen resolution: | |||
[Display] | |||
iSize W=2560 <-- Monitor horizontal resolution | |||
iSize H=1080 <-- Monitor vertical resolution | |||
* Change the zoom used on terminals to fit the screen: | |||
[RenderedTerminal] | |||
fRenderedTerminalZoom=75 | |||
===== In-game Tweaks ===== | |||
* Change the FOV to compensate for an ultra-wide screen: | |||
Press P to bring up Power Armor Configuration menu, select Vision Overhaul Configuration, then select '''Increase Helmetless FOV to 90'''. You can pick any FOV you like, but 90 is recommended. | |||
== | === Credits === | ||
# | {{Fc|#F77D00|You}}, yes you for keeping the Fallout New Vegas community going for this long.<br> | ||
# | {{Fc|#F77D00|EssArrBee}} - Head hancho<br> | ||
# | {{Fc|#F77D00|WilliamImm}} - suggestions, feedback, spelling corrections, BOSS/LOOT masterlist guru<br> | ||
# | {{Fc|#F77D00|Kelmych}} - optimization wizard<br> | ||
# | {{Fc|#F77D00|Neovalen}} - for letting me steal his guide's style :p<br> | ||
# | {{Fc|#F77D00|rootsrat}} - suggestions, feedback<br> | ||
# | {{Fc|#F77D00|GSDFan}} - UIO testing extraordinaire<br> | ||
# | {{Fc|#F77D00|AyleidRuin}} - ninja editor<br> | ||
{{Fc|#F77D00|redirishlord}} - suggestions, feedback, manic load order merging<br> | |||
{{Fc|#F77D00|Audley}} - testing, editing, banner maker, modder<br> | |||
{{Fc|#F77D00|GrantSP}} - testing, editing, modder<br> | |||
{{Fc|#F77D00|MonoAccipiter}} - testing, editing, support, modder<br> | |||
{{Fc|#F77D00|oqhansoloqo}} - suggestions, feedback, and many updates to the guide<br> | |||
{{Fc|#F77D00|darkside}} - testing, feedback, ultra-wide support section<br> | |||
{{Fc|#F77D00|STEP}} for being one the best communities on the internet, gaming or not<br> | |||
The Nexus for hosting all the mods<br> | |||
Reddit's Fallout sub-reddits for constantly being a source of good and bad ideas<br> | |||
The Modders for making their excellent contributions, really cannot say enough good things about them<br> | |||
There are some names missing, but they will get added soon ;) | |||
{{#css:User:EssArrBee/FalloutNewVegas.css}} | |||
Latest revision as of 03:15, April 19, 2023

"What? No. We can't stop here. This is bat country." - Raoul Duke

GUIDE FORUMS
Announcement: Clear and Present Danger, a guide for modding Fallout 3 has been released. It is heavily based on F&L, so it will be easy to use. Take a look and get back into the capital wasteland.
CURRENT USERS: The updates made during the latest revision (prior revisions can be found here):
- August 26th, 2018
- Made several version updates.
- Added Darnified UI Extension to User Interface section.
- Added Project FNVIcons to Supplemental UI section.
- Added New T-51b Icons New Vegas to Supplemental UI section.
- Added a merge for icon mods (three) to the end of said section.
- Removed the classic world map mod because it looks out of place.
- June 19th, 2017
- As of today, the guide author EssArrBee, will only be providing maintenance for the guide. Consider the current guide to be complete unless others decide to take over development.
- Added LOD Resources for Vurts WFO - Fertile Edition v2.9a to LOD section.
- March 27th, 2017
- Added EXE - Effect teXtures Enhanced to Poosh.
- March 21st, 2017
- Removed Lutana NVSE Plugin. Integrated into JIP LN NVSE Plugin.
- March 17th, 2017
- Removed Enclave Power Armors Retextured. Book of Steel - Compatibility Edition was updated so that it is not required anymore. Mod may return at another date.
- March 16th, 2017
- Added Enclave Power Armors Retextured to Clothing Is Not Optional.
- Added Book of Steel - Compatibility Edition to Clothing Is Not Optional.
- Added Tops Casino Neon Restored to Poosh.
- Added weijiesen's HD Fog to Poosh.
- Updated CaliberX to v5.04.
- March 15th, 2017
- Added Unofficial Patch Plus to Fixes section.
- Removed Reload Speed Game Start Fix from Fixes section. Included in Unofficial Patch Plus.
- Removed Dead Money - Christine Has More Skills and Improved Transportalponder - Old World Blues from Yukichigai Gameplay Tweaks. Returning users should not update their merged version. Included in Unofficial Patch Plus.
- Removed Merging Fixes section. No longer needed.
- March 13th, 2017
- General guide maintenance is underway, mods will be updated to current versions and install instructions will be updated as well.
- Removed No more giant manhole covers. Now included in YUP.
- Added YUP-Spice of Life Patch.
We were somewhere around Barstow...
...on the edge of the desert, when the mods began to take hold. Fallout New Vegas has been out for a number of years now and there is a truly amazing community that has supported the game with really creative mods since the game's release. This guide will help make New Vegas look as good as possible while maintaining a setup that adds to gameplay and re-playability. With that in mind, New Vegas is old enough that only the Ultimate Edition will be supported, so all DLC will be required. Users with all the major DLC and not the pre-order packs can still use the guide, but without a couple mods or patches. STEP officially supports the use of Mod Organizer and everyone who uses it for a long enough period will see why. This guide will use Mod Organizer as its main mod manager, but Wrye Flash NV will be used to generate a Bashed Patch.
Users already familiar with STEP and Skyrim Revisited will notice that this takes queues from the styles of both guides. Also, due to the somewhat campy humor of the Fallout series, this guide will not take itself too serious, and will have a Fear and Loathing in Las Vegas theme. STEP changed the way so many people mod video games and really gave birth to new type of mod community that was very strict in its pursuit for a better experience of Skyrim. It only makes sense to extend some of STEP and Skyrim Revisited's ideals to other great games and that is the very thing this guide will set out to do.
While going through the guide remember that there is a F&LNV - Support forum to post any questions that might arise. This guide also has an official thread here. This guide will probably never be the size and scope of the STEP guide, but the current mods listed should work together without compatibility issues.
The guide is listed from top down and it is advised to install the mods in that order to make sure that all directions are followed correctly and no mods are missed. Keep in mind, there are very specific directions to install the interface mods and those directions are very important to make sure there are no problems when starting New Vegas.
Without the support of STEP, this guide would not be possible. If you would like to make a donation, that would be awesome! Do so with Paypal.

ALL donations are applied to hosting expenses.


Pre-Installation Checklist
Make sure that everything is ready to install before proceeding with this guide.
- Fallout New Vegas and Steam in general should not be installed in the Program Files or Program Files (x86) folder.
- Either Google how to move the Steam folder or watch video on YouTube, here.
- Make sure Fallout New Vegas directory is clean from any other modding previously done.
- A good way to make sure is to delete everything in the New Vegas folder except the Data folder.
- Now open the Data folder and delete everything that is not a vanilla ESM or BSA from New Vegas or the DLCs.
- Now go to New Vegas in Steam and verify game cache and Steam will download all the necessary files.
- Delete the Fallout.ini and FalloutPrefs.ini from My Games in the Documents folder and start the Fallout launcher so new ones can regenerate. This will allow the INIs to revert back to vanilla before starting.
- Set the Fallout New Vegas launcher settings to max for the system being used to play the game. Fallout New Vegas should be able to perform well on any modern hardware.
- Fallout New Vegas and Steam in general should not be installed in the Program Files or Program Files (x86) folder.
A Word About Gamebryo and Plugin Limits
The game engine for Fallout New Vegas has quite a few issues, but instead of working to solve those problems, a limit on the number of plugins was instituted during one of the patches. There is now an ~140 plugin limit for Gamebryo which will cause the function incorrectly or just not load at all if this number is reached. In addition to that, the stability of New Vegas will decrease as the number of plugins start to approach the 140 count. This means this guide will never grow out of control and the goal will always be to have, at most, 135 plugins. This, of course, is just a number to aim for so it keeps the guide in a state that promotes a stable New Vegas. If adding mods on top of the guide, be aware of the plugin cap and learn to use the FNVEdit merge script to lower the count. This is also the reason that Wrye Flash NV is so essential, since the Bashed Patch will lower plugin count.
Video Tutorials
There are a few video tutorial series for Mod Organizer and Fallout New Vegas. All of them are recommended for users that prefer watching videos.
- Official STEP Mod Organizer Video Series by Gamer Poets
- Covers Mod Organizer and STEP thoroughly with emphasis on Skyrim, but all directions can be applied to Fallout games. Many of the videos were reviewed by the author of this guide.
- Fallout New Vegas Mod Organizer Series by Gopher.
- Covers Mod Organizer and Fallout New Vegas with great examples of very popular mod installations. Reviewed by the author of this guide.
- Mod Organizer for Fallout New Vegas Series by Dirty Weasel Media.
- Covers Mod Organizer and Fallout New Vegas and uses Fear and Loathing examples. Video maker has had an open dialogue about MO for FalloutNV with the author of this guide.
Utilities
There are a few tools that are necessary to mod Fallout New Vegas and they should be downloaded and installed before any modding starts.
NOTE
DDSOpt is optional. If texture optimization is desired at the end of the guide, then install this program.DDSopt
- Author: Ethatron
- Version: v0.8.0.upd4
- Installation: The program is portable so it should be extracted to a folder that is easy to access, like C:/Games/DDSopt. Also, it may be easier to make a shortcut on the desktop and the program should be set to 'Run as Administrator'. The default ddsopt.ini needs changed, so get the latest version here and overwrite the ddsopt.ini in the DDSopt folder.
- Note: Detailed information on installation and use of DDSopt for Fallout New Vegas can be seen in the Fallout Quick Start Tab of the DDSopt Guide.
Needed to optimize and/or reduce textures and the resolution of textures for increased quality and performance.
FNVEdit
- Author: ElminsterAU
- Version: v4.0.2
- Fallout 3 Equivalent: FO3Edit
- Installation: Make sure the FNVEdit folder is put into the Fallout New Vegas root folder. This video can be applied to any xEdit version: TES5Edit Installation
- Install additional xEdit scripts:
- Download Generate Bash Tags.pas and the scripts from TES5EditScripts.
- Navigate to the scripts in windows explorer and move the scripts to the "...FNVEdit/Edit Scripts" folder.
- Install additional xEdit scripts:
It would really be impossible to have a heavily modded game without this amazing little tool. Essential for anyone wanting to mod a Bethesda game.
FNVLODGen
- Author: Ehamloptiran Sheson zilav and FNVEdit Team
- Version: v3.2.1
- Fallout 3 Equivalent: FO3LODGen
- Installation: Download the FNVLODGen file. Make a folder named FNVLODGen in theFallout New Vegas root folder and extract the contents into it.
This amazing tool allows users to regenerate LOD meshes and textures based on your installed mods.
LOOT
- Author: LOOT Team
- Version: v0.14.3
- Installation: LOOT Installation Video
- Note: Mod Organizer has a sort button that uses LOOT, but this is still required.
Originally BOSS v3.0, but it is so different that a new name was required.
Merge Plugins Standalone
- Author: matortheeternal
- Version: v2.3.1
- Installation: Download the main file. Extract the contents to a folder, i.e. C:/Games/Utilities/Merge Plugins. Start Merge Plugins Standalone from its folder to make sure that the game profiles are identified. If not, then point Merge Plugins to the game's location.
This is a standalone version of the merge plugin script.
Mod Organizer
- Author: Tannin
- Version: v1.3.11
- Installation: Download the Mod Organizer 1 Legacy file.
To use MO for multiple games it must have multiple installs in different locations. It is recommended to put each install of MO into the game directory of each game that it will be installed for. For New Vegas, it should go into .../Steam/steamapps/common/Fallout New Vegas. MO Install Video
- Note: There is some information to be aware of when installing Mod Organizer:
- The newer versions of Mod Organizer have introduced a new system of handling mods not installed by Mod Organizer and the official DLC. They will now be listed in the left pane of MO and can be moved around so those files will become part of the file priority.
- Left Pane should have the official content listed first, without check boxes to tick and the category should say Non-MO. Any mods installed in the Data folder will also be listed the same way.
- For more information, see the Mod Organizer Guide.
- Official STEP Mod Organizer Video Series by Gamer Poets.
- The newer versions of Mod Organizer have introduced a new system of handling mods not installed by Mod Organizer and the official DLC. They will now be listed in the left pane of MO and can be moved around so those files will become part of the file priority.
MO is a powerful mod manager that does not install mods into the game's data folder like other mod managers. Instead, MO uses a virtual directory which gives modders the ability to switch between profiles very easily without having to install and uninstall mods.
Wrye Flash NV
- Author: valda and Sharlikran
- Version: v18.0
- Fallout 3 Equivalent: Wrye Flash
- Installation: This program is NOT optional. Get the Wrye Flash 18.0 - Standalone Executable main file. Follow these instructions:
Open up the Wrye Flash 18.0 - Standalone Executable archive from where ever it was downloaded to.
Extract the entire contents to the ".../Steam/steamapps/common/Fallout New Vegas" folder, not the "Data" folder.
Start Wrye Flash NV right now to correct an annoying setting:
From the Mods tab, right click the header on the top bar and make sure Lock Times is UNTICKED.
Wrye Flash NV is only going to be used for its Bashed Patch abilities to merge mods or parts of mods to increase compatibility while using many mods. Sharlikran has started developing Wrye Flash NV again, but he is only one person, so anyone with python experience should consider lending a hand on Wrye Bash/Flash/Flash NV/Smash coding.
Setting up Mod Organizer
Now that all the programs necessary to mod New Vegas are installed, it is time to set them up for installing mods and running New Vegas with Mod Organizer.
- Start MO and click the Profiles button
 .
.
- Now highlight the Default profile, make sure Archive Invalidation is checked, and click [Copy].
- Rename the profile to the desired name (Fear and Loathing would be a good choice), and click [Okay] then [Close].
- This procedure can be repeated for copying any profile in the future.
- Setup MO to download mods from the Nexus, follow the directions provided on the Mod Organizer Guide. Linking to Nexus
- Click the Executables button
 and set up the programs that will be run from the MO launcher using directions from the Mod Organizer Guide. Third Party Programs
- For this guide you will need to add: LOOT, FNVEdit, FNVLODGen, Merge Plugins Standalone, and Wrye Flash NV. Only add the GECK and FOMM - Fork if necessary.
- MO LOOT Installation. Other programs can be installed similarly.
- LOOT has one extra instruction to setup
- In the Executables menu select LOOT.
- Next to the Arguments text field, type "--game=FalloutNV", without quotations.
- Click [Modify], then [Close].
- FNVLODGen has one extra instruction to setup
- In the Executables menu select FNVLODGen.
- Next to the Arguments text field, type " -o:"C:/FNVLODGenOutput" ", without quotations. Additionally, any location outside of MO's virtual directory can be chosen.
- Click [Modify], then [Close].
- Merge Plugin Standalone has one extra instruction to setup
- In the Executables menu select Merge Plugins Standalone.
- Next to the Arguments test field, type "-profile FNV", without quotations.
- Merge Plugin Standalone must be setup for MO use Merge Plugins
- Start Merge Plugin Standalone through MO and then click [OK].
- Select the Settings (gear icon).
- Go to the Integrations tab.
- Tick the "I'm using Mod Organizer" checkbox.
- Set the "mod manager path" to MO's installation folder.
- Click [OK]
- Close Merge Plugins Standalone.
- FNVEdit has one extra instruction to setup
- In the Executables menu select FNVEdit.
- Next to the Arguments text field, type "-IKnowWhatImDoing", without quotations.
- Click [Modify], then [Close].
- For this guide you will need to add: LOOT, FNVEdit, FNVLODGen, Merge Plugins Standalone, and Wrye Flash NV. Only add the GECK and FOMM - Fork if necessary.
- Set up optional settings as desired:
- Click the Settings button
 . General Settings
 - Choose style, language, mod folders, customize mod categories among other things.
- Click the Settings button
- Check that the official DLC is sorted correctly.
- In the left pane make sure the official DLC are listed as the first mods when sorted by priority. Left Pane: Columns
Mod Organizer should now be installed and properly set up for modding from this point forward.
BSAs and Mod Organizer
Bethesda Software Archives (BSA) can be used to store mod files in an attempt to reduce file sizes. The added benefit is the reducing in file system fragmentation caused by having many loose, small files. Although this is the case, it may be desirable to extract the contents of a BSA for various reasons, such as: if the user does not wish to install the entire contents of the BSA, if textures within the BSA need to be optimized, or simply if the user wishes to view the contents of the BSA.
VERY IMPORTANT - make sure to follow the directions in this paragraph: First of all, go to the Archives tab on the right pane of MO. Checking the BSAs under this tab allows MO to read their contents. Then make sure that Have MO manage archives is checked. Next, be aware that the Fallout - Invalidation.bsa file must be the top file in the list, just under data. If is not the top file in the list it will cause many mods to not function properly. Perhaps the easiest way to recognize this is that the textures of many objects in the game will look vanilla. In addition to this, make sure that all BSAs in the list are checked. If there are any that aren't, then make them so. Greyed out BSAs will be checked no matter what due to their plugin requiring that BSA to load.
For various reasons, the guide may give instructions to extract certain BSAs. The instructions given in the guide would explain how to that after they have been already installed. An alternative method to extracting BSAs after installing them is to change the setting for the BSA Extractor plugin. Open the Settings and change false to true. Each time a mod that has a BSA is installed a dialog will be presented offering to extract the included BSA.
In versions of MO prior to v1.3.x there was a limit to how many characters are allowed by the game engine when loading BSAs. If the names of all the BSAs being loaded are more than 254 characters, the game will not load or if there are just too many files in the data folder directory, thrashing can take place which causes the game not to load either. This creates an issue that either causes users to rename BSAs or extract some of them to remain under the 255 character limit. This (and other potential reasons) is why when following this guide it is very important to make sure that your installed version of MO is up to date with the guide's listed MO version.
"We are all wired into a survival trip now"
INI Tweaks
The Fallout INIs are used for a few different reasons, from disabling mouse acceleration to increasing grass render distance. This section will cover the necessary tweaks for Fear and Loathing to operate with all the mods in the guide.
The INI Editor will be used for this section. To access it, click the MO puzzle icon![]() and choose INI Editor.
and choose INI Editor.
- When the editor is open, use the find function (ctrl-f) to quick find the line that needs to be edited.
Fallout.ini Tweaks
- Remove mouse acceleration
[Controls]
fForegroundMouseAccelBase=0
fForegroundMouseAccelTop=0
fForegroundMouseBase=0
fForegroundMouseMult=0
- Light distance fade
Copy-paste the following under [Display]
[Display]
fLightLODDefaultStartFade=10240.0
fLightLODRange=10240.0
fLightLODMinStartFade=10240.0
fLightLODMaxStartFade=10240.0
fShadowLODDefaultStartFade=200.0
fShadowLODRange=200.0
fShadowLODMinStartFade=100.0
fShadowLODMaxStartFade=1000.0
fSpecularLODDefaultStartFade=10240.0
fSpecularLODRange=10240.0
fSpecularLODMinStartFade=10240.0
fSpecularLODMaxStartFade=10240.0
- Remove the startup splash screens for the most efficient transition to the main menu
[General]
SMainMenuMovieIntro=0
- Allow facial morphs from mods to work correctly (needed in both INIs)
[General]
bLoadFaceGenHeadEGTFiles = 1
FalloutPrefs.ini Tweaks
- Allow additional plugins to be loaded.
[Launcher]
bEnableFileSelection = 1
- Increase Grass Render distance from 3 to 5 cells.
[Grass]
fGrassStartFadeDistance = 17000
- Allow facial morphs from mods to work correctly (needed in both INIs)
[General]
bLoadFaceGenHeadEGTFiles = 1
- Change to your Screen Resolution
[Display]
iSize W=1920  <-- Monitor horizontal resolution
iSize H=1080  <-- Monitor vertical resolution
Remember to click [Save] before exiting the INI Editor.
Extenders
Fallout New Vegas will need to take advantage of a couple extenders to open up functionality for certain mods.
NVSE
- Author: Ian Patterson, Stephen Abel and Paul Connelly, hlp
- Version: v5.1b4
- Fallout 3 Equivalent: FOSE
- Installation: Download the stable 5.1b4 file. Follow these instructions:
Extract the files from the archive into the Fallout New Vegas folder, NOT into the Data folder. The src folder and text files are not needed.
In the Data folder "right click->New->Folder", then name it "NVSE". Only do this if the folder DOES NOT exist.
Open up the Data/NVSE folder and "right click->New->Text Document", then name the file "nvse_config.ini".
Open nvse_config.ini and add the following:
[Memory]
DefaultHeapInitialAllocMB=400
scrapheapsizeMB=128
Save and close.
The value for DefaultHeapInitialAllocMB must be between 200 and <500. 400 seems to be the best value for Fallout New Vegas, but it is recommended to play around with it a bit.
Without NVSE, many mods that add incredible features to New Vegas cannot be used. This is an essential mod for any gamer.
JIP LN NVSE Plugin
- Author: jazzisparis, LuthienAnarion
- Version: v55.10 or latest version
- Requirements: NVSE
NVSE extension that is required for some other mods to function.
FalloutNV 4GB Patcher
- Author: Roy Batty, LuthienAnarion
- Version: v1.3
- Installation: Download and extract the contents into the Fallout New Vegas folder, NOT into any other folder.
- Patching: Run the patcher to "patch" the game's executable.
Use MO to call the game executable, not NVSE or the launcher. The game is now "patched" to see 4GB of memory and will automatically load NVSE if present.
ENB Series
As this guide grows, the section on ENB Series Graphics Modification and ENBoost will too. Eventually there will just be separate pages linking to the directions of how to install different versions ENB, based on hardware or whether the ENB Series Graphics are being used. The following instructs the setup for ENBoost using the Wrapper method.
ENBoost may cause performance issues for some users. Try it out and if performance drops, then just remove the d3d9.dll from the Fallout New Vegas folder.
ENBoost
- Author: Boris Voronstov
- Version: v0.322 or whatever version is available
- Installation: ENB recommendations are yet to come, but ENBoost is still usable by everyone until then. Follow these instructions:
Choose the latest version of ENB, currently v0322, and click the black arrowat the bottom of the page to download. Open the archive and the Wrapper folder then extract everything except the text files to the Fallout New Vegas folder. Go to the Fallout New Vegas, open enblocal.ini in a text editor, like Notepad++, and edit the following lines: [GLOBAL] UseENBoostWithoutGraphics=true [MEMORY] ExpandSystemMemoryX64=false ReduceSystemMemoryUsage=true DisableDriverMemoryManager=false DisablePreloadToVRAM=false EnableUnsafeMemoryHacks=false <-- As a last resort, setting this to 'true' may actually benefit some people getting stutter otherwise. Beware that it could potentially cause CTDs on some systems. ReservedMemorySizeMb= <-- Possible values include 128, 256, or 512. It may require some tweaking depending on system hardware, but 256 is a good starting point. VideoMemorySizeMb= <-- Go here to get the vramsizetest tool. Run the vramsizedx9.exe. Note the number it reports back. For Windows 7/XP, subtract 170 from the reported number to get your final value. For Windows 8.1/10, subtract 350 from the reported number to get your final value. The final value is what you want to enter here. EnableCompression=true <-- Weaker systems may benefit from this setting being false. AutodetectVideoMemorySize=false <-- Set the VRAM manually.
- Users with Nvidia Optimus enabled laptops may need to use the Injector version. Follow these instructions:
Use the above directions, except for extracting from the Wrapper folder, use the Injector folder and extract everything to the Fallout New Vegas folder.
Do not move anything to the "exes" folder, then follow all the other directions the same.
- Optional use of borderless window, follow these instructions:
Open enblocal.ini in a text editor, like Notepad++, and edit the following lines:
[WINDOW]
ForceBorderless=true
ForceBorderlessFullscreen=true
Save and close. Both settings must be set to true for it to work correctly.
- Optional Anisotropic Filtering and Anti-Aliasing through ENBoost, follow these instructions:
Open enblocal.ini in a text editor, like Notepad++, and edit the following lines:
[ENGINE]
ForceAnisotropicFiltering=true
MaxAnisotropy=16
[ANTIALIASING]
EnableEdgeAA=true
EnableAccumulativeAA=true
Save and close.
In Mod Organizer, click the plugin icon  and select INI Editor.
Change iMultiSample= and iMaxAnisotropy= to '0' in falloutpref.ini under [Display]
Save and close. To use AF and AA with ENBoost, the games default AF and AA must be turned off.
and select INI Editor.
Change iMultiSample= and iMaxAnisotropy= to '0' in falloutpref.ini under [Display]
Save and close. To use AF and AA with ENBoost, the games default AF and AA must be turned off.
- Optional Proxy use through ENBoost, follow these instructions:
Open enblocal.ini in a text editor, like Notepad++, and edit the following lines:
[PROXY]
EnableProxyLibrary=true
InitProxyFunctions=true
ProxyLibrary=other_d3d9.dll  <-- This should be set the name of the d3d9.dll that is being installed.
Save and close.
Open the folder where the other injector is located and change the name of the d3d9.dll to what was put on the Proxy Library line.
Extract all the files to the Fallout New Vegas.
- Note: A couple things to be aware of:
- If already using an ENB, disregard the installation of these files and since ENBoost is already included in ENB. The optional settings can be followed for users that need borderless window or help with setting up the AF and AA settings.
- If setting up the Proxy Library be sure to rename the d3d9.dll from the additional injector or it will overwrite the ENB d3d9.dll.
Users that are running out of memory may be able to solve their issues with ENBoost. Also, the borderless window function and setting up a proxy for using other AA methods may be of interest to others.
Fixes
The comprehensive patches for New Vegas have seen many changes since release. There have been a few different groups that have tried to take on the task of fixing most of the bugs in New Vegas, but some have disappeared or lead their projects in directions away from just fixing bugs. Enter the Yukichigai Unofficial Patch which is just fixes and nothing else. The project has been quickly adopted by many New Vegas users and is still supported by Yukichigai and community members bringing even more bugs to be fixes constantly. Other projects that may have more to offer than just fixes will not be used in this guide. Other than that, there are few other fixes and some excellent utilities to increase stability and performance.
New Vegas Anti-Crash
- Author: Queue
- Version: v7.5.1.0
- Requirements: NVSE
- Note: The Grass Rendering Distance INI tweak will not work without this mod.
This mod helps with some of the offsets and structures the exception handling of New Vegas to reduce crashes for the supported addresses. This mod will be updated frequently and should be followed for updates.
New Vegas Stutter Remover
- Author: SkyRanger-1
- Version: v4.1.36
- Fallout 3 Equivalent: Fallout Stutter Remover
- Requirements: NVSE
- Installation: This mod is packaged incorrectly, follow these instructions:
During install right click Data and select "Set data directory".
This mod has an INI file that has some options users should be aware of. Changes should made by double-clicking NVSR in the left pane of MO and selecting the INI-Files tab. "NVSE/plugins/sr_New_Vegas_Stutter_Remover.ini" should be listed in the top left box, click it, and use the following to make changes accordingly:
NOTE
Windows 10 Fall Creator's Update completely broke some core functions in this. If you have that OS you must disable 2 core functions.If you are on Windows 10 you must do this:
     bHookCriticalSections=0
     bHookLightCriticalSections=0
All other users can continue with the following settings.
Master section (Enable/Disable NVSR functions):
Master = {
        _comment = You can turn on or off each distinct feature from here.
        bManageFPS = 1
        bHookCriticalSections = 1
        bHookLightCriticalSections = 0     <-- Default is 1, but that setting has been known to cause major stuttering on some systems
        bHookHashtables = 1
        bReplaceHeap = 1     <-- Needed for heap replacement, only for advanced users, detailed info in the readme. Modern systems will want to make use of this so it is recommended to enable this.
        bReplaceGetTickCount = 1
        bLogToConsole = 0
        bFastExit = 1
        bFlushLog = 1
        iSchedulingResolution = 1
        bReplaceRandom = 1
        bExperimentalStuff = 0
        iMainHookPoint = 1
}
FPS section:
FPS_Management = {
	bInject_iFPSClamp = 1
	fMaximumFPS = 60     <-- Default is 30, but should bet set to monitor refresh rate or either 1/2 or 1/3 refresh rate
	fMinimumFPS = 20
	iFPS_Report_Period = 4000
	fExtraSleepPercent =0.05
}
Heap Section (used for Heap replacement):
Heap = {
	_comment = Heap replacement can produce MAJOR improvements in performance on Oblivion at a significant cost in stability
	_comment = It crashes instantly on Fallout3 last I remember checking
	_comment = It seems to work on Fallout: New Vegas ?
	_comment = Algorithms: 1=FastMM4, 2=Microsoft (slow on XP), 3=SimpleHeap1, 4=TBBMalloc, 5=ThreadHeap2, 6=ThreadHeap3, 8=tcmalloc
	_comment = Algorithms numbers 1, 4, and 8 require external DLL files in the Data/OBSE/Plugins/ComponentDLLs folder
	iHeapAlgorithm = 6     <-- Only #2, #3, #5, and #6 are the only methods supported by {{NAMESPACE}} at the moment
                                   #3, #5, and #6 require a change to iHeapMainBlockAddress in Experimental section
                                   From NVSR Readme:
                                   1: FastMM4 heap.  This requires an external dll (BorlndMM.dll) to be present in
                                      Data/nvse/plugins/ComponentDLLs, otherwise it will prevent the game from starting up.
                                   2: Windows standard heap.  OS dependant.  A really bad idea on XP, but okay on Vista and Windows 7.
                                   3: SimpleHeap1, made by me.
                                   4: TBBMM, aka TBBMalloc.  Made by Intel.  Fast.  This requires an external dll (tbbmalloc.dll) to be present
                                   5: ThreadHeap2, made by me.  Fast.
                                   6: ThreadHeap3, made by me.  Fast.
                                   8: tcmalloc.  Made by Google.  Usually fast.  This requires an external dll (libtcmalloc_minimal.dll) to be
                                      present.
                                   Note that heap algorithms 3, 5, and 6 are statically sized based upon the iHeapSize setting.  Heap algorithms
                                   1, 2, 4, and 8 will resize themselves as needed.  The fastest algorithms tend to be 6, 4, 5, and 8, but it
                                   varies from computer to computer.
	bEnableProfiling = 0
	iHeapSize = 450     <-- This only affects heap algorithms #3, #5, and #6, default is 450
	bEnableMessages = 0
	bZeroAllocations = 0
}
Cannot recommend this plugin enough. In addition to the fix for the stutter bug, it can do so many more things. Many of them are really advanced for even advanced modders. To understand some of these functions a decent knowledge of software architecture and imperative, procedural, or declarative programming is required. This does not mean that those advanced features should be avoided. Overtime this section will expand with more details and suggestions for general users. Right now all the information is made directly from the readme which is the best source of information for the mod.
Armor Replacer Child NPC Fix
- Atuhor: HanzoTheRazor
- Version: v1.0
Fix armor that children wear if a body replacer is used so the kids do not look weird. Shout out to WilliamImm for recommending this mod.
Game Tweaks
- Author: EssArrBee
- Version: v1.0
- Installation: There are two ways get the file. Create it using FNVEdit or by downloading the pre-made version. Choose one of the following:
- Create plugin manually with FNVEdit here.
- The FNVEdit instructions are provided to users looking to learn how more about using FNVEdit.
- Download plugin here.
- Go to download location and drag the archive to the Downloads tab in MO.
- This is for users that just want to install the mod.
Small game setting tweaks that will change the kill cams and size of the Moon.
Yukichigai Unofficial Patch - YUP
- Author: Yukichigaki, sandbox6
- Version: v11.6
- Installation: Install the YUP - Base Game and All DLC main file.
This mod can be consider the main unofficial patch for New Vegas and is still being actively supported by Yukichigai and New Vegas players.
Unofficial Patch Plus
- Author: PushTheWinButton and others
- Version: v2.04
- Installation: Install both the main file and the Unofficial Patch Plus - Project Nevada Patch optional file. When installing the optional file, select [Merge], not [Replace].
This mod expands on fixes outside the bound of YUP by combining things that can only be fixed with NVSE and functions created for use with NVSE.
Quests & Cut Content
Nothing really breathes new life into a game like additional content. This section will add content mods to open up new areas and quests for users that have playthrough the game a few times and might be looking for something new.
New Vegas Uncut
This series was made by MoBurma to reintroduce some of the cut content that was still inside the game files. Some of it restores really good pieces of Fallout New Vegas and the other mods are just tiny parts that are forgettable. These mods are able to be merged to together using a FNVEdit merge script. Instructions for that are yet to come for users not familiar with using that advanced feature of FNVEdit.
New Vegas Uncut 1 - Rotface to Riches
- Author: MoBurma
- Version: v1.2
- Note: The Count Fix optional file is for users that are installing the mod to a game in progress and have gotten tips from Rotface.
Rotface will now use those caps for stuff.
New Vegas Uncut 2 - A Koch and Bohr Story
- Author: MoBurma
- Version: v1.1
Very small restoration of two robots who miss their master.
New Vegas Uncut 3 - A Van Graff Scorned
- Author: MoBurma
- Version: v1.1
- Installation: LOOT reports this mod needs to cleaned with FNVEdit:
- avangraffscorned.esp
Contains dirty edits: 1 ITM, 0 UDR records. Follow instructions for cleaning here.
Really nice piece of content, but very small.
New Vegas Uncut 4 - A Thorny Situation
- Author: MoBurma
- Version: v1.0
- Installation: LOOT reports this mod needs to cleaned with FNVEdit:
- athornysituation.esp
Contains dirty edits: 10 ITM, 0 UDR records. Follow instructions for cleaning here.
Opens up a new option for The Thorn quest.
New Vegas Uncut 5 - A Wilder Wasteland
- Author: MoBurma
- Version: v1.0
- Installation: LOOT reports this mod needs to cleaned with FNVEdit:
- awilderwasteland.esp
Contains dirty edits: 9 ITM, 0 UDR records. Follow instructions for cleaning here.
Make the Wild Wasteland perk even more wild.
New Vegas Uncut 7 - Pacers Gambit
- Author: MoBurma
- Version: v1.0
- Installation: LOOT reports this mod needs to cleaned with FNVEdit:
- Pacersgambit.esp
Contains dirty edits: 1 ITM, 0 UDR records. Follow instructions for cleaning here.
Adds a new part of the Kings and NCR feud.
More Cut Content
Sandbox6 is another author that has restored some really good little pieces all over the map. These mods are also good candidates to be merged together after installation to save some plugin spots.
Cut Sewers Restored
- Author: sandbox6
- Version: v0.2
Adds two sewers cut from the game with some something to shoot at.
Strip Wall Billboards
- Author: sandbox6
- Version: v1.0
Great little restoration of The Strip wall billboards. Adds a little something that was missing.
Uncut Wasteland
- Author: sandbox6
- Version: v0.91b
- Installation: Install the Uncut Wasteland plus NPCs main file.
This mod adds back in tons of little things left out of the game that were not very performance friendly. Moore's Law has taken care of that years later, so this gem adds all that stuff back in.
Merging Cut Content Mods
- Open Merge Plugins Standalone through MO and click [OK].
- TICK "Copy general assets" in the Settings->Integration tab.
- Hold
ctrland click every plugin listed below: NOTE:If the plugins are contiguous hold
shiftand click the first then the last.- rotfacetoriches.esp
- kochandbohr.esp
- avangraffscorned.esp
- athornysituation.esp
- awilderwasteland.esp
- Pacersgambit.esp
- Cut Sewers Restored.esp
- Strip Wall Billboards.esp
- Uncut Wasteland.esp
- Right click one of the highlighted plugins and goto "Add to merge", then select "<New Merge>".
- In the popup, type the name of the merge and the plugin, then click [OK]. Cut Content Merged is recommended for both.
- Open the Merges tab and right click "Cut Content Merged" and goto "Plugins", then select "Check plugins for errors".
- There will be errors, so right click "Cut Content Merged" and goto "Plugins", then select "Resolve issues".
- Right click Uncut Wasteland.esp and select "Ignore errors", then click [OK].
- Right click "Cut Content Merged" again and select "Build Merge".
- When complete click [Close], to close Merge Plugins Standalone.
- The mod now resides in the Cut Content Merged folder.
- It may not show in MO's left panel, so click the small tool icon dropdown above the left panel and select "Refresh".
- Move the folder right below Uncut Wasteland and make sure it is ticked.
- Untick all the mods that were merged from the list above.
- Bash tags need to be added for the plugin and there are a couple fixes to be forwarded. It is a good idea to do it now by starting FNVEdit and following these instructions:
- Right click the list and "Select None".
- Tick "YUP - Base Game + All DLC.esm" and "Cut Content Merged.esp", then hold
shiftand click [OK]. - After xEdit loads, copy and paste the record ID
00134094into the field "FormID" and press ENTER to open the associated record. - Drag the line
BMDT - Biped Datafrom the YUP - Base Game + All DLC.esm column into the right Cut Content Merged.esp column. - Do the same for the lines
DATA - DataandDNAM -. - Open record
001205A6, and then drag the lineResponses->Response->NAM1 - Response Textfrom the YUP - Base Game + All DLC.esm column into the Cut Content Merged.esp column. - Repeat the exact same operation for record
001547A4. - Now right click "Cut Content Merged.esp" and select "Apply Script"
- Choose "Generate Bash Tags" from the dropdown and click [OK]
- When asked to add the tags to the header, select [Yes]
- Tags that should be added:
- Actors.ACBS
- Actors.AIPackages
- Actors.DeathItem
- Actors.Stats
- C.Light
- C.Water
- Factions
- Graphics
- Invent
- Names
- Relations
- Scripts
- Stats
- Tags that should be added:
- Close and ONLY save "Cut Content Merged.esp".
Cut Content Merged
- Author: MoBurma, sandbox6 (99%), and You (1%)
- Version: v1
- Changelog: This tiny changelog is provided for users that may have already done an older version of this section.
- v1: Original version
This is the second example of how the merge plugin script and demonstrates a more complex merging procedure than the first. Additionally, there was also some instructions to solve conflicts with YUP, this is known as forwarding fixes. For the rest of the guide, any place that there is a mod or section to merge plugins and add fixes, it will have similar instructions. This is a great set of mods to use with the merge script. It restores lots of little parts that were left out of New Vegas that can now be added back in and enjoyed. Try going to the Hoover Dam and seeing some of the missing detail added by Uncut Wasteland or check out the billboard wall that surrounds The Strip.
"And that, I think, was the handle..."
"...that sense of inevitable victory over the forces of old and evil." - Raoul Duke. These mods will continue the triumph over evil by hunting down scum for money or avenging the death of a friend only ever known from a distance.
Sortomatic - Modders Resource
- Author: tunaisafish and Gribbleshnibit8
- Version: v1.3
- Requirements: NVSE
This mod sorts inventory into separate containers for houses that support it. Very useful for hoarders, like me, you, and everyone that has every played a Bethesda game. Shout out to Kelmych for recommending this mod. It is a UI mod that is needed to support "Afterschool Special", and another mod later in the guide.
Afterschool Special
- Author: Mike Hancho
- Version: v2.01
- Requirements: NVSE, Sortomatic
- Installation: Get the Afterschool Special V 2O1 - Sortomatic V4 Full main file. This mod is not packaged properly, follow these instructions:
During the install, expand "Afterschool_Special_V201_Sortomatic_V4" and right click "DATA", then select "Set data directory" and click [OK].
Probably the best school house mod ever made?
Beyond Boulder Dome
- Author: The Beyond Boulder Dome Team
- Version: v1.2
- Installation: Install all five main files and then install the update file, click [Merge] not [Replace] for all.
This mod is the closest to a third party DLC that exists for New Vegas. It is a separate worldspace in Colorado with tough enemies and lots of radiated areas.
D.E.I.M.O.S.
- Author: Alexander J Velicky
- Version: v1.05
Nice quest, not very long, but the voice acting and story are good. Take a shotgun and energy weapon with you, but you must leave companions behind and go ahead alone at an obvious point.
The New Bison Steve Hotel and Lucky Casino
- Author: Mike Hancho
- Version: v107
- Requirements: NVSE, Sortomatic
- Installation: Get the New Bison Steve Version 107 MASTER FILE VERSION main file and the New Bison Steve Version 107 - SORTOMATIC VERSION optional file. This mod is packaged incorrectly, follow these instructions:
During main file install, expand "New_Bison_Steve_V107_Master", then right click "Data" and select "Set data directory" and click [OK].
During optional file install, expand "New Bison Steve Hotel - Sortomatic->ESM version", then right click "Data" and select "Set data directory" and click [OK], select [Merge] not [Replace]."
Give some extra life to Primm.
The Someguy Series
- Author: someguy2000
- Version: v2.0
- Installation: This mod is not packaged correctly, follow these instructions:
During the install, expand "Someguy Series 2.0" and right click "DATA", then select "Set data directory" and click [OK].
This is a master file that lets all the someguy mods work together. NV Bounties I & II are already included in the guide and others will be added as their testing is completed.
New Vegas Bounties I
- Author: someguy2000
- Version: v1.55
- Requirements: The Someguy Series
Great set of bounties with decent voice acting. They are fun to do for some quick cash.
New Vegas Bounties II
- Author: someguy2000
- Version: v1.47
- Requirements: The Someguy Series, New Vegas Bounties I
- Installation: This mod is not packaged correctly, follow these instructions:
During the install, expand "NVBII Version 1.47" and right click "DATA", then select "Set data directory" and click [OK].
NOTE: Some Bounty Quests will make the game Crash/CTD IF companions are present. Excluding "Willow". Leave the Kids @home.
This mod really shows how someone can grow as a developer. Someguy added in options to kill or capture criminals with bounties on their head. Lots of new areas added to the game and you might have to think about how to approach some of the quests instead of just running in guns blazing and retrieving a finger.
Tales from the Burning Sands
- Author: Puce Moose
- Version: v1.31b
- Installation: Get the Tales from the Burning Sands 1.31b FULL version - all three chapters main file ONLY.
LOOT reports this mod needs to cleaned with FNVEdit:
- Tales from the Burning Sands.esm
Contains dirty edits: 17 ITM, 0 UDR records. Follow instructions for cleaning here.
This one is for the people that like the old school RPGs where quests require lots of reading and actually paying attention because quest markers are not part of the mix. Lots of detail is added to this mod and it is easy to overlook at lot of it, so keep an eye out.
User Interface
The interface section will be the first section where mods that affect the actually in game elements are installed.
UI Mods Requiring a Specific Installation Procedure
UI Organizer (UIO) is a NVSE plugin that allows UI mods to be installed and uninstalled without having to worry if they have UI elements. If following this guide, it is required. Download the file but DON'T INSTALL / ACTIVATE UI ORGANIZER YET. It will be installed at the end of the section after Flashlightnvse. The reason for this is UIO will correct any conflicts and/or overwrites of all the previously installed UI mods.
UIO - UI Organizer
- Author: jazzisparis
- Version: v1.31
- Note: Do NOT install / activate UIO yet. If you activate the file now, your UI will most certainly be bugged or malfunction. Install / activate UIO after Flashlightnvse.
- Note 2: There may some files or folders in the Overwrite folder after exiting the game or after a crash. This is not a problem, those files can be ignored or deleted without issue. The mod will regenerate those files every time the game loads.
The next great HUD management mod.
Darnified UI
- Author: Darn
- Version: v04beta
- Fallout 3 Equivalent: Darnified UI
- Installation: To install this mod with MO click [Manual], then [Okay] during the installation or the default installer will skip a very important file.
- Alternate Download; This file is also hosted on ModDB. Until another location is made available you can access it there. As of 15th January 2017 it appears the original site is back in Darn's control and you should use that.
Even though this mod never made it out of beta it is still complete enough to be used for all interface text. Some other modders have also expanded the Darnified font to other parts of the game. Author's Page
DarNified UI Font Dummies
- Author: Axonis
- Version: v1.0
Makes the Darnified UI fonts work without ini editing.
Darnified UI Extension
- Author: Jesus H Christ
- Version: 0.9
- Installation: Get all main files. Install them in any order, but for the second and third file, click [Merge], not [Replace].
This extension allows the colour of fonts in the main menu to match the one you've set in Darnified UI, adds a useful preload function to UI textures, and support for upscaled icons.
Ambient Temperature
- Author: Imp of the Perverse
- Version: v1.2.1
This mod allows other mods to use temperature to affect how the world works. Powered Power Armor is the mod in this guide that will make use of it.
FPS Weapon Wheel
- Author: vivanto
- Version: v1.13
Transform the mouse scroll wheel into a weapon selector, just like a real FPS.
JIP Realistic Weapon Overheating
- Author: jazzisparis
- Version: v0.90
This mod adds in weapon overheating so play and spray is a little less easy in big fire fights. Also, adds to weapon degradation if the weapon is hot constantly.
JIP Selective-Fire
- Author: jazzisparis
- Version: v1.21
- Requirements: NVSE, JIP NVSE Plugin
Changes the firing mode of the guns in game. It is compatible with any gun added by mods, and has an MCM menu to customize the options.
JIP Companions Command and Control
- Author: jazzisparis
- Version: v2.60
- Requirements: NVSE, JIP LN NVSE Plugin
Does a ton of Companion stuff. It's so much that most people probably will not even use half the features.
JIP Improved Recipe Menu
- Author: jazzisparis
- Version: v1.10
- Requirements: NVSE, JIP NVSE Plugin
Makes the crafting menus less painful to navigate, and keeps it from closing every time you make something.
Powered Power Armor
- Author: Imp of the Perverse
- Version: vBeta3A
- Installation: Get the Powered Power Armor NV Beta3 main file and the Beta 3 Hotfix A optional file. Install in that order and click [Merge] not [Replace].
- Note: This mod will override your console/.ini FOV settings (always resetting to FOV 75) but the in-game item for configuring Powered Power Armor lets you specify a new FOV.
Makes power armor much more complex to own and operate. Reading the read me and nexus page are highly recommend so something is not missed.
Mojave Patch Outpost - YUP-PPA Patch
- Author: EssArrBee
- Version: v1.0
- Installation: Get the YUP-PPA Patch main file. During install rename the file to "YUP-PPA Patch" since the page will be used again for other patches.
Patch for YUP and PPA.
Project Nevada
- Author: PN Team
- Version: v2.5
- Requirements: NVSE, DarnUI
Major overhaul of Fallout New Vegas gameplay and equipment. Adds many new features from sprinting to nightvision.
Project Nevada - Extra Options
- Author: Gribbleshnibit8 and Roy Batty
- Version: v1.3
- Requirements: NVSE, Project Nevada
- Installation: Project Nevada MUST be activated first. During the installer, DO NOT tick the Equipment module or the installer will not work. There is no Equipment module for PN - EO.
Further extension of Project Nevada features. Also, includes a merged DLC patch.
The Mod Configuration Menu
- Author: Pelinor
- Version: v1.5
- Requirements: NVSE
- Installation: Get The Mod Configuration Menu main file and the MCM BugFix 2 update file.
This mod will allow other mods to have advanced functionality by accessing the in game menu for customizable settings. Project Nevada has its own version of this mod so it should be installed before this mod.
The Weapon Mod Menu
- Author: Pelinor
- Version: v1.2
- Requirements: NVSE, MCM
- Note: If reinstalling the first part of the User Interface section this mod will need to be uninstalled and reinstalled as well.
Opens up new features to the weapon modding interface used in game, so it is more intuitive.
One HUD - oHUD
- Author: Gopher
- Version: v1.1
- Requirements: NVSE, MCM
- Installation: Get the One HUD (oHUD) main file and the One HUD (oHUD) Darnified Patch optional file.
This mod combines ImmersiveHUD, AdjustableHUD, and Primary Needs HUD into one version for easy installation.
- For some reason the little arrow on the rad meter is hidden.
After installation, open up "/menus/main/hud_main_menu.xml" and navigate to line 713.
Either comment out the line or delete it
Flashlight NVSE
- Author: vivanto
- Version: 1.22
Great mod to use with darker nights. This really helps navigate the wastes for users that do not want to use the Project Nevada vision modes.
{{{title}}}
{{{text}}}
Gopher's Advanced Recon
Gopher's Advanced Recon mods will add advanced tactical and stealth gear to the game. This subsection covers the mods and their patches with a small merging section, but it is all still within the UI section.
Advanced Recon Trap Detection
- Author: Gopher
- Version: v2.7.1
- Fallout 3 Equivalent: Advanced Recon Trap Detection
- Installation: Get the Adv Recon Trap Detection main file only.
This mod will add some very cool ways to detect traps. This is very helpful when using darker interiors and nights.
Advanced Recon Range Finder
- Author: Gopher
- Version: v1.2.1
- Fallout 3 Equivalent: Advanced Recon Range Finder FO3
This mod will add a range finder to scoped weapons up to 200 meters.
Advanced Recon Stealth Armor
- Author: Gopher
- Version: v1.4.5
More recon armors, more combat armors, more fun!
Advanced Recon Thermal Nightvision
- Author: Gopher
- Version: v3.3.1
- Installation: Get the Adv Recon Thermal Nightvision main file only.
Adds in more nightvision gear, which goes great with the other Advanced Recon mods.
Advanced Recon and Project Nevada Patches (DLC - TTW - Legacy of X-13 Support)
- Author: darthbdaman
- Version: v1.5
This great mod patches Advanced Recon and Project Nevada with all the appropriate mods in F&L through the wonders of NVSE.
Merging Advanced Recon
- Plugin order matters for this merge, so make sure the plugins are listed in MO's right panel the in the order they are listed below.
- Open Merge Plugins Standalone through MO and click [OK].
- Hold
ctrland click every plugin listed below:NOTE:If the plugins are contiguous holdshiftand click the first then the last.- Advanced Recon Gear.esp
- Advanced Recon Armor.esp
- Detect Traps - Perk.esp
- Detect Traps - Traponator 4000.esp
- Advanced Recon Range Finder.esp
- Advanced Recon Patches.esp
- Right click one of the highlighted plugins and go to "Add to merge", then select "<New Merge>".
- In the popup, type the name of the merge and the plugin, then click [OK]. Advanced Recon Merged is recommended for both.
- Open the Merges tab and right click "Advanced Recon Merged" and goto "Plugins", then select "Check plugins for errors".
- UNTICK "Copy general assets" in the Settings->Integration tab.
- Right click "Advanced Recon Merged" again and select "Build Merge".
- When complete click [Close], then close Merge Plugins Standalone.
- The mod now resides in the Advanced Recon Merged folder.
- It may not show in MO's left panel, so click the small tool icon dropdown above the left panel and select "Refresh".
- Move the folder right below Advanced Recon and Project Nevada Patches (TTW - ADAM - X-13 Support) and make sure it is ticked.
- In the left pane of MO, double click Advanced Recon Trap Detection.
- Now go to the "Optional ESPs" tab and move the "Detect Traps - Perk.esp" and "Detect Traps - Traponator 4000.esp" to the Optional ESPs box.
- In the left pane of MO, double click Advanced Recon Range Finder.
- Now go to the "Optional ESPs" tab and move the "Advanced Recon Range Finder.esp" to the Optional ESPs box.
- In the left pane of MO, double click Advanced Recon Thermal Nightvision.
- Now go to the "Optional ESPs" tab and move the "Advanced Recon Gear.esp" and "Advanced Recon Tech.esp" to the Optional ESPs box.
- In the left pane of MO, double click Advanced Recon Stealth Armor.
- Now go to the "Optional ESPs" tab and move the "Advanced Recon Armor.esp" to the Optional ESPs box.
- In the left pane of MO, untick Advanced Recon and Project Nevada Patches (TTW - ADAM - X-13 Support).
- Bash tags need to be added for the plugin. It is a good idea to do it now by starting FNVEdit and following these instructions:
- From the list of plugins double click "Advanced Recon Merged.esp"
- When FNVEdit loads, right click "Advanced Recon Merged.esp" and select "Apply Script"
- Choose "Generate Bash Tags" from the dropdown and click [OK]
- When asked to add the tags to the header, select [Yes]
- Close and save.
Advanced Recon Merged
- Author: Gopher (85%), darthbdaman (14%), and you (1%)
- Version: v2
- Changelog: This tiny changelog is provided for users that may have already done an older version of this section.
- v1: Initial version.
- v2: Added "Advanced Recon and Project Nevada Patches (TTW - ADAM - X-13 Support)" to the merge.
Supplemental UI
The rest of the User Interface section does not change HUD elements, so they can be installed after UI Organizer and do not require a specific install order.
CASM with MCM
- Author: Cipscis and Gribbleshnibit8
- Version: v1.9
- Fallout 3 Equivalent: CASM
- Requirements: NVSE, Lutana NVSE Plugin
Autosave ability to prevent losing progress if game crashes. Use MCM menu to customize.
Centered 3rd Person Camera
- Author: Jahandar
- Version: v5
- Note: In Mod Organizer, in the left panel, right click and select "Information" or Double Click the Mod. Go to Tab "Optional Plugins" and put the one you DO NOT want in "optional ESPs". Choices are: "Centered 3rd Person Camera.esp" OR "Centered 3rd Person Camera - Unraised.esp"
Every game has a crappy over the shoulder camera and modders always fix that problem.
Quote from Nexus site on v5: "By request, I've included a version that does not raise the camera/crosshair. The "unraised" version includes only the centered camera and the increased max camera distance (the crosshair will float roughly at your character's neck). Both ESM files are included in the download, just choose which one you want."
Sortomatic for Tales from the Burning Sands
- Author: kelwyn and Sarcophski
- Version: v1.1
- Requirements: NVSE, Sortomatic, Tales from the Burning Sands
Extend Sortomatic to the house from Tales from the Burning Sands. Very useful. Shout out to Kelmych for recommending this and mod as well as making it.
Traits Menu DarNified
- Author: DarN and Mama Stankum
- Version: v1.0
- Requirements: DarnifiedUI
- Note: If reinstalling the first part of the User Interface section this mod will need to be uninstalled and reinstalled as well.
Extends the DarnUI to the traits menu. Shout out to Kelmych for suggesting this mod.
Misc Item Icons - New Vegas
- Author: The 3rd Type and DekoMan91
- Version: v0.9
- Fallout 3 Equivalent: T3T Misc Item Icons
Replaces many of the icons in the Pip-Boy menu for more diversity.
Project FNVIcons
- Author: bro_nod
- Version: v1.3
- Note: Get the Project FNVIcons - Challenge optional file.
One of the optional files of this mod adds new icons to the various challenge perks that previously shared the same icon.
New T-51b Icons New Vegas
- Author: Captain-Ultima
- Version: v1.0
The T-51b icons in vanilla are quite uninspiring. This mod adds much better-looking icons for both armor and helmet.
Merging Icon Mods
- Open Merge Plugins Standalone through MO and click [OK].
- Hold
ctrland click every plugin listed below:NOTE:If the plugins are contiguous holdshiftand click the first then the last.- MiscItemIconsNV.esp
- Project FNVIcons - Challenge.esp
- New Icons For T-51B FONV Edition.esp
- Right click one of the highlighted plugins and goto "Add to merge", then select "<New Merge>".
- In the popup, type the name of the merge and the plugin, then click [OK]. Icon Mods Merged is recommended for both.
- Open the Merges tab and right click "Icon Mods Merged" and go to "Plugins", then select "Check plugins for errors".
- UNTICK "Copy general assets" in the Settings->Integration tab.
- Right click "Icon Mods Merged" again and select "Build Merge".
- When complete click [Close], then close Merge Plugins Standalone.
- The mod now resides in the Icon Mods Merged folder.
- It may not show in MO's left panel, so click the small tool icon dropdown above the left panel and select "Refresh".
- Move the folder right below New T-51b Icons New Vegas and make sure it is ticked.
- In the left pane of MO, double click Misc Item Icons - New Vegas.
- Now go to the "Optional ESPs" tab and move the "MiscItemIconsNV.esp" to the Optional ESPs box.
- Repeat the process for the plugins in the two other mods.
- Bash tags need to be added for the plugin. It is a good idea to do it now by starting FNVEdit and following these instructions:
- From the list of plugins double click "Icon Mods Merged.esp"
- When FNVEdit loads, right click "Icon Mods Merged.esp" and select "Apply Script"
- Choose "Generate Bash Tags" from the dropdown and click [OK]
- When asked to add the tags to the header, select [Yes]
- Close and save.
Icon Mods Merged
- Author: The 3rd Type and DekoMan91 (33%), bro_nod (33%), Captain-Ultima (33%) and you (1%)
- Version: v1
- Changelog: This tiny changelog is provided for users that may have already done an older version of this section.
- v1: Initial version.
HUD and Pip Boy Optional Additions
Sometimes it is easy to get bored with Darnified UI after a few playthroughs. Also, some players might play as a female and want the pip-boy to be a pip-girl. This additional page will include cellHUD and Complete Vault Girl Interface, plus a patch if both are being used. This completely optional and both mods can be safely installed or uninstalled at any time.
Covering the Mojave
Texture Overhauls
MGs Neat Clutter Retextures
- Author: Mental Gear
- Version: v7.0
- Installation: Get the MGs NCR Pack Ojo friendly 7 main file.
This mod retextures a lot of the clutter missed by the larger packs. NMCs textures are generally of a higher quality however, hence the mod is installed here, allowing the other packs to overwrite it.
- Some included textures need to be hidden in MO:
Double click on the mod in MO's left pane and click on the "Filetree" tab.
Navigate to "textures/architecture/helios_one" and right click on solar_reflector_lod.dds.
Select [Hide].
Navigate to "textures/armor/headgear" and right click on slavecollar_g.dds.
Select [Hide].
NMCs Texture Pack For New Vegas
- Author: NeilMc_NMC
- Version: v1.0
- Fallout 3 Equivalent: NMCs_Texture_Pack_for_FO3
- Installation: Install both Medium files. Users that need performance can install the Small file instead of the Medium files.
- Note: Large files on the Nexus can get corrupted during download and the only fix is to retry the download until it works.
The largest texture pack for New Vegas and with Poco Bueno is a great base to build from. There are three sizes of this texture pack, the Medium is a mix of different sized textures matched together really well. The large is mostly 2k and 4k textures, so too much for a heavily modded setup.
POCO BUENO Texture Pack
- Author: Ojo Bueno aka tapioks
- Version: v5
- Installation: Get the main file and the PocoBueno Skeleton Transparency Fix optional file. The main file does not install correctly with MO, follow these instructions:
Open Windows Explorer and navigate to the ".../<Mod Organizer>/downloads" folder and select PocoBuenoTexturePackV5-42028-5.zip.
Extract the PocoBuenoV5.fomod to the "downloads" folder.
Return to MO and install the FOMOD, click on [Manual].
Expand "PocoBuenoV5" (not "pocobuenov5"), right click on "data" and select [Set data directory].
Click [OK].
Install the optional file, adding it to the same folder as the main file, and click [Merge], not [Replace].
Excellent texture pack that covers everything from robots to dirt.
Textures Over Time
- Author: DonKnotts
- Version: v1.0
- Installation: Get the FlagStoneWalls, HH_Sandstone, and Sandbags main files ONLY. Install them in any order, but for the second and third file, click [Merge], not [Replace].
The sandstone textures for Honest Hearts are really amazing. Zion National Park never looked so good, unless you actually go to Zion National Park, but who goes outside anymore?
Collision Meshes
- Author: KiCHo666
- Version: 1.5.2
Technically this is just meshes, no textures, but there is no meshes sections. Anyways nitpickers, this mod makes the in game meshes work much better for projectiles, since bullets can now go through the guard tower rails, the holes between the wood beams in the farmhouses, and cars have much better collision meshes. Great mod from a modder that is really making some essential stuff for FNV.
Weather & Lighting
ELECTRO-CITY - Relighting the Wasteland
- Author: MyGoodEye
- Version: v12A
Adds a bunch of lights to the wasteland. This helps with the darker nights in Nevada Skies.
When installing the mod, select [Manual].
Expand the top level.
Deselect the two optional & compatibility folders and install just the meshes,textures & ELECTRO CITY-*.esm files.
NVInteriors Project
- Author: chucksteel and Bigcrazewolf
- Version: v2.0
- Fallout 3 Equivalent: DCInteriors Project
- Installation: Get the NVInteriors Core and NVInteriors_Combo Edition main files and the NMC_NVInteriors Compatibility patch Medium optional file. Install the NVInteriors Core-43534-2-0.7z first then install the other two files in any order, but make sure to install in the same folder as the main file and when asked click [Merge], not [Replace].
This mod adds many new interiors to the game for exploration and looting. Perfectly fits into the game world.
NVInteriors Rewritten
- Author: MonoAccipiter
- Version: v1.31
- Installation: Get the NVInteriors_Rewritten_ESMReplacer main file and the NVInteriors_Rewritten_ILO-Patch optional file.
Make sure to install the patch into the same folder as the main file and when asked click [Merge], not [Replace].
This mod rewrites all of the terminal entries and notes in NVInteriors, correcting many grammatical errors and making them a bit more lore-friendly.
NV InteriorsProject A Room With A View
- Author: Chucksteel
- Version: v2.1
Great overhaul of the Suites from the Strip. There are actual windows.
Interior Lighting Overhaul
- Author: Sarge198 and Killergrimm
- Version: v6.9
- Installation: Get the Interior Lighting Overhaul 6-9 - Mod Organizer optional file and follow these instructions:
Navigate to where you downloaded the archive in an explorer window and unpack the *.fomod file.
Click the install from archive button  in MO and select the FOMOD file you just unpacked in the pop-up.
WARNING
Template:FOMOD_Instructions is deprecated and should no longer be used on this wiki. Please change this template call to use the better-looking and simpler Template:Fomod. We apologize for the inconvenience.| FOMOD Instructions Interior Lighting Overhaul |
Core
Core
Install Extras
Extras
Next Mod Support
Mod Support
Next Compatibility Patches
Compatibility Patches
Install |
Double click Interior Lighting Overhaul in the left pane and go to the [Optional ESPs] tab.
Move "Interior Lighting Overhaul - Ultimate Edition.esp" to the "Optional ESPs" box.
- The patches from this mod can be merged with the one from NVInteriors Rewritten, so follow these instructions:
- Open Merge Plugins Standalone through MO and click [OK].
- UNTICK "Copy general assets" in the Settings->Integration tab.
- Hold
ctrland click every plugin listed below:NOTE:If the plugins are contiguous holdshiftand click the first then the last.- ILO - D.E.I.M.O.S.esp
- ILO - NVInteriors Project.esp
- ILO - New Vegas Bounties.esp
- ILO - New Vegas Bounties II.esp
- ILO - YUP Patch.esp
- Right click one of the highlighted plugins and goto "Add to merge", then select "<New Merge>".
- In the popup, type the name of the merge and the plugin, then click [OK]. ILO Merged is recommended for both.
- Open the Merges tab and right click "ILO Merged" and goto "Plugins", then select "Check plugins for errors".
- Right click "ILO Merged" again and select "Build Merge".
- When complete click [Close], then close Merge Plugins Standalone.
- The mod now resides in the ILO Merged folder.
- It may not show in MO's left panel, so click the small tool icon dropdown above the left panel and select "Refresh".
- Move the folder right below Interior Lighting Overhaul and make sure it is ticked.
- In the left pane of MO, double click NVInteriors Rewritten.
- Now go to the "Optional ESPs" tab and move the "ILO - NVInteriors Project.esp" to the Optional ESPs box.
- In the left pane of MO, double click Interior Lighting Overhaul.
- Now go to the "Optional ESPs" tab and move the "ILO - D.E.I.M.O.S.esp", "ILO - New Vegas Bounties.esp", "ILO - New Vegas Bounties II.esp", and "ILO - YUP Patch.esp" to the Optional ESPs box.
- LOOT does not sort the ILO - Merged.esp plugin properly, follow these instructions:
Run LOOT through MO executable dropdown.
Find "ILO - Merged.esp" in the left pane and click the three dots on the right of the plugin, then select [Edit Metadata], and the [LOAD AFTER] tab.
Enter "RaestlozFactionArmorEnhancement.esp" into the ''Filename'' textbox.
Enter "TrooperOverhaul-Dragbody.esp" into the ''Filename'' textbox.
Click the save icon next to ILO - Merged.esp.
This adds light switches to the interiors of building, but also so much more.
Old World Blues - Path Lighting
- Author: Sarge198
- Version: v1.1
- Installation: This mod has an extra plugin, follow these instructions:
Double click Old World Blues - Path Lighting in the left pane of MO, and go to the "Optional ESPs" tab.
Move "OWB-Path Lights - Darker Nights.esp" to the "Optional ESPs" box.
Make all the ground lights in OWB light up at night. Used with darker nights in Nevada Skies, it really makes the Big Empty look great.
Realistic Wasteland Lighting Enhancement
- Author: xCamoLegend, Sal203, and RoyBatty
- Version: v0.96
- Installation: Get the "FNV Realistic Wasteland Lighting - Enhancement" main file and the "RWLE - Someguy's Mods Patch Collection" optional file. Follow these instructions:
Install the main file.
Now for the optional file, select [Manual] at the installation popup.
Right click on "RWLE - Someguy's Mods Patch Collection" and select "Select data directory", untick "TTW and "FNV", then click [OK].
Select [Merge], not [Replace].
Weather mod that actually makes the desert look like one.
Not crazy about RWLE? Additional information and weather mods can be found on the Weather Mods page.
Plants & Stuff
The deserts of the Southwestern United States have the second highest plant density of any habitat in the world, only behind the rain forest regions of Earth. Chernobyl only a few decades removed from the second biggest nuclear meltdown in history is completely covered in vegetation, radioactive vegetation, but still covered in the stuff. The point being that nuclear war would allow for plants to just cover the Mojave and make the world feel much less empty and devoid of life. Hopefully this section can address that problem.
Wasteland Flora Overhaul
- Author: vurt
- Version: v2.9a for Dead and Fertile versions, v1.0 for esp-less version
- Fallout 3 Equivalent: Flora Overhaul
- Installation: Use the Fertile or Dead version as preferred. If using the Dead version, download the Update for the latest Dead version update file. Also, get the LOD Patches v1dot2 optional file no matter what version you chose. Follow these instructions:
Install the main file version of choice normally.
If using the Dead version, install the Update for the latest Dead version, select [Merge], not [Replace].
Now during install for the LOD file it is recommended to install to a separate folder so it can be reverted easily.
Where "Name" is shown type "Wasteland Flora Overhaul POCO Bueno LOD".
Now expand "Vurts WFO - LOD Patches v1_2->--CHOOSE YOUR PACK--->POCO and OJO BUENO - LOD Patch", then right click "Data" and select "Set data directory".
Click [OK].
- LOOT reports this about these plugins:
Do not clean, otherwise, the game will crash on startup.
Of course, this is the best floral mod for FNV. Did you expect anything less from Vurt?
Hectrol FX DUSTSTORM Deluxe HighRes Retex
- Author: Hectrol
- Version: v1.0
- Installation: There are multiple versions, follow these instructions:
Expand "Hectrol_FX_Duststorm_Deluxe_HighRes_Retex" and then right click "1024" and select "Set data directory".
Click [OK].
- Note: The "2048" or "4096" version can also be chosen for high end systems.
Hectrol is the man and makes wonderful little mods that address many eye sores.
Hectrol Tumbleweed Deluxe HighRes Retex
- Author: Hectrol
- Version: v1.0
HiRes Raider Graffiti
- Author: tvs_frank
- Version: v1.0
Improved LOD Noise Texture
- Author: Cyberlazy
- Version: v1.00
- Fallout 3 Equivalent: Improved LOD Noise Texture
This is one of those mods that you did not know you needed until you had it and now you cannot play without it.
Laurens Bathroom Poetry
- Author: lauren_dr
- Version: v1
- Fallout 3 Equivalent: Laurens Bathroom Poetry
The highest form of art in the future.
Mojave Nights - a moon and stars replacer
- Author: CptJoker
- Version: v1.0
- Fallout 3 Equivalent: Enhanced Night Sky
- Installation: If you choose the FOMOD version, select 100% (vanilla) for moon size, the size will adjusted manually later in the guide. Choose default Moon glow. Using the non-FOMOD version will mean setting "Mojave Nights 1.0" folder as the Data directory folder correctly in MO's 'Manual' installer.
- Note: Installation instructions are given to avoid using a plugin for this mod to reduce plugin count. Further instructions are found in the Game Tweaks section.
What color do you think the moon and stars would be through an atmosphere that went through a nuclear war? I think it would be rainbow colored.
Vault 22 Flora Overhaul
- Author: Macintroll
- Version: v1.1
- Installation: This mod is not packaged correctly, follow these instructions:
When the installation window pops up, expand "Vault22FloraOverhaul-mod".
Right click "data" and select Set data directory and click [OK]
- LOOT reports this:
Do not clean, otherwise, the game will crash on startup.
"Welcome to the jungle..." Crank up volume to 11 on Vault 22.
People and Mutants
Too weird to live, and too rare to die." - Raoul Duke

"If you'll be my bodyguard...
...I can be your long lost pal". The wasteland can be a lonely hellhole that leads you to soul crushing depression and complete shellshock. It is probably better if you partner up and spread the misery with a friend. Willow seems as good a companion as any and the mod comes with a quest, dog, and player home. Also, in this section are mods that cover the other NPCs in game until more companions are added so a new section makes sense.
Willow - A Better Companion Experience
- Author: llamaRCA and Nivea
- Version: v1.10
- Installation: Get the NVWillow v1.10 main file and the NVWillow v1.0 and above - Project Nevada Rebalance Patch miscellaneous file. Follow these instructions:
Install the NVWillow v1.10 file.
Install the NVWillow v1.0 and above - Project Nevada Rebalance Patch file, select [Merge], not [Replace].
She's funny, cute, and has way more lines of dialogue that do not become annoying after an hour. Hint: Talk to Willow about her dog right away.
Authentic Burned Man
- Author: Rocket
- Version: v1.0
Bandages look like used bandages and much better head mesh.
Ghouls Hires retexture
- Author: Macintroll
- Version: v1.2
- Fallout 3 Equivalent: Ghouls Hires retexture
- Installation: Get ONLY the Ghoul retexture for Roberts Male Body replacer optional file. The main file is not needed.
Great little retexture of the Ghouls. Shout out to Brainfever for suggesting this mod.
Fallout Character Overhaul
- Author: Drumber
- Version: v3.01
- Fallout 3 Equivalent: Fallout Character Overhaul - Races
- Requirements: The New Bison Steve Hotel, Afterschool Special, Roberts Males, Beyond Boulder Dome, Willow
- Installation: Get the Fallout Character Overhaul 3.0 main file and the Fallout Character Overhaul 3.01 update, then follow these instructions:
WARNING
Template:FOMOD_Instructions is deprecated and should no longer be used on this wiki. Please change this template call to use the better-looking and simpler Template:Fomod. We apologize for the inconvenience.| FOMOD Instructions Fallout Character Overhaul 3.0 |
Fallout Character Overhaul 3.0
Addons
Teeth Textures
Options
Next Fallout Character Overhaul 3.0
Patches
NPC Addons
Install |
Install the Fallout Character Overhaul 3.01 update file and click [Merge], not [Replace].
- The installer has a tendency to install more .esp files than selected, follow these instructions:
In MO's left pane, double click "Fallout Character Overhaul" and select the "Optional ESPs" tab.
Move the "FCO - OHSB NPC Edits.esp", "FCO - Russel.esp" and "FCO - Willow (Cazy).esp" to the "Optional ESPs" box.
Great character edit of just about every NPC in game. Amazing amount of time and dedication went into this mod.
"Looking good, Billy Ray."
"Feeling Good, Louis" Sorry to change up the movie references, but it works. The vanilla bodies in Bethesda games tend to be weird and ugly. Lucky for us some excellent modders have made much better bodies to conquer the wasteland with. Exeter not only offers a version of the Type3 female body by Dimon99, but also redid all the meshes for female outfits. On the other side Nivea has taken over Robert's Males body replacer, so all the bases are covered for just about every character.
Type3 Body and Armor Replacer
- Author: Exeter, Dimon99
- Version: v2.1
- Installation: Install the New Vegas Type3 Armor Complete main file and the Business Suit Fix, CombatMk1, CombatMk2, Fieldhand outfit Fix, Leather Armor Wrist fix update files. During install click [Merge], not [Replace], when asked.
This is the non-nude version of the Type3 female body replacer and the armor meshes to go along with them. Vanilla body type are really weird looking in the Fallout series, and Type3 is the solution for females. If you prefer the nude body then get the other main file for Armors only and use the original Type3 body replacer.
Dead Money Type3 Outfits
- Author: Exeter
- Version: v1.0
- Requirements: Type3 Body
- Installation: Install the main file and the Type3 Dean Domino Tuxedo -Fixed file. Also there is the Reversed Vera Dress optional file for users that install holster mods (recommended, since the guide does include a holster mod).
Convert the Dead Money clothing to Type3 body.
Type 3 Honest Heart Tribal Armors
- Author: Exeter
- Version: v2.5
- Requirements: Type3 Body
- Installation: Install the main file and the Fix for Graham outift file (filename has typo) and the Fix for Sorrows body file.
Convert the Honest Hearts clothing to Type3 body.
Old World Blues Armors for Type 3
- Author: Exeter
- Version: v1.0
- Requirements: Type3 Body
- Installation: Install the main file and the Patch for StealthSuit- Fixed file.
Convert the Old World Blues clothing to Type3 body.
Lonesome Road Armors for Type 3
- Author: Exeter
- Version: v1.1
- Requirements: Type3 Body
Converts the Lonesome Road clothing to Type3 body.
Roberts Male Body
- Author: Nivea and Favoredsoul
- Version: v3.4
- Fallout 3 Equivalent: Roberts Male Body for Fallout 3
- Installation: This mod is divided into many files, get the following:
- Main files:
- Roberts New Vegas Main - Underwear 3_4
- Optional files:
- Roberts Courier's Stash DLC Patch 3_3
- Roberts Dead Money DLC Patch 3_3
- Roberts Honest Hearts DLC Patch-Underwear 3_4
- Roberts Lonesome Road DLC Patch 3_3
- Roberts Old World Blues DLC Patch-Underwear 3_3
- Miscellaneous files:
- Roberts Pipboy Fix 3_3
- Roberts Hairy Patch 3_3
- Roberts Dirty Raiders 3_3
Install the files in the order just given, and select [Merge], not [Replace].
The male hand textures and meshes included with Robert's are problematic. Follow these instructions to revert to vanilla meshes using FCO hand textures.
Double click on the Roberts Male Body FNV mod in MO's left pane and click on the "Filetree" tab.
Navigate to "meshes/characters/_male" and right click on lefthand.nif.
Select [Hide].
Repeat this step for lefthand1st.nif, righthand.nif, and righthand1st.nif, found in the same location.
- Note: If black bars are showing on male bodies in game, try ticking or unticking the BSA for Roberts Males. If that does not work check that no other mod than aMidianBorn Book of Water, ALR - Aptom's Legion Retextured, Ghouls Hires retexture, or Wasteland clothing Hires retexture overwrite Roberts Males.
Robert's Males is the best male body made for Fallout games, if using mods that require Breeze's Males, then they are usually compatible with Robert's too. Too bad he never finished his Skyrim body replacer. If you prefer the nude body then get the respective "Nude" versions when available instead of the "Underwear" versions and also get and install the Roberts Sexy Legion Patch 3_3, and select [Merge], not [Replace].
Uhh... That's Not a Bug
An author's note: The Cazador is based on a real monster known as the Tarantula Hawk. They are huge black spider wasps with orange wings that have the second most painful sting or bite in the world. They usually sting tarantulas and their venom flips over the spider and paralyzes it. Then they lay their eggs in the tarantula's stomach and when the eggs hatch a feast ensues, while the spider is alive. They are the state insect of New Mexico, the state which the author is a former resident and now lives about 10 minutes from. Nightmares, check. Remember that like Australia, everything in the Mojave wants to kill you.
aMidianBorn NV Book Of Water
- Author: CaBaL
- Version: vOmni2
- Installation: Just install The Book of Flesh for now, but download The Book of Steel which will come later.
Cabal is clearly a master of the dark arts. It is the only explanation for the level of quality his work produces.
Feral Ghoul Retexture by Koldorn
- Author: Koldorn
- Version: v1.0
The Ghouls will now look much more like rotting, radiation ridden zombies, and that is a good thing.
Hectrol ED-E Deluxe HR Retex EVOLUTION PACK
- Author: hectrol
- Version: v1.0
- Installation: During the FOMOD installer choose High Res [2048x2048] and Spooky ED-E by archerarcher.
Excellent ED-E retexture and ED-E will now change to a new texture after upgrade from follower quest.
Improved Robots Textures
- Author: Tau34RUS
- Version: v1.0
- Installation: Get the Improved Main Robots Textures, Improved OWB Robot Textures, and Improved LR Robot Textures main files. Follow these instructions:
During install of the Improved Main Robots Textures file, right click "Data" and select "Set data directory".
During install of the Improved OWB Robot Textures file, right click "Data" and select "Set data directory", then click [Merge], not [Replace].
During install of the Improved LR Robot Textures file, right click "Data" and select "Set data directory", then click [Merge], not [Replace].
Beep boop.
Super Mutant Mesh Replacer
- Author: TheNeglected
- Version: v1.3
- Installation: Add the file to the MO download folder to install.
Much better meshes for the Super Mutants. Old link for reference is here.
Securitron Hires retexture
- Author: Macintroll
- Version: v1.0
- Installation: Get the Securitron Hires retexture 2048x2048px optional file.
Who said Securitrons couldn't look old, comical and badass all at once?
The Most Dangerous Game
Clothing Is Not Optional
... or maybe it is? There is no sunscreen in the wasteland though. Why did the neck collars of the Ranger Armor get left out? No one knows, but these will fix that and a bunch of other stuff.
Wasteland clothing Hires retexture
- Author: Macintroll
- Version: v1.3A
- Installation: Install the Wasteland Clothing HD V1-3 FULL PACK main file and the Wasteland Clothing HD V1-3 POWDERGANG FIX -IMPORTANT- optional file. Both files are packaged incorrectly, follow these instructions:
During main file install, expand "wastelandclothing-HD-v1.3", then right click "data" and select "Set data directory", click [OK].
During optional file install, expand "wastelandclothing-HD-Powdergang-FIX", then right click "data" and select "Set data directory", click [OK], then select [Merge], not [Replace].
High res retexture of the clothing from the Mojave.
Faction Armor Usage Enhancement
- Author: Raestloz
- Version: v0.8b
This mod helps the faction armor hide your character if the face is covered, who would have thought?
ADAM Reborn
- Author: MonoAccipiter & darthbdaman
- Version: v4.4.3
- Installation: Grab the ADAM All-in-one Installer 4.4.1 main file and the Defaced Ranger Armor Hotfix updates file. Follow the fomod install for the main file, then install the update file and select [Merge], not [Replace].
WARNING
Template:FOMOD_Instructions is deprecated and should no longer be used on this wiki. Please change this template call to use the better-looking and simpler Template:Fomod. We apologize for the inconvenience.| FOMOD Instructions ADAM Reborn |
Main
Complete Version or Custom Install
Install Alternate Riot Gear Helmet
Do you want to install alternate Riot Gear Helmet?
Next NCR Trooper
Do you want to install NCR Trooper module?
Install |
Original mod page is here. Pretty much the go-to overhaul for the game's most iconic equipment. The linked version includes improvements upon AI99's updated version and a FOMOD installer.
ALR - Aptoms Legion Retextured
- Author: Aptom
- Version: v1.1
Better gear for Legion. Ave, Hail Caesar!
Bornagain Combat Armor
- Author: EmeraldReign and Cabal120
- Version: v1.0
- Installation: Lite Version
Combat armor is big, bulky, and makes soldiers look ridiculous, which is the most accurate representation of combat armor. This will just make it look more big, bulky, and ridiculous.
aMidianBorn NV Book Of Water
- Author: CaBaL
- Version: vOmni2
- Installation: During installation, rename the file "Book of Steel" so it does not end up in the same file as the other Book of Water file.
After installation, double-click the mod and go to the Optional ESPs tab
Move both plugins to the Optional ESPs box
Again, these textures are dark magic, use at your own risk.
Book of Steel - Compatibility Edition
- Author: darthbdaman
- Version: v2.0
Simplifies the installation of the last two mods.
Distributed Necklaces and Chains Neck Seam Concealer (MCM and JIP NVSE) (DLC and TTW Support)
- Author: AcidicMind - Gallahorn - TJ - arkngt - darthbdaman - thaiusmle
- Version: v2.8
- Requirements: NVSE, JIP NVSE Plugin
Getting rid of neck seams with the power of NVSE, this update keeps the more feminine necklaces from popping up on males.
Dragonskin Tactical Outfit
- Author: antistar
- Version: v1.1
- Installation: Install the Dragonskin Tactical Outfit v1_1 main file and the DTO - Project Nevada Support v1_0_1 optional file. This mod has an extra plugin, follow these instructions:
Double click Dragonskin Tacitical Outfit in the left pane of MO and go to the "Optional ESPs" tab.
Move DragonskinNCRPersonnelWearingOutfits.esp and close the window.  Next, double click DTO - Project Nevada
Support in the left pane. Click "Optional ESPs" tab and move  DTOBP-ProjectNevada.esp to the "Optional ESPs"
box.
Great military style armor mod. The outfits can be bought at vendors, but they are expensive to maintain some balance. Also, find them in special locations around New Vegas.
The Legacy of X13 - An Armor Overhaul
- Author: EmeraldReign
- Version: v3.2
- Installation: Get the 3-2 Patch, Dead Money Assassin Suit, and the FULL - Old World Blue main files and the Type 3 Mesh optional file. Follow these instructions:
Install the Dead Money Assassin Suit file.
During install of the FULL - Old World Blue file, right click "Data" and select "Set data directory", the click [Merge], not [Replace].
During install of the 3-2 Patch file, right click "Data" and select "Set data directory", the click [Merge], not [Replace].
During install of the Type 3 Mesh file, right click "Data" and select "Set data directory", the click [Merge], not [Replace].
The stealth suit on steroids is a good thing.
Holster
- Author: Heavensturkey
- Version: v1.0
Gun holsters are these things that hold guns while they are not being shot. Take note Bethesda.
Holster - new mesh for Heavensturkey
- Author: pat
- Version: v1.2a
- Requirements: Holster
- Installation: Install the holster - thigh and cowboy 1_2 and holster unequip kf 1_2a main files. Follow these instructions:
Install the holster - thigh and cowboy 1_2 main file. This will require you to correctly set the data folder in MO's manual install dialog.
For the holster unequip kf 1_2a main file, right click "data" and select "Create directory...".
Name the new folder "meshes". Select this new folder and create a new folder called "characters". Lastly select this new folder and create one named "_male".
This process will result in a nested folder structure like this meshes/characters/_male.
Expand this folder tree so "_male" is visible and drag the 1hpunequip.kf file into this folder. Press [OK].
When asked select [Merge], not [Replace].
Better female mesh for Holster.
NCR Civilian Clothing
- Author: Darziak
- Version: v1.0
Make nice tweaks to the NCR clothing and bring a bit color to the their wardrobe.
NCR Trooper Overhaul_beta
- Author: EmeraldReign, Nekronom, CaBaL, wjs, and dragbody
- Version: vbeta
- Installation: Get the Main File Beta 7_2 main file and Sapper Leg Fix optional file. This mod's plugin is not needed, follow these instructions:
Double click NCR Trooper Overhaul in the left pane of MO and click the Optional ESPs tab.
Move the "NCRTrooperOverhaul.esp" to the Optional ESPs box.
This is much like ADAM except that it covers the NCR troopers and it does not come packaged in such a ridiculous way.
NCR Trooper Overhaul - Distributed
- Author: pwinkle
- Version: v1.0
- Requirements: NCR Trooper Overhaul beta
- Installation: LOOT reports this mod needs to cleaned with FNVEdit:
- TrooperOverhaul-Dragbody.esp
Contains dirty edits: 6 ITM records. Follow instructions for cleaning here.
This mod takes the added trooper models and textures from NCR Trooper Overhaul and distributes them across the wasteland.
Omnis Hi-Res Pip-Boy 3000
- Author: OmniDeath
- Version: v1.0
- Fallout 3 Equivalent: Omnis Hi-Res Pip-Boy 3000 - FIXED
- Installation: This mod is packaged incorrectly, follow these instructions:
During install, expand "omni's hi-res pip-boy 3000 v1.0", then right click "Data" and select "Set data directory" and click [OK].
Make that bling bling look good. Shout out to Brainfever for this one.
Pip-Boy Light Colours
- Author: Sarge198
- Version: v1.4
- Installation: Select the preferred settings during install. Recommendations are as follows:
WARNING
Template:FOMOD_Instructions is deprecated and should no longer be used on this wiki. Please change this template call to use the better-looking and simpler Template:Fomod. We apologize for the inconvenience.| FOMOD Instructions Pip-Boy Light Colours |
Select Radius
Pip-Boy Light Radius
Next Select Magnitude
Pip-Boy Light Magnitude
Next Radius: 1024; Magnitude: 45
Radius: 1024; Magnitude: 45
Install |
Better Pip-Boy light.
Spice of Life - Variety Armor and Clothing
- Author: Nivea
- Version: v1.2
- Requirements: Type3 Body, Roberts Male Body, Project Nevada
- Installation: Get the main file and the NivSpiceofLife-PN Patch 1_2 optional file and install both.
- Note: For users that installed ENB/ENBoost, there is a bug that turns some outfits invisible, follow these instructions:
Open enblocal.ini in a text editor, like Notepad++, and edit the following lines:
[FIX]
FixTransparencyBugs=false
Save and close.
Adds lots of clothes, head pieces, and backpacks. Make the people of the wasteland look a lot more like survivalists, which is what everyone is.
PN_SoL Backpacks Compatibility
- Author: MonoAccipiter and darkside
- Version: v1
- Requirements: Project Nevada, Spice of Life
Adds the PN effects to Spice of Life backbacks. Inspired by DEATHSHOCK's mod found here, which unfortunately had some unresolved issues.
YUP-Spice of Life Patch
- Author: EssArrBee
- Version: v1
- Requirements: Yukichigai Unofficial Patch, Spice of Life
- Instructions: Get the YUP-Spice of Life Patch main file. During installation change the name to "YUP-Spice of Life Patch".
Patch for YUP and Spice of Life to forward a few sound fixes from YUP.
Do You Feel Lucky?
Well, do you punk? America may be dead and gone, but the 2nd Amendment is alive and well in the Mojave, so make sure that rifle is real nice and shiny when you stand your ground.
Weapons of the New Millenia
- Author: Millenia, Naky, MediocrityGoggles, and many others
- Version: v1.1a
- Installation: Get the main file, follow these instruction to install manually since the fomod does not work for Mod Organizer:
In the pop up for manual installation right click "Premade Weapons.of.the.New.Millenia" and select "Set data directory".
Click the arrow next to "Optional Store" and highlight "Sound, meshes, textures" and drag them to "data".
Uncheck "Optional Store, _OPTIONAL, fomod, images, Weapons.of.the.New.Millenia.Cheat.Cabinet.esp, and  Weapons.of.the.New.Millenia.Honest.Hearts.Grunt.Patch.esp".
Click [OK].
- LOOT reports that this mod needs to be cleaned with FNVEdit:
- Weapons.of.the.New.Millenia.esm
Contains dirty edits: 10 ITM records. Follow instructions for cleaning here.
- Note: The store and CaliberX plugins will be provided by CaliberX.
This is a full compilation of the Millenia's weapon mods. The awesomeness of these textures and models are based on real guns and the work is so good it may melt your face off. You've been warned. Dr. Thompson would approve.
CaliberX
- Author: Earache42, Fluidfire, odin_ml, Maintainers Brigand231, WhiskeyRiver2, Roy Batty
- Version: v5.04
- Fallout 3 Equivalent: eXcalibr - ammo eXpansion pack
- Requirements: Weapons of the New Millenia
- Note: Version v5.04 was removed until JIP NVSE Plugin was updated. The 4.017 version is the current version until then.
- Installation: Get the CaliberX v5.04 main file and the WotNM_CaliberX 5.0 Patches optional file.
Install the main file normally, then navigate to your downloads folder and drag the WotNM_CaliberX 5.0 Patches zip-file to MO's downloads tab.
Double click on the dropped file to install. Rename the mod to match the main file and click [Manual].
In the pop up for manual installation, right click "WotNM-CalXVer5.0-Patches" and select "Set data directory".
Untick everything except Weapons.of.the.New.Millenia.Leveled.Lists.esp, Weapons.of.the.New.Millenia.Store.esp and WotNM-CalXVer5-Patch.esp.
Click [OK], then click [Merge], not [Replace].
- Only the following plugins should be in the "Available ESPs" pane:
- Caliber.esm
- Weapons.of.the.New.Millenia.Levelled.Lists.esp
- Weapons.of.the.New.Millenia.Store.esp
- WotNM-CalXver5-Patch.esp
The go-to ammunition overhaul for Fallout: New Vegas.
Retextured FALLOUT Ordnance - RFO
- Author: EmeraldReign
- Version: v0.2
Heavy Weapons face lift, covers most of the larger guns.
Weapon Retexture Project - WRP
- Author: Millenia
- Version: v1.95
- Fallout 3 Equivalent: FO3-WRP - Weapon Retexture Project
- Installation: Install weapon_retexture_project_1dot95 main file, the New 12_7mm SMG update file, and the ChristineCOSRifle optional file. Install the main and update files first and save the ChristineCOSRifle file for later.
There is not a whole lot to say about this mod that has not already been said. Millenia is a gun nut who is also the best texture artist making mods ever. We are just lucky that he was making mods and not scooped up by a studio earlier.
357 Revolver Re-Retextured
- Author: Millenia
- Version: v1.2
- Installation: The plugin for this mod is not necessary, follow these instructions:
Install the mod.
In Mod Organizer's left pane double-click the mod and in the pop-up box select the "Optional ESPs" tab.
Move "357retex.esp" to the "Optional ESPs" box.
This gun is included in the Weapon Retexture Project, but has an issue, so this file will fix that. Shout out to STEP member Janzzze for pointing out the need for this mod even with WRP.
Single Shotgun Re-Retexture
- Author: Millenia
- Version: v1.0
- Installation: The plugin for this mod is not necessary, follow these instructions:
Install the mod.
In Mod Organizer's left pane double-click the mod and in the pop-up box select the "Optional ESPs" tab.
Move "singleshot_retex.esp" to the "Optional ESPs" box.
This another gun that has an issue from Weapon Retexture Project. Shout out to STEP member Janzzze for pointing out the need for this mod even with WRP.
Bozar retexture
- Author: Millenia
- Version: v1.1
- Installation: Get the Bozar_retexture_2k_maps main file.
Bozar is a Fallout 2 weapon that was supposed to be a sniper rifle, but someone messed up and gave it the wrong stats. Obsidian kept that wonderful mistake alive with GRA.
GRA WRP Unofficial Patch V2
- Author: Millenia and micalov
- Version: v2.1
- Requirements: WRP
Continued work on WRP for GRA integration.
EVE - Essential Visual Enhancements
- Author: weijiesen and jonnyeah
- Version: v1.18
- Fallout 3 Equivalent: EVE - Energy Visuals Enhanced
- Installation: Get the EVE v1.18 - Alternate main file and follow these install instructions:
Install the main file and select the "All 5 DLCs" option in the installer.
EVE is just better at energy weapons than anything else. Many great modders contributed to the project and that means it is essential to any mod list.
Weapon Mods Expanded - WMX
- Author: antistar
- Version: v1.1.4
- Installation: Get the Weapon Mods Expanded v1_1_4 main file and WMX - EVE Compatibility v1.0.10, WMX - Weapon Retexture Project compatibility v1.2.4, and WMX-DLC v1_0_2. Follow these install instructions:
Install the Weapon Mods Expanded v1_1_4 file normally.
Install the WMX-DLC v1_0_2 file and during the installer select "WMX-DLCMerged" and "WMX-POPMerged", then click [Next], [Install] and when asked select [Merge], not [Replace].
Install the WMX - EVE Compatibility v1.0.10 file and select "WMX-EVE-AllDLCMerged", click [Install] and when asked select [Merge], not [Replace].
Install the WMX - Weapon Retexture Project compatibility v1.2.4 file and select [Merge], not [Replace].
In the left pane of MO, double click "Weapon Mods Expanded - WMX" and select the "Optional ESPs" tab.
Move the "WMX-POPMerged.esp" to the "Optional ESPs" box.
Adds many new weapon mods for guns and melee weapons.
Project Nevada Patches
- Author: PN Team
- Version: v1.0
- Requirements: Project Nevada, EVE, WMX
- Installation: Get the Project Nevada - EVE Support 1_2 and Project Nevada - WMX Support 1_3 files only. Install each into its own folder.
When installing these mods they will automatically install into a folder named by the first mod, e.g. if Project Nevada - EVE Support 1_2 is installed first then MO will install it as Project Nevada - EVE Support.
The next install will then ask to [Merge, Replace, Rename or Cancel].
If you wish to have two separate mods in MO choose [Rename] and type the desired name in the field presented.
These patches will make Project Nevada compatible with EVE and WMX. Praise be.
Mojave Patch Outpost - YUP-WMX-PN-PNEO Patch
- Author: EssArrBee
- Version: v2.0
- Installation: Get the YUP-WMX-PN-PNEO Patch main file. During install rename the file to "YUP-WMX-PN-PNEO Patch" since there are multiple patches from this page used in the guide.
Combines all your favorites. ;)
Half Hansified Holorifle
- Author: MadCat221
- Version: v1
- Requirements: WRP, WMX
- Installation: Install the Half Hansified Holorifle WMX DLC file only.
Add one more gun with Millenia textures to the game, with bonus WMX compatibility.
LAER Retexture
- Author: The Riff
- Version: v1.1
- Installation: This mod is not packaged correctly, follow these instructions:
During install, right click "data" and select "Set data directory", untick "before.png" and "after.png", then click [OK].
Only one gun, but proper energy weapon retextures are few and far between. At least the LAER is done correctly.
HD One Hand Melee by Insanity Sorrow
- Author: InsanitySorrow and 2cooldays
- Version: v1.0
- Installation: Install the One Hand Melee HD main file and the Gun Runner Box HD optional file.
One-Handed melee weapons get a face lift from one of the best.
Fire Axe - Retextured
- Author: d_seven
- Version: v2
- Installation: Install Fire Axe and Knock Knock retextures.
Give the chop in style.
Fallout 3 Weapon Enhancement Pack
- Author: ChristopherWallace & Madcat221
- Version: v1.0
- Installation: Get the Weapon Enhancement Pack main file only. This is a Fallout 3 mod, so MO will not be able to download the file. Follow these instructions:
In Windows Explorer, navigate to the archive.
Drag the archive over to the downloads tab of MO and drop it. MO will copy the file over.
Install the file.
This will improve upon the Fallout 3 weapons added by Project Nevada.
WRP Christine's COS Rifle Replacer
- Author: Millenia
- Version: v1.0
- Installation: Install the ChristineCOSRifle file downloaded earlier as a separate file and follow these instructions:
Right click the "WRP Christine's COS Rifle Replacer" file in MO's left panel and select "Open in explorer".
In the explorer window navigate to "textures/weapons/2handrifle" and duplicate the christinecos.dds file until there are four in total.
Rename the four files to 1stpersonsniperriflecarbonurban.dds, 1stpersonsniperrifleurban.dds, sniperriflecarbonurban.dds, sniperrifleurban.dds respectively.
Keep the explorer window open.
Open MO again and right click on the Fallout 3 Weapon Enhancement Pack file and select "Open in explorer"
In the explorer window navigate to "textures/Weapons/2HandAutomatic/"
Find and copy the 1stPersonG3AssaultRifleClip.dds and G3AssaultRifleClip.dds
Paste the two files into the other explorer window
Rename 1stPersonG3AssaultRifleClip.dds to 1stpersonsniperrifleurbanextmag.dds and G3AssaultRifleClip.dds to sniperrifleurbanextmag.dds, overwriting any existing textures.
Close the explorer windows.
This workaround allows Millenia's textures to work with WMX.
Additional Weapons
This optional section will link to a separate pages with instructions to install mods with only one or a few weapons. It will also include merging instructions for those mods to save plugin slots. Any user can make a page with weapons and have it linked in this section, just create the page and let EssArrBee know about it. The idea is to make this small section a place where users can choose one or two sets of additional weapons to add into their game. It is also a good way to teach users to build their pack and merge them together for others to use.
Millenia's Additional Weapons - Weapons from Millenia, not included in Weapons of the New Millenia.
EssArrBee's Recommended Weapons - WIP page for some extra weapons EssArrBee recommends, expect this page to add a few weapons over the next couple of weeks.
Packrat Mentality
Let's be honest, there is a ton of ugly, rundown crap in the wasteland. This section will help that crap look as good as possible.
Audleys Misc Textures
- Author: audley
- Version: v1.1b
- Installation: Get the Audleys Misc Textures - Fear and Loathing optional file.
Eggs for protein, smokes to look cool, and shovels to bury the bodies.
Hectrol Lockinterface Deluxe HighRes Retex
- Author: hectrol
- Version: v1.0
- Fallout 3 Equivalent: Hectrol Lockinterface Deluxe HighRes Retex
- Installation: 1024
Wouldn't shooting locks be more fun? Oh well, this will help it look good.
Hectrol Vegas Sewer Deluxe HighRes Retex
- Author: hectrol
- Version: v1.0
- Installation: 1024
In the future the whole world will be a sewer, so do not forget where the Ninja Turtles live.
HI-RES Chems and Health Re-Texture
- Author: clintmich
- Version: v1.2
"We had two bags of grass, seventy-five pellets of mescaline, five sheets of high-powered blotter acid, a saltshaker half-full of cocaine, and a whole galaxy of multi-colored uppers, downers, screamers, laughers... Also, a quart of tequila, a quart of rum, a case of beer, a pint of raw ether, and two dozen amyls. Not that we needed all that for the trip, but once you get locked into a serious drug collection, the tendency is to push it as far as you can." - Raoul Duke
Magazine Redux
- Author: razzy1319
- Version: v1.1
- Installation: Get the MagRedux 1024x1024 main file and the MagRedux QuickFix file, and when installing the optional file, click [Merge], not [Replace].
If magazines gave bonuses in real life then I'd be King of the World.
Minimod - High Resolution Newspapers
- Author: Tagaziel and LadySinestro
- Version: v1.5
- Installation: This mod is not packaged correctly, follow these instructions:
During install, right click "data" and select "Set data directory", then click [OK].
You can almost see the industry dying in these retextures.
Money Higher Quality Retex 1_2
- Author: Lord Inquisitor
- Version: v1.2
Caps are really hard to see, but this makes them stand out.
OJO BUENO NUKA-COLA MACHINE
- Author: tapioks and weijiesen
- Verison: v6a
- Installation: Get the Ojo Bueno Nuka-Cola Machine 2K Lite main file.
- Note: This mod can potentially cause a drop in framerate. It is suggested that you test this by going to a Nuka-Cola machine and monitoring your FPS when facing the machine. A good place for this test is in Goodsprings. After leaving Doc Mitchell's house turn left and face the gas station. If you get a noticeable drop in framerate, it may be best to use this mod only for texture replacer. To do this, re-installing the mod by select [Manual] and tick only textures folder.
Yep, Nuka-Cola is that important.
Pre-War Money Retexture
- Author: RedRoomService
- Version: v1.2
- Fallout 3 Equivalent: Pre-War Money Retexture - RRS
- Installation: Choose "$5 Light Distress" during the installer.
Money will survive the apocalypse and this mod will make sure it does it in style.
Teddy Bear Retextures
- Author: MisterGibson
- Version: v1.0
- Installation: This mod is not packaged correctly, follow these instructions:
Expand the teddy bear retexture of choice, "Pink Bear" is recommended.
Right click on the preferred resolution, 1024 is recommended, and select Set data directory, then click [OK].
Why the pink bear? Because Breaking Bad, Dammit!!!
Tweaked Cashregister
- Author: Lord Inquisitor
- Version: v1.0
Urban Food Re-Tex
- Author: clintmich
- Version: v1.0
Ever wonder what food that can last over 200 years looks like? This mod has the answer.
Cherry Bomb HD retexture and remodel
- Author: legandalfo & Jokerine
- Version: Not specified
- Installation: Download the "Round mesh for cherry bomb" optional file and the "512x512 textures", install in that order.
When installing the "512x512 textures" right click the preferred retexture (default is recommended) and select Set data directory, then click [OK].
If the BAIN installer is used simply select the Default option.
Poosh
Not sure you're gonna make it, but that sure is a pretty shade of red. Make sure that some of the special effects look special with this section.
Enhanced Blood Textures for NV v2_22c
- Author: dDefinder
- Version: v2.22c
- Fallout 3 Equivalent: Enhanced Blood Textures v2_22b
- Installation: Download the Enhanced Blood Texture main file, as well as the Alternate Textures and Low Res Textures optional files. Follow these instructions:
Install the main file first.
Install "Low Res textures" file, in its own folder or into the Enhanced Blood Textures, but make sure to use [Merge], not [Replace].
Open downloads folder in windows explorer to find Alternate Textures-34917.rar and extract Alt Blur Screen Blood.zip and Alt v2.0 Blood splatter.rar to download folder.
Go back to MO and install Alt Screen Blood Blur and Alt v2.0 Blood splatter, in their own folders or into Enhanced Blood Textures, but make sure to use [Merge], not [Replace].
Probably the only blood mod for New Vegas that matters.
Better Gas Leak Effect
- Author: KiCHo666
- Version: v1.1
This is not just for gas leaks, it will also make the exhaust coming out of the Mr. Handy's glorious.
Better Posture
- Author: JW1
- Version: v1.0
- Fallout 3 Equivalent: Better Posture
- Installation: This mod is packaged incorrectly, follow these instructions:
During install, right click "Data" and select "Set data directory", then click [OK].
Stand up straight soldier!
Hectrol Binocular Scope Deluxe HighRes Retex
- Author: hectrol
- Version: v1.0
- Installation: Get the Hectrol Binocular Scope Deluxe 1024 Retex optional file. This mod is packaged incorrectly, follow these instructions:
During install, expand "Hectrol_Binocular_Scope_Deluxe_HighRes_Retex", right click "Military Version" and select "Set data directory", then click [OK].
Looking through binocular scope will look so much better.
Ragdolls
- Author: KiCHo666
- Version: v3.02
- Requirements: NVSE, MCM
- Fallout 3 Equivalent: Ragdoll Overhaul FO3 Edition
This mod overhauls almost all ragdolls in the game, as well as adding headtracking to a lot of creatures that lacked it.
Tops Casino Neon Restored
- Author: SuBNeRoCL
- Version: v1
Restores some cut neon lights for the coolest cats on the whole Strip.
New Vegas - Enhanced Camera
- Author: LogicDragon
- Version: v1.4b
- Requirements: NVSE
We should have bodies in every first person game by now.
Weapon Animation Replacers
- Author: joefoxx082
- Version: vWAR2.0
- Installation: Choose the recommended options:
WARNING
Template:FOMOD_Instructions is deprecated and should no longer be used on this wiki. Please change this template call to use the better-looking and simpler Template:Fomod. We apologize for the inconvenience.| FOMOD Instructions Weapon Animation Replacers |
|
Aimed Pistol
Assault Rifles 1st Person
Assault Rifles 3rd Person
Rifles 1st Person
Rifles 3rd Person
Pistols 1st Person
Pistols 3rd Person
Stance
|
- Note: With Enhanced Camera the 1st Person Animations do not matter, so no choices have to made. They are simply recommended here for anyone that does not use Enhanced Camera.
Nexus site mod page is here. Shout out to Will for the combined installer version.
This mod will fix many of the weird looking animations that the vanilla game has with weapon animations. It is also what the Millenia weapon mods are designed to work with.
WAR-Enhanced Camera compatibility pack
- Author: 11meister, Joefoxx082
- Version: v2.0
- Requirements: New Vegas - Enhanced Camera, WAR
- Installation: Get both main files, follow these instructions:
Install the Release 2 - 2hand Rifle Reanimations file first.
During installation, expand "Release 2 - 2handrifle animations->Raw Files".
Right click "Data" and select "Set data directory", then click [OK].
Install the Release 3 - 2hand auto reanimations - v2 with animated fingers file next.
During installation, expanded "Release 3 - 2handauto update v2.0->2handauto v2.0->Data".
Right click "Data" and select "Create Directory", then name it NVSE.
Right click "NVSE" and select "Create Directory", then name it Plugins.
Drag and drop "NVSE_EnhancedCamera.ini" into "Plugins".
Right click "Data" and select "Set data directory", then click [OK].
When asked select [Merge], not [Replace].
- This mod has some INI settings that all users should be aware of. Double click the mod in the left pane of MO and go the INI-Files tab.
- This setting is for head bobbing while running. It is on by default, but recommended to be turned off.
; Enables the head bob when in first person
; Note: This overrides the camera position and may not be as compatible with some animations
bEnableHeadBob=     <----- Set to 1 to turn on, set to 0 to turn off.
- First person shadow is cast by the player. This is off by default and may cause performance issues, but it is recommended to turn it on. If there are performance issues just turn it off.
; Enables shadows on the player when in first person
bFirstPersonShadows=     <----- Set to 1 to turn on, set to 0 to turn off.
weijiesen's HD Fog
- Author: weijiesen
- Version: v1.0
EXE - Effect teXtures Enhanced
- Author: weijiesen
- Version: v1.0
The VFX-god has overhauled every last visual effect texture in the game. We better start writing some fire sermons now.
In the Wasteland No One Can Hear You Scream
Oh wait... that's space. Anyways, there are some annoying sounds in the wasteland, but this section will help with that.
Ambient Wasteland 2
- Author: Leviathan1753
- Version: v1.1
- Fallout 3 Equivalent: Ambient Wastleand 2
- Note: The WAV version is the best solution for Audiophiles, sorry no FLAC. The OGG version is the best solution for everyone else. Be warned that the WAV files will take up significant amounts of RAM and VRAM due to their size.
Adds many new ambient sounds to the wasteland.
CONELRAD 640-1240 - Civil Defense Radio
- Author: Macabre Productions
- Version: v1.4
- Fallout 3 Equivalent: CONELRAD 640-1240 - Civil Defense Radio
- Installation: This mod is packaged incorrectly, follow these instructions:
During install, right click "Data" and select "Set data directory", then click [OK].
"What kind of rat bastard psychotic would play that song right now, at this moment?" - Raoul Duke. Great selection of songs that fit right in with the Fallout theme.
Improved Sound FX v0821
- Author: dDefinder
- Version: v0.821
- Fallout 3 Equivalent: Improved Sound FX v1_3
- Requirements: Project Nevada
- Installation: Get the main file and the PN esp optional file. Follow these instructions:
For the Improved Sound FX v0821 tick both "DLC esps" and "Data".
Install the PN esp file into the Improved Sound FX mod and select [Merge] when asked.
In the left pane of MO, right click Improved Sound FX and select "Information".
Under the Optional ESPs tab, move all plugins EXCEPT "Improved Sound FX.esp" and "Improved Sound FX - Project Nevada.esp" to Optional ESPs.
A rebalance of just about every in game sound. Even makes some of the more annoying sounds, i.e. Cazador poison, less so.
Improved Sound FX - WMX Patch
- Author: dDefinder1 and EssArrBee
- Version: v1.1
- Requirements: Improved Sounds, WMX
Updated version of the Improved Sound FX patch for WMX to work with the WMX-MergedDLCs.esp.
Immersive Pickup Sounds FalloutNV Edition
- Author: TheKetzku and pintocat
- Version: v1.0
- Installation: Get the Immersive Pickup Sounds - Compatibility Version main file.
Adds pick-up sounds determined by item type to lots of different items.
Mojave Music Radio - Extended
- Author: ZeroDiamond
- Version: v1.0
- Installation: Get the MMRE ESPs main file and the music packs required for the plugin of your choosing. Follow these instructions:
The pack includes plugins for 20, 40, 60, 80, 100 songs. The vanilla radio has 15 songs.
Choose the plugin you want and untick all the others when installing. MojaveExtended60.esp is recommended.
Adds lots of new thematically appropriate songs to the Mojave Music Radio.
Gameplay
Yukichigai Gameplay Tweaks
Yuki is a ridiculous modder. He has well over a hundred mods for FalloutNV and FO3 as well as the excellent YUP mod, which is the unofficial patch used in this guide. Many of the mods here are nice gameplay tweaks that fit in the 'Should of been in the vanilla game' category. The entire section has grown so large now that it has been spun off to its own page.
Even though it is on its own page now, this section is required unlike the Additional Weapons Section which is optional.
Machienzo Gameplay Tweaks
Primm is supposed to have a reputation like Goodsprings and Novac... Wha??? Ulysses is supposed to react to the player's faction allegiance... Pssshhh!!! Machienzo has made some mods that are in the category of "This is how the game should have been". This section will add a few of those mods.
Lonesome Road True Faction Allegiance
- Author: Machienzo
- Version: v1.1.2
Lonesome Road barely makes sense as it is, but at least now the faction allegiance will not be screwed up.
Primm Reputation Restored
- Author: Machienzo
- Version: v1.1
Primm will now have a reputation for associated with the choices the player makes surrounding the town.
Refined Casino People and Suits - Grimy_Dirty_Fixes
- Author: Machienzo
- Version: v1.3
- Installation: Install the main file only.
Fixes some of the clothing the Families and casino goers wear. Also, the faces of the dealers will be different instead of just a bunch of clones.
Machienzo Merged Mods
- Open Merge Plugins Standalone through MO and click [OK].
- TICK "Copy general assets" in the Settings->Integration tab.
- Hold
ctrland click every plugin listed below:NOTE:If the plugins are contiguous holdshiftand click the first then the last.- NVDLC04 Allegiance w Duster.esp
- Primm Reputation Restored.esp
- RefinedCasinoPeople&Suits.esp
- Right click one of the highlighted plugins and goto "Add to merge", then select "<New Merge>".
- In the popup, type the name of the merge and the plugin, then click [OK]. Machienzo Merged Mods is recommended for both.
- Open the Merges tab and right click "Machienzo Merged Mods" and goto "Plugins", then select "Check plugins for errors".
- Right click "Machienzo Merged Mods" again and select "Build Merge".
- When complete click [Close], to close Merge Plugins Standalone.
- The mod now resides in the Machienzo Merged Mods folder.
- It may not show in MO's left panel, so click the small tool icon dropdown above the left panel and select "Refresh".
- Move the folder right below Refined Casino People and Suits - Grimy_Dirty_Fixes and make sure it is ticked.
- Untick all the mods that were merged from the list above.
- Bash tags need to be added for the plugin. It is a good idea to do it now by starting FNVEdit and following these instructions:
- From the list of plugins double click "Machienzo Merged Mods.esp"
- When FNVEdit loads, right click "Machienzo Merged Mods.esp" and select "Apply Script"
- Choose "Generate Bash Tags" from the dropdown and click [OK]
- When asked to add the tags to the header, select [Yes]
- Tags that should be added:
- Graphics
- Invent
- NpcFaces
- Scripts
- Tags that should be added:
- Close and save "Machienzo Merged Mods.esp".
Machienzo Merged Mods
- Author: Machienzo (99%) and You (1%)
- Version: v2
- Changelog: This tiny changelog is provided for users that may have already done an older version of this section.
- v1: Initial version.
- v2: Ported instructions to Merge Plugin Standalone.
Additional Gameplay
Gun Runners Actually Run Guns
- Author: Ripple
- Version: v1.8
This adds a caravan of Gun Runners that actually, you know, run guns. Who would'a thought, right? The Gun Runners HQ has been beefed up with more security and living areas.
More Perks
- Author: Kyung-Bum Lee aka dree74
- Version: v2.4.6
- Fallout 3 Equivalent: More Perks
- Installation: Get the three main files and the three DLC optional files. Follow these instructions:
Install More Perks 2_4_6, More Perks for Dead Money DLC 1_0_9, More Perks for Honest Hearts DLC 1_0_9, and More Perks for Old World Blues DLC 1_0_5,  and make sure each mod goes into "More Perks", select [Merge], not [Replace].
In Mod Organizer's left pane double-click the mod and in the pop-up box select the Optional ESPs tab.
Move all the plugins into the Optional ESPs box then select the Filetree tab.
Expand Sound->Voice->More Perks for Honest Hearts.esm and move the three folders into sound->voice->More Perks.esm and then delete More Perks for Honest Hearts.esm folder.
Install More Perks for Companions 1_0_6 into More Perks for Companions.
In Mod Organizer's left pane double-click the mod and in the pop-up box select the Optional ESPs tab.
Move all the plugins into the Optional ESPs box then select the Filetree tab.
Expand Sound->Voice->More Perks For Companions.esm and rename it to More Perks.esm.
Install More Traits 1_1_5 into More Traits.
In Mod Organizer's left pane double-click the mod and in the pop-up box select the Optional ESPs tab.
Move all the plugins into the Optional ESPs box then select the Filetree tab.
Expand Sound->Voice->More Traits.esm and rename it to More Perks.esm.
- Note: There should be no plugins left from this mod after following the above directions. The following mod will install a merged ESM for this mod. It is called More Perks Merged, but the file is from the NVEC page.
This excellent mod will give many new perks and traits to players that are every bit as good or better than the vanilla perks and traits.
More Perks Merged
- Author: Tommy, Freddy, luthienanarion, HunterZ, timeburn, and Waldo67
- Version: v4
- Installation: This is from the NVEC page, so ignore everything on this page except the More Perks Merged V4 in the optional section. In Fomod install: pick "DLC".
Merged version of More Perks from above. Reduces load order immensely.
Roleplayers Alternative Start Fallout New Vegas
- Author: Gribbleshnibit8, pintocat, and scaredwolf
- Version: v1.5
- Requirements: NVSE
Roleplaying options and start somewhere other than Goodsprings.
One Last Merge
By now it should be pretty clear that many mods in this guide end up merged together. Welcome to modding Fallout New Vegas and the plugin limit of 140.
Ammo Ingredients as Loot
- Author: Moogiefluff
- Version: v1.0
Reduce the chance to find ammo in the Project Nevada Rebalance menu and this mod will make it so that ammo crafting is a bigger part of the game. And who doesn't like crafting? Shout out to rootsrat for the suggestion.
Armour Repair Kits
- Author: Antistar
- Version: v1.0.2
- Requirements: NVSE
Allows player to repair armor just like weapons. Fixes up the equipped piece of armor with the lowest condition.
A Few More Map Markers
- Author: NeilUK02
- Version: v2.0
- Installation: LOOT reports that this mod needs to be cleaned with FNVEdit, follow instructions for the version being used:
- mapmarkers.esp
Contains dirty edits: 4 ITM records. Follow instructions for cleaning here.
Adds map markers to The Strip and Freeside. No more three load doors to get to Vault 21 or the NCR Embassy.
Burning Campfire
- Author: Sagittarius22 & MonoAccipiter
- Version: v3.1
This will light up the fire when using campingfires to cook. This updated version was made compatible with Honest Hearts by MonoAccipiter.
Casino Exchange All
- Author: pintocat
- Version: v1.5
- Installation: Get the Fomod installer version. Choose the Pre-War Money option during install.
Better option for exchanging money for chips at the casinos.
Couriers Stash Integration
- Author: The-Silenced
- Version: v1.3
- Requirements: NVSE
- Installation: Get the Integration - Couriers Stash - Vanilla main file and then get the WMX compatible plugin here.
Install the Integration - Couriers Stash - Vanilla file.
Install the Couriers Stash Integration - WMX file and rename it to "Courier Stash Integration", select [Merge], not [Replace].
In MO's left pane, double click "Couriers Stash Integration" and select the "Optional ESPs" tab.
Move the "Integretion - Couriers Stash.esp" to the "Optional ESPs" box.
This will distribute the pre-order packs gear throughout the game instead letting the player start with them. Shout out to rootsrat for the suggestion.
Delay DLC - TTW
- Author: Gribbleshnibit8
- Version: v2.0
- Installation: Install Delay DLC Combined.
The first main file is for TTW, so be careful.
Extended Dialogue-Vulpes Inculta
- Author: Scorpial
- Version: v1.2
Adds a bit more to one of the Legion's finest.
Gas Pumps of New Vegas
- Author: EdibleGrenade12, Thaiauxn, darkside & MonoAccipiter
- Version: v1.5
- Installation: Get the main file and the Gas Pumps of NV Update 1.5 optional file.
Install the main file first.
Install "Gas Pumps of NV Update 1.5" and click [Merge], not [Replace].
Adds gas (coolant) pumps to the various pit-stops around the Mojave.
Improved Casinos
- Author: Mr Excitement
- Version: v1.01
- Installation: There are three versions of the mod, 2X, 3X, and 4X. Choose which ever is preferred, 2X is recommended, and then follow these instructions:
After installing the mod, in the left pane of MO, right-click the mod and select "Information".
Select the Optional ESPs tab and move the other two plugins that will NOT be used to the Optional ESPs box.
Higher stakes gaming and the ability to win more money before getting banned. Works well if the merchant difficulty is increased with Project Nevada.
Nipton Fires Extinguished
- Author: qwerty
- Version: v1.0
Those fire should burn themselves out eventually right?
Populated Casinos
- Author: xMrAx
- Version: v0.96
- Installation: Install the main. There is a medium and low version for low end systems.
- LOOT reports that this mod needs to be cleaned with FNVEdit, follow instructions for the version being used:
- populatedcasino.esp
Contains dirty edits: 2 UDR 48 ITM records. Follow instructions for cleaning here.
- populatedcasino-medium.esp
Contains dirty edits: 8 UDR 47 ITM records. Follow instructions for cleaning here.
- populatedcasino-light.esp
Contains dirty edits: 16 UDR 46 ITM records. Follow instructions for cleaning here.
Reintroduce some life to The Strip by adding in a bunch of gamblers and patrons to the casinos.
Portable Campsite
- Author: Antistar
- Version: v1.0.2
Sleep anywhere. Eat anywhere. Its the 'Merican way.
Tales from the Burning Sands - Project Nevada Patch
- Author: ddraig
- Version: v1.1b
- Requirements: NVSE, Project Nevada, Tales from the Burning Sands
- Installation: This mod is packaged incorrectly, follow these instructions:
During install, right click "Data" and select "Set data directory", then click [OK].
Patch the Tales from the Burning Sands ingestibles to work like the ones from Project Nevada.
Tutorial Killer
- Author: pintocat
- Version: v1.3
You do not need a tutorial to play this game. Kill it with this gem.
You take a sip from your trusty Vault 13 canteen
- Author: Just Another
- Version: v1.0
Even in the wasteland you can't escape pop-ups. Better use this blocker.
Merging Gameplay Mods
Most of these smaller gameplay mods only affect one aspect of the game so merging them into one plugin is a good way to reduce the amount of plugins without causing any conflicts.
- Open Merge Plugins Standalone through MO and click [OK].
- TICK "Copy general assets" in the Settings->Integration tab.
- Hold
ctrland click every plugin listed below:NOTE:If the plugins are contiguous holdshiftand click the first then the last.- ammoingredientsloot.esp
- ArmourRepairKits.esp
- mapmarkers.esp
- Burning CampFire.esp
- Casino Exchange All.esp
- Integration - Couriers Stash+WMX.esp
- Delay DLC - DM + HH + OWB + LR +GRA.esp
- ExtendedDialogueVulpes.esp
- GasPumpsOfNV.esp
- Improved Casinos 2X.esp
- Nipton Fires Extinguished.esp
- populatedcasino.esp - May also be populatedcasino-medium.esp or populatedcasino-light.esp
- PortableCampsite.esp
- Tales PN.esp
- Tutorial Killer.esp
- You take a sip from your trusty Vault 13 canteen.esp
- Right click one of the highlighted plugins and goto "Add to merge", then select "<New Merge>".
- In the popup, type the name of the merge and the plugin, then click [OK]. Gameplay Mods Merged is recommended for both.
- Open the Merges tab and right click "Gameplay Mods Merged" and goto "Plugins", then select "Check plugins for errors".
- Right click "Gameplay Mods Merged" again and select "Build Merge".
- When complete click [Close], then close Merge Plugins Standalone.
- The mod now resides in the Gameplay Mods Merged folder.
- It may not show in MO's left panel, so right click the right pane and go to "All Mods", then select "Refresh".
- Move the folder right below You take a sip from your trusty Vault 13 canteen and make sure it is ticked.
- Untick the all the mods from the list above.
- Start FNVEdit, the double click "Gameplay Mods Merged.esp".
- Right click "Gameplay Mods Merged.esp" and select "Apply Script"
- Choose "Generate Bash Tags" from the dropdown and click [OK]
- When asked to add the tags to the header, select [Yes]
- Close and ONLY save "Gameplay Mods Merged.esp".
Gameplay Mods Merged
- Author: Mod Authors (99%) and you (1%)
- Version: v1
- Changelog: This tiny changelog is provided for users that may have already done an older version of this section.
- v1: Initial version.
- v2: Added Gas Pumps of New Vegas.
Running FNVLODGen
The level of detail in Fallout New Vegas is extremely lacking. There are a number of reasons for this, but at least there is FNVLODGen to add more objects to the distance. Even though there are trees in FNV, there is no tree LOD for the game so all trees are treated as object LOD. This is different from the other Bethesda titles where LODGen is used. Over time there should better LOD created for FalloutNV now that a tool exists for easy LOD generation.
Make sure that FNVLODGen is installed, instructions were in the Utilities section here and to setup it up for MO here. Additionally, you will need to download and install the FNVLODGen Resources main file from the FNVLODGen Nexus page. Install this archive like normal in MO, and after installing move the FNVLODGen Resources mod just above the JIP NVSE Plugin mod in the left window of MO.
LOD additions and improvements
- Author: tomzik
- Version: v1.06
- Requirements: FNVLODGen
- Installation: Get the LODadditions main file and the LODadditions-NVInterriors optional file. Follow these instructions:
Double-click the mod in the left panel of MO, then select the Filetree. Expandtextures->clutterand the right clickbillboard01blod.ddsand select "Hide". Repeat forbillboard01blod_n.dds.
- This mod has a wild edit that needs to be correct or weather mods may have errors.
Open FNVEdit and right click the list of plugins, then select "Select None". Tick tmzLODadditions.esp and tmzLODadditions-NVInterriors.esp, hold [shift] then click [OK]. ExpandFallout.esm->Worldspaceand select000DA726. For the line,INAM - Image SpacedragNVDefaultExterior [IMGS:0008809D]to both columns for tmzLODadditions.esp and tmzLODadditions-NVInterriors.esp. Save and close.
This is an extension for LOD files for LODGen. It does nothing when the original LODGen files aren't enabled.
LOD Resources for Vurts WFO - Fertile Edition v2.9a
- Author: Skibadaa
- Version: v1.1
- Requirements: Vurt's WFO Fertile Version, FNVLODGen
- Note: Do not use with the Dead Version of WFO.
This mod is only for use in conjunction with FNVLODGen. It should not be used without LODGen files being enabled.
FNVLODGen Instructions
Before starting, make sure that both FNVLODGen Resources and LOD additions and improvements are unticked in the left pane of MO. Run LOOT and sort the load order. Activate FNVLODGen Resources and LOD additions and improvements in the left pane of MO. In MO, go to the archives tab and make sure "Have MO manage archives" is Unchecked. Launch FNVLODGen through MO. After a moment of processing a window will popup. On the left pane, select the worldspace(s) to generate LOD. Right click and choose "Select all" to do all worldspaces (recommended). On the right side, make sure both Objects LOD and Tree LOD are checked. Click [Generate]. Once FNVLODGen has finished, a message "LOD Generator: finished (you can close this application now)" will show. Close the program. Go to the location which that was selected when setting it up (C:/FNVLODGenOutput was suggested). Create an archive of the contents of this folder (should be meshes and textures) In MO, select the install archive button
Texture Optimization
Fallout New Vegas can benefit greatly from optimization of both vanilla and mod textures. Mod textures can be even more important for users with low and mid range systems or even users with high end systems that do not have a lot of VRAM available. Texture optimization for FalloutNV will be provided on separate pages, but it is highly recommended that the procedure is completed to ensure maximum performance and stability.
The texture optimization process is still quite new for FNV, so there may be some bad textures here and there when the game is started. Just snap a screenshot and report it in the DDSopt thread or the F&L thread. This will make the process better since the offending textures can be added to the ddsopt.ini for exclusion.
First, follow the Fallout Quickstart Guide on the DDSopt Guide, provided by STEP user Kelmych, for vanilla texture optimization. There are still many vanilla textures not overwritten by mods in F&L, so optimization can help performance by correcting mip levels and saving textures in correct formats. Be sure to get the correct batch files for FalloutNV and not the Skyrim batch files. FalloutNV batch files are v2.76 and Skyrim are v2.75. Also, make sure to get the latest ddsopt.ini which is universal for all games.
Second, follow the instructions for the F&L Texture Optimization. This will provide the process for optimizing a set of mods for performance reasons. This can significantly increase FPS in areas that need it the most, such the Strip, Freeside, and Novac. Exterior textures from Poco Bueno and NMCs Texture Pack can be 2048x2048 resolution and severely impact performance in outdoor locations. This is not such a problem indoors, so the DDSopt batch files can separate out the exterior color maps and normal maps into separate folders where they can be reduced in size to 1024x1024 resolution for systems that need to increase performance.
"The possibility...
...of physical and mental collapse is now very real. No sympathy for the Devil, keep that in mind. Buy the ticket, take the ride." - Raoul Duke. By now fatigue to modding this wacky game is probably setting in, but the end is very near. Just a few post installation errands before killing raiders, running way around Cazadors, and emptying the caps of caravans will be all that awaits.
Post Installation Checklist
- Generate Bash Tags
- Run LOOT
- Create Bashed Patch
Generate Bash Tags
The purpose of this process is to analyze plugins and recognize the correct bash tags to apply to them. This is a tedious process that involves running a script on all non-vanilla plugins that have been installed, but it is necessary in order to allow a vital patch called a bashed patch to properly combine records from all installed plugins that can benefit from being in that patch.
- Open FNVEdit through MO.
- Right click the list of mods and choose "Select None".
- Scroll down past FalloutNV.esm, DeadMoney.esm, HonestHearts.esm, OldWorldBlues.esm, LonesomeRoad.esm, GunRunnersArsenal.esm, ClassicPack.esm, MercenaryPack.esm, TribalPack.esm, and CaravanPack.esm (skip the vanilla files) and find the first non-vanilla plugin in the list; it will likely be YUP - Base Game + All DLC.esm.
- Tick that plugin (and that plugin only), then hold
shiftand click [OK]. - After FNVEdit loads, right click on the previously ticked plugin from the list on the left and select "Apply Script".
- From the top dropdown select Generate Bash Tags and click [OK].
- Click [Yes] in the popup.
- After the script is completed, you will see a [Apply Script done] message at the bottom of the right window panel.
- Close FNVEdit and save the plugin.
- Now repeat steps 7-12 on the next plugin in the list.
- Repeat the previous step until you have run the script on all the rest of the plugins in your list (shortcuts will not work - only process one plugin at a time), but don't run the script on your bashed patch if you already have one created.
Remember that this process will need to be redone on any plugin reinstalled in MO. The current version of the script can recognize all known bash tags but one: Deflst. Currently, there is only one plugin in this guide that contains that bash tag and it will have to be treated as a special circumstance; that plugin is 1nivVSLArmors.esp. The script would have determined that Deflst was a bad tag in 1nivVSLArmors.esp and improperly removed it. Follow these steps to manually correct the tags for this plugin:
- Open Wrye Flash NV though MO.
- Select "1nivVSLArmors.esp" and then right click the Bash Tags box in the bottom right and add each these tags:
- Actors.Stats
- Deflst
- Graphics
- Invent
- Names
- Relev
- Stats
- Close Wrye Flash NV.
Run LOOT
Open LOOT through Mod Organizer and sort the mod list. Click [Apply] when the list of mods is presented. Close LOOT.
Create a Bashed Patch
The Bashed Patch is almost as versatile for New Vegas as it is for Oblivion. This means that many more options exist to merge things to the Bashed Patch.
- Go to "...Fallout New Vegas/Mopy/Templates" and create an archive containing the "Bashed Patch, 0.esp". Then drop it into the Downloads tab of MO.
- Install it like any other Mod and use the name <Profile Name> Bashed Patch.
- In the left pane of MO, make sure it is ticked and located just above Overwrite.
- After you completed these steps, a new Bashed Patch can be generated again and again without having to repeat this process. Wrye Flash will just overwrite this "Bashed Patch, 0.esp" from now on.
- Also UN-tick Unofficial Patch Plus. Otherwise your bashed patch build will fail.
- Run Wrye Flash NV through Mod Organizer.
- When started right click "Bashed Patch,0.esp" and select Rebuild Patch.
- If there is a pop-up saying that certain mods will be disable because they are mergeable, click [Yes]. If not disregard.
- Go through the left side and click each tag one at a time and stop after Import Weapon Modifications, before Global.
- If there are any plugins listed on the right side, tick the highlighted tab on the left side and tick all the plugins on the right side. (image on right)
- For Import Names, leave FalloutNV.esm unticked.
- Tick Tweak Settings, Content Checker, FormID Lists, Leveled Lists, and Race Records.
- For Tweak Settings, tick Cost Multiplier: Repair and then right click and select '1.5', then tick Terminal Speed Adjustment and then right click and set to 'x 6'.
- For Race Record tick all the plugins on the right side.
- If there are any plugins listed on the right side, tick the highlighted tab on the left side and tick all the plugins on the right side. (image on right)
- Click Build Patch and wait for it to finish. Wrye Flash should take care of everything from here and ask to activate itself if that is needed.
- After building the Bashed Patch you will notice that all plugins merged into the patch appear green. Those have been merged into the Bashed Patch and deactivated. In addition to those, there are a couple mods (MiscItemIconsNV.esp and WMX-ArenovalisTextures.esp) that appear purple. These have not been merged into the Bashed Patch due to being flagged NoMerge, but have been deactivated during the process and must be manually re-enabled in order to work as intended. Click the checkbox to the left of these mods (make sure there is a check in the box next to each, rather than a dot) in order to reactivate them.
- When done, close Wrye Flash NV.
- In the left pane of MO, go to the bottom of the mod list and double click on "Overwrite".
- Drag the folder Docs from the newly opened window onto <Profile Name> Bashed Patch in the mod list and drop it.
- Tick Unofficial Patch Plus, so it is enabled again.
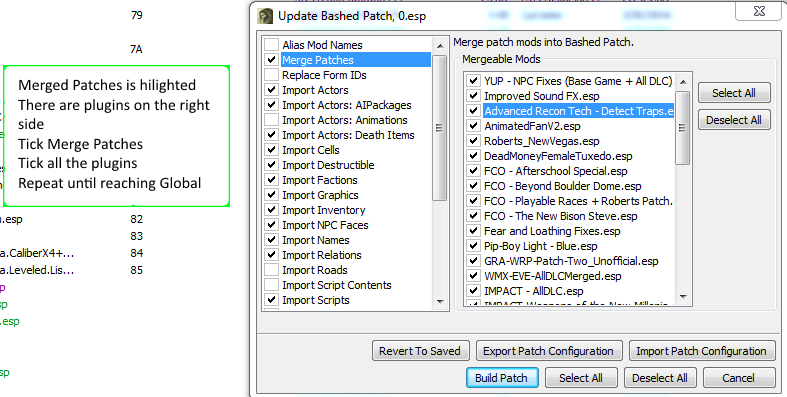
Create a Merged Patch
A merged patch can be made in xEdit to solve the few remaining issues not handled by the Bashed Patch, there are several instructional videos about it on YouTube. Alternatively you can just use MonoAccipiter's pre-made patch:
Mono's Merged Patch
- Author: MonoAccipiter
- Version: v1
- Requirements: YUP, The New Bison Steve Hotel & Casino, WMX, EVE, Improved Sound & FX
- Changelog: This tiny changelog is provided for users that may have used an older version of this patch:
- v1: Initial version
- Sort this after the Bashed Patch.:
Run LOOT through MO executable dropdown.
Find "Merged Patch.esp" in the left pane and click the three dots on the right of the plugin, then select [Edit Metadata], and the [LOAD AFTER] tab.
Enter "Bashed Patch, 0.esp" into the ''Filename'' textbox.
Click the save icon next to ILO - Merged.esp.
In Game Settings
The many mods that take advantage of the MCM allow for a plethora options to customize the New Vegas experience. The following link has a suggested list of settings for certain MCM settings from a few mods to customize the experience. If any user would like to have their settings listed, just look at the MCM settings page linked below and format it the same way. Also, only include mods that are listed in this guide and make sure the URL is correct. It is very simple, after the "https://stepmodifications.org/wiki" add "/User:<Username>/Fear and Loathing MCM Settings". That is it to start a MCM settings page, when finished just link it in the forum or send a PM to EssArrBee and it will get added below for other users to see.
EssArrBee's MCM Settings (Unfinished)
Controller Support
Fallout New Vegas supports the Xbox 360 controller natively, but there is no way to change the default button settings other than switching two button's commands. This is a problem when using mods like Project Nevada that add in new hotkeys or for users that have any other type of controller. To solve this issue, the best option is to use an emulator or wait until a modder figures out how to fix the whole thing (which is being worked on, so there is hope). The link below is for a page that will have instructions to setup Xpadder with an Xbox 360 controller and some other instructions for users with different gamepads to create their own profiles. User that are using other emulators can create their own wiki pages and they will be linked to from here.
Ultra-Wide Screen (21:9) Support
Fallout New Vegas needs further tweaks to fully support utra-wide screens (21:9) at 2560X1080 and 3440x1440 resolutions. After applying these tweaks, there will only be a few minor problems left. Loading screen pictures will be slightly stretched, but there's no real way of fixing that. You will have screen cutoff while assigning S.P.E.C.I.A.L. points in Doc Mitchell's house or in the alternative start shack. It is recommended to play in 16:9 through this point.
Fallout.ini Tweaks
- Fix 1st person weapon clipping while aiming down sights when using a FOV setting higher than 75:
[Display]
fNearDistance=4 <-- Change to 3 if you still see clipping
- Fix screen cutoff when zooming with scoped weapons:
[Display]
fScopeScissorAmount=0
FalloutPrefs.ini Tweaks
- Change your screen resolution:
[Display]
iSize W=2560  <-- Monitor horizontal resolution
iSize H=1080  <-- Monitor vertical resolution
- Change the zoom used on terminals to fit the screen:
[RenderedTerminal]
fRenderedTerminalZoom=75
In-game Tweaks
- Change the FOV to compensate for an ultra-wide screen:
Press P to bring up Power Armor Configuration menu, select Vision Overhaul Configuration, then select Increase Helmetless FOV to 90. You can pick any FOV you like, but 90 is recommended.
Credits
You, yes you for keeping the Fallout New Vegas community going for this long.
EssArrBee - Head hancho
WilliamImm - suggestions, feedback, spelling corrections, BOSS/LOOT masterlist guru
Kelmych - optimization wizard
Neovalen - for letting me steal his guide's style :p
rootsrat - suggestions, feedback
GSDFan - UIO testing extraordinaire
AyleidRuin - ninja editor
redirishlord - suggestions, feedback, manic load order merging
Audley - testing, editing, banner maker, modder
GrantSP - testing, editing, modder
MonoAccipiter - testing, editing, support, modder
oqhansoloqo - suggestions, feedback, and many updates to the guide
darkside - testing, feedback, ultra-wide support section
STEP for being one the best communities on the internet, gaming or not
The Nexus for hosting all the mods
Reddit's Fallout sub-reddits for constantly being a source of good and bad ideas
The Modders for making their excellent contributions, really cannot say enough good things about them
There are some names missing, but they will get added soon ;)
{{#css:User:EssArrBee/FalloutNewVegas.css}}