
NoMansSky:3.2
WARNING
This guide is out of date and is NOT supported! It may contain information that is incorrect or not in line with the current state of the game.Go to the latest supported NoMansSky Guide.
This Release
Supported Game Version: NMS:Omega v4.6+
This is our next minor release of the Step NMS Guide for No Man's Sky. Just a few of the highlights are:
- Added a Common Issues section
- Several new mods have been incorporated
- Updates to AMUMSS instructions to reflect the latest version of the tool
- Better Planet Generation installation has been updated, again, now that LUAs are available
See the changelog for more details and to determine if upgrading from a previous version is advisable.
Step NoMansSky Guide
This is the official Step modding guide for No Man's Sky. Its goal is to provide an "enhanced vanilla" look and feel with a focus on exploration gameplay. It is built for No Man's Sky on the PC without VR. Other situations by vary. For a full list of features to expect from this Guide, please see our Nexus Mods page.
Modding No Man's Sky is more of a manual process versus other games. As such, throughout this Guide expect to edit files, build patches, etc. However, this is a Step Modifications Guide so there will instructions throughout process. Be aware of what modding NMS entails before moving forward.
- Visit the forums to learn more or contribute.
- Also follow Step Modifications on Facebook.
- To support hosting and maintenance of this website, consider donating to the project.
New to Modding?
We recommend that you ...
- read through this Guide at least once before attempting installation.
- follow all linked guides and read through them, as well.
There is a lot of information to absorb and learn in order to successfully build a modded game. We and the community, have brought together a lot of this information into guides as a free and hopefully convenient resource for all. New and experienced modders alike will find many answers within these guides and linked resources. This Guide is written in such a way that it expect the basics of modding to be known and how to use related tools (e.g. mod managers, LOD optimizers, configuration utilities, etc.). However our support forums are always available.
Nomenclature and Instructions
The following nomenclature is used throughout this guide and should be understood before proceeding.
- 'tick' means 'check': Frequently, the word 'check' or 'checked' can mean 'ensure' in addition to "check mark", so 'check' is not used where it is synonymous with 'tick' to avoid any mistakes that can (and have) happened from this conflation.
- Baseline: The recommended install option is shown within the Baseline column of the mod tables below.
- Step Patches: Custom patches created for the respective Step Guides. Always use them!
Expand Instructions!
Click the heading below to expand detailed instructions that are collapsed by default for readability:
Expand mod table detailed instructions:

System Requirements
No Man's Sky should be run on a relatively modern Windows 10/11 64-bit desktop or laptop at 1920x1080 or higher.
- The minimum specs should allow the game to be ran on High settings
- The recommended specs should allow the game to be ran on Ultra settings
- CPU/GPU Marks should be within the ranges listed below. Refer to the links for examples.
| Hardware | Minimum | Recommended |
|---|---|---|
| CPU Mark Range | 6,000 - 7,000 | > 8,000 |
| System RAM | 8Gb | 16Gb |
| GPU G3D Mark Range | 10,000 - 12,000 | > 13,000 |
| Game Drive | HDD | SSD |
- For those wishing to use high quality settings at resolutions higher than 1920x1080, be advised that a more powerful system will likely be required.
- This game will also consume a lot of VRAM, so the more VRAM available the better the performance will be; since files will not have be offloaded to slower system RAM.
STEP 1
Follow the System Setup Guide!
Those who have not completed the System Setup Guide should STOP and do so now!
- The Setup Guide is a perquisite for this Guide.
- Once it has been completed, return here and continue below.
- Deviate from these instructions at your own risk! Instructions in this guide presume that previous instructions have been followed.
As suggested in the Setup Guide, for supporting No Man's Sky this Guide uses the following folder structure:
Drive:\Modding\Tools\..\AMUMSS..\PSArcTool
Enable Mods
Mod support for No Man's Sky is disabled by default. This needs to be enabled after the game is registered with the system. To do this:
- Navigate to the game's PCBANKS folder (i.e.,
..\Steam\steamapps\common\No Man's Sky\GAMEDATA\PCBANKS) - Locate the DISABLEMODS.TXT file
- Rename this file: ENABLEMODS.TXT
- In fact, this file can be renamed to anything or simply removed from the folder structure.
- This step must be repeated every time the game updates because Hello Games resets this file every update.
- Create a new folder within PCBANKS and name it: MODS (this folder may already exist)
To disable mod support again, simply rename the file, above, back to the original name, or replace it back in the PCBANKS folder. This completes the initial game setup.
Tools Installation and Setup
Install the following tools to the location created above (i.e., ..\Modding\Tools):
| Mod Name | Baseline | Instructions |
|---|
| AMUMSS |
Detailed Instructions available | |||||
| ||||||
| PSArcTool |
Detailed Instructions available | |||||
| ||||||
AMUMSS
Initialization
AMUMSS will be set up for use below:
- Open the AMUMSS folder (i.e.
..\Modding\Tools\AMUMSS) - Add an exception/exclusion for this entire folder to any antivirus/antimalware software (Windows and/or 3rd party solutions)
- Run the Test_AMUMSS_install.bat file (
..AMUMSS\TOOLS\) and follow its prompts to determine and fix any issues that may remain - Once the above test passes, run BUILDMOD.bat by double-clicking on it.
- When first ran, it will check for updates and ask to install each one and restart afterwards. Allow it to install all updates available.
- The following should be displayed towards the top of the log:
Path to NMS_FOLDER is >>> GOOD <<< game files found - Next AMUMSS will check and update MBINCompiler, if updates are available.
- At
??? Do you want to use AMUMSS in [F]ULL, [D]EV, or [L]EAN mode, enter F - At
??? IS your NMS game version [P]ublic or [E]xperimental, enter P - Ignore the
[NOTICE] No user .lua Mod Script found in ModScript...message, as this is just an initialization run. If there are other warnings, investigate.
- The following should be displayed towards the top of the log:
- When first ran, it will check for updates and ask to install each one and restart afterwards. Allow it to install all updates available.
- Press any key to close when complete
- Firewall / Internet Security / Antivirus Software:
- AMUMSS connects to the internet to check for MBINCompiler updates. To allow this process, an exception may have to be created in this software for:
<pathTo>\AMUMSS\MODBUILDER\MBINCompilerDownloader\curl.exe
To check if this working, the following should be displayed in BUILDMOD.bat log when an update is available and downloaded, else only an error message will be displayed:>>> Added MBINCompiler.x.xx.x.exe to Extras\MBINCompiler_OldVersions folder...
...
>>> Your new MBINCompiler is version: x.xx.x - If the CMD window closes immediately (or is blank) when double-clicking BUILDMOD.BAT, it could be security software blocking the program from running. Try creating an exception in the software and rebooting the PC.
- AMUMSS connects to the internet to check for MBINCompiler updates. To allow this process, an exception may have to be created in this software for:
NMS PCBANKS Explorer
NOTE
NMS PCBANKS Explorer only needs to be setup, if additional customization is done beyond the Guide. Specifically, only if these customizations will require edits to the game files. These steps will extract the game files for use and allows NMS PCBANKS Explorer to search through these files.
Else, free to skip this NMS PCBANKS Explorer section and move to the next.This program enables the easy exploration of the game's files and other features, however, it must be set up before it can operate. The instructions have been separated into groups for ease. If this is being followed, it's assumed the optional step is desired! Keep in mind these steps will have to be repeated every game update to get the new files!
- From the AMUMSS folder, run NMS PCBANKS Explorer.exe
- At the Would you like to use .\DEFAULT_UNPACKFOLDER as your 'MAIN' Unpack folder? prompt, click [Yes]
- At the Would you like to use .\DEFAULT_UNPACKFOLDER as your 'Results' folder for Un-packing results? prompt, click [Yes]
- At the Would you like to use .\DEFAULT_EXMLsaveFOLDER as your 'MAIN' folder for saving EXML files? prompt, click [Yes]
- At the Would you like to use .\DEFAULT_EXMLsaveFOLDER as your 'Resutls' folder for saving EXML files? prompt, click [Yes]
- At the Explorer Usage prompt, click [Ok] and allow NMS PCBANKS Explorer to load
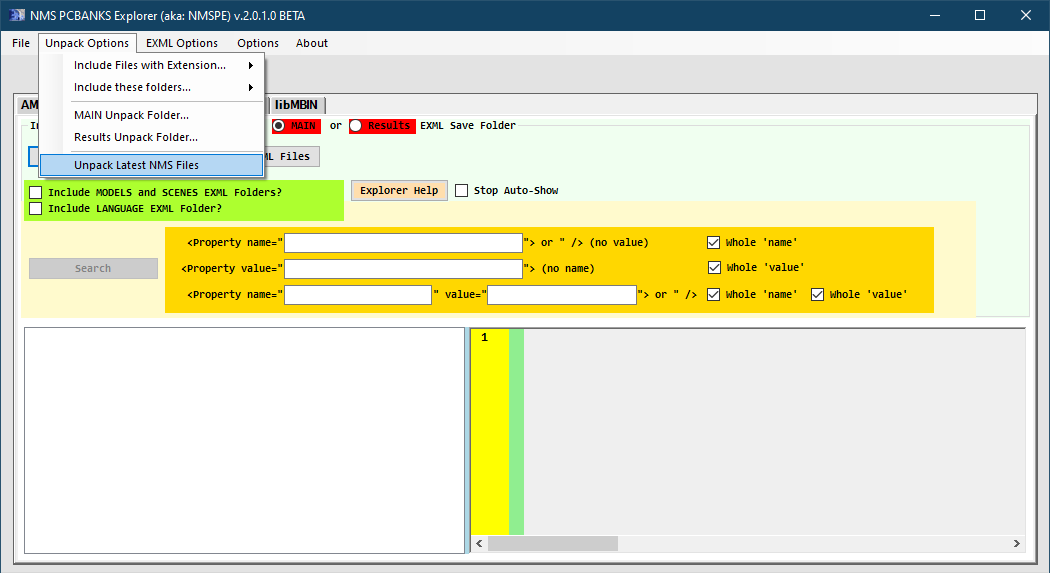
Unpack
- Once complete, click the Unpack Options menu and select Unpack Latest NMS Files or simply click the Unpack button.
- At the Please, choose your unpack folder location... prompt, click [MAIN]
- At this point NMS PCBANKS Explorer will unpack the game files. Please wait for it to complete (1-5 mins).
- Click [Ok] at the unpack completion prompt and ensure the "Explorer" tab is selected on NMS PCBANKS Explorer
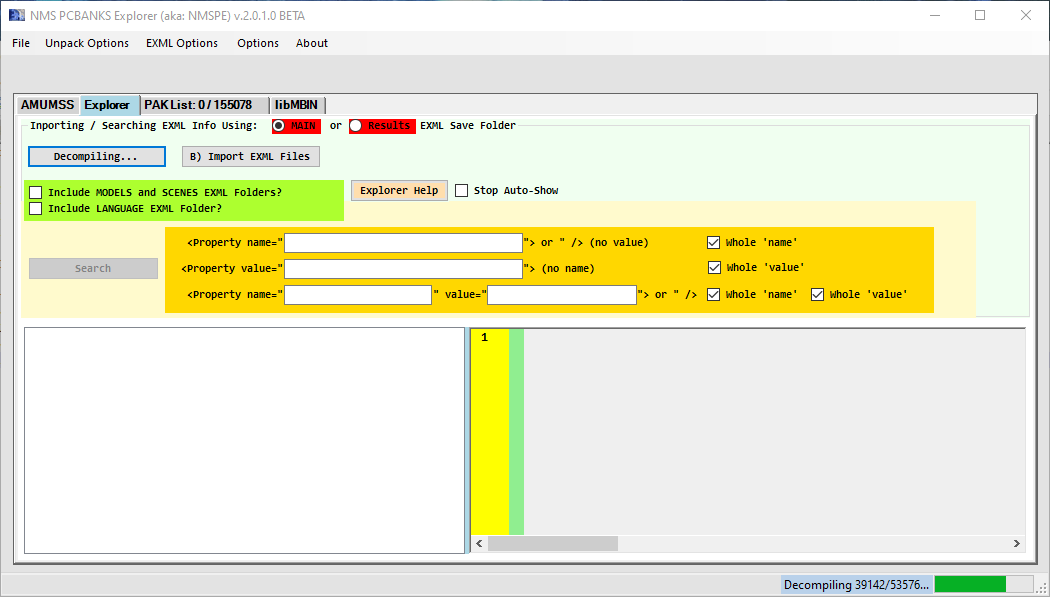
Decompile
- On the Explorer tab, click the [Decompile] button
- At the Please, choose your unpack folder location... prompt, click [MAIN]
- At the Please, choose your EXML folder location... prompt, click [MAIN]
- At this point NMS PCBANKS Explorer will decompile all the unpacked game files. Please wait for it to complete (10-30 mins).
- If a prompt appears that any files other than
METADATA\INPUTTEST.MBINcouldn't be decompiled, please verify the game files using Steam and try again. Files from Steam will sometimes be corrupted, which causes this.
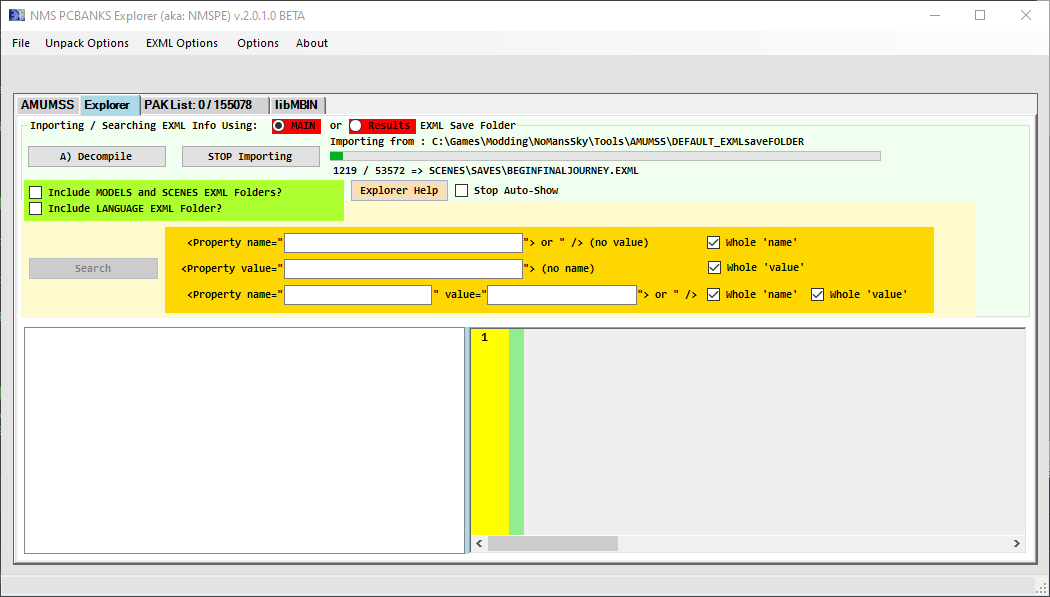
Import EXMLs
- On the Explorer tab, click the [Import EXML Files] button
- At the Please, choose... prompt, click [MAIN]
- Include MODELS and SCENES folders?, click [Yes]
- Include LANGUAGE folder?, click [No]
- Read the prompt and click [Ok]
- At this point NMS PCBANKS Explorer will import all the decompiled EXML files, which allows them to be explored. Please wait for it to complete (40-60 mins).
AMUMSS is now set up and ready to use.
STEP 2
Mod Installation
Currently no mods listed within the Guide are required, besides the Resource Files. Yet, all mods are recommended for the intended user experience the Guide provides. Those who deviate from the Guide will have various results.
AMUMSS Installation
The majority of the mods are incorporated into a single PAK file using AMUMSS and LUA scripts.
- Download the mod from Nexus Mods using the Manual Download button on the mod's File tab
- Open the downloaded archive and extract the LUA scripts to:
..AMUMSS\ModScripts- All mods listed with the yellow bar within the tables will be installed to this location.
- Instructions are provided the first time this manual installation is encountered within the Guide; however, subsequent instances will not.
Manual Installation
Some mods are manually installed because they have not conflicts within the Guide. This is done so by placing PAK files within the game's MODS folder:
- Download the mod from Nexus Mods using the Manual Download button on the mod's File tab
- Open the downloaded archive and extract the PAK file to:
..No Man's Sky\GAMEDATA\PCBANKS\MODS- All mods listed with the green bar within the tables will be installed to this location.
- Instructions are provided the first time this manual installation is encountered within the Guide; however, subsequent instances will not.
NOTE
The PAKs installed in the Guide have no conflicts or resolve as intended. If other mods are added, that are not included in the Guide, these mods will need to be checked for conflicts with the other installed PAKs. This process is beyond the scope of this Guide.
Mod Table Reference
| Table Flags | Red vertical bars indicate the mod requires an update and should not be installed. Yellow bars indicate the mod is installed using AMUMSS. Follow installation procedures for AMUMSS for these mods. Green bars indicate the mod is installed manually. Follow manual installation procedures for these mods. | |||
| Mod Name | The mod's name presented as a link to Nexus for downloading. | |||
| Baseline | This notes the Step Baseline version or option of the corresponding mod that should be installed, and usually refers to options affecting performance/quality. | |||
| Instructions | Brief notes that apply to the mod or installation. In some cases, mods with several options will include a suggested option. These suggestions will take the form of: Step recommends: Option A main file In other cases, there may only be one appropriate option that fits the Step Mandate. These instructions will take the form of: Install Option A main file When [Expand] is present, click this link to expand the mod row to reveal detailed instructions for installing the mod. |
- To maintain compatibility, it's important to install mods as described; thus, ensure to click on [Expand] when it's available on the mod listing. If no Detailed Instructions are provided for a particular mod, check the Baseline column for the recommended option. If no Baseline or instructions are provided, all options are valid. Step encourages customization.
Foundation
Foundation includes mods that provide large and sweeping changes toward how the game's environments are generated.
| Mod Name | Baseline | Instructions |
|---|
| Better Planet Generation |
Detailed Instructions available | |||||
Better Planet Generation (BPG) greatly expands the biomes and diversity of planets. However, there are a few things to be aware of before installing BPG:
Installation
WARNING: Read the paragraphs above before installing this mod! The LUA files by Babscoole will be used for merging BPG with the rest of the Guide.
| ||||||
| Clean Space Origins |
Detailed Instructions available | |||||
| ||||||
| Exosolars Abyss |
Detailed Instructions available | |||||
| Step recommends Exosolar's Abyss main file for the most vanilla experience. The Jasondude file is compatible, which increases the number of colors the water can be generated as. | ||||||
| Exosolars Grass Fix |
Detailed Instructions available | |||||
Optional
These steps are optional, but provide less clipping issues and shorter grass, which helps prevent it from clipping through and hiding a lot of smaller objects. This keeps the regular grass at a max height of around the character's mid-thigh in dense areas, rather than allowing the character to wade through waist-high grass.
| ||||||
Animation and Physics
| Mod Name | Baseline | Instructions |
|---|
| Better Asteroid Explosions |
| Rotating Atmosphere |
Models and Textures
| Mod Name | Baseline | Instructions |
|---|
| Better Deposit Colors |
Detailed Instructions available | |||||
| ||||||
| Black Carbon |
Detailed Instructions available | |||||
| ||||||
| Blackhole BAAA |
Detailed Instructions available | |||||
| ||||||
| Clean Analysis Visor |
Step recommends: Clean_Analysys_Visor_With_Helmet_by_RogerHN |
| Clean Ship Space Map |
| HD Clouds |
2K |
| No Lag Leaving Planets DIY Edition |
Detailed Instructions available | |||||
Remember to re-run this tool to recreate the mod after game updates! | ||||||
| Windrex |
Step recommends: Windrex main file |
Sounds and Music
| Mod Name | Baseline | Instructions |
|---|
| No Suit Annoyances |
Detailed Instructions available | |||||
There are two options, and either are valid for the guide.
| ||||||
Fixes
Mods located here provide various fixes to multiple bugs and/or inconsistencies throughout the game.
| Mod Name | Baseline | Instructions |
|---|
| Bigger Wallet |
| Frigate LOD Fix |
| Miscellaneous Text Fixes |
Detailed Instructions available | |||||
| ||||||
| Private Landing Pads |
Detailed Instructions available | |||||
Install the options for the play-style and build options desired.
| ||||||
| True Black |
Gameplay
Gameplay includes mods that affect various aspects of gameplay mechanics.
| Mod Name | Baseline | Instructions |
|---|
| Better Buildings Scans |
Detailed Instructions available | |||||
| ||||||
| Better Ship Transfer Ranges |
Only install Better Ship Teleport Module Range main file |
| Gumsks Base Building |
Detailed Instructions available | |||||
| ||||||
| New Milestones |
| Quick Crates |
Detailed Instructions available | |||||
| This is an optional mod, since its goal is fixing an annoyance rather than a bug. It removes the junk (i.e., rust, goo, slime, etc.) from the green drop pods/crates. The material is typically useless and discarded by most players; however, if the material is really needed, it can be found elsewhere. | ||||||
| Short Shop Dialogs |
Interface
Interface mods alter various aspects of the user interface.
| Mod Name | Baseline | Instructions |
|---|
| Better Frigate View |
| Colorful Substance Labels |
| Fast Actions |
Step recommends: Fast Actions main file |
| Fullscreen Warps |
| Gumsks Cameras |
Detailed Instructions available | |||||
| ||||||
| Tiny Inventory Changes |
Locations
Location mods either add new locations or alter vanilla locations in larger ways.
| Mod Name | Baseline | Instructions |
|---|
| Unpredictable Shelters |
Lighting and Weather
Lighting and Weather mods alter interior and exterior lighting and/or weather systems.
| Mod Name | Baseline | Instructions |
|---|
| Exosolars Lumen |
Detailed Instructions available | |||||
| ||||||
| Indoors Lighting Fix |
| Integrated Planets |
| Natural Nights |
| No Bloom Effect |
Detailed Instructions available | |||||
| This mod is optional!
The bloom effects are fairly overdone and ruin what could be good lighting. Since bloom seems to be controlled by shaders now, there is little control over it. This mod removes the bloom and all the lens flares besides from the sun. It's optional as some may like the very bloomy look, but for the rest this mod could ease some eye tension. | ||||||
| ReLight |
Resource Files
| Mod Name | Baseline | Instructions |
|---|
| Step NoMansSky Resource Files |
Detailed Instructions available | |||||
If a new version of the Resource Files is released, overwrite the old files with the new. | ||||||
Quality of Life Mods
There are a few mods available that will take away some annoyances that crop up from repeated gameplay. These mods are listed here, at the end of the list, because they are outside the scope of the Step Mandate. However, they should be installed at this point (simply use their LUAs and place them in the AMUMSS folder).
- Better Base Sites
-
- This mod allows base sites to be discoverable with the Secure Site planetary charts. These sites are large, flat areas with a base computer in the center. This can be useful when scouting for new base locations.
- gMission No Approximate Location
-
- Since the feature was added, many find the "approximate location" aspect of missions very annoying; unrealistic even. This mod controls the distance the game places the "approximate location" for missions. Use the 10u option to place the marker directly at the mission location, similar to before the feature was added.
- gShip - More Frequent Traders - Easier Ship Hunting
-
- This mod causes the traders on stations to swap out more frequently. This can be useful for ship hunting and trading.
STEP 3
The files placed within the ModScript folder must be merged and compressed into a PAK file, which is used as the Guide's patch.
 WARNING:It is extremely important within the ModScript folder the beginning of the file names have been changed according to the Detailed Instructions for each mod!
The mod options (below) have timers associated with them; set by the mod author. Most have adopted 10 secs for their timers. Once the timed limited is hit, the default option will be auto-selected. Pressing Enter/Return will select the default option. However, if the provided time is not enough to read the options, timers can be adjusted by editing the mod's script. The following mods have timers:
- Beyond Base Building
- gCam
To change the timers:
- Open the mod's LUA
- Find all lines that have the following:
OffsetGUIF = GUIF({DefaultOption, [[The question text will be here?]]},10) - Change the 10 at the end to a larger time in seconds (60 = 1 minute, 90 = 1 min 30 sec, etc.).
Build Guide Patch
Base Options
Please continue below to build the Guide patch. Use the following options at the provided prompts:
- Open the AMUMSS folder:
..\Modding\Tools\AMUMSS - Run BUILDMOD.bat by double-clicking on it.
- At this point, there may be updates for AMUMSS. Install all updates, restarting the BUILDMOD.bat file after each update.
??? Do you want to use AMUMSS in [F]ULL, [D]EV, or [L]EAN mode [F,D,L]?, enter L- If issues beyond the normal arise from running AMUMSS, use FULL to produce all help files to help troubleshoot.
??? Is your NMS game version [P]ublic or [E]xperimental [P, E]?, enter P??? Do you want to include them in the created PAK [Y,N]?, enter Y??? Do you want to create a COMBINED[Y] or INDIVIDUAL[N] mods? [Y,N], enter Y??? Your choice: [2,3]?, enter 2??? Would you like or [N]ot to COPY [S]ome or [A]ll Created Mod PAKs to your game folder and DELETE [DISABLEMODS.TXT] [N,S,A]?, enter N
Mod Options
Some mods provide options during the build process. Please use the options desired. Below are Step's recommendations:
Better Base Building
??? Do you want GeoBays on FrDeeighters?, enter N??? Do you want to farm in any biome?, enter N??? Do you want to place Base Storage Containers on Freighters?, enter N??? Do you want to place Freighter Tech and Bio rooms on Planet Bases?, enter N??? Choose a multiplier for Storage and Rates and EMAnywhere status:, enter 1
gCam
??? Do you want the character camera centered?, enter Y??? How fast do you want the build and photomode cameras to move?, enter 17??? Do you want to eliminate aerieal view zoomouts?, enter N??? Do you want to fix the camera for large freighters during warp?, enter Y- Ignore the conflicts that result from the Guide, these have been vetted and are resolved correctly.
- After the selections, AMUMSS will build the Patch from the LUA scripts. When complete, there may be warning, notices and/or conflicts, depending on the mods installed. This is normal and can be ignored for the mods in the Guide. Added mod conflicts should be vetted.
- Press any button on the command window when finished to close it.
Install Guide Patch
- Open the CreatedModPAKs folder:
..AMUMSS\CreatedModPAKs - Rename the PAK file to:
___Step Patch-NoMansSky.pak- The underscores are intentional to force the archive to load last. The TXT file is for reference and can be deleted.
- Move the new PAK from the CreatedModPAKs folder into the game's MODS folder:
..No Man's Sky\GAMEDATA\PCBANKS\MODS
STEP 4
That is a wrap on the Guide! Congratulations and enjoy the enhanced gameplay! Below are some recommended settings for the the game and graphics, as well as, a few tips for new players.
Graphic Drivers
The following can be set within the graphic drivers, themselves for a possible bump in quality. These are optional, but recommended:
- Disable any Anisotropic Filtering Optimizations settings
- Set Texture Filtering to the highest quality setting
Starting a New Game
To start a new game, select Play Game and then New Game on the menus. Game options should appear. Which option to choose is entirely user choice; however, Custom will allow the control of many game aspects for a tailored experience.
Step recommends using Custom to achieve the intended Guide outcome. As such, the following Custom settings are recommended for a more casual, exploration-focused gameplay that the Guide was designed for; without cutting out the other gameplay elements. The Guide's Resource Files are designed around these settings. As always, any of the settings may be adjusted up or down for a harder or more relaxed experienced.
Survival Settings
- Survival Difficulty: Relaxed
- Sprinting: Standard
- Relaxed Sprinting will remove the extra life support cost from running, which some players may prefer because it makes exploring very easy.
- Scanner Recharge: Fast
Crafting and Item Settings
- Fuel Usage: Discounted
Combat Settings
- On-Foot Combat: Minimal
- Space Combat: Minimal
Ease of Use
- Tutorial Missions
- Those who are familiar with the gameplay may consider disabling the Tutorial Missions. This skips the repetitive gameplay forced at the start of a new game; teaching the basics. This will quickly drop the player onto a planet with the normal gear installed. Simply start exploring or find the ship and be off into space to summon the Anomaly.
Game Settings
The following are only recommendations for in-game settings. they can be accessed from the Options menu in the left bottom corner before starting a game. Once a game has been started, press Esc to open the game menu and click on Options.
Display & Graphics
- Window Mode: Fullscreen
- Max FPS: monitor refresh rate - 3 (144 - 3 = 141)
- All settings on High or Ultra
- Anisotropic Filter: 16x
- GTAO: High
- There isn't much difference between High and Ultra, visually; therefore, only use Ultra if performance allows.
- Anti Aliasing:
- If Nvidia 30xx/40xx series: DLSS or DLAA
- If AMD or later model Nvidia: FSR (results will vary)
- If neither of the options above are viable: TAA
Network
- Multiplayer can be disabled here for solo players. This disables the majority of multiplayer aspects in-game; the Anomaly/Nexus will be empty, other players won't be ran into by chance, etc.
- For those planning to play the multiplayer aspects of the game, there a several settings located here to consider before playing.
Camera
- On-Foot Field of View: 80 or higher
- Flight Field of View: 85 or higher
- This will help prevent the HUD clipping on some ships. Those playing at screen resolutions other than 1920x1080 may have to adjust for their systems.
- Vignette & Scanlines: Disabled
- First-Person Head Bob: Disabled
- These two above are two settings that will help alleviate some of the motion sickness effect the game can have.
- Camera Shake Strength: Step removes many shakes and lowers the effects of others. However if the camera shakes are still too strong, return here and lower this setting.
Go...rule the galaxy!
Tips
New to No Man's Sky and not sure where to start? Here are some tips from over 200 hours of gameplay:
- If there is an ongoing expedition, they will sometimes be available from game-start. If so, opt to start with an expedition to potentially grab some great goodies before you ever even start the main game. Once the expedition is over, players will start the game as usual.
- Complete the entirety of "Awakenings" mission line as early as possible. This introduces players to many of the game's features, and will unlock the basic tech along the way for free.
- Any time warping to a new system, visit the Space Station. This will allow players to return via teleporters, but more important is to visit the Exosuit Merchant to upgrade the suit's inventory, tech or cargo capacity. Since this can only be done once per station, players will have to do some traveling to fully unlock all exosuit slots.
- Planets with "Ancient Bones" are an easy way to build units. They will sell for hundreds of thousands each and the rarer ones can be over one million units each.
- Skip the first freighter that is offered to you for free. It's scripted and will always be a C-class. Players will still be able to grab one, but make sure it's B-class or better.
- When on the search for new freighters or ships, wealthier systems will have higher chances for higher class vessels.
- Mine! Players will need more resources than they realize, especially once base building starts and freighters are obtained. Ferrite Dust, Carbon, Copper, and Tritium are the big ones.
- Purchase the Personal Refiner as early has possible from the Anomaly. It will be a godsend for refining on the go.
Common Issues
Below are a resolutions to a few common issues when modding No Man's Sky:
- Mods not working after an update
- Remember to check for the DISABLEMODS.txt file, which is usually restored during updates.
- Cashes while leaving the planet after an update
- Remember to re-run the NMS No Lag tool, which needs to be re-run after every update in order for it to grab any file changes.
Credits
The Step Team would sincerely like to thank (from the bottoms of our fuzzy little hearts):
- Hello Games for their games
- The authors of mods recommended within our Guides
- The authors of mods who granted permission for their mods to be incorporated into the Resource Files
- The core Community for feedback, suggestions and input
The following mods had open permissions (or permissions were granted by author) and were merged into the Guide's Resource Files
- Better Landings
- Clean Space Origins
- Exosolar's Abyss | Only part of the changes from this mod are merged.
- Fine LOD
Personnel
MO Support
- GSDfan
Step Administrators
- DoubleYou
- Greg
- TechAngel85 | Lead Release Coordinator, Patch Coordinator, Mod Author
- z929669
Retired Staff
|
|
|
|
|
COMMUNITY CONTRIBUTIONS
About Step
Created by TheCompiler (Daniele Ferraro), Step is a collaborative project with input from the modding community, technical volunteers, and project administrators. The goal is to provide tested and validated methods for establishing and maintaining an enhanced, modded game. Thus, the Step Guides provide detailed, well-tested build instructions for a solid, modded game that achieves an enhanced, vanilla experience.
The Step team collects information from the modding community through extensive mod testing, detailed reviews, feedback, and suggestions exchanged on the Step Community Forums. Posting rules apply, so be sure to read and follow them. Engage and enjoy a warm welcome and plenty of high-quality support from a large community of experienced members.
Step Modifications can only get bigger and better with help from the community. It is very time consuming for the Step Team to ensure that the Step Guides are consistently maintained at the highest quality possible. As such, we rely on the community. Whether a regular user or a knowledgable modder, below are some ways to help Step grow:
The Community
All members of the community can help build the Guides they love and utilize for their own games. Step relies on the community, that's you, to help identify mods that improve the vanilla game while adhering to our Mandate through mod suggestions. We also need ongoing bug reports, feedback, reviews, and updates on included mods that may cause problems or that stray from the Mandate. This help can be as simple as reporting an encountered bug or as extensive as providing a one-off review of a mod based from personal experience with it.
In order to suggest a mod for inclusion in this Guide, visit the Mods section of the forums and use the Create Mod Topic button on the editor toolbar.
Staff Roles
There are official staff roles that are almost always open for new candidates.
Community members interested in becoming a member of the Step staff, please contact any Administrator or Step Staff member on the forums. Please include some idea of the role desired and include strengths and weaknesses within that role! For example, if applying for a Curator include the game desired to curate, strengths (xEdit, conflict resolution, texture editing), and weaknesses (mesh work, CK, scripting). This gives Step some initial idea of the candidate's skill sets.
Forum Moderators
Most of the moderation work for our Moderators is simply to keep topics on track and do general forum maintenance; such as moving topics to the correct forum and handling spammers. Very rarely does moderation on the Step forums end up in warnings and bannings (and we all like it that way). To be effective Moderators, community members who desire this role are expected to be familiar with the Step community and actively involved. As such, Moderator criteria is be based upon level and quality of activity within our community. Moderators will be expected to be more familiar with the Community Guidelines than the average member and be able to remain unbias in their moderating.
Guide Curators
Guide Curators are the super-stars of the staff at Step Modifications. They are those who curate the Guides for members. Guide creation, growth, and maintenance takes a lot of time, effort, and skill. As such, Curators are generally required to be of a higher skill-level than the average modder. In an ideal world there would be 2-4 Curators per Guide. However, Curators are often working alone on Guides; thus, they require the knowledge and skills to be able to follow Mandate while building mod lists, patches, and writing all Guide and ancillary content in a way members can easily follow. This is no small feat for a single staff member to do! For more information about Guide Curation, see Game Guide Curation.
Testers
Generally, Testers are required to maintain a non-deviated Guide installation from which to install and test mods that are tagged for testing on the forums, as well as, general testing of Guides as a whole with the goal of finding bugs, issues, possible improvements, etc. Testers will be given access to Staff forums that house useful information on the Guides they test for. For more information about our testing process, read through the Mod Testing Guide to get a sense of what's involved.