- Visit the forums and provide feedback related to STEP.
- Also visit the STEP Facebook page maintained by TheCompiler (Daniel).
- To support hosting and maintenance of the STEP Community Project, contributions are welcome.
STEP 2.2.8 marks the second release in bridging our move to a new paradigm that will officially be unveiled as STEP 2.3.0. Thus, this marks our second interim release with a more strict STEP:Core.
The 2.2.8 Guide is more streamlined now. We have set our users onto a fast-track to configuration and installation by trimming out many of the setup details that existed in previous guides. The more detailed information is now linked from within each section, and each section now has a quick-setup blurb applicable to all users, whether upgrading from a previous 2.2.5+ release or installing STEP for the first time. This guide is reliant more on the vanilla configuration in order to get all STEP:Core mods installed as simply and efficiently as possible to achieve a stable and working game. Performance and stability are the focus and quality is secondary. For those interested in polishing STEP (or any modded setup) to optimal quality, be sure to click on the prominent links to the ancillary guides underneath each applicable heading.
Also, STEP now recommends Mod Organizer as the preferred mod manager for modding, as it not only has features that simplify installation and maintenance, but it is the only mod manager that isolates profile-specific mods and configuration files from the actual game resources. This means that there is no chance of the user contaminating or breaking Skyrim game or configuration resources. All mods and altered files are effectively isolated from the default game directories using virtualization (mods) and profiles (configuration). The interface is also intuitive, and the application is under active development. The software is open source, and extensible via third-party plugins.
Finally, STEP:Packs to be installed after a STEP:Core install (all mods flagged by the green indicator) will be linked at the end of this guide for users wishing to add user-contributed functionality to the STEP:Core build. So far there are a few Packs created for STEP, but we expect this number to grow in the near future. Full Pack integration will be rolled out with STEP v2.3.0.
A Foreword
Created by TheCompiler, STEP is a collaborative project with input from the modding community, technical volunteers, and project administrators. The goal is to provide tested and validated methods for establishing and maintaining an enhanced modded Skyrim. Thus, the Guide provides detailed, well-tested build instructions for a solid modding template. New modders can follow STEP explicitly, or more experienced modders may use it as general guide.
The STEP team collects information from the modding community through extensive mod testing, detailed reviews, feedback, and suggestions exchanged on the STEP Community Forums. Posting rules apply, so be sure to read and follow them and enjoy a warm welcome and plenty of high-quality support from a large community of experienced STEPers. Check out the comparison screenshots on the Nexus.
Minimum System for STEP:Core[edit | edit source]
It is tentatively planned that STEP:Core (and Extended, by proxy) will continue to provide a performance-friendly version in tandem with a standard version. Given what we know about the memory limits for 32-bit applications (aka the "3.1 GB limit for Skyrim"). This will most likely entail installation options associated with many of the Core mods and possibly even two performance patches (TBD).
For this release, we recommend the following as a minimum hardware configuration for running STEP:Core (installing "Baseline" versions of "Core" mods only). For those wishing to use higher-quality options and/or to install the non-Core mods (tentatively, STEP:Extended Beta), be advised that a more powerful system is likely necessary. The Baseline install that we recommend will provide the best quality-performance trade-off.
| Hardware
|
Minimum
|
Recommended
|
| Windows OS
|
Windows XP
|
Windows 7 or 8
|
| CPU
|
Intel Core i3 (dual core)
|
Intel Core i5/i7 (quad core)
|
| System RAM
|
4 GB
|
>=8 GB
|
| GPU
|
1GB VRAM
|
>=2GB VRAM
|
| Monitor Resolution
|
1366x768
|
1920x1080
|
{{{text}}}

NOTE
Baseline (referenced throughout this guide) is the STEP:Core 'Baseline' mods install (see mod tables) and adherence to all of the instructions in this guide, nothing more, nothing less.
NOTE: It is particularly important that novice modders begin with clean installations of Steam & Skyrim in order to be successful with the 'quick' setup first time around, so PLEASE READ EACH SECTION CAREFULLY, as no information included in this guide is irrelevant!
Pre-Installation Setup
1.A. Install Steam & Skyrim[edit | edit source]
Detailed Information --> Skyrim Installation Guide
This guide assumes that the user is beginning with a clean Skyrim installation. If necessary, please take some time to properly set up and configure Steam and install Skyrim as recommended by the Skyrim Installation Guide before continuing.
1.B. Skyrim Launcher Options[edit | edit source]
Detailed Information --> Skyrim Launcher Guide
As a quick-start to installing STEP, simply launch Skyrim from Steam to initialize the auto-detection process, accept the preset, and continue to 1.C. Make certain that the preset Antialiasing is no greater than 4x (4 samples); otherwise, keep the preset. This is a conservative preset that will facilitate a smooth game once STEP is configured initially according to this guide (i.e., what does not tax performance now may be burdensome later). More extensive INI tweaking can be done after STEP is set up and verified as running smoothly.
1.C.1. Better Oblivion Sorting Software[edit | edit source]
Better Oblivion Sorting Software (BOSS) is an essential utility for managing mod plugins for Skyrim. The primary function of BOSS is to reorder esp/esm plugins based on a master plugin order list. In addition, BOSS identifies plugins (ESPs/ESMs) that need cleaning with TES5Edit or other special treatment (more on this below), and adds Bash Tags to plugins that are later used by Wrye Bash when creating a bashed patch. Download BOSS and install according to the instructions provided by the author.
Detailed Information --> Wrye Bash Guide
Although Wrye Bash is a mod manager, STEP recommends that it only be used as a helper application to Mod Organizer exclusively for the functionality of the Bashed Patch. The reason for the limited support of Wrye Bash is due to simplicity of this guide. Users who wish to use Wrye Bash can easily use that mod manager to install and maintain STEP.
Navigate to the Wrye Bash Nexus page and install "Wrye Bash xxx_x - Installer". Be certain to use the "Standalone Executable" option when prompted during the install.
NOTE
Until STEP 2.2.9 is released, please only use
MO v1.1.2! The changes made in v1.2.5 and higher will cause some issues with the DLCs and Unofficial Patches as well as any optimized textures mod the user made via DDSopt for the DLCs. When STEP 2.2.9 is released, we'll be updating all the mod pages and other instructions to incorporate the latest changes in MO. Sorry for any inconvenience and thank you for your patience.
Detailed Information --> Mod Organizer Official Documentation
While mods can be installed manually, it is not recommended. A mod-management utility is HIGHLY RECOMMENDED in order to keep track of a complex setup like STEP. These utilities also make it exponentially simpler to deconstruct a STEP install in order to update to a new STEP version, and to update versions of the mods. This is impossible to do simply or efficiently (or even correctly) otherwise.
There are several utilities that may be used to manage the STEP setup; however, STEP now officially supports only Mod Organizer for reasons stated in the guide introduction. For this reason, only Mod Organizer setup will be addressed briefly here. Wrye Bash users can use the Wrye Bash Guide for detailed instructions on setting up that exceedingly excellent modding utility package.
To properly install and setup Mod Organizer for the first time, please do the following:
- Download and install the Mod Organizer (MO) installer version (use default settings, but install to your Skyrim game directory).
- Run the ModOrganizer application. If you installed Skyrim to a protected directory (e.g., Program Files), you may have to Run as Administrator.
- When first started, MO will present a window asking for input to select the game to manage. Select Skyrim, or use the browse function to find the Skyrim game folder if necessary.
- First time users will receive a message to show a tutorial. It is highly recommended to do so.
- Click the wrench icon
 in the toolbar, and select the Nexus tab.
- Check "automatically log in" box, insert your Nexus username and password, and click OK.
- Optionally go to the General tab in Settings and change the style to a theme of your choice (dark.qss is currently the most popular).
- Click the globe icon
 in the toolbar. This allows MO to download mods when the Download with Manager button is clicked on the Nexus.
- If the update icon
 is lit up, click it to update Mod Organizer to the latest version.
- Click the profiles icon
 in the toolbar and click the Create button.
- Call the new profile STEP Core, do NOT check the Default Game Settings, and click OK. (STEP Extended and Pack users: Do NOT create the STEP Extended or related Pack profiles yet. Create these after installing STEP Core successfully and by using the Copy profile function. This will save you the hassle of rearranging all your installed mods again.)
- Activate the STEP Core profile from the drop-down menu and proceed to 1.D.
Detailed Information --> Skyrim INI Guide
The Skyrim INI files are located in %USERPROFILE%/Documents/My Games/Skyrim/. As in the previous section above, it is highly recommended that no other INI settings be configured at this point, because the conservative presets are a good starting point for accommodating a performance-friendly initial STEP setup. The detailed INI guide can be referenced once a stable setup is verified after completing this guide.

MO2
The INI configuration files can be accessed directly from within MO by clicking on the Tools icon and selecting either [INI Editor] or [Configurator]. These tools point to the INIs located under
<Mod Organizer>/profiles.
The following INI tweaks are recommended for all users and affect gameplay without impacting performance (except minorly where indicated). Create the following at the end of each of the indicated INI sections. Sections are marked by names within square brackets '[ ]', and some of these sections may already exist, but for those that do not, create the section. Carefully check that ...
- ... no duplicate entries are created,
- that all entries are placed into the correct section, and
- that all sections are properly defined
MO2
Using the Tools > [Configurator] tool prevents any editing mistakes. Open the tool, click [Basic] to get the Advanced options, and choose the applicable section from the combobox. Then find the applicable setting and alter as indicated below. Click the [Save] button after each change and close the dialog when finished.
Each of the following entries can be pasted directly into the INI (if editing manually). The entry descriptions are commented, so they will not be interpreted by the game at startup. Alternatively, these descriptions can be omitted.
[General]
sIntroSequence=    ;Disables the intro sequence for a faster startup
fFlickeringLightDistance=8192    ;Helps prevent lighting pop-in
[Display]
;Improves shadow changes as the sun moves through the sky
fSunShadowUpdateTime=0.25    ;Transition time of sun-shadow movement
fSunUpdateThreshold=1.5    ;Time between sun-shadow movement
[Grass]
iMaxGrassTypesPerTexure=3    ;increase grass diversity with a small cost to performance (yes, 'texure' and not 'texture'). Consider setting to 7 if using Skyrim Flora Overhaul.
[Combat]
;Shift the point of aim to the center of the aiming reticule for arrows and crossbows.
f1PArrowTiltUpAngle=0.7
f3PArrowTiltUpAngle=0.7
f1PBoltTiltUpAngle=0.7
f3PBoltTiltUpAngle=0.7
[Actor]
fVisibleNavmeshMoveDist=12288.0000    ;allows arrows to hit objects as far as the appear to fly.
[Display]
iMaxAnisotropy = 0    ;Anisotropic Filtering - set this to zero, as it should be controlled via the graphics driver.
iMultiSample = 4    ;Antialiasing - keep the value set by the Skyrim Launcher for now
iPresentInterval = 0    ;disable vsync! - vsync should be handled in enblocal.ini (see ENBoost mod instructions)
bTreesReceiveShadows=1    ;Enables shadows rendering on trees (insignificant performance impact)
bDrawLandShadows=1    ;Enables shadows rendering on land (insignificant performance impact)
bFloatPointRenderTarget=0    ;Set to 'one' if using deferred shader rendering ENB lighting (NOT supported by STEP).
- NOTE: ENB lighting (not supported by STEP) is not the same as using ENBoost (supported by STEP)!
[Controls]
bMouseAcceleration=0    ;Disable mouse acceleration
1.E. Display & Video Card Settings[edit | edit source]
Often under-appreciated, display and driver settings have a huge potential impact on graphic quality of Skyrim and anything else that is displayed on the monitor in 2D or 3D. So it is important to get this done correctly. Below are the essentials, and no further tweaking is necessary; although, people will do what they must. Again, it is highly recommended that the bare minimal tweaking be done until after STEP is installed and configured according to the Baseline dictated by this guide.
If there is any reason to believe that the latest drivers are not the latest available or that they are not already installed correctly ...
- Download the latest beta or stable AMD drivers / Nvidia drivers.
- If installing/re-installing new drivers, download DDU and install it (DDU forum Page).
- Boot into safe mode by repeatedly pressing F8 once the boot check initializes and before the OS begins loading (no need to uninstall the current drivers, but it will not hurt at all).
- Launch DDU, and select the appropriate driver from the drop-down combobox.
- Note the recommendations in DDU and initialize the cleanup.
- Reboot normally and install the latest drivers.
NOTE:
This guide (and the
corresponding section in the STEP Guide) assumes that users will not be running ENB (at least not during initial setup of STEP). If ENB will be used after verifying a functional setup, driver-based graphics settings should not invoke ANY of the settings described below. Simply let the application handle everything, as driver-based settings will conflict with ENB.
1.E.1. Configure Driver Settings[edit | edit source]
Please configure STEP graphics settings without ENB until STEP is configured according to this guide.
STEP has more detailed information in both the AMD-CCC guide as well as the Nvidia Inspector guide, and other AMD-CCC and Nvidia Inspector / Control Center guides exist for the inquisitive user. The following information is minimalistic, sound advice, and users are encouraged to add their own 2 cents for consideration via the AMD-CCC Talk and Nvidia Inspector Talk pages.
In Short - The graphics software should only be forcing max Anisotropic Filtering (AF) (and Supersampling Anti-Aliasing (SSAA) for higher-end cards). All other settings should be left to the Skyrim configuration and ENBoost configurations.
NOTE:
This guide (and the
corresponding section in the STEP Guide) assumes that users will not be running ENB (at least not during initial setup of STEP). If ENB will be used after verifying a functional setup, driver-based graphics settings should not invoke ANY of the settings described below. Simply let the application handle everything, as driver-based settings will conflict with ENB.
NOTE:
ENBoost-ONLY users (NOT ENB graphics users!) should NOT use AF in enblocal.ini (set ForceAnisotropicFiltering to false ). For some reason it is more costly than setting AF via CCC and there is no difference in the effect.
Detailed Information --> Catalyst Control Center Guide
The AMD driver configuration utility, Catalyst Control Center (CCC), is installed along with the graphics drivers by default.
- Within CCC , select |Gaming| > |3D Application Settings|.
- Click |+ Add|, then browse to and select TESV.exe, and click on this new profile (these settings will only apply to Skyrim now).
- Set Anti-Aliasing Mode to "Use application settings" (driver-side AA has no impact on Skyrim, as it is a function only of iMultiSample in SkyrimPrefs.ini). If set to "Override application settings", AA will be turned off in Skyrim, regardless of the Skyrim INI setting!
- Set Anti-Aliasing Method to "Multisampling" (for better performance), or set to Supersampling if your video card can handle it (for better quality). For some reason, driver-side AA method does work, just not sample rate.
- Force Anisotropic Filtering Mode by setting Anisotropic filtering to "Override application settings". NOTE: this provides a slight frame-rate gain over using ENB to handle AF with no difference in quality; however, ENB can also be used to handle AF, and so can SkyrimPrefs.ini for that matter (but using SkyrimPrefs.ini will conflict with ENB graphics if that will later be used). If using ENB, set Anisotropic Filtering Mode to "Use application settings"
- Set Anisotropic Filtering Setting to 16x. NOTE: as above.
- Set Wait for Vertical Refresh to "Always off" (Recall that vsync should be running via ENBoost's enblocal.ini!)
- Save and close, accepting any overwrite when prompted.
Detailed Information --> Nvidia Inspector Guide: Editing Skyrim Settings
Make the following changes via Nvidia Inspector, otherwise leave the defaults (they can be tweaked later if absolutely necessary).
- Download Nvidia Inspector. This is a portable program and requires no installation. Simply place in a convenient location and create a shortcut to the executable.
- Within Inspector, select the "Elder Scrolls V: Skyrim" profile and keep all of the default settings except for the following changes:
- Set Antialiasing - Mode to "Application-controlled". Apparently, SkyrimPrefs.ini dictates the level of AA, but the video card drivers can dictate the method of AA. If set to "Override", AA will be turned off in Skyrim, regardless of the Skyrim INI setting!
- Set Antialiasing - Setting to "Application-controlled / Off" (for better performance), or set to use 2x2 (or 4x4) Supersampling if the video card can handle it (for better quality).
- Force Anisotropic filtering mode by setting Anisotropic filtering to "User-defined / Off".
- Set Anisotropic filtering setting to 16x. Higher values may cause texture shimmering in mid to long range texture LODs. If this happens, adjusting the LOD bias (below) can help to remedy the issue.
- Click Apply changes and close, accepting any overwrite when prompted. (Sometimes 'Apply changes' needs to be clicked twice.)
1.E.2. Display Calibration[edit | edit source]
Color calibration is critical to photographers and graphic artists that work across media types, but it is also more or less important for everyone that uses a computer. For gamers like those interested inb STEP, it is a bit more important, because there is a lot of screenshot sharing and qualitative discussion about in-game visuals. It is ideal id all users are somewhat 'standardized' for comparative purposes alone.
The gist: Calibrate the monitor's display settings based on the video driver configuration utility with all other configuration baselines set to something akin to "mid level".
There are three places to configure color saturation, temp, brightness, contrast, gamma, etc:
- The monitor's built-in config
- Windows color management
- The driver configuration utility (see h"Configure Driver Settings above)
The settings of one affect the settings of the other, and depending on the quality of the monitor, #1 could be very good or just 'OK'. The #2 and #3 settings should be standard though, since they are made to work across various monitors.
- Ensure that #1 is set to "the middle ground" with respect to all settings. Having extreme settings in the monitor configuration could potentially constrain the other configurations. For some, wetting all #1 to mid levels will be best, but for others the 'auto-config' will be best (this may not set all #1 to mid settings). Depending on the monitor, there may be other auto-config options based on various presets. Whatever seems most "middle of the road" is probably best for #1.
- Optionally, also run #2 (Control Panel > Display > Calibrate Color) and set to 'vanilla' mid-levels with respect to all attributes. If this was never run previously, then it should already be at mid-level.
- Calibrate using #3 (see below) using a this reference image and in a room with no direct lighting that could affect what the monitor shows (not-too-bright, diffuse-lighted room). The main calibration should be left to #3 once a mid baseline 'canvas' has been established for #1 and #2.
- AMD-CCC: |Desktop Management| > |Desktop Color| (click "Reactivate AMD color controls").
- Nvidia Control Panel: Access from the Windows Control Panel. |Display| > |Adjust desktop color settings|
1.F. Performance Benchmarking[edit | edit source]
Detailed Information --> Benchmarking STEP
- YOU CAN HELP!
Baseline performance benchmarks help us to assess performance variation across a range of computer configurations, which is useful for all users. User contributions in this regard are highly valued and much appreciated! Database-comparison benchmarks will be available as sufficient numbers of user-submitted data accumulate (and once we construct the system that will contain this information).
Points during setup that benchmarking is suggested will be indicated by:
Final Pre-Installation Notes[edit | edit source]
A Final Consideration
- Remember that STEP:Core should be used as a base for ANY modded setup. It is a universal build and will not spoil any downstream setup (e.g., Skyrim Revisited - Legendary Edition), although there may well be a few minor redundancies whereby a STEP:Core mod is later installed again with some added or subtracted options.}}
- Install mods in the order that they are presented in the following tables in order to achieve the desired result.
- Read the ReadMe and other mod-related documentation that comes packaged with most mods. This includes the mod description on the Nexus. If the mod author has seen fit and taken time to create these reference materials, then they are relevant and important in the eyes of the mod author. This means that they are relevant and important to you!
Mod Installation
Below is the legend and reference for the mod tables used in this Guide. Users should refer back to it when confused about a mod listing.
The following is an example of the mod tables, found in Step 2 below, followed by the legend for reading the table. Users should familiarize themselves with this information.
|
|
|
Patch Requirement
|
A green vertical bar indicates that the mod is required by the Step Conflict Resolution Patch, and a red bar indicates that the LW patch is required.
|
|
|
|
Mod Name
|
Nexus mod name presented as a link to Nexus for download.
|
|
|
|

|
Link to the mod's wiki page, which includes various information about the mod.
|
|
|
|
Baseline
|
This notes the STEP Baseline version or option of the corresponding mod that should be installed, and usually refers to options affecting performance/quality. General suggestions are located in the "Notes" column; see below.
|
|
|
|
Quality
|
Indicates if there are lower or higher quality options for the mod relative to the Baseline recommendation:
|
|
|
|
|
 Relative to Baseline, a lower quality, less demanding version of the mod is also available. Relative to Baseline, a lower quality, less demanding version of the mod is also available.
|
|
|
|
|
 Relative to Baseline, a higher quality, more demanding version of the mod is also available. Relative to Baseline, a higher quality, more demanding version of the mod is also available.
|
|
|
|
|
Relative to Baseline, both lower and higher quality versions of the mod are available.
|
|
|
|
Notes
|
Brief notes that apply to the mod or installation. In some cases, mods with several options will include a suggested option. These suggestions will take the form of: "STEP recommends 'Option A'." In other cases, there may only be one appropriate option, which fits the STEP Mandate. These instructions will take the form of: "Download and install 'Option A'." Users will also see links displayed as: Detailed instructions available. Users should follow these links to find detailed instructions for installing the mod.
|
NOTE
Consider the following while installing mods:
- Mods should be installed in the order that they are listed to ensure that mods further down the list overwrite those occurring before them. This is necessary to ensure the desired in-game effect. Mods are otherwise listed in alphabetical order within each section, and any deviations from this are purposeful to achieve the desired outcome.
- Wrye Bash Users: To achieve the best results, “Loose files” (non-BSA) versions of mods should be used. If a "loose files" version is not available, extract the BSA as described here. Mod Organizer Users: There are no benefits of loose files over BSAs in MO.
- Always install plugins (ESPs/ESMs) unless otherwise noted. If there are not any notes associated with a particular mod, then all options fit the STEP mandate. The notes only provide instructions where necessary; otherwise, STEP encourages user customization.
- Unless otherwise stated, follow BOSS's advice with regards to mod cleaning.
WARNING:
Do not activate the STEP Patch plugin in your load order until you have finished installing STEP completely, or you will CTD.
The STEP Patches are for users that intend to install either all of STEP Core or all of STEP Extended. This is to gain stability by increasing compatibility between mods and to decrease the amount of patches needed which reduces the number of plugins.
Even though the STEP Patches are listed first in the guide, the patch being used will be one of the very last mods in load order. Something to be aware of when using the STEP Patches, ONLY use one patch at a time. One last thing is that some STEP Pack authors may make their own patch, probably from the STEP Core Patch, so if using a STEP Pack, check if one of these patches are necessary.
To users that do not install all the mods in either STEP Core or STEP Extended, these patches can still be used if experienced enough with TES5Edit to customize the plugin to match the preferred load order, but permission to distribute that patch is explicitly forbidden. Also, if not using the STEP Patches then download any separate patches for mods that need them, they may not be listed in the guide, so keep an eye out.
NOTE
Until STEP 2.2.9 is released, please only use MO v1.1.2! The changes made in v1.2.5 and higher will cause some issues with the DLCs and Unofficial Patches as well as any optimized textures mod the user made via DDSopt for the DLCs. When STEP 2.2.9 is released, we'll be updating all the mod pages and other instructions to incorporate the latest changes in MO. Sorry for any inconvenience and thank you for your patience.
- Standalone applications that aid in the management of the modding process
|
|
|
|
|
Mod Name
|
Baseline
|
Instructions
|
|
|
|
|
|
BOSS
|
|
Detailed Instructions available
|
| It is recommended to install BOSS directly to your Skyrim game directory instead of its default location at the top of your system drive, unless you are using an SSD on which you would rather conserve space. This allows Mod Organizer to automatically detect and add BOSS to your list of executables.
Mod Organizer users:
If you do not want to follow the above advice as to where to install BOSS, do the following in order to add BOSS to the list of executables:
- Click the gears icon
 . This opens the Modify Executables window. . This opens the Modify Executables window.
- In the Title field, type BOSS.
- For the Binary field, browse to your BOSS installation and select the BOSS GUI.exe application.
- Click the Add button. This will add BOSS to your executables list.
- Click OK.
Now each time you want to run BOSS, simply select it from the drop-down menu at top right and click Run.
|
|
|
|
|
|
BOSS Userlist Manager
|
|
Detailed Instructions available
|
Since you must launch BOSS Userlist Manager (BUM) through Mod Organizer in order for it to recognize your mods, add BUM to the list of executables by doing the following:
- Click the gears icon . This opens the Modify Executables window.
- In the Title field, type BUM.
- For the Binary field, browse to your BUM installation and select the BOSS Userlist Manager.exe application.
- Click the Add button. This will add BUM to your executables list.
- Click OK.
Now each time you want to run BUM, simply select it from the drop-down menu at top right and click Run.
|
|
|
|
|
|
DDSopt
|
DDSopt - pre-release - update 4
|
Detailed Instructions available
|
| For users who do not want to do a custom run with DDSopt, STEP now provides the STEP Optimized Vanilla Textures which is installed during in the Fixes section of the STEP Guide. There is no need to run DDSopt if choosing to install this new mod from STEP.
Do NOT run through Mod Organizer!
See DDSopt Guide for usage details. The Quick-Start Guide is a good place to start.
|
|
|
|
|
|
Mod Organizer
|
|
Detailed Instructions available
|
- Download Main File from Nexus Mods and run the EXE.
- Windows may issue a warning. If so, click more information and then click [Run Anyway].
- Install MO into the Tools using the name: Mod Organizer.
Do not run MO yet! It will be run for the first time later in the guide.
|
|
|
|
|
|
Skyrim Performance Monitor
|
|
Detailed Instructions available
|
Installing Skyrim Performance Monitor
- Download and install the Microsoft .NET Framework.
- Download the mod from the mod page using the download manually link and extract the zip archive.
- Install the SlimDX Runtime .NET 2.0 (January 2012).msi included in the archive. (If you're upgrading to a new version of SPM and already have SlimDX installed, there's no need to uninstall/reinstall SlimDX. You can simply skip this step)
- Install Skyrim Performance Monitor by running the setup.exe included in the archive.
- The default install location is in Documents. You may change this according to your preference.
Please remember to completely uninstall any previous versions of SPM prior to upgrading.
Initial Setup of Skyrim Performance Monitor
- Launch Skyrim Performance Monitor and click the Setup... button at bottom right.
- Select your Primary Gaming Video Card from the drop-down in the Primary Video Card tab.
- Go to the Miscellaneous Settings tab.
- ENBoost and ENB users should check the Attempt Support for Custom D3D9.dll and Combine TESV and ENBHost System RAM settings.
- Click Save
Configuring Skyrim Performance Monitor for Use with Mod Organizer
- Launch Skyrim Performance Monitor and click the "Setup..." button at bottom right.
- Go to the File Paths tab and point the Skyrim Launcher File Path to your ModOrganizer.exe. Here is an example for Mod Organizer and other launchers.
- Click Save.
- Click the Launch Skyrim button at bottom right, which will start Mod Organizer (make certain that Mod Organizer is not already running first!). From there you can select your desired profile and run SKSE (or other launcher) to play Skyrim and monitor its performance.
|
|
|
|
|
|
TES5Edit
|
|
Detailed Instructions available
|
- Download TES5Edit from Nexus Mods.
- Extract the archive to the xEdit folder:
..Modding/Tools/xEdit
To clean any mods that require it, run "Quick Auto Clean". It will allow users to select the mod to clean and automatically clean it.
Reference videos
|
|
|
|
|
|
Wrye Bash
|
Installer version
|
Detailed Instructions available
|
| If updating to 306, you need to uninstall your previous version.
MO users - Install and be certain to tick the stand-alone executable version when prompted for the path to the Steam/Skyrim directory. Wrye Bash users - see the Wrye Bash Guide.
Since you must launch Wrye Bash through Mod Organizer in order for it to recognize your mods, add Wrye Bash to the list of executables by doing the following:
- Click the gears icon . This opens the Modify Executables window.
- In the Title field, type Wrye Bash.
- For the Binary field, browse to your Wrye Bash installation and select the Wrye Bash.exe application.
- Uncheck Close MO when started if necessary.
- Click the Add button. This will add Wrye Bash to your executables list.
- Click Close.
Now each time you want to run Wrye Bash, simply select it from the drop-down menu at top right and click Run.
|
- Mods that expand on the inherent functionality of a game or another mod without themselves affecting content
|
|
|
|
|
Mod Name
|
Baseline
|
Instructions
|
|
|
|
|
|
SKSE
|
|
Detailed Instructions available
|
Download and install the latest archive:
- Place all *.exe and *.dll files into
<skyrim>/ (not the data directory!). Should be three files (i.e., skse_1_9_32.dll, skse_loader.exe, and skse_steam_loader.dll).
- Click the Archive
 button. button.
- Browse to and select the downloaded skse archive.
- In the manual installation prompt, right-click data and select [Set data directory]. It should say it Looks good, and not say No game data at top level.
- Click OK
- Create the SKSE ini file OR download and install it from here.
- Right-click the SKSE mod in Mod Organizer and select [Open in explorer].
- Open the SKSE folder or create one if one does not exist.
- In the SKSE folder, create skse.ini and paste inside it the following:
[Display]
iTintTextureResolution=2048
[General]
ClearInvalidRegistrations=1
The SKSE folder structure, including the skse.ini should look like the following:
Restart MO; if SKSE is installed correctly, MO will detect it and show in the executables drop down. Use the SKSE executable when launching Skyrim from MO from now on.
|
|
|
|
|
|
ENBoost
|
|
Detailed Instructions available
|
| ENBoost is required! Due to Skyrim LE's 32-bit memory limit, ENBoost must be used by everyone.
The following instructions pertain only to ENBoost; the memory manager of ENBSeries. Do not install a full ENB Preset during the Step Guide setup! This can be done later, after the installation of the Guide is confirmed to be working.
Install
- Download and install the DirectX 9 Runtimes.
- This is for good measure to prevent some commonly reported issues on the forums. Be sure to install it and not just extract it!
- Visit ENBSeries website to download the latest archive.
- Do not use the Skyrim Nexus version of ENBoost due to incorrect settings for Step Guides.
- Click the link for the latest archive (usually the one on the top of the list)
- On the next page click the
 button to download the archive. button to download the archive.
- Open the archive and go to the "WrapperVersion" folder, then extract only the following files into the root Skyrim directory (do NOT copy into the 'Data' directory!):
- d3d9.dll
- enbhost.exe
- enblocal.ini
Alternatively, if the "WrapperVersion" does not function as advertised, try the "InjectorVersion". Remove any existing remnants of the Wrapper version, and extract only the enbhost.exe, ENBInjector.exe, enbinjector.ini, enblocal.ini, and enbseries.dll files from the "InjectorVersion" folder into ./skyrim/. Users must run ENBInjector.exe before running the game for the injector version to work properly.
Configure enblocal.ini
The following are important changes that are either required or highly recommended. Advanced users see the detailed INI configuration settings for more information:
[PROXY]
EnableProxyLibrary=true
InitProxyFunctions=false
ProxyLibrary=d3dx9_42.dll
[GLOBAL]
UsePatchSpeedhackWithoutGraphics=true
UseDefferedRendering=false
[MEMORY]
ExpandSystemMemoryX64=false
ReservedMemorySizeMb=128 ; This value should be set to lowest possible value without experiencing stutter. Increase this value until stuttering is either gone or minimal. See advanced guide above for more information.
VideoMemorySizeMb={integer in MB} ; Download and run Boris's tool: VRamSizeTest. Run VRamSizeDX9.exe. Windows users subtract 350 from the value provided and use that value.
AutodetectVideoMemorySize=false
[ENGINE]
EnableVSync=true
VSyncSkipNumFrames=0
; Be sure the parameters in the [THREADS] section match what is below! These are for special case use only. You are 99% not likely one of those special cases! The section should remain as follows:
[THREADS]
DataSyncMode=0
PriorityMode=0
; This may be a necessary performance enhancement for some users. If experiencing stuttering and the [MEMORY] section is verified to be set up properly, enabling or disabling these parameters could help resolve some stuttering.
[WINDOW]
ForceBorderless=true
ForceBorderlessFullscreen=true
|
- Mods have a programmatic component that fixes various bugs and/or inconsistencies
|
|
|
|
|
Mod Name
|
Baseline
|
Instructions
|
|
|
|
|
|
Double Cursor Fix
|
|
This mod can be skipped if ENBoost is installed. Users not installing ENBoost, should install this mod.
|
|
|
|
|
|
Nitpick
|
|
Users NOT using Mod Organizer should install this mod. The fixes are already included in Mod Organizer.
|
|
|
|
|
|
SKSE-Elys-AltF4
|
|
ENBoost user can skip this mod. Users not installing ENBoost should install this mod.
|
|
|
|
|
|
Skyrim Project Optimization
|
Full Version
|
Install the "Skyrim Project Optimization - Full Version" Main File. Tick Data and click [OK] to install.
|
|
|
|
|
|
Smart Souls
|
|
Detailed Instructions available
|
The Smart Souls.ini file needs to be edited manually. To do this:
- While in Mod Organizer, right-click the Smart Souls mod on the left-hand side
- Select the menu option Open in explorer
- Within the new window, navigate into the SKSE/Plugins folder
- Right-click within the folder and select the menu option New > Text Document
- Name the file Smart Souls.ini (make sure you are showing File Extensions - click here to see how)
- Open the new file and copy the below contents, pasting them into the file
'"`UNIQ--pre-000001D6-QINU`"'
- Save and close the file
NOTE: If you forget to follow the instructions above, the Smart Souls.ini file should be created upon running the game for the first time after this mod's installation. It will be located in the Mod Organizer Overwrite folder. This file needs to be dragged and dropped into the SKSE/Plugins folder within the Smart Souls mod. |
|
|
|
|
|
XP32 Maximum Skeleton
|
|
Detailed Instructions available
|
| NSFW mod page (only in photos at top page gallery). Download from link above to bypass mod page. Else, download and install the XP32 Maximum Skeleton main file.
The installation instructions here support using wearable items from the Wet and Cold STEP mod. Skyrim Revisited includes different installation options that support using items from a different mod (Frostfall). The two installation option sets are not compatible.
FOMOD Instructions
XPMS NMM-BAIN INSTALLER
|
- Choose Your Setup
- 1st Person Skeleton
- Did you USE Joy Of perspective Mod ?
- Experimental Package
- Choose Your Setup
- Choose Your Setup
- Dagger Equip Animation Package
- Back Hip Dagger Equip Animation
- ◉ Back Hip Dagger equip animation
- Options
- LAST STEP
|
Remember to run FNIS after installing all mods.
|
- Mods that affect any aspect of the user interface
|
|
|
|
|
Mod Name
|
Baseline
|
Instructions
|
|
|
|
|
|
Not Another Colored Map Icon Mod
|
|
STEP recommends installing only the optional "NACMIM - Full" file. Turn off version checking for maps in the MCM: SkyUI menu. This is necessary until NACMIM is made fully compatible with SkyUI 4.0 or higher.
|
2.F. 06-Models and Textures[edit | edit source]
- Mods that replace existing models or textures
|
|
|
|
|
Mod Name
|
Baseline
|
Instructions
|
|
|
|
|
|
Dual Sheath Redux
|
|
Detailed Instructions available
|
Install the Main File. Ensure the latest 32-bit version of Java Runtime Environment is installed, it's required for the patcher.
FOMOD Instructions
Dual Sheath Redux
|
- Base Mod and/or Compatibility Packs
- Base Packs or Both
- ☑ Patcher and Vanilla Meshes
- ☑ Mod Packs
- Back or Hip
- Do you use a swords on back skeleton?
- Replacer Mods
- Skyrim Weapon De-LARP-ification Project
- Standalone Mods (select only the options below)
- aMidianBorn Book of Silence
- ☑ aMidianBorn Book of Silence
- Elemental Staffs
|
Dual Sheath Redux Patcher must be launched through Mod Organizer for it to recognize installed mods. Add the DSR Patch to the list of executables by doing the following:
- In the right pane, go to the Data tab.
- Locate the SkyProc Patchers directory and expand the Dual Sheath Redux Patch directory.
- Right-click the Dual Sheath Redux Patch.jar file and select Add as executable.
- If asked to locate the Java binary, browse to where you installed Java (usually
Program Files (x86)/Java/jreX.X.X_XX/bin) and select javaw.exe.
- Enter a name and finish.
Now each time you want to run the DSR Patch, simply select it from the drop-down menu at top right and click Run.'
Example video
|
|
|
|
|
|
High Quality 3D Map
|
Hi-res meshes, 1k normals
|
STEP recommends installing both the HQ3DMap - Meshes Hi-Res and HQ3DMap - Normals Original main files. Do not install any of the files with "Textures" in the file name. Choose the 03 - High 1024x1024 option in the installer.
|
|
|
|
|
|
Bethesda Hi-Res DLC Optimized
|
Hybrid + Vanilla normals
|
Detailed Instructions available
|
| Note that the following options are written in terms of the Wrye Bash Wizard and FOMOD options. If installing manually (not recommended), make sure to adjust accordingly.
Select the option that best suits your VRAM limitations...
- Less than 1GB
- Full 1024: Select "Core files" (selected by default), "Vanilla Secondary stuff", and all four "Vanilla" optionals. Also install the "Compatible Version" optional. Disable the three "HighResTexturePack" ESPs in launcher or mod manager.
- Between 1GB and 1.25GB - Baseline
- Hybrid (1024 + 2048) + Vanilla NormalMaps: Select "Core files" (selected by default), "Hi-Res Secondary stuff", and "Hybrid + Vanilla NM files". Also install the "Compatible Version" optional.
- Between 1.25GB and 1.5GB
- Hybrid (1024 + 2048): Select "Core files" (selected by default) and "Hi-Res Secondary stuff". Also install the "Compatible Version" optional.
- Greater than 1.5GB
- Do not download this mod, just use the full HRDLC.
|
|
|
|
|
|
Ruins Clutter Improved
|
|
Detailed Instructions available
|
Download and install the Ruins_Clutter_Improved_v2-8 NMM Installation Main File.
FOMOD Instructions
Ruins Clutter Improved
|
- Options
- Custom
- Candles
- ☑ High Resolution Candles
- Catacomb Candles
- Enchantingstation
- Spider Eggs
- Ruins Pots
- Ruins Door
- Dragonclaws
- Subliminal Traps
- Lantern
|
Hide the following files/folders:
- texture/clutter/candles
- texture/clutter/containers/miscbag01.dds
- texture/clutter/containers/miscbag01_n.dds
- texture/clutter/ruins/ruinslinen01.dds
- texture/clutter/ruins/ruinslinen02.dds
|
|
|
|
|
|
SkyFalls and SkyMills
|
|
Detailed Instructions available
|
Download and install the "SkyFalls and SkyMills FOMOD-BAIN Installer" main file.
FOMOD Instructions
SkyFalls and SkyMills FOMOD-BAIN Installer
|
- Installed DLC?
- Dawnguard (DG)
- Dragonborn (DB)
- Flaskaar (FS)
- Wyrmstooth (WT)
- Check your choices
- LOD mod compatibility
- Optionals
- Optional Small Waterfalls
- Optional Patches
- Windmill sail Size
- Select your water mod
- ◉ Realistic Water Two (Default)
|
|
|
|
|
|
|
Serious HD
|
1024
|
Detailed Instructions available
|
| Download and install the "Serious HD Retexture LANDSCAPE 1024px" file found in the Old Versions section and the "Serious HD Retexture RIFTEN 1024px" file found in the Optional Files section.
Hide the following files:
- textures/landscape/coastbeach02.dds
- textures/landscape/coastbeach02_n.dds
- textures/landscape/icefloes.dds
- textures/landscape/icefloes_n.dds
- textures/landscape/riverbededge.dds
- textures/landscape/riverbededge_n.dds
- textures/landscape/riverbottom.dds
- textures/landscape/riverbottom_n.dds
- textures/landscape/rivermud.dds
- textures/landscape/rivermud_n.dds
|
|
|
|
|
|
A Quality World Map
|
|
Detailed Instructions available
|
| Download and install the A Quality World Map 9.0.1 - Vivid with Stone Roads main file.
|
|
|
|
|
|
Skyrim Flora Overhaul
|
Basic
|
Detailed Instructions available
|
Download and install the Skyrim Flora Overhaul Basic Edition v1.87 main file. Also install the Dragonborn addon v02 main file. Select [Merge] when asked while installing the addon.
Add/modify the following under [Grass] in Skyrim.ini to reduce the quantity of grass (as seen in this comparison):
'"`UNIQ--pre-000000E1-QINU`"'
Note that this value can be set to any number (default is 20), where a lower value corresponds to a higher grass density and thus lower performance. Try different values to see what provides the best balance of performance and visual quality.
Add/modify the following under [Grass] in Skyrim.ini for more grass variety (with a slight performance impact):
'"`UNIQ--pre-000000E2-QINU`"'
(The typo in "texture" was made by Bethesda and should be written that way.)
STEP recommends hiding or removing the following files:
Hide the following file:
- textures/dlc02/landscape/volcanic_ash_01.dds
- textures/dlc02/landscape/volcanic_ash_04.dds
- textures/dlc02/landscape/volcanic_ash_04_n.dds
- textures/landscape/dirtcliffs (the entire folder)
- textures/landscape/fieldgrass02.dds
- textures/landscape/fieldgrass02_n.dds
- textures/landscape/trees/treepineforestbranchcompsnow.dds
- textures/landscape/trees/treepineforestbranchcompsnowl.dds
- textures/terrain/tamriel/trees/tamrieltreelod.dds
|
|
|
|
|
|
Dragon Glyphs-Fixed
|
Dragon Chiseled
|
Detailed Instructions available
|
| Step recommends the Dragon Chiseled Main File.
Hide the following files/folders:
- textures/dungeons/ridgedstone07a.dds
- textures/dungeons/ridgedstone07a_n.dds
|
|
|
|
|
|
HD Enhanced Terrain
|
1024
|
Step recommends: Hd Enhanced Terrain and Map snow 1024x1024 Version Old File.
|
|
|
|
|
|
Footprints
|
|
Install the Footprints v1_00 - Legendary main file. Clean save required if updating from 0.99
|
|
|
|
|
|
High Quality LODs
|
Hi-Res Meshes
|
Install the HQLODs - Meshes Hi-Res main file. Do not install the normals. For slightly better performance at slightly less quality, the medium-resolution meshes can be used.
|
|
|
|
|
|
HQ Snow
|
|
Download and install the main file.
|
|
|
|
|
|
Moss Rocks-Dragonborn
|
|
Download and install the Ruffled Feather Moss Rocks - Dragonborn Addon - v2.0 - SMIM Meshes main file.
|
|
|
|
|
|
Real Ice
|
1024
|
Detailed Instructions available
|
| Download the All-in-One Pack. Choose the 'With Parallax' option (even without using ENB; this is a parallax effect without an ENB requirement) and then the "Half Icecube-Half Dull" option (00 Dull and Ice). The BCF includes a wizard and Fomod to simplify installation -->
|
|
|
|
|
|
Re-Defined Dungeons
|
1024
|
Detailed Instructions available
|
| Download and install the Re-Defined Dungeons 1024x1024 optional file. This mod is not packaged correctly. When installing this mod, right-click on the Data folder and choose [Set data directory]. Okay [OK] to install.
If using the main file (2048x textures), hide or remove the candle textures as they conflict with SMIM. The recommended version (1024x textures) does not contain these textures and does not have this issue.
|
|
|
|
|
|
Realistic Water Two
|
|
Detailed Instructions available
|
| Download and install the Main File.
Those using the ENB Preset may want to also install Realistic Water Two - ENB Textures optional file. This optional file is not used for the Step Guide.
FOMOD Instructions
Realistic Water Two
|
- Options
- 0. Core
- 1. Resolution
- 2. Compatibility
- Options
- 3. Combination
- 4. New Lands
- 5. Waves
- 6. Other
|
|
|
|
|
|
|
Skyrim Distant Detail
|
|
Hearthfire users: Use the "Hearthfire Edition" file instead. Mod requires TES5Edit cleaning.
|
|
|
|
|
|
Skyrim Improved Puddles
|
1024
|
Detailed Instructions available
|
Download and install the Skyrim Improved Puddles 1024 BAIN Main File.
Choose both 00 - Core Files and 17 Dawnguard-HearthFires-Dragonborn DLC Users options from the installer.
|
|
|
|
|
|
Terrain Bump
|
Performance
|
Detailed Instructions available
|
| STEP recommends hiding or removing the following files from Terrain Bump:
Hide the following files:
textures/landscape/fieldgrass01_n.dds
textures/landscape/mountains/mountainslab01_n.dds
textures/landscape/mountains/mountainslab02_n.dds
|
|
|
|
|
|
Trees HD
|
High
|
Detailed Instructions available
|
| If installing with MO:
Hide the following files:
meshes/landscape/trees (entire folder)
textures/landscape/trees/Vurt_Pine01.dds
textures/landscape/trees/Vurt_Pine02.dds
|
|
|
|
|
|
Visible Windows
|
Medium version
|
STEP recommends the "Gritty" option for all windows and the "Default" for all color options but "Yellow Tint" for both Solitude and Whiterun. BCF Available. BCF needs 2 files (Reduced Night Glow optional file also needed)
|
|
|
|
|
|
Vivid Landscapes-Tundra Moss Revised
|
1024, Yellow
|
Detailed Instructions available
|
| Install the Vivid Landscapes - Tundra Moss Revised - yellow 1024 Main File. Merge the SMIM compatibility patch Optional File.
The optional file is not packaged correctly.
- Double-click high poly mesh...
- Right-click on Data found below high poly mesh...
- Select [Set data directory].
- Click [OK] and then [Merge], when asked.
|
|
|
|
|
|
AMidianBorn Book of Silence
|
|
Detailed Instructions available
|
Download the following files:
- aMidianBorn book of silence -- ARMORS
- aMidianBorn Book of Silence -- CREATURES
- aMidianBorn book of silence -- DRAGONBORN
- aMidianBorn book of silence -- UNIQUE ITEMS
- aMidianBorn book of silence -- WEAPONS
This mod has two installation options. When multiple files are used from the same mod, either:
- create a single mod listing and merge all files into it or,
- create a separate mod listing for each file.
STEP Recommends: Merging all files into single mod listing named aMidianBorn Book of Silence
FOMOD Instructions
aMidianBorn Book of Silence ARMORS
|
- Options
- Options
- Iron and Banded
- Steel
- Steel Plate
- Leather
- Hide and Studded
- Fur
- Elven
- Dwarven
- Ancient Nord
- Orcish
- Scaled
- Wolf
- Glass
- Ebony
- Blades
- Falmer
|
FOMOD Instructions
aMidianBorn Book of Silence CREATURES
|
- Options
- Options
- Skeleton
- Dragon Priest
- Draugr
- Falmer
- Chaurus
- Spriggan
|
FOMOD Instructions
aMidianBorn Book of Silence DRAGONBORN DLC
|
- Options
- Custom
- Nordic Carved Armor
- Bonemold Armor
- Acolyte Masks
- Dragon Priest Acolytes
- Hulking Draugr
- Ash Spawn
- Ash Guardians
|
FOMOD Instructions
aMidianBorn Book of Silence UNIQUE ITEMS
|
- Options
- Custom
- Targe of the Blooded
- Wuuthrad
- Savior's Hide
- Helm of Yngol
- Mace of Molag Bal
- Mehrune's Razor
- Volendrung
- Tsun's Armor
- Ebony Mail
- Staff of Magnus
- Dragon Priest Masks
|
FOMOD Instructions
aMidianBorn Book of Silence WEAPONS
|
- Options
- Options
- ◉ Install all weapons (default)
|
Optional ESPs
Depending on how the mods are installed:
- Right-click the aMidianBorn Book of Silence or aMidianBorn Book of Silence WEAPONS mod
- Click [Information...].
- Click the Optional ESPs tab and move aMidianborn_Skyforge_Weapons.esp from the right pane to the left.
Repeat these steps whenever asked to moved plugins to the Optional ESPs.
Hiding files and folders
Hide the following files/folders:
To do this,
- Double-click on the mod listing in the left pane.
- Click the Filetree tab.
- Expand the textures folder.
- Right-click on the clothes folder and select [Hide].
Repeat these steps whenever asked to hide files or folders from a mod.
|
|
|
|
|
|
Elemental Staffs
|
1024
|
Install the Main File and merge the Elemental Staffs LE Basic Optional File.
|
|
|
|
|
|
Elven Weapons for Silence
|
|
Detailed Instructions available
|
| If using the STEP recommended options for Book of Silence which installs the Gold Eleven Armor, then his mod can be skipped entirely.
If using the Black Eleven Armor, the following is recommended:
- Texture Type
- Users choice. This is a personal preference; however, use the med res option.
- Improved Meshes
|
|
|
|
|
|
Greatsword Sheaths and Scabbards Redux
|
|
Detailed Instructions available
|
FOMOD Instructions
Greatsword Sheaths and Scabbards Redux
|
- Installation Options
- Select DLC
- ☑ Skyrim
- ☑ Dawnguard
- ☑ Dragonborn
- Meshes Type
- Sheath/Scabbard Type
- Skyforge Steel
|
|
|
|
|
|
|
Improved Closefaced Helmets
|
|
Detailed Instructions available
|
| Download and install the "Improved Closefaced Helmets (Legendary Edition)" and the "Update - Male corundum Dragon Priest mask texture fix" update file. [Merge] when asked for installing the update file.
|
|
|
|
|
|
New Thinner Torch
|
|
Download and install the Ultimate HD Torch by rheadude compatible Optional File.
|
|
|
|
|
|
Ultimate HD Torch
|
1024
|
Install the Main File and Ultimate HD Torch -less glowing cloth- Optional File.
|
|
|
|
|
|
Detailed Rugs
|
Main File
|
Download and install the Detailed Rugs v1-5 Main File.
|
|
|
|
|
|
HD Ore and Ingots
|
|
STEP recommends the "With manager" file. The main file is mostly extraneous screenshots and duplicate files.
|
|
|
|
|
|
HD Sacks
|
|
Step recommends: HDSacks14TypeBBig and HDSacks14TypeBSmall Main Files.
|
|
|
|
|
|
Septim HD
|
|
Detailed Instructions available
|
FOMOD Instructions
Septim HD
|
- Texture and Mesh Options
- Septim HD Plugin
|
|
|
|
|
|
|
Skyrim Redesigned
|
|
Detailed Instructions available
|
Download and install the FOMOD version and install according to the instructions below:
DO NOT use the STEP option in the installer. It pertains to old versions of the Guide.
FOMOD Instructions
Skyrim Redesigned
|
- Options
- Custom Installation
- Skyrim Redesigned
- ☑ Alchemy Table
- ☑ Anvil
- ☑ Bloody Rags
- ☑ Brown (less saturated) Money Bags
- ☑ Buckets
- ☑ Enchanting Table-Css01 Retexture
- ☑ Hagraven Claws
- ☑ Skeever Tail
- ☑ Skeleton Key
|
Users who experience black and purple or rainbow colors on their money bag and alchemy lab tables need to set iTexMipMapSkip to the value of 0. This is found in the SkyrimPrefs.ini file under the [Display] header.
|
|
|
|
|
|
Soul Gems Differ
|
|
Detailed Instructions available
|
Download and install the Soul Gems Differ - All-In-One main file.
FOMOD Instructions
Soul Gems Differ
|
- Welcome!
- Welcome
- ☑ Continue to installation
- Normal or Requiem
- ESP Files
- Mod Version Options
- ◉ Sort-friendly and Weighted
- Installation Options
- Choose your install option
- ◉ STEP Installation Option
- Install Soul Gems Differ
- Mod Installation
- ☑ Install Soul Gems Differ
|
For STEP users using Wrye Bash, download the " Soul Gems Differ All-In-One" main file and run using the WB wizard. This will allow you to install the STEP-recommended Configuration.
All other users, the Requiem option will install a Requiem patched version of the mod so only choose "Yes" if you are using Requiem or your game will likely crash at start. The next screen allows you to install the version of the mod you want. This will also install all needed language files to make the mod multilingual. The next screen allows you to install the gem options. Either choose a pre-made option or choose custom to customize the options you want.
|
|
|
|
|
|
Super Realistic Ore
|
|
Download the Just the textures optional file. This mod is not packaged correctly. Right-click on Data and choose [Set data directory]. Click [OK] to install.
|
|
|
|
|
|
Bellyache's Creature Pack
|
Medium
|
Detailed Instructions available
|
| Use the Default Animal Replacement Med Res file located in the Miscellaneous Files.
Hide the following files/folders:
- textures/actors/chaurus
- textures/effects/fxbird01.dds
- textures/effects/fxbird01_b.dds
- textures/effects/fxbird01_n.dds
|
|
|
|
|
|
Burn Freeze Shock Effects
|
Loose
|
Detailed Instructions available
|
| This mod has been known to cause issues on some systems, therefore, it is highly recommended to use the memory patch included in SKSE.
Download and install the BFS Effects 3_6 - Loose main file. Also install the optional BFS Effects 3_6 - Dragonborn Dawnguard file. Select [Merge] when prompted.
|
|
|
|
|
|
Deadly Spell Impacts
|
Medium
|
Detailed Instructions available
|
FOMOD Instructions
Deadly Spell Impacts
|
- Options
- Custom
- Fire Spell Dependent Feature
- ◉ One Fire Impact (Default)
- One
|
If issues arise from this mod, try installing the low resolution version.
|
|
|
|
|
|
Enhanced Blood Textures
|
|
Detailed Instructions available
|
Download and install the Enhanced Blood Textures LITE Main File.
Optionally, download and merge the No Screen Blood Optional File. This will remove blood spatters from the screen.
|
2.H. 08-Character Appearance[edit | edit source]
- Mods that affect the appearance of the player character or NPCs
|
|
|
|
|
Mod Name
|
Baseline
|
Instructions
|
|
|
|
|
|
Beards
|
1K
|
Detailed Instructions available
|
FOMOD Instructions
Hvergelmir's Aesthetics - Beards
|
- Choose Options
- Choose full or vanilla replacer
- Choose resolution
|
|
|
|
|
|
|
Better Beast Races
|
Lite
|
This mod is not packaged correctly. When installing this mod, right-click on the Data folder and choose [Set data directory]. Okay [OK] to install.
|
|
|
|
|
|
Better Freckles
|
|
This mod is not packaged correctly. When installing this mod, right-click on the Data folder and choose [Set data directory]. Okay [OK] to install.
|
|
|
|
|
|
Birds and Flocks
|
Hearthfire Edition Cleaned
|
Detailed Instructions available
|
| STEP recommends only the Hearthfire Edition Cleaned optional file.
DynDOLOD will not run with this mod active. STEP recommends leaving it inactive until DynDOLOD is ran at the Patch section of the Guide.
xEdit Cleaning Required
|
|
|
|
|
|
Brows
|
Standard Resolution
|
Detailed Instructions available
|
FOMOD Instructions
Hvergelmir's Aesthetics - Brows
|
- Choose Options
- Choose full or vanilla replacer
- Choose resolution
|
|
|
|
|
|
|
Diverse Priests
|
|
Core users NOT using the STEP Core patch install DiversePriests_ConsistentOlderPeoplePatch.esp. Extended users NOT using the STEP Extended Patch install DiversePriests_ConsistentOlderPeoplePatch.esp and DiversePriests_BringOutYourDeadPatch.esp.
|
|
|
|
|
|
Ice Wraith
|
|
Only install the "Even Better Ice Wraiths - Completely Redone" file.
|
|
|
|
|
|
New Children
|
|
Detailed Instructions available
|
| Mod is not packaged correctly. Double-click child_detail_dirt. Right-click on data and choose [Set data directory]. Click [OK] to install.
|
|
|
|
|
|
XCE-Xenius Character Enhancement
|
|
Download and install the main file only. This mod is not packaged correctly. Right-click on Data and choose [Set data directory]. Click [OK] to install.
|
|
|
|
|
|
XCE-Dawnguard
|
|
This mod is not packaged correctly. Right-click on Data and choose [Set data directory]. Click [OK] to install.
|
2.J. 05-Animation and Physics[edit | edit source]
- Mods that affect animations or physics
|
|
|
|
|
Mod Name
|
Baseline
|
Instructions
|
|
|
|
|
|
Better Turn Animation
|
|
Detailed Instructions available
|
| Install both the main file and the Fix Crossed Swords and Turn with Leg move update file.
Hide the following files:
- meshes/actors/character/animations/1hm_shout_exhale.hkx
- meshes/actors/character/animations/mt_shout_exhale.hkx
- meshes/actors/character/animations/mt_shout_inhale.hkx
|
|
|
|
|
|
No Spinning Death Animation
|
|
Detailed Instructions available
|
| This mod is now included in all versions of the STEP Patches: STEP Core Patch, STEP Extended Patch, and both versions of the STEP Combined Plugin.
If not using ANY of the STEP Patches:
- Users with Dragonborn should install the No Spinning Death Animation v1_3 MERGED main file.
- Users without Dragonborn should install the No Spinning Death Animation v1_3 main file.
|
|
|
|
|
|
NoMaaM Breathing Idles
|
non-BBB
|
Download and install the Female without BBB and Male Breathing Idles V0_1 optional file.
|
|
|
|
|
|
Skyrim Performance Plus
|
|
Detailed Instructions available
|
| Recommended for all users and particularly those with lower-end systems and those with performance issues.
Use the following three Main files:
- "Pine Needles FX"
- "Rainfall FX"
- "Snowfall FX".
... and one of the following:
Higher systems: "The Rift - Aspen Leaves FX - Good Performance"
Mid systems: "The Rift - Aspen Leaves FX - Super Performance"
Low systems: "The Rift - Aspen Leaves FX - Extreme Performance"
|
2.K. 06-Models and Textures[edit | edit source]
- Mods that replace existing models or textures
|
|
|
|
|
Mod Name
|
Baseline
|
Instructions
|
|
|
|
|
|
Dual Sheath Redux
|
|
Detailed Instructions available
|
Install the Main File. Ensure the latest 32-bit version of Java Runtime Environment is installed, it's required for the patcher.
FOMOD Instructions
Dual Sheath Redux
|
- Base Mod and/or Compatibility Packs
- Base Packs or Both
- ☑ Patcher and Vanilla Meshes
- ☑ Mod Packs
- Back or Hip
- Do you use a swords on back skeleton?
- Replacer Mods
- Skyrim Weapon De-LARP-ification Project
- Standalone Mods (select only the options below)
- aMidianBorn Book of Silence
- ☑ aMidianBorn Book of Silence
- Elemental Staffs
|
Dual Sheath Redux Patcher must be launched through Mod Organizer for it to recognize installed mods. Add the DSR Patch to the list of executables by doing the following:
- In the right pane, go to the Data tab.
- Locate the SkyProc Patchers directory and expand the Dual Sheath Redux Patch directory.
- Right-click the Dual Sheath Redux Patch.jar file and select Add as executable.
- If asked to locate the Java binary, browse to where you installed Java (usually
Program Files (x86)/Java/jreX.X.X_XX/bin) and select javaw.exe.
- Enter a name and finish.
Now each time you want to run the DSR Patch, simply select it from the drop-down menu at top right and click Run.'
Example video
|
|
|
|
|
|
High Quality 3D Map
|
Hi-res meshes, 1k normals
|
STEP recommends installing both the HQ3DMap - Meshes Hi-Res and HQ3DMap - Normals Original main files. Do not install any of the files with "Textures" in the file name. Choose the 03 - High 1024x1024 option in the installer.
|
|
|
|
|
|
Bethesda Hi-Res DLC Optimized
|
Hybrid + Vanilla normals
|
Detailed Instructions available
|
| Note that the following options are written in terms of the Wrye Bash Wizard and FOMOD options. If installing manually (not recommended), make sure to adjust accordingly.
Select the option that best suits your VRAM limitations...
- Less than 1GB
- Full 1024: Select "Core files" (selected by default), "Vanilla Secondary stuff", and all four "Vanilla" optionals. Also install the "Compatible Version" optional. Disable the three "HighResTexturePack" ESPs in launcher or mod manager.
- Between 1GB and 1.25GB - Baseline
- Hybrid (1024 + 2048) + Vanilla NormalMaps: Select "Core files" (selected by default), "Hi-Res Secondary stuff", and "Hybrid + Vanilla NM files". Also install the "Compatible Version" optional.
- Between 1.25GB and 1.5GB
- Hybrid (1024 + 2048): Select "Core files" (selected by default) and "Hi-Res Secondary stuff". Also install the "Compatible Version" optional.
- Greater than 1.5GB
- Do not download this mod, just use the full HRDLC.
|
|
|
|
|
|
Ruins Clutter Improved
|
|
Detailed Instructions available
|
Download and install the Ruins_Clutter_Improved_v2-8 NMM Installation Main File.
FOMOD Instructions
Ruins Clutter Improved
|
- Options
- Custom
- Candles
- ☑ High Resolution Candles
- Catacomb Candles
- Enchantingstation
- Spider Eggs
- Ruins Pots
- Ruins Door
- Dragonclaws
- Subliminal Traps
- Lantern
|
Hide the following files/folders:
- texture/clutter/candles
- texture/clutter/containers/miscbag01.dds
- texture/clutter/containers/miscbag01_n.dds
- texture/clutter/ruins/ruinslinen01.dds
- texture/clutter/ruins/ruinslinen02.dds
|
|
|
|
|
|
SkyFalls and SkyMills
|
|
Detailed Instructions available
|
Download and install the "SkyFalls and SkyMills FOMOD-BAIN Installer" main file.
FOMOD Instructions
SkyFalls and SkyMills FOMOD-BAIN Installer
|
- Installed DLC?
- Dawnguard (DG)
- Dragonborn (DB)
- Flaskaar (FS)
- Wyrmstooth (WT)
- Check your choices
- LOD mod compatibility
- Optionals
- Optional Small Waterfalls
- Optional Patches
- Windmill sail Size
- Select your water mod
- ◉ Realistic Water Two (Default)
|
|
|
|
|
|
|
Serious HD
|
1024
|
Detailed Instructions available
|
| Download and install the "Serious HD Retexture LANDSCAPE 1024px" file found in the Old Versions section and the "Serious HD Retexture RIFTEN 1024px" file found in the Optional Files section.
Hide the following files:
- textures/landscape/coastbeach02.dds
- textures/landscape/coastbeach02_n.dds
- textures/landscape/icefloes.dds
- textures/landscape/icefloes_n.dds
- textures/landscape/riverbededge.dds
- textures/landscape/riverbededge_n.dds
- textures/landscape/riverbottom.dds
- textures/landscape/riverbottom_n.dds
- textures/landscape/rivermud.dds
- textures/landscape/rivermud_n.dds
|
|
|
|
|
|
A Quality World Map
|
|
Detailed Instructions available
|
| Download and install the A Quality World Map 9.0.1 - Vivid with Stone Roads main file.
|
|
|
|
|
|
Skyrim Flora Overhaul
|
Basic
|
Detailed Instructions available
|
Download and install the Skyrim Flora Overhaul Basic Edition v1.87 main file. Also install the Dragonborn addon v02 main file. Select [Merge] when asked while installing the addon.
Add/modify the following under [Grass] in Skyrim.ini to reduce the quantity of grass (as seen in this comparison):
'"`UNIQ--pre-000000E1-QINU`"'
Note that this value can be set to any number (default is 20), where a lower value corresponds to a higher grass density and thus lower performance. Try different values to see what provides the best balance of performance and visual quality.
Add/modify the following under [Grass] in Skyrim.ini for more grass variety (with a slight performance impact):
'"`UNIQ--pre-000000E2-QINU`"'
(The typo in "texture" was made by Bethesda and should be written that way.)
STEP recommends hiding or removing the following files:
Hide the following file:
- textures/dlc02/landscape/volcanic_ash_01.dds
- textures/dlc02/landscape/volcanic_ash_04.dds
- textures/dlc02/landscape/volcanic_ash_04_n.dds
- textures/landscape/dirtcliffs (the entire folder)
- textures/landscape/fieldgrass02.dds
- textures/landscape/fieldgrass02_n.dds
- textures/landscape/trees/treepineforestbranchcompsnow.dds
- textures/landscape/trees/treepineforestbranchcompsnowl.dds
- textures/terrain/tamriel/trees/tamrieltreelod.dds
|
|
|
|
|
|
Dragon Glyphs-Fixed
|
Dragon Chiseled
|
Detailed Instructions available
|
| Step recommends the Dragon Chiseled Main File.
Hide the following files/folders:
- textures/dungeons/ridgedstone07a.dds
- textures/dungeons/ridgedstone07a_n.dds
|
|
|
|
|
|
HD Enhanced Terrain
|
1024
|
Step recommends: Hd Enhanced Terrain and Map snow 1024x1024 Version Old File.
|
|
|
|
|
|
Footprints
|
|
Install the Footprints v1_00 - Legendary main file. Clean save required if updating from 0.99
|
|
|
|
|
|
High Quality LODs
|
Hi-Res Meshes
|
Install the HQLODs - Meshes Hi-Res main file. Do not install the normals. For slightly better performance at slightly less quality, the medium-resolution meshes can be used.
|
|
|
|
|
|
HQ Snow
|
|
Download and install the main file.
|
|
|
|
|
|
Moss Rocks-Dragonborn
|
|
Download and install the Ruffled Feather Moss Rocks - Dragonborn Addon - v2.0 - SMIM Meshes main file.
|
|
|
|
|
|
Real Ice
|
1024
|
Detailed Instructions available
|
| Download the All-in-One Pack. Choose the 'With Parallax' option (even without using ENB; this is a parallax effect without an ENB requirement) and then the "Half Icecube-Half Dull" option (00 Dull and Ice). The BCF includes a wizard and Fomod to simplify installation -->
|
|
|
|
|
|
Re-Defined Dungeons
|
1024
|
Detailed Instructions available
|
| Download and install the Re-Defined Dungeons 1024x1024 optional file. This mod is not packaged correctly. When installing this mod, right-click on the Data folder and choose [Set data directory]. Okay [OK] to install.
If using the main file (2048x textures), hide or remove the candle textures as they conflict with SMIM. The recommended version (1024x textures) does not contain these textures and does not have this issue.
|
|
|
|
|
|
Realistic Water Two
|
|
Detailed Instructions available
|
| Download and install the Main File.
Those using the ENB Preset may want to also install Realistic Water Two - ENB Textures optional file. This optional file is not used for the Step Guide.
FOMOD Instructions
Realistic Water Two
|
- Options
- 0. Core
- 1. Resolution
- 2. Compatibility
- Options
- 3. Combination
- 4. New Lands
- 5. Waves
- 6. Other
|
|
|
|
|
|
|
Skyrim Distant Detail
|
|
Hearthfire users: Use the "Hearthfire Edition" file instead. Mod requires TES5Edit cleaning.
|
|
|
|
|
|
Skyrim Improved Puddles
|
1024
|
Detailed Instructions available
|
Download and install the Skyrim Improved Puddles 1024 BAIN Main File.
Choose both 00 - Core Files and 17 Dawnguard-HearthFires-Dragonborn DLC Users options from the installer.
|
|
|
|
|
|
Terrain Bump
|
Performance
|
Detailed Instructions available
|
| STEP recommends hiding or removing the following files from Terrain Bump:
Hide the following files:
textures/landscape/fieldgrass01_n.dds
textures/landscape/mountains/mountainslab01_n.dds
textures/landscape/mountains/mountainslab02_n.dds
|
|
|
|
|
|
Trees HD
|
High
|
Detailed Instructions available
|
| If installing with MO:
Hide the following files:
meshes/landscape/trees (entire folder)
textures/landscape/trees/Vurt_Pine01.dds
textures/landscape/trees/Vurt_Pine02.dds
|
|
|
|
|
|
Visible Windows
|
Medium version
|
STEP recommends the "Gritty" option for all windows and the "Default" for all color options but "Yellow Tint" for both Solitude and Whiterun. BCF Available. BCF needs 2 files (Reduced Night Glow optional file also needed)
|
|
|
|
|
|
Vivid Landscapes-Tundra Moss Revised
|
1024, Yellow
|
Detailed Instructions available
|
| Install the Vivid Landscapes - Tundra Moss Revised - yellow 1024 Main File. Merge the SMIM compatibility patch Optional File.
The optional file is not packaged correctly.
- Double-click high poly mesh...
- Right-click on Data found below high poly mesh...
- Select [Set data directory].
- Click [OK] and then [Merge], when asked.
|
|
|
|
|
|
AMidianBorn Book of Silence
|
|
Detailed Instructions available
|
Download the following files:
- aMidianBorn book of silence -- ARMORS
- aMidianBorn Book of Silence -- CREATURES
- aMidianBorn book of silence -- DRAGONBORN
- aMidianBorn book of silence -- UNIQUE ITEMS
- aMidianBorn book of silence -- WEAPONS
This mod has two installation options. When multiple files are used from the same mod, either:
- create a single mod listing and merge all files into it or,
- create a separate mod listing for each file.
STEP Recommends: Merging all files into single mod listing named aMidianBorn Book of Silence
FOMOD Instructions
aMidianBorn Book of Silence ARMORS
|
- Options
- Options
- Iron and Banded
- Steel
- Steel Plate
- Leather
- Hide and Studded
- Fur
- Elven
- Dwarven
- Ancient Nord
- Orcish
- Scaled
- Wolf
- Glass
- Ebony
- Blades
- Falmer
|
FOMOD Instructions
aMidianBorn Book of Silence CREATURES
|
- Options
- Options
- Skeleton
- Dragon Priest
- Draugr
- Falmer
- Chaurus
- Spriggan
|
FOMOD Instructions
aMidianBorn Book of Silence DRAGONBORN DLC
|
- Options
- Custom
- Nordic Carved Armor
- Bonemold Armor
- Acolyte Masks
- Dragon Priest Acolytes
- Hulking Draugr
- Ash Spawn
- Ash Guardians
|
FOMOD Instructions
aMidianBorn Book of Silence UNIQUE ITEMS
|
- Options
- Custom
- Targe of the Blooded
- Wuuthrad
- Savior's Hide
- Helm of Yngol
- Mace of Molag Bal
- Mehrune's Razor
- Volendrung
- Tsun's Armor
- Ebony Mail
- Staff of Magnus
- Dragon Priest Masks
|
FOMOD Instructions
aMidianBorn Book of Silence WEAPONS
|
- Options
- Options
- ◉ Install all weapons (default)
|
Optional ESPs
Depending on how the mods are installed:
- Right-click the aMidianBorn Book of Silence or aMidianBorn Book of Silence WEAPONS mod
- Click [Information...].
- Click the Optional ESPs tab and move aMidianborn_Skyforge_Weapons.esp from the right pane to the left.
Repeat these steps whenever asked to moved plugins to the Optional ESPs.
Hiding files and folders
Hide the following files/folders:
To do this,
- Double-click on the mod listing in the left pane.
- Click the Filetree tab.
- Expand the textures folder.
- Right-click on the clothes folder and select [Hide].
Repeat these steps whenever asked to hide files or folders from a mod.
|
|
|
|
|
|
Elemental Staffs
|
1024
|
Install the Main File and merge the Elemental Staffs LE Basic Optional File.
|
|
|
|
|
|
Elven Weapons for Silence
|
|
Detailed Instructions available
|
| If using the STEP recommended options for Book of Silence which installs the Gold Eleven Armor, then his mod can be skipped entirely.
If using the Black Eleven Armor, the following is recommended:
- Texture Type
- Users choice. This is a personal preference; however, use the med res option.
- Improved Meshes
|
|
|
|
|
|
Greatsword Sheaths and Scabbards Redux
|
|
Detailed Instructions available
|
FOMOD Instructions
Greatsword Sheaths and Scabbards Redux
|
- Installation Options
- Select DLC
- ☑ Skyrim
- ☑ Dawnguard
- ☑ Dragonborn
- Meshes Type
- Sheath/Scabbard Type
- Skyforge Steel
|
|
|
|
|
|
|
Improved Closefaced Helmets
|
|
Detailed Instructions available
|
| Download and install the "Improved Closefaced Helmets (Legendary Edition)" and the "Update - Male corundum Dragon Priest mask texture fix" update file. [Merge] when asked for installing the update file.
|
|
|
|
|
|
New Thinner Torch
|
|
Download and install the Ultimate HD Torch by rheadude compatible Optional File.
|
|
|
|
|
|
Ultimate HD Torch
|
1024
|
Install the Main File and Ultimate HD Torch -less glowing cloth- Optional File.
|
|
|
|
|
|
Detailed Rugs
|
Main File
|
Download and install the Detailed Rugs v1-5 Main File.
|
|
|
|
|
|
HD Ore and Ingots
|
|
STEP recommends the "With manager" file. The main file is mostly extraneous screenshots and duplicate files.
|
|
|
|
|
|
HD Sacks
|
|
Step recommends: HDSacks14TypeBBig and HDSacks14TypeBSmall Main Files.
|
|
|
|
|
|
Septim HD
|
|
Detailed Instructions available
|
FOMOD Instructions
Septim HD
|
- Texture and Mesh Options
- Septim HD Plugin
|
|
|
|
|
|
|
Skyrim Redesigned
|
|
Detailed Instructions available
|
Download and install the FOMOD version and install according to the instructions below:
DO NOT use the STEP option in the installer. It pertains to old versions of the Guide.
FOMOD Instructions
Skyrim Redesigned
|
- Options
- Custom Installation
- Skyrim Redesigned
- ☑ Alchemy Table
- ☑ Anvil
- ☑ Bloody Rags
- ☑ Brown (less saturated) Money Bags
- ☑ Buckets
- ☑ Enchanting Table-Css01 Retexture
- ☑ Hagraven Claws
- ☑ Skeever Tail
- ☑ Skeleton Key
|
Users who experience black and purple or rainbow colors on their money bag and alchemy lab tables need to set iTexMipMapSkip to the value of 0. This is found in the SkyrimPrefs.ini file under the [Display] header.
|
|
|
|
|
|
Soul Gems Differ
|
|
Detailed Instructions available
|
Download and install the Soul Gems Differ - All-In-One main file.
FOMOD Instructions
Soul Gems Differ
|
- Welcome!
- Welcome
- ☑ Continue to installation
- Normal or Requiem
- ESP Files
- Mod Version Options
- ◉ Sort-friendly and Weighted
- Installation Options
- Choose your install option
- ◉ STEP Installation Option
- Install Soul Gems Differ
- Mod Installation
- ☑ Install Soul Gems Differ
|
For STEP users using Wrye Bash, download the " Soul Gems Differ All-In-One" main file and run using the WB wizard. This will allow you to install the STEP-recommended Configuration.
All other users, the Requiem option will install a Requiem patched version of the mod so only choose "Yes" if you are using Requiem or your game will likely crash at start. The next screen allows you to install the version of the mod you want. This will also install all needed language files to make the mod multilingual. The next screen allows you to install the gem options. Either choose a pre-made option or choose custom to customize the options you want.
|
|
|
|
|
|
Super Realistic Ore
|
|
Download the Just the textures optional file. This mod is not packaged correctly. Right-click on Data and choose [Set data directory]. Click [OK] to install.
|
|
|
|
|
|
Bellyache's Creature Pack
|
Medium
|
Detailed Instructions available
|
| Use the Default Animal Replacement Med Res file located in the Miscellaneous Files.
Hide the following files/folders:
- textures/actors/chaurus
- textures/effects/fxbird01.dds
- textures/effects/fxbird01_b.dds
- textures/effects/fxbird01_n.dds
|
|
|
|
|
|
Burn Freeze Shock Effects
|
Loose
|
Detailed Instructions available
|
| This mod has been known to cause issues on some systems, therefore, it is highly recommended to use the memory patch included in SKSE.
Download and install the BFS Effects 3_6 - Loose main file. Also install the optional BFS Effects 3_6 - Dragonborn Dawnguard file. Select [Merge] when prompted.
|
|
|
|
|
|
Deadly Spell Impacts
|
Medium
|
Detailed Instructions available
|
FOMOD Instructions
Deadly Spell Impacts
|
- Options
- Custom
- Fire Spell Dependent Feature
- ◉ One Fire Impact (Default)
- One
|
If issues arise from this mod, try installing the low resolution version.
|
|
|
|
|
|
Enhanced Blood Textures
|
|
Detailed Instructions available
|
Download and install the Enhanced Blood Textures LITE Main File.
Optionally, download and merge the No Screen Blood Optional File. This will remove blood spatters from the screen.
|
- Mods that affect sounds or music
|
|
|
|
|
Mod Name
|
Baseline
|
Instructions
|
|
|
|
|
|
Better Animal Footsteps
|
|
Detailed Instructions available
|
FOMOD Instructions
Better Animal Footsteps
|
- Custom
- Select one option
- ◉ Install all of the footstep sounds
- Custom
- Optional Pets of Skyrim patch
|
|
|
|
|
|
|
Audio Overhaul for Skyrim
|
|
Detailed Instructions available
|
FOMOD Instructions
Audio Overhaul for Skyrim 2
|
- Welcome to the AOS Installer
- Choose the type of installation:
- ◉ Install for STEP or SR:LE
|
Users that play with headphones may also consider the AOS_Reduced_Reverb Optional File.
|
|
|
|
|
|
Immersive Thunder
|
|
This mod is not packaged correctly. Double-click on ImmersiveSkyrimThunderV6. Right-click on Data and choose [Set data directory]. Click [OK] to install.
|
|
|
|
|
|
Smooth Blade Draw and Sheathe
|
|
Detailed Instructions available
|
Install the Smooth draw and Sheathe sfx - Full options Main File.
FOMOD Instructions
Smooth blades draw and sheath
|
- Introduction
- Choose one ADS version
- Choose your options
- SBDS options
- ☑ Daggers
- ☑ 1Handed blades
- ☑ 2Handed blades
- ☑ Enchanted weapons
- ☑ Mute activation fail
- ☑ Mute critical hit
- ☑ Mute left hand
- Outro
|
|
- Mods that affect general or multiple gameplay mechanics
|
|
|
|
|
Mod Name
|
Baseline
|
Instructions
|
|
|
|
|
|
Weapons and Armor Fixes
|
|
Detailed Instructions available
|
Install the Main File:
FOMOD Instructions
Weapons and Armor Fixes Remade
|
- Main File and DLC Selection
- Main File and DLC Selection
- Options
- Select Custom Options
- True Weapons
- ◉ True Orcish and Daedric Weapons
- Dragon Priest Masks
- Faster Arrows
- Dark Brotherhood Mask Fix
- ☑ Dark Brotherhood Mask Fix
- Better Fitting Glass Helmet
- ☑ Better Fitting Glass Helmet Meshes
- Texture Size
- Compatibility Patches
- aMidianborn Skyforge Weapons
- Immersive Weapons
- Improved Closedfaced Helmets
- Final Final
|
|
|
|
|
|
|
Auto Unequip Ammo
|
|
Detailed Instructions available
|
In the MCM settings for Auto Ammo Unequip, STEP recommends changing following settings:
- Follower Addon
- Default: unticked
- STEP: ticked
- This will add the mod's functionality to your followers as well.
|
|
|
|
|
|
No NPC Greetings
|
Sligtly Reduced
|
Included in every version of the STEP Patches, STEP Core Patch, STEP Extended Patch, and both versions of the STEP Combined Plugin.
|
|
|
|
|
|
Wet and Cold-Ashes
|
|
 WARNING
This mod is no longer supported by Wet & Cold v2.0+. It is now included in the main Wet & Cold mod as an optional. |
A Necessity
3.A. Post-Installation Housekeeping[edit | edit source]
3.A.1. Sort Plugins Using BOSS[edit | edit source]
Before launching the game via Mod Organizer (or via Wrye Bash or skse_launcher directly), it is necessary to sort the plugins to ensure proper asset and plugin loading order, which can have a dramatic impact on the game (or at worst cause a CTD).
- Launch BOSS via Mod Organizer (or via Wrye Bash or directly from the BOSS program folder).
- Examine the BOSS output carefully and look for any alerts or warnings and address each. The Plugins tab in MO (on the right side of the MO window) is where plugins can be activated/deactivated and sorted (hold Ctrl + Up/Down arrow keys to sort).
- The STEP Patch may need to be manually sorted and activated. Place it directly before "bashed patch, 0.esp".
3.A.2. Create the Bashed Patch[edit | edit source]
- Launch Wrye Bash via Mod Organizer.
- Within the Mods Tab, right click on "bashed patch, 0.esp", and select "Rebuild Patch".
- Tick the boxes next to "Merge Patches", "Import Names", "Import Stats", "Tweak Settings", and "Leveled Lists".
- Highlight "Tweak Settings", and tick the box next to "Crime: Alarm Distance". Optional: tick the box next to "Timescale".
- Right-click on "Crime: Alarm Distance" and select '1000' and optionally set "Timescale" to a value less than '20' but no less than '10'.
- Next click [Build Patch] at the bottom of the window to construct the patch based on the current plugin list/order
NOTE:
text=Rebuild the Bashed Patch again each time the plugin load list/order changes.
MO2
After closing Wrye Bash and returning to MO, the
"bashed patch, 0.esp" will be located in the
"Overwrite" folder. A different Bashed Patch can be created for every MO profile, so it is advised to move the Bashed Patch and its data to a separate mod folder. Simply right click the
"Overwrite" folder and select 'Create Mod', then name it. Example is STEP Core Bashed Patch. You will then need to check it to enable it. Each subsequent time you rebuild the patch, you must open Overwrite and drag the new files back to this mod.
3.A.3 Fore's New Idle System (STEP Extended Only)[edit | edit source]
The animation files need to be generated for the skeleton changes and weapon placement to show properly in game. Combined with XP32 Skeleton and Dual Sheath Redux, Fore's New Idle System allows users to place swords, daggers, and shields on the Player Character's back instead on the hip and arm.
- Launch GenerateFNISforUsers via Mod Organizer (or from the mod's folder in windows explorer if not using MO).
- In the Available Patches at the bottom of the window, check the box adjacent to "SKELETON Arm Fix".
- Click the [Update FNIS Behavior] button and wait for a message to appear in the window stating "X animations for Y mods successfully included.".
- Click [Exit].
MO2
After closing FNIS, there will be files in
Overwrite (essentially a fake mod located at the bottom of the left pane if sorted by priority ascending) created by FNIS. Right-click
Overwrite and select
Create Mod, name it FNIS Output and click OK. This will create a new mod listing in the left pane for the FNIS generated files. You will then need to check it to enable it. Each subsequent time you update FNIS behavior, you must open Overwrite and drag the new files back to this mod.
3.A.4. Dual Sheath Redux Patch (STEP Extended Only)[edit | edit source]
- Launch Dual Sheath Redux (DSR) Patch via Mod Organizer.
- Click [Patch] in the top right corner to generate the patch. After this is done, Dual Sheath Redux Patch will close automatically.
MO2
After closing the Dual Sheath Redux Patch, there will be files in
Overwrite (essentially a fake mod located at the bottom of the left pane if sorted by priority ascending) created by DSR. Right-click
Overwrite and select
Create Mod, name it DSR Output and click OK. This will create a new mod listing in the left pane for the DSR patch generated files. You will then need to check it to enable it. Each subsequent time you rebuild the patch, you must open Overwrite and drag the new files back to this mod.
WARNING:
Each time you change your load order, you should rerun the DSR Patch to remake the patch. Failure to do so may lead to a CTD upon startup.
Once all mods have been installed and are ready to play, be certain to either:
- Start a brand new character, or
- load the save game generated just after character creation if it exists, or
- load an existing character after clean saving the relevant save game.
MO2
It takes significantly longer to launch Skyrim from within MO than it does by using other means. Allow up to 3 minutes for Skyrim to launch before panicking ... launch time will be faster after the first launch in a given MO session (unless lots of mod-list changes are made).
Tips & Troubleshooting Common Issues
4.A. Troubleshooting Common Problems[edit | edit source]
A heavily modded Skyrim can bring even a very powerful system to its knees. Maximum visual quality is highly dependent upon total on-card graphics-dedicated video memory (VRAM), the number of GPUs, and monitor resolution. The goal should be to maintain 30 or more FPS on average without any noticeable stuttering.
{{{text}}}
Skyrim still sometimes fails to launch, and the following are some of the most common causes and solutions:
- Improper load order - Run BOSS and examine the output. Plugins out of order or plugins with missing masters will cause this. BOSS will sort everything properly, but certain patches installed with certain mods included with STEP:Extended will not apply under a STEP:Core install, so these plugins need to be un-ticked in MO or WB plugin lists.
- Improper Bashed Patch - This can result from ticking options that are not explicitly mentioned in this guide (see above), or it can result if the Bashed Patch was not rebuilt after a mod-list/order change.
- Bad INI settings - If Skyrim.ini or SkyrimPrefs.ini were edited in a way that was not described in STEP 1.D. (or if a fresh, default INI was not used as a baseline), certain settings can cause this issue. The quickest solution is to revisit that section and regenerate a fresh INI with the recommended settings.
4.A.2. Crashes to Desktop (CTD)[edit | edit source]
There are unfortunately many reasons for CTDs just after launch or shortly thereafter, but if this guide was followed precisely, STEP mods should not be the cause. Following are some common causes and solutions.
- Improper Load Order - Run BOSS and examine the output as in the previous section.
- Missing Masters - If an active plugin is missing its dependent master, a CTD will occur immediately. To fix, either locate the missing master and add it in or deactivate the plugin missing its master.
- MO will show a red exclamation icon next to the plugin, while Wrye Bash will show a red checkbox next to the plugin.
- Improper Bashed Patch - See the previous section.
- Bad INI settings - Yep, see the previous section.
- Bad video settings or incompatible driver version - Revisit STEP 1.E. and verify settings, back them down to 'performance' options, or update to the proper video driver.
- Windows environment issue - This is highly possible and unfortunately too difficult to prescribe any remotely ubiquitous solution other than restarting the computer and checking for conflicting processes (e.g., anti-virus/maleware). Google is a friend to all in need.
4.A.3. Semi-Invisible People, Objects or Misbehaving Walls[edit | edit source]
Following are some solutions:
- Transparency Antialiasing - Turn of any transparency (adaptive) sampling if enabled under antialiasing settings of the graphics-driver software (see references under STEP 1.E.). Also, remember to download the latest ATI drivers.
- Bad INI settings - If using ENB, set
bFloatPointRenderTarget=1 in the SkyrimPrefs.ini.
- Microstutter - This is an annoying 'glitchiness' when moving or panning for those using higher-end graphics cards (usually) or multiple GPUs in SLI or CrossfireX configs (purportedly). Follow the recommendations for ENBoost, noting in particular
EnableVSync=true . If this does not resolve the issue:
- Ensure that microstutter is not being confused with 'macro'-stutter, which is more severe and memory related. Remember: microstutter is very annoying, but not hindering in any way.
- Try forcing vsync via Nvidia Inspector (Nvidia users) or RadeonPro (AMD users) ... sorry Intel users. Also (and this is very important), enable D3D-compatible triple buffering via RadeonPro. Nvidia Inspector users: D3D-compatible triple buffering is not available. Use D3Doverrider instead. This may also have a vsync function.
- Macrostutter - This is most likely the result of using textures and meshes that exceed the limits of GPU VRAM. ENBoost should prevent this in most cases, but certain user configurations and/or hardware may not behave as expected:
- Verify ENBoost settings and graphics settings described under STEP 1.E.!
- Re-install the most performance-friendly versions of mods as indicated by the "Quality Options" column of the mod tables above.
- Consult the DDSopt Guide to learn how to optimize textures accordingly.
- Finally, Un-install Skyrim Flora Overhaul and Skyrim Realistic Overhaul, which are easily the most VRAM-intensive mods in STEP (although there are others under STEP 2.F. and STEP 2.G. in particular).
- Enable windowed mode via ENBoost (instructions at bottom of mod page).
4.A.5. Texture Flickering, Etc.[edit | edit source]
Refer to the Z-Fighting Guide.
- The console can be activated by pressing the tilde ([~]) key, often located just below [Escape], while in-game.
- ENBoost has a couple built in hotkeys that are helpful (can be adjusted in enblocal.ini section [INPUT]):
- Show FPS: [*] (on the numpad not shift+8)
- Free VRAM: [f4]
- Screenshot: print screen (Skyrim's screenshots do not work with ENB/ENBoost)
- Steam screenshots are [f12], but if using a keyboard with multimedia keys it could be [shift+f12].
- Be aware [shift+f12] is also the ENB Series Graphics hotkey to toggle the effects on/off. ENBoost ONLY users are not affected.
4.B.1. Optimize Field of View (FOV)[edit | edit source]
Prior to 2008, the most common monitor resolutions were 16:10 aspect ratio (source). Since then, 16:9 has become the standard. The Skyrim FOV defaults to 75 (%) and is optimized for monitor aspect ratio of 16:10. Therefore, users with 16:9 monitors (e.g. 1920x1080) will want to increase their FOV to 81. Setting this in the INI does not persist, so it must be done via the console. Within Skyrim, open the console (tap the tilde [~] key) and type: fov 81 . Those rare and unfortunate users stuck with 4:3 aspect ratio will need to 'reduce' their FOV down to 62.
A helpful conversion calculator can assist in calculation of other monitor types (just type in a 16:10 on the right side and the new resolution on the left to get the new hFOV).
4.B.2. BIG Frame Drops During Cell Loading[edit | edit source]
This is a likely indicator that VRAM is too often operating at or beyond capacity (see 4.A.4).
Community Add-ons
STEP Packs are generally intended to go over the STEP:Core build. Be certain to read the Pack instructions to determine what build the Pack is dependent upon.
MO2
You will now experience one of the reasons why Mod Organizer is the chosen mod-management utility for STEP. Pack installation is a breeze, as it is possible to have profiles for each build dependency that a given Pack relies upon.
Consider reviewing some of the Packs that our users have been developing to augment STEP.
STEP Packs
How YOU Can Help
STEP can only get bigger and better with help from the user community. Even simply maintaining the current STEP is too much work for the core STEP team to ensure that the highest quality is maintained. We need people to help us identify mods that improve Skyrim while adhering to the STEP Mandate. We also need ongoing reviews and updates on mods that may be causing problems or that stray from the STEP philosophy. Finally, we need help from the community in terms of testing, benchmarking and analysis. More detail is presented in the Mod Testing Guide.
In order to suggest a mod, visit the Mod Suggestions section of the STEP Forums.
NOTE
The STEP team will be beta testing a new mod-testing procedure and interface currently in final stages of development here on the STEP Wiki. Anyone interested in testing mods of any kind --whether included in STEP or not-- should
contact the STEP administrators by email or on the forums (click on the link in upper left of header).
Call for Wiki Content Editors[edit | edit source]
The STEP Community Wiki is open to editing by all registered community members; however, we need assistance maintaining and creating new supporting content. We are particularly interested in obtaining a few people with a passion for writing and editing. Familiarity with wiki markup is preferable but not necessary. Interested parties please contact z929669 via PM on the forums (Please register on the forums and see the very bottom of the Forum Team page).
STEP users interested in becoming testers, please contact z929669 via PM on the forums (Please register on the forums and see the very bottom of the Forum Team page). Once registered, record your system specs by clicking on the button and filling out the form. These specs will be associated with performance data by tester.
Users interested in helping out with the STEP Benchmarking Project, see our benchmarking guidelines and submit results on the forums (see link at upper left of site header bar).
Regular STEP forum users interested in becoming moderators, please contact z929669 via PM on the forums (Please register on the forums and see the very bottom of the Forum Team page).
Thank you for reading and enjoy the game!
The STEP administrators would sincerely like to thank (from the bottoms of our fuzzy little hearts):
- The authors of mods recommended in STEP
- The core STEP Community for feedback, suggestions and input
- The STEP beta testers ... for their good humor and rigorous analyses
- The Nexus community
- Bethesda Softworks for Skyrim (and TES in general)
- A very special thanks to STEP aficionados, EssArrBee and DoubleYou for their assistance with this release. EssArrBee is also our STEP Patch maintainer, so a big thanks to him for that. DoubleYou is also the lead maintainer of the MO Guide
- stoppingby4now - Main site developer, Semantic Mediawiki developer & extraordinaire, site founder
- TheCompiler - STEP creator, mod-list extraordinaire
- z929669 - Wiki & forums content editor, main site administrator, hosting maintenance, site founder
- Active STEP volunteer staff: Aiyen, EssArrBee, deathneko11, DoubleYou, GSDfan, Kelmych, kryptopyr, phazer11, rootsrat, Tannin, Techangel89, torminater, Uhuru, WilliamImm, and wolverine2710
- Farlo - Mediawiki developer & extraordinaire, Mod-list co-compiler, forums admin, site founder (out of commission since November, 2013)
- MontyMM - Solutions developer (Semi-Automatic STEP), site founder (out of commission since December, 2013)

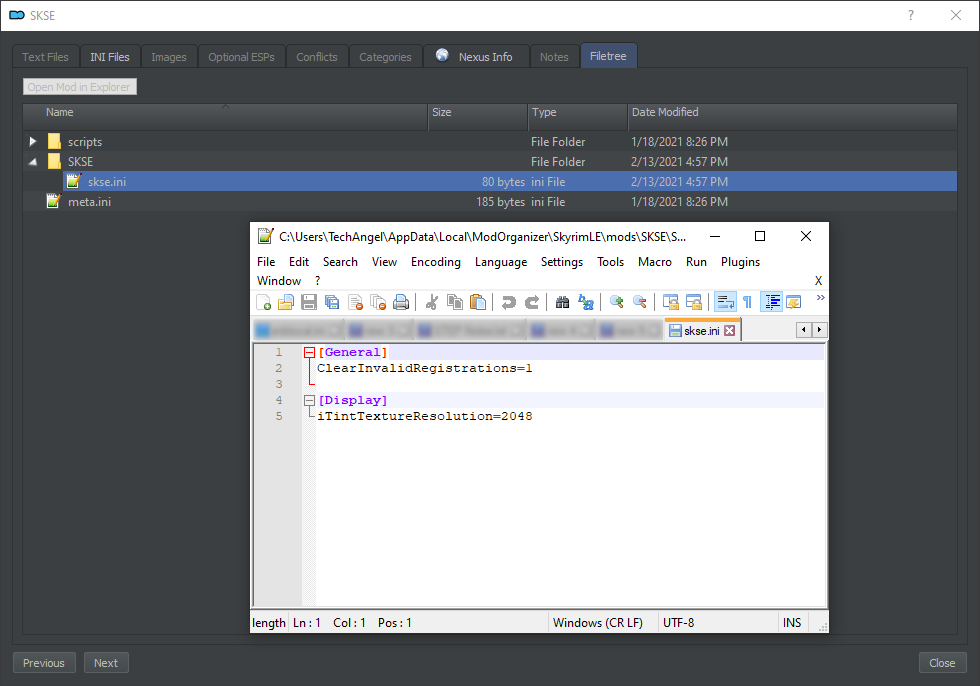
