
Starfield:1.0
WARNING
This guide is in the development phase and is NOT supported. The contents of this page can change at any time, so please DO NOT request support for this guide on the forums!Go to the latest supported Starfield Guide
This Release[edit | edit source]
The most noteworthy changes are listed below. See the Step Versioning Documentation for more information on Step's versioning methodology.
- Initial release
See the changelog for more details and to determine if upgrading from a previous version is advisable.
Step Starfield Guide[edit | edit source]
This is the official Step modding guide for Starfield. Its goal is to provide an "enhanced vanilla" look and feel. It is built for Starfield on the PC without VR.
- Visit the forums to learn more or contribute.
- Also follow Step Modifications on Facebook.
- To support hosting and maintenance of this website, consider donating to the project.
New to Modding?[edit | edit source]
We recommend that you review this entire guide before attempting installation, especially if this is your first exposure to a Step Game Guide. We and the community, have consolidated a lot of information into our guides for use as a free resource for all. New and experienced modders alike will find many answers within these guides and linked resources. This guide is written in such a way that it expects users to know the basics of modding and related tools (e.g. mod managers, LOD optimizers, configuration utilities, etc.). However our support forums are always available for Q&A.
Nomenclature and Instructions[edit | edit source]
The following nomenclature is used throughout this guide and should be understood before proceeding.
- 'tick' means 'check': Frequently, the word 'check' or 'checked' can mean 'ensure' in addition to "check mark", so 'check' is not used where it is synonymous with 'tick' to avoid any mistakes that can (and have) happened from this conflation.
- Baseline: The recommended install option is shown within the Baseline column of the mod tables below.
- Step Patches: Custom patches created for the respective Step Guides. Always use them!
Expand Instructions![edit | edit source]
Click the heading below to expand detailed instructions that are collapsed by default for readability:
Expand mod table detailed instructions:

Not Safe For Work Content[edit | edit source]
Installing this Guide in the manner intended results in no not safe for work (NSFW) content in-game. However, there may be mod pages linked within the Guide that do include NSFW content; namely images. In the past, mod instructions included direct links to download files; bypassing these pages. However, when Nexus Mods implemented a unique MD5 hash to every download request it prevented Step from providing links directly to specific files. As such, these mod pages are indicated with warning text.
- Example:
-
- This is a Not Safe For Work (NSFW) mod page!
System Requirements[edit | edit source]
Starfield should be run on a relatively modern Windows 10/11 64-bit desktop or laptop, gaming capable PC. While CPU specs and performance are important factors, they matter only to a point beyond which is diminishing return on investment. Smooth gameplay, LODGen-related tools, and ENBSeries post-processing are most limited by the GPU performance coupled to the resolution at which the game is run.
- The minimum specs assume that the recommended 'baseline' mod options will be installed, which are biased towards 'performance' options when available.
- The recommended specs assume a bias toward 'quality' and assume higher quality mod options will be installed when available.
- CPU/GPU Marks should be within the ranges listed below. Refer to the links for examples.
| Hardware | Minimum | Recommended |
|---|---|---|
| CPU CPU Mark Range | 11,000 - 13,000 | > 14,000 |
| System RAM | 16GB | 16GB |
| GPU G3D Mark Range | 16,000 - 18,000 | > 19,000 |
| Video RAM | at least 4GBs | 8GBs or higher |
| Game Drive | SSD | SSD |
| Resolution | 1080p (HD) | 1440p (QHD) |
Time Commitment[edit | edit source]
Be aware it will take anywhere from several hours to a several days to complete this build from start to finish. This time will vary greatly depending on internet download speed and user experience. Following are cumulative time estimates on average:
- 3-6 hours : Steps 1 - 3 (modding-environment setup)
- 10-12 hours : Step 4 (mod download, installation)
- 4-6 hours : Steps 5 - 7 (LODGen, post-build configuration, and fine-tuning the build)
STEP 1[edit | edit source]
Follow the System Setup Guide![edit | edit source]
Those who have not completed the System Setup Guide (SSG) should STOP and do so now BEFORE beginning Step 2! This is a perquisite for completing this guide, as many of the following instructions reference concepts, tools, and even file paths established in the SSG.
NOTE
Since mod have been around longer than official mod support, many have mod files and other things installed from previous modding journeys. This guide expects a clean install of the latest version of Starfield and any official DLC. It's highly recommended to revert to vanilla, validate the game data, and reinitialize the game before continuing with this guide.
STEP 2[edit | edit source]
Mod Organizer[edit | edit source]
It's recommended to create a new MO instance for each Step build. Revisit the SSG - MO First-Launch Setup if a Step Starfield 1.0 instance wasn't created previously.
Tool Setup[edit | edit source]
All modding tools needed should already be installed according to the System Setup Guide. Some tools will have been auto-detected and added; nevertheless, ensure the settings are correct for all tools. xEdit is used in the following example. 'SSEEdit', TES5Edit, FO4Edit, etc. are all 'xEdit', which applies to all Bethesda games.:
- For xEdit, it is useful to create a mod into which all xEdit ouput can be directed in order to keep it all together:
- Click
 at the top of the left pane in MO, and select "Create empty mod".
 - Type
xEdit Output, and select [OK]. - Place this mod at the top of the mod list just below the vanilla game files, and enable it.
- Click
- Click
 at the top of the main Mod Organizer window.
 - In the left pane of the executables config, click the [+] to add a new executable, and then [Add from file...].
- Browse to the xEdit.exe file (e.g.
..Modding/Tools/xEdit/xEdit.exe).- This should auto-fill most of the fields.
- Change the title to xEdit.
- Input the following in the Arguments field separated by a single space:
- e.g.
-IKnowWhatImDoing -STF -AllowMasterFilesEdit - "-IKnowWhatImDoing": This turns off a warning presented when users make edits.
- "-AllowMasterFilesEdit": By default xEdit will not allow master file editing. This enables that.
- e.g.
- Tick the Create files in mod instead of overwrite box. Select the xEdit Output mod from the drop-down.
- Tick the Use applications icon for desktop shortcuts box.
- Click [Apply].
- Repeat these steps to add the remaining executables as indicated in the table following.
- Arrange the tools in any order using the up and down buttons above the list. This will dictate the order that tools are listed in the MO "Run" dropdown menu. Close the window by clicking [OK].
NOTE
For tools previously installed, adjust the arguments below for use with Starfield. Also note that the SFSE configuration was created automatically by MO, so simply modify that accordingly.| Application Title | Executable | Argument(s) & Special Instructions |
|---|---|---|
| BethINI Pie | Bethini.exe | no arguments |
| LOOT | LOOT.exe | --game="Starfield"
|
| SFSE Skyrim Launcher | skse64_loader.exe | no arguments Tick the Create files in mod instead of overwrite box and select the SKSE Output mod from the drop-down. |
| xEdit | xEdit.exe | -SF1 -IKnowWhatImDoing -AllowMasterFilesEditTick the Create files in mod instead of overwrite box and select the xEdit Output mod from the drop-down. |
| xEditQuickAutoClean | xEditQuickAutoClean.exe | -SF1Tick the Create files in mod instead of overwrite box and select the xEdit Output mod from the drop-down. |
| xLODGen | xLODGenx64.exe | -lodgen -SF1 -o:"DriveLetter:\Modding\Tools\xLODGen\xLODGen_Output"Replace DriveLetter with the drive letter containing the 'Modding' folder.
|
MO executables can be arranged in any order using the up and down buttons above the list or drag & drop. This will dictate the order they are listed in the MO "Run" dropdown menu. When complete, close the window by clicking the [OK] button.
BethINI Pie[edit | edit source]
MO2
Unlike the previous version of BethINI used in past Step guides, BethINI Pie should be run as an MO executable%LOCALAPPDATA%\<gameFolder>). See the Tools configuration table in the previous section.- The goal before mods are installed is to establish a common baseline referenced below. This will be used as a basis for #2.
- Those revisiting during Performance Tuning will want to test the [High] or [Ultra] preset under the 'Basic' configuration. Once the targeted changes are made, close BethINI, and click [Yes] at all prompts.
BethINI Pie Settings[edit | edit source]
Configure BethINI as reflected in the images below under each expandable heading. The optimal settings will be applied --and scaled sensibly according to the quality preset chosen, but circumstantial instructions are provided in case they apply to the modding environment.
Many settings are expected for Performance Tuning later in this guide, so please don't deviate from the High preset until that point.
| [ Basic ]Click to show/hide |
|---|

|
| [ General ]Click to show/hide |
Screenshots Directory, Filename, and Index can be set as desired. Screenshots are taken by pressing Prt Screen on the keyboard.

|
| [ Gameplay ]Click to show/hide |

|
| [ Interface ]Click to show/hide |

|
| [ Environment ]Click to show/hide |

|
| [ Shadows ]Click to show/hide |
If ENB or other post-processing will be used, untick Ambient Occlusion.

|
| [ Visuals ]Click to show/hide |

|
| [ View Distance ]Click to show/hide |

|
STEP 3[edit | edit source]
Sorting Plugins With LOOT[edit | edit source]
At any time during the mod installation process, LOOT should be used to sort plugins before running the game. This is necessary to ensure proper plugin priority (load order), which can have a dramatic impact on the game:
- Launch LOOT via MO from the executables launch dropdown at the top of the right pane.
- If LOOT cannot find the game directory, click File > Settings > "Starfield", and set Install Path to the actual path of the game folder.
- If LOOT fails to start, close LOOT, open the MO executables configuration , and modify the arguments:
--single-process --game="Starfield"
- Click [Sort Plugins].
- Several plugins will show warnings in yellow. This will be fixed shortly.
- Click [Apply Sorted Load Order].
- Close LOOT.
Up to this point, only the following plugins should be listed in the MO right pane in the order listed. (If not, run LOOT again):
- Starfield.esm
- Constellation.esm
- OldMars.esm
- BlueprintShips-Starfield.esm
Cleaning Vanilla Master Plugins[edit | edit source]
To resolve potential issues later, the vanilla plugin masters should be cleaned with xEdit. Step is aware of the debate regarding whether or not it's necessary to clean vanilla masters. While it may or may not matter for general references, that is not the case regarding large references. Any large reference that is deleted, "initially disabled", or overwritten triggers large reference bugs. See the relevant posts for details and further reading.
Prior to getting started, create an empty mod in MO:
- Click at the top of the left pane in MO, and select "Create empty mod".
- Type
Cleaned Vanilla Masters, and select [OK]. - This mod should appear at priority 79 in the MO left pane if all instructions were followed correctly.
Clean the Vanilla Masters[edit | edit source]
Use the following procedure for cleaning the vanilla plugins (including Creation Club masters), which involves exactly 44 'dirty' vanilla masters (including plugins from the base game, the original DLC, the base Creation Club DLC, and the Anniversary Upgrade DLC, all of which are required). Use LOOT as a reference to determine which specific vanilla plugins should undergo cleaning. Following the provided cleaning and housekeeping instructions ensures that this process only needs to be performed once, unless a master is updated by Bethesda.
- Run LOOT from the drop-down executable list in MO, sort the plugins, and apply the changes. Do not close LOOT.
- NOTE: that any dirty plugins plugins will have yellow "warning" blocks. These are the plugins that should be cleaned.
- Leaving the LOOT window open, click on the MO window and note the "Mod Organizer is locked ...." message in the center of the MO window. Click [Unlock].
- This allows the LOOT window to remain open as a reference for the plugins that should be cleaned. The vanilla plugins with 'dirty' warnings should be cleaned in order listed.
- Run xEditQuickAutoClean from the drop-down executable list in MO.
- In the xEdit plugin selection window, double-click on the first dirty plugin (e.g., Update.esm).
- Once xEdit is finished, close xEdit. A backup of the original plugin will automatically be saved to the xEdit Output mod created previously (e.g.,
Update.esm.backup.YYYY_MM_DD_HH_MM_SS). - Repeat this procedure on the remaining dirty plugins indicated by LOOT.
- When all of the vanilla plugins have been cleaned, close the LOOT window and rerun LOOT from MO to verify that no warnings appear.
Move the Cleaned Vanilla Masters[edit | edit source]
After the vanilla master files are cleaned, they should be moved into the "Cleaned Vanilla Masters" mod in MO, and the original files should be restored into the "Data" directory in the game folder (e.g., C:\Games\Steam\steamapps\common\Skyrim Special Edition\Data\. This makes Steam happy when "validating" files so that it remains unaware of changes. To move the new files and restore the original files, perform the following:
- In MO, open the Cleaned Vanilla Masters mod in Windows Explorer (right-click Cleaned Vanilla Masters, then click Open in Explorer).
- Click the
 button above the MO mod list (left) pane, and select Open Game Folder to open the game folder in Windows Explorer.
 - Move all the cleaned master files from
..\Datainto..\Cleaned Vanilla Mastersfolder.- Tip: Set the Explorer View to Details, and sort by the Date modified column. This will sort all the recently modified files to the top of the file list. (reference image)
- Tip: Create a backup of the cleaned masters in case they are somehow lost.
- Leave the game folder open, lose the Cleaned Vanilla Masters folder, and tick the box to enable it in the MO left pane if it isn't enabled.
- Close MO for the next steps.
Restore the Original Vanilla Masters[edit | edit source]
To restore the original masters, simply copy and rename the official, uncleaned vanilla masters now located as backups in the xEdit Output mod. The original vanilla masters can also be restored by using Verify integrity of game files in Steam. If this is done, and the game presents the message to download CC content again, simply force quit the game via the console by pressing ~, typing qqq, and pressing Enter.
- In MO, open the xEdit Output mod in Windows Explorer (right-click xEdit Output, then click Open in Explorer).
- Tip: Set the Explorer View to Details, and sort by the Date modified column. This will sort all the recently modified files to the top of the file list beginning with ...
ccasvsse001-almsivi.esm.backup.YYYY_MM_DD_HH_MM_SSand ending with ...Update.esm.backup.YYYY_MM_DD_HH_MM_SS.
- Tip: Set the Explorer View to Details, and sort by the Date modified column. This will sort all the recently modified files to the top of the file list beginning with ...
- Copy the 44 backed up masters into the game "Data" directory.
Dawnguard.esm.backup.YYYY_MM_DD_HH_MM_SSwill have two backups. Copy the one with the earliest timestamp (the original).
- Inside the game "Data" directory, rename the files by stripping
.backup.YYYY_MM_DD_HH_MM_SSfrom the end of each file name.- Tip: To rename all of the files instantly, open a Windows Powershell session in this directory and run the following command:
Get-ChildItem *.backup.* | Rename-Item -NewName { $_.Name -replace '(.*es.).*','$1' }
- Tip: To rename all of the files instantly, open a Windows Powershell session in this directory and run the following command:
- Close all Explorer windows.
MO2
Any time Bethesda updates these master files, they will likely need to be cleaned again and replaced in MO. Any previously cleaned versions of these same files that exist in the MO mod list must be either disabled or deleted first, because xEdit will see only the cleaned versions otherwise.At this point, the Bethesda masters should be cleaned and the mod list prioritization in the left pane should reflect as follows (ignore the plugin prioritization in the right pane for now):
- BlueprintShips-Starfield.esm
- xEdit Output
- Cleaned Vanilla Masters
NOTE
To verify the vanilla mods have been cleaned, LOOT can be run again, and no warnings should be apparent.
STEP 4[edit | edit source]
At this point, the modding environment should be fully configured and ready for mod installation.
IMPORTANT: Please read ALL of the following carefully BEFORE requesting support on the forums!
- This guide can be installed in one of three (3) ways:
- All mods from all ModGroups (mod tables) installed. This is recommended, due to the coordination of this build in terms of lighting, weather, and ENB. These are usually the most difficult aspects of a build to get right, given vanilla Skyrim's rather wonky lighting 'incoherence'.
- All mods from all ModGroups EXCEPT for the optional ModGroup, 21-Post-Processing. Like the default recommended option, this is most useful for those that cannot afford the performance cost of running with post-processing mods like ENBSeries. For those that want to use a custom ENB setup, we obviously cannot support that, but feel free to try any ENBs that are compatible with the 18-Lighting and Weather ModGroup.
- All mods from all ModGroups EXCEPT for the optional ModGroups, 18-Lighting and Weather and 21-Post-Processing. Use this approach if a custom lighting/weather/post-processing solution will be applied, which are not supported.
Understanding the Step Patches[edit | edit source]
A “conflict resolution” patch is a plugin that resolves conflicts between various active plugins. They allow using various mods together that would otherwise be incompatible. The Step Patches are built exclusively for this Step Game Guide. They are required and are dependent on specific mods as noted by indicators in the mod tables in Step 4. They will not resolve conflicts with any conflicting mod plugins that are not in this guide.
Step Patches[edit | edit source]
- Step Patch - Conflict Resolution (CR) - required
- Patches all conflicting plugins except for optional mods and ModGroups noted below.
- Step Patch - Lighting and Weather (LW) - optional
- Only required if the LW ModGroup is installed per guide instructions
- Patches the 18-Lighting and Weather ModGroup
- Step Patch - Post-Processing (PP) - optional
- Requires the Step LW Patch
- Only required if the PP ModGroup is installed per guide instructions
- Patches the 18-Lighting and Weather AND 21-Post-Processing ModGroups for use with ENB
Mod Table Reference[edit | edit source]
Below is the legend and reference for the mod tables used in this guide.
Mod Table Legend[edit | edit source]
| Table Flags | A red vertical bar indicates that the mod is required by Step Patch - Conflict Resolution. A yellow bar indicates that the mod is required by Step Patch - Lighting and Weather. A green bar indicates that the mod is required by Step Patch - Post-Processing. A blue bar indicates the mod supports or otherwise relates to mods in the 21-Post-Processing ModGroup. | ||||
| Mod Name | Nexus mod name presented as a link to Nexus for download. | ||||
| Link to the mod's wiki page, which includes various information about the mod. | |||||
| Baseline | This notes the Step Baseline version or option of the corresponding mod that should be installed, and usually refers to options affecting performance/quality. General suggestions are located in the "Notes" column; see below. | ||||
| Instructions | Brief note specifying a recommended install option. In some cases, mods will have several options. In such cases, click [Expand] to expand the mod row to reveal detailed instructions. |
Quick Reference[edit | edit source]
| Mod Name | Baseline | Instructions | ||||
|---|---|---|---|---|---|---|
| Master to NO patches with NO ENB option |
Baseline | Notes | ||||
| Master to all patches with ENB option |
Baseline | Notes |
Mod Installation Considerations[edit | edit source]
- If no Notes or Step recommendations are provided for a particular mod, always install the Main File, any Update Files, and all Optional Files are valid.
- After installing a mod, ALWAYS enable the mod and any related plugins in MO unless otherwise instructed.
- Mods are listed in alphabetical order within each ModGroup and any deviations from this are purposeful to achieve the desired outcome.
- Mods should be arranged in MO in the order that they are listed to ensure other mods further down the list overwrite/override those occurring before them.
- Always install plugins (ESLs/ESMs/ESPs), unless otherwise noted. When there is a choice to use an ESL, always choose that UNLESS continuing a playthrough using a previously-existing savegame (ESL-flagged plugins can 'break' a save that relies on a ESP or ESM version of the same plugin!).
- Always follow LOOT's advice in regards to mod cleaning and sorting unless otherwise noted.
- Do not extract BSAs unless specifically instructed to do so.
ModGroup Separators[edit | edit source]
Mod Organizer features the ability to create separators within the mod list to group mods for easier visual reference. Step recommends using these separators for each ModGroup below:
- Click at the top of the mod list pane.
- Select [Create Separator], and give the separator a name. Step recommends using the Mod Group names (i.e., Extensions, Resources, Lighting and Weather, etc.).
- Create a new separator for each new Mod Group while working through the Guide.
- Separator colors can be customized by right-clicking on any separator and selecting Select Color.
02-Extenders[edit | edit source]
- Mods that expand on the inherent functionality of a game or another mod without themselves affecting content
| Mod Name | Baseline | Instructions |
|---|
| Address Library for SFSE Plugins |
| Powerofthrees Tweaks SFSE |
| Starfield Script Extender (SFSE) |
Detailed Instructions available | |||||
Root Files Installation
Launcher Configuration
Normally, MO should auto-detect that SFSE is installed upon a restart of the program, and it will auto-generate the SFSE launcher. This should be used for launching Starfield going forward. Please review the Tools Setup for configuration of the SFSE launcher, if necessary. | ||||||
Game-Launch Smoke Test[edit | edit source]
At this stage, the preliminary build should be tested to confirm that there are no issues with the modding environment or engine-level mod configurations:
- Start the game by running the SKSE launcher from Mod Organizer. The game should load to the main menu without issue.
- Open the console (~), type in coc riverwood, and press Enter/Return. The game should load at Riverwood without issue.
- Exit the game using the
qqqconsole command or the standard menu options.
If the game launched and loaded as expected, continue forward. Otherwise, all instructions were not followed, and something was missed. Revisit the installation steps above starting with the System Setup Guide in Step 1. If a careful review of the previous instructions does not resolve the issue, post on the guide support forums for help.
WARNING
Beyond this point, DO NOT launch the game again until instructed to do so.Many of the following mods are interdependent, and launching the game prematurely will most likely result in issues or failures. Please DO NOT post on the forums for support of non-issues relating to a failure to do as instructed.
03-Resources[edit | edit source]
- Mods solely providing assets intended specifically for use by other mods without themselves affecting content
No mods defined.
04-Foundation[edit | edit source]
- Baseline mods having many conflicting assets that should be overridden by other mods OR mods having programmatic changes that are widely accepted and adopted/expected by other mods
| Mod Name | Baseline | Instructions |
|---|
| Starfield Community Patch |
| Starfield HD Reworked Project |
05-Animation and Physics[edit | edit source]
- Mods that affect animations or physics
| Mod Name | Baseline | Instructions |
|---|
| Faster Airlock and Hatch and Door Animations |
Step Recommends: 1.5x option |
| Simple Faster Walk |
Install the SimpleFasterWalk_v2b optional file |
| Simply Faster Ladders |
Step Recommends: 1.25x option |
06-Models and Textures[edit | edit source]
- Mods that replace existing models or textures
| Mod Name | Baseline | Instructions |
|---|
| Artifacts Redone |
2K | Step Recommends: Artifacts Redone - 2K Loose Files optional file |
| Clean Reflex Sight Lenses |
Step Recommends: Clean Reflex Sight Lenses - Alt main file |
| Clear Anti-glare Glass for Outpost Windows |
Install the Main File. Install the Optional File separately, placing it after the Main File. |
| Clouds Overhaul |
| Enhanced Blood Textures |
Detailed Instructions available | |||||||
Install the Enhanced Blood Textures Starfield For Mod Manager main file:
WARNING "REMINDER!This mod includes recommended INI edits that will need to be evaluated and applied via Bethini Pie. remove this Alert when task is complete" | ||||||||
| EXE - Effect Textures Enhanced |
Detailed Instructions available | |||||
| Hide the following files/folders (instructions for hiding files/folders):
textures\decals\impactdecals\impactdecalbloodhit01_color.dds textures\decals\impactdecals\impactdecalbloodhit01_opacity.dds textures\effects\fires\firesgeneric_sm_01_14x14 (entire folder) | ||||||
| Flora Redone |
2K | Step Recommends: Flora Redone - 2K Loose Files optional file |
| Furniture Redone |
2K | Step Recommends: Furniture Redone - 2K Loose Files optional file |
| Immersive New Atlantis City Map |
| Improved Transit Signs for New Atlantis |
| Landscape Textures Overhaul |
2K | Step Recommends: LTO_1.1_2K main file |
| Real Flashlight |
Step Recommends: Real Flashlight Soft main file |
| Realistic Water |
| SavrenX Cave |
Install the SavrenX Cave and Ice main file |
| SavrenX Crisp Flora |
| SavrenX Stone |
| Spaceships Redone |
2K | Step Recommends: Spaceships Redone - 2K Loose Files optional file |
| Spacesuits Redone |
2K | Step Recommends: Spacesuits Redone - 2K1K - Loose Files optional file |
| Stellar Glass |
07-Sounds and Music[edit | edit source]
- Mods that affect sounds or music
| Mod Name | Baseline | Instructions |
|---|
| Barefoot Footstep Sounds for the Nightwear and Swimsuit |
Install the Barefoot Footstep Sounds for Shoeless Clothing main file |
| Faster Airlock and Hatch and Door Animations - Sound Fix |
Use the matching speed from Faster Airlock and Hatch and Door Animations |
| UHD4k 60 FPS FMVs |
| Vasco - Reduced Footsteps Volume |
Step Recommends: Vasco - Footsteps reduced to 50 and Vasco - Idle Hand reduced to 50 files |
08-Character Appearance[edit | edit source]
- Mods that affect the appearance of the player character or NPCs
| Mod Name | Baseline | Instructions |
|---|
| Crowd NPC eye Ambient occlusion Fix |
| Eyes Brows and Lashes Redone |
2-1K | Step Recommends: Eyes Brows and Lashes Redone 2K1K BA2 main file |
| High-Res Hair and Beards |
2K | Step Recommends: 2K Beards and 2K Hair optional files |
| Pekoe Brows |
1K | Step Recommends: Pekoe Brows 1K main file. Install corresponding Update File file. |
| Pekoe Eyes and Lashes |
1K | Step Recommends: Pekoe Lashes (Wispy 1K) optional file. Do not install any Main File. |
| Retina - Photorealistic Eyes Overhaul |
1K | Detailed Instructions available | ||||||
| ||||||||
| SavrenX Hair |
1K | Step Recommends: SavrenX Hair 1K ( Vanilla ) |
| SavrenX HD Crowd Optimized |
Install the SavrenX HD Crowd Optimized V2 main file |
| SavrenX HD NPC Optimized |
09-Fixes[edit | edit source]
- Mods have a programmatic component that fixes various bugs and/or inconsistencies
| Mod Name | Baseline | Instructions |
|---|
| Baka Achievement Enabler |
| Generic Crew Member Disappearance Fix |
| Persistent Weather Effect Fix |
| Ship Command Certification Challenge Fix |
| Stay Put |
10-Gameplay-General[edit | edit source]
- Mods that affect general or multiple gameplay mechanics
No mods defined.
11-Gameplay-AI and Combat[edit | edit source]
- Mods that affect AI, stats, or combat mechanics of NPCs
| Mod Name | Baseline | Instructions |
|---|
| Better NPCs |
| Sense Star Stuff Immunity for Companions and Crew |
| Simple Offence Suppression SFSE |
12-Gameplay-Economy[edit | edit source]
- Mods that affect currency, rewards, values, rates, or any other economy-related mechanics
No mods defined.
13-Gameplay-Immersion[edit | edit source]
- Mods that help to improve game immersion and role-playing scenarios
| Mod Name | Baseline | Instructions |
|---|
| Functional Ship Infirmaries |
| ImmerSleep - See Yourself Sleeping |
| Souls of Cities |
| Toggle Spacesuit Visibility Hotkey |
14-Gameplay-Quests[edit | edit source]
- Mods that alter aspects of quests and/or related lore
No mods defined.
15-Gameplay-Skills and Perks[edit | edit source]
- Mods that affect the player character's or NPC skills and perks or related leveling
| Mod Name | Baseline | Instructions |
|---|
| Better Backgrounds |
| Skill Fixes |
Install the Skill Fixes main file and Skill Fixes - Particle Beams Are Lasers optional file |
16-Interface[edit | edit source]
- Mods that affect any aspect of the user interface
| Mod Name | Baseline | Instructions |
|---|
| Auto Hide HUD |
| Auto Highlight Outpost Items |
| Compact Crew Menu UI |
| Enhanced Dialogue Interface |
Download the option that most closely matches the FPS achieved from the Game-Launch Smoke Test |
| Enhanced Player Healthbar |
Step Recommends: Enhanced Player Healthbar - WYOR |
| Enhanced Presets |
The choice of which preset to install is user perference |
| Enhanced Subtitles |
Download the option that most closely matches the FPS achieved from the Game-Launch Smoke Test |
| Item Sorter |
Detailed Instructions available | |||||||
| ||||||||
| Scanner Closest Path Highlight Improvements |
| Ship Builder - Notify Me About Warnings |
| Skip Launch Video |
| StarUI Inventory |
| StarUI Outpost |
| StarUI Ship Builder |
| StarUI Workbench |
| Visible Companion Affinity |
| Visible Skills Descriptions |
Download the option that most closely matches the FPS achieved from the Game-Launch Smoke Test |
17-Locations[edit | edit source]
- Mods that programmatically add new or alter vanilla locations
No mods defined.
18-Lighting and Weather[edit | edit source]
- Mods that affect lighting and/or weather systems **installation is optional**
No mods defined.
19-Utilities[edit | edit source]
- Mods that generate derived mod output from load-order-specific assets
No mods defined.
20-Patches[edit | edit source]
- Mods that programmatically resolve load-order conflicts
| Mod Name | Baseline | Instructions |
|---|
| Step Patch - Conflict Resolution |
Detailed Instructions available | |||||
| The Step Conflict Resolution Patch is delivered as separate files to fix MO's update tracking features. This will allow each file to be flagged by MO, separately, when they are updated.
Download Step Patch - Conflict Resolution and any Update File, if one exists. (required) | ||||||
Performance Tuning[edit | edit source]
It's necessary to determine the available performance headroom prior to generating LOD or setting up ENB, because the full LODGen setup can cost upwards of 20 FPS on average in exteriors, and ENB can cost upwards of an additional 40 FPS. The goal at this point is to have at least 120 FPS (≥ 140 recommended) on average in the tundra with clear weather (and ideally the Rift as well). Keep in mind that decreasing game resolution can drastically improve performance.
NOTE
For guidance on additional display settings (e.g., ultra widescreen, FreeSync, G-SYNC, etc.), refer to the SSE Display Settings Guide before continuing.Performance/Quality Optimization[edit | edit source]
This process will optimize the performance-quality trade off prior to configuration of ENB and LOD.
- If the average FPS is 120 - 130 FPS, stop here and continue to 21-Post-Processing or Step 5 - LOD.
- If the average FPS is lower or higher than 120 - 130 FPS continue below to optimize performance/quality to get closer to this range.
- Revisit the BethINI setup to make changes accordingly:
- If the average FPS is lower than 120 FPS:
- Set the [Medium] preset, and otherwise follow the text instructions in each step of the BethINI Setup instructions but DO NOT adjust values based on the images this time, since the preset will have changed many.. Consider increasing the Grass Density by 5.
- Rerun the benchmark.
- If average FPS is still not ≥ 120, repeat these steps selecting the [Low] preset and/or adjust Grass Density accordingly.
- If the average FPS is now higher than 125 FPS:
- Set the [Ultra] preset, and otherwise follow the text instructions in each step of the BethINI Setup instructions but DO NOT adjust values based on the images this time, since the preset will have changed many.. Consider decreasing the Grass Density by 5.
- Rerun the benchmark.
- If average FPS is not ≥ 120, revert to the default [High] preset and/or adjust Grass Density accordingly.
- If the average FPS is lower than 120 FPS:
- NOTE: Once finished, don't forget to re-enable graphics settings as described at the bottom of the "Benchmarking Steps" spoiler above to reap the benefits of those disabled settings.
Performance Examples[edit | edit source]
Following are performance results using the approach described previously. This serves as a preview to help in making decisions about ENB/DynDOLOD configurations. Note that with Step's recommended configurations, ENB is more costly than DynDOLOD in terms of performance.
- Reference System
- All ModGroups installed, including Post Processing (installed later by ENB users only)
- Resolution: 2560x1440 (2k/QHD/1440p) - HD/1080p resolution should perform much better ... even on a lesser/cheaper/older GPU.
- Weather: SkyrimClearTU (10A240) - One of the more performance-demanding weathers. With ENB, clear weathers costs more FPS than cloudy.
- Location: Tundra at Whiterun looking west
| Configuration | ||||||||||||||||||||
|---|---|---|---|---|---|---|---|---|---|---|---|---|---|---|---|---|---|---|---|---|
| BethINI | ENB | DynDOLOD | FPS | Note | ||||||||||||||||
| High | n/a | n/a | 121 | Baseline (G/Free-Sync disabled) | ||||||||||||||||
| Ultra | n/a | n/a | 108 | Baseline (G/Free-Sync disabled) | ||||||||||||||||
| Ultra | n/a | n/a | 110 | Baseline (Re-enable G/Free-Sync) | ||||||||||||||||
| Ultra | Heavy | n/a | 53 | |||||||||||||||||
| Ultra | Light | n/a | 63 | |||||||||||||||||
| Ultra | Milk Drinker | n/a | 72 | |||||||||||||||||
| Ultra | Heavy | Ultra | 34 | Max quality | ||||||||||||||||
| Ultra | Heavy | Optimal | 38 | Ideal performance/quality trade-off | ||||||||||||||||
| Ultra | Light | Optimal | 43 | |||||||||||||||||
| High | Light | Optimal | 45 | |||||||||||||||||
| Ultra | Milk Drinker | Performance | 50 | |||||||||||||||||
| High | Milk Drinker | Performance | 53 | |||||||||||||||||
*Based on these data, a few FPS could be gained by running the BethINI 'Medium' preset. Among other things, this will reduce the distance of LOD4 objects.
| ||||||||||||||||||||
21-Post-Processing[edit | edit source]
Decide whether or not to install the Post-Processing ModGroup (and use ENB).
NOTE
Keep in mind that LOD generation is more fundamentally important to visual enhancement than ENB, so if average frame rate from the previous benchmark is consistently below 100 FPS at this point, consider skipping 21-Post-Processing, and continuing on to Final Sorting and Cleaning.NOTE: If ENB will be used, revisit the BethINI Setup to disable: Display > Lens Flare, Anamorphic Lens Flare, and Ambient Occlusion. Also consider modifying the sun size as instructed under Custom.
Optional Post-Processing Mods[edit | edit source]
Beginning at 04-Foundation, confirm that all mod rows prefixed with a blue vertical bar are configured with Post-Processing options.
Post-Processing Mod Table[edit | edit source]
- Mods that affect post-processing graphics **installation is optional**
No mods defined.
Final Sorting and Cleaning[edit | edit source]
If plugins have not been sorted this session, run LOOT again. Examine the plugins in LOOT for errors or warnings (ignoring the game's default masters at the top of the list). Ignore any reported missing compatibility patches or other warnings. These are either handled by the Step Patches or not of any concern. Perform the standard cleaning procedure on any mods requiring cleaning (except for the game's default masters).
Be aware that the Step Patches are designed to work with a default, LOOT-sorted plugin order. This eliminates the need to set rules on the load order. From this point on:
- Ensure all applicable mods are ticked in the left pane of MO.
- Ensure all plugins are ticked in the right pane of MO.
- Sort the load order using LOOT whenever plugins are added/removed.
- Update LOOT (the program and masterlist) whenever updates are available.
STEP 5[edit | edit source]
Now that all mods and patches have been installed/sorted and performance margins are acceptable, the next step is to generate custom LOD data for the mod list. Recommended settings correspond to rendered game resolutions that will benefit from those settings.
NOTE
Tip for AMD Users: Consider killing any AMD* named processes via Task Manager to significantly increase LODGen processing time. Right click on the Windows taskbar, select Task Manager, and from the Processes screen, right click > End Task. These processes are not needed for LODGen and can be easily restored by rebooting the OS.LOD Setup[edit | edit source]
Before moving on, create three empty mods for the LOD output:
- Click on the
 button and select, [Create empty mod].
 - Name it
Step Starfield - xLODGen Output.- This places a new, empty mod at the bottom of the mod list. However if it's not, place it last in the mod list.
- Repeat these steps to create two more mods named:
Step Starfield - TexGen Output, andStep Starfield - DynDOLOD Output. - Place these new mods directly after Step Starfield - xLODGen Output.
- Sort with LOOT.
The last few mods in the mod list should now reflect the following (numbering is approximate and reflects the number of mods installed without extra mods or mod-list separators):
- BlueprintShips-Starfield.esm
- ...
- Starfield - xLODGen Output
- Starfield - TexGen Output
- Starfield - DynDOLOD Output
WARNING
The steps following must be completed in the order presented (terrain LODGen/installation first, followed by object LODGen/installation). Using higher resolutions than recommended for any of the following LOD applications will result in a waste of PC resources with NO BENEFIT.xLODGen[edit | edit source]
xLODGen is run first to generate updated LOD terrain textures and meshes so that landscape LOD is updated with mod changes:
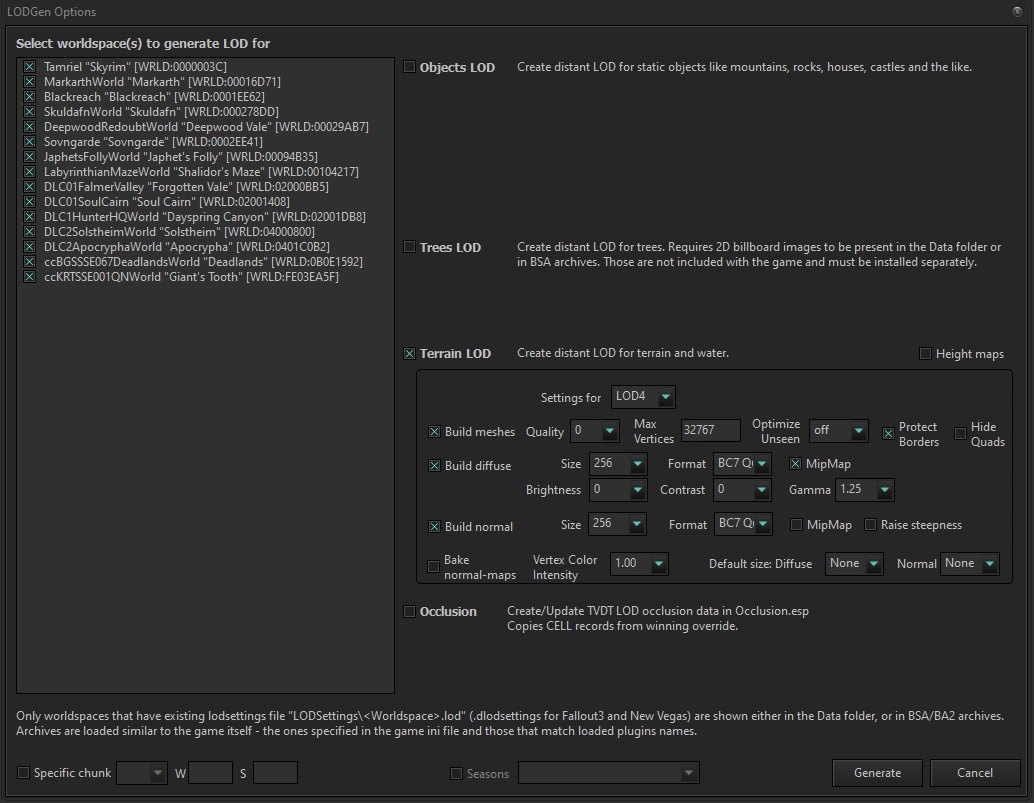
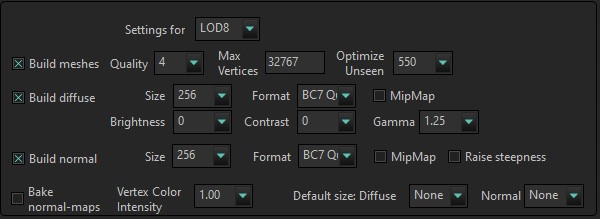
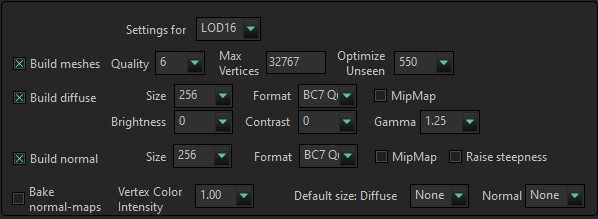
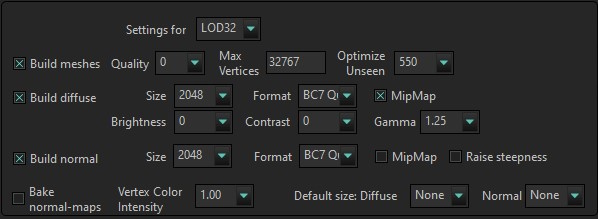
Generate terrain LOD[edit | edit source]
- Ensure LOD Setup was completed.
- Run xLODGen from the MO executable drop-down list.
- Select all worldspaces.
- Ensure that ONLY the Terrain LOD box is ticked in the right pane.
- Use the following settings, which have been verified in extensive testing:
- NOTE: Unless you are running STF at ≥ 4k resolution, resist the urge to wastefully increase the texture resolutions shown, which will only reduce FPS with NO BENEFIT. Those running ≥ 4k resolution WILL benefit by doubling the resolution for LOD4, LOD8, and LOD16 from 256 to 512.
- Click [Generate] to run the process, which will require upwards of 20 minutes, depending on the PC.
- Once the "LOD generation complete" message has appeared, close xLODGen.
- NOTE: If the xLODGen window closes itself, post in the xLODGen topic and include
../Modding/GameName/Tools/xLODGen/bugreport.txtand any logs created.
- NOTE: If the xLODGen window closes itself, post in the xLODGen topic and include
Terrain LOD Wrap-Up[edit | edit source]
- Browse to the xLODGen output folder (e.g.
..Modding/GameName/Tools/xLODGen/xLODGen_Output). - In MO, open the xLODGen Output mod in Windows Explorer (Ctrl + double-click).
- Cut and paste the files from
../xLODGen_Outputinto the Starfield - xLODGen Output folder, then close both folders. - Enable xLODGen Output mod.
DynDOLOD[edit | edit source]
Object LOD will be created using Dynamic Distant Objects LOD (DynDOLOD). At a significant performance cost (upwards of 10 FPS) for a subtle improvement to LOD, DynDOLOD v3+ supports generation of grass billboard LOD.
NOTE
TexGen settings used here apply to the Step Starfield 1.0 build. Settings still vary, depending on the end user's hardware, particularly the monitor and driver-soft settings, which should be optimized in accordance with the SSG.Run TexGen[edit | edit source]
TexGen 3, shipped with DynDOLOD 3, will generate custom object LOD textures based on enabled mods. TexGen 3 will also generate grass billboards for LOD.
- Run TexGen from the MO executable drop-down list.
- Use the setting corresponding to rendered game resolution: 1080p = HD, 1440p = QHD, 2160p = 4k
 HD
HD QHD
QHD 4k
4k
- Click [Start].
- Once the completed message has appeared (1-5 minutes, depending on the PC), click [Exit].
- Navigate to the DynDOLOD TexGen_Output folder location (e.g.
../Modding/Tools/DynDOLOD/TexGen_Output). - Move the files from the TexGen_Output folder into the Step Starfield - TexGen Output mod:
- In MO, hold down the Ctrl key and double-click the Step Starfield - TexGen Output mod. Alternatively, right click the mod to open it in an Explorer window.
- Enable the Step Starfield - TexGen Output mod in MO.
Run DynDOLOD[edit | edit source]
DynDOLOD will generate the object LOD.
Configure and Generate[edit | edit source]
- Run DynDOLOD from the MO executable drop-down list to open the GUI configuration in 'expert' mode (if the DynDOLOD INI modification was set as described previously).
- Select all worldspaces.
- Tick Candles and FXGlow.
- IMPORTANT - Click the 'High' button to bring in mesh rules for A Clear Map of Skyrim mod and the Step Patch - Conflict Resolution. For slightly better performance with some quality loss, consider clicking on 'Medium' or 'Low' instead.
- Configure by replicating everything in the images following (tick/untick all boxes likewise), or make performance modifications as instructed further below before continuing to the next step:
- ONLY generate Occlusion data on the first run. If DynDOLOD is run again for some reason, leave Occlusion UNticked to speed up generation.
- Tick Grass LOD to generate grass LOD. Otherwise, leave this UNticked.
- 'Optimal' tree & catch-all rules with recommended LOD32 rules for A Clear Map of Skyrim.
 HD / QHD
 4K
4K
- Click [OK].
- Once the completed message has appeared (15-30 minutes [25-50 minutes with Occlusion ticked], depending on the PC), click [Save & Exit].
- Navigate to the DynDOLOD DynDOLOD_Output folder location (e.g.
..\Modding\Tools\DynDOLOD\DynDOLOD_Output). - Move the files the DynDOLOD_Output folder into the Step Starfield - DynDOLOD Output mod:
- In MO, hold down the Ctrl key and double-click the Step Starfield - DynDOLOD Output mod. Alternatively, right click the mod to open it in an Explorer window.
- Enable the Step Starfield - DynDOLOD Output mod in MO.
- Ensure the DynDOLOD.esm and DynDOLOD.esp plugins are ticked in the right pane.
- Sort with LOOT.
NOTE
Multiple DynDOLOD outputs at varying quality settings can be created and stored in different mods. If this is done, generate occlusion only on the first run and copy this into a separate mod (e.g., 'DynDOLOD Occlusion') to reduce the generation time of subsequent outputs. Likewise, consider generating only for the Tamriel worldspace before settling on the chosen output and generating for all worldspaces.When to Regenerate LOD[edit | edit source]
- xLODGen
- Whenever there are changes to the mod list that affect the underlying landscape: height, shape, textures, etc. This does not include grass, mountains or other objects on the landscape.
- TexGen
- Whenever there are changes to the mod list that affect objects with LOD: new objects, moved structures or objects, removed structures or objects, changes to grass (only when using grass LOD), changes to trees and/or landscape height, when its master plugins order is changed (out of order masters), etc. When grass is re-cached, TexGen should also be run again to update grass billboards.
- DynDOLOD
- Whenever there are changes to the mod list that affect objects with LOD: new objects, moved structures or objects, removed structures or objects, changes to grass (only when using grass LOD), changes to trees and/or landscape height, when its master plugins order is changed (out of order masters), etc. When LOD textures are updated with TexGen, DynDOLOD should also be run again to update all affected object LOD.
- Occlusion
- Only with noticeable changes to geography of Tamriel and/or Solstheim. For Step, this should only need to be run once.
STEP 6[edit | edit source]
The game is now ready to be loaded to configure mods in the Mod Configuration Menu (MCM). The MCM is a feature of SkyUI that allows mod authors to provide custom, game-accessible settings for their mods. Recommendations are provided below for select mods. The remainder are user preference.
First Launch[edit | edit source]
To run the game, select the SFSE executable from the drop-down list and click the Run button. Keep the following in mind when first launching from a fresh Guide installation:
- Test the build on a new game
- In other words, don't load from a save after a fresh Guide install to avoid false flags caused by savegame incompatibility. See the changelog before upgrading from a previous version of this Guide to determine whether or not a new game is advisable.
- When launching the game for the first time after a Guide install, the load could take significantly longer than normal. This will only be a one-time wait as all the installed mods are being initialized. Subsequent load times should be shorter.
- Finally, INI files may appear in the Overwrite folder after closing the game (e.g.
../SKSE/Plugins/SkyrimUncapper.ini). These files should be moved to their respective mod folders, respecting their folder structure during the move.
Mod Configuration Menu Settings[edit | edit source]
| ⟡ Cathedral Weathers ⟡Click to show/hide |
|---|
If the 18-Lighting and Weather ModGroup was installed, it is user preference on whether or not to set Interior Vision to Darker. The Step ENB was designed for Normal.
|
| ⟡ Complete Crafting ⟡Click to show/hide |
The following screenshots display the recommended settings for the mod's MCM:
  
|
| ⟡ Farmhouse Chimneys SE ⟡Click to show/hide |
Vanilla villages should all be ticked on the first page. The following screenshot displays the recommended settings for the New Locations page:

|
| ⟡ Lock Overhaul ⟡Click to show/hide |
This mod must be activated to work. Once enabled, the settings are user preference.
|
| ⟡ Smart NPC Potions ⟡Click to show/hide |
It's suggested to reduce the maximum an NPC can use, but it's user preference.

|
| ⟡ Storm Lightning ⟡Click to show/hide |
The Minimum preset in the MCM is recommended.
|
| ⟡ Timing is Everything ⟡Click to show/hide |
Timing is Everything is set up in a way that integrates DLC content and balances the game's quests. Vampires and werewolves will show up early in the game because they are a part of the world. Dragonborn will not start until the news of your deeds has time to reach the island, and the player becomes something that must be dealt with. Attack chances are lowered from 100% so there will be less of a chance to predict an attack. Other things are active that make sense, such as not being able to do the Break of Dawn quest if the player is a vampire, Thalmor won't attack until after engaging their quest line, etc. The following screenshots display the recommended settings for the mod's MCM:
  
|
Remaining Mod Configurations[edit | edit source]
The remaining mod configurations are recommended to be left at their defaults.
COMMUNITY CONTRIBUTIONS[edit | edit source]
About Step[edit | edit source]
Created by TheCompiler (Daniele Ferraro), Step is a collaborative project with input from the modding community, technical volunteers, and project administrators. The goal is to provide tested and validated methods for establishing and maintaining an enhanced, modded game. Thus, the Step Guides provide detailed, well-tested build instructions for a solid, modded game that achieves an enhanced, vanilla experience.
The Step team collects information from the modding community through extensive mod testing, detailed reviews, feedback, and suggestions exchanged on the Step Community Forums. Posting rules apply, so be sure to read and follow them. Engage and enjoy a warm welcome and plenty of high-quality support from a large community of experienced members.
Step Modifications can only get better with contributions and help from the community. It is very time consuming for the Step team to ensure that Step's Game Guides are consistently maintained at the highest quality possible. As such, we rely on the community. Whether a regular user or a knowledgeable modder, below are some ways to contribute in maintaining Step as a reliable, high-quality resource:
The Community[edit | edit source]
All members of the community can help build the Guides they love and utilize for their own games. Step relies on the community (e.g., you) to help identify mods that improve the vanilla game while adhering to our Mandate through mod suggestions. We also need ongoing bug reports, feedback, reviews, and updates on included mods that may cause problems or that stray from the Mandate. This help can be as simple as reporting an encountered bug or as extensive as providing a one-off review of a mod based from personal experience with it.
In order to suggest a mod for inclusion in this Guide, visit the Mods section of the forums and use the Create Mod Topic button on the editor toolbar.
Staff Roles[edit | edit source]
There are official staff roles that are almost always open for new candidates.
Community members interested in becoming a member of the Step staff, please contact any Administrator or Step Staff member on the forums. Please include some idea of the role desired and include strengths and weaknesses within that role! For example, if applying for a Curator include the game desired to curate, strengths (xEdit, conflict resolution, texture editing), and weaknesses (mesh work, CK, scripting). This gives Step some initial idea of the candidate's skill sets.
Forum Moderators[edit | edit source]
Most of the moderation work for our Moderators is simply to keep topics on track and do general forum maintenance; such as moving topics to the correct forum and handling spammers. Very rarely does moderation on the Step forums end up in warnings and bannings (and we all like it that way). To be effective Moderators, community members who desire this role are expected to be familiar with the Step community and actively involved. As such, Moderator criteria is be based upon level and quality of activity within our community. Moderators will be expected to be more familiar with the Community Guidelines than the average member and be able to remain unbiased in their moderating.
Guide Curators[edit | edit source]
Guide Curators are the super-stars of the staff at Step Modifications. They are those who curate the Guides for members. Guide creation, growth, and maintenance takes a lot of time, effort, and skill. As such, Curators are generally required to be of a higher skill-level than the average modder. In an ideal world there would be 2-4 Curators per Guide. However, Curators are often working alone on Guides; thus, they require the knowledge and skills to be able to follow Mandate while building mod lists, patches, and writing all Guide and ancillary content in a way members can easily follow. This is no small feat for a single staff member to do! For more information about Guide Curation, see Game Guide Curation.
Testers[edit | edit source]
Generally, Testers are required to maintain a non-deviated Guide installation from which to install and test mods that are tagged for testing on the forums, as well as, general testing of Guides as a whole with the goal of finding bugs, issues, possible improvements, etc. Testers will be given access to Staff forums that house useful information on the Guides they test for. For more information about our testing process, read through the Mod Testing Guide to get a sense of what's involved.
Credits[edit | edit source]
The STEP administrators would sincerely like to thank (from the bottoms of our fuzzy little hearts):
- The authors of mods recommended within our guides
- The authors of mods who granted permission for their mods to be incorporated into the Step Patches
- The core Community for feedback, suggestions and input
- The Beta and Mod Testers for their good humor and rigorous analyses
- sheson for DynDOLOD and all things LODGen
- The Nexus community
- Bethesda Softworks for their games
- Tannin for the gift that is Mod Organizer
- All the developers that kept MO going
Personnel[edit | edit source]
Testers[edit | edit source]
LODGen Support[edit | edit source]
- sheson
MO Support[edit | edit source]
- GSDfan
Step Administrators[edit | edit source]
- DoubleYou
- Greg
- TechAngel85
- z929669
Retired Staff[edit | edit source]
|
|
|
|
|