
NOTE
This is the current version of the Step Fallout4 Guide. Don't forget to
endorse Step on the Nexus if you like the guide. Please report any problems or confusing instructions on the latest
Feedback & Bug Reports pinned forum topic.
This Release
This is our first major release of the Step Fallout4 Guide. As described in the Step Versioning Documentation, this is a 'major' release. This Guide requires Fallout 4 GOTY edition (or all DLC).
- Visit the forums, and provide feedback related to this guide.
- Also follow Step Modifications on Facebook.
- To support hosting and maintenance of the Step Community Project, consider donating to the project.
About Step
A Foreword
Created by TheCompiler (Daniele Ferraro), Step is a collaborative project with input from the modding community, technical volunteers, and project administrators. The goal is to provide tested and validated methods for establishing and maintaining an enhanced modded Skyrim. Thus, the Guide provides detailed, well-tested build instructions for a solid modded Skyrim that achieves an enhanced, vanilla experience. It's meant to be installed in its entirety and not piecemeal.
The Step team collects information from the modding community through extensive mod testing, detailed reviews, feedback, and suggestions exchanged on the Step Community Forums. Posting rules apply, so be sure to read and follow them. Engage and enjoy a warm welcome and plenty of high-quality support from a large community of experienced members.
New to Modding?
We recommend that you ...
- read through this Guide at least once before attempting installation.
- follow all linked guides and read through them, as well.
There is a lot of information to absorb and learn in order to successfully build a modded game. We and the community, have brought together a lot of this information into guides as a free and hopefully convenient resource for all. New and experienced modders alike will find many answers within these guides and linked resources. This Guide is written in such a way that it expects users to know the basics of modding and related tools (e.g. mod managers, LOD optimizers, configuration utilities, etc.). However our support forums are always available for our users.
Nomenclature
The following nomenclature is used throughout this guide and should be understood before proceeding.
- 'tick' means 'check': Frequently, the word 'check' or 'checked' can mean 'ensure' in addition to "check mark", so 'check' is not used where it is synonymous with 'tick' to avoid any mistakes that can (and have) happened from this conflation.
- Baseline: An installation of a mod using the recommend file option listed within the Baseline column of the mod tables below.
- Step Patches: A "patch" is a plugin that allows two or more mods to work together without conflicting. The Step Patches are such plugins, but allow all of the mods in the Step Guide to work harmoniously together. Some users refer to this as a conflict resolution patch or "CR Patch".
Minimum System Requirements
We recommend the following hardware configuration for running a Step Fallout4 installation at a resolution of 1920x1080 on Ultra-like settings. The minimum requirements will allow most users to install and run the Baseline options, which match Fallout4's recommended requirements. Our recommended requirements below will allow most users to install and run the Guide using higher quality options with all of the Guide's optional components (Lighting & Weather, ENB, etc.).
Users wishing to install high quality options at resolutions higher than 1920x1080, be advised a more powerful system will likely be required than what is listed below.
| Hardware
|
Minimum
|
Recommended
|
| Windows OS
|
Windows 10 64-bit
|
Windows 10 64-bit
|
| CPU
|
Intel Core i5-7600 / i7-4790 or equivalent
|
Intel Core i5-8600 / i7-8700 or equivalent or better
|
| System RAM
|
8 GB
|
8 GB or higher
|
| GPU
|
Nvidia GTX 970 or equivalent
|
Nvidia GTX 1060 or equivalent or better
|
| Drive Space
|
~65 GBs (includes game+guide)
|
~75 GBs (includes game+guide)
|
| Monitor Resolution
|
1920x1080
|
1920x1080 or higher
|
Time Requirement
Users should be aware that it will usually take anywhere from several hours to a several days to complete this Guide from start to finish. Since this is a start to finish process, a recommend schedule for completing it is:
- Day 1 : Steps 1 - 3
- Day 2 : Step 4
- Step 4 is installing all the mods. Depending on download speeds and previous modding knowledge, this step could span 1-3 days.
- Final Day : Finish the remainder of the Guide.
The overall message here is that Step encourages users to always follow proper computer ergonomics when modding! Remember to take breaks and happy modding!
STEP 1
Game & Tool Installation
Those who have not completed the System Setup Guide should STOP and do so now BEFORE continuing this guide! This is a perquisite for completing any of the Step Bethesda mod-build guides.
NEW GUIDE FOLLOWERS: Deviate from these instructions at your own risk! Instructions in this guide presume that previous instructions have been followed.
STEP 2
Tool Configuration
Mod Organizer - Fallout 4 Initialization
FIRST, follow the System Setup Guide. The below instructions describe how to initialize a Fallout 4 instance in Mod Organizer (MO). If MO wass installed as a Portable application, the instructions below will need to be reinterpreted accordingly. Those who already have a MO instance for Fallout 4 can skip this initialization:
➕ [Click to show]➖ [Click to hide] Initialization Instructions
- Launch MO by running its executable (e.g.
..Modding/Tools/Mod Organizer/ModOrganizer.exe)
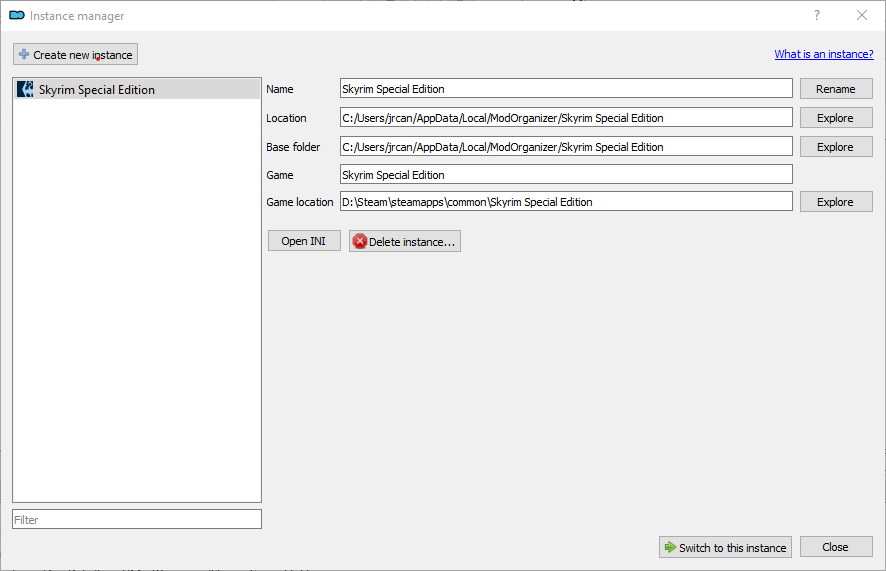
- Upon load, click the Instance Manager button on the tool (first button).
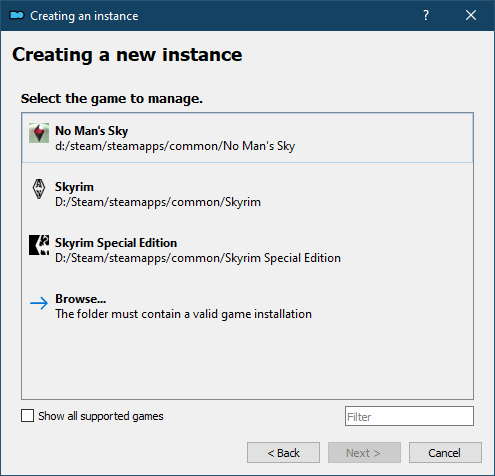
- Click [Create new instance] button.
- Select Fallout 4 and click [Next].
- If it didn't find the game, users can manually browse to the game's location.
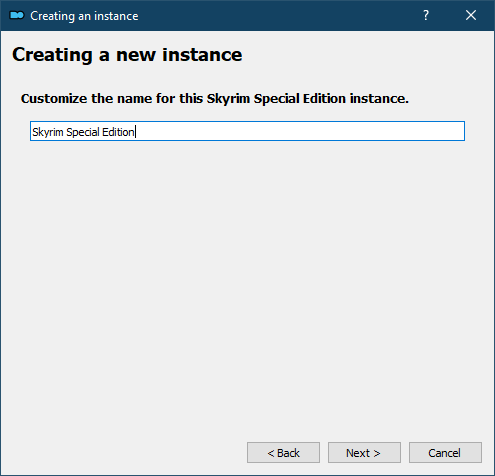
- Name the instance something like
Step Fallout 4 or keep the default. Click [Next].
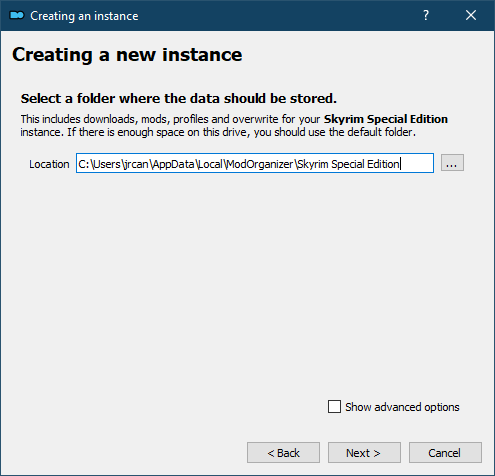
- (optional) change the location of data stored. Step recommends the default location, unless space restraints prevent this. Click [Next].
- A confirmation window will display with the installation information. Click [Finish].
- MO is now ready to use with this guide.
Profile Setup
Mod Organizer's profile feature allows the creation of multiple mod-builds. Begin by creating/editing two profiles for use with this guide:
➕ [Click to show]➖ [Click to hide] Profile Setup Instructions
- Launch MO, choosing the Fallout 4 Instance.
- On the Default profile, arrange the mods in the left pane in the following order:
- DLC: Dawnguard
- DLC: HearthFires
- DLC: Dragonborn
- Click the
 button on the menu bar.
- Select the Default profile.
- Ensure the Use profile-specific Game INI Files box is ticked and click [Copy].
- Name the new profile
Step Fallout4, or anything similar.
- Ensure the Use profile-specific Game INI Files box is ticked.
- Close the window by clicking [Close].
- Select the Step Fallout4 profile from the profile selection down-drop.
- If users receive a notice saying some INI files were missing and will be copied. This is normal.
- If an error is displayed about missing "modlist.txt" files, restart MO (or do a system reboot if one hasn't been done yet).
- Now click the
 button and select [Create empty mod].
- Name it xEdit Output.
Tool Setup
All tools installed in the System Setup Guide should be added to MO. Some tools will have been auto-detected and added; however, ensure the settings below are set correctly for all tools. xEdit is used in this example:
➕ [Click to show]➖ [Click to hide] Tool Setup Instructions
- Click the
 button at the top of the main Mod Organizer window.
- Over the left pane of the executables config, click the [+] to add a new executable, and then [Add from file...].
- Navigate to the TES5Edit.exe file (e.g.
..Modding/Tools/xEdit/TES5Edit.exe).
- This should auto-fill most of the fields.
- Change the title to xEdit.
- Input the following in the Arguments field separated by a single space:
- e.g.
-FO4 -IKnowWhatImDoing -AllowMasterFilesEdit
- "-IKnowWhatImDoing": This turns off a warning presented when users make edits.
- "-AllowMasterFilesEdit": By default xEdit will not allow master file editing. This allows users to edit these files.
- Tick the Create files in mod instead of overwrite box. Select the xEdit Output mod from the drop-down.
- Tick the Use applications icon for desktop shortcuts box.
- Click [Apply].
- Repeat these steps to add the remaining executables as indicated in the table below:
Tool Setup Reference for Fallout 4
NOTE:
For tools previously installed, simply adjust the arguments below for use with Fallout 4.
| Application Title
|
Executable
|
Argument(s)
|
| xEdit
|
xEdit.exe
|
-FO4 -IKnowWhatImDoing
Tick the Create files in mod instead of overwrite box and select the xEdit Output mod from the drop-down.
|
| xEditQuickAutoClean
|
xEditQuickAutoClean.exe
|
-FO4
Tick the Create files in mod instead of overwrite box and select the xEdit Output mod from the drop-down.
|
| LOOT
|
LOOT.exe
|
--game="Fallout4"
|
| xLODGen
|
xLODGenx64.exe
|
-fo4 -lodgen -o:"DriveLetter:\Modding\Tools\xLODGen\xLODGen_Output"
Replace DriveLetter: with the drive letter of the 'Modding' folder.
|
Users can arrange the tools in any order using the up and down buttons above the list. This will dictate the order that tools are listed in the MO "Run" dropdown menu. Close the window by clicking the [OK] button.
BethINI Setup
BethINI needs to be run for the current MO profile to establish the configuration files before beginning mod installation. This ensures that all users share a common configuration during the modding process. As such, please do not deviate from the instructions below. Once the guide is complete and things are confirmed to be working, there's an optional BethINI setup located at the end of this guide that can be used to fine tune the configuration.
BethINI Initialization
➕ [Click to show]➖ [Click to hide] Initialize BethINI
- Close MO2 and run BethINI (e.g.
..Modding/Tools/BethINI/BethINI.exe).
- If prompted by Windows protection, click More Info and then [Run anyway].
- When BethINI launches, select "Fallout 4" from the game selection box.
- Allow BethINI to handle custom INIs, if prompted.
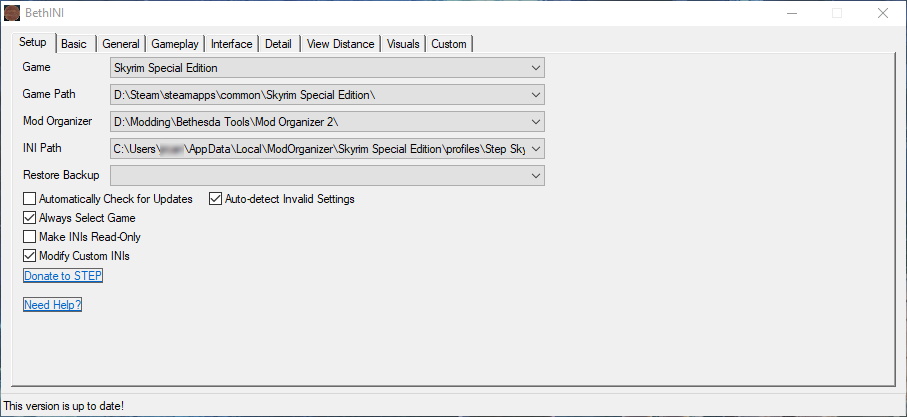
- Go to the Setup tab and ensure the
- Ensure the Game path is correct (e.g.
..\Steam\steamapps\common\Fallout 4).
- Ensure the Mod Organizer path is correct (e.g.
..\Modding\Tools\Mod Organizer).
- The INI Path name depends on the MO Profile Setup
- If BethINI does not automatically display the profile created previously, browse to the applicable MO profile under the instance created previously in step 5 of the MO initialization instructions (e.g.,
%LOCALAPPDATA%\ModOrganizer\{instanceName}\profiles\STEP Fallout4).
- Select the Step Fallout4 profile folder, and click [Open].
- Click [OK] at the prompts to restart BethINI with the desired profile configured. Allow BethINI to handle custom INIs, if prompted.
- Return to the Setup tab.
- The “Automatically Check for Updates”, “Auto-detect Invalid Settings”, “Always Select Game”, and “Modify Custom INIs” boxes should be ticked.
- Keep BethINI open.
BethINI Basline Configuration
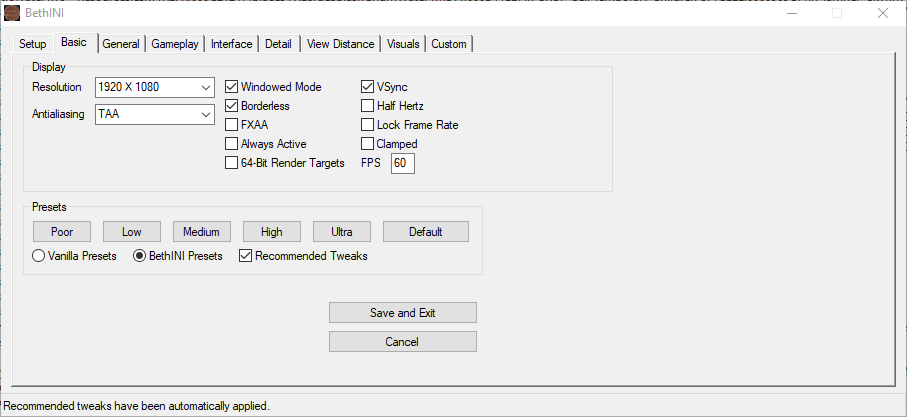
Users should now continue through each of the tabs within BethINI, matching the screens below. Again, please do no deviate from these instructions at this time. Click the header to see important notes:
➕ [Click to show]➖ [Click to hide] Basic
- Click the [Default] button.
- Window Resolution should match the system resolution.
- Tick the boxes
- Note that these settings may be overridden by the setting SSE Display Tweaks configuration file or enblocal.ini.
- Lock Frame Rate should NOT be ticked.
- Click the [High] preset
- Please avoid the temptation to click 'Ultra' for now, even if the PC is high-end.
|
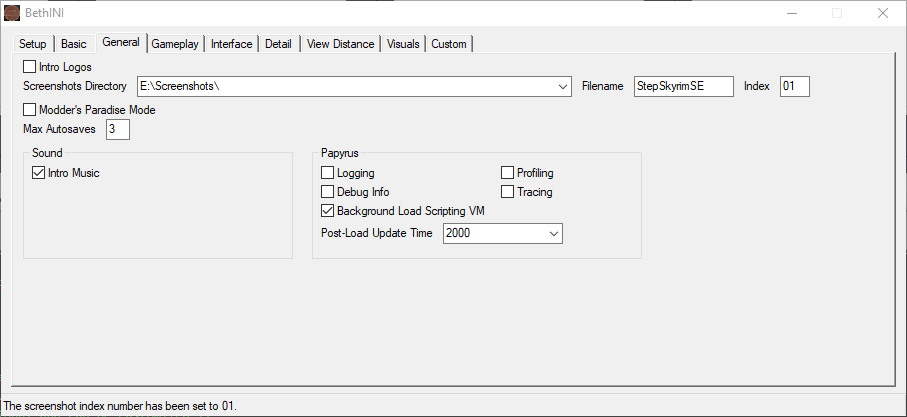
➕ [Click to show]➖ [Click to hide] General
- The Screenshots directory, Filename, and Index can be set to whatever the user desires. Screenshots are taken by pressing the Print Screen button on the keyboard (PrtSc).
|
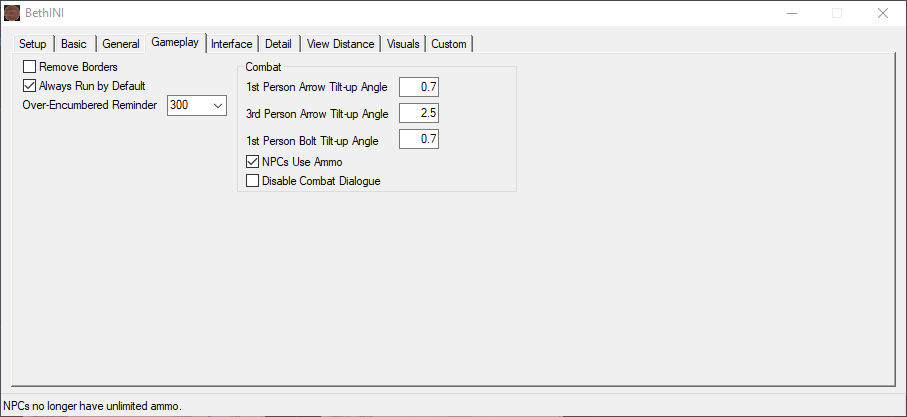
➕ [Click to show]➖ [Click to hide] Gameplay
- Set Over-Encumbered Reminder to 300 (5 mins) or 3600 (1 hour)
- NPC Use Ammo is optional, but recommended.
|
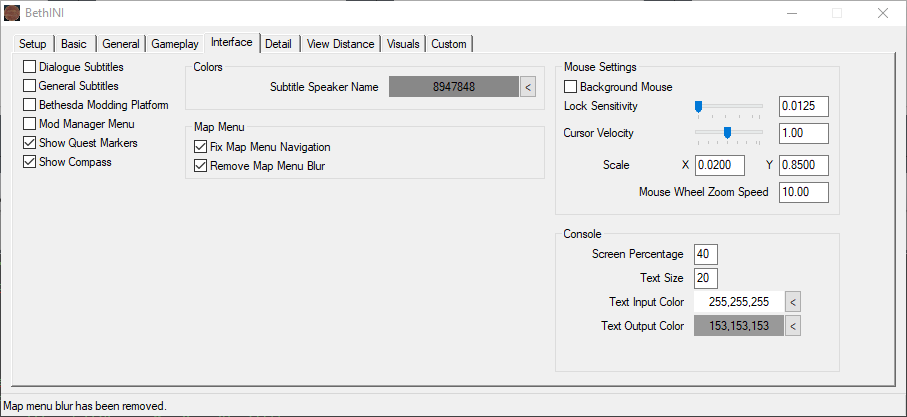
➕ [Click to show]➖ [Click to hide] Interface
- Users that require subtitles may enable them here.
|
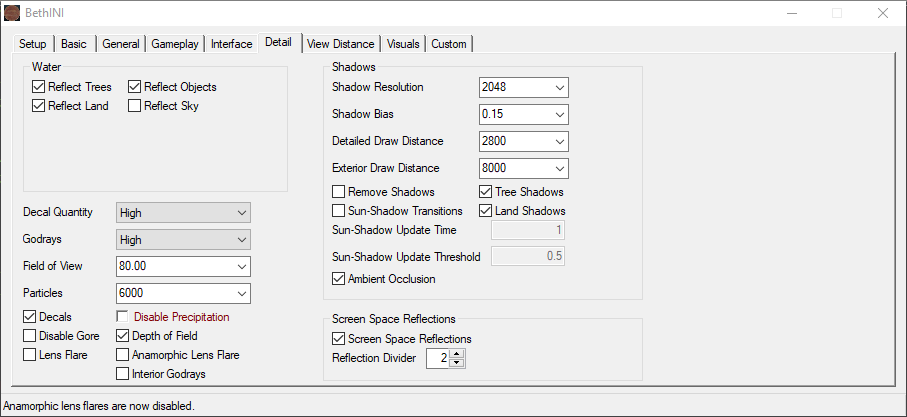
➕ [Click to show]➖ [Click to hide] Detail
- Depth of Field, Lens Flare, and Anamorphic Lens Flare (the flare seen on candles) may be toggled as preferred.
|
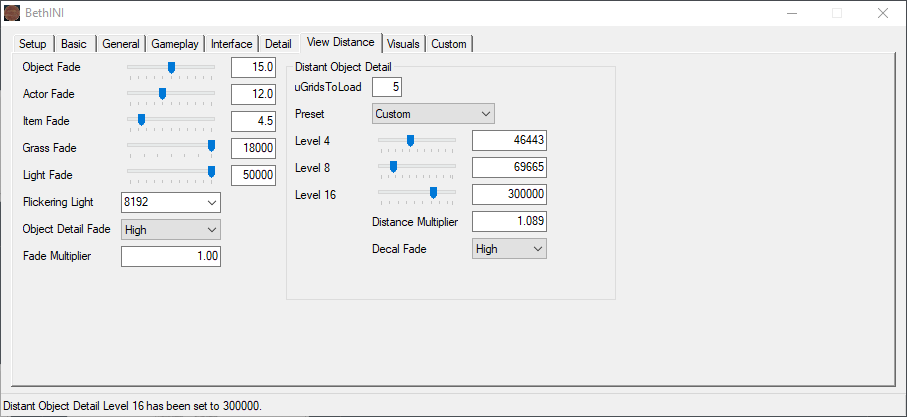
➕ [Click to show]➖ [Click to hide] View Distance
- The Object, Actor, and Item fade values are user preference.
- uGridsToLoad should never been changed from vanilla's default of 5.
- Always keep Level 16 at 300000.
|
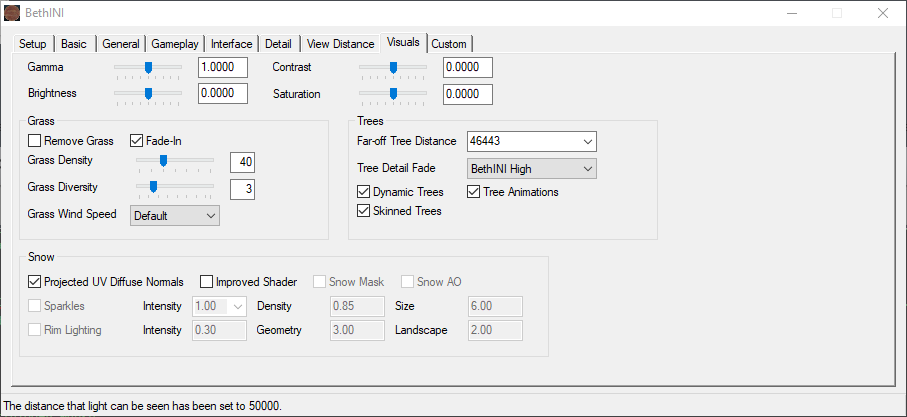
➕ [Click to show]➖ [Click to hide] Visuals
- The Grass settings are set later, in the NGIO configuration file.
|
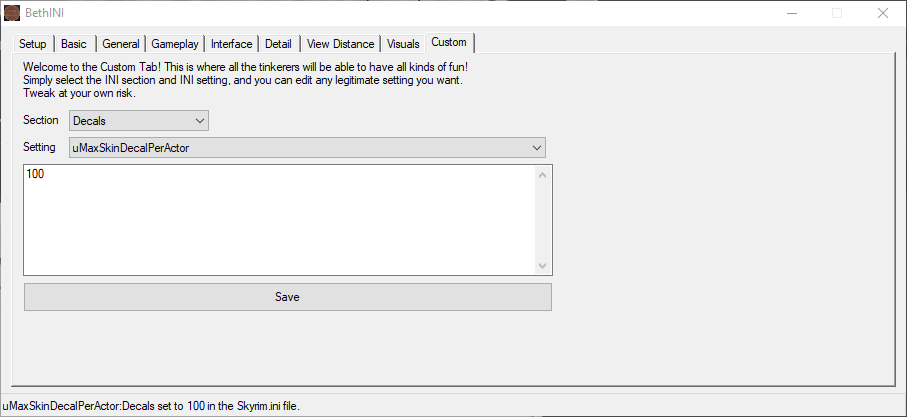
➕ [Click to show]➖ [Click to hide] Custom
- Section drop-down again, select Display.
- Setting drop-down, select fWaterSSRIntensity.
- Set value: 0.5 and click [Save].
- Section drop-down again, select Interface.
- Setting drop-down, select fBookOpenTime.
- Set value: 500 and click [Save].
- Return to Basic tab, and click [Save and Exit].
|
STEP 3
Cleanup and Considerations
LOOT
At any time during the mod installation process, LOOT should be used to sort plugin load order before running the game. This is necessary to ensure proper plugin priority (load order), which can have a dramatic impact on the game. Users not running the game during the mod installation step of the Guide can wait to sort after this step is complete. To sort with LOOT:
- Launch LOOT via Mod Organizer 2 from the executables drop-down menu at the top of the right pane.
- If LOOT fails to start, try adding the following argument as described in Tools Setup:
--single-process. If LOOT cannot find the game directory, add the path to ../Fallout 4 folder to Installed Path under LOOT settings.
- Click the [Sort Plugins] icon at the top of the LOOT window.
- Several plugins will show warnings. The next section describes how to clean them up.
- Click [Apply] button, which has replaced the Sort button at the top.
- Close LOOT.
NOTE
When running LOOT
before completing the Step Guide, additional warnings may be indicated. These will all be addressed by the end of this Guide.
Up to this point, users should only have the following plugins, in the order listed:
- Fallout4.esm
- DLCRobot.esm
- DLCworkshop01.esm
- DLCCoast.esm
- DLCworkshop02.esm
- DLCworkshop03.esm
- DLCNukaWorld.esm
- DLCUltraHighResolution.esm
If the plugins are not in the order listed, run LOOT now.
Cleaning Vanilla Master Files
Step no longer recommends cleaning the vanilla masters, since this has always been unnecessary. See the relevant posts for details and further reading. We continue to provide general plugin cleaning instructions for those mods that may require it.
NOTE
For those that have previously-cleaned vanilla masters, please feel free to continue using them. It is also fine to revert to the uncleaned vanilla masters. Effectively, there is no difference.
Standard Cleaning Procedures
➕ [Click to show]➖ [Click to hide] Toggle cleaning procedures...
- Run xEditQuickAutoClean from the drop-down executable list in MO2.
- On the plugin selection window, double-click on the mod being cleaned (e.g. Update.esm).
- Once xEdit is finished, click [X] at upper right to close. A backup of the original plugin will automatically be saved into (e.g.,
../xEdit Output/SSEEdit Backups) inside of xEdit Oputput mod (or in Overwrite at the bottom of the MO mod list (left) pane id previous instructions were NOT followed!).
- To verify the plugin has been cleaned, LOOT can be run again, and no warnings should be apparent.
Understanding the Step Patches
A “conflict resolution” patch, or CR Patch, is a plugin that resolves conflicts between various active plugins. They allow users to use various mods together without any major issues, while still achieving the desired outcome from the mods. Thus, the Step Patches are one part patch and one part mod.
The Step Patches are built specifically for the Step mod list. They are required to run the this Guide and are dependent on specific mods within the mod list (those tagged at left with a green vertical bar). They will not resolve conflicts with any applicable mods that are not within the Guide's mod list, though.
Step Patches
- Step Fallout4 - Conflict Resolution Patch (Step CR Patch)
- For those that would opt for their own custom lighting and weather mods
- Patches all applicable mods except for Lighting & Weather mods
- Required for all users!
- Step Fallout4 - Lighting & Weather Patch (Step LW Patch)
- For those that are using Guide's lighting and weather mod from the Lighting & Weather mod group.
- Patches only the applicable Lighting & Weather mods; the CR Patch is still required!
STEP 4
Step Fallout4 Mod List
At this point, the PC modding environment should be fully set up and ready for mod installation. Those unfamiliar with using MO2 should return to that guide for a refresher. When installing mods, keep the following in mind:
- To maintain compatibility with downstream Patch instructions, it is important to install Patch-related mods as described in their respective Notes.
- After installing a mod, enable the mod in MO.
- If no Notes or Step recommendations are provided for a particular mod, all options are good. Step encourages user customization.
- Mods should be arranged in MO in the order that they are listed to ensure other mods further down the list overwrite/override those occurring before them. This is necessary to ensure the desired outcome.
- Mods are listed in alphabetical order within each Mod Group and any deviations from this are purposeful to achieve the desired outcome.
- Always install plugins (ESLs/ESMs/ESPs), unless otherwise noted. When there is a choice between ESL and ESP, always choose ESL unless otherwise noted.
- Always follow LOOT's advice in regards to mod cleaning and sorting unless otherwise noted.
- Step does not recommend extracting BSAs as a general principle, since it adds to the potential for user error and unnecessary support issues. Experienced and self-supporting users may derive benefit from doing so, however.

MO2
MO Separators: Mod Organizer features the ability to create separators within the mod list to group mods for easier visual reference. Step recommends using these separators for each Mod Group following below. To create a separator:
- Click the button on the top of the mod list pane.
- Select [Create Separator] and give the separator a name. Step recommends using the Mod Group names (i.e., Extensions, Resources, Lighting & Weather, etc.).
- Create a new separator for each new Mod Group while working through the Guide.
- Separator colors can be customized by right-clicking on any separator and selecting Select Color.
Mod Table Reference
Below is the legend and reference for the mod tables used in this Guide. Users should refer back to it when confused about a mod listing.
Mod Table Legend
|
|
|
|
Table Flags
|
A red vertical bar indicates that the mod is required by the Step CR Patch.
A yellow bar indicates that the mod is required by the Step L&W Patch.
A blue bar indicates the mod supports or otherwise relates to ENB.
|
|
|
|
|
Mod Name
|
Nexus mod name presented as a link to Nexus for download.
|
|
|
|
|

|
Link to the mod's wiki page, which includes various information about the mod.
|
|
|
|
|
Baseline
|
This notes the Step Baseline version or option of the corresponding mod that should be installed, and usually refers to options affecting performance/quality. General suggestions are located in the "Notes" column; see below.
|
|
|
|
|
Instructions
|
Brief notes that apply to the mod or installation.
In some cases, mods with several options will include a suggested option. These suggestions will take the form of: "Step recommends: Option A Main File."
In other cases, there may only be one appropriate option, which fits the Step Mandate. These instructions will take the form of: "Install Option A Main File."
Users will also see links displayed as: [Expand]. Users should click these links to expand the mod row to reveal detailed instructions for installing the mod.
|
02-Extenders
- Mods that expand on the inherent functionality of a game or another mod without themselves affecting content
|
|
|
|
|
Mod Name
|
Baseline
|
Instructions
|
|
|
|
|
|
F4SE
|
|
ExpandDetailed Instructions available
|
Root Files Installation
- Download the main file.
- Open the archive and extract the following files to the Fallout 4 root folder
..\Steam\steamapps\common\Fallout 4:
- CustomControlMap.txt
- f4se_1_10_163.dll
- f4se_loader.exe
- f4se_steam_loader.dll
Data Files Installation
- In Mod Organizer, install the same archive. At the Install Mods window, type
F4SE Scripts
- Expand the top level to reveal the Data folder. Right-click the Data folder and select [Set ‹data› directory].
- Click [OK] to finish installing the mod.
|
|
|
|
|
|
Buffout 4
|
|
ExpandDetailed Instructions available
|
| Once installed, double-click on the mod to open up the information window, and ensure the following settings in config.toml ("Text Files" tab):
[Compatibility]
F4EE = true
|
|
|
|
|
|
Shadow Boost FO4
|
|
ExpandDetailed Instructions available
|
General Installation and Setup
- Install the version 1.8 main file and the ShadowBoostFO4 ini optional file.
- Double-click on the mod in the MO left pane and set the following in
ShadowBoostFO4.ini
[Main]
fMinDistance = 2048.0
fMaxDistance = 6144.0
fDynamicValueFactor = 12.8
[Lod]
fLODFadeOutMultObjectsMin = 5
fLODFadeOutMultObjectsMax = 15
fLODFadeOutMultItemsMin = 3
fLODFadeOutMultItemsMax = 6
fLODFadeOutMultActorsMin = 6.0
fLODFadeOutMultActorsMax = 12.0
fDynamicValueFactor = 0.2
[Grass]
fGrassStartFadeDistanceMin = 1024.0
fGrassStartFadeDistanceMax = 6144.0
fDynamicValueFactor = 25.6
[TerrainManager]
bEnable = 0
NOTES:
- The default key to change setting in-game is the Home key.
- Consider changing the
fFpsTarget setting to a lower or higher value as desired.
- If any of these dynamic changes are too noticeable, tweak or disable them in the in-game menu.
- Do not enable the TerrainManager tweaks, as they will introduce stutter.
- This mod includes the godrays fix to make ultra godrays performance friendly.
|
|
|
|
|
|
XSE PluginPreloader F4
|
|
ExpandDetailed Instructions available
|
Visual C++ Redistributable Package
This mod requires the latest Microsoft Visual C++ 2015, 2017, 2019, and 2022 Redistributable Package to be installed in order to function. Download and install the X86 and X64 installers.
Root Files Installation
- Extract the archive into the root Fallout 4 directory (e.g.
..\SteamApps\common\Fallout 4).
- Open the xSE PluginPreloader.xml file with a text editor.
- Change
<LoadMethod Name="ImportAddressHook"> to <LoadMethod Name="OnThreadAttach"> and save.
|
03-Resources
- Mods solely providing assets intended specifically for use by other mods without themselves affecting content
|
|
|
|
|
Mod Name
|
Baseline
|
Instructions
|
04-Foundation
- Baseline mods that should be overridden by other mods AND/OR that make widely-accepted programmatic changes expected by other mods
|
|
|
|
|
Mod Name
|
Baseline
|
Instructions
|
|
|
|
|
|
Fallout 4 HD Overhaul 2k
|
|
ExpandDetailed Instructions available
|
Install all of the main files via Mod Organizer.
- Alternately (not recommended), install all of the main files directly into the game data directory, overwriting the vanilla texture BA2 files, if you want to save disk space. Performance-wise, there will be no difference. If you do this, you may want to backup the vanilla texture BA2 files to another location. If you do this, understand that if you Verify integrity of game files in Steam, it will erase this mod with the vanilla textures.
|
|
|
|
|
|
FO4LODGen Resources
|
|
ExpandDetailed Instructions available
|
ExpandFOMOD Instructions
FO4LODGen Resources
|
-
- Options
- ☑ FO4LODGen.esp
- ☑ FO4LODGen-DLCCoast-WindTurbines.esp
|
|
|
|
|
|
|
Langleys HD Textures Workshop
|
|
ExpandDetailed Instructions available
|
- Install the main file only.
- Right-click the mod in the left pane and select Open in Explorer.
- Delete the following folders:
- materials
- textures\architecture\buildings
- Copy the folder path to your clipboard.
- Follow the Cathedral Assets Optimizer Usage Instructions.
- Referring to the LOOT Meta Rule Instructions:
- Create a Group rule for Langleys HD Textures Workshop.esp to sort in the Texture Overhauls (the plugin name may vary if you named the mod differently at installation).
- Create a Load After rule for Langleys HD Textures Workshop.esp to load after High Resolution Texture Pack 2K and 4K - Valius.esp (names may vary if you named the mod differently at installation).
|
|
|
|
|
|
FlaconOils Complete Retexture Project
|
2k
|
ExpandDetailed Instructions available
|
- Install the FlaconOil 2k Loose files optional file and the 2k The Patch update file, merging together for simple rearchiving.
- Right-click the mod in the left pane and select Open in Explorer.
- Delete the following files:
- Materials\Architecture\Buildings\Hightech\HitTechFullPanels_02.bgsm
- Materials\Architecture\Buildings\Hightech\HitTechFullPanels_03.bgsm
- Materials\Architecture\Buildings\Hightech\HitTechFullPanels_04.bgsm
- Materials\Architecture\Buildings\Hightech\HitTechFullPanels_05.bgsm
- Materials\Architecture\Buildings\Hightech\HitTechFullPanels_06.bgsm
- Materials\Architecture\Buildings\Hightech\HitTechFullPanels_07.bgsm
- Materials\Architecture\Buildings\Hightech\HitTechFullPanels_08.bgsm
- Materials\Architecture\Buildings\Hightech\HitTechLargePanels_01.bgsm
- Materials\Architecture\Buildings\Hightech\HitTechLargePanels_02.bgsm
- Materials\Architecture\Buildings\Hightech\HitTechLargePanels_03.bgsm
- Materials\Architecture\Buildings\Hightech\HitTechLargePanels_04.bgsm
- Materials\Architecture\Buildings\Hightech\HitTechLargePanels_05.bgsm
- Materials\Architecture\Buildings\Hightech\HitTechLargePanels_06.bgsm
- Materials\Architecture\Buildings\Hightech\HitTechLargePanels_07.bgsm
- Materials\Architecture\Buildings\Hightech\HitTechLargePanels_08.bgsm
- Textures\Architecture\Buildings\Bricks01_d.dds
- Textures\Architecture\Buildings\Bricks01_n.dds
- Textures\Architecture\Buildings\Bricks01_s.dds
- Textures\Architecture\Buildings\bricks01trim_d.dds
- Textures\Architecture\Buildings\bricks01trim_n.dds
- Textures\Architecture\Buildings\bricks01trim_s.dds
- Textures\Architecture\Buildings\BuildingFoundation01_d.dds
- Textures\Architecture\Buildings\BuildingFoundation01_n.dds
- Textures\Architecture\Buildings\BuildingFoundation01_s.dds
- Copy the folder path to your clipboard.
- Follow the Cathedral Assets Optimizer Usage Instructions.
- Referring to the LOOT Meta Rule Instructions:
- Create a Group rule for FlaconOil's Complete Retexture Project.esp to sort in the Texture Overhauls (the plugin name may vary if you named the mod differently at installation).
- Create a Load After rule for FlaconOil's Complete Retexture Project.esp to load after Langleys HD Textures Workshop.esp (names may vary if you named the mod differently at installation).
|
-
No mods defined.
06-Models and Textures
- Mods that replace existing models or textures
No mods defined.
07-Sounds and Music
- Mods that affect sounds or music
No mods defined.
08-Character Appearance
- Mods that affect the appearance of the player character or NPCs
|
|
|
|
|
Mod Name
|
Baseline
|
Instructions
|
|
|
|
|
|
The Eyes Of Beauty Fallout Edition
|
|
ExpandDetailed Instructions available
|
Install the main file according to user preference. Below are suggestions.
ExpandFOMOD Instructions
The Eyes of Beauty Fallout Kaleidoscope Edition - All-in-One
|
- Introduction
- Table of Contents
- ☑ Part 1. New Standalone Plugins
- ☑ Part 2. Eyelash Options
- ☑ Part 3. Vanilla Eye Replacement
- ☑ Part 4. Looking Stranger Combo Sets
- ReadMe
- ☑ ReadMe
- ☑ Eye Normal Map Fix
- 1.0 Standalone Options
- Main Plugin
- Optional Plugins
- ☐ All-In-One Compatibility Plugin
- ☑ Looking Stranger Standalone
- 1.1 Plugin Type
- 2.1 Female Lashes
- Female - Thick Lashes
- Female - Full Lashes
- Female - Thin Lashes
- 2.0 Male Lashes
- Male - Thick Lashes
- Male - Full Lashes
- Male - Thin Lashes
- 3.0 Vanilla Eyes
- 4.01 Combo01 (Thin Lash) Left Eye
- Combo01 (Thin Lash) Left Eye Replacers
- ◉ Blue: Volcano Reflection (Default)
- 4.02 Combo01 (Thin Lash) Right Eye
- Combo01 (Thin Lash) Right Eye Replacers
- ◉ Cyborg Surreal: Cyber Punk (Default)
- 4.03 Combo02 (Full Lash) Left Eye
- Combo02 (Full Lash) Left Eye Replacers
- ◉ Hazel-Green: Earth Reflection (Default)
- 4.04 Combo02 (Full Lash) Right Eye
- Combo02 (Full Lash) Right Eye Replacers
- ◉ Hazel-Green: Mystery Light Reflection (Default)
- 4.05 Combo03 (Thick Lash) Left Eye
- Combo03 (Thick Lash) Left Eye Replacers
- ◉ Brown: Dark Brown Reflection (Default)
- 4.06 Combo03 (Thick Lash) Right Eye
- Combo03 (Thick Lash) Right Eye Replacers
- ◉ Hazel: Complex Brown Reflection (Default)
|
|
|
|
|
|
|
WX Hair Colors
|
|
ExpandDetailed Instructions available
|
| Install the WX Edited Hair Textures miscellaneous file and the WX All Naturals optional file.
|
09-Fixes
- Mods have a programmatic component that fixes various bugs and/or inconsistencies
|
|
|
|
|
Mod Name
|
Baseline
|
Instructions
|
|
|
|
|
|
High FPS Physics Fix
|
|
ExpandDetailed Instructions available
|
General Installation and Setup
- Install the second High FPS Physics Fix main file for the 1.10.163.0 game version.
- Double-click on the mod in the MO left pane and set the following in
HighFPSPhysicsFix.ini
[Main]
DisableBlackLoadingScreens=true
DisableAnimationOnLoadingScreens=true
PostloadingMenuSpeed=3.0
[Limiter]
LoadingScreenFPS=350
PipBoyFPS=60.0
OneThreadWhileLoading=false
FPS Limiter Recommendations
It is recommended to set the InGameFPS FPS Limiter settings in accordance with your hardware to improve latency.
- PC has NVIDIA G-SYNC or AMD Freesync video card AND monitor support, set each frame limit (FPS cap) to:
- [monitor refresh rate] - 3 (e.g., 144 Hz monitor should have 141 limit: 144 - 3 = 141)
- PC does NOT have NVIDIA G-SYNC or AMD Freesync video card OR monitor support, set each frame limit (FPS cap) to:
- [monitor refresh rate] - 1 (e.g., 60 Hz monitor should have 59 limit: 60 - 1 = 59)
[Limiter]
InGameFPS=??
|
|
|
|
|
|
Pip-Boy Flashlight
|
|
ExpandDetailed Instructions available
|
Install the Pip-Boy Flashlight v6 BETA 3.02 main file using the instructions below. The file has some textures packaged incorrectly, requiring manual installation.
- Select the [Manual] button at the prompt.
- Expand the textures folder.
- Drag and drop the nested Textures folder onto ‹data›.
- Click [OK] to finish installation.
|
|
|
|
|
|
Previsibines Repair Pack
|
|
ExpandDetailed Instructions available
|
- Install the PRP Resources main file.
- Install the PRP Plugins main file as a separate mod (click [Rename] instead of [Merge] and name it
PRP Plugins).
NOTE: Only install the PRP - Clarity 4.3 Patch if installing Clarity, which is a part of the optional 18-Lighting and Weather mod group.
ExpandFOMOD Instructions
PRP Updates
|
- Choose Your Language
- Main Files + Compat Grabbag
- Main Files
- Compat Grabbag
- ☐ PRP - Clarity 4.2 Patch
- ☑ PRP - Clarity 4.3 Patch
- ☐ PRP - Diamond City Ambience Patch
- ☐ PRP - Fogout Patch
- ☐ PRP - Interiors Enhanced Patch
- ☑ PRP - Region Names Patch
- ☐ PRP - Ultra Exterior Lighting Patch
- ☐ PRP - Ultra Interior Lighting Patch
- ☐ PRP - Ultra Interior Lighting Patch (Darker)
- ☐ PRP - JSRS Regions Patch
|
|
10-Gameplay-General
- Mods that affect general or multiple gameplay mechanics
|
|
|
|
|
Mod Name
|
Baseline
|
Instructions
|
|
|
|
|
|
Equipment and Crafting Overhaul Redux
|
|
ExpandDetailed Instructions available
|
ExpandFOMOD Instructions
Equipment and Crafting Overhaul (ECO) - Redux
|
- Main Files
- Primary Files
- Texture Size
- DLC Expansions
- ☑ Automatron
- ☑ Far Harbor
- ☑ Nuka World
- Extended INNR
- Optional
- ☑ RobCo Patcher Support
- ☑ Disable Placed Objects
- Extensions
- Universal Workbench Extensions
- ☐ Auto OMOD Stripper
- ☐ Immersive Hunting Overhaul
- ☐ Universal Disaasembler
- Crafting and Quick Mod
- ☐ Burst-Fire Framework (BFF)
- ☐ Real Time Cover Penetration Framework
- ☐ Tactical Reload
- ☐ Uneducated Reload
- ☐ West-Tek Optics Pack
- Munitions - Ammo Expansion Project
- Miscellaneous
- ☐ Armament (Retired)
- ☐ AWKCR
- ☐ Gunsmith Overhaul
- ☐ Standalone Workbenches
|
|
|
|
|
|
|
New Equipment Overhaul
|
|
ExpandDetailed Instructions available
|
ExpandFOMOD Instructions
NEO
|
- Config
- New Equipment Overhaul (NEO)
- Armor Paint Extended (APE)
- Eli's Armour Compendium (EAC) - Tweaks
- Misc Tweaks
- New Equipment Overhaul (NEO)
- Modules
- ☑ Base Game
- ☑ DLC - Automatron
- ☑ DLC - Far Harbor
- ☑ DLC - Nuka World
- ☑ DLCs Interconnected
- Optional
- ☐ AWKCR Patch
- ☑ Complex Sorter Tagging Rules
- ☐ Improved and Extended INNR
- Armor Paint Extended (APE)
- Optional
- ☐ Default Black Synth Armor
- ☑ INNR for Complex Item Sorter users
|
|
11-Gameplay-AI and Combat
- Mods that affect AI, stats, or combat mechanics of NPCs
No mods defined.
12-Gameplay-Economy
- Mods that affect currency, rewards, values, rates, or any other economy-related mechanics
|
|
|
|
|
Mod Name
|
Baseline
|
Instructions
|
13-Gameplay-Immersion
- Mods that help to improve game immersion and role-playing scenarios
|
|
|
|
|
Mod Name
|
Baseline
|
Instructions
|
|
|
|
|
|
See Through Scopes
|
|
ExpandDetailed Instructions available
|
ExpandFOMOD Instructions
See Through Scopes
|
- Main Mod Settings
- ADD or REPLACE
- DLC
- ☑ Far Harbor
- ☑ Nuka World
- ☑ Install and Merge both DLC's
- Add-ons
- ☐ Install addon patches for other weapon mods
- ☐ Auto-detect and select add-ons
- Tweaks
- ☐ Remove lens reflection when aiming
- ☑ Power Armor Fix
- ☐ Remove Ripple Effect for Recon Scopes
- Patches
- Patches (Optional)
- ☐ Weaponsmith Extended 2
- ☐ Smaller Institute Weapons
- ☐ Take Cover
- ☐ G67 Combat Rifle Replacer
- ☐ Robco Recon Scopes
- ☐ Tactical Reload
- ☐ LString / Weapon Jiggle Remover Patch
- ☐ Improved Prototype Gauss Rifle (CC) Patch
- Animation patches
- ☐ Right Handed Hunting Rifle by Wardaddy
- ☐ Right Handed Handmade Assault Rifle
- ☐ Right Handed Creation Club Anti-Material Rifle
|
|
14-Gameplay-Quests
- Mods that alter aspects of quests and/or related lore
|
|
|
|
|
Mod Name
|
Baseline
|
Instructions
|
|
|
|
|
|
DLC Timing
|
|
Install only the DLC Timing ESL main file.
|
15-Gameplay-Skills and Perks
- Mods that affect the player character's or NPC skills and perks or related leveling
No mods defined.
16-Interface
- Mods that affect any aspect of the user interface
|
|
|
|
|
Mod Name
|
Baseline
|
Instructions
|
|
|
|
|
|
CCCleaner
|
|
Install the CCCleaner 1.10.163.0 old file.
|
|
|
|
|
|
FallUI - Confirm Boxes
|
|
ExpandDetailed Instructions available
|
NOTE: If updating from an older version, untick the Default settings option and use the [Merge] button.
ExpandFOMOD Instructions
FallUI - Confirm Boxes
|
- Select installation options
- Main files
- ☑ FallUI - Confirm Boxes
- ☑ Default settings
- Compatibility
- ☐ DavesMod - ESP Explorer
- Default Settings
- Choose your preferred design type
- ☑ Modern (Default)
- ☐ Fancy
- ☐ Classic
- Installation
|
|
|
|
|
|
|
FallUI - HUD
|
|
ExpandDetailed Instructions available
|
NOTE: Tick the Default settings option and use the [Merge] button only if you have trouble saving the FallUI - HUD layout in MCM. You may need to customize the layout manually to resolve overlapping issues if you tick this the Default settings option.
ExpandFOMOD Instructions
FallUI - HUD
|
- Select installation options
- Main files
- ☑ FallUI - HUD
- ☑ Addon: Workshop
- ☑ Addon: PromptMenu
- Settings
|
|
|
|
|
|
|
FallUI - Icon Library
|
|
ExpandDetailed Instructions available
|
NOTE: If updating from an older version, untick the Default settings option and use the [Merge] button.
ExpandFOMOD Instructions
FallUI - Icon Library
|
- Select installation options
- Main files
- ☑ FallUI - Icon Library
- ☑ Default settings
|
|
|
|
|
|
|
FallUI - Inventory
|
|
ExpandDetailed Instructions available
|
NOTE: If updating from an older version, untick the Default settings option and use the [Merge] button.
ExpandFOMOD Instructions
FallUI - Inventory
|
- Select installation options
- FallUI - Inventory
- ☑ FallUI - Inventory
- ☑ Default settings
- Optional
- FallUI - Inventory Settings
- Do you use bPipboyDisableFX?
- ◉ Yes (Read description!)
- Readme and information
- Please read the following notes
- ☐ Enable 'ArchiveInvalidation'
- ☐ Item Sorter
- ☐ Icons: Icon Library
- ☐ Pipboy: High-Resolution INI-Settings
- ☐ FAQ: Colored Pipboy (Disable Pipboy FX)
|
NOTE: The bPipboyDisableFX=1 setting is included in the plugin INI for There It Is - Satellite Maps For Collectors.
|
|
|
|
|
|
FallUI - Map
|
|
ExpandDetailed Instructions available
|
NOTE: If updating from an older version, untick the Default settings option and use the [Merge] button.
ExpandFOMOD Instructions
FallUI - Map
|
- Select installation options
- Main files
- ☑ FallUI - Map
- ☑ Default settings
- Default Settings
- Choose your preferred design type
- ☐ Uncolored (Default)
- ☐ Colored
- ☑ Colored 4k
- ☐ Colored 8k
- Installation
|
|
|
|
|
|
|
FallUI - Sleep and Wait
|
|
ExpandDetailed Instructions available
|
NOTE: If updating from an older version, untick the Default settings option and use the [Merge] button.
ExpandFOMOD Instructions
FallUI - Sleep And Wait
|
- Select installation options
- Main files
- ☑ FallUI - Sleep and Wait
- ☑ Default settings
|
|
|
|
|
|
|
FallUI - Workbench
|
|
ExpandDetailed Instructions available
|
NOTE: If updating from an older version, untick the Default settings option and use the [Merge] button.
ExpandFOMOD Instructions
FallUI - Workbench
|
- Select installation options
- Main files
- ☑ FallUI - Workbench
- ☑ Default settings
|
|
|
|
|
|
|
FIS - The NEW FallUI Item Sorter
|
|
ExpandDetailed Instructions available
|
NOTE: If updating from an older version, untick the Default settings option and use the [Merge] button.
ExpandFOMOD Instructions
FIS - The NEW FallUI Item Sorter
|
- Select installation options
- Main files
- ☑ FIS - FallUI Item Sorter
- ☑ Default settings
- Sorting
- ☐ Light (No sorting plugins)
- ☐ Basic (name reordering for weapon/apparel)
- ☑ Pro (Complex Sorter plugin)
|
|
|
|
|
|
|
FO4 Photo Mode
|
|
At the manual installation prompt, right-click Data and select Set as directory.
|
|
|
|
|
|
LooksMenu
|
|
ExpandDetailed Instructions available
|
| Install the main file for your display's aspect ratio.
|
|
|
|
|
|
Organized Workbench Menu
|
|
ExpandDetailed Instructions available
|
NOTE: Do not install the DLC addons. That is covered by the Synthesis patcher.
ExpandFOMOD Instructions
OrganizedWorkbenchMenu
|
- Game Type
- DLCs/Other Addons
- DLCs
- ☐ Automatron
- ☐ Nuka World
- Mods
|
|
17-Locations
- Mods that programmatically add new or alter vanilla locations
|
|
|
|
|
Mod Name
|
Baseline
|
Instructions
|
|
|
|
|
|
Boston Public Library Settlement
|
|
ExpandDetailed Instructions available
|
Install the main file, the Base Object Swapper Light Replacer Config optional file, and the LibraryExtras optional file.
ExpandFOMOD Instructions
BPLSettlement
|
- Installation
- Main File
- Compatibility Patches
- ☑ Automatron
- ☐ Previsibines Repair Pack
- ☐ Sim Settlements 2 Chapter 2
|
NOTE: The included Previsbines Repair Pack patch is unnecessary as it will be patched in the Step Patch - Conflict Resolution.
|
18-Lighting and Weather
NOTE:
This section is optional!
We wish to be clear that the mods included within this section are completely optional. They are still within the
Mandate, however, we've made this section optional for users who wish to customize their own lighting and weather. As such, we've included an additional patch solely for this mod group.
- Mods that affect lighting and/or weather systems **installation is optional**
No mods defined.
19-Utilities
- Mods that generate derived mod output from load-order-specific assets
|
|
|
|
|
Mod Name
|
Baseline
|
Instructions
|
|
|
|
|
|
M8r98a4f2's Complex Item Sorter
|
|
ExpandDetailed Instructions available
|
- Install the main file as a normal mod in Mod Organizer.
- Create a new empty mod and name it Step Fallout4 - Complex Sorter Output.
- In the right pane, go to the Data tab, and scroll down to locate the Complex Sorter.bat file.
- Right-click Complex Sorter.bat, select Add as Executable, and click [OK] at the name prompt (should default to Complex Sorter).
- Click
 at the top of the main Mod Organizer window to open the Executables menu. at the top of the main Mod Organizer window to open the Executables menu.
- Select the new Complex Sorter entry, and click the [...] button to the right of the Start in field.
- Navigate to and select the xEdit installation folder
..Modding/Tools/xEdit.
- Tick the Create files in mod instead of overwrite box. Select the Step Fallout4 - Complex Sorter Output mod from the drop-down.
- Click [Apply] and [OK].
The finished executable will have been configured as follows (items in [brackets] will be specific to your setup).
| Title
|
Complex Sorter
|
| Binary
|
[Driveletter]:\Windows\system32\cmd.exe
|
| Start in
|
[...]\Modding\Tools\xEdit
|
| Arguments
|
/C "[...]\mods\M8r98a4f2's Complex Item Sorter\Complex Sorter.bat"
|
| Create files in...
|
Step Fallout4 - Complex Sorter Output
|
Complex Sorter will be run later in STEP 5 of the guide.
|
|
|
|
|
|
Synthesis
|
|
ExpandDetailed Instructions available
|
| Official and in-depth instructions can be found on the Synthesis wiki page. The following instructions should be sufficient in most cases.
.NET SDK
This mod requires the installation of the .NET 9.0 SDK in order to function. A restart is recommended following installation.
Installation
- Download the Synthesis.zip file and extract it to the Tools folder (e.g.
..\Modding\Tools\Synthesis).
- Create a new empty mod and name it Step Fallout4 - Synthesis Output.
Configure MO Executable
Configure as follows (If necessary, revisit the Tool Setup in the guide.):
| Title
|
Synthesis
|
| Binary
|
Synthesis.exe
|
| Create files in...
|
Step Fallout4 - Synthesis Output
|
Synthesis will be run later in STEP 5 of the guide.
|
|
|
|
|
|
TexGen
|
|
ExpandDetailed Instructions available
|
NOTE: TexGen for Fallout 4 is included within DynDOLOD 3 Alpha for Skyrim Special Edition.
- Ensure that both x86 and x64 versions of Visual Studio 2015, 2017 and 2019 are installed.
- Download the Main File.
- Extract the archive to the Tools folder (e.g.
..\Modding\Tools\DynDOLOD).
Configure MO Executable
Configure as follows (If necessary, revisit the Tool Setup in the guide.):
| Title
|
TexGen
|
| Binary
|
TexGen64.exe
|
| Argument(s)
|
-FO4
|
NOTE: The output path is defined in the TexGen GUI and NOT in the MO executable configuration.
TexGen will be run later in STEP 5 of the guide.
|
20-Patches
- Mods that programmatically resolve load-order conflicts
|
|
|
|
|
Mod Name
|
Baseline
|
Instructions
|
Mod List Cleanup & Performance Check
Final Sorting and Cleaning
Before moving on, run LOOT from MO, then sort, and accept the default load order provided. Review the mod list in LOOT looking for any plugins reported as needing to be cleaned. Keep in mind that LOOT tends to lag behind on the report information, so it will not always be accurate. Ignore any reported missing compatibility patches or other warnings. These are either handled by the Step Patches or not of any concern. Perform the standard cleaning procedures on the mods requiring cleaning.
Be aware the Step Patches are designed to work with a default, LOOT-sorted plugin order. This eliminates the need to set rules on the load order. From this point on:
- Ensure all applicable mods are ticked in the left pane of MO.
- Ensure all plugins are ticked in the right pane of MO.
- Sort the load order using LOOT whenever plugins are added/removed.
- Update LOOT (the program and masterlist) whenever updates are available.
Performance Tuning
The goal at this point is to have at least 80 FPS in exteriors on average. It's necessary to determine how much performance headroom is available before generating LOD, because the full LODGen setup can cost upwards of 30 FPS on average in exteriors. Before beginning, uncap FPS if it was configured in SSE Display Tweaks or via the driver software so that actual frame rates can be measured. Some users may by required to turn of vsync to measure above 60FPS. These changes should be reversed when FPS performance is no longer a concern.
It's recommended to turn on the On-Screen Display (OSD) settings in SSE Display Tweaks to measure FPS. Other third-party applications like FRAPS, Skyrim Performance Monitor (SPM), and even driver software can be used but are unnecessary with SSE Display Tweaks. Optional instructions are provided to assist.
➕ [Click to show]➖ [Click to hide] Benchmarking Instructions
Take a moment to configure the chosen FPS overlay as described above. If SPM or FRAPS are used for some reason, install into e.g., C:/Modding/Tools/SPM.
- Uncap FPS if it was configured in BethINI, SSE Display Tweaks, or via the driver software so that actual frame rates can be seen. This can be set again when the build is fully completed. Ignore any stuttering, screen tearing, etc. for the time being, as these are probably not related to performance if FPS ≥ 60.
- Launch Fallout4, and start a NEW game to verify that Skyrim loads without issue.
- Ensure that the FPS overlay is working.
- NOTE: If the game crashes at any point, there is a problem with load order, enabled mods, or any number of things missed in the above instructions. Please troubleshoot by validating that all instructions have been followed. If custom mods have been installed and enabled, disable them.
- Create a character to test initial frame rates. Skyrim should successfully load into the Alternate Start character generation interface.
- At the Statue of Mara, select "I own property in one of the holds".
- Select "Breezehome".
- Rest, and then save the game when the Breezehome interior loads. This will be the clean save to use for testing performance before and after LODGen.
- Exit Breezhome, then Whiterun, and stand at the end of the wood deck looking out over the tundra.
- Note FPS while panning over the horizon
Performance/Quality Optimization
There are many things that can be modified to improve performance and quality, depending on the performance headroom available. Following are some suggestions listed in descending priority:
- Consider revisiting the BethINI Setup to set the 'Low', 'Medium', 'High', or 'Ultra' preset until FPS is close to or greater than 80 FPS while looking West across the tundra outside of the Whiterun main gate. NOTE: Changing the preset revises View Distance, so be certain to change "Level 16" to 300000.
- Consider modifying the following grass settings in GrassControl.config.txt of the No Grass In Objects mod:
- Set
ExtendGrassDistance = False and OverwriteGrassDistance = 6000 or less to improve performance. Increase the latter value to improve quality at the cost of performance.
- Don't forget to also lower
OverwriteGrassFadeRange to some value less than 6000 (like 3000).
- Set
OverwriteMinGrassSize to a value of 50-20 to improve quality (default of '60' is already the performance optimum, but it can be increased further to optimize the quality-performance trade-off).
- If FPS is at least 80 in the test area, then consider enabling grass LODGen (addressed below, including screenshots)
STEP 5
ENBSeries Configuration
NOTE:
This section is optional!
We wish to be clear that this section is completely optional. All is still within the
Mandate, however, we've made this section optional for users who wish to customize their own custom post-processing. As such, we've included an additional patch solely for this section's mod group.
Using Cathedral Minimalist ENB as a starting point, the Step Team built an ENB Preset specifically tailored to the mod list with this Fallout4 Guide. Two different configurations are available for use. The Milk-Drinker configuration is designed to be light-weight; costing 5-10FPS. It is tailored to be used by the majority of Guide users to fix many of Fallout 4's lighting issues while bringing in some additional enhancements and features. The Dragonborn configuration is the fully designed Preset with all the desired effects and features enabled. It will cost ~20FPS outdoor.
- If average FPS is between 75-90 (HINT: check in the Rift and the Frozen Marshes), Step recommends installing the Milk-Drinker configuration.
- If average FPS is > 90, Step recommends the Dragonborn configuration. Keep in mind that LOD generation is more important to visual enhancement than ENB.}}
21-Post-Processing
- Mods that affect post-processing graphics **installation is optional**
No mods defined.
STEP 6
Level of Detail (LOD)
Now that all the mods and patches have been installed/sorted and performance margins are acceptable, the next step is to generate custom LOD data for the mod list. Recommended settings correspond to rendered game resolutions that can benefit. Using 'higher' settings will otherwise be a waste of PC resources that may be necessary to keep frame rates above 50 FPS. Use 'lower' settings as a compromise if necessary.
Any time a mod providing LOD assets is added, removed, or changed, LOD should be regenerated. Examples include --but are not limited to-- most of the '03-Foundation' mods, No Grass In Objects, Enhanced Vanilla Trees, Just Ice, etc.
Before moving on, create three empty mods for the LOD output:
- Click on the button and select, [Create empty mod].
- Name it
(TEMP) - SSE Terrain - Tamriel - xLODGen (this will only be used as a resource for xLODGen).
- This places a new, empty mod at the bottom of the mod list. However if it's not, place it last in the mod list.
- Repeat these steps to create three other new mods named:
Step Fallout4 - xLODGen Output, Step Fallout4 - TexGen Output, and Step Fallout4 - DynDOLOD Output; or anything unique and descriptive to their source/function.
- Place these new mods directly after (TEMP) - SSE Terrain - Tamriel - xLODGen.
- Find the (TEMP) - Cathedral Landscapes - LODGen mod from the 04-Foundation mod group and enable it if it is not enabled. This mod ONLY needs to be enabled for terrain LOD generation. If it is not disabled before actually playing the game, it will cause visual glitches.
The last few mods in the mod list should now reflect the following (numbering is approximate and reflects the number of mods installed without extra mods or mod-list separators):
- DLC: Hearthfires
- ...
- (TEMP) - SSE Terrain - Tamriel - xLODGen
- (TEMP) - Cathedral Landscapes - LODGen NOTE: This mod can be here or under 04-Foundation with Cathedral Landscapes main mod, but it must be DISABLED later as instructed!
- Step Fallout4 - xLODGen Output
NOTE
Complete the following in order, and ensure that all mods are enabled and plugins enabled and sorted!
xLODGen
xLODGen is run first to generate updated LOD terrain textures and meshes so that landscape LOD is updated with mod changes:
Preparation
➕ [Click to show]➖ [Click to hide] Terrain LOD preparation
- Visit the Step Forum and download SSE-Terrain-Tamriel.esm.
- Extract the file to the (TEMP) - SSE Terrain - Tamriel - xLODGen mod folder in MO.
- Ensure the both (TEMP) - SSE Terrain - Tamriel - xLODGen and (TEMP) - Cathedral Landscapes - LODGen are active in the plugin list (ticked), as they will be used by xLODGen to regenerate corrected landscape LOD and disabled afterwards.
- Sort with LOOT.
Generation
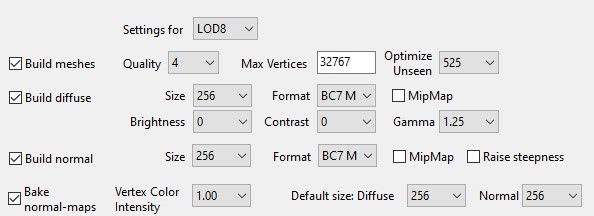
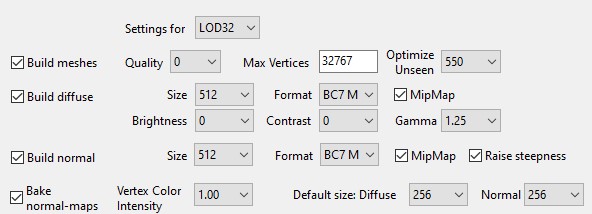
➕ [Click to show]➖ [Click to hide] Terrain LOD generation
- Run xLODGen from the MO2 executable drop-down list.
- Select all worldspaces.
- Ensure that ONLY the Terrain LOD box is ticked in the right pane.
- Use the following settings, which have been verified in extensive testing:
NOTE:
Those running 4k resolution or higher should consider bumping up all texture sizes by doubling values shown (256 --> 512, 512 --> 1024).
- Click [Generate] to run the process, which will require upwards of 30 minutes, depending on the PC.
- Once the "LOD generation complete" message has appeared, close xLODGen.
Wrap Up
➕ [Click to show]➖ [Click to hide] Terrain LOD wrap up
- Navigate to the xLODGen output folder (e.g.
..Modding/Tools/xLODGen/xLODGen_Output).
- Back on MO, open the Step SkrimSE - xLODGen Output mod in an Explorer window (Ctrl+double click).
- Cut and paste the files from the LOD generation to the Step Fallout 4 - xLODGen Output folder. Close both folders.
- Enable Step SkrimSE - xLODGen Output mod.
- Disable (TEMP) - SSE Terrain - Tamriel - xLODGen and (TEMP) - Cathedral Landscapes - xLODGen mods (only needed as xLODGen resources).
When to Regenerate LOD
- xLODGen
- Whenever there are changes to the mod list that affect the underlying landscape: height, shape, textures, etc. This does not include grass, mountains or other objects on the landscape.
STEP 6
Final INI Configuration
Step Fallout4 is fully installed and working at this point, but if FPS are < 60 or > 80, some adjustments may be beneficial to performance or quality. A final consideration is customizing BethINI. Refer to the Skyrim Configuration Guides for more information.
STEP 7
Mod Configuration (MCM)
The game is now ready to be loaded to configure mods in the Mod Configuration Menu (MCM). The MCM is a feature of SkyUI that allows mod authors to provide custom, game-accessible settings for their mods. Recommendations are provided below for select mods. The remainder are user preference.
First Launch
NOTE:
The MCM menu item may juxtapose the 'Exit' menu item, so be sure to scroll down to exit if it is 'missing'. Alternatively, use the 'qqq' console command.
To run the game, select the F4SE Launcher executable from the drop-down list and click the Run button. Keep the following in mind when first launching from a fresh Guide installation:
- A new game is required!
- In other words, don't load from a save when first launching after a fresh guide install to avoid issues. Review the changelog before upgrading from a previous version of this Guide to determine whether or not a new game is advisable.
- When launching the game for the first time after a Guide install, the load could take significantly longer than normal. This will only be a one-time wait as all the installed mods are being initialized. Subsequent load times should be shorter.
- Finally, INI files may appear in the Overwrite folder after closing the game (e.g.
../SKSE/Plugins/SkyrimUncapper.ini). These files should be moved to their respective mod folders, respecting their folder structure during the move.
Alternate Start
Upon starting a new game, the Alternate Start - Live Another Life is the first mod in play. Lets face it, Fallout 4 is old and the vanilla start quest is the last thing many want to play through. Alternate Start provides a variety of ways to start the game. Once a new game is started, a locked cell is loaded. Simply talk to the statue in the room, choose a preference for starting the game (the vanilla start is provided as an option), and then sleep in the bed to start your new life. When using an alternate start location, the main quest line can be initialized by simply visiting Helgen.
Cathedral Weathers
Users who have installed the optional Lighting & Weathers mod group should set Interior Vision to "Darker" in order for Luminosity to have the correct interior brightness.
Complete Crafting
The following screenshots display the recommended settings for the mod's MCM:
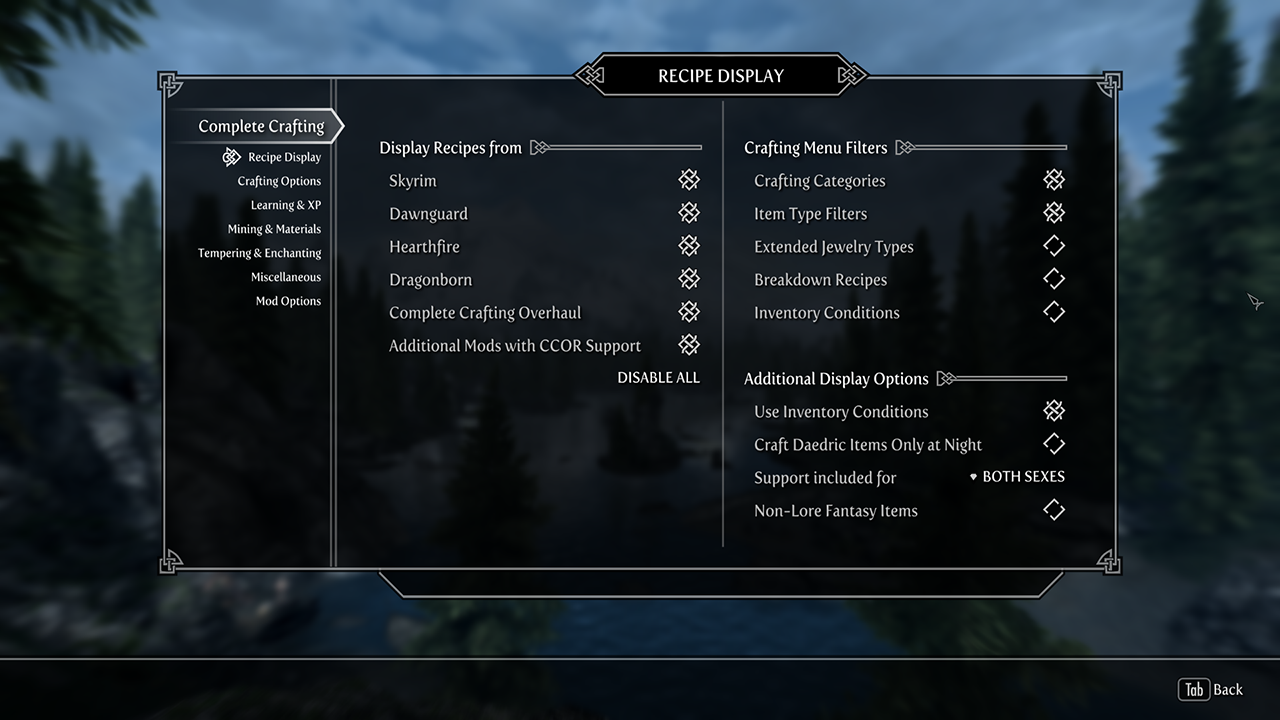
Recipe Display
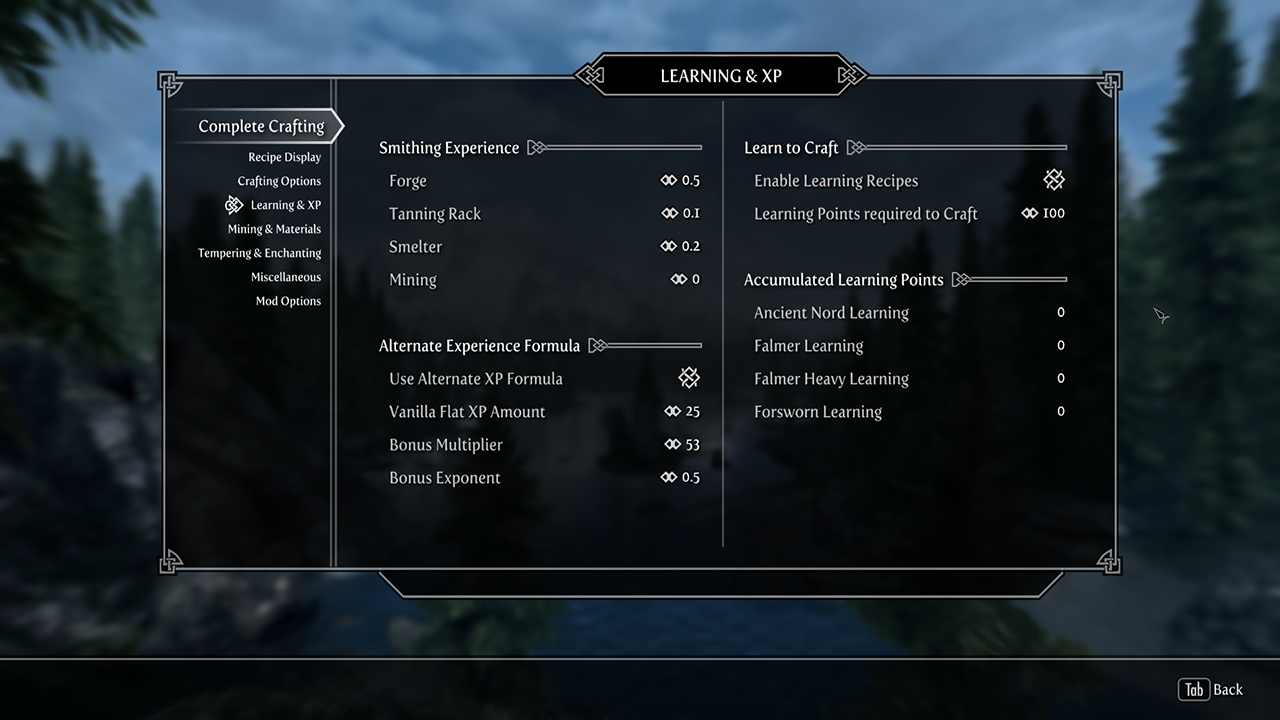
Learning & XP
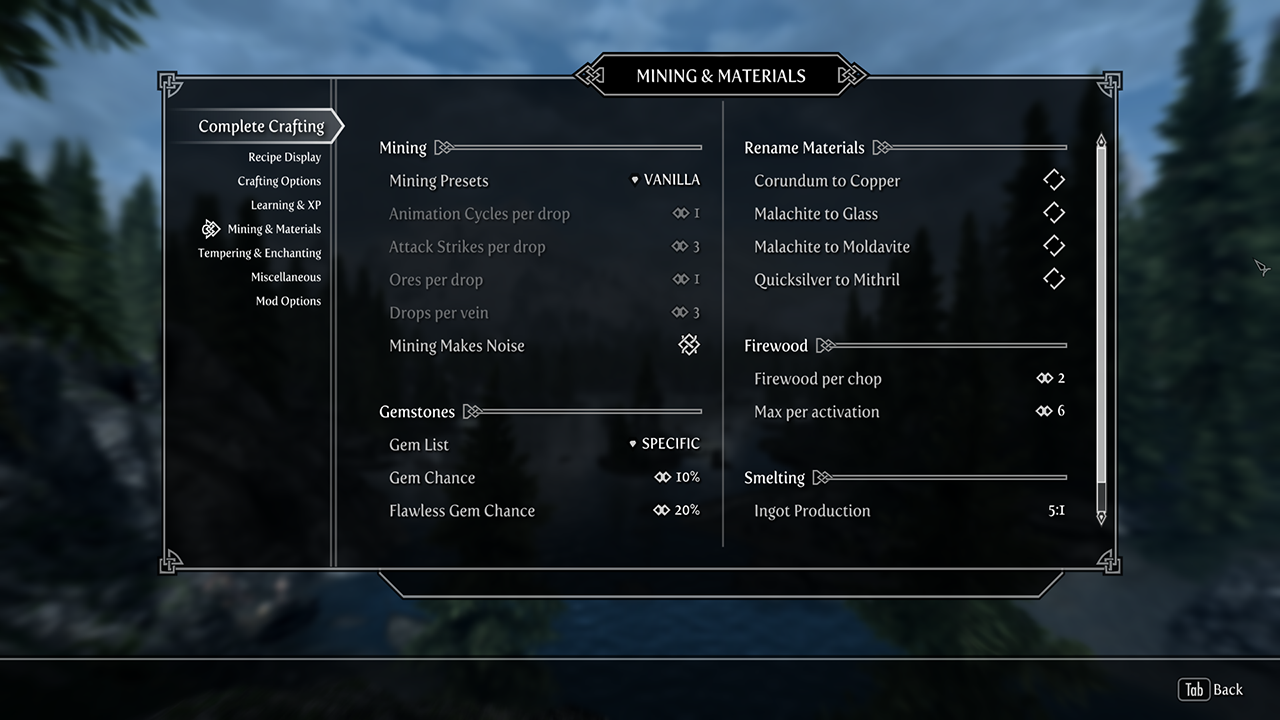
Mining & Materials
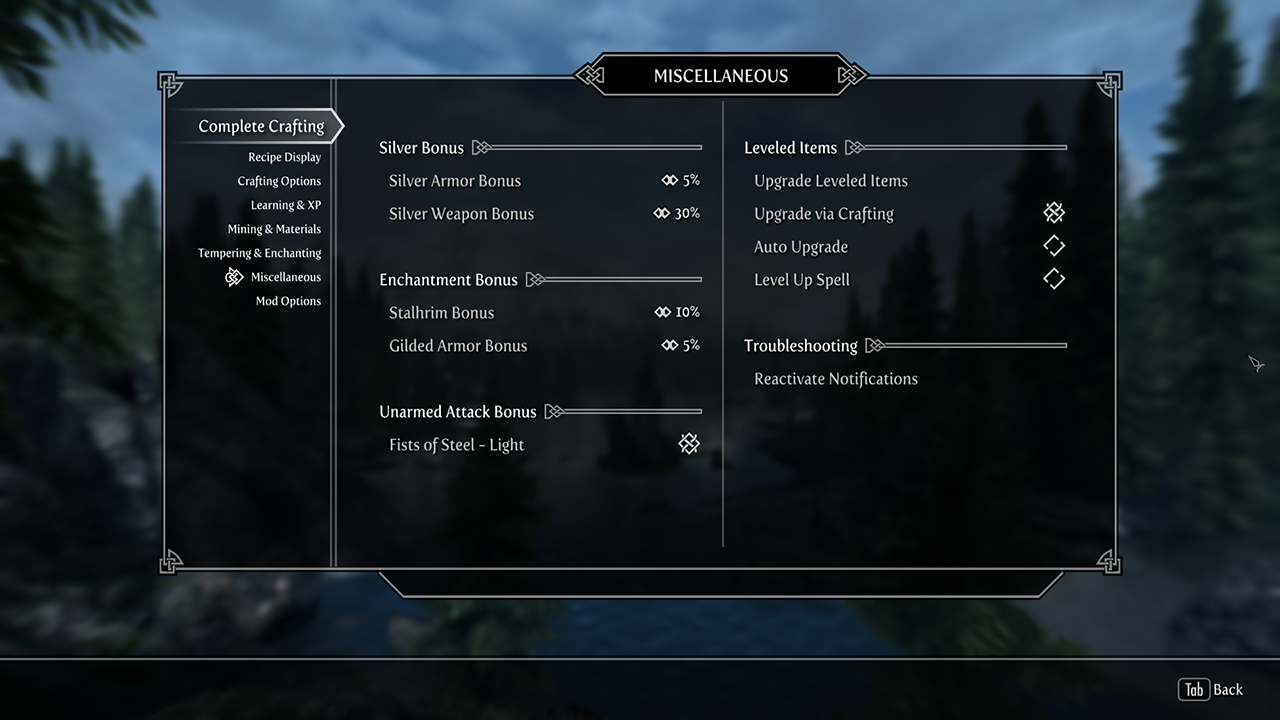
Miscellaneous
Remaining Mod Configurations
The remaining mod configurations are recommended to be left at their defaults for the most enhanced, vanilla experience. However, users may adjust the settings for these mods to their preference.
Help build STEP
STEP can only get bigger and better with help from the community. It is very time consuming for the STEP team to ensure that the Guide is consistently maintained at the highest quality possible. We need people to help us identify mods that improve the vanilla game while adhering to our Mandate. We also need ongoing bug reports, reviews, and updates on mods that may cause problems or that stray from the Mandate.
In order to suggest a mod for inclusion, visit the Mods section of the Forums.
Call for Mod Testers
Community members interested in becoming Mod Testers, please contact TechAngel85 via PM on the forums. Once registered, Mod Testers will be given access to Staff forums that houses useful information. For more information about our mod testing process, read through the Mod Testing Guide to get a sense of what's involved.
Call for Forum Moderators
Regular community members interested in becoming moderators, please contact TechAngel85 via PM on the forums. Forum Moderators will be determined based upon level and quality of activity within our community.
Thank you for reading and enjoy the game!
Credits
Thank you all!
The Step administrators would sincerely like to thank (from the bottoms of our fuzzy little hearts):
- The authors of mods recommended within our Guides
- The authors of mods who granted permission for their mods to be incorporated into the STEP Patches
- The core Community for feedback, suggestions and input
- The Beta and Mod Testers for their good humor and rigorous analyses
- The Nexus community
- Bethesda Softworks for their games
- Tannin for the gift that is Mod Organizer
- All the developers that kept MO alive to create MO2
Step Staff
Administrators
- TechAngel85
- Lead Release Coordinator, Patch Coordinator, Lead Forum Administrator, Mod Author
- z929669
- Project Founder, Lead Site Developer, Lead Site Administrator
Step Admin
Honorary Staff
Retired Founders, Administrators, and Staff:
- Aiyen
- Bealdwine
- deathneko11
- EisDrache
- EssArrBee
- Farlo
- frihyland
- GSDfan (still active: MO Support)
- GrantSP
- hishutup
- Kelmych
- MontyMM
- Nebulous112
- oqhansoloqo
- phazer11
- rootsrat
- stoppingby4now
- TheCompiler
- torminater
- Uhuru
- WilliamImm
- wolverine2710


