
NoMansSky:0.1.0: Difference between revisions
TechAngel85 (talk | contribs) |
TechAngel85 (talk | contribs) |
||
| Line 58: | Line 58: | ||
=== Folder Structure === | === Folder Structure === | ||
For all our Modding Guides Step recommends users create the following folder: <code>C:\Modding\</code>. For supporting No Man's Sky, Step recommends creating a sub-folder here and naming it '''''NoMansSky'''''. Now create the folder structure: | For all our Modding Guides Step recommends users create the following folder: <code>C:\Modding\</code>. For supporting No Man's Sky, Step recommends creating a sub-folder here and naming it '''''NoMansSky'''''. Now create the folder structure: | ||
* <code>..Modding | * <code>..Modding</code> | ||
** <code>..\NoMansSky | ** <code>..\NoMansSky</code> | ||
*** <code>..\Tools</code> | *** <code>..\Tools</code> | ||
**** <code>..\MBINCompiler</code> | |||
**** <code>..\NMS Modding Station</code> | |||
**** <code>..\PSArcTool</code> | |||
*** <code>..\Vanilla Game Files</code> | *** <code>..\Vanilla Game Files</code> | ||
Revision as of 21:32, February 19, 2021
WARNING
This guide is out of date and is NOT supported! It may contain information that is incorrect or not in line with the current state of the game.Go to the latest supported NoMansSky Guide.
Step No Man's Skyrim Guide
This is the official Step modding guide for No Man's Sky. It's goal is to provide an "enhanced vanilla" look and feel, and is built for No Man's Sky on the PC and without VR; other situations by vary.
Nomenclature
The following nomenclature is used throughout this guide and should be understood before proceeding.
- 'tick' means 'check': Frequently, the word 'check' or 'checked' can mean 'ensure' in addition to "check mark", so 'check' is not used where it is synonymous with 'tick' to avoid any mistakes that can (and have) happened from this conflation.
Reference System
The following hardware configuration was used for building and running this Guide at a resolution of 1920x1080. This configuration will allow most users to run at the game settings set later within the Guide. For those wishing to use high quality settings at resolutions higher than 1920x1080, be advised that a more powerful system will likely be required.
| Name | Hardware |
|---|---|
| Windows OS: | Windows 10 64-bit |
| CPU: | Intel Core i5-4670K (overclocked to 4GHz) |
| System RAM: | 16 GB |
| GPU: | Nvidia GTX 1060 6GB VRAM |
| Disk Drive: | SSD |
| Monitor Resolution: | 1920x1080 |
Game/graphic settings used on the system:
- All settings on Ultra
- Antisophic Filter: 16x
- Anit Aliasing: TAA+FXAA
- GTAO: High
- In-flight FOV
- I recommend users turn this up to 85. This will help prevent the HUD clipping on some ships. Users playing at screen resolutions other than 1920x1080 may have to adjust for their systems.
With the above hardware and game settings, the game is smooth and steady. Keep in mind that changes as simple as using a higher monitor resolution can cause a drop in performance.
STEP 1
First, users need to select, and set up, a folder structure to support NMS modding. Before doing so there are a couple considerations:
- Due to issues with some modding programs and Windows User Account Control (UAC), Step recommends using a location outside of
C:\Program Files\orC:\Program Files (x86)\. - Consider the space requirements for modding games, which can be significant. Step recommends using the C: drive for convenience, however, users who don't have enough space on their C: drive can create their folder structure elsewhere.
Folder Structure
For all our Modding Guides Step recommends users create the following folder: C:\Modding\. For supporting No Man's Sky, Step recommends creating a sub-folder here and naming it NoMansSky. Now create the folder structure:
..Modding..\NoMansSky..\Tools..\MBINCompiler..\NMS Modding Station..\PSArcTool
..\Vanilla Game Files
File Extensions
It's recommended to unhide file extensions so that they are visible. This makes working with files much easier when modding.
- Click on the Windows button.
- Type in the search, File Explorer Options.
- Click on the File Explorer Options listing.
- Click the View tab on the window that opens.
- In the Advanced settings pane, remove the checkbox next to Hide extensions for known file types.
STEP 2
Steam Installation
Steam is a digital distribution platform and program from Valve used for purchasing, downloading, installing, and playing digital copies of video games. User's can download the program from their website. When installing Steam...
- Users should not install it to a location controlled by UAC...
- ...unless the game installation location is changed to a location outside UAC control.
- When choosing an installation location for Steam, keep in mind the space requirements for the games that will be installed...
- ...users may opt to install their games to another drive other than C due to space constraints on the C drive.
Step recommends: If space permits, we recommend the ..\Modding\ folder created above.
Steam can be installed one of two ways:
- Purchase the physical copy of the game from a retailer:
- Insert the game disk into your disk drive.
- If the installer doesn't run automatically, open the disk from Explorer and run Setup.exe.
- Follow the on-screen instructions to install Steam (see video link below)
- Download Steam from their website and install it:
- Navigate to the Steam website
- Download the Steam installer
- Navigate to your downloads location and launch SteamSetup.exe (see video link below).
Moving Steam and Installed Games
Some users may already have Steam installed C:\Program Files\ or C:\Program Files (x86)\. This is okay, as long as the games are installed to a separate location outside UAC control. However, if the game and Steam are installed within these locations, users can utilize Steam to move the installation locations. Follow their instructions on thier website.
After installation the Modding folder structure should reflect the following:
..\Modding\..\NoMansSky\..\Tools\..\Vanilla Game Files\
..\Steam\(optional; Steam and games may be installed elsewhere)
Game Installation
Games are installed using the Steam application, and this can be done on one of two ways:
- Users who purchased a physical copy of the game from a retailer should already have the game installed from the Steam installation above.
- Use Steam to download and install:
- Open the Steam application.
- Users who need to purchase a game can use the search bar to search for and purchase it from the app.
- Users who have already purchased a copy of the game, click Library at the top.
- Users will now see a list of their purchased games. Games in grey are not installed. Click on the game needing to be installed.
- On the game's page (right pane) click the Install button.
- Check the shortcuts desired and ensure the path is correct (e.g.
C:\Modding\Steam\). - Click [Next], accept any EULA/Agreements, and install the game.
Initial Launch
Once the game is installed, it needs to be loaded with the default launcher to register it with the system and create necessary files. To do this:
- Click the Play button on the games page in Steam.
- Load the game to the game menu.
- Exit the game.
This completes the initial game setup.
Tools Installation and Setup
Users should install the tools to the location created above (i.e., ..\Modding\NoMansSky\Tools\). Install the following tools to that location:
| Mod Name | Baseline | Instructions
Template:ModTable/RowTemplate:ModTable/RowTemplate:ModTable/Row |
|---|
Users will also require a text editor for editing files. Notepad++ is highly recommended!
The "Modding" folder structure should now reflect:
..\Modding\Steam(optional; may be installed elsewhere)..\Modding\NoMansSky..\Tools..\MBINCompiler..\NMS Modding Station..\PSArcTool
STEP 3
MBINCompiler and PSArcTool
The use of these tools are very simple and require no configuration. Users only need to drag and drop the supported files onto their EXE files for the applications to execute their tasks. MBINCompiler is used for extracting and compressing the game's MBIN files, while PSArcTool does the same for the game's PAK files.
NMS Modding Station
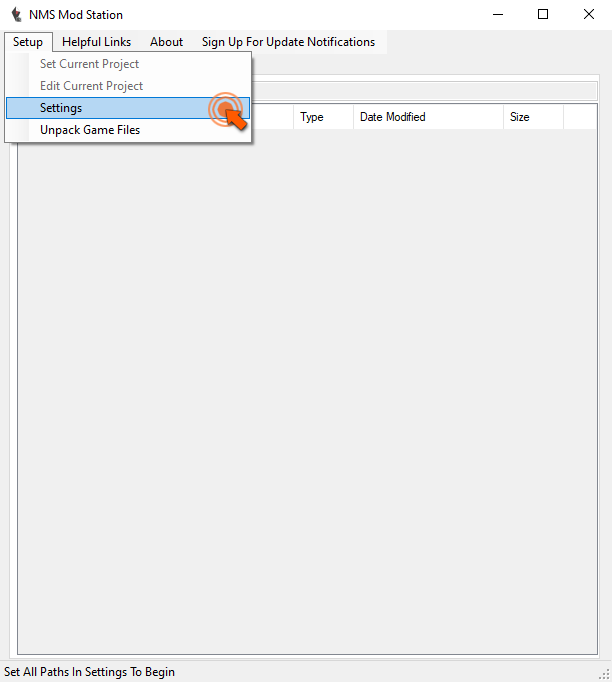
This tool needs to be set up for use.
- Navigate to its EXE and run the the program
- On the Menu Bar, navigate to Setup >> Settings
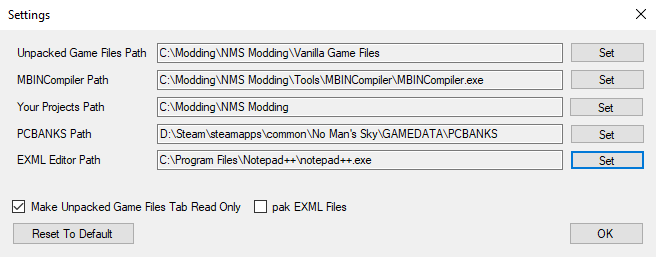
- Fill in all the paths correctly for the folder used. The following are provided as examples:
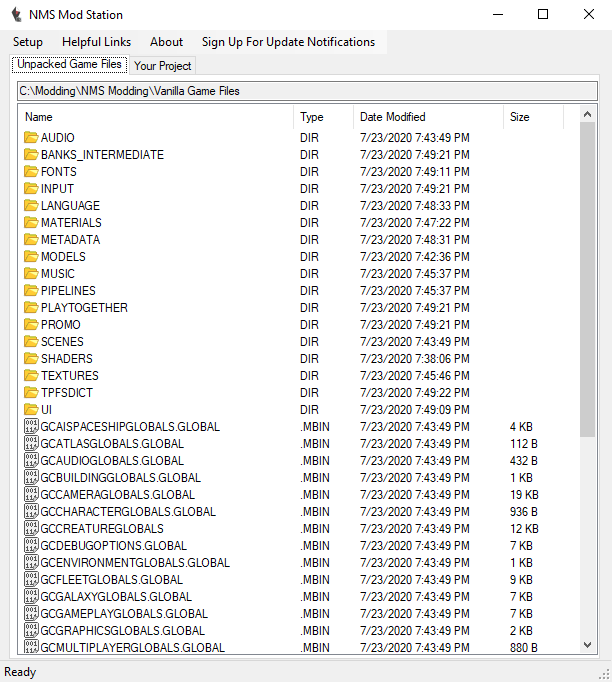
- Unpacked Game Files Path:
C:\Modding\NoMansSky\Vanilla Game Files - MBINCompiler Path:
C:\Modding\NoMansSky\Tools\MBIN Compiler\MBINCompiler.exe - Your Projects Path:
C:\Modding\NoMansSky - PCBANKS Path:
..\Steam\steamapps\common\No Man's Sky\GAMEDATA\PCBANKS - EXML Editor Path:
C:\Program Files\Notepad++\notepad++.exe
- Unpacked Game Files Path:
- Ensure the checkbox for Make Unpacked Game Files Tab Read Only is checked.
- Ensure the pak EXML Files is unchecked. Leaving it unchecked will skip EXML files when compressing PAK files, else they will be included (they're not needed).
- Click [OK] to save the settings.
Unpacking Game Files and Project Files (optional)
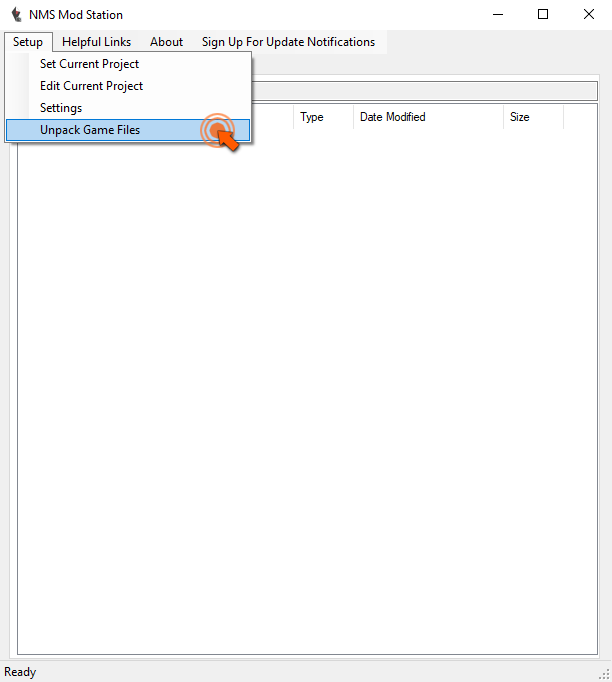
This section is optional since all the files required for this guide are included. However, it's important that users know these steps so they could update their own setups, if this guide ever becomes outdated. For this, NMS Modding Station is used and it will require ~24GBs of disk space.
The vanilla game files need to be unpacked from their normal state for development use. This process will take several minutes to complete, even on SSDs. Let it set, even if it looks like it's not doing anything...users should have ~17 folders, ~29 MBIN files, and a few other files when complete. To do this:
- Open NMS Modding Station
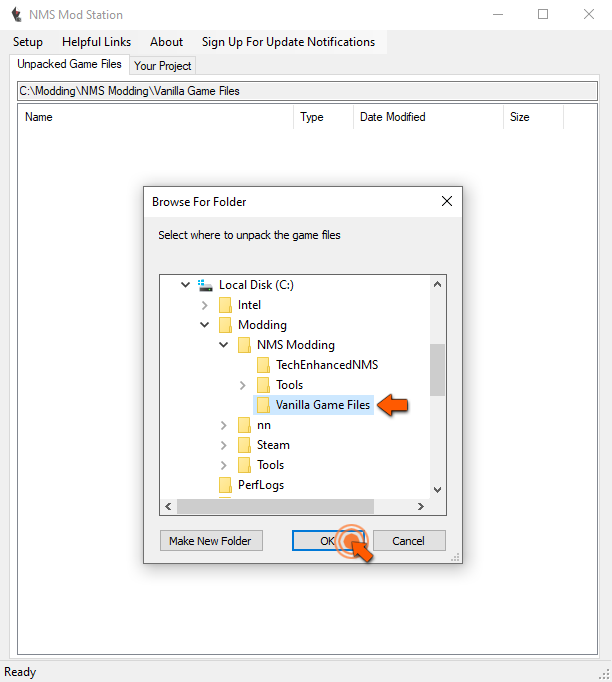
- Navigate to Setup and click on [Unpack Game Files].
- If prompted, navigate the desired folder to house the files (e.g.
C:\Modding\NoMansSky\Vanilla Game Files)
Users are encouraged to not overwrite or alter the vanilla game files to keep them as a vanilla reference. Therefore, "Projects" are used to copy the vanilla assets for development purposes. This can be done manually by copying and pasting the files from their unpacked location to a Project folder, or NMS Modding Station can be used and it'll include the proper folder structure when doing so:
- Open NMS Modding Station
- Right-click on the desired file
- Select [Copy to Project Path].
- On the prompt, select the project folder to copy the file to (e.g.
C:\Modding\NoMansSky\ModProject2)- This will "set" the project for the current session. To move additional files to a different project folder, users will have to close and reopen the program.
Users are now ready to start working with the game files.
STEP 4
At this point users should have their systems fully set up and ready to install mods. The mods listed below, currently, have no conflicts with any other part of this Guide. They can be installed, individually as separate mods, skipped, or replaced by other alternatives. Installing individual mods for NMS is very simple. To do so:
- Download the mod's archive. If downloading from Nexus Mods, ensure to download manually.
- Extract only the PAK file from the archive directly to the
..\No Man's Sky\GAMEDATA\PCBANKS\MODS\folder.
Mod Table Legend
| Flags | A green vertical bar indicates that the mod works with supported game version and is okay to install. A red bar indicates that the mod requires an update and should not be installed. | ||
| Mod Name | Mod name presented as a link to download the mod. | ||
| Link to the mod's wiki page, which includes various information about the mod. | |||
| Baseline | This notes the Step Baseline version or option of the corresponding mod that should be installed, and usually refers to options affecting performance/quality. General suggestions are located in the "Instruction" column; see below. | ||
| Instructions | Brief notes that apply to the mod or installation. In some cases, mods with several options will include a suggested option. These suggestions will take the form of: "Step recommends: Option A Main File." In other cases, there may only be one appropriate option, which fits the Step Mandate. These instructions will take the form of: "Install Option A Main File." Users will also see links displayed as: [Expand]. Users should click these links to expand the mod row to reveal detailed instructions for installing the mod. |
COMMUNITY CONTRIBUTIONS
STEP can only get bigger and better with help from the community. It is very time consuming for the STEP team to ensure that the Guide is consistently maintained at the highest quality possible. We need people to help us identify mods that improve the vanilla game while adhering to our Mandate. We also need ongoing bug reports, reviews, and updates on mods that may cause problems or that stray from the Mandate.
In order to suggest a mod for inclusion, visit the Mods section of the Forums.
Call for Mod Testers
Community members interested in becoming Mod Testers, please contact TechAngel85 via PM on the forums. Once registered, Mod Testers will be given access to Staff forums that houses useful information. For more information about our mod testing process, read through the Mod Testing Guide to get a sense of what's involved.
Call for Forum Moderators
Regular community members interested in becoming moderators, please contact TechAngel85 via PM on the forums. Forum Moderators will be determined based upon level and quality of activity within our community.
Credits
The STEP administrators would sincerely like to thank (from the bottoms of our fuzzy little hearts):
- The authors of mods recommended within our Guides
- The authors of mods who granted permission for their mods to be incorporated into the STEP Patches
- The core Community for feedback, suggestions and input
- The Beta and Mod Testers for their good humor and rigorous analyses
- The Nexus community
- Bethesda Softworks for their games
- Tannin for the gift that is Mod Organizer
- All the developers that kept MO alive to create MO2
STEP Staff
Administrators
- TechAngel85
- Lead Release Coordinator, Patch Coordinator, Lead Forum Administrator, Mod Author
- z929669
- Project Founder, Lead Site Developer, Lead Site Administrator
SM Forum Moderators
Currently active STEP Forum Moderators:
- DoubleYou
- Greg
Honorary Staff
Retired Founders, Administrators, and Staff:
- Aiyen
- Bealdwine
- deathneko11
- EisDrache
- EssArrBee
- Farlo
- frihyland
- GSDfan (still active: MO Support)
- GrantSP
- hishutup
- Kelmych
- MontyMM
- Nebulous112
- oqhansoloqo
- phazer11
- rootsrat
- stoppingby4now
- TheCompiler
- torminater
- Uhuru
- WilliamImm
- wolverine2710