
NoMansSky:Editing NMS Textures: Difference between revisions
m (→Photoshop) |
m (→Introduction) |
||
| (45 intermediate revisions by 3 users not shown) | |||
| Line 1: | Line 1: | ||
{{#set: | |||
{{ | NMSIndex=Textures | ||
{{ | }}{{PageTitle|logo=nomanssky|title=How to edit .DDS Textures|author=Lo2k}} | ||
{{NMSPage}} | |||
{{TOC}}[[Category:NoMansSky General Guides]] | |||
== Introduction == | == Introduction == | ||
No Man's Sky uses the .DDS format | No Man's Sky uses the common '''.DDS''' format for its texture files. They are located in the TEXTURES folder from the unpacked game assets. Conveniently, TEXTURES is more or less organized in directories that mimic the MODELS directories. Therefore if users find a 3D model, they can quite easily find the texture and vice versa by following the mimicked paths. | ||
Conveniently, | |||
Format itself stores one or more textures | [https://stepmodifications.org/wiki/NoMansSky:Reference_Guides/TEXTURES/Texture_Formats The Format], itself, stores one or more textures either with or without an alpha channel. Though the DDS format is commonly used by the gaming industry, many texture programs still require a plugin to be able to read and write the format. This tutorial will explain how to display thumbnails of .DDS files within Windows Explorer, as well as, how to edit the files in Paint.net and/or Adobe Photoshop. | ||
== | == System Setup == | ||
To open and read .DDS files, | === Texture Previews === | ||
Even if .DDS is a part of DirectX, created by Microsoft, Windows doesn't support the .DDS file format preview in its explorer.<br> | |||
Thankfully, some other company did the job and the best way, so far, is to use [https://www.getpaint.net/ Paint.net] paired with the [https://github.com/dtzxporter/FileTypeDDS/releases FileTypeDDS extension].<br> | |||
All you have to do is : | |||
* install paint.net | |||
* decompress FiletypeDDS zip file | |||
* copy-paste extracted folders into the paint.net directory to overwrite the default one | |||
* open any folder containing some NMS .DDS file | |||
* right click a .DDS file and choose "open with" | |||
* Select Paint.net | |||
* Close any texture folder | |||
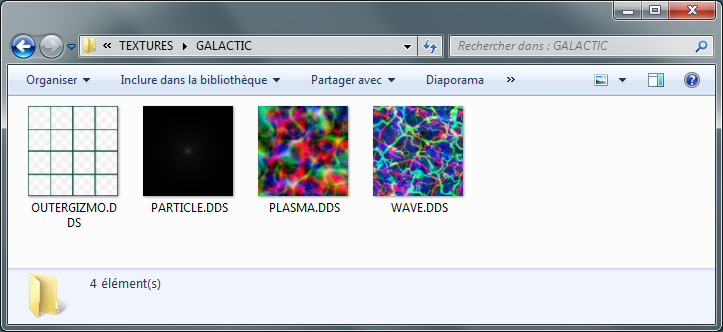
Starting from now on, opening any texture folder will display all the .DDS files as thumbnails instead of generic icons ! | |||
{{GallerySimple|id=ImageSet1|width=144|img=Image:DDSpreview.jpg|caption= }} {{clear}} | |||
=== Various Texture Tools === | |||
Below are various tools that are helpful when working with textures. | |||
; [https://github.com/microsoft/DirectXTex/releases DirectXTex] | |||
: This is a shared source library for reading and writing .DDS files, and performing various texture content processing operations on such files. The item of interest here is '''Texdiag'''. | |||
: [https://github.com/microsoft/DirectXTex/wiki/Texdiag '''Texdiag'''] is a command line tool used to analyze images. When ran on a texture, Texdiag will output useful information such as the texture size, compression format, channel information, mipmap levels, etc. | |||
== Paint.net <small>(by Casebolt)</small> == | |||
Paint.net is a free Open source photo editing software that can be [https://www.getpaint.net downloaded here]. | |||
To open and read .DDS files, users will need [https://github.com/dtzxporter/FileTypeDDS/releases this specific addon] by '''Nick aka Dtzxporter'''.<br> | |||
Then follow the included readme file to install it. It's just a matter of copying 2 files. | Then follow the included readme file to install it. It's just a matter of copying 2 files. | ||
Now, to edit a .DDS file : | Now, to edit a .DDS file : | ||
* Open Paint.net and go to File | * Open Paint.net and go to {{ui|File}} and select {{ui|Open}} (or Ctrl+O). Choose the desired .DDS file. | ||
* | * Users can now edit the file as any other image. | ||
* To save | * To save the finished file, choose {{ui|File}} and select {{ui|Save as}} (or Ctrl+Shift+S). Select '''.DDS''' file type as the output type and click {{ui|Save}}. | ||
== Photoshop == | == Photoshop == | ||
Photoshop is | Photoshop is Adobe's renowned image editing program. Currently all existing versions require a paid license to use. | ||
However, for users who do have Photoshop, all that is required to read/write .DDS files is the [https://software.intel.com/content/www/us/en/develop/articles/intel-texture-works-plugin.html Intel Texture Works plug-in]. To install, copy the '''.8bi''' plugin to the '''File Formats''' directory ( <code>/Plug-ins/File Formats</code> ) within the Photoshop installation folder. | |||
To edit a .DDS file : | |||
# Open the file from within Photoshop or, if .DDS files are associated to Photoshop, open the file directly from the folder | |||
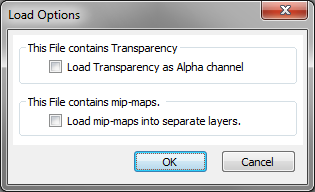
# When opening, a prompt will appear with options for loading the file. If the texture has an alpha layer or mimaps, users will see the following: | |||
: https://wiki | #: https://stepmodifications.org/wiki/images/4/45/OpenDDSinPS.png | ||
: The alpha layer is mandatory so if | #:* The alpha layer is mandatory so if the option is available, always check the checkbox. | ||
: | #:* If mip-maps box is checked, it will create a separate layer for each mip-map. This is rarely useful as mipmaps should be auto-generated during save, therefore, users should generally avoid checking this box. | ||
# When ready to save, go to {{ui|File}} and select {{ui|Save As}}. Choose {{fc|#FFF|Intel texture Works .DDS}} as the file format. | |||
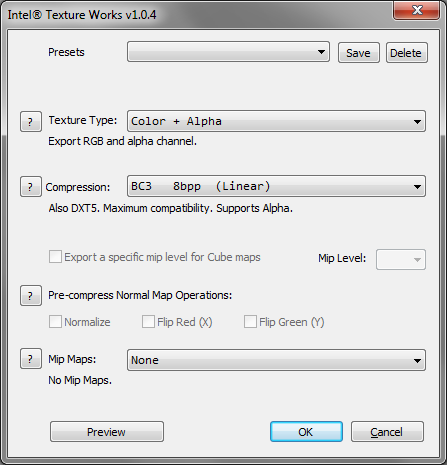
: A new window will open with .DDS specific settings : | #: A new window will open with .DDS specific settings : | ||
: {{GallerySimple|id=ImageSet1|width=144|img=Image:SaveDDS_in_PS.png|caption=Save DDS window}} {{clear}} | #: {{GallerySimple|id=ImageSet1|width=144|img=Image:SaveDDS_in_PS.png|caption=Save DDS window}} {{clear}} | ||
: Settings are as | #: Settings are as follows : | ||
:* Texture Type : | #:* '''Texture Type''' : Choose ''Color'' if there's no alpha layer (fully opaque textures) or ''Color + Alpha'' for textures with an alpha channel. | ||
:* Compression : | #:* '''Compression''' : Users should select the same compression as the original file. However, BC7 will usually provide the best results for any texture unless it has a very noisy alpha channel. | ||
:* Pre-compress Normal Maps Operation : | #:* '''Pre-compress Normal Maps Operation''' : is only available when saving normal maps and could help if some of the channels are flipped. This is not a common. | ||
:* Mip-Maps : This option offers to auto generate a given | #:* '''Mip-Maps''' : This option offers to auto generate a given level of mip-maps. Though the game will work without them, for performance reasons, users should always generate mip-maps if the original texture also included them. Generally, users should choose to generate the same level that the original texture included. | ||
# Finally, click {{ui|OK}} to save the file. | |||
# The final step is to {{fc|#F88|rename the file from ''.dds'' into ''.DDS''}} because {{fc|#F88|lowercase .dds files are not recognized by the game}}. | |||
==Cached Textures== | |||
If after replacing a texture, it can't be seen in-game or it displays weird striped artifacts, it's most likely because this texture is one of the NMS cached textures. To speed up some texture access, NMS stores headers and footers of some of the textures in a cache file. If one of these textures are edited, its properties, header, and/or footer will no longer match the stored information within the cache, resulting in a corrupted display of the texture. | |||
This cache file is named '''CACHE.SQS''' and can be find in the ''TEXTURES'' folder. Editing this file is quite complex, but a simple workaround can be used : | |||
# Rename the texture to something new (like changing LASER.DDS into LASER2.DDS). | |||
# Find the [https://stepmodifications.org/wiki/NoMansSky:Reference_Guides/MATERIAL_Files MATERIAL.MBIN file] calling the original texture file and change the texture name to the renamed version (LASER2.DDS). | |||
Doing the above, as the texture name is new, it won't be find in the cache file and will be used as is. The only minor drawback is that the modder will need to edit and release 2 files (the texture and the calling material) instead of one. | |||
Latest revision as of 15:09, January 11, 2023

How to edit .DDS Textures
by: Lo2k
Introduction[edit | edit source]
No Man's Sky uses the common .DDS format for its texture files. They are located in the TEXTURES folder from the unpacked game assets. Conveniently, TEXTURES is more or less organized in directories that mimic the MODELS directories. Therefore if users find a 3D model, they can quite easily find the texture and vice versa by following the mimicked paths.
The Format, itself, stores one or more textures either with or without an alpha channel. Though the DDS format is commonly used by the gaming industry, many texture programs still require a plugin to be able to read and write the format. This tutorial will explain how to display thumbnails of .DDS files within Windows Explorer, as well as, how to edit the files in Paint.net and/or Adobe Photoshop.
System Setup[edit | edit source]
Texture Previews[edit | edit source]
Even if .DDS is a part of DirectX, created by Microsoft, Windows doesn't support the .DDS file format preview in its explorer.
Thankfully, some other company did the job and the best way, so far, is to use Paint.net paired with the FileTypeDDS extension.
All you have to do is :
- install paint.net
- decompress FiletypeDDS zip file
- copy-paste extracted folders into the paint.net directory to overwrite the default one
- open any folder containing some NMS .DDS file
- right click a .DDS file and choose "open with"
- Select Paint.net
- Close any texture folder
Starting from now on, opening any texture folder will display all the .DDS files as thumbnails instead of generic icons !
Various Texture Tools[edit | edit source]
Below are various tools that are helpful when working with textures.
- DirectXTex
- This is a shared source library for reading and writing .DDS files, and performing various texture content processing operations on such files. The item of interest here is Texdiag.
- Texdiag is a command line tool used to analyze images. When ran on a texture, Texdiag will output useful information such as the texture size, compression format, channel information, mipmap levels, etc.
Paint.net (by Casebolt)[edit | edit source]
Paint.net is a free Open source photo editing software that can be downloaded here.
To open and read .DDS files, users will need this specific addon by Nick aka Dtzxporter.
Then follow the included readme file to install it. It's just a matter of copying 2 files.
Now, to edit a .DDS file :
- Open Paint.net and go to [File] and select [Open] (or Ctrl+O). Choose the desired .DDS file.
- Users can now edit the file as any other image.
- To save the finished file, choose [File] and select [Save as] (or Ctrl+Shift+S). Select .DDS file type as the output type and click [Save].
Photoshop[edit | edit source]
Photoshop is Adobe's renowned image editing program. Currently all existing versions require a paid license to use.
However, for users who do have Photoshop, all that is required to read/write .DDS files is the Intel Texture Works plug-in. To install, copy the .8bi plugin to the File Formats directory ( /Plug-ins/File Formats ) within the Photoshop installation folder.
To edit a .DDS file :
- Open the file from within Photoshop or, if .DDS files are associated to Photoshop, open the file directly from the folder
- When opening, a prompt will appear with options for loading the file. If the texture has an alpha layer or mimaps, users will see the following:
- The alpha layer is mandatory so if the option is available, always check the checkbox.
- If mip-maps box is checked, it will create a separate layer for each mip-map. This is rarely useful as mipmaps should be auto-generated during save, therefore, users should generally avoid checking this box.
- When ready to save, go to [File] and select [Save As]. Choose Intel texture Works .DDS as the file format.
- A new window will open with .DDS specific settings :
- Settings are as follows :
- Texture Type : Choose Color if there's no alpha layer (fully opaque textures) or Color + Alpha for textures with an alpha channel.
- Compression : Users should select the same compression as the original file. However, BC7 will usually provide the best results for any texture unless it has a very noisy alpha channel.
- Pre-compress Normal Maps Operation : is only available when saving normal maps and could help if some of the channels are flipped. This is not a common.
- Mip-Maps : This option offers to auto generate a given level of mip-maps. Though the game will work without them, for performance reasons, users should always generate mip-maps if the original texture also included them. Generally, users should choose to generate the same level that the original texture included.
- Finally, click [OK] to save the file.
- The final step is to rename the file from .dds into .DDS because lowercase .dds files are not recognized by the game.
Cached Textures[edit | edit source]
If after replacing a texture, it can't be seen in-game or it displays weird striped artifacts, it's most likely because this texture is one of the NMS cached textures. To speed up some texture access, NMS stores headers and footers of some of the textures in a cache file. If one of these textures are edited, its properties, header, and/or footer will no longer match the stored information within the cache, resulting in a corrupted display of the texture.
This cache file is named CACHE.SQS and can be find in the TEXTURES folder. Editing this file is quite complex, but a simple workaround can be used :
- Rename the texture to something new (like changing LASER.DDS into LASER2.DDS).
- Find the MATERIAL.MBIN file calling the original texture file and change the texture name to the renamed version (LASER2.DDS).
Doing the above, as the texture name is new, it won't be find in the cache file and will be used as is. The only minor drawback is that the modder will need to edit and release 2 files (the texture and the calling material) instead of one.