
NoMansSky:2.0.0
WARNING
This guide is out of date and is NOT supported! It may contain information that is incorrect or not in line with the current state of the game.Go to the latest supported NoMansSky Guide.
Step NoMansSky Guide
This is the official Step modding guide for No Man's Sky. Its goal is to provide an "enhanced vanilla" look and feel and is built for No Man's Sky on the PC without VR. Other situations by vary.
All of the features are listed on our Nexus Mods page, but here are a few in summary:
- Increased base radiuses and many base improvements
- Improved environmental effects, like clouds and water
- Greatly enhanced player movement
- Balanced environmental hazards to the suit for more favorable gameplay
- Greatly improved cameras, binoculars, and scanners
- Customized and varied ship controls based on weight-class
- Lots of visual and other enhancements via mods
Nomenclature
The following nomenclature is used throughout this guide and should be understood before proceeding.
- 'tick' means 'check': Frequently, the word 'check' or 'checked' can mean 'ensure' in addition to "check mark", so 'check' is not used where it is synonymous with 'tick' to avoid any mistakes that can (and have) happened from this conflation.
System Requirements
We recommend the following hardware configuration for running a Step NoMansSky installation at a resolution of 1920x1080. The minimum requirements will allow most users to install and run the game on High. Our recommended requirements will allow most users to install and run the game on Ultra for most, if not all settings.
| Hardware | Minimum | Recommended |
|---|---|---|
| Windows OS | Windows 10 64-bit | Windows 10 64-bit |
| CPU | Intel Core i5-6600K or equivalent | Intel Core i7-4790 or equivalent |
| System RAM | 8 GB | 16 GB or higher |
| GPU | Nvidia GTX 970 4GB | Nvidia GTX 1060 or equivalent or better / 4GB VRAM or higher |
| Drive Space | ~30 GBs | ~50 GBs |
| Monitor Resolution | 1920x1080 | 1920x1080 or higher |
- For those wishing to use high quality settings at resolutions higher than 1920x1080, be advised that a more powerful system will likely be required.
- This game will also eat VRAM, so the more VRAM available the better the performance will be as files aren't being offloaded to slower system RAM.
STEP 1
Follow the System Setup Guide!
Those who have not completed the System Setup Guide should STOP and do so now BEFORE continuing this guide! This is a perquisite for completing this Guide. Once complete, return here and continue below.
NEW GUIDE FOLLOWERS: Deviate from these instructions at your own risk! Instructions in this guide presume that previous instructions have been followed.
Suggested Folder Structure
For all our Modding Guides Step recommends users create the following folder: Drive:\Modding\ (e.g., C:\Modding\). For supporting No Man's Sky, Step recommends creating a sub-folder within the Modding folder and naming it NoMansSky. Now create the folder structure below:
..\Modding\..\NoMansSky..\Tools..\AMUMSS..\PSArcTool
Game Settings
The following are only recommendations for the in-game settings. Launch the game using Steam and set the following. Other settings are user preference.
Video Options
- Window Mode: Borderless
- Flight Field of View: 85
- This will help prevent the HUD clipping on some ships. Users playing at screen resolutions other than 1920x1080 may have to adjust for their systems.
- Vignette & Scanlines: Disabled
- This is just one part that will help elevate some of the motion sickness effect the game can have.
Graphic Options
- All settings on Ultra
- Anisotropic Filter: 16x
- GTAO: High
- Anit Aliasing: TAA
Mod Organizer - NMS Initialization
FIRST, follow the System Setup Guide. The below instructions describe how to initialize a No Man's Sky instance in Mod Organizer (MO). If MO wass installed as a Portable application, the instructions below will need to be reinterpreted accordingly. Those who already have a MO instance for NMS can skip this initialization:
- Launch MO by running its executable (e.g.
..Modding\Tools\Mod Organizer\ModOrganizer.exe) - Upon load, click the Instance Manager button on the tool (first button).
- Click [Create new instance] button.
- Select No Man's Sky and click [Next].
- If it didn't find the game, users can manually browse to the game's location.
- Name the instance something like
No Man's Skyor keep the default. Click [Next]. - (optional) change the location of data stored. Step recommends the default location, unless space restraints prevent this. Click [Next].
- A confirmation window will display with the installation information. Click [Finish].
- MO is now ready to use with this guide.
Profile Setup
Mod Organizer's profile feature allows the creation of multiple mod-builds. Begin by creating/editing two profiles for use with this guide:
- Launch MO, choosing the No Man's Sky Instance.
- On the Default profile, arrange the mods in the left pane in the following order:
- DLC: Dawnguard
- DLC: HearthFires
- DLC: Dragonborn
- Click the
 button on the menu bar.
 - Select the Default profile.
- Ensure the Use profile-specific Game INI Files box is ticked and click [Copy].
- Name the new profile
Step NoMansSky, or anything similar. - Ensure the Use profile-specific Game INI Files box is ticked.
- Close the window by clicking [Close].
- Select the Step NoMansSky profile from the profile selection down-drop.
- If users receive a notice saying some INI files were missing and will be copied. This is normal.
- If an error is displayed about missing "modlist.txt" files, restart MO (or do a system reboot if one hasn't been done yet).
Enable Mods
Mod support for No Man's Sky is disabled by default, thus, users need to enable support after the game is registered with the system. To do this:
- Navigate to the game's PCBANKS folder (i.e.,
..\Steam\steamapps\common\No Man's Sky\GAMEDATA\PCBANKS) - Locate the DISABLEMODS.TXT file.
- Rename this file: ENABLEMODS.TXT
- In fact, this file can be renamed to anything or simply removed from the folder structure. To disable mod support again, simply rename the file back the the original name, or place it back in the PCBANKS folder. Users will have to do this step every time the game updates because Hello Games resets this file every update.
- If it doesn't exist, create a new folder within PCBANKS and name it MODS.
This completes the initial game setup.
Tools Installation and Setup
Users should install the tools to the location created above (i.e., ..\Modding\NoMansSky\Tools). Install the following tools to that location:
| Mod Name | Baseline | Instructions |
|---|
AMUMSS
Initialization
AMUMSS will be set up for use below:
- Run BUILDMOD.bat by double-clicking on it.
- Users should see this at the top of the log:
>>> Checking Path to NMS_FOLDER...
Path to NMS_FOLDER is >>> GOOD <<<, game files found
- Users should see this at the top of the log:
- At the prompts enter [N] and let it run.
- Ignore the
No user .lua Mod Script found in ModScript...warning, as this is just an initialization run. If there are other warnings, user should investigate.
- Ignore the
- Close when complete.
- Firewall / Internet Security / Antivirus Software:
- AMUMSS connects to the internet to check for MBINCompiler updates. To allow this process, users may have to create an exception in their software for:
<pathTo>\AMUMSS\MODBUILDER\MBINCompilerDownloader\curl.exe
To check if this working, users should see the following in their BUILDMOD.bat log when an update is available and downloaded, else only an error message will be displayed:>>> Added MBINCompiler.x.xx.x.exe to Extras\MBINCompiler_OldVersions folder...
>>> Your new MBINCompiler is version: x.xx.x - If the CMD window closes immediately (or is blank) when double-clicking BUILDMOD.BAT, it could be security software blocking the program from running. Try creating an exception in the software and rebooting the PC.
- AMUMSS connects to the internet to check for MBINCompiler updates. To allow this process, users may have to create an exception in their software for:
NMS PCBANKS Explorer
This is a program that enables the easy exploration of the game's files and other features, however, it must be set up before it can operate. The instructions have been separated into groups to help users follow along easier.
- Run NMS PCBANKS Explorer.exe
- At the Would you like to use .\DEFAULT_UNPACKFOLDER as your 'MAIN' Unpack folder? prompt, click [Yes]
- At the Would you like to use .\DEFAULT_UNPACKFOLDER as your 'Results' folder for Un-packing results? prompt, click [Yes]
- At the Would you like to use .\DEFAULT_EXMLsaveFOLDER as your 'MAIN' folder for saving EXML files? prompt, click [Yes]
- At the Would you like to use .\DEFAULT_EXMLsaveFOLDER as your 'Resutls' folder for saving EXML files? prompt, click [Yes]
- At the Explorer Usage prompt, click [Ok] and allow NMS PCBANKS Explorer to load
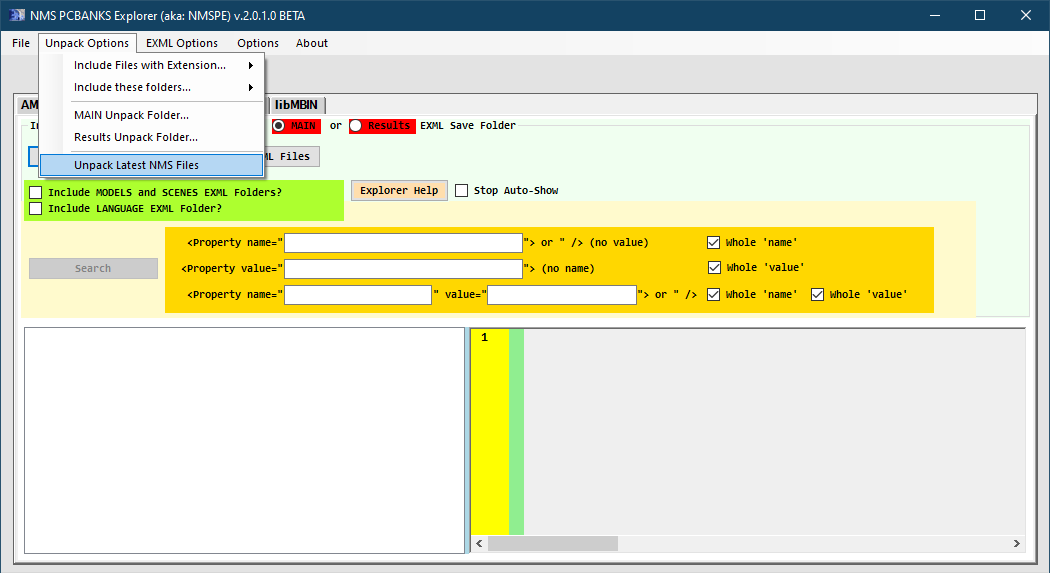
- Once complete, click the Unpack Options menu and select Unpack Latest NMS Files
- At the Please, choose your unpack folder location... prompt, click [MAIN]
- At this point NMS PCBANKS Explorer will unpack the game files. Please wait for it to complete (1-5 mins).
- Click [Ok] at the unpack completion prompt and ensure the "Explorer" tab is selected on NMS PCBANKS Explorer
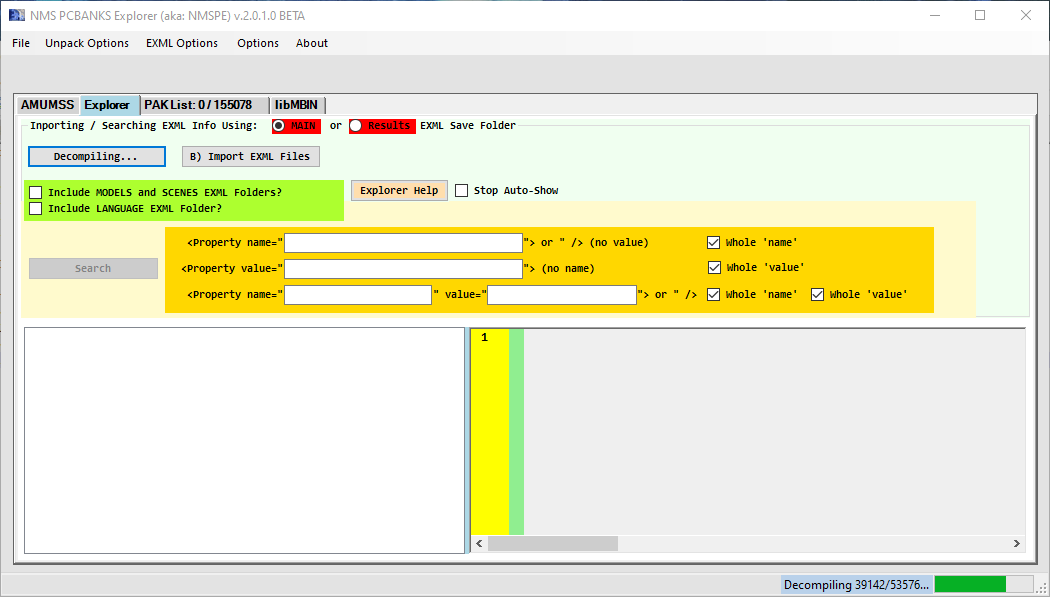
- On the Explorer tab, click the [Decompile] button
- At the Please, choose your unpack folder location... prompt, click [MAIN]
- At the Please, choose your EXML folder location... prompt, click [MAIN]
- At this point NMS PCBANKS Explorer will decompile all the unpacked game files. Please wait for it to complete (10-30 mins).
- Click [OK] at any warning prompts of files that couldn't be unpacked.
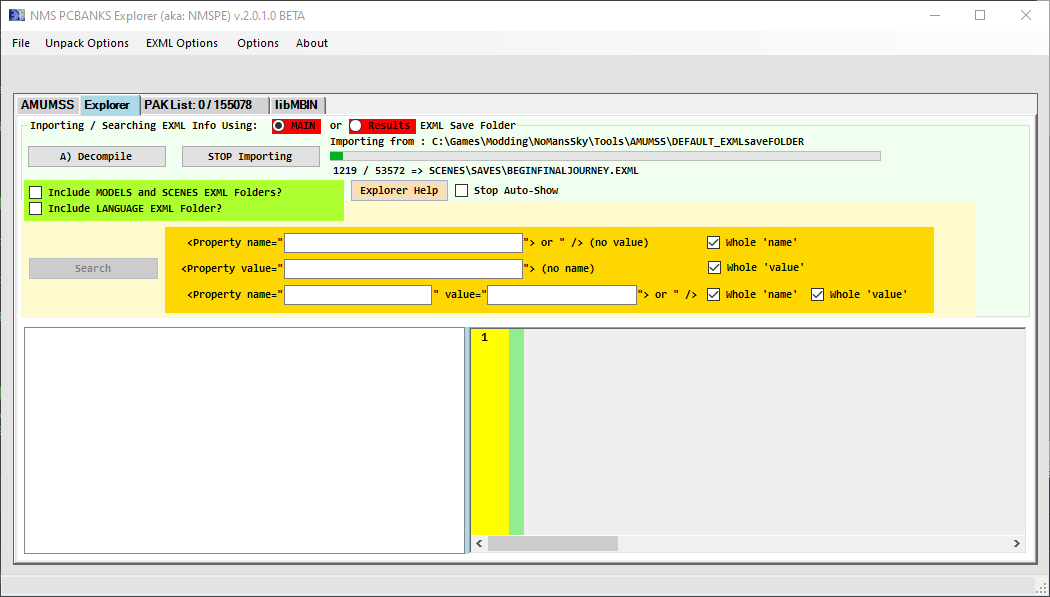
- On the Explorer tab, click the [Import EXML Files] button
- At the Please, choose... prompt, click [MAIN]
- Include MODELS and SCENES folders?, click [Yes]
- Include LANGUAGE folder?, click [No]
- Read the prompt and click [Ok]
- At this point NMS PCBANKS Explorer will import all the decompiled EXML files, which allows them to be explored. Please wait for it to complete (40-60 mins).
AMUMSS is now set up and ready to use.
STEP 2
At this point the modding environment should be fully set up and ready to install mods. Installing individual mods for NMS is done so via Mod Organizer 2. (see: installing mods) When installing mods, keep the following in mind:
- To maintain compatibility, it's important to install mods as described in their respective Detailed Instructions.
- If no Detailed Instructions or Step recommendations are provided for a particular mod, all options are good. Step encourages user customization.
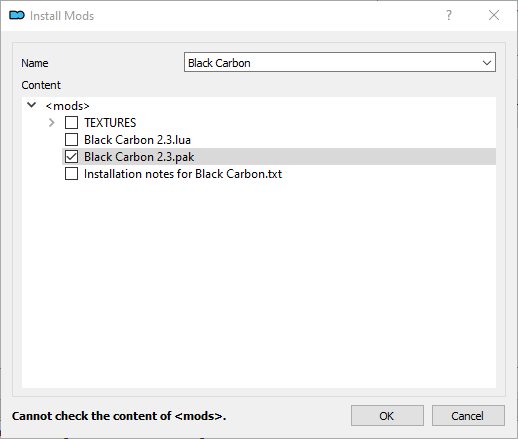
- Unless Detailed Instructions are given, only install the PAK files when installing mods. (see example below)
- After installing a mod, enable the mod in MO.
- Since LUA scripts are used, no mods are required besides the Resource Files, so user are free to customize as they like. Yet, all mods are recommended for the intended Guide outcome. Users who deviate from the Guide will have various results.
Mod Table Reference
- Supported Game Version: NMS:Prisms v3.53
| Table Flags | A red vertical bar indicates that the mod requires an update and should not be installed. A blue bar indicates that the mod works with supported game version and is okay to install. | |||
| Mod Name | Nexus mod name presented as a link to Nexus for download. | |||
| Link to the mod's wiki page, which includes various information about the mod. | ||||
| Baseline | This notes the Step Baseline version or option of the corresponding mod that should be installed, and usually refers to options affecting performance/quality. General suggestions are located in the "Notes" column; see below. | |||
| Instructions | Brief notes that apply to the mod or installation. In some cases, mods with several options will include a suggested option. These suggestions will take the form of: "Step recommends: Option A Main File." In other cases, there may only be one appropriate option, which fits the Step Mandate. These instructions will take the form of: "Install Option A Main File." Users will also see links displayed as: [Expand]. Users should click these links to expand the mod row to reveal detailed instructions for installing the mod. |
Models & Textures
No mods defined.
Sounds & Music
No mods defined.
Fixes
| Mod Name | Baseline | Instructions |
|---|
Gameplay
| Mod Name | Baseline | Instructions
Template:ModTable/RowTemplate:ModTable/RowTemplate:ModTable/RowTemplate:ModTable/RowTemplate:ModTable/RowTemplate:ModTable/Row |
|---|
Lighting & Weather
No mods defined.
Resource Files
| Mod Name | Baseline | Instructions |
|---|
Build Patch/Resource Files
To wrap up, the mod and Resource Files need to be be merged and compressed into a PAK file so that they can be used by the game. This process is done using AMUMSS:
- Open the guide's project folder in an Explorer window:
..\Modding\NoMansSky\StepNoMansSky - Select all the files and folders in the project's root folder.
- Drag and drop all selected items onto PSArcTool.exe
- This will compress the files into a PAK file.
- Rename the file to: ZZZZStepNoMansSky.PAK (this format ensures it's last in the load order)
- The "z" is intentional to force the archive to load last.
Install the Resource Files
- Create a new mod in MO named: Step NoMansSky - Resource Files
- Copy and paste the packed Resource Files into this new mod:
..\ModOrganizer\No Man's Sky\mods\Step NoMansSky - Resource Files - Ensure this and all mods are enabled.
Go...rule the galaxy!
That is a wrap on this short Guide. Enjoy your enhanced gameplay!
To start the game with mods enabled, run the game's executable from MO's drop-down list.
Credits
The Step administrators would sincerely like to thank (from the bottoms of our fuzzy little hearts):
- The authors of mods recommended within our Guides
- The authors of mods who granted permission for their mods to be incorporated into the Resource Files
- The core Community for feedback, suggestions and input
- The Beta and Mod Testers for their good humor and rigorous analyses
- The Nexus community
- Hello Games for their games
The following mods had open permissions and were either merged into the guide's resource files or used for references:
- Better Base Sites
- Better Buildings Scans
- Better Landings
- Clean Space Origins
- Dig Out - this mod's changes are merged with permission from the author.
- Fast Refiners
- Fine LOD
- Gumsk's Base Building
- Gumsk's Cameras
- Just a little TORCH mod
- Realistic Faster Movement Speed
- Sensible Planetary Charts / Sensible Planetary Charts - Origins
- Starship Out of Range and Faster Scanner
- Ultimate Flight Mod
- ZRatCraft - Flight Modifications
Step Staff
The following staff are associated with this Guide:
Administrators
- TechAngel85
- Lead Release Coordinator, Patch Coordinator, Lead Forum Administrator, Mod Author
COMMUNITY CONTRIBUTIONS
Step Modifications can only get bigger and better with help from the community. It is very time consuming for the Step team to ensure that our Guides are consistently maintained at the highest quality possible. We need people to help us identify mods that improve the vanilla game while adhering to our Mandate. We also need ongoing bug reports, reviews, and updates on mods that may cause problems or that stray from the Mandate.
In order to suggest a mod for inclusion, visit the Mods section of the Forums.
Call for Mod Testers
Community members interested in becoming Mod Testers, please contact TechAngel85 via PM on the forums. Once registered, Mod Testers will be given access to Staff forums that houses useful information. For more information about our mod testing process, read through the Mod Testing Guide to get a sense of what's involved.
Call for Forum Moderators
Regular community members interested in becoming moderators, please contact TechAngel85 via PM on the forums. Forum Moderators will be determined based upon level and quality of activity within our community.