
Guide:System Setup Guide: Difference between revisions
TechAngel85 (talk | contribs) (→Verify Integrity of Game Files: Updated instructions to remove Skyrim-specific content (remember this is used for all games)) |
No edit summary |
||
| Line 64: | Line 64: | ||
=== Moving Steam and Installed Games{{Fc|yellow|<sup>(optional)</sup>}} === | === Moving Steam and Installed Games{{Fc|yellow|<sup>(optional)</sup>}} === | ||
Since Steam installs its games in the <code>..Steam\steamapps\</code> sub-folder by default, UAC restrictions are usually not an issue. To avoid any potential UAC issues with the modding tools and unknown security setups, Step recommends installing all modding-related software into the "Modding | Since Steam installs its games in the <code>..Steam\steamapps\</code> sub-folder by default, UAC restrictions are usually not an issue. To avoid any potential UAC issues with the modding tools and unknown security setups, Step recommends installing all modding-related software into the "Modding" folder as described previously. If Steam was previously installed into its default location, it can ''optionally'' be moved into a [https://support.steampowered.com/kb_article.php?ref=7418-YUBN-8129 custom location] if desired. | ||
=== Disabling Steam Automatic Updates{{Fc|yellow|<sup>(optional)</sup>}} === | === Disabling Steam Automatic Updates{{Fc|yellow|<sup>(optional)</sup>}} === | ||
| Line 112: | Line 112: | ||
=== Mod Organizer{{Fs|0.75em|<sup>([https://stepmodifications.org/forum/topic/417-- Forum])</sup>}} === | === Mod Organizer{{Fs|0.75em|<sup>([https://stepmodifications.org/forum/topic/417-- Forum])</sup>}} === | ||
# [https://www.nexusmods.com/skyrimspecialedition/mods/6194 Download] MO from [https://www.nexusmods.com/skyrimspecialedition/mods/6194 Nexus]. | # [https://www.nexusmods.com/skyrimspecialedition/mods/6194 Download] MO from [https://www.nexusmods.com/skyrimspecialedition/mods/6194 Nexus]. | ||
# Install MO by running the installer and changing the path to the "Modding | # Install MO by running the installer and changing the path to the "Modding" folder (e.g. <code>..Games\Modding\Mod Organizer</code>) | ||
#* See the [[Guide:Mod_Organizer#Installation_and_Setup|Mod Organizer Guide for installation guidance]]. | #* See the [[Guide:Mod_Organizer#Installation_and_Setup|Mod Organizer Guide for installation guidance]]. | ||
| Line 145: | Line 145: | ||
# From the link at the top of the OP, [https://stepmodifications.org/forum/topic/13451-xlodgen-terrain-lod-beta-85-for-fnv-fo3-fo4-fo4vr-tes5-sse-tes5vr-enderal-enderalse/ Download xLODGen]. | # From the link at the top of the OP, [https://stepmodifications.org/forum/topic/13451-xlodgen-terrain-lod-beta-85-for-fnv-fo3-fo4-fo4vr-tes5-sse-tes5vr-enderal-enderalse/ Download xLODGen]. | ||
# Extract the archive to the ''xLODGen'' folder: <code>..\Games\Modding\Tools\xLODGen</code> | # Extract the archive to the ''xLODGen'' folder: <code>..\Games\Modding\Tools\xLODGen</code> | ||
# Create a folder for the application output: <code>..\Games\Modding\Tools\xLODGen\ | # Create a folder for the application output: <code>..\Games\Modding\Tools\xLODGen\xLODGen_Output</code> | ||
---- | ---- | ||
Revision as of 12:55, May 8, 2022

This guide describes the expected configuration of the PC environment in order to complete ANY Bethesda mod-build guide on this wiki. This standard configuration prevents some common modding issues and facilitates support and resolution of many others.
A couple of notes before continuing:
- This guide assumes a Windows 10 environment.
- Windows 7 is at End-of-Life and Windows 8 is not recommended, therefore, Windows 10 is the only OS supported by Step.
- Step recommends solid state drives (SSD) over hard drives (HDD)
- SSDs are much faster than HDDs and are therefore the recommended location for games and game-management software like Steam.
Modding Folder
First, set up a directory location for modding. Due to issues with some modding programs and Windows User Account Control (UAC), Step recommends using a location outside of UAC jurisdiction. Avoid installing games and modding resources within the following directory locations without first understanding why this can cause issues and how to circumvent them:
C:\Windows\..C:\Program Files\..C:\Program Files (x86)\..C:\Users\{logged in user}\AppData\LocalNote that some modding applications like BethINI and Mod Organizer may validly create files under this location.
Also consider the space requirements for modding, which can be significant for a single game. For a heavily modded setup, at least 60 GB of free space per game is typical. This accounts for installed mods, temporary LODGen files, modding tools, etc. Additionally, allow for at least 20 GB of free space for each game (e.g., Skyrim requires 13 GB, and Fallout 4 requires upwards of 30 GB). Also remember that no PC drive should be filled to more than 90% of its capacity.
NOTE
A good rule of thumb for modding drive space requirements is ~100 GB per game.Specifically, begin by creating the following folders on any drive (C:\ is used here for demonstration). This keeps path depth shallow and path strings brief:
C:\Games
C:\Games\Modding
C:\Games\Modding\Tools
File Extensions
It's recommended to unhide file extensions so they are visible to make identifying assets easier.
Steam Installation
Steam is a digital distribution platform by Valve Corp. used for purchasing, downloading, installing, and launching PC games.
- Download the program from their website
- Run the installer and install Steam to the Games folder created above: e.g.,
C:\Games\- This location is outside of UAC control and keeps path depth shallow.
- Steam installs its games in the
..\Steam\steamapps\common\sub-folder.
Steam can be installed to any drive and any location, regardless of the paths used for this Guide. However, all of our Guides will reference these default paths, so any deviations must be taken into account when following our guides. When installing Steam to an alternative path...
- ...avoid installing to a location controlled by UAC (see Modding Folder)
- ...keep in mind the space requirements for the games that will be installed
Steam Game Installation & Maintenance
Games are installed using the Steam application. Those who have installed a physical copy of the official game will have done this.
Moving Steam and Installed Games(optional)
Since Steam installs its games in the ..Steam\steamapps\ sub-folder by default, UAC restrictions are usually not an issue. To avoid any potential UAC issues with the modding tools and unknown security setups, Step recommends installing all modding-related software into the "Modding" folder as described previously. If Steam was previously installed into its default location, it can optionally be moved into a custom location if desired.
Disabling Steam Automatic Updates(optional)
To stop Steam from automatically updating a game, select "Only update this game when I launch it" from the game Library > Properties > Updates.
Initialize the Game
Once the game is installed, it needs to be loaded with the default launcher to register it with Windows and create necessary files:
- Click the Play button on the games page in Steam.
- Load the game to the game menu.
- Some games download their DLC from within the game, after connecting to game servers. Allow games to automatically download DLC or manually start the downloads, if available.
- Exit the game.
Game Backup(optional)
Though not necessary with the use of Mod Organizer, some may wish to create a backup of their vanilla game before modding begins. If so, now would be the time to complete this task. For this, Step recommends using 7-Zip to archive the following directories:
- Replace 'GameFolder' with the name of the folder being archived.
..\Steam\steamapps\common\GameFolder%USERPROFILE%\My Documents\My Games\GameFolder%LOCALAPPDATA%\GameFolder(e.g.C:\Users\UserName\AppData\Local\GameFolder)
Reverting to Vanilla
During the modding experience it is handy to know how to re-establish a clean game installation. If the game was backed up as described previously, the archives may simply be extracted into the desired location (see previous instructions).
If an archived backup was not created, the default game content can be downloaded fresh from Steam. This is a two part process:
Remove Installed Content
Verify Integrity of Game Files
Tools Installation and Setup
Step recommends the tools for modding be installed and setup as “standalone” applications whenever possible. This means a tool is installed once and used for all games. Most of the modding tools used already have this feature built in, and some are meant to be used as such. This will also reduce redundant tool installations while saving hard drive space. All Step guides will assume that tools are installed as “standalone” applications.
Mod Organizer(Forum)
- Download MO from Nexus.
- Install MO by running the installer and changing the path to the "Modding" folder (e.g.
..Games\Modding\Mod Organizer)
Mod Organizer 2 (MO) is the official mod manager for all Step guides. MO supports both 32-bit and 64-bit versions of Bethesda games and has basic support for a few games from other publishers. The major changes MO brings from the old version are:
- A return to normal plugin/archive relationship
- BSA archives (Bethesda games only) are no longer decoupled from their corresponding plugins. In MO, the plugins must be active for the archives to load, which is the behavior expected by all mods.
- New installation options
- MO may be installed as "instanced" or "portable". Certain third-party (mostly deprecated) applications like Merge Plugins can require special configuration with instanced installations of MO, but Step recommends it's successor, zMerge, which works fine with the instanced install method. Also see Gamerpoet's zEdit tutorial for all assets and instruction.
- Step recommends “instanced” installation, meaning a single installation of MO is used for all supported games. Not only is this option cleaner and better organized, but it also allows us to design all of our mod-build guides around using MO's instances, which allows management of independent mod lists.
- See the Portable vs Instanced Installation Sidebox on the Mod Organizer Guide for more information.
Modding Tools Setup
Install tools to the location created above (e.g., ..\Games\Modding\Tools\).
NOTE: These tools pertain to multiple Bethesda games. Install as directed unless the referring game guide dictates otherwise.
BethINI(Forum)
- Download BethINI from Nexus.
- Extract the archive to the *Tools* folders (e.g.
..\Games\Modding\Tools\BethINI\)
LOOT(Forum)
- Download the latest version of LOOT from their GitHub page (currently loot_0.18.0-win64.exe).
- Install LOOT by running the installer and changing the path to the Tools folder (e.g.
..\Games\Modding\Tools\LOOT\)
xEdit(Forum)
- Download xEdit from Nexus Mods.
- Extract the archive to the xEdit folder:
..\Games\Modding\Tools\xEdit
xLODGen(Forum)
- From the link at the top of the OP, Download xLODGen.
- Extract the archive to the xLODGen folder:
..\Games\Modding\Tools\xLODGen - Create a folder for the application output:
..\Games\Modding\Tools\xLODGen\xLODGen_Output
The "Modding" folder structure should now reflect:
..\Games\Modding\Mod Organizer
..\Games\Modding\GameName
..\Games\Modding\Tools
..\Games\Modding\Tools\BethINI
..\Games\Modding\Tools\LOOT
..\Games\Modding\Tools\xEdit
..\Games\Modding\Tools\xLODGen
Tool Configuration
Mod Organizer Initialization
Step recommends installing all applications as standalone programs, including MO. If MO was installed as a 'portable' application, the instructions below will need to be interpreted accordingly. For further information about this process, see the Mod Organizer Guide.
- Launch MO by running its executable (e.g.
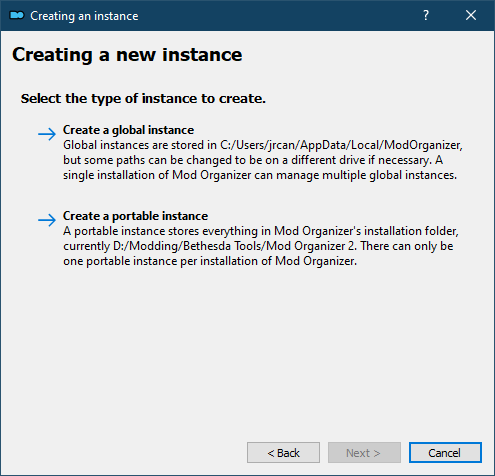
..Games\Modding\Mod Organizer\ModOrganizer.exe) - Upon launch, a window explaining "instances" will be presented. Tick [Next].
- Choose [Create a global instance] to install as standalone.
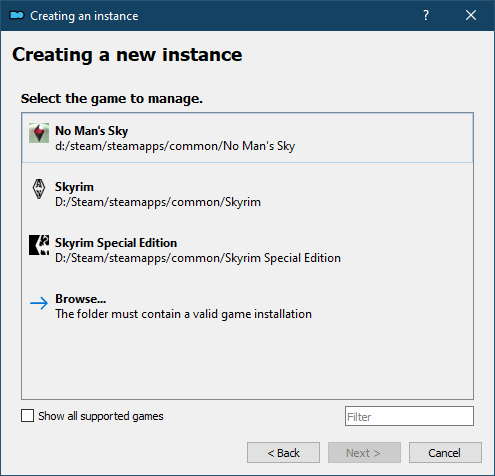
- The installer will detect games that are installed. Select any one of the games listed and tick [Next].
- If it didn't find a game, manually browse to the game directory.
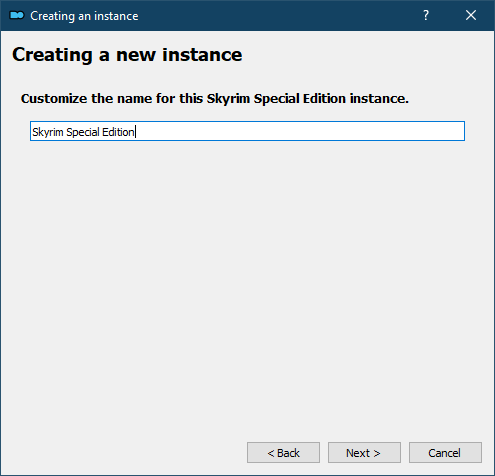
- Leave the default name, or create a custom name, and tick [Next].
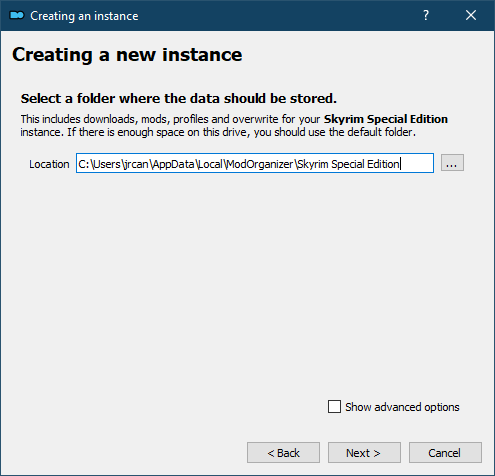
- Choose an installation path, and tick [Next].
- Tick the [Connect to Nexus] button.
- If this fails, wait a moment and try again.
- When successful, a browser window will open Nexus Mods. Log in, and tick the [Authorise] button to allow the connection.
- The browser page should present a 'success' message. Close the window, and tick [Next]
- Tick [Finish] after the confirmation message appears.
- A tutorial prompt may appear. First time MO users should run it for a quick lesson on MO.
- Another prompt will appear if MO is not set up to handle .NXM links. Select [Yes].
- MO is now ready to use.


Display & Overlays
System Drivers
Most drivers are updated fairly frequently, especially if hardware is relatively new. Driver updates often fix bugs, expand functionality, increase compatibility, and provide performance improvements. As such, it is important to keep drivers up to date, particularly chipset drivers.
Pre-built PCs often bundle driver-update applications that can be used to download and install official driver updates specific to the PC. Drivers for custom-built PCs will be on the component manufacturer's websites. BIOS and firmware updates are often available as well but can be trickier and more risky to implement.
To help users of compatible Intel-based motherboards keep their drivers up-to-date, Intel provides it's Intel® Driver & Support Assistant(DAR). Once it has been downloaded and installed, it can: (1) easily identify drivers installed by Intel and third-parties, (2) scan for Intel driver and software updates as well as system and device information and (3) provide integrated support and links to other support information. Subsequent visits to the DAR webpage will show if any drivers need updating. All of which can make it easier to keep your motherboard's drivers current.
Users of AMD Radeon™ Series Graphics cards and Ryzen™ Chipsets can download and install amd-software-adrenalin-edition software to auto-Detect and install driver updates. This software is for use with systems running Windows® 11 / Windows® 10 64-bit version 1809 and later.
Display Drivers
Most graphics software applications (i.e., GeForce Experience) provide links or automated updates for their software and drivers. If updated display drivers are available:
- Download and install the latest stable AMD drivers / Nvidia drivers. Otherwise, Google "AMD drivers", "NVIDIA drivers", etc. to download updated drivers.
- Reboot normally
Display drivers can often be upgraded without issue, particularly if done so using the video card's software; however, a bad installation or corruption is possible. In such situations, it is necessary to perform a "clean-upgrade" as described below:
Also see SSE Display Tweaks for additional information. Thought this article is in reference to SSE, much of it applies to all games.
Overlays
Certain programs (e.g., ENBSeries) don't work properly when other program overlays are active. Consider disabling all unnecessary overlays commonly found on modern Windows PCs.
Display Calibration
Color calibration is critical to photographers and graphic artists who work across media types, but it's also equally important for gamers due to there being a lot of screenshot sharing and qualitative discussion about in-game visuals. However, with that said, all monitors will be slightly different in their accuracy of displaying colors.
The gist: Calibrate the monitor's display settings based on the video driver configuration utility with all other configuration baselines set to something akin to "mid level".
There are three places to configure color saturation, temperature, brightness, contrast, gamma, etc:
- The monitor's built-in configuration menu
- Windows color management
- The driver configuration utility
The value of one setting can affect the appearance of other settings, and depending on the quality of the monitor, #1 above could be very good or just 'OK'. The #2 and #3 objects should be standard though, since they are made to work across various monitors.
- Ensure that #1 above is set to "the middle ground" with respect to all settings. Having extreme settings in the monitor configuration could potentially constrain the other configurations. For some, setting all #1 values to mid levels will be best, but for others the 'auto-config' will be best (auto-config may not set all #1 values to mid settings). Depending on the monitor, there may be other auto-config options based on various presets. Whatever seems most "middle of the road" is probably best for option #1 above.
- Optionally, also run option #2 (Control Panel > Display > Calibrate Color) and set to 'vanilla' mid-levels with respect to all attributes. If this was never run previously, then it should already be at mid-levels.
- Finally, calibrate using option #3 (see below) using this reference image and in a room with no direct lighting that could affect what the monitor displays (not-too-bright, diffuse-lighted room). The main calibration should be done using option #3 once a baseline 'canvas' has been established for options #1 and #2.