
User:Boycad/FO4: Natural Born Killers: Difference between revisions
| Line 105: | Line 105: | ||
<br><br> | <br><br> | ||
==Mallory appears indifferent to the attention, but | ==Mallory appears indifferent to the attention, but continues despite the attentions of the clearly aroused deputy.== | ||
-Where and when to initiate: file versionf-<br> | |||
-Where and when to initiate: file | |||
These are baseline .ini file edits which will be assumed throughout. Future installed mods depending on specific .ini switches will function properly, at least on this account, and most modules you may want to add after the core build is completed will be taken care of too. | These are baseline .ini file edits which will be assumed throughout. Future installed mods depending on specific .ini switches will function properly, at least on this account, and most modules you may want to add after the core build is completed will be taken care of too. | ||
Revision as of 10:45, November 9, 2020
Fallout 4: Natural Born Killers
>>Rated "R" for mature themes and nudity<<
Yes, it sounds violent and abusive, doesn't it? Are you perhaps made uncomfortable by such things as incest, exploitation and selfishness? Or are you concerned that such visceral material is merely being sensationalised for effect; in other words: to shock? Or, a third possibility is that you are yourself damaged, and will find something familiar herein.
If any of those approximate your reaction, then you are in need of the dark catharsis waiting within.
WIP
Natural Born Killers is in draft stage
Frontpage
Game : Fallout 4
Title : Natural Born Killers
Version : scratch 1
Forum thread : tba
Author : Boycad
Cut-and-Paste source (thanks): Gernash
Introduction
Just getting started...
The intention is a Mod Organizer 2 based, Lovers Lab friendly build; stand-alone or autistic install; a basic technical competancy for bug fixes, base-game improvements, and post-build capabilities, as per site tradition; also lore-friendly but "vanilla adverse". The selections follow a core and module model, describing the core in preparation for later additions, content mods for instance, without actually choosing those additions. Such items are left up to the individuals taste; and although we are making assumptions about your tastes, dear reader, we will be discreet. But they are there, in your id, even if you don't admit it, and in fact especially if you don't admit it. It is part of your identity.
Regarding the theme, I make no apologies. It may be exaggerated for dramatic purposes, but reality is my model. These are the suburbs and sprawl of a foreign landscape, degraded and ravaged, where the anonymous are captive, and you are among them. Do not panic. Focus on your immediate problems. It is afterall just a game.
So we jack it up and set it loose. Some features are a Fusion Girl body, for animations, and possibly physics; other stuff as I think of it... The build is LoversLab friendly, though not gratuitous nor often linked; performance budget is targeted moderate. Thanks to Gernash for his starting section and reference point. Lets begin with the workspace.
A juke box plays at the back of a smokey restaurant...
Installing useful programs
If you don't have them already, there are two generic programs very useful when modding games :
7-zip : This is an archive extractor. It'll allow you to extract archives (.zip, .rar, .7z). Since most mods and other utilities come in this format, it's critical to be able to extract them.
To make it even more convenient to use :
- Locate the 7-zip File manager : 7zFM.exe, (located by default in C:\Program Files\7-Zip, or simply type in 7-zip File Manager in windows' search bar)
- Start it with administrator privileges (right-click -> run as administrator).
- Navigate under Tools -> Options.. and look at the System tab, you'll find the file association manager.
- Associate 7zip with .7z, .zip, and .rar files by simply clicking on them.
This way, you will be able to preview the content of archives and extract what you want out of them by simply double-clicking on it.
Notepad++ : An advanced text editor. Useful to edit various configurations files, as its layout, syntax-coloration, and other built-in search functions are by far superior to what your basic notepad can do.
Since we're going to open a lot of .ini files in this guide, it's a good idea to tell windows that you want to automatically open them with Notepad++ :
- After you've installed it, right click on any .ini file on your system (if you don't have any yet, just read a bit further, you'll discover them ;) )
- Select Open With... -> Choose default program...
- Select Notepad++. If Notepad++ is not on the list, use the Browse... button and navigate to NP++ installation path (by default C:\Program Files (x86)\Notepad++).
- Make sure that the Always use the selected program to open this kind of file checkbox is ticked in.
Isolating the Base Game
Isolating the Fallout 4 game files, in anime known as "Autistic Mode", ensures the user controls this data at all times in the future. This is important because we will be putting a tremendous amount of time and labour in to the build, and it is a very sensitive and temperamental arrangement being created. This step prevents all known scenarios where the automatic behaviour of another application disturbs or disorders your work-in-process. It also and opens up the possibility of making a backup of the entire build.
The file structure here uses the format D:\{build}\Fallout 4\Data, where {build} contains not only the base game files, but "{build}\Mod Organizer 2", "{build}\{tools}", and (optionally) "{build}\{archive}"
Accordingly, there is very little information stored on C:.
Removing Creation Club content
Creation club content is among of the base game files by default, and unless unless unlocked will remain dormant as un-activated .esps. According to the "super-clean" approach to modding, these files amount to clutter and could cause problems. Although we support the Creation Club as an innovative way for independant modders to co-operate with large companies, in theory at least, this guide does not use it nor support it.
Donations to modders can be directed through the Nexus Mods site, which has an excellent and well thought out distribution system.
Verifying your Local Fallout4 Validity
If you have used NMM or Bethesda Game Studios mods this Section is mainly for you.
Navigate to C:\Users\%Username%\AppData\Local\Fallout4
The only file that should be in there, if you have an untouched Fallout 4 installation, is
DLCList.txt the contents of which are:
DLCRobot.esm
DLCworkshop01.esm
DLCworkshop02.esm
DLCworkshop03.esm
DLCNukaWorld.esm
DLCCoast.esm
If you have run FO4Edit in the past then the following will be present
- Plugins.fo4viewsettings
If there is ANYTHING else in there or you just want to reset them to default Please do the following:
- Navigate to C:\Users\%Username%\AppData\Local\Fallout4
- Make a backup of its content (IF you are an NMM user and want to use a FO4 mod list built in that manager, as this will break your existing NMM profiles) and delete the contents
- Start the game using the default launcher, and when you get to main menu, exit to desktop.
- Navigate to C:\Users\%Username%\AppData\Local\Fallout4
- It should now contain only the DLCList.txt with the contents as above.
Template:Alert small
If you moved here from NMM then this has to be done. Check validity of your factory Fallout 4 setting is important it resolves issues later in the Wiki that can be avoided NOW!
Mallory appears indifferent to the attention, but continues despite the attentions of the clearly aroused deputy.
-Where and when to initiate: file versionf-
These are baseline .ini file edits which will be assumed throughout. Future installed mods depending on specific .ini switches will function properly, at least on this account, and most modules you may want to add after the core build is completed will be taken care of too.
In other words: we get this out of the way early, and can leave it alone hereafter.
Initializing your Fallout 4 INI files
If you have been playing Fallout 4 or just Starting for the 1st time I’d advise you to reset your INI files back to a default state before continuing.
The rest of the following sections in this portion of the guide will assist in achieving a performance vs quality setup before you take off on your modding adventure.
- If you have launched the game before you will have Fallout 4 INI configuration files present. Navigate to your Documents\My Games\Fallout4. Backup all the files and folders (excluding the Saves folder)
- Delete all the contents of the Documents\My Games\Fallout4 (excluding the Saves folder)
To speed up the MAIN Screen of Fallout 4 (Shudder) if you have many save games please do the following
- Go into your Documents\My Games\Fallout4\Saves folder and create a folder called BACKUP.
- Sort the files via the date modified tab. Select all the older Save game you no longer access and Move them to the Documents\My Games\Fallout4\Saves\BACKUP folder. You should be left with 10-20 save games. More than this seems to cause the MAIN PAGE to cough and shudder.
Launch Fallout 4 and select the Ultra Preset then click Play. When the game loads to the main menu, exit the game. (This sets up the 1st run INI files). The following files will be generated.
- Fallout4.ini
- Fallout4Prefs.ini
Once we start doing some changes with will be modifying a 3rd file
- Fallout4Custom.ini
This file overwrites most settings contained in the other 2 so it you delete or clear it out your game will run in a default fashion.
Tailoring your configuration
At this point make a backup of your two INI files.
- Fallout4.ini
- Fallout4Prefs.ini
And call it Fallout4Default.7z (I’m using 7-Zip as it’s seems to be the default standard on the NEXUS)
There are several ways of editing your INI files we will be doing both. First we will use a couple of GUI editors and then add some entries manually.
Installing the TOOLS
These are the main two GUI Configuration Tools I use.
BethINI - Inifile configurator
WARNING
This template is deprecated and should not be used. It was originally created to support custom user guides, but we now have a guide-creation infrastructure that can be used by anyone. If this does not accommodate the need, please PM a moderator or administrator on the forums for assistance.Fallout 4 Configuration Tool
WARNING
This template is deprecated and should not be used. It was originally created to support custom user guides, but we now have a guide-creation infrastructure that can be used by anyone. If this does not accommodate the need, please PM a moderator or administrator on the forums for assistance.Basic GUI Setup
First open BethINI. .
Under the Setup TAB
- Check the Make INIs Read-Only (you do not want these files modified by anything other then yourself)
Under the Basic TAB
- Check the Windowed Mode (If you ALT-TAB without it and you use ENB’s the response time will be the same as 1st load to menu i.e. 15-60sec on a fast computer)
- Check the Recommended Tweaks (This will auto configure the rest of the tabs to the Authors recommendations.)
- Check Load Loose Files
Under the General TAB
- NONE
Under the Gameplay TAB
- Check Sprint Fix
- Remove Borders
Under Interface TAB
- Autosize Quick Containers
Under Detail TAB
- NONE
Under View Distance TAB
- NONE
Under Foliage TAB
- NONE
BethINI Modified Settings
WARNING
This template is deprecated. Please revise markup to use Template:GallerySimple instead.Setup TAB
Basic TAB
General TAB
Gameplay TAB
Interface TAB
Detail TAB
View Distance TAB
Foliage TAB
WARNING
This template is deprecated. Please revise markup to use Template:GallerySimple instead.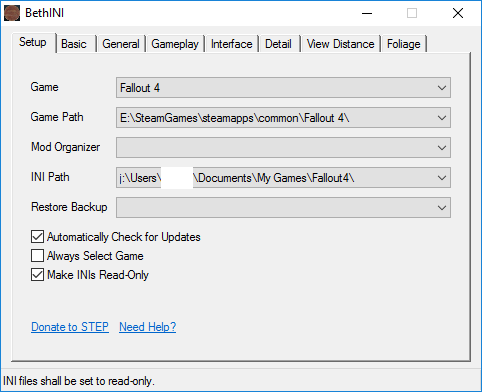
WARNING
This template is deprecated. Please revise markup to use Template:GallerySimple instead.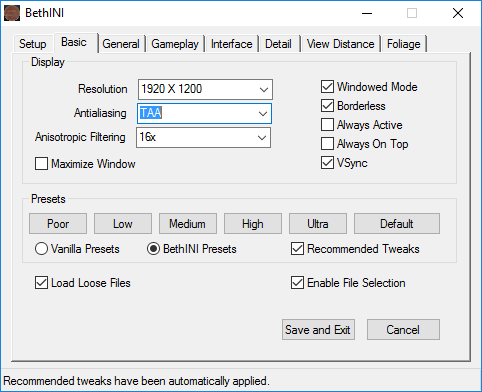
WARNING
This template is deprecated. Please revise markup to use Template:GallerySimple instead.
WARNING
This template is deprecated. Please revise markup to use Template:GallerySimple instead.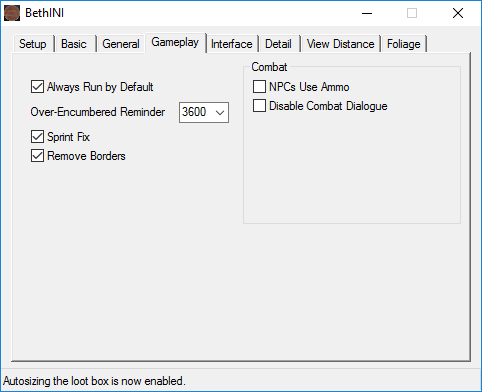
WARNING
This template is deprecated. Please revise markup to use Template:GallerySimple instead.
WARNING
This template is deprecated. Please revise markup to use Template:GallerySimple instead.
WARNING
This template is deprecated. Please revise markup to use Template:GallerySimple instead.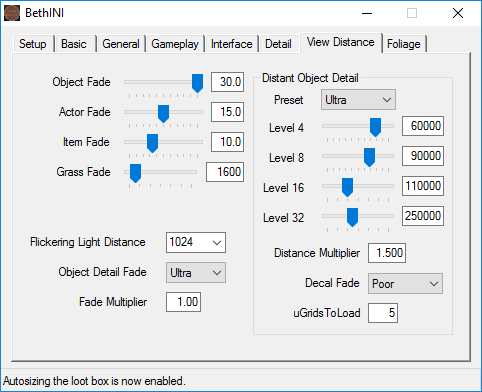
WARNING
This template is deprecated. Please revise markup to use Template:GallerySimple instead.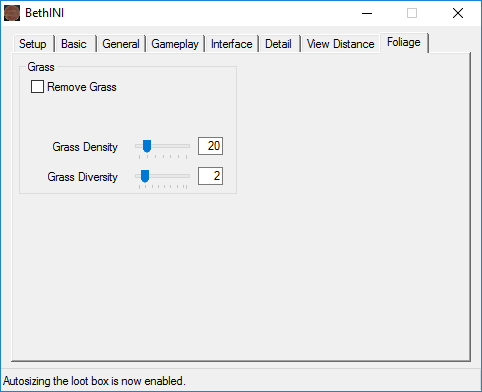
Go to the Basic tab and click Save and Exit.
.ini edits in Mod Organizer 2
Finalizing your .inis
At this point make a backup of your two INI files.
SETTING UP YOUR MODDING ENVIRONMENT
Installing Mod Organizer 2
We will be installing Mod Organizer 2, v.2.3.2 (November 2020), in portable mode.
"This is my Rifle, this is my gun! / This ones for fighting, this is for fun!"
In your dreams, or in an idealized self-image, you do see yourself standing alone and unaided against the tempestuous fortunes. But this is vanity, hubris. In fact, it is the device which is so important defining the individual externally, amplifying your choices and your will, and the damn thing almost seem to replace you, to the point that you would be lost without it. Mod Organizer 2 will be in this Wasteland what the service rifle is to the soldier in training: that one essential tool which keeps you in the game. Pay special attention, Greaseball!
Base MO2 Directory
- Create the folder [D:\{build root}\ModOrganizer2], and extract the contents of the archive here
- Inside the folder, locate the "ModOrganizer.exe" file and double-click it to run ModOrganizer2
- Add the D:\{build root}\ModOrganizer2 folder to Windows Defender Exclusions
- Make ModOrganizer.exe run as an Administrator
Issues Resolution
- Go into MO2 Settings and in the NEXUS tab enter your login Information.
NOTE
To resolve download manager issue from Nexusmod site I recommend deleting the nxmhandler.ini from D:\{build}\ModOrganizer2 and D:\{build}\ModOrganizer2Data then run nxmhandler.exe in D:\{build}\ModOrganizer2 folder to generate the nxmhandlers.ini filesNOTE
If you have issues with your profiles you can try (make sure you backup) deleting D:\{build}\ModOrganizer2Data\Falout4\ModOrganizer.ini when you restart MO2 it will remake it.Programs and 3rd party extensions
(F4SE) Fallout 4 Script Extender
WARNING
This template is deprecated and should not be used. It was originally created to support custom user guides, but we now have a guide-creation infrastructure that can be used by anyone. If this does not accommodate the need, please PM a moderator or administrator on the forums for assistance.- MAIN FILES - 7z archive - f4se_0_06_11.7z
FO4Edit
WARNING
This template is deprecated and should not be used. It was originally created to support custom user guides, but we now have a guide-creation infrastructure that can be used by anyone. If this does not accommodate the need, please PM a moderator or administrator on the forums for assistance.BSA Browser
WARNING
This template is deprecated and should not be used. It was originally created to support custom user guides, but we now have a guide-creation infrastructure that can be used by anyone. If this does not accommodate the need, please PM a moderator or administrator on the forums for assistance.- MAIN FILES - BSA Browser Portable
Install and Configure LOOT
LOOT (Load Order Optimization Tool) is a utility that aims to sort your load order in the most optimized way possible. This will ensure that mods with dependencies are loaded before their masters properly without having to sort them manually.
WARNING
This template is deprecated and should not be used. It was originally created to support custom user guides, but we now have a guide-creation infrastructure that can be used by anyone. If this does not accommodate the need, please PM a moderator or administrator on the forums for assistance.- MAIN FILES - LOOT v0.16.0 - Installer
Advanced Tools
Merge Plugins xEdit Script
WARNING
This template is deprecated and should not be used. It was originally created to support custom user guides, but we now have a guide-creation infrastructure that can be used by anyone. If this does not accommodate the need, please PM a moderator or administrator on the forums for assistance.- MAIN FILES - Merge Plugins v1.9
Champollion PEX to Papyrus Decompiler
WARNING
This template is deprecated and should not be used. It was originally created to support custom user guides, but we now have a guide-creation infrastructure that can be used by anyone. If this does not accommodate the need, please PM a moderator or administrator on the forums for assistance.- MAIN FILES - Champollion V1.0.6 - x64
Merge Plugins
WARNING
This template is deprecated and should not be used. It was originally created to support custom user guides, but we now have a guide-creation infrastructure that can be used by anyone. If this does not accommodate the need, please PM a moderator or administrator on the forums for assistance.Installing ENBSeries
ENBSeries Core files
WARNING
This template is deprecated and should not be used. It was originally created to support custom user guides, but we now have a guide-creation infrastructure that can be used by anyone. If this does not accommodate the need, please PM a moderator or administrator on the forums for assistance.
Base Game Preparation
It is here, at the nucleus of your game and the natural starting point, that the first actual mods are installed. But first we need to clean and sort the DLC .esms.
Cleaning the DLC
NOTE
{{{text}}}
- In Mod Organizer, select and start the FO4QuickAutoClean.exe
- Select each DLC .esm and clean them
Further information: TES5Edit on Github.io, on Cleaning DLCs