
SkyrimLE:2.2.2: Difference between revisions
m (Text replace - "Category:Step Guides" to "Category:STEP Guides") |
mNo edit summary |
||
| Line 15: | Line 15: | ||
Created by [https://skyrim.nexusmods.com/users/2547509 TheCompiler], STEP is a collaborative project with input from the modding community, technical volunteers, and project administrators. The goal is to provide tested and validated methods for establishing and maintaining an enhanced modded Skyrim. Thus, the Guide provides detailed, well-tested build instructions for a solid modding template. New modders can follow STEP explicitly, or more experienced modders may use it as general guide. | Created by [https://skyrim.nexusmods.com/users/2547509 TheCompiler], STEP is a collaborative project with input from the modding community, technical volunteers, and project administrators. The goal is to provide tested and validated methods for establishing and maintaining an enhanced modded Skyrim. Thus, the Guide provides detailed, well-tested build instructions for a solid modding template. New modders can follow STEP explicitly, or more experienced modders may use it as general guide. | ||
The STEP team collects information from the modding community through detailed reviews, feedback, and suggestions exchanged on the [https://forum | The STEP team collects information from the modding community through detailed reviews, feedback, and suggestions exchanged on the [https://stepmodifications.org/forum/ STEP Community Forums]. Posting rules apply, so be sure to read and follow them and enjoy a warm welcome and plenty of high-quality support from a large community of experienced STEPers. Check out the comparison [https://skyrim.nexusmods.com/mods/11 screenshots on the Nexus]. But remember: the only way to experience STEP ... is to actually ''experience'' STEP. | ||
====Call for Wiki Content Editors ==== | ====Call for Wiki Content Editors ==== | ||
The STEP Community Wiki is open to editing by all registered community members; however, we need assistance [https://forum | The STEP Community Wiki is open to editing by all registered community members; however, we need assistance [https://stepmodifications.org/forum/showthread.php?tid=1241&pid=16772#pid16772 maintaining and creating new supporting content]. We are particularly interested in obtaining a few people with a passion for writing and editing. Familiarity with wiki markup is preferable but not necessary. Interested parties please contact one of the STEP Admin (Farlo, z929669 and/or stoppingby4now) via PM on the forums (Please register on the forums and [https://stepmodifications.org/forum/showteam.php see the very bottom of the Forum Team page]). | ||
====Call for STEP Mod Testers ==== | ====Call for STEP Mod Testers ==== | ||
STEP users interested in becoming testers, please contact one of the STEP Admin (Farlo, z929669 and/or stoppingby4now) via PM on the forums (Please register on the forums and [https://forum | STEP users interested in becoming testers, please contact one of the STEP Admin (Farlo, z929669 and/or stoppingby4now) via PM on the forums (Please register on the forums and [https://stepmodifications.org/forum/showteam.php see the very bottom of the Forum Team page]). Once registered, [[STEP:Main|record your system specs]] by clicking on the button and filling out the form. These specs will be associated with performance data by tester. | ||
====Call for STEP Benchmarks ==== | ====Call for STEP Benchmarks ==== | ||
| Line 27: | Line 27: | ||
====Call for Forum Moderators ==== | ====Call for Forum Moderators ==== | ||
Regular STEP forum users interested in becoming moderators, please contact one of the STEP Admin (Farlo, z929669 and/or stoppingby4now) via PM on the forums (Please register on the forums and [https://forum | Regular STEP forum users interested in becoming moderators, please contact one of the STEP Admin (Farlo, z929669 and/or stoppingby4now) via PM on the forums (Please register on the forums and [https://stepmodifications.org/forum/showteam.php see the very bottom of the Forum Team page]). | ||
<blockquote style="color:#ddd;"><big> Visit the [https://forum | <blockquote style="color:#ddd;"><big> Visit the [https://stepmodifications.org/forum/ forums] and provide feedback related to STEP. Assistance and feedback are what is needed in order for STEP to grow and improve. Also visit the STEP [https://www.facebook.com/pages/STEP-Skyrim-Total-Enhancement-Project/175289219235392?sk=info Facebook page] maintained by TheCompiler (Daniel). | ||
<br /><br /> | <br /><br /> | ||
To support hosting and maintenance of the STEP Community Project, [https://skyrim.nexusmods.com/users/donate/?mode=straight&id=2547509 contributions are welcome].</big></blockquote> | To support hosting and maintenance of the STEP Community Project, [https://skyrim.nexusmods.com/users/donate/?mode=straight&id=2547509 contributions are welcome].</big></blockquote> | ||
| Line 91: | Line 91: | ||
# Under {{fc|#E6B69E|Antialiasing}}, select {{fc|#E6B69E|4 Samples}}, as the difference between 4 Samples and 8 Samples is very subtle and not worth the performance loss (per [https://www.geforce.com/Optimize/Guides/the-elder-scrolls-v-skyrim-tweak-guide/#1 Tweakguides]). Drop down to 2 Samples as a last-resort to improve performance. {{fc|#E6B69E|NOTE: If using SMAA, set this value to zero.}} | # Under {{fc|#E6B69E|Antialiasing}}, select {{fc|#E6B69E|4 Samples}}, as the difference between 4 Samples and 8 Samples is very subtle and not worth the performance loss (per [https://www.geforce.com/Optimize/Guides/the-elder-scrolls-v-skyrim-tweak-guide/#1 Tweakguides]). Drop down to 2 Samples as a last-resort to improve performance. {{fc|#E6B69E|NOTE: If using SMAA, set this value to zero.}} | ||
# Under {{fc|#E6B69E|Anisotropic Filtering}}, select {{fc|#E6B69E|16 Samples}} (use 8 Samples for a very slight performance gain). | # Under {{fc|#E6B69E|Anisotropic Filtering}}, select {{fc|#E6B69E|16 Samples}} (use 8 Samples for a very slight performance gain). | ||
# Click the {{fc|#E6B69E|[Advanced]}} button and make sure {{fc|#E6B69E|FXAA}} is ''UN-checked''. FXAA reduces the Anisotropic Filter effect as well as overall texture detail. It is a huge performance improvement over AA, but comes with a quality cost. For more information on FXAA, and to see if it is right for you, see [https://forum | # Click the {{fc|#E6B69E|[Advanced]}} button and make sure {{fc|#E6B69E|FXAA}} is ''UN-checked''. FXAA reduces the Anisotropic Filter effect as well as overall texture detail. It is a huge performance improvement over AA, but comes with a quality cost. For more information on FXAA, and to see if it is right for you, see [https://stepmodifications.org/forum/showthread.php?tid=109&pid=1391#pid1391 this post]. {{fc|#E6B69E|NOTE: [https://www.iryoku.com/smaa/ SMAA] is a superior alternative to FXAA.}} | ||
#* Consider setting shadow detail to 'High' rather than 'Ultra' for video cards with less than 1 GB VRAM (Performance STEP), or leave at 'Ultra' for Extreme STEP: | #* Consider setting shadow detail to 'High' rather than 'Ultra' for video cards with less than 1 GB VRAM (Performance STEP), or leave at 'Ultra' for Extreme STEP: | ||
#* Under {{fc|#E6B69E|[View Distance]}}, make sure {{fc|#E6B69E|Object Detail Fade}} is ''UN-checked'' and adjust grass to 100% with all other settings around 50%.{{fc|#E6B69E|NOTE: High-end systems can handle max view distances just fine.}} | #* Under {{fc|#E6B69E|[View Distance]}}, make sure {{fc|#E6B69E|Object Detail Fade}} is ''UN-checked'' and adjust grass to 100% with all other settings around 50%.{{fc|#E6B69E|NOTE: High-end systems can handle max view distances just fine.}} | ||
| Line 370: | Line 370: | ||
<br /> | <br /> | ||
== Mod Table Reference == | |||
Below is the legend and reference for the mod tables used in this Guide. Users should refer back to it when confused about a mod listing. | |||
{| class="steptable" | | {| class="steptable" | | ||
! class="first" | | ! class="first" | | ||
! '''Mod Name''' | ! class="second" | | ||
! '''Baseline''' | ! class="modname" | '''Mod Name''' | ||
! ''' | ! class="baseline" | '''Baseline''' | ||
! | ! class="notes" | '''Notes''' | ||
! | |- style="border-bottom: 1px solid #666C71;" | ||
|- | ! class="first" | | ||
! class="second" | | |||
| class="modname" | [[Main Page|Mod (patches not required)]]<sup>[[File:Wikilink.png|20px]]</sup> | |||
| class="baseline" | Baseline | |||
| class="notes" | Notes | |||
|- style="border-bottom: 1px solid #666C71;" | |||
! class="core" | | ! class="core" | | ||
| | ! class="landw" | | ||
| | | class="modname" | [[Main Page|Mod (requires patches)]]<sup>[[File:Wikilink.png|20px]]</sup> | ||
| class="baseline" | Baseline | |||
| class=" | | class="notes" | Notes | ||
| Notes | |||
|} | |} | ||
<br/> | |||
{| valign=" | == Mod Table Legend == | ||
! style=" | <p>The following is an example of the mod tables, found in [[#Step_2|Step 2]] below, followed by the legend for reading the table. Users should familiarize themselves with this information.</p> | ||
| style="border-bottom: 1px solid #666C71; border-top: 1px solid #666C71;" | | {| valign="left" style="width: 95%; background-color: transparent; font-size:0.95em; margin-left:2rem;" | ||
| style="border-bottom: 1px solid #666C71; border-top: 1px solid #666C71;" | | ! class="chartrbg" style="width: 0.25rem; border-bottom: 1px solid #666C71; border-top: 1px solid #666C71; padding: 0;" | | ||
! class="redbg" style="width: 0.25rem; border-bottom: 1px solid #666C71; border-top: 1px solid #666C71; padding: 0;" | | |||
| style="width: 9%; border-bottom: 1px solid #666C71; border-top: 1px solid #666C71; padding: 0 0.5rem;" | '''Patch Requirement''' | |||
| style="border-bottom: 1px solid #666C71; border-top: 1px solid #666C71;" | A green vertical bar indicates that the mod is required by the STEP CR Patch, and a red bar indicates that the LW patch is required. | |||
|- | |- | ||
| style="border-bottom: 1px solid #666C71;" | | | style="border-bottom: 1px solid #666C71;" | | ||
| style="border-bottom: 1px solid #666C71;" | Mod Name | | style="border-bottom: 1px solid #666C71;" | | ||
| style="border-bottom: 1px solid #666C71;" | Nexus mod name | | style="border-bottom: 1px solid #666C71;" | '''Mod Name''' | ||
| style="border-bottom: 1px solid #666C71;" | Nexus mod name presented as a link to Nexus for download. | |||
|- | |- | ||
| style="border-bottom: 1px solid #666C71;" | | |||
| style="border-bottom: 1px solid #666C71;" | | | style="border-bottom: 1px solid #666C71;" | | ||
| style="border-bottom: 1px solid #666C71;" | [[File:Wikilink.png]] | | style="border-bottom: 1px solid #666C71;" | [[File:Wikilink.png]] | ||
| style="border-bottom: 1px solid #666C71;" | Link to the mod's | | style="border-bottom: 1px solid #666C71;" | Link to the mod's wiki page, which includes various information about the mod. | ||
|- | |- | ||
| style="border-bottom: 1px solid #666C71;" | | | style="border-bottom: 1px solid #666C71;" | | ||
| style="border-bottom: 1px solid #666C71;" | Baseline | | style="border-bottom: 1px solid #666C71;" | | ||
| style="border-bottom: 1px solid #666C71;" | This notes the STEP Baseline version or option of the corresponding mod, and usually | | style="border-bottom: 1px solid #666C71;" | '''Baseline''' | ||
| style="border-bottom: 1px solid #666C71;" | This notes the STEP Baseline version or option of the corresponding mod that should be installed, and usually refers to options affecting performance/quality. General suggestions are located in the "''Notes''" column; see below. | |||
|- | |- | ||
| style="border-bottom: 1px solid #666C71;" | | | style="border-bottom: 1px solid #666C71;" | | ||
| style="border-bottom: 1px solid #666C71;" | Quality | | style="border-bottom: 1px solid #666C71;" | | ||
| style="border-bottom: 1px solid #666C71;" | Indicates if there are | | style="border-bottom: 1px solid #666C71;" | '''Quality''' | ||
| style="border-bottom: 1px solid #666C71;" | Indicates if there are lower or higher quality options for the mod ''relative to the Baseline recommendation'': | |||
|- | |- | ||
| style="border-bottom: 1px solid #666C71;" | | |||
| style="border-bottom: 1px solid #666C71;" | | | style="border-bottom: 1px solid #666C71;" | | ||
| style="border-bottom: 1px solid #666C71;" | | | style="border-bottom: 1px solid #666C71;" | | ||
| style="border-bottom: 1px solid #666C71;" | [[File:LowQuality.png|18px]] '''''Relative to Baseline''''', a lower quality, less demanding version of the mod is also available. | | style="border-bottom: 1px solid #666C71;" | [[File:LowQuality.png|18px]] '''''Relative to Baseline''''', a lower quality, less demanding version of the mod is also available. | ||
|- | |- | ||
| style="border-bottom: 1px solid #666C71;" | | |||
| style="border-bottom: 1px solid #666C71;" | | | style="border-bottom: 1px solid #666C71;" | | ||
| style="border-bottom: 1px solid #666C71;" | | | style="border-bottom: 1px solid #666C71;" | | ||
| style="border-bottom: 1px solid #666C71;" | [[File:HighQuality.png|18px]] '''''Relative to Baseline''''', a higher quality, more demanding version of the mod is also available. | | style="border-bottom: 1px solid #666C71;" | [[File:HighQuality.png|18px]] '''''Relative to Baseline''''', a higher quality, more demanding version of the mod is also available. | ||
|- | |- | ||
| style="border-bottom: 1px solid #666C71;" | | |||
| style="border-bottom: 1px solid #666C71;" | | | style="border-bottom: 1px solid #666C71;" | | ||
| style="border-bottom: 1px solid #666C71;" | | | style="border-bottom: 1px solid #666C71;" | | ||
| Line 420: | Line 437: | ||
|- | |- | ||
| style="border-bottom: 1px solid #666C71;" | | | style="border-bottom: 1px solid #666C71;" | | ||
| style="border-bottom: 1px solid #666C71;" | | | style="border-bottom: 1px solid #666C71;" | | ||
| style="border-bottom: 1px solid #666C71;" | Notes | | style="border-bottom: 1px solid #666C71;" | '''Notes''' | ||
| style="border-bottom: 1px solid #666C71;" | Brief notes that apply to the mod or installation. In some cases, mods with | | style="border-bottom: 1px solid #666C71;" | Brief notes that apply to the mod or installation. In some cases, mods with several options will include a suggested option. These ''suggestions'' will take the form of: {{fc|#ddd|"STEP recommends <nowiki>'</nowiki>''Option A''<nowiki>'</nowiki>."}} In other cases, there may only be one appropriate option, which fits the STEP Mandate. These ''instructions'' will take the form of: {{fc|#ddd|"Download and install <nowiki>'</nowiki>''Option A''<nowiki>'</nowiki>."}} Users will also see links displayed as: {{fc|#ddd|Detailed instructions available}}. Users should follow these links to find detailed instructions for installing the mod. | ||
|} | |} | ||
<br /> | <br /> | ||
| Line 435: | Line 449: | ||
}} | }} | ||
== 2.A. {{#show:Category: | == 2.A. {{#show:Category:ModGroup_01-Tools|?ModGroupName}} == | ||
:{{fc|#E6B69E|{{#show:Category: | :{{fc|#E6B69E|{{#show:Category:ModGroup_01-Tools|?ModGroupDescription}} }} | ||
{{ModTable|ModTableRow= | {{ModTable|ModTableRow= | ||
{{#ask:[[Version::{{PAGENAME}}]][[ | {{#ask:[[Game::{{NAMESPACE}}]][[Version::{{PAGENAME}}]][[ModGroup::01-Tools]] | ||
|?ModName | |||
|?Version | |||
|mainlabel=- | |mainlabel=- | ||
|named args=yes | |named args=yes | ||
|link=none | |link=none | ||
| | |format=plainlist | ||
| | |template=ModTableMods | ||
|sort=OrderID | |sort=OrderID | ||
}} | }} | ||
}} | }} | ||
== 2. | == 2.C. {{#show:Category:ModGroup_02-Extenders|?ModGroupName}} == | ||
:{{fc|#E6B69E|{{#show:Category: | :{{fc|#E6B69E|{{#show:Category:ModGroup_02-Extenders|?ModGroupDescription}} }} | ||
{{ModTable|ModTableRow= | {{ModTable|ModTableRow= | ||
{{#ask:[[Version::{{PAGENAME}}]][[ | {{#ask:[[Game::{{NAMESPACE}}]][[Version::{{PAGENAME}}]][[ModGroup::02-Extenders]] | ||
|?ModName | |||
|?Version | |||
|mainlabel=- | |mainlabel=- | ||
|named args=yes | |named args=yes | ||
|link=none | |link=none | ||
| | |format=plainlist | ||
| | |template=ModTableMods | ||
|sort=OrderID | |sort=OrderID | ||
}} | }} | ||
}} | }} | ||
== 2. | == 2.D. {{#show:Category:ModGroup_09-Fixes|?ModGroupName}} == | ||
:{{fc|#E6B69E|{{#show:Category: | :{{fc|#E6B69E|{{#show:Category:ModGroup_09-Fixes|?ModGroupDescription}} }} | ||
{{ModTable|ModTableRow= | {{ModTable|ModTableRow= | ||
{{#ask:[[Version::{{PAGENAME}}]][[ | {{#ask:[[Game::{{NAMESPACE}}]][[Version::{{PAGENAME}}]][[ModGroup::09-Fixes]] | ||
|?ModName | |?ModName | ||
|? | |?Version | ||
|mainlabel=- | |mainlabel=- | ||
|named args=yes | |named args=yes | ||
|link=none | |link=none | ||
| | |format=plainlist | ||
| | |template=ModTableMods | ||
|sort=OrderID | |sort=OrderID | ||
}} | }} | ||
| Line 496: | Line 495: | ||
{{Benchmark}} | {{Benchmark}} | ||
== 2.E. {{#show:Category: | == 2.E. {{#show:Category:ModGroup_16-Interface|?ModGroupName}} == | ||
:{{fc|#E6B69E|{{#show:Category: | :{{fc|#E6B69E|{{#show:Category:ModGroup_16-Interface|?ModGroupDescription}} }} | ||
{{ModTable|ModTableRow= | {{ModTable|ModTableRow= | ||
{{#ask:[[Version::{{PAGENAME}}]][[ | {{#ask:[[Game::{{NAMESPACE}}]][[Version::{{PAGENAME}}]][[ModGroup::16-Interface]] | ||
|?ModName | |||
|?Version | |||
|mainlabel=- | |mainlabel=- | ||
|named args=yes | |named args=yes | ||
|link=none | |link=none | ||
| | |format=plainlist | ||
| | |template=ModTableMods | ||
|sort=OrderID | |sort=OrderID | ||
}} | }} | ||
| Line 512: | Line 511: | ||
{{Benchmark}} | {{Benchmark}} | ||
== 2.F. {{#show:Category: | == 2.F. {{#show:Category:ModGroup_06-Models & Textures|?ModGroupName}} == | ||
:{{fc|#E6B69E|{{#show:Category: | :{{fc|#E6B69E|{{#show:Category:ModGroup_06-Models & Textures|?ModGroupDescription}} }} | ||
{{ModTable|ModTableRow= | {{ModTable|ModTableRow= | ||
{{#ask:[[Version::{{PAGENAME}}]][[ | {{#ask:[[Game::{{NAMESPACE}}]][[Version::{{PAGENAME}}]][[ModGroup::06-Models & Textures]] | ||
|?ModName | |?ModName | ||
|? | |?Version | ||
|mainlabel=- | |mainlabel=- | ||
|named args=yes | |named args=yes | ||
|link=none | |link=none | ||
| | |format=plainlist | ||
| | |template=ModTableMods | ||
|sort=OrderID | |sort=OrderID | ||
}} | }} | ||
| Line 544: | Line 527: | ||
{{Benchmark}} | {{Benchmark}} | ||
== 2.H. {{#show:Category: | == 2.H. {{#show:Category:ModGroup_08-Character Appearance|?ModGroupName}} == | ||
:{{fc|#E6B69E|{{#show:Category: | :{{fc|#E6B69E|{{#show:Category:ModGroup_08-Character Appearance|?ModGroupDescription}} }} | ||
{{ModTable|ModTableRow= | {{ModTable|ModTableRow= | ||
{{#ask:[[Version::{{PAGENAME}}]][[ | {{#ask:[[Game::{{NAMESPACE}}]][[Version::{{PAGENAME}}]][[ModGroup::08-Character Appearance]] | ||
|?ModName | |?ModName | ||
|? | |?Version | ||
|mainlabel=- | |mainlabel=- | ||
|named args=yes | |named args=yes | ||
|link=none | |link=none | ||
| | |format=plainlist | ||
| | |template=ModTableMods | ||
|sort=OrderID | |sort=OrderID | ||
}} | }} | ||
| Line 576: | Line 543: | ||
{{Benchmark}} | {{Benchmark}} | ||
== 2.J. {{#show:Category: | == 2.J. {{#show:Category:ModGroup_05-Animations & Effects|?ModGroupName}} == | ||
:{{fc|#E6B69E|{{#show:Category: | :{{fc|#E6B69E|{{#show:Category:ModGroup_05-Animations & Effects|?ModGroupDescription}} }} | ||
{{ModTable|ModTableRow= | {{ModTable|ModTableRow= | ||
{{#ask:[[Version::{{PAGENAME}}]][[ | {{#ask:[[Game::{{NAMESPACE}}]][[Version::{{PAGENAME}}]][[ModGroup::05-Animations & Effects]] | ||
|?ModName | |?ModName | ||
|? | |?Version | ||
|mainlabel=- | |mainlabel=- | ||
|named args=yes | |named args=yes | ||
|link=none | |link=none | ||
| | |format=plainlist | ||
| | |template=ModTableMods | ||
|sort=OrderID | |sort=OrderID | ||
}} | }} | ||
| Line 608: | Line 559: | ||
{{Benchmark}} | {{Benchmark}} | ||
== 2.L. {{#show:Category: | == 2.L. {{#show:Category:ModGroup_07-Sounds & Music|?ModGroupName}} == | ||
:{{fc|#E6B69E|{{#show:Category: | :{{fc|#E6B69E|{{#show:Category:ModGroup_07-Sounds & Music|?ModGroupDescription}} }} | ||
{{ModTable|ModTableRow= | {{ModTable|ModTableRow= | ||
{{#ask:[[Version::{{PAGENAME}}]][[Section::L]] | {{#ask:[[Version::{{PAGENAME}}]][[Section::L]] | ||
|?ModName | |||
|?Version | |||
|mainlabel=- | |mainlabel=- | ||
|named args=yes | |named args=yes | ||
|link=none | |link=none | ||
| | |format=plainlist | ||
| | |template=ModTableMods | ||
|sort=OrderID | |sort=OrderID | ||
}} | }} | ||
| Line 624: | Line 575: | ||
{{Benchmark}} | {{Benchmark}} | ||
== 2.M. {{#show:Category: | == 2.M. {{#show:Category:ModGroup_10-Gameplay-General|?ModGroupName}} == | ||
:{{fc|#E6B69E|{{#show:Category: | :{{fc|#E6B69E|{{#show:Category:ModGroup_10-Gameplay-General|?ModGroupDescription}} }} | ||
{{ModTable|ModTableRow= | {{ModTable|ModTableRow= | ||
{{#ask:[[Version::{{PAGENAME}}]][[ | {{#ask:[[Game::{{NAMESPACE}}]][[Version::{{PAGENAME}}]][[ModGroup::10-Gameplay-General]] | ||
|?ModName | |||
|?Version | |||
|mainlabel=- | |mainlabel=- | ||
|named args=yes | |named args=yes | ||
|link=none | |link=none | ||
| | |format=plainlist | ||
| | |template=ModTableMods | ||
|sort=OrderID | |sort=OrderID | ||
}} | }} | ||
| Line 651: | Line 602: | ||
== 3.A. Technical Tips == | == 3.A. Technical Tips == | ||
The following is a good place to begin, but be certain to also check the [[Guide:Troubleshooting|Troubleshooting Guide]]. Also, search the [https://forum | The following is a good place to begin, but be certain to also check the [[Guide:Troubleshooting|Troubleshooting Guide]]. Also, search the [https://stepmodifications.org/forum/forumdisplay.php?fid=21 support & Troubleshooting forum] on the STEP Boards, | ||
=== 3.A.1. Maximizing STEP === | === 3.A.1. Maximizing STEP === | ||
| Line 711: | Line 662: | ||
STEP can only get bigger and better with help from the user community. Even simply maintaining the current STEP is too much work for the core STEP team to ensure that the highest quality is maintained. We need people to help us identify mods that are thought to improve Skyrim while adhering to the [[#STEP Mandate|STEP Mandate]]. We also need ongoing reviews and updates on mods that may be causing problems or that stray from the STEP philosophy. Finally, we need help from the community in terms of testing, benchmarking and analysis. More detail is presented in the [[Guide:Mod Testing|Mod Testing Guide]]. | STEP can only get bigger and better with help from the user community. Even simply maintaining the current STEP is too much work for the core STEP team to ensure that the highest quality is maintained. We need people to help us identify mods that are thought to improve Skyrim while adhering to the [[#STEP Mandate|STEP Mandate]]. We also need ongoing reviews and updates on mods that may be causing problems or that stray from the STEP philosophy. Finally, we need help from the community in terms of testing, benchmarking and analysis. More detail is presented in the [[Guide:Mod Testing|Mod Testing Guide]]. | ||
In order to suggest a mod, visit the [https://forum | In order to suggest a mod, visit the [https://stepmodifications.org/forum/forumdisplay.php?fid=43 Mod Suggestions] section of the STEP Forums. | ||
{{alert|type=notice|size=90|text=The STEP team will be beta testing a new mod-testing procedure and interface currently in final stages of development here on the STEP Wiki. Anyone interested in testing mods of any kind --whether included in STEP or not-- should [mailto:admin@step-project.com contact the STEP administrators by email] or on the forums (click on the link in upper left of header).}} | {{alert|type=notice|size=90|text=The STEP team will be beta testing a new mod-testing procedure and interface currently in final stages of development here on the STEP Wiki. Anyone interested in testing mods of any kind --whether included in STEP or not-- should [mailto:admin@step-project.com contact the STEP administrators by email] or on the forums (click on the link in upper left of header).}} | ||
| Line 740: | Line 691: | ||
* ''EMPTY SLOTS WAITING TO BE FILLED BY ESTABLISHED & DEDICATED COMMUNITY MEMBERS!'' | * ''EMPTY SLOTS WAITING TO BE FILLED BY ESTABLISHED & DEDICATED COMMUNITY MEMBERS!'' | ||
[[Category:SkyrimLE Guides]][[Category: | [[Category:SkyrimLE Guides]][[Category:Step Guides]] | ||
Revision as of 22:53, January 30, 2021
WARNING
This guide is out of date and is NOT supported! It may contain information that is incorrect or not in line with the current state of the game.Go to the latest supported SkyrimLE Guide.
STEP is now on a biweekly release schedule.
- Minor version updates will occur every other weekend (usually on Saturday afternoon on United States time).
- Minor revisions apply mainly to new STEP users installing fresh.
- Updates are optional for current STEP users, but minor updates should require very little effort.
About STEP
STEP is an extensive, STEP-by-STEP, guide to enhancing TESV Skyrim with the best mods, tweaks and settings. The focus is quality over quantity. STEP tries to stay as close to vanilla Skyrim as possible while improving visual quality and fixing game-play mechanics.
Created by TheCompiler, STEP is a collaborative project with input from the modding community, technical volunteers, and project administrators. The goal is to provide tested and validated methods for establishing and maintaining an enhanced modded Skyrim. Thus, the Guide provides detailed, well-tested build instructions for a solid modding template. New modders can follow STEP explicitly, or more experienced modders may use it as general guide.
The STEP team collects information from the modding community through detailed reviews, feedback, and suggestions exchanged on the STEP Community Forums. Posting rules apply, so be sure to read and follow them and enjoy a warm welcome and plenty of high-quality support from a large community of experienced STEPers. Check out the comparison screenshots on the Nexus. But remember: the only way to experience STEP ... is to actually experience STEP.
Call for Wiki Content Editors
The STEP Community Wiki is open to editing by all registered community members; however, we need assistance maintaining and creating new supporting content. We are particularly interested in obtaining a few people with a passion for writing and editing. Familiarity with wiki markup is preferable but not necessary. Interested parties please contact one of the STEP Admin (Farlo, z929669 and/or stoppingby4now) via PM on the forums (Please register on the forums and see the very bottom of the Forum Team page).
Call for STEP Mod Testers
STEP users interested in becoming testers, please contact one of the STEP Admin (Farlo, z929669 and/or stoppingby4now) via PM on the forums (Please register on the forums and see the very bottom of the Forum Team page). Once registered, record your system specs by clicking on the button and filling out the form. These specs will be associated with performance data by tester.
Call for STEP Benchmarks
Users interested in helping out with the STEP Benchmarking Project, see our benchmarking guidelines and submit results on the forums (see link at upper left of site header bar).
Call for Forum Moderators
Regular STEP forum users interested in becoming moderators, please contact one of the STEP Admin (Farlo, z929669 and/or stoppingby4now) via PM on the forums (Please register on the forums and see the very bottom of the Forum Team page).
Visit the forums and provide feedback related to STEP. Assistance and feedback are what is needed in order for STEP to grow and improve. Also visit the STEP Facebook page maintained by TheCompiler (Daniel).
To support hosting and maintenance of the STEP Community Project, contributions are welcome.
STEP Mandate
Core STEP is about enhancing vanilla Skyrim for the PC ...
- Texture replacements at minimized performance cost and true to vanilla Skyrim
- Continuity of all in-game textures (i.e., comparable resolution and style across all armors, weapons, clutter, terrain, etc.)
- Graphical mods (ESPs) including new content and effects that "fit" vanilla Skyrim
- Gameplay & sound mods that improve the consistency and the perceived intent of vanilla Skyrim
- Interface mods that improve the menus and UI.
- Fix mods that truly "fix" malfunctioning aspects of vanilla Skyrim.
STEP is NOT about ...
- Content mods that conflict with vanilla Skyrim and/or TES lore
- Mods that change the perceived intent of vanilla Skyrim
- Sex mods or female body replacement mods
- Music replacement mods
- Gameplay overhauls
Performance, Baseline & Extreme STEP
STEP provides an enhanced vanilla experience by utilizing a minimum or “Core” set of game enhancements adhering to the original vanilla feel of the game according to the STEP Mandate. All Core mods are considered essential to all STEP "versions". Non-Core mods are optional but highly recommended. STEP versions are delineated at three levels according to relative performance impacts:
- Performance STEP: Core mods only; performance options wherever possible.
- My poor box needs all of the mercy that I can spare it, but I must have STEP!
- Baseline STEP: Core and non-Core mods; performance/quality and balanced options wherever possible.
- My box is decent, but I hate even the tiniest FPS drops and stuttering!
- Extreme STEP: Core and non-Core mods; highest-quality options wherever possible.
- My box is omnipotent!
STEP 1
Requirements
- Official Patch v1.8
- Patience and attention to detail
Baseline System
The STEP Guide is written with the following system (or comparable) in mind:
- Windows 7
- Intel i5/i7 quad core
- 4+ GB system RAM
- GPU with 1+ GB VRAM (DDR5)
- Resolution: 1680x1050
1.A. Install Steam & Skyrim
This guide assumes that the reader has installed Steam as recommended by the Skyrim Installation Guide (SIG). Please take some time to properly set up and configure Steam as recommended by the guide before continuing.
It is very important to begin by reverting to a clean Vanilla Skyrim installation.
1.B. Skyrim Launcher Options
1.B.1. Launcher Settings
- Launch Skyrim from Steam and click on [Options]. This will establish the INI file configurations according to the detected hardware. It will also establish the registry entries necessary for utilities and applications used downstream.
- Click the [Ultra] button.
- Under Antialiasing, select 4 Samples, as the difference between 4 Samples and 8 Samples is very subtle and not worth the performance loss (per Tweakguides). Drop down to 2 Samples as a last-resort to improve performance. NOTE: If using SMAA, set this value to zero.
- Under Anisotropic Filtering, select 16 Samples (use 8 Samples for a very slight performance gain).
- Click the [Advanced] button and make sure FXAA is UN-checked. FXAA reduces the Anisotropic Filter effect as well as overall texture detail. It is a huge performance improvement over AA, but comes with a quality cost. For more information on FXAA, and to see if it is right for you, see this post. NOTE: SMAA is a superior alternative to FXAA.
- Consider setting shadow detail to 'High' rather than 'Ultra' for video cards with less than 1 GB VRAM (Performance STEP), or leave at 'Ultra' for Extreme STEP:
- Under [View Distance], make sure Object Detail Fade is UN-checked and adjust grass to 100% with all other settings around 50%.NOTE: High-end systems can handle max view distances just fine.
- Exit and click Play from the Skyrim Launcher. This will create the necessary configuration files, and registry settings required by downstream applications (contrary to popular belief, the INI files are created immediately, and the game does not need to launch).
1.C. Display & Video Card Settings
1.C.1. Nvidia Users
- Download and install the latest Nvidia drivers (beta if available).
- Download Nvidia Inspector.
- See the Nvidia Inspector Wiki Guide for configuration details.
1.C.2. ATI Users
- Download and install the latest AMD drivers (beta if available).
- Open Catalyst Control Center, and click on the [Preferences] button in the upper right. Select Advanced View.
- Under the Gaming section on the left select 3D Application Settings.
- Mirror the anti-aliasing and anisotropic filtering values set using the Skyrim Launcher above.
- Set [Tessellation] to AMD Optimized
- Set [Catalyst A.I.] to highest texture quality and tick Enable Surface Format Optimization
- Set [Wait for vertical refresh] to Quality
- Set [Anti-Aliasing Mode] to Multi-sample AA
- Tick Triple buffering under [OpenGL Settings]
1.C.3. Display
Configure the monitor's display settings using Windows Display configuration utility (Control Panel > Display > Calibrate Color).
- First use the monitor's built-in configuration to attempt to complete the wizard. (ignore the ClearType tuner process)
- Repeat the calibration wizard using the GPU's driver configuration settings.
- For each run, be certain to execute all calibrators with particular attention to gamma, brightness and contrast. Most users' monitor output will be significantly darker and slightly more color-saturated.
1.D. Performance Benchmarking
The following procedure is very important in determining baseline performance and ultimately helps the STEP team to assess performance variation across a wide range of computer configurations. This ultimately allows the accurate prediction of performance requirements for the various versions of STEP to come. User contributions in this regard are highly valued and much appreciated! Even more importantly, this routine should be used to assess the performance of the strict STEP versions as described above. Database-comparison benchmarks will be available as sufficient numbers of user-submitted data accumulate.
At this point ...
- There should be a clean install of both Steam and Skyrim as recommended by the SIG (see above),
- the baseline INI settings should be configured (via the Skyrim Launcher), and
- the monitor and video-driver configurations should be optimized.
This is a perfect point to collect some baseline performance data, as all tweaks after this section are manual and could have significant performance impact on some systems. A baseline benchmark provides valuable information about the setup and the gaming environment. Detecting driver issues, software incompatibilities, hardware problems or other issues is essential while the build is simple, as these kinds of problems are much more difficult to diagnose and solve as the build becomes more complex. It is recommended that users execute the following process again after the INI edits following are applied and after each sequence of potentially-impactful changes is introduced (e.g., after each mod section).
Points during setup that benchmarking is suggested will be indicated by:
Use the following checklist to calculate the standard STEP benchmark:
- Identify any unnecessary background programs that may be running. Most importantly, determine if it is possible to set any anti-virus/spyware to low priority or "game mode". Any running background processes will consume some proportion of resources that Skyrim could otherwise use and increase the chances for instability. It is fine to have processes running in the background, but it is a good idea to be aware of what they are for troubleshooting in case there are problems.
- If mods were recently installed and IF NOT USING a SSD, defragment the game HDD. This will prevent game stutter caused by i/o inefficiencies (the effects are real!).
- Launch Fraps in order to measure FPS. Set to output FPS to a log file.
- Launch GPU-z in order to measure GPU and system memory-usage statistics. Set GPU-z to output the following to the log file (Sensors > Log to File; each variable log can be toggled by selecting the corresponding drop-downs):
- GPU Core Clock (MHz)
- GPU Temperature (°C)
- GPU Load (%)
- Memory Usage (Dedicated) - This is on-card-VRAM
- Memory Usage (Dynamic) - This is the amount of VRAM transferred to much-slower system RAM
- Launch Skyrim, and start a new game. Once loaded and the sound starts and the FPS counter appears, hit the FRAPS benchmark hotkey (F11 by default).
- Let the game progress up to the first autosave just after jumping down off the cart, and press the FRAPS benchmark hotkey again to stop benchmarking. Total time since first depressing the benchmark hotkey will be approximately 240 seconds.
- Quit the game as quickly as possible and immediately exit the GPU-z app to stop logging.
- Go to the GPU-z log. Identify the point in the log where the GPU Core Clock first maxes out and find the point beyond which the GPU Load values and the Dedicated Memory max and become fairly consistent (it should be between 50-90 rows from the top of the file). Delete all preceding rows (keep the header row!).
- Move down to the end of the file and locate the point at which the GPU Load and Dedicated Memory begin to recede again (signifying loading the menue and quitting the game, usually 20-40 rows of data, depending on how much time is spent in the menu and actually shutting down the game and quitting GPU-z). Delete all rows after this point. The GPU-z log file is now trimmed of "noisy" data.
- There are many ways to do this, but get GPU-z log data into a spreadsheet program and calculate the mean and standard deviation for:
- GPU Load
- GPU Temperature
- Memory Usage (Dedicated)
- Memory Usage (Dynamic)
- Open the Fraps FPS log, and copy that column into the GPU-z spreadsheet.
- Download this example spreadsheet as an actual working example.
- As can be seen in the example spreadsheet, there are several columns and 200+ rows of data. The relevant summary statistics are the mean (i.e., average) and the standard deviation (i.e., a measure of the variation about the mean). These can be calculated for each column of data by using the following formulas in Excel or most other spreadheets (cell ranges are in parentheses):
 =AVERAGE(A2:A240)
 =STDEV(A2:A240)
Example benchmark results:
1.E. Install Utilities
1.E.2. Better Oblivion Sorting Software
Better Oblivion Sorting Software (BOSS) is an essential utility for managing mod plugins for Skyrim. Specifically, BOSS ensures proper mod order and Bash Tags, and it also identifies plugins (ESPs/ESMs) that need cleaning or other special treatment (more on this below). Download BOSS and install according to the instructions provided by the author.
1.E.3. BOSS Userlist Manager
Boss Userlist Manager (BUM) helps to make BOSS even easier by providing a GUI to edit the BOSS masterlist, which is used to define load order. Includes automated BOSS masterlist management and more.
1.E.4. Mod Manager(s)
There are several utilities that may be used to manage the STEP setup. Truth be told, mods can even be installed manually (not recommended). A mod-management utility is HIGHLY RECOMMENDED in order to keep track of a comlpex setup like STEP. These utilities also make it exponentially simpler to deconstruct a STEP install in order to update between versions. This is impossible to do simply or efficiently (or even correctly) otherwise.
- Wrye Bash
- Wrye Bash (WB) is perhaps the most powerful mod-management utility, and is full of features for both modders and advanced mod authors alike. A fairly comprehensive mod-maintenance process is presented in the Wrye Bash Guide and presented in a context that applies to STEP. Presently, Wrye Bash lacks a Nexus-compatible-mod-update management system, so this will need to be managed by the user. Mod updates are not necessary for STEP though, and it is HIGHLY RECOMMENDED that regular STEP users avoid updating single mods piecemeal. This is the kind of thing that the STEP mod testing team works on for upcoming releases, and troubleshooting issues related to mod updates takes resources away from supporting others that are using supported versions of mods. (The mod testers are specifically encouraged to use Wrye Bash as the preferred management utility to simplify information exchange, although MO is another option).
- Mod Organizer
- Mod Organizer (MO) is a feature-rich management utility that utilizes data virtualization to keep your Skyrim folder pristine. See the Mod Organizer Guide to learn more. MO does keep track of mod updates on the Nexus, and is as accurate as long as the Nexus metadata is current.
- Nexus Mod Manager
1.E.5. TES5Edit
TES5Edit is a utility that can be used to 'fix' plugins in order to prevent problems during gameplay. The potential for incompatibilities, CTDs and other issues increases as the mod load increases. Thus, it is inevitably necessary to do some basic cleaning of a few mod plugins that BOSS identifies. The process for cleaning mods can be found here.
1.F. INI Tweaks
INI files can be used to managed many aspects of the game and also ancillary mods to Skyrim. Following are relevant tweaks that apply to Baseline STEP. Performance STEP may require that some of the following settings be relaxed, and Extreme STEP settings can be further enhanced in some cases. Potential performance impact is indicated for each tweak.
The Skyrim INI files are located in "Documents/My Games/Skyrim" or "My Documents/My Games/Skyrim," depending on Operating System. At this point, the default INI files should have been established due to actions completed in step 1.B, and the following tweaks assume that the Skyrim INI files are not already customized in any way. If using Mod Organizer, editing INI files is done by clicking [Edit Ini]. Wrye Bash users can edit and manage all INI files via the INI Tweaks tab.
1.F.1. Skyrim INI
Go to the bottom of the Skyrim.ini and create the following:
- Increases the distance arrows fly. (From "Arrows and Bolts Tweaks").
[Actor]
fVisibleNavmeshMoveDist=12288.0000
- Places the camera just above your character's head in third-person view, and correct the camera angle in third-person view while on horseback. (From "Third Person Horse Camera"). Provides instant camera-angle switching when switching view types or when mounting/dismounting your horse. (from "Instant Camera POV Switching").
[Camera]
fOverShoulderAddY=0.0
fOverShoulderPosZ=18.0
fOverShoulderPosX=0.0
fOverShoulderCombatAddY=0.0
fOverShoulderCombatPosZ=24.0
fOverShoulderCombatPosX=0.0

fOverShoulderHorseAddY=-72.0
fOverShoulderHorsePosZ=50.0
fOverShoulderHorsePosX=35.0
fActorFadeOutLimit=-100

fMouseWheelZoomSpeed=60.0
f1st3rdSwitchDelay=0.95
iHorseTransitionMillis=001
- Speeds up the book opening animation, and move the HUD elements closer to the borders of the screen.:
[Interface]
fBookOpenTime=200.0

fSafeZoneX=10
fSafeZoneY=10
fSafeZoneXWide=10
fSafeZoneYWide=10
Add the following under [Combat]:
- Shifts the point of aim to the center of the aiming reticule for arrows and crossbows (with this setting targets will be hit where the cursor is placed at approximately 100 feet from the target).
f1PArrowTiltUpAngle=0.7
f3PArrowTiltUpAngle=0.7
f1PBoltTiltUpAngle=0.7
f3PBoltTiltUpAngle=0.7
Add the following under [Display]:
- Fixes the shadow flickering issue. Shadow flickering is caused by updating sun shadows.
fSunShadowUpdateTime=0
fSunUpdateThreshold=2.0
- Increases the time that blood decals remain visible (tweak from “Enhanced Blood Textures” mod).
fDecalLifetime=512.0
- Helps reduce Z-fighting, but may increase clipping, especially with a higher field of view. See Gopher's More Z-fighting video for more information and examples.
fNearDistance=18.0000
Add the following under [General]:
- Disables the annoying intro sequence.
sIntroSequence=
- Prevents crashes when loading into a large interior area.
iLargeIntRefCount=262144
- Helps prevent lighting “pop-in” by pushing back the distance at which the flicker/pulse animation loops begin.
fFlickeringLightDistance=8192
1.F.2. SkyrimPrefs INI
Modify the following under [Controls]:
- Disable mouse acceleration.
bMouseAcceleration=0
Add the following under [Decals]:
- Enables higher resolution blood decals on NPCs.
bDecalsOnSkinnedGeometry=1
Modify the following values under [Display]:
- Valid values range from 0 - 7. Lower values will sharpen shadows (not the resolution), making vegetation more "vibrant." It gives a subtle increase in performance, but also gives more pixelated and striping effects to shadows. Higher values will make shadows softer and more blurred. Consider a value of two if using ENB.
iBlurDeferredShadowMask=3
- Enables shadows rendering on trees.
bTreesReceiveShadows=1
- If running Extreme STEP using 'Ultra' setting for shadow shadow quality to in 1.B.1, this tweak will further improve shadow resolution at a performance cost. Consider also raising 'iShadowMapResolutionSecondary' to 4096 on high-end machines. For Performance or Baseline STEP, do not change the default values for either of these settings.
iShadowMapResolutionPrimary=4096
iShadowMapResolutionSecondary=2048
- Improves the blood decals number per scene (from “Enhanced Blood Textures”).
iMaxDecalsPerFrame=256
- ENB users ONLY! Enabling these without an ENB will decrease performance with no visual impact and possibly introduce excessive shadow striping.
bDrawLandShadows=1
bFloatPointRenderTarget=1
Modify the following under [TerrainManager]:
- Helps reduce Z-fighting, but may increase clipping, especially with a higher field of view. See Gopher's More Z-fighting video for more information and examples.
fBlockMaximumDistance=500000
fBlockLevel1Distance=140000
fBlockLevel0Distance=75000
fSplitDistanceMult=4.0
Modify the following under [MAIN]:
- Also helps reduce Z-fighting. See Gopher's More Z-fighting video for more information and examples.
fSkyCellRefFadeDistance=500000.0000
Reminder - Essential Guides
The following guides form the base from which STEP builds and provide details on many of the topics mentioned in this Guide.
- Skyrim Installation Guide (SIG) – Comprehensive installation and configuration guide to Skyrim and its DLCs, mods, extensions, and utilities.
- Wrye Bash Guide (WBG) – A practical, hands-on introduction to Wrye Bash using STEP as a working example.
- Mod Organizer Guide (MOG) – A WIP with some advice and troubleshooting suggestions.
Final Notes
Install mods in the order that they are presented in the following tables in order to achieve an aesthetically and mechanically well-vetted result. More experienced or adventurous modders may want to use STEP as a loose guide.
Information from certain mods used can write additional information into save games. Thus, some mods can continue to affect the game even after the mods are removed or updated.
From the Bethesda document, Skyrim Mod Troubleshooting: Best Practices:
"When you play Skyrim with a mod, in most cases, the new data for the mod will be written into any new saved games you create. For example, if you play Skyrim with Mod X and create a save, the next time you load that save, the game will expect Mod X to also be loaded. If you no longer want to play Skyrim with Mod X, it is best to unload Mod X (by unchecking the plugin under Data Files in your Skyrim launcher) and loading a save that does not require Mod X, usually an older save or a backed up save."
The short version is “Never continue with a save once a mod it relies upon has been removed.” Although this is good advice, there may be occasions when it is inconvenient to revert to an older save. The Troubleshooting Guide provides a "best-practice procedure" for attempting to ‘clean’ the effects of a removed mod from a save game.
FINALLY...
ALWAYS read the ReadMe and other mod-related documentation that comes packaged with most mods. This includes the mod description on the Nexus. If the mod author has seen fit and taken time to create these reference materials, then they are relevant and important in the eyes of the mod author. This means that they are relevant and important to you!
STEP 2
Mod Table Reference
Below is the legend and reference for the mod tables used in this Guide. Users should refer back to it when confused about a mod listing.
| Mod Name | Baseline | Notes | ||
|---|---|---|---|---|
| Mod (patches not required) |
Baseline | Notes | ||
| Mod (requires patches) |
Baseline | Notes |
Mod Table Legend
The following is an example of the mod tables, found in Step 2 below, followed by the legend for reading the table. Users should familiarize themselves with this information.
| Patch Requirement | A green vertical bar indicates that the mod is required by the STEP CR Patch, and a red bar indicates that the LW patch is required. | ||
| Mod Name | Nexus mod name presented as a link to Nexus for download. | ||
| Link to the mod's wiki page, which includes various information about the mod. | |||
| Baseline | This notes the STEP Baseline version or option of the corresponding mod that should be installed, and usually refers to options affecting performance/quality. General suggestions are located in the "Notes" column; see below. | ||
| Quality | Indicates if there are lower or higher quality options for the mod relative to the Baseline recommendation: | ||
| | |||
| | |||
| | |||
| Notes | Brief notes that apply to the mod or installation. In some cases, mods with several options will include a suggested option. These suggestions will take the form of: "STEP recommends 'Option A'." In other cases, there may only be one appropriate option, which fits the STEP Mandate. These instructions will take the form of: "Download and install 'Option A'." Users will also see links displayed as: Detailed instructions available. Users should follow these links to find detailed instructions for installing the mod. |
NOTE
Consider the following while installing mods:
- Mods should be installed in the order that they are listed to ensure that mods further down the list overwrite those occurring before them. This is necessary to ensure the desired in-game effect. Mods are otherwise listed in alphabetical order within each section, and any deviations from this are purposeful to achieve the desired outcome.
- To achieve the best results, “Loose files” (non-BSA) versions of mods should be used. If a "loose files" version is not available, extract the BSA as described here.
- Always install plugins (ESPs/ESMs) unless otherwise noted. If there are not any notes associated with a particular mod, then all options fit the STEP mandate. The notes only provide instructions where necessary; otherwise, STEP encourages user customization.
- Unless otherwise stated, follow BOSS's advice with regards to mod cleaning.
2.A. 01-Tools
- Standalone applications that aid in the management of the modding process
| Mod Name | Baseline | Instructions |
|---|
| BOSS |
Detailed Instructions available | |||||
| It is recommended to install BOSS directly to your Skyrim game directory instead of its default location at the top of your system drive, unless you are using an SSD on which you would rather conserve space. This allows Mod Organizer to automatically detect and add BOSS to your list of executables.
Mod Organizer users: If you do not want to follow the above advice as to where to install BOSS, do the following in order to add BOSS to the list of executables:
Now each time you want to run BOSS, simply select it from the drop-down menu at top right and click Run. | ||||||
| BOSS Userlist Manager |
Detailed Instructions available | |||||
Since you must launch BOSS Userlist Manager (BUM) through Mod Organizer in order for it to recognize your mods, add BUM to the list of executables by doing the following:
Now each time you want to run BUM, simply select it from the drop-down menu at top right and click Run. | ||||||
| Wrye Bash |
Installer version | Detailed Instructions available | ||||
| If updating to 306, you need to uninstall your previous version.
MO users - Install and be certain to tick the stand-alone executable version when prompted for the path to the Steam/Skyrim directory. Wrye Bash users - see the Wrye Bash Guide. Since you must launch Wrye Bash through Mod Organizer in order for it to recognize your mods, add Wrye Bash to the list of executables by doing the following:
Now each time you want to run Wrye Bash, simply select it from the drop-down menu at top right and click Run. | ||||||
| Mod Organizer |
Detailed Instructions available | |||||
Mod Organizer 2 installation instructions have been moved to the SSG. Follow guides for usage instructions.
Do not run MO yet! It will be run for the first time later in the guide. | ||||||
| DDSopt |
DDSopt - pre-release - update 4 | Detailed Instructions available | ||||
| For users who do not want to do a custom run with DDSopt, STEP now provides the STEP Optimized Vanilla Textures which is installed during in the Fixes section of the STEP Guide. There is no need to run DDSopt if choosing to install this new mod from STEP.
Do NOT run through Mod Organizer! See DDSopt Guide for usage details. The Quick-Start Guide is a good place to start. | ||||||
| Optimizer Textures |
| TES5Edit |
Detailed Instructions available | |||||
To clean any mods that require it, run "Quick Auto Clean". It will allow users to select the mod to clean and automatically clean it. | ||||||
| Skyrim Performance Monitor |
Detailed Instructions available | |||||
Installing Skyrim Performance Monitor
Please remember to completely uninstall any previous versions of SPM prior to upgrading. Initial Setup of Skyrim Performance Monitor
Configuring Skyrim Performance Monitor for Use with Mod Organizer
| ||||||
2.C. 02-Extenders
- Mods that expand on the inherent functionality of a game or another mod without themselves affecting content
| Mod Name | Baseline | Instructions |
|---|
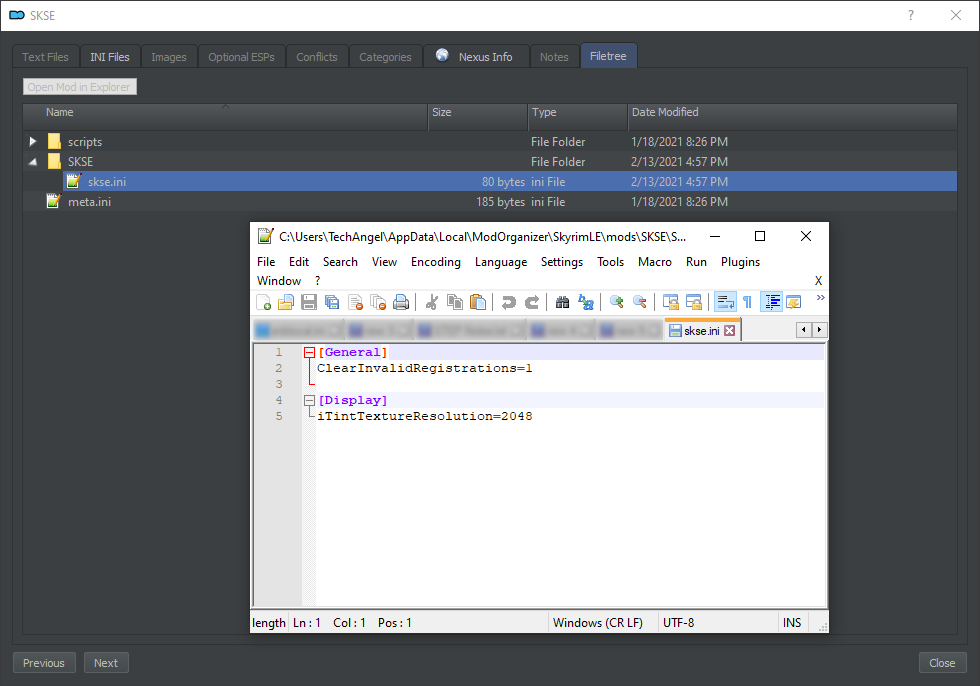
| SKSE |
Detailed Instructions available | |||||
Download and install the latest archive:
[Display] iTintTextureResolution=2048 [General] ClearInvalidRegistrations=1 The SKSE folder structure, including the skse.ini should look like the following: Restart MO; if SKSE is installed correctly, MO will detect it and show in the executables drop down. Use the SKSE executable when launching Skyrim from MO from now on. | ||||||
2.D. 09-Fixes
- Mods have a programmatic component that fixes various bugs and/or inconsistencies
| Mod Name | Baseline | Instructions |
|---|
| Ancient Nord Armor Fix |
| Appropriately Attired Jarls |
| Argonian Decapitation Fix |
This is now covered by USKP 2.0.5. |
| Barrow Button Fix |
| Bowlegged Jump Fix |
| Brawl Bugs Patch |
Detailed Instructions available | |||||
| Only use the "Compatibility Edition" main file. Not necessary for Extended users that are installing Enhanced Blood Textures. | ||||||
| Fast Travel Timescale Fix |
| Nitpick |
Users NOT using Mod Organizer should install this mod. The fixes are already included in Mod Organizer. |
| Unofficial Skyrim Patch |
| Unofficial Dawnguard Patch |
| Unofficial Hearthfire Patch |
| Unofficial Dragonborn Patch |
| Acquisitive Soul Gems |
Vanilla users: Use the old v2.1 file. |
| Distant Decal Fix |
Mod now only includes the meshes that do not conflict with USKP. |
| Waterbreathing Breathless Emerge |
2.E. 16-Interface
- Mods that affect any aspect of the user interface
| Mod Name | Baseline | Instructions |
|---|
| Better Book Names |
Use the "Vanilla Version".
Dawnguard users: Use the "Vanilla - Dawnguard" file. Dragonborn users: Use the "Vanilla - Dragonborn" file. Dawnguard and Dragonborn users: Use the "Vanilla - All DLCs" file. |
| Better Dialogue Controls |
| Better MessageBox Controls |
| Categorized Favorites Menu |
| Dungeon Quest Awareness |
May cause minor spoilers. |
| Immersive HUD |
| Lockpicking Interface |
STEP recommends the without wings around keyhole main file. |
| Lore-Based Loading Screens |
| Main Font Replacement |
Fertigo Pro | DO NOT USE this mod if Skyrim language is not set to English! |
| Not Another Colored Map Icon Mod |
STEP recommends installing only the optional "NACMIM - Full" file. Turn off version checking for maps in the MCM: SkyUI menu. This is necessary until NACMIM is made fully compatible with SkyUI 4.0 or higher. |
| Simple Crosshair |
STEP recommends"Normal". |
| Smaller Cursor |
STEP recommends the main file. |
2.F. 06-Models and Textures
- Mods that replace existing models or textures
No mods defined.
2.H. 08-Character Appearance
- Mods that affect the appearance of the player character or NPCs
| Mod Name | Baseline | Instructions |
|---|
| Consistent Older People |
Install the Consistent Older People All NPCs USLEEP Main File. |
| AOF Believable Hair |
| Beards |
1K | Detailed Instructions available | ||||||
| ||||||||
| Better Beast Races |
Lite | This mod is not packaged correctly. When installing this mod, right-click on the Data folder and choose [Set data directory]. Okay [OK] to install. |
| Better Freckles |
This mod is not packaged correctly. When installing this mod, right-click on the Data folder and choose [Set data directory]. Okay [OK] to install. |
| Birds of Skyrim |
Lower resolution |
| Brows |
Standard Resolution | Detailed Instructions available | ||||||
| ||||||||
| Cover Khajiits |
1024 | Install both Main Files. Merge when asked. |
| Female Vampires Have Fangs |
| Frost Atronach HD |
| Natural Eyes |
128k |
| New Children |
Detailed Instructions available | |||||
| Mod is not packaged correctly. Double-click child_detail_dirt. Right-click on data and choose [Set data directory]. Click [OK] to install. | ||||||
| Pond Fish |
| XCE-Dawnguard |
This mod is not packaged correctly. Right-click on Data and choose [Set data directory]. Click [OK] to install. |
| More Village Animals |
Use all three Main Files. |
2.J.
No mods defined.
2.L.
No mods defined.
2.M. 10-Gameplay-General
- Mods that affect general or multiple gameplay mechanics
| Mod Name | Baseline | Instructions |
|---|
| Ars Metallica-Smithing |
| Auto Unequip Ammo |
Detailed Instructions available | |||||
In the MCM settings for Auto Ammo Unequip, STEP recommends changing following settings:
| ||||||
| Candle Lanterns of the North |
Use the "Dawnguard Edition" file. |
| Dark Brotherhood to Misc |
Currently NOT recommended. Use the optional in Even Better Quest Objectives instead. |
| Death Cam Duration Options |
| Disable Thieves Guild Autostart |
| Dynamic Fires |
| Lantern Caretakers |
Requires "Lanterns of Skyrim" |
| More Salt Please |
Also install the optional "Dragonborn Addon" file. |
| Move It Dammit |
Less Wait Time |
| No NPC Greetings |
Sligtly Reduced | Included in every version of the STEP Patches, STEP Core Patch, STEP Extended Patch, and both versions of the STEP Combined Plugin. |
| Realistic Crime Radius |
| Wearable Lanterns |
No BSA |
| Lanterns for Caravans |
No BSA |
| Lanterns for Guards |
No BSA |
| When Vampires Attack |
Post-Installation Housekeeping
Once all mods have been installed and are ready to play, be certain to either:
- Start a brand new character, or
- load the save game generated just after character creation if it exists, or
- load an existing character after clean saving the relevant save game.
STEP 3
3.A. Technical Tips
The following is a good place to begin, but be certain to also check the Troubleshooting Guide. Also, search the support & Troubleshooting forum on the STEP Boards,
3.A.1. Maximizing STEP
A heavily modded Skyrim can bring even a very powerful system to its knees. Maximum visual quality is highly dependent upon total on-card graphics-dedicated video memory (VRAM), the number of GPUs, and monitor resolution. The goal should be to maintain 32 or more FPS on average without any noticeable stuttering. Following are some enhancements that users with rather powerful systems might be able to take advantage of:
- Try using SSAO (using video driver settings) for better quality graphics and note the performance hit.
- Use one of the STEP-recommended ENB configurations.
- Make sure Skyrim.ini and SkyrimPrefs.ini are writable and, using the Skyrim Launcher, max out ...
- anti-aliasing
- anisotropic filtering
- view distances
- shadow quality
- texture quality
3.A.2. Fix game launch crash after installing STEP
For crashes to desktop (CTDs),
- Set the Skyrim executable "TESV.exe" to run as administrator (right click TESV.exe > Properties > Compatibility > Check Run this program as administrator).
- If using RCRN or any other FXAA-Injector/ENB mod, turn off any on-screen display programs and monitoring tools such as Fraps, ATI Tray Tools, MSI Afterburner, GPU-Z, etc.
- Get the latest DirectX runtime installed.
3.A.3. Defrag the Hard Drive
For hard drives (not SSDs), this is a very important task once most/all mods are installed. The Windows defrag utility may be used, but it is sub-standard. A couple of the best free utilities are Defraggler and Auslogics Disk Defrag. Do NOT defrag an SSD as it will detrimentally affect its lifetime.
3.A.4. Semi-Invisible People & Misbehaving Walls
Be certain that ATI Antialiasing is set to Multi-Sample and NOT Adaptive. Also, remember to download the latest ATI drivers. Also be certain that bFloatPointRenderTarget=1 in the SkyrimPrefs.ini if using ENB.
3.A.5. Using Windowed Mode (ATI)
If having stuttering problems or CTDs in full screen mode, try "full screen" windowed mode by downloading Simple Borderless Window. The "Simple Borderless Window" launcher SBW.exe launches SKSE, so start the game through SBW.exe.
3.A.6. Increase Overall Performance
If after following the whole guide and installing the enhanced graphics, the game is unplayable due to low performance, try one or more of the following:
- Disable SSAO or Supersampling AA (or both) if enabled.
- Reduce shadow quality from the Skyrim Launcher.
- Install the performance-friendly versions of textures where applicable.
- Consider texture optimization.
- Reduce The [View Distance] settings in the game launcher (see 1.B.1).
3.A.7. Texture Shimmering, Etc.
Refer to the Z-Fighting Guide.
3.B. In-Game Tips
The console can be activated by pressing the tilde ([~]) key, often located just below [Escape], while in-game.
3.B.1. Optimize Field of View (FOV)
In the console enter the following using a number from 66-100, depending on resolution and screen ratio. Default is 65 (4:3 screens), but 70-75 works nicely for 16:10 screens and 75-80 works nicely for 16:9 screens:
FOV ##
This change will be permanent in the saved game. Other INI FOV tweaks don't require opening the console, but they don’t 'stick' and can corrupt the game. Also note that high FOV can cause a performance drop for some configurations.
3.B.2. BIG Frame Drops During Cell Loading
This is a likely indicator that VRAM is too often operating at or beyond capacity (see 3.A.6).
User Contributions
STEP can only get bigger and better with help from the user community. Even simply maintaining the current STEP is too much work for the core STEP team to ensure that the highest quality is maintained. We need people to help us identify mods that are thought to improve Skyrim while adhering to the STEP Mandate. We also need ongoing reviews and updates on mods that may be causing problems or that stray from the STEP philosophy. Finally, we need help from the community in terms of testing, benchmarking and analysis. More detail is presented in the Mod Testing Guide.
In order to suggest a mod, visit the Mod Suggestions section of the STEP Forums.
NOTE
The STEP team will be beta testing a new mod-testing procedure and interface currently in final stages of development here on the STEP Wiki. Anyone interested in testing mods of any kind --whether included in STEP or not-- should contact the STEP administrators by email or on the forums (click on the link in upper left of header).
Special Credits
The STEP administrators would sincerely like to thank (from the bottoms of our fuzzy little hearts):
- The authors of mods recommended in STEP
- The core STEP Community for feedback, suggestions and input
- The STEP beta testers ... for their good humor and rigorous analyses
- The Nexus community
- Bealdwine, EisDrache & MontyMM - site founders on indefinite leave (we hope you guys are well!) --UPDATE: MontyMM is back ... welcome back!
- Outstanding contributors - Techangel85, Neovalen, rpsgc, Besidilo, JudgementJay, torminater, Kelmych, rootsrat, & more to come ...
- Bethesda Softworks for Skyrim (and TES in general)
Site Donors
We have had a handful of generous user donations to keep this site alive and viable. Most of these donors have not left their user names, so they will remain anonymous; however, the following are site contributors that have generously given a bit of their livelihood in support of STEP. For that, we thank them immensely!
- geeee785
- Lauren
- solist
- 26 additional generous contributors that will remain anonymous until their user names are made known to us.
The core STEP team is:
- Farlo - Mediawiki developer & extraordinaire, Mod-list co-compiler, forums admin, site founder
- frihyland - Solutions developer (Thunderbolt), mod extraordinaire, site founder
- stoppingby4now - Main site developer, Semantic Mediawiki developer & extraordinaire, site founder
- TheCompiler - STEP creator, mod-list extraordinaire
- z929669 - Wiki & forums content editor, main site administrator, hosting maintenance, site founder
- EMPTY SLOTS WAITING TO BE FILLED BY ESTABLISHED & DEDICATED COMMUNITY MEMBERS!