SkyrimSE:0.1.0
WARNING
This guide is out of date and is NOT supported! It may contain information that is incorrect or not in line with the current state of the game.Go to the latest supported SkyrimSE Guide.
STEP SE Core Guide
Per our previous release, the "STEP Guide" versioning scheme facilitates our move towards a major change in the way we not only create guides but also with respect to our entire website and methodology. In totality, we've been calling this "STEP 3.0". This Guide version is "0.1.0" (since this a new guide specific to Special Edition, it's versioning starts fresh). It's a prequel or "Beta" to the Guide we will release with STEP 3.0. While we don't consider this release quite to the standards of a full-blown 'major' release, it still represents the entirety of the Guide as it will be released.
There has been so many changes that we highly recommend users reviewing the Changelog, for all the fine details.
- Visit the forums and provide feedback related to STEP.
- Also follow STEP on Facebook.
- To support hosting and maintenance of the STEP Community Project, contributions are welcome.
About STEP
Created by TheCompiler, STEP is a collaborative project with input from the modding community, technical volunteers, and project administrators. The goal is to provide tested and validated methods for establishing and maintaining an enhanced modded Skyrim. Thus, the Guide provides detailed, well-tested build instructions for a solid modding template. New modders can follow STEP explicitly to achieve an enhanced, vanilla experience, or more experienced modders may use it as general guide from which to build a foundation.
The STEP team collects information from the modding community through extensive mod testing, detailed reviews, feedback, and suggestions exchanged on the STEP Community Forums. Posting rules apply, so be sure to read and follow them. Engage and enjoy a warm welcome and plenty of high-quality support from a large community of experienced members.
New to Modding?
We recommend that you ...
- read through this Guide at least once before attempting installation.
- follow all linked guides and read through them, as well.
There is a lot of information to absorb and learn in order to successfully build a modded game. We and the community, have brought together a lot of this information into guides as a free and hopefully convenient resource for all. New and experienced modders alike will find many answers within these guides and linked resources. This guide is written in such a way that it expects users to know the basics of modding and related tools (e.g., mod managers, LOD optimizers, configuration utilities, etc.). However our support forums are always available for visitors.
Nomenclature
The following nomenclature is used throughout this guide and should be understood before proceeding.
- Baseline: An installation of a mod using the recommend file option listed within the Baseline column of the mod tables below.
- STEP Patches: A "patch" is a plugin that allows two or more mods to work together without conflicting. The "STEP Patches" are such plugins, but allow all of the mods in the STEP Guide to work harmoniously together. Some users refer to this as a "conflict resolution patch" or "CR Patch".
Minimum System Requirements
We recommend the following hardware configuration for running a STEP SE Core installation at a resolution of 1920x1080. The minimum requirements will allow most users to install and run the Baseline options, which are Skyrim SE's recommended requirements. The recommended requirements for this Guide will allow most users to install and run a modded setup beyond that of the Baseline options (higher quality options). For those wishing to use high quality options at resolutions higher than 1920x1080, be advised that a more powerful system will likely be required.
| Hardware | Minimum | Recommended |
|---|---|---|
| Windows OS | Windows 7 64-bit or later | Windows 7 64-bit or later |
| CPU | Intel Core i5-2400 or equivalent | Intel Core i5-4430 or equivalent |
| System RAM | 8 GB | 8 GB or higher |
| GPU | Nvidia GTX 780 3GB / AMD R9 290 4GB | Nvidia GTX 970 or equivalent or better |
| Monitor Resolution | 1920x1080 | 1920x1080 or higher |
Time Requirement
Users should be aware that it will usually take several hours to complete a STEP Guide from start to finish. STEP encourages users to always follow proper computer ergonomics when modding. Remember to take breaks and happy modding!
STEP 1
Game Installation and Modding Setup
NOTE
Start Out Clean!
It is particularly important for new users begin with clean installations of both Steam and Skyrim in order to be successful with the setup of this Guide the first time through.
Before continuing with this Guide, users who have not completed the System Setup Guide should stop and do so now. Before continuing, users should already have the game installed and folder structure set up for modding. Our mod-build guides are written with the expectation of the linked setup process already being completed. Users deviating from our recommendations will need to adjust the instructions in our guides accordingly.
Mod Organizer 2
Mod Organizer 2 is the successor to Mod Organizer, and is now the official mod manager for all STEP mod-build guides. It supports both 32-bit and 64-bit versions of Bethesda games. The major changes it brings are ...
- A return to normal plugin/BSA relationship - Users will no longer be able to load BSAs without loading the corresponding plugin as they did with MO. The plugins must be active for the BSAs to load, which is the intended behavior that the game expects.
- New MO installation options - Users will have the choice between installing MO in "standalone" or "portable" mode. Unless Merge Plugins is going to be utilized, it’s purely an individual preference. Merged Plugins will currently only work when MO is installed and used in “portable” mode. STEP recommends “standalone” mode for use with this guide. This allows us to design all of our mod-build guides around using MO's "Instances". This means one MO installation is used for all supported games. Users should decide how they wish to install and use MO before continuing; keeping in mind the space requirements mentioned in our System Setup Guide.
NOTE
For more information about MO installation options, please see the Mod Organizer Guide.Tools Installation and Setup
STEP recommends the tools for modding be installed and setup as “standalone” applications, when possible. This means a tool is installed once and used for all games. Most of the modding tools used already have this feature built in and some are meant to be used as such. Following this recommendation will also reduce redundant tool installations; thus, saving hard drive space, and it's more organized. The instructions throughout this Guide will assume the tools are installed as “standalone” applications. However, users are free to set up their tools as they see fit.
Tool Installation
Users should install the tools to the location created while following the System Setup Guide (i.e., ../Modding/Tools/). Install the following tools to that location:
| Mod Name | Baseline | Instructions |
|---|
| MBINCompiler |
ExpandDetailed Instructions available |
| NMS Modding Station |
ExpandDetailed Instructions available |
| PSArcTool |
ExpandDetailed Instructions available |
The Modding folder structure should now reflect:
- ../Modding/Steam (optional; may be installed elsewhere)
- ../Modding/Tools
- ../Tools/BethINI
- ../Tools/DynDOLOD
- ../Tools/LOOT
- ../Tools/Mod Organizer
- ../Tools/Wrye Bash
- ../Tools/xEdit
- ../Tools/xLODGen
STEP 2
Mod Organizer 2 - Configuration
Initialization
STEP recommends using all applications, including Mod Organizer 2, as standalone programs. The below instructions for MO's first run reflect this. If MO is ran in Portable mode, users will need to adjust the instructions as appropriate. To initialize Mod Organizer 2:
Profile Setup
Now users will take advantage of Mod Organizer's profile feature by creating/editing two profiles for use during this Guide:
Tool Setup
The final step of setting up Mod Organizer 2 is to add all the tools to it, which were install in the previous step. Some tools will have been auto-detected and added for the user, however, ensure the settings below are set for all tools, even the auto-detected ones. Use the instructions below to add the tools to MO. xEdit is used for the example:
Tool Setup Table
| Executable | Title | Argument(s) |
|---|---|---|
| DynDOLOD64.exe | DynDOLOD SE | -SSE |
| LOOT.exe | LOOT | --game="Skyrim Special Edition" |
| SSEEditQuickAutoClean.exe | xEdit Quick Auto Clean | |
| TexGen64.exe (installed with DynDOLOD) | TexGen SE | -SSE |
| WryeBash.exe | Wrye Bash | -o “path to Skyrim Special Edition folder” (i.e, -o "D:/Steam/steamapps/common/Skyrim Special Edition" ) |
| xLODGen64.exe | xLODGen | -lodgen -SSE |
Users can arrange their tools in any order they wish using the up and down buttons above the list. When complete, close the window by clicking the Cancel button.
BethINI Setup
BethINI needs to be set up to run for the current profile in MO and ran to establish solid INIs before beginning the mod installations. To do this:
At this time BethINI should restart to grab the correct INIs. Once it is restarted:
Users now have a minimal setup for the game INIs for testing and running the game during the mod installations. Once all mods have been installed, BethINI will be ran again to complete the INI setup.
STEP 3
LOOT
At any time during the mod installation process LOOT should be used to sort plugin load order before running the game. This is necessary to ensure proper plugin priority (load order), which can have a dramatic impact on the game. To sort with LOOT:
- Launch LOOT via Mod Organizer 2 from the executables drop-down menu.
- Click the “Sort” button at the top of the LOOT window.
- Examine the resulting order carefully and look for any alerts or warnings and address each (clean any mods it says has ITMs or UDRs)
- Click the “Apply” button, which has replaced the Sort button at the top.
- Close LOOT.
LOOT must be run any time a mod is installed that adds one or more plugins to the load order.
Up to this point, users should only have the following plugins, in the order listed:
- Skyrim.esm
- Update.esm
- Dawnguard.esm
- HearthFires.esm
- Dragonborn.esm
If the plugins are not in the order listed, run LOOT now.
Cleaning Vanilla Master Files
To remove errors in the Bethesda master files, it is recommended they be cleaned with xEdit before modding begins. This ensures maximum stability and compatibility within the modding experience.
Standard Cleaning Procedures
Update.esm, Hearthfires.esm, Dragonborn.esm
Follow the standard cleaning procedures to clean these master files, one at a time. Place the “MasterName.esm - Cleaned” mod listing for each below its vanilla master listing. Update.esm will not be listed in MO and Update.esm - Cleaned is placed at the top of the modlist.
Dawnguard.esm
Follow the standard cleaning procedures to clean Dawnguard.esm.
Once the automatic cleaning is complete, Dawnguard also has some manual cleaning required. To do this,
After the manual cleaning is complete, create the mod listing as directed above and place the “Dawnguard.esm - Cleaned” mod listing directly below Dawnguard.esm.
NOTE
Any time Bethesda updates these master files, users should complete this cleaning process again. This ensures users have any fixes Bethesda may have included within their updates.
At this point, the Bethesda masters should be cleaned and the mod list order should reflect:
- Updated - Cleaned .esm
- DLC: Dawnguard.esm
- Dawnguard - Cleaned.esm
- DLC: HearthFires.esm
- HearthFires - Cleaned.esm
- DLC: Dragonborn.esm
- Dragonborn - Cleaned.esm
Understanding the STEP Patches
A “conflict resolution” patch, or CR Patch, is a plugin that resolves conflicts between various active plugins. They allow users to use various mods together without any major issues, while still achieving the desired outcome from the mods. The STEP Patches are CR patches and more.
The STEP Patches are CR Patches built specifically for the mod list within this Guide. They are required to run the Guide without issues; providing conflict resolution between various mods. Additionally, the patches provide both mod integration and custom edits surrounding the use of specific mods. This means the patches are one part CR patch and one part mod.
Users should decide now, before installing any mods, whether or not they will be using the STEP Patches or creating their own. This decision will be referenced during mod installations below. Users who decide to install the STEP Patches will do so after the mod installations.
NOTE
Users installing only the Core mod list or only installing mods on top of this Core mod list, are recommended to use the STEP Patches! These patches will solve all conflicts for users installing only the Core mod list. For users adding a few additional mods on top of STEP Core, the Patches can be used as a foundation to build upon. This ensures a stable game.
We do not offer support for unpatched mod installations!
STEP Patches Requirements - We recommend keeping the forum topic from the link open for referencing the list of required mods. This is helpful for users deciding whether or not to install a mod that may be required by the Patches.
Finally, we offer the following options in regards to Patches:
- STEP SE Core - Conflict Resolution Patch
- patches the entire STEP SE Core mod list besides the Lighting and Weather mod group.
- STEP SE Core - Lighting and Weather Patch
- patches the mods listed within the Lighting and Weather mod group with the rest of the STEP SE Core mod list.
- this is provided as a separate patch for users wanting to customize their own lighting and weather setup.
STEP 4
At this point users should have their systems fully set up and ready to install mods from the modlist below. Users who are unaware of how to complete mod installations using Mod Organizer 2 should return to that Guide and refresh their knowledge. When installing mods from the list below, keep the following in mind:
- Mods should be installed in the order that they are listed to ensure other mods further down the list overwrite those occurring before them. This is necessary to ensure the desired in-game effect.
- Mods are listed in alphabetical order within each section and any deviations from this are purposeful to achieve the desired outcome.
- Always install plugins (ESLs/ESMs/ESPs) unless otherwise noted.
- If there are no notes associated with a particular mod, then all options fit the our mandate and it's the user's decision which option to install. Mod notes only provide instructions where necessary; otherwise, STEP encourages user customization.
- Unless otherwise stated, follow LOOT's advice in regards to mod cleaning and sorting.
NOTE
STEP does not recommend extracting BSAs for this Guide. Each BSA has been manually checked by the staff to ensure the proper overwrites are maintained, without the need for extraction.
Mod Table Reference
Below is the legend and reference for the mod tables used in this Guide. Users should refer back to it when confused about a mod listing.
| Mod Name | Baseline | Quality Options | DLC Required | Notes | |
|---|---|---|---|---|---|
| Mod Name |
Baseline | DG
|
Notes |
Legend
Mods that expand on the inherent functionality of a game or another mod without themselves affecting content
- Mods that expand on the inherent functionality of a game or another mod without themselves affecting content
No mods defined.
Mods solely providing assets intended specifically for use by other mods without themselves affecting content
- Mods solely providing assets intended specifically for use by other mods without themselves affecting content
No mods defined.
Baseline mods having many conflicting assets that should be overridden by other mods OR mods having programmatic changes that are widely accepted and adopted/expected by other mods
- Baseline mods having many conflicting assets that should be overridden by other mods OR mods having programmatic changes that are widely accepted and adopted/expected by other mods
No mods defined.
Mods that affect animations or physics
- Mods that affect animations or physics
No mods defined.
Mods that replace existing models or textures
- Mods that replace existing models or textures
| Mod Name | Baseline | Instructions |
|---|
| Black Carbon |
| Clean Analysis Visor |
Step recommends: Clean_Analysys_Visor_With_Helmet_by_RogerHN |
| Clean Ship Space Map |
| Exosolars Abyss |
ExpandDetailed Instructions available |
| HD Clouds |
2K |
Mods that replace existing models or textures
- Mods that replace existing models or textures
No mods defined.
Mods that affect the appearance of the player character or NPCs
- Mods that affect the appearance of the player character or NPCs
No mods defined.
Mods that replace existing models or textures
- Mods that replace existing models or textures
No mods defined.
Mods that affect general or multiple gameplay mechanics
- Mods that affect general or multiple gameplay mechanics
| Mod Name | Baseline | Instructions |
|---|
| Better Ship Transfer Ranges |
Install: Better Ship Teleport Module Range main file |
| Sensible Planetary Charts |
Only install the Main File. |
Mods that replace existing models or textures
- Mods that replace existing models or textures
No mods defined.
Mods that affect sounds or music
- Mods that affect sounds or music
No mods defined.
Mods that help to improve game immersion and role-playing scenarios
- Mods that help to improve game immersion and role-playing scenarios
No mods defined.
- Mods that alter aspects of quests and/or related lore
No mods defined.
Mods that affect any aspect of the user interface
- Mods that affect any aspect of the user interface
No mods defined.
Mods that programmatically add new or alter vanilla locations
- Mods that programmatically add new or alter vanilla locations
No mods defined.
Mods that affect lighting and/or weather systems **installation is optional**
- Mods that affect lighting and/or weather systems **installation is optional**
We wish to be clear that the mods included within this section are completely optional. They are still within the Mandate, however, we've made this section optional for users who wish to customize their own lighting and weather for their games. As such, we've included an additional patch solely for this mod group.
| Mod Name | Baseline | Instructions |
|---|
| LightFix |
Soft | ExpandDetailed Instructions available |
| ReLight |
| Rotating Atmosphere |
| Integrated Planets |
| Natural Nights |
ExpandDetailed Instructions available |
| No Atmosphere No Dust |
Mods that generate derived mod output from load-order-specific assets
- Mods that generate derived mod output from load-order-specific assets
No mods defined.
Once FNIS SE is installed, the animation files need to be generated for the skeleton changes.
- Sort the load order with LOOT.
- Run FNIS SE via Mod Organizer 2.
- In the Available Patches at the bottom of the window, check the box adjacent to "SKELETON Arm Fix".
- Click the [Update FNIS Behavior] button and wait for a message to appear in the window stating "X animations for Y mods successfully included".
- Click [Exit].
After closing FNIS SE, there will be files in Overwrite (essentially a fake mod located at the bottom of the left pane if sorted by priority ascending):
- Right-click Overwrite and select Create Mod
- Name it FNIS SE Output and click OK.
- This will create a new mod listing in the left pane for the FNIS SE generated files.
- Check the new mod entry to enable it.
Mods that programmatically resolve load-order conflicts
- Mods that programmatically resolve load-order conflicts
| Mod Name | Baseline | Instructions |
|---|
| Step NoMansSky Resource Files |
ExpandDetailed Instructions available |
STEP 5
Sorting with LOOT
Users should now run LOOT and accept the default mod order it provides.
The new Patches are designed to work with a default LOOT sorting of the mods. This means there are no more meta rules to set with the STEP Guides. This reduces user tasks (preventing one less area for user error) and streamlines the Guide's installation. Users should:
- sort their load order using LOOT any time they install, uninstall or update a mod.
- update LOOT any time it says their is an update available.
Creating a Bashed Patch
A Bashed Patch is a patch created by running Wrye Bash (WB). This process imports several record types from a load order, to ensure those records are carried forward.
NOTE
This Guide no longer uses a Bashed Patch!
All necessary edits, which the Bashed Patch covered in previous versions of the STEP Guide are now contained with the STEP Patches.
Though this Guide doesn't require a Bashed Patch, users may eventually install mods that require one. Users should only require a Bashed Patch if they include additional mods that add or alter leveled lists. Even then, one may not always be required. STEP provides the instructions below to create a Bashed Patch. If users need to create one, they are highly encouraged to review the results in xEdit! Investing has shown many of the leveled lists forwards to be completely unnecessary as they were just copies of the winning mod's records.
Building a Bashed Patch
Keep in mind these procedures are only for using a Bashed Patch to manage leveled lists.
DynDOLOD
Users will now create LODs using Dynamic Distant Objects LOD (DynDOLOD). DynDOLOD is one part mod and one part tool. Users should already have the tool installed from the beginning of the Guide. Now it's time to install the mod portion:
Before moving on, users need to create two empty mods to use for the files DynDOLOD outputs:
The last few mods in the mod list should now reflect:
- ..
- STEP SE Core - CR Patch
- STEP SE Core - LW Patch (optional)
- DynDOLOD SE Resources
- STEP SE Core - TexGen Output
- STEP SE Core - DynDOLOD Output
Run TexGen
TexGen, shipped with DynDOLOD, is a program that will create custom LOD textures for objects based on the full-size texture installed. This means distance object textures will better match their fully rendered counterparts. To create custom LODs:
Run DynDOLOD
DynDOLOD will now be run to generate the remainder of the LODs for the game. Users have the options of generating higher quality 3D Trees or generating the standard tree LOD. Following one of the two sets of instructions below, depending on the option desired.
Standard Tree LOD
3D Tree LOD
There are two options for 3D Trees. Full or Hybrid.
- Full 3D Trees will generate the entire tree (branches and trunks) in 3D.
- Hybrid 3D Trees is more performance friendly. It will generate 3D branches with 2D trunks.
When do users need to rebuild LODs?
Users should rebuild their LODs any time they update their mod lists with mods that adds, removes, or relocates exterior objects such as buildings, roads, trees, etc. Users should also rebuild any time an update to DynDOLOD SE Beta is released.
STEP 6
Users should now be ready to load the game for the final steps, configuring mods in the Mod Configuration Menu (MCM). The MCM is a feature of SkyUI that allows mod authors to provide custom settings for their mods, which users can set within the game. Well provide recommendations for users below for all the mods installed within this Guide.
When ready to play the game after a new STEP Guide install, it is recommended to start a new character.
Mod Configuration Menu Settings
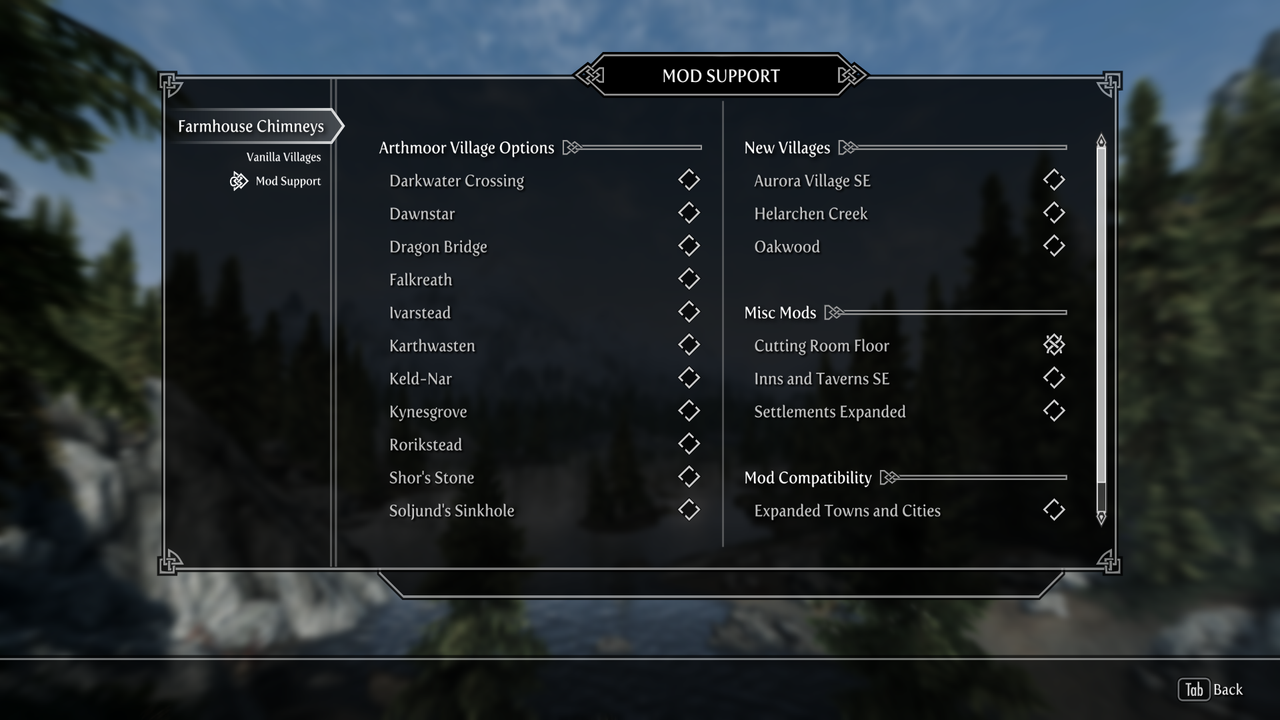
Farmhouse Chimneys SE
Vanilla villages should all be checked on the first page. The following screenshot displays the recommended settings for the Mod Support page:
Remaining Mod Configurations
The remaining mod configurations are recommended to be left at their defaults for the most enhanced, vanilla experience. However, users may adjust the settings for these mods to their liking.
(optional) BethINI Customization
Users are now ready to play their enhanced Skyrim SE, however, please consider reading the remainder of the Guide before taking an arrow to the knee.
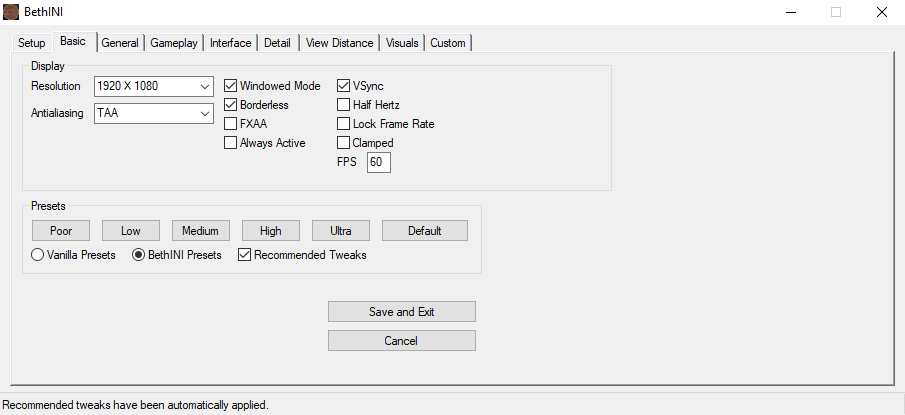
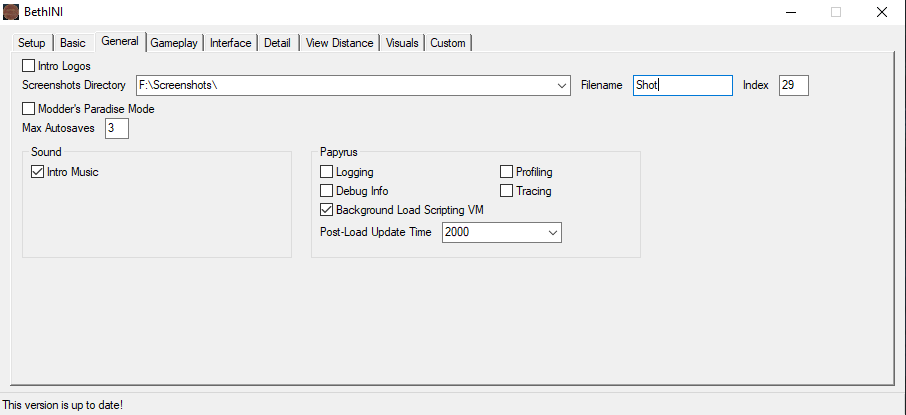
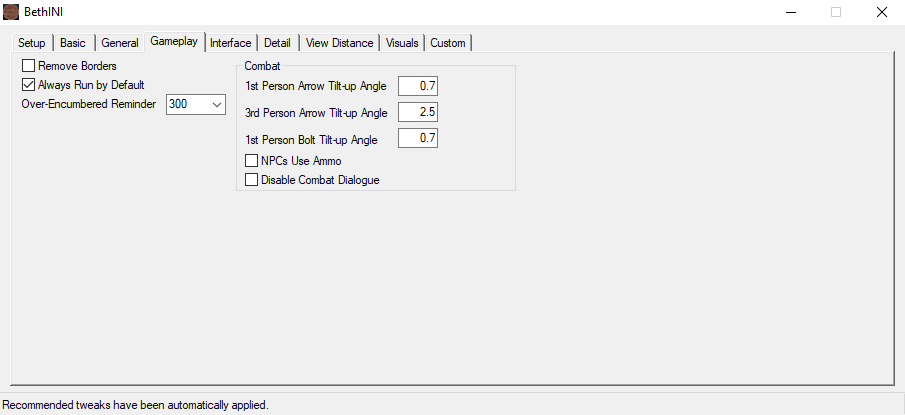
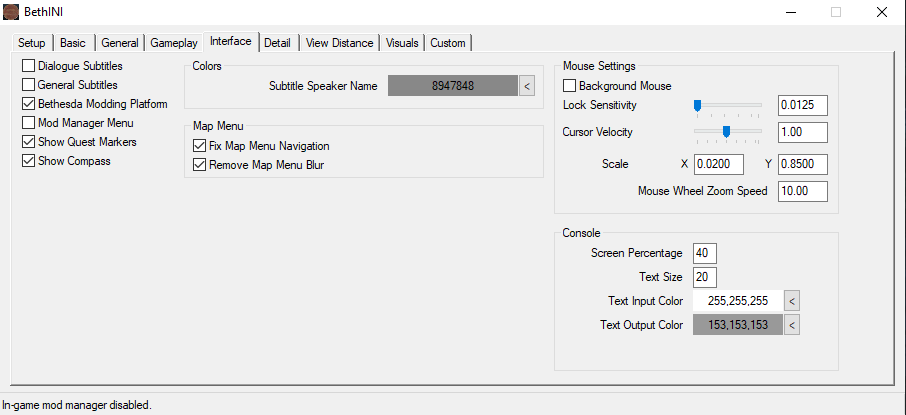
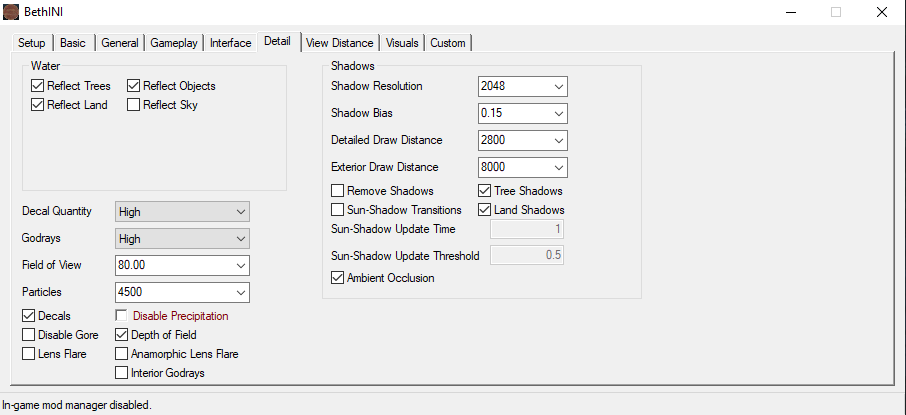
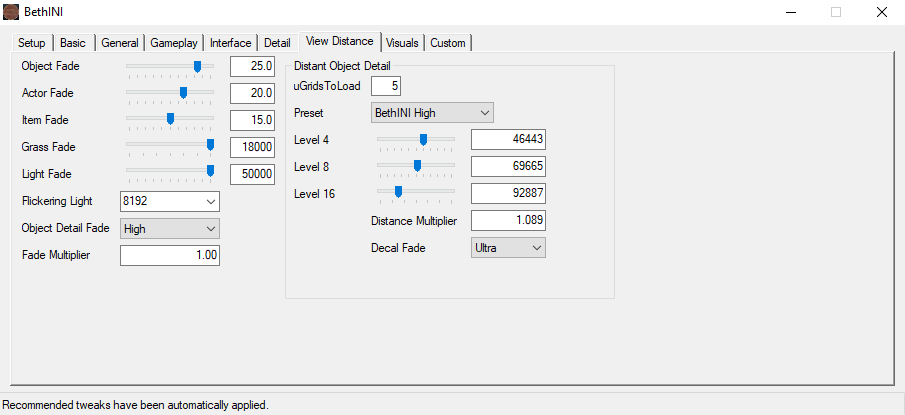
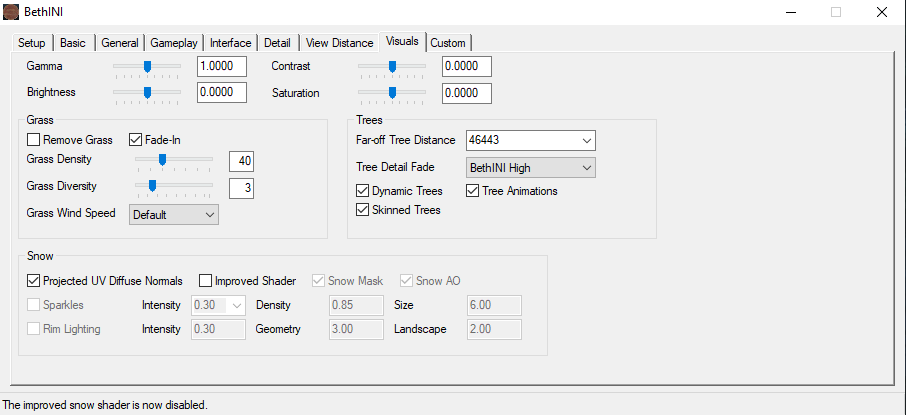
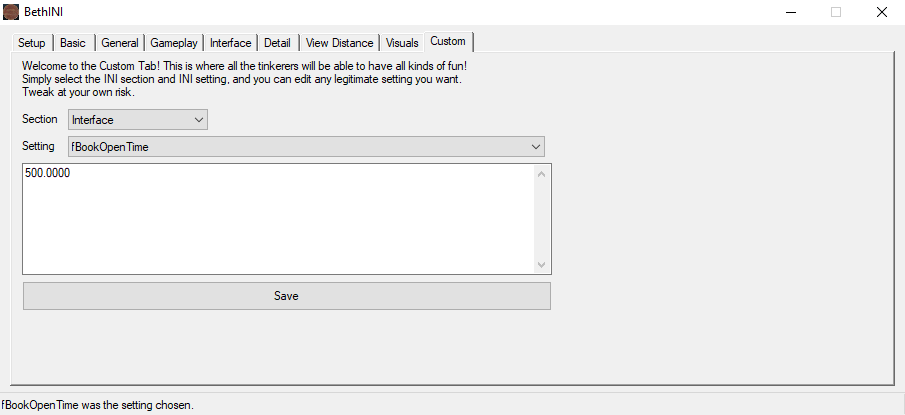
The final consideration is customizing BethINI once the game is confirmed to be stable. Users who have no issues with performance and aren't knowledgeable with the settings can simply follow along. Other users can feel to customize the settings to their personal preferences. Caution is advised against using the custom INI input feature. This feature will allow users to make custom INI edits, however, doing so without the knowledge of exactly what the customizations are doing can cause instability.
The following are provided as examples of the settings used for taking the screenshot's on Nexus (1920x1080 using a GTX 1060). The recommended settings are called out and/or shown in the screenshots below. Simply click on a section heading to expand it.
➕ [Click to show]➖ [Click to hide] Basic |
➕ [Click to show]➖ [Click to hide] General |
➕ [Click to show]➖ [Click to hide] Gameplay |
➕ [Click to show]➖ [Click to hide] Interface |
➕ [Click to show]➖ [Click to hide] Detail |
➕ [Click to show]➖ [Click to hide] View Distance |
➕ [Click to show]➖ [Click to hide] Visuals |
➕ [Click to show]➖ [Click to hide] Custom |
ENBSeries with STEP SE Guide
The Guide doesn't include an ENB preset for reasons that should be obvious, however, we know it can be difficult to find a preset that works with Cathedral Weathers. To make this a bit easier, we've included a small list of ENB presets below which were made to work with Cathedral Weathers, without breaking the horizon. We've included a variety of "looks", but users should search on Nexus to find the preset that works best for their preferences.
- A Cathedralist's ENB
- Blubbos ENB ReShade
- CELESTIAL CATHEDRAL ENB
- iiENB
- Ljoss
- Lucid ENB
- PRENB
- Ragnar's Vivid ENB for Cathedral Weathers 2
- Serio's ENB
COMMUNITY CONTRIBUTIONS
STEP can only get bigger and better with help from the community. It is very time consuming for the STEP team to ensure that the Guide is consistently maintained at the highest quality possible. We need people to help us identify mods that improve the vanilla game while adhering to our Mandate. We also need ongoing bug reports, reviews, and updates on mods that may cause problems or that stray from the Mandate.
In order to suggest a mod for inclusion, visit the Mods section of the Forums.
Call for Mod Testers
Community members interested in becoming Mod Testers, please contact TechAngel85 via PM on the forums. Once registered, Mod Testers will be given access to Staff forums that houses useful information. For more information about our mod testing process, read through the Mod Testing Guide to get a sense of what's involved.
Call for Forum Moderators
Regular community members interested in becoming moderators, please contact TechAngel85 via PM on the forums. Forum Moderators will be determined based upon level and quality of activity within our community.
STEP Builds
STEP Builds are user-created guides that use one of the STEP Core mod lists as a foundation to their own mod list within their guide. If a STEP Build adheres to our guidelines, it can be considered as a candidate for being hosted on the STEP 3.0 website. An example of a STEP Build will be provided with the release of STEP 3.0 in the form of Tech's Skyrim Special Edition Guide. Be certain to read the STEP Builds documentation when it becomes available.
MO2
This one of the reasons why Mod Organizer is the chosen mod-management utility for STEP. MO makes building mod lists for STEP Builds a breeze.
Credits
The STEP administrators would sincerely like to thank (from the bottoms of our fuzzy little hearts):
- The authors of mods recommended within our Guides
- The authors of mods who granted permission for their mods to be incorporated into the STEP Patches
- The core Community for feedback, suggestions and input
- The Beta and Mod Testers for their good humor and rigorous analyses
- The Nexus community
- Bethesda Softworks for their games
- Tannin for the gift that is Mod Organizer
- All the developers that kept MO alive to create MO
STEP Staff
Administrators
- TechAngel85
- Lead Release Coordinator, Patch Coordinator, Lead Forum Administrator, Mod Author
- z929669
- Project Founder, Lead Site Developer, Lead Site Administrator
SM Forum Moderators
Currently active STEP Forum Moderators:
- DoubleYou
- GrantSP
- Greg
- Kelmych
Honorary Staff
Founder, Administrators, and Staff no longer active with the project:
- Aiyen
- EssArrBee
- Farlo
- hishutup
- MontyMM
- Nebulous112
- oqhansoloqo
- phazer11
- rootsrat
- stoppingby4now
- TheCompiler
- torminater
- WilliamImm

