Guide:Wrye Bash
Installing & Maintaining S.T.E.P Using Wrye Bash
By z929669 & the S.T.E.P Team
Wrye Nomenclature
Wrye was a prominent TES (The Elder Scrolls) enthusiast, modder and developer that created Wrye Bash as a tool to help other modders deal with the idiosyncrasies of modding for Oblivion (TES4). Wrye also later created an implementation that he called Wrye ‘Mash’ for Morrowind (TES3). Wrye Smash is simply Wrye ‘Bash’ implemented for Skyrim (TES5), so it is Wrye Bash. For the sake of brevity and consistency, this guide will henceforth refer to Wrye Bash as ‘WB,’ and its analogues will likewise be referred to as ‘WS’ and ‘WM’ for Wrye Smash and Wrye Mash, respectively.
Purpose of This Guide
This guide assumes that the reader has reviewed the most updated, relevant documentation available for the WB program. If that is not the case, the authors strongly encourage a review of that documentation. Understanding--in a basic sense--what WB does and why it is useful are important concepts providing a context necessary for the reader to maximize the benefit of using this guide with respect to a fresh install of the most current major STEP (Skyrim Total Enhancement Project) release. Additionally, the guide will be modified and updated to reflect ongoing changes in each forthcoming major release of STEP. The novice WB user will likely find substantial value in following the guide as an actual working example of several sound techniques for implementing WB; nevertheless, much of the material covered in the following pages will be best understood with a baseline level of experience that exceeds “null” by at least a small margin, please familiarize yourself with the program before getting started.
Background - Basic Modding Principles
As with all TES games, modding Skyrim--in the most raw sense--can be accomplished by simply placing compatible files within the Steam\SteamApps\common\skyrim\Data directory (henceforth, referred to as “Data directory”). These files usually come packaged as a “mod” in an archive that facilitates simple decompression into the Data directory. Due to the vast number of mods and their incredible variety, the task of manual extraction and installation is a tedious process with lots of potential for error. Furthermore, it is difficult to “undo” what has been done, since it is difficult to keep track of the source of each file as the number of mods and files in the Data directory increases.
One must take care to read each mod’s documentation to understand exactly what it does and how it does in in at least a very general sense. Why? Because it is important to create a customized Skyrim that suits the tastes of the individual modder. Strictly defined, two mods are compatible if they do not attempt to alter the same game variable. Likewise, two mods that affect the same game variable are strictly defined as incompatible, which is more often termed a conflict. Said variable could be a mesh or a texture as well as a plugin or INI file. Even a game setting affected by a plugin while also being altered by an INI setting or a configuration script represents a conflict. Under the strict definitions of mod compatibility and conflict, many mods are incompatible and thus, have conflicts.
Fortunately, this is usually not really a problem, because most of the time, a conflict is inherently resolved by one mod “winning;” that is, one mod overwrites or overrides the other. For example, two particular versions of a texture file could attempt to occupy the same logical space in the Data\textures directory, in which case the second texture to be written to that space during installation will naturally overwrite the first; however, if one of those texture copies resides in a compressed BSA while the other exists as a “loose file,” then neither will physically overwrite the other upon installation, but rather one will override the other in-game upon execution of Skyrim.
The STEP Solution
One can spend hundreds of hours just searching for mods before actually getting down to the business of installing them. As mods increase in number and complexity and mod creators produce more and more mods that alter game play, interface and settings, the probability of game-crashing conflicts increases. The STEP project takes care of the heavy lifting associated with sifting through thousands of mods and selecting the ones that significantly enhance and improve the vanilla experience without detracting from it with as little cost as possible in terms of performance. Users are able to follow TheCompiler’s detailed, step-by-STEP manual-installation instructions and be confident that all components have been individually and communally tested and the results verified. STEP also facilitates customization by providing details of changes affected by each mod so that the user can choose to omit or change the order of STEP’s’. This cuts down on a vast amount of time and headache dealing with sampling, testing, troubleshooting, etc.
Limitations of STEP
Regardless of the huge time savings, efficiency boost and piece of mind that STEP offers, it is still a large manual process with many, well … steps. It can therefore take a while, and problems can and will occur for many users with increasing frequency as mod numbers and complexity increase, so STEP will only go so far to reduce the job of maintaining a viable setup with each new mod or mod update. In order to allow better scalability of STEP as it evolves, it is necessary to simplify and condense the procedure into more manageable components. Mod organizers in general help in this regard by keeping track of files installed and package installation order. In particular WB enables the most configurable interface for mod management, and is thus the recommended choice for installing, configuring and maintaining the STEP setup with each new alteration in the mod configuration.
Wrye Bash as a Tool for Maintaining STEP
WB is not just simply a mod organizer but much, much more. Like other mod organizers, WB keeps track of mod packages as well as file sources and installation priority; however, WB goes far beyond this, as will be demonstrated throughout the rest of the guide. Set Up Skyrim & Supporting Software
Establish a Clean Skyrim Install
A clean Skyrim install establishes a baseline from which to begin the STEP installation procedure. The simplest way to ensure a clean Skyrim install is to delete all loose files (not directories) from the skyrim\ directory (parent to Data directory), followed by cleaning out all files and directories from the Data directory (Figure 1).
Once complete, open the Steam Libraries view, right click on Skyrim and select [Properties]. Click on the [LOCAL FILES] tab, then click on [VERIFY INTEGRITY OF GAME CACHE...]. This will restore any missing files whilst avoiding the time-consuming and redundant download of the large files listed above. If ther is any uncertainty, uninstall and then reinstall Skyrim from scratch to this point.
Install File-Compression Software
Almost any file-compression software can be used to view the contents of packages. 7-zip is favored by the authors, because it can produce dramatically smaller files than the other formats and it recognizes virtually every compression format. It's also free, open-source, and supports most of the other common formats.
Install & Configure Wrye Bash
Download the Wrye Bash installer as well as the Game Definitions under [updates]. Click the tracker (the small binoculars icon near the bottom of the header) while you are there to keep track of updates. To keep thing simple, just run the installer and select only [Skyrim] as well as the [Wrye Bash [Standalone]] check boxes. Other options exist, but please avoid them at this time unless the reader is willing to support related issues on his/her own. Ensure that the path points to the correct location of your sykrim\ directory and proceed.
- Navigate to the skyrim\ directory.
- IMPORTANT: Merge the contents of the ‘Game Definitions’ archive into this location. (This will place files called 'skyrim.py' and ‘Oblivion.py’ into \Mopy\bash\game\).
- Copy then rename the file 'bash_default.ini' to 'bash.ini,' and place this alongside the former. This INI lets you define many useful things including where Wrye looks for installers. (Be certain to global replace the ‘\Oblivion’ directory references to ‘\Skyrim’ and DO NOT simply do a global replace of ‘Oblivion’ with ‘Skyrim’ or you will break the INI, since certain variable names must remain unchanged even in Skyrim: e.g., ‘sOblivion=’).
- Lastly, go to skyrim\Mopy\templates\ and move 'Bashed Patch, Skyrim.esp' into your Data directory.
Install BOSS
Get BOSS from the Nexus and install according the the instructions provided. You will be launching BOSS from Wrye Bash’s interface going forward.
NOTE: WB-BOSS v2.0+ integration is still pending at the time of this writing.
Install SKSE & Script Dragon
- Download the current release build of SKSE.
- Drop all loose files into skyrim\ (but leave the ‘'src\'’ directory behind)
- Create a text file using Notepad or any other simple text editor and paste the following two lines:
- [Interface]
- EnableContainerCategorization=1
- Under the Data directory, create a folder called ‘'SKSE\'’, save the file as ‘skse.ini’ and drop it into skyrim\Data\SKSE
- Download Script Dragon from the Nexus.
- From the archive, drop bin\dinput8.dll and bin\ScriptDragon.dll into the skyrim\ directory.
Launch Wrye Bash for the First Time
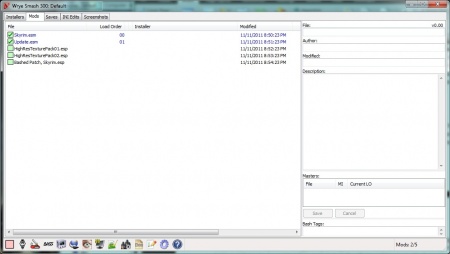
Launch Wrye Bash using the Start Menu shortcut, and WB will open to the Mods Tab, which is where plugins (ESMs & ESPs) are managed (Figure 2). Upon launch, WB creates Skyrim Mods\ beside skyrim\. This is the directory under which WB will look for mod packages among other things; therefore, mod packages should be moved or downloaded directly to Steam\SteamApps\common\Skyrim Mods\Bash Installers\.
NOTE: The application bar along the bottom of the WB window might show shortcuts to helper applications recognized by WB if those apps are already installed to their default locations.
Click the 'Installers' tab. This might invoke a pop-up warning, which happens because the installers tab triggers a refresh that can take quite awhile if lots of mod packages are located in the mods repository (Bash Installers\). If it does, click on ‘Yes,’ and it should load very quickly, as there is nothing yet in the package repository. It should be noted that WB recognizes the contents of both extracted folders (called projects) and archives (called packages); however, it is strongly recommended that installers be kept in archive format as a standard practice, as this is not only a more efficient use of space, but for some reason, it takes WB significantly longer to scan a given project than it does its corresponding package.
BAIN Installers & Package Interpretation
The installers tab contains the package-management interface. Package management is a VERY important aspect of WB, and standards of Wrye BAsh INstaller (aka BAIN package or archive) structure represent the foundation of effectively using BAIN. Unfortunately, not all mod authors pack their mods in a BAIN-ready format, so it is important to understand how to convert to the proper structure. The good news is that BAIN has some flexibility, and usually can translate archives correctly. The following examples illustrate BAIN package interpretation and allude to some effective packing methods.
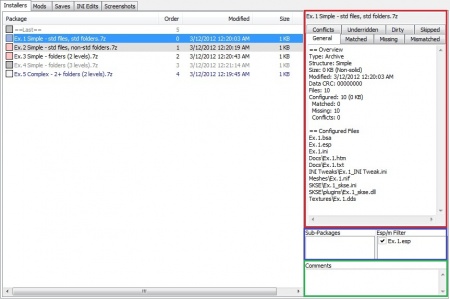
- Clicking on an archive will bring up details about the package in the upper right frame (red outline), as well as any sub-packages or plugins if present just below that (blue outline), followed by a convenient area to type in some comments about the package (green outline).
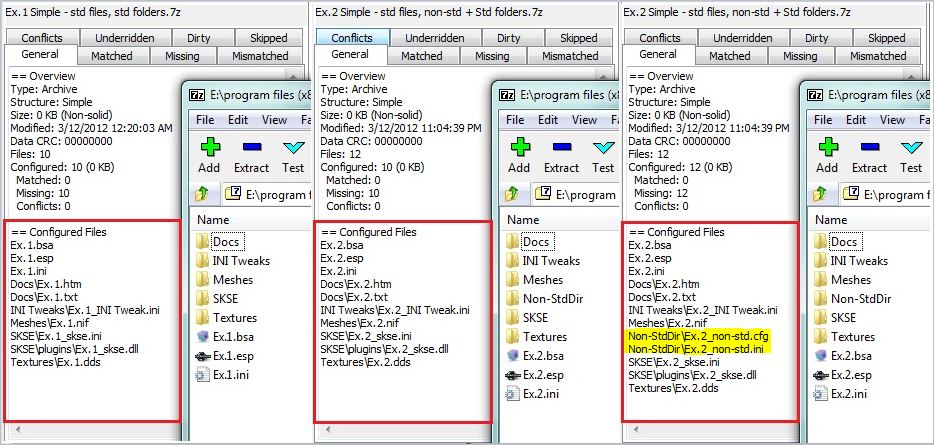
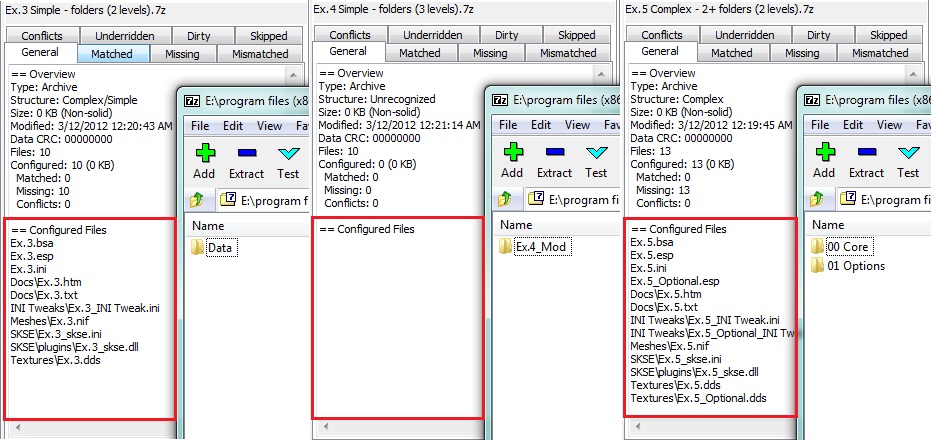
- A closer look at the package details of example packages 1-4 depicted in the package list of Figure 3 reveals further detail:
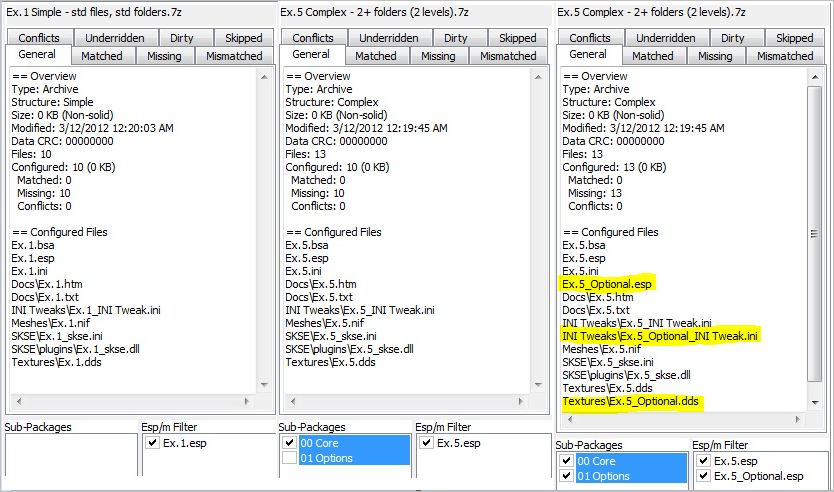
- Plugin filters and sub-packages can be seen just beneath the package details viewer (see blue outline in Figure 3). Any BAIN-ready package selected that contains an ESM or ESP will list them under [Esp/m Filter]. Complex BAIN packages will also list the folder names alphanumerically under [Sup-Packages]. Details in Figure 6 reference the Ex 1 and Ex 5 as in Figures 4 & 5.
| Ex 1. Standard files & folders. All files and directory structure are revealed. WB recognises several typical Skyrim file types and folder names as well as folders installed by WB itself. | Ex 2. Standard files & folders with extra, non-standard folders. There is an extra directory in this archive that is not recognized by WB, because it does not follow a standard naming convention. | Ex 2. Standard files & folders with extra, non-standard folders (revealed). The files that were invisible to WB are detected if [Has Extra Directories] is ticked in the context menu (right click any package to bring up the context menu). |
| Ex 3. Standard files & folders (2 levels). This reveals the exact same contents ad in Ex 1 previously; however, the directory structure includes another level represented by the Data directory. Many mods are packed this way, and WB understands them just fine and will install the package accordingly. | Ex 4. Standard files & folders (3 levels). This is exactly the same as Ex 3, but the Data directory is now beneath yet another parent directory. Unfortunately, WB stops looking for anything more than 2 folders deep at this time. Many mods come packed this way, and were not created by modders that are thoughtful of BAIN. This will need to be extracted and repact according to Ex 1 or Ex 3. | Ex 5. Two folders containing standard files & folders. All preceding examples have been of simple package structure. This is an example of a complex package structure. The contents of 00 Core are exactly the the same as in Ex 4, but there the ‘01 Optional’ folder containing options (note the file names in the example). Complex package structures allow an additional level of organization. |
| Ex 1. Standard files & folders. This is a simple BAIN archive containing a single plugin, which (unlike other files in the archive) must be selected prior to install. | Ex 5. Two folders containing standard files & folders. This is a complex BAIN archive; therefore, it contains two directories as listed in the [Sub-Packages] area, each of which contains recognized files and/or folders as listed in the package details above. As is indicated, selecting the 00 Core sub-package will direct BAIN to install those listed. Selecting also the 01 Options sub-package will add the highlighted optional files. Again, unlike other file types, plugins must be selected to flag specifically for install. |
Installing Mods
Like all tabs in WB, the installers tab has several header elements that can be right clicked to pull up a context menu of useful commands. Left clicking on a given header label will sort the list by that column.
The [Order] column is of particular interest, as this column defines the installation hierarchy. Packages assigned to lower numbers are installed first; thus, files from lower-numbered packages will be overwritten by those from higher numbered packages where there is conflict. Likewise, sub-packages work the same way: those with lower numeric prefixes will appear in the list first and thus, will be installed first, and conflicting files will be overwritten by those with higher numbers (sub-packages are sorted alphanumerically).
Download the Mods
This guide will illustrate in detail how to set up STEP mods by focusing only on the initial texture mods. The same process may be used to set up all subsequent mods.
- Open a web browser and navigate to the STEP site on the Nexus, and download the latest STEP guide (v2.0.1a [Preview #3] at the time of this writing).
- Carefully follow TheCompiler’s (creator of STEP) instructions through STEP 2, Sec. A (Script Utilities).
- Download mod groups 1 through 6 as listed in STEP 2, Sec. B1 (Textures\Graphics) and place each package into your Bash Installers\ directory.
- Click on the WB program title bar or task bar icon to bring it into focus. This will prompt a refresh of the Installers as the newly-added packages are scanned by BAIN, so allow a few minutes for this process to complete.
- Once BAIN finishes there are a couple of different ways to organize the installers such that the STEP install order is honored; however, it is recommended that packages be renamed according to the name given by TheCompiler in the STEP Guide. This allows differentiation according the the numeric prefixes as in the guide and sorting by package.
Prepare BAIN Packages for Installation
Once the files have been downloaded, renamed and sorted by package, BAIN should resemble Figure 8. Packages preceded by a red (simple package), white (complex package) or gray (unrecognized) box are not installed. Before proceeding further, all packages must be made recognizeable to BAIN.
Repack unrecognized archives into BAIN format
- Begin by navigating to Bash Installers\ and unpacking unrecognized packages into projects of same name in same location. Do the same for any packages that need modification according to TheCompiler’s advice.
- Within each project, find the ReadMe and READ IT if available. If it is not, then navigate to the mod’s host site on the Nexus and scan the description. If there is still ambiguity, post a comment to the mod author asking that a ReadMe be provided (this should be a mandatory requirement!).
- Determine which files\folders are of interest, and restructure the projects with reference to Figures 4 & 5 above.
- Even though BAIN will recognize up to two directory levels, it is best-practice to structure the archive with a single directory level as if the archive itself were the Data directory.
- If there are no conflicting options within the package, then it should be packed as simple. Otherwise, pack as complex, and label the sub-package directories such that the default precedes the optional version(s).
- Once the new directory restructure of the project is complete, re-pack the mod into an archive using the same name as the project, but with ‘BAIN’ added to the end of the file name. DO NOT DELETE the original package.


