
Guide:NVIDIA Inspector: Difference between revisions
No edit summary |
m (Text replacement - "{{TOC right" to "{{TOC") |
||
| (227 intermediate revisions by 3 users not shown) | |||
| Line 1: | Line 1: | ||
__NOTITLE__[[Category:Application Guides]] | |||
{{PageTitle|title=Nvidia Inspector|subtitle=A Guide to using Nvidia Inspector|author=The Step Team|forumtid=1194}} | |||
{{clear}} | |||
{{TOC}} | |||
{{fs|1.2em|Suggest first reading: [[Guide:SystemSetupGuide|System Setup Guide]]}} | |||
Nvidia Inspector is a tool created by Orbmu2k. It provides detailed hardware information, much like GPU-Z, from the hardware senors on Nvidia video cards. This sensor information can also be monitored via the included "monitors", which in turn can be logged to a CSV file for later viewing. Inspector also provides simple overclocking tools to control the GPU clock, memory clock, shader clock, voltage, and fan speed of the video card; however, not all of these options will be available to all users. The availability of these tools is dependent upon the video card. | |||
Nvidia Inspector's real gem lies within its driver profile settings (game profiles). Inspector includes over two hundred individual game profiles. Profiles allow user-defined, game-specific settings that will be loaded and used when the game is launched. The settings available here are more extensive than those offered in the Nvidia Control Panel. This gives the ability for better control and finer tweaking on a per-game basis. | |||
Finally, this Guide ''does not'' provide the "gold-standard" of Inspector settings which users simply copy and use. That would be impossible to do with the endless combinations of video cards and system hardware available. This Guide simply provides a breakdown of each of the Inspector dialog menus so users may be better informed about the capabilities of these settings and the applicability to a particular game environment. However, some recommended settings for Skyrim users are mentioned since this Guide was created with Skyrim in mind. | |||
<br/> | |||
<br/> | |||
<br/> | |||
Finally, this Guide does not provide the gold-standard of Inspector settings | |||
= Installation & Setup = | = Installation & Setup = | ||
= | <div style="width: 100%; border-style:solid; border-bottom-width: 2px; border-color:rgb(200,100,20);"></div> | ||
Nvidia Inspector is a standalone application; there is no installation required. Simply download the tool, extract the folder, and run the executable to launch the program. This means it can also be run from USB drives and used on the go. When changing the location of where the program is located or copying it to a new location, be sure to move the entire folder and not just the executable file. Users can download Nvidia Inspector from [https://github.com/Orbmu2k/nvidiaProfileInspector/releases Github for the latest releases]. | |||
<br/> | |||
<br/> | |||
<br/> | |||
= | = Nvidia Inspector Overview = | ||
= | <div style="width: 100%; border-style:solid; border-bottom-width: 2px; border-color:rgb(200,100,20);"></div><br/> | ||
{{GallerySimple|id=overview|width=250|img=Image:InspectorMainScreen.png|caption=Main Window}} | |||
{{GallerySimple|id=overview|width=250|img=Image:InspectorMonitors.png|caption=Monitors}} | |||
{{GallerySimple|id=overview|width=250|img=Image:InspectorProfiles.png|caption=Driver Profile Settings}} | |||
{{GallerySimple|id=overview|width=250|img=Image:InspectorOverclocking.png|caption=Overclocking Pane}} | |||
{{clear}} | |||
=== | === Main Window === | ||
When Inspector first launched, this is the first window that appears. This window contains all the hardware information about the graphics card. There are two buttons on the upper left side. The first button uploads a screenshot of the app to Techpowerup.org. The second button below that will open the hardware monitors. Further down and to the right of the ''Driver Version'' box is a button that opens the game profiles plugin for Inspector. Finally, at the bottom there is a banner to allows donations, a drop-down box to allow switching between multiple GPUs, and a button that will open the Overclocking pane. Clicking the {{ui|Show Overclocking}} button will prompt a warning about overclocking, before the pane opens. | |||
Clicking the Sensor Monitoring button will open | === Monitors === | ||
Clicking the {{ui|Sensor Monitoring}} button will open this screen. Monitors are discussed in the Sensor Monitoring section below. | |||
=== Driver Profile Settings === | |||
Clicking the {{ui|Driver Profile Settings}} (game profiles) button will open this screen. Game profiles are discussed in the Custom Profiles and Settings section below. | |||
=== Overclocking Pane === | |||
Clicking on the {{ui|Show Overclocking}} button and choosing "Yes" to the prompt will open this overclocking pane. Overclocking is discussed in the Overclocking section below. | |||
<br/> | |||
<br/> | |||
<br/> | |||
Clicking on the Show Overclocking button and choosing "Yes" to the prompt will open this overclocking pane. Overclocking is discussed | |||
= Sensor Monitoring = | = Sensor Monitoring = | ||
= | <div style="width: 100%; border-style:solid; border-bottom-width: 2px; border-color:rgb(200,100,20);"></div> | ||
Sensor monitoring can be very helpful when testing hardware stability, performing overclocks, mod testing, or when testing new settings or changes to those settings. Inspector includes | Sensor monitoring can be very helpful when testing hardware stability, performing overclocks, mod testing, or when testing new settings or changes to those settings. Inspector includes 21 different monitors for this purpose. Of these, the most useful are going to be determined by the task the monitors are being used for. | ||
Of these, the most useful are going to be determined by | |||
== Customizing the Monitors == | == Customizing the Monitors == | ||
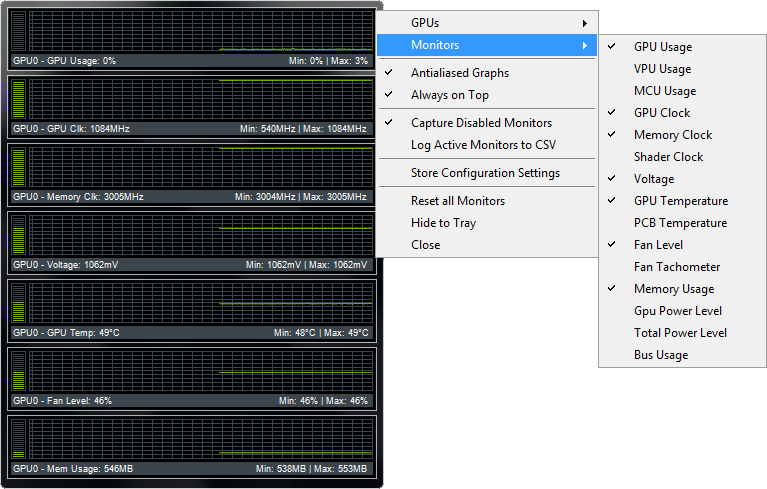
To open the monitors, click on the {{ui|Sensor Monitoring}} button located on the main screen on the upper left side. Once opened, the monitors are defaulted to stay on top of all other windows. To change the monitors simply right-click on the monitor window and hover over '''Monitors'''. The monitors that have a check beside them will be the monitors displayed. Users may display as few as one or all of them. | |||
{{GallerySimple|id=monitors|width=250|img=Image:InspectorMonitors.png}} | |||
{{clear}} | |||
* GPUs | |||
** This allows to users to select which GPU they wish to monitor. Multiple GPUs will be for users running SLI, a second video card as a physics processor, the on-board GPU, etc. | |||
* Monitors | |||
** Provides a list of all the monitors available. | |||
* Antialiased Graphs | |||
** Makes the graphs a bit less jagged. | |||
* Always on Top | |||
** Toggle whether the monitor windows stays on top of other windows or not. | |||
* Capture Disabled Monitors | |||
** Toggles whether to capture all monitor data or just the monitors displayed via the Monitors menu. Enabled by default. | |||
* Log Active Monitors to CSV | |||
** Toggles whether or not to log the active monitors to a CSV file for later viewing of the data. | |||
* Store Configuration Settings | |||
** Selecting this will save the active monitors for the next time Inspector is opened; else, the default set of monitors will appear when Inspected is closed and reopened. | |||
* Reset All Monitors | |||
** Resets the monitors to start fresh. | |||
* Hide to Tray | |||
** Minimizes the monitor window to the system tray. This is useful when monitoring your system over time. | |||
* Close | |||
** Closes the monitor window. | |||
<br/> | |||
<br/> | |||
<br/> | |||
; | = Overclocking = | ||
: | <div style="width: 100%; border-style:solid; border-bottom-width: 2px; border-color:rgb(200,100,20);"></div><br/> | ||
{{alert|type=notice|text=Nvidia Inspector nor Step Modifications can not be held liable for any possible mishaps resulting from overclocking graphics cards. Potential problems resulting from overclocking can include anything from voiding warranties to overheating to bricking the card (rendering it useless), and anything in between. If users decide to overclock their graphic cards, they do so at their own risk. | |||
{{fc|#ddd|''This overclocking overview is meant for informational purposes only and is not an overclocking guide!''}}}}<br/> | |||
Overclocking in Inspector is not unlike overclocking in other third party software. Keep in mind, depending on the video card model, not all overclocking controls will be at available in Inspector. Inspector was not written with overclocking in mind; therefore, if a more powerful and precise option is needed, users should look elsewhere. It's also a good idea to have monitors open when overclocking to monitor the effect of the changes. | |||
To open the Overclocking pane, click the {{ui|Show Overclocking}} button at the bottom of the main screen. A prompt with a warning will appear asking if users are aware of the risk with overclocking. Clicking {{ui|No}} closes the windows. Clicking {{ui|Yes}} will open the overclocking pane. Clicking the {{ui|Show Overclocking}} button again will hide the pane. | |||
== Overclocking Pane Overview == | |||
{{GallerySimple|id=overclocking|width=250|img=Image:InspectorOverclocking.png}} | |||
: | {{clear}} | ||
=== Fan === | |||
The large vertical slider on the left controls the fan speed on the card. By default it is set to '''Auto''' and that is the recommended setting. Changing this could overwrite other third party fan control solutions. To manually set the fan speed, uncheck {{ui|Auto}} and move the slider to the desired position. Then click the {{ui|Set Fan}} button below the slider to lock in the new setting. | |||
{{AlertSmall|type=notice|text=Be aware! Setting the fan speed too low can cause overheating.}} | |||
; | === Performance Level Drop-down === | ||
This is a drop-down menu which allows the selection of various performance levels the Nvidia drivers use. The performance level is normally changed dynamically by the drivers depending on the GPU load. The main levels are P0, P1, P8, and P12; though this may differ depending on the card model. P0 is for high loads such as video gaming, P8 is for loads similar to video acceleration, and P12 is an idle load; when the video card isn't really doing anything. If there are different values, remember that the lower values are higher performance and the higher values are for lower performance. | |||
= | === Unlock Min & Unlock Max === | ||
The frequencies available by default are locked. Clicking {{ui|Unlock Min}} or {{ui|Unlock Max}} will removed these limitations so overclocking to higher frequencies or underclocking to lower frequencies is enabled. Clicking these buttons again will re-lock the frequencies to the card's default. If they are grayed-out, this usually means the card in use has unlocked frequencies by the card's manufacturer. | |||
=== Base Clock Offset === | |||
Measured in megahertz, this changes the frequency of the GPU clock. The buttons below the sliders allows for fine tuning of the frequency. | |||
== | === Memory Clock Offset === | ||
Measured in megahertz, this changes the frequency of the card's VRAM. The buttons below the sliders allows for fine tuning of the frequency. | |||
=== Power and Temperature Target === | |||
These two sliders set the power target and temperate target for the card. The top slider sets the upper power target, which is the power the card will use. The second slider sets the temperature upper target, which is the maximum temperature the card will run at. Checking the '''Priorize Temperature''' box will set the temperature target to take priority over the power target. This is a safety feature to help prevent the card from overheating. If these settings are used, it is highly recommended to check the '''Priorize Temperature''' box. | |||
{{AlertSmall|type=notice|text=Be aware! Setting either of these sliders too high could cause the video card to overheat.}} | |||
== | === Voltage === | ||
Here it is possible to change the voltage to which the video card receives. Changing this setting can destroy the video card! {{fc|warning|'''>>> Use extreme caution if changing the voltage! <<<'''}} | |||
=== Create Clocks Shortcut === | |||
Clicking the {ui|Create Clocks Shortcut}} button will save a shortcut to the desktop with specific, preset clock settings. This means it's possible to have different overclocks for different game profiles or other tasks. Double clicking on one of these shortcuts will adjust the clocks to the preset settings automatically. This eliminates the need to open Inspector to change settings for each game or use. So if a 10% overclock is desired while video encoding, a 25% overclock while gaming, and default settings the rest of the time, all that is required is to make three ''Clock Shortcuts'' with the respected settings and double-click the appropriate shortcut to change between presets. One of these preset can also be loaded at system start-up by simply placing the shortcut in the '''Startup''' folder in the Windows. | |||
=== Apply Defaults === | |||
This reverts any changes back to their driver defaults. | |||
=== Apply Clocks & Voltage === | |||
This applies the clock and voltage settings immediately. | |||
<br/> | |||
<br/> | |||
<br/> | |||
= Driver Profiles and Settings = | |||
<div style="width: 100%; border-style:solid; border-bottom-width: 2px; border-color:rgb(200,100,20);"></div> | |||
Driver Profile Settings or "game profiles" can be opened from the main screen by click the {{ui|Driver Profile Settings}} button located to the right of the Driver Version box. Game profiles are the main attraction with Nvidia Inspector, because these profiles will allow custom driver settings for individual games. The profiles will then be saved and loaded once the game is launched. | |||
What's the difference between the Nvidia Control Panel profiles and Nvidia Inspector profiles?<br/> | |||
Inspector provides a more extensive set of settings and options than the Nvidia Control Panel does. Many of the settings and additional options that are included in Inspector are hidden from the Control Panel, but still exist within the driver. Inspector gives users full control over these hidden settings. | |||
{{GallerySimple|id=profiles|width=250|img=Image:InspectorProfiles.png}} | |||
{{clear}} | |||
=== Loading a Profile === | |||
Hundreds of game profiles are already included in Inspector and there is rarely a need to create a new one. This is because the profiles exist within the graphics drivers, themselves. Whenever Nvidia releases a new driver version, they often come with new or updated profiles. If a new profile is ever needed, create one by clicking the {{ui|Create New Profile}} button on the toolbar of the ''Driver Profile Settings'' window. | |||
To load a game's profile, | |||
# Open the ''Driver Profile Settings'' window. | |||
#* This may prompt a UAC notification. If so, select {{ui|Yes}} to load. | |||
# In the search box on the toolbar, type the name of the game. (e.g The Elder Scrolls V, Fallout, etc.) | |||
#* The search box will provide suggestions based on matched text. | |||
# Click on the game's profile from the suggestion list. | |||
This loads the pre-configured profile for the game selected. If users have already set some settings in the Nvidia Control Panel, those settings will be seen here. If not, the settings will be at their default values. | |||
== | {{alert|type=notice|text= The process is the same for all games, however, ''Skyrim'' is used for the examples below. Users may see a difference in some of the available settings from what is seen in the images below. Various options are available with various Nvidia cards so don't be alarmed if there are extra or missing settings from what is seen below.}} | ||
<br/> | |||
== Compatibility == | |||
This section determines the compatibility for other sections in the profile. Rarely do these settings need to be changed from their defaults. | |||
; Ambient Occlusion compatibility | |||
: Changes how ambient occlusion (AO) is processed and works in the game. | |||
;Antialiasing | ; Antialiasing compatibility | ||
: | : Changes how antialiasing (AA) for ''DirectX 9 and lower'' is processed and works in the game. | ||
;Antialiasing | ; Antialiasing compatibility (DX1x) | ||
: | : Changes how antialiasing (AA) for ''DirectX 10 and higher'' is processed and works in the game. | ||
; Antialiasing Fix | |||
: It's currently unknown what this setting does. | |||
; SLI compatibility bits | |||
: This changes how SLI for ''DirectX 9 and lower'' is processed and works in the game. | |||
; SLI compatibility bits (DX10 + DX11) | |||
: This changes how SLI for ''DirectX 10 and 11'' is processed and works in the game. | |||
; | ; SLI compatibility bits (DX12) | ||
:This | : This changes how SLI for ''DirectX 12'' is processed and works in the game. | ||
== Sync and Refresh == | |||
This section covers everything related to video frames displayed on the monitor that is controllable within the video drivers. | |||
; Frame Rate Limiter | |||
: This is the driver side frame rate limiter. Capping or limiting the frame rate is useful for users with high-end cards or users with 120/144Hz monitors, since it's common for the frame rate fluctuate above and below the monitor's refresh rate. This fluctuating causes choppy graphics and other issues (e.g. running above 60FPS will cause havoc issues in Skyrim). Limiting the frame rate prevents this fluctuation. A general recommendation is to cap the frame rate to 2/3 of the monitor's refresh rates which is measured in hertz. For example, a user with a 120Hz monitor should cap their frame rate to 80FPS. | |||
{{AlertSmall|type=notice|text= {{fc|#ddd|'''Skyrim Users:'''}} It is a general recommendation to cap the frame rate to ~58 FPS to avoid any havok-based issues.}} | |||
; GSYNC - Application Mode | |||
: Information unknown. | |||
; GSYNC - Application Requested State | |||
: Information unknown. | |||
; GSYNC - Application State | |||
: Information unknown. | |||
; GSYNC - Global Feature | |||
: Turns on Nvidia's GSYNC feature for users who have a GSYNC enabled monitor. | |||
; GSYNC - Global Mode | |||
: Sets the global mod in which GSYNC will display. Fullscreen only is the default. | |||
; GSYNC - Indicator Overlay | |||
: Displays an indicator on the screen that GSYNC is enabled. | |||
; Maximum pre-rendered frames | |||
: Maximum pre-rendered frames sets the number of frames the CPU can pre-render before the GPU takes over. Increasing this setting can cause an input delay (in milliseconds) from the mouse and keyboard when set to higher values; however, this will be different for every user. Raising this value can actually improve performance if users experience no input lag or stuttering by doing so. If experimenting with this setting, no harm will come from doing so. When adjusting the value, use the highest value possible where no lag or stuttering is experienced. | |||
; | ; Preferred Refreshrate | ||
: | : Information unknown | ||
; | ; Triple buffering | ||
: | : When vsync is enabled, triple buffering improves performance between the frame rate and monitor refresh rate, when the frame rate is below that of the monitor's refresh rate. There is no drawback from using this feature. This setting does nothing when vsync is disabled. | ||
; | ; Vertical Sync | ||
: | : Users should leave this setting on '''Use the 3D application setting''' in most circumstances, unless playing an older game that does not have native vsync. In such cases, users should use the, '''Force On''' option. | ||
; | ; Vertical Sync Smooth AFR behavior | ||
: | : This supposedly smooths out the stutter from movement and panning when vsync is enabled. Some users report smoother camera panning with this setting turned on, therefore, users experiencing some stuttering when moving the camera from side to side may want to enable this to test if it helps reduce the issue. | ||
; | ; Vertical Sync Tear Control | ||
: | : This controls the type of vsync used for the game. Leaving this set to the default option is best in most cases. | ||
== Antialiasing == | |||
This section deals with everything antialiasing, which is controllable within the drivers. | |||
{{alert|type=notice|text={{fc|#ddd|'''ENB Users:'''}} | |||
: | |||
Most up-to-date versions of ENBSeries no longer supports hardware AA. Users planing on using an ENB preset with their game will need to disable AA in the drivers. Some ENBSeries versions offer edge antialiasing, which is similar to MSAA, but with a FXAA-like blur. ENBSeries users looking for a superior AA solution should use [[Guide:ENB|SMAA Injector]].}} | |||
; | ; Antialiasing - Behavior Flags | ||
:This | : This tells the driver how to use antialiasing. Users would not normally change this from the default. | ||
; | ; Antialiasing - Gamma correction | ||
: | : The default setting is '''On'''. Gamma correction can improve colors in a game in come circumstances. | ||
; Antialiasing - Line gamma | |||
: Information unknown | |||
; Antialiasing - Mode | |||
: This setting tells the drivers how to process AA. The '''Application-controlled''' option allows the game to control how the AA is processed. The '''Override any application setting''' option will override the game's AA and force the AA method that is specified below in ''Antialiasing - Setting''. The '''Enhance the application setting''' will process the AA method specified below in ''Antialiasing - Setting'' in addition to the game's default AA. This last method can be performance intensive since two AA passes are performed before the frame is displayed on the monitor. SMAA users will want to set this to '''Application-controlled'''. | |||
; Antialiasing - Setting | |||
: This setting changes the method or type of AA used when either '''Override any application setting''' or '''Enhance the application setting''' is selected in ''Antialiasing - Mode'' above. SMAA users will want to set this to '''Application-controlled / Off'''. | |||
; Antialiasing - Transparency Multisampling | |||
: Transparency antialiasing provides AA for transparent textures. This is for objects like fences, foliage, trees, and water. This setting is for multisampling. If transparency AA is desired, consider using Supersampling (below,) since it's higher quality at about the same performance cost. | |||
; Antialiasing - Transparency Supersampling | |||
: Transparency antialiasing provides AA for transparent textures. This is for objects like fences, foliage, trees, and water. This setting is for supersampling instead of multisampling. Only use one or the other. If used, '''[2x Supersampling]''' is recommended as the minimum in most cases; however, adjust according to the performance/quality desired. Higher values come at more of a performance cost. ''Sparse Grid Supersampling'' is often better quality. | |||
This | ; Enable Maxwell sample interleaving (MFAA) | ||
: This turns enables/disables Multi-Frame Sampled Anti-Aliasing (MFAA) and sets the quality of the setting. This is only available on Maxwell-based cards. MFAA is similar to TXAA, but is only implemented in a limited number of games by Nvidia (27 at the time of this writing). The idea of MFAA is to offer good antialiasing that has less impact on performance, providing higher frame rates for smoother gameplay. 4xMFAA would, in theory, be around the same performance hit as 2x MSAA but offers closer to 4xMSAA quality (or a little better). | |||
; | ; NVIDIA Predefined FXAA Usage | ||
: | : This setting allows or disallows FXAA usage by the game. FXAA is a fast AA method. Although it works, it also softens the textures and hazes the scene so some texture sharpness is lost, which looks like a slight blur. | ||
; | ; Toggle FXAA Indicator on or off | ||
: | : Setting to '''On''' will display an indicator on the screen telling the user if FXAA is enabled or not. | ||
; | ; Toggle FXAA on or off | ||
: | : This will force FXAA on or off. If FXAA is desired, it's recommended to use a FXAA injector instead. RCRN includes a very nice FXAA injector which is extremely light on performance. | ||
== Texture Filtering == | |||
This section covers all the settings for texture processing. | |||
== | |||
; | ; Anisotropic filtering mode | ||
: | : Anisotropic filtering is a texture filtering technique that improves clarity of textures when those textures are viewed at angles, such as when walking down a path or viewing water from the shore. This setting defines its use. | ||
; | ; Anisotropic filtering setting | ||
: | : This controls the amount the textures are filtered. Use the highest setting possible, however for older or weaker systems a lower setting can be used for a very slight performance gain. Higher values may cause texture shimmering in mid to long range texture LODs in some games. If this happens, adjusting the LOD Bias (below) can help to remedy the issue. | ||
{{AlertSmall|type=notice|text=ENBoost users should ensure the ''Anisotropic filtering setting'' is off and set '''''ForceAnisotropicFiltering''''' is set to ''true'' in the ''enblocal.ini'' file.}} | |||
; | ; Prevent Anisotropic filtering | ||
: | : This will override the profile used for anisotropic filtering. | ||
;Texture filtering - | ; Texture filtering - Anisotropic filtering optimization | ||
: | : Runs optimized AF at the potential cost of image quality. | ||
;Texture filtering - | ; Texture filtering - Anisotropic sampling optimization | ||
: | : This setting is only used if the Texture Filtering - Quality setting (below) is not set to High Quality. If enabled, it limits the number of samples that Anisotropic Filtering uses. This "optimized texture sampling" is suppose to have better performance, but it often results in slightly lower quality results or produces shimmering in textures. Real world results are, most often, not noticeable for either performance nor quality. | ||
;Texture filtering - | ; Texture filtering - Driver Controlled LOD Bias | ||
: | : This will turn the driver's control of the LOD Bias on or off. If needing to adjust the LOD Bias (below), this setting will need to be set to '''On'''. | ||
== | ; Texture filtering - LOD Bias | ||
{{AlertSmall|type=notice|text= There are two settings for LOD Bias. "LOD Bias (DX)", which is for DirectX games, and "LOD Bias (OGL)", which is for OpenGL games. Use the LOD Bias which is for the game's use of DirectX or OpenGL (DirectX is most common).}} | |||
''' | : LOD Bias reduces the quality of textures as distance grows from the viewpoint to those textures. Setting this to a lower value will increase distant texture detail, however, this comes at a performance cost and lowering the value could also cause glitches such as texture shimmering. If a high anisotropic filtering setting is causing texture shimming (known as Z-fighting), then raising this value will make the distant textures more blurry and help to reduce the shimmering. It's best to leave it set to default if possible; '''+0.0000'''. | ||
''' | ; Texture filtering - Negative LOD bias | ||
: This allows negative LOD Bias values, which sharpen distant textures. If using anisotropic filtering, it is best to set this value to '''Allow'''. The Clamp option is no longer supported by Nvidia, even though it still appears in Inspector. | |||
; Texture filtering - Quality | |||
: This controls the quality of the texture filtering. '''High Quality''' is best the quality, but with the highest performance impact. Likewise, '''High Performance''' is the best performance, but with the lowest image quality. For real-world use, the performance difference is about 1% even on weaker systems with little to no discernible difference. | |||
; Texture filtering - Trilinear optimization | |||
: This setting is only adjustable if the ''Texture Filtering - Quality'' setting (above) is not set to '''High Quality''' and is only applicable to DirectX games. If enabled, this setting will substitute Trilinear filtering with Bilinear filtering, where the software thinks trilinear is not necessary. This can result in lower quality filtering on textures. It's is recommend to be set to '''Off''' for the best image quality, or whenever AF is in use. | |||
== Common == | |||
The Common header is where users will find the rest of the settings that don't really fit into any other areas. | |||
;Ambient Occlusion | ; Ambient Occlusion setting | ||
: | : This setting forces the driver-side AO on or off. Ambient occlusion (AO) is a lighting technique that determines when certain pixels are blocked from the environmental light by nearby geometry (such as corners), in which case, its brightness value is reduced creating a shadowing effect. This provides much richer, more realistic shadowing in-game. However, AO can be very performance heavy. | ||
; | ; Ambient Occlusion usage | ||
: | : This determines the drivers usage of Ambient Occlusion (AO). If ''Ambient Occlusion setting'' (above) is set to anything other than Off, then this setting should be set to the default setting for the game profile being edited. If Ambient Occlusion setting is set to '''Off''' and another method of AO will be used instead (the the game's own built-in AO), then this setting should be set to '''Enabled'''. Else, if Ambient Occlusion isn't used at all due to the performance loss it come with, this setting should be set to '''Disabled'''. | ||
; | ; Extension limit | ||
:This is | : This setting is only for use with OpenGL games and can cause crashes in DirectX games. It is normally left at its default setting. | ||
; | ; Multi-display/mixed-GPU acceleration | ||
: | : This is another setting only used for OpenGL games. The setting tells OpenGL games how to handle both mult-display monitors and multi GPU systems. If only one monitor is used for gaming, use the '''Single display performance mode'''. If multiple monitors are used for gaming, use the '''Multi display performance mode'''. If multiple monitors are used and some issues arise with the previous settings use the '''Compatibility performance mode'''. OpenGL games are not very common anymore so this setting is not likely to be used. | ||
; | ; OpenGL - Version Override | ||
:This is | : This setting is only for use with OpenGL games and overrides the version of OpenGL used for the game. It is normally left at its default setting. | ||
;Power management mode | ; Power management mode | ||
:This should be left on it's default | : This should be left on it's default, '''Adaptive''', which ensures the graphics card changes its speed and power usage according to the load it's under. Users who have the newest GTX 10 series cards or higher may see a new setting, '''Optimal Power''', which causes the GPU to not render any frames when nothing is changing on the screen. GTX 10 series or higher users should use this new setting instead. '''Per maximum performance''' should only be used for troubleshooting purposes as it forces the GPU to run at maximum speeds. However, this can reduce stutter in some games to provide a smoothing gaming experience. | ||
{{AlertSmall|type=notice|text=Users should be aware in some situations when the '''Per maximum performance''' option is used, the GPU remains in its maximum power state even when the game is closed. Be cautions when using this option as it will decrease the life of the video card when left in this power state 24/7.}} | |||
; | ; Shadercache | ||
: | : Released with driver version 337.88, Shader Cache saves compiled shaders to a cache on your hard drive. This allows the shader to simply be recalled from the hard disk the next time it is required, potentially reducing load times and CPU usage. | ||
; | ; Show PhysX Visual Indicator | ||
: | : Setting this to '''On''' will show an indicator on the screen for when PhysX is on or off. | ||
; | ; Thread optimization | ||
:This | : This setting controls the use of multithreaded optimization for games on systems with multiple cores and/or Hyper-threaded CPUs. By allowing the driver to offload certain GPU-related processing tasks as separate threads on available CPU cores, performance can potentially be improved. Some older games can have issues with this setting. If this is experienced users should set this to '''Off''' for those game profiles. Otherwise, it is recommended to leave this set to '''Auto'''. | ||
== Other Profile Sections == | |||
The remaining of the sections within the Profiles are mainly specific to the system and rarely require being changed. Users can research these settings on their own as they are not covered in this Guide. | |||
<br/> | |||
<br/> | |||
<br/> | |||
= Troubleshooting = | = Troubleshooting = | ||
<div style="width: 100%; border-style:solid; border-bottom-width: 2px; border-color:rgb(200,100,20);"></div> | |||
There's not much for troubleshooting currently. Troubleshooting will be added over time as issues arise in the forums. | |||
= | ===== Transparent Textures ===== | ||
:If textures are displayed as transparent which should not be transparent, this could be caused by ''Sparse Grid Supersampling'' or ''Transparency Multisampling''. To fix this issue set ''Antialiasing - Transparency Multisampling'' to {{ui|Disabled}}. Users can also switch ''Antialiasing - Transparency Supersampling'' to {{ui|Supersampling}} instead of {{ui|Sparse Grid Supersampling}}. | |||
==== Transparent Textures ==== | |||
If | |||
===== SSAO from ENB not rendering ===== | |||
:Some NVIDIA cards (like the GTX 560 Ti) ceased rendering SSAO outdoors in Skyrim after the official 1.5.24 patch. The problem hasn’t been resolved, but NVIDIA is aware of it. For now, users can temporarily switch to ''Oblivion'' or ''Fallout 3'' compatibility to get back SSAO in exteriors. | |||
Latest revision as of 21:13, July 25, 2021

Suggest first reading: System Setup Guide
Nvidia Inspector is a tool created by Orbmu2k. It provides detailed hardware information, much like GPU-Z, from the hardware senors on Nvidia video cards. This sensor information can also be monitored via the included "monitors", which in turn can be logged to a CSV file for later viewing. Inspector also provides simple overclocking tools to control the GPU clock, memory clock, shader clock, voltage, and fan speed of the video card; however, not all of these options will be available to all users. The availability of these tools is dependent upon the video card.
Nvidia Inspector's real gem lies within its driver profile settings (game profiles). Inspector includes over two hundred individual game profiles. Profiles allow user-defined, game-specific settings that will be loaded and used when the game is launched. The settings available here are more extensive than those offered in the Nvidia Control Panel. This gives the ability for better control and finer tweaking on a per-game basis.
Finally, this Guide does not provide the "gold-standard" of Inspector settings which users simply copy and use. That would be impossible to do with the endless combinations of video cards and system hardware available. This Guide simply provides a breakdown of each of the Inspector dialog menus so users may be better informed about the capabilities of these settings and the applicability to a particular game environment. However, some recommended settings for Skyrim users are mentioned since this Guide was created with Skyrim in mind.
Installation & Setup[edit | edit source]
Nvidia Inspector is a standalone application; there is no installation required. Simply download the tool, extract the folder, and run the executable to launch the program. This means it can also be run from USB drives and used on the go. When changing the location of where the program is located or copying it to a new location, be sure to move the entire folder and not just the executable file. Users can download Nvidia Inspector from Github for the latest releases.
Nvidia Inspector Overview[edit | edit source]

Main Window[edit | edit source]
When Inspector first launched, this is the first window that appears. This window contains all the hardware information about the graphics card. There are two buttons on the upper left side. The first button uploads a screenshot of the app to Techpowerup.org. The second button below that will open the hardware monitors. Further down and to the right of the Driver Version box is a button that opens the game profiles plugin for Inspector. Finally, at the bottom there is a banner to allows donations, a drop-down box to allow switching between multiple GPUs, and a button that will open the Overclocking pane. Clicking the [Show Overclocking] button will prompt a warning about overclocking, before the pane opens.
Monitors[edit | edit source]
Clicking the [Sensor Monitoring] button will open this screen. Monitors are discussed in the Sensor Monitoring section below.
Driver Profile Settings[edit | edit source]
Clicking the [Driver Profile Settings] (game profiles) button will open this screen. Game profiles are discussed in the Custom Profiles and Settings section below.
Overclocking Pane[edit | edit source]
Clicking on the [Show Overclocking] button and choosing "Yes" to the prompt will open this overclocking pane. Overclocking is discussed in the Overclocking section below.
Sensor Monitoring[edit | edit source]
Sensor monitoring can be very helpful when testing hardware stability, performing overclocks, mod testing, or when testing new settings or changes to those settings. Inspector includes 21 different monitors for this purpose. Of these, the most useful are going to be determined by the task the monitors are being used for.
Customizing the Monitors[edit | edit source]
To open the monitors, click on the [Sensor Monitoring] button located on the main screen on the upper left side. Once opened, the monitors are defaulted to stay on top of all other windows. To change the monitors simply right-click on the monitor window and hover over Monitors. The monitors that have a check beside them will be the monitors displayed. Users may display as few as one or all of them.
- GPUs
- This allows to users to select which GPU they wish to monitor. Multiple GPUs will be for users running SLI, a second video card as a physics processor, the on-board GPU, etc.
- Monitors
- Provides a list of all the monitors available.
- Antialiased Graphs
- Makes the graphs a bit less jagged.
- Always on Top
- Toggle whether the monitor windows stays on top of other windows or not.
- Capture Disabled Monitors
- Toggles whether to capture all monitor data or just the monitors displayed via the Monitors menu. Enabled by default.
- Log Active Monitors to CSV
- Toggles whether or not to log the active monitors to a CSV file for later viewing of the data.
- Store Configuration Settings
- Selecting this will save the active monitors for the next time Inspector is opened; else, the default set of monitors will appear when Inspected is closed and reopened.
- Reset All Monitors
- Resets the monitors to start fresh.
- Hide to Tray
- Minimizes the monitor window to the system tray. This is useful when monitoring your system over time.
- Close
- Closes the monitor window.
Overclocking[edit | edit source]
NOTE
Nvidia Inspector nor Step Modifications can not be held liable for any possible mishaps resulting from overclocking graphics cards. Potential problems resulting from overclocking can include anything from voiding warranties to overheating to bricking the card (rendering it useless), and anything in between. If users decide to overclock their graphic cards, they do so at their own risk.
This overclocking overview is meant for informational purposes only and is not an overclocking guide!
Overclocking in Inspector is not unlike overclocking in other third party software. Keep in mind, depending on the video card model, not all overclocking controls will be at available in Inspector. Inspector was not written with overclocking in mind; therefore, if a more powerful and precise option is needed, users should look elsewhere. It's also a good idea to have monitors open when overclocking to monitor the effect of the changes.
To open the Overclocking pane, click the [Show Overclocking] button at the bottom of the main screen. A prompt with a warning will appear asking if users are aware of the risk with overclocking. Clicking [No] closes the windows. Clicking [Yes] will open the overclocking pane. Clicking the [Show Overclocking] button again will hide the pane.
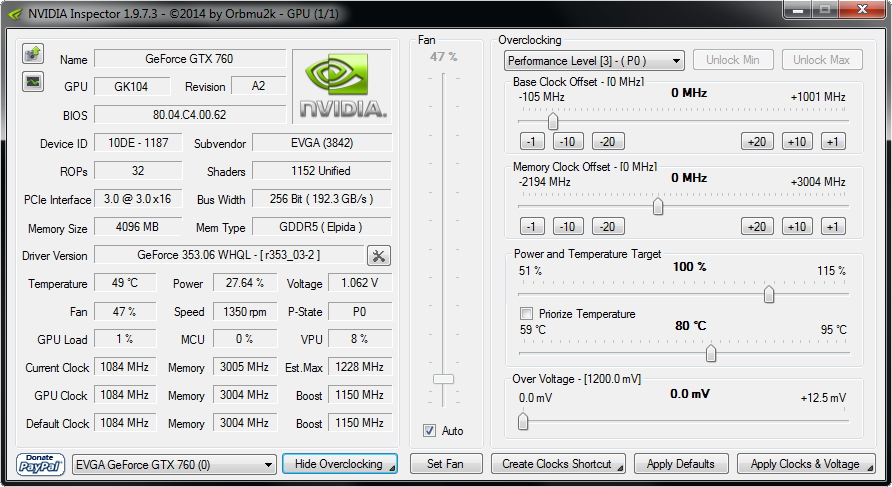
Overclocking Pane Overview[edit | edit source]
Fan[edit | edit source]
The large vertical slider on the left controls the fan speed on the card. By default it is set to Auto and that is the recommended setting. Changing this could overwrite other third party fan control solutions. To manually set the fan speed, uncheck [Auto] and move the slider to the desired position. Then click the [Set Fan] button below the slider to lock in the new setting.
Performance Level Drop-down[edit | edit source]
This is a drop-down menu which allows the selection of various performance levels the Nvidia drivers use. The performance level is normally changed dynamically by the drivers depending on the GPU load. The main levels are P0, P1, P8, and P12; though this may differ depending on the card model. P0 is for high loads such as video gaming, P8 is for loads similar to video acceleration, and P12 is an idle load; when the video card isn't really doing anything. If there are different values, remember that the lower values are higher performance and the higher values are for lower performance.
Unlock Min & Unlock Max[edit | edit source]
The frequencies available by default are locked. Clicking [Unlock Min] or [Unlock Max] will removed these limitations so overclocking to higher frequencies or underclocking to lower frequencies is enabled. Clicking these buttons again will re-lock the frequencies to the card's default. If they are grayed-out, this usually means the card in use has unlocked frequencies by the card's manufacturer.
Base Clock Offset[edit | edit source]
Measured in megahertz, this changes the frequency of the GPU clock. The buttons below the sliders allows for fine tuning of the frequency.
Memory Clock Offset[edit | edit source]
Measured in megahertz, this changes the frequency of the card's VRAM. The buttons below the sliders allows for fine tuning of the frequency.
Power and Temperature Target[edit | edit source]
These two sliders set the power target and temperate target for the card. The top slider sets the upper power target, which is the power the card will use. The second slider sets the temperature upper target, which is the maximum temperature the card will run at. Checking the Priorize Temperature box will set the temperature target to take priority over the power target. This is a safety feature to help prevent the card from overheating. If these settings are used, it is highly recommended to check the Priorize Temperature box.
Voltage[edit | edit source]
Here it is possible to change the voltage to which the video card receives. Changing this setting can destroy the video card! >>> Use extreme caution if changing the voltage! <<<
Create Clocks Shortcut[edit | edit source]
Clicking the {ui|Create Clocks Shortcut}} button will save a shortcut to the desktop with specific, preset clock settings. This means it's possible to have different overclocks for different game profiles or other tasks. Double clicking on one of these shortcuts will adjust the clocks to the preset settings automatically. This eliminates the need to open Inspector to change settings for each game or use. So if a 10% overclock is desired while video encoding, a 25% overclock while gaming, and default settings the rest of the time, all that is required is to make three Clock Shortcuts with the respected settings and double-click the appropriate shortcut to change between presets. One of these preset can also be loaded at system start-up by simply placing the shortcut in the Startup folder in the Windows.
Apply Defaults[edit | edit source]
This reverts any changes back to their driver defaults.
Apply Clocks & Voltage[edit | edit source]
This applies the clock and voltage settings immediately.
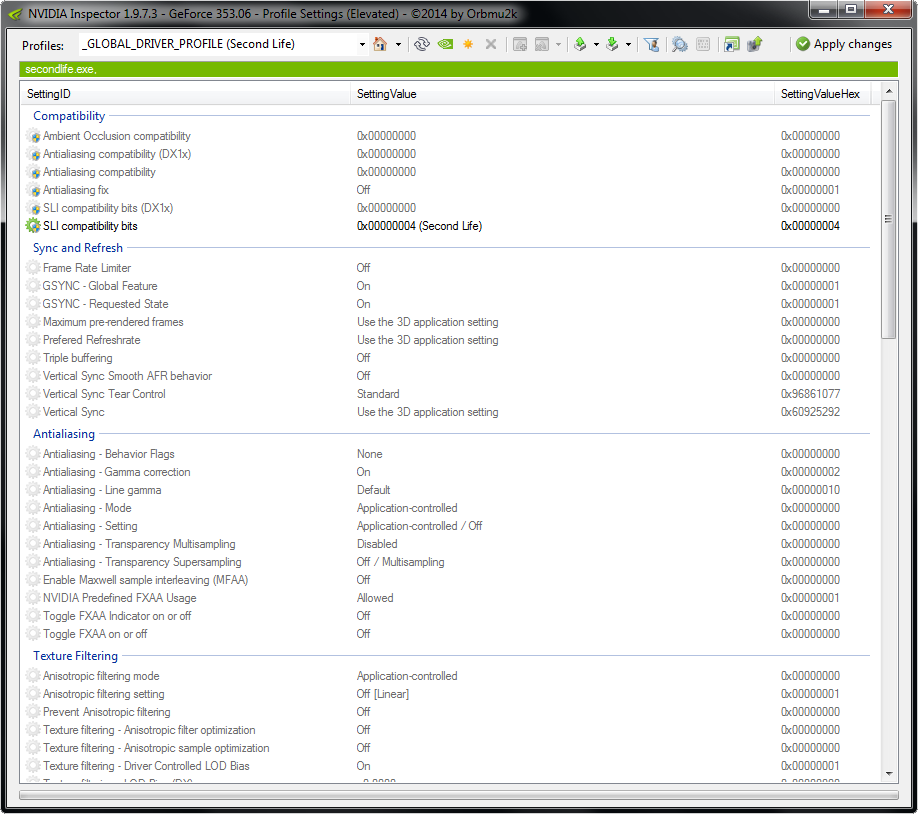
Driver Profiles and Settings[edit | edit source]
Driver Profile Settings or "game profiles" can be opened from the main screen by click the [Driver Profile Settings] button located to the right of the Driver Version box. Game profiles are the main attraction with Nvidia Inspector, because these profiles will allow custom driver settings for individual games. The profiles will then be saved and loaded once the game is launched.
What's the difference between the Nvidia Control Panel profiles and Nvidia Inspector profiles?
Inspector provides a more extensive set of settings and options than the Nvidia Control Panel does. Many of the settings and additional options that are included in Inspector are hidden from the Control Panel, but still exist within the driver. Inspector gives users full control over these hidden settings.
Loading a Profile[edit | edit source]
Hundreds of game profiles are already included in Inspector and there is rarely a need to create a new one. This is because the profiles exist within the graphics drivers, themselves. Whenever Nvidia releases a new driver version, they often come with new or updated profiles. If a new profile is ever needed, create one by clicking the [Create New Profile] button on the toolbar of the Driver Profile Settings window.
To load a game's profile,
- Open the Driver Profile Settings window.
- This may prompt a UAC notification. If so, select [Yes] to load.
- In the search box on the toolbar, type the name of the game. (e.g The Elder Scrolls V, Fallout, etc.)
- The search box will provide suggestions based on matched text.
- Click on the game's profile from the suggestion list.
This loads the pre-configured profile for the game selected. If users have already set some settings in the Nvidia Control Panel, those settings will be seen here. If not, the settings will be at their default values.
NOTE
The process is the same for all games, however, Skyrim is used for the examples below. Users may see a difference in some of the available settings from what is seen in the images below. Various options are available with various Nvidia cards so don't be alarmed if there are extra or missing settings from what is seen below.
Compatibility[edit | edit source]
This section determines the compatibility for other sections in the profile. Rarely do these settings need to be changed from their defaults.
- Ambient Occlusion compatibility
- Changes how ambient occlusion (AO) is processed and works in the game.
- Antialiasing compatibility
- Changes how antialiasing (AA) for DirectX 9 and lower is processed and works in the game.
- Antialiasing compatibility (DX1x)
- Changes how antialiasing (AA) for DirectX 10 and higher is processed and works in the game.
- Antialiasing Fix
- It's currently unknown what this setting does.
- SLI compatibility bits
- This changes how SLI for DirectX 9 and lower is processed and works in the game.
- SLI compatibility bits (DX10 + DX11)
- This changes how SLI for DirectX 10 and 11 is processed and works in the game.
- SLI compatibility bits (DX12)
- This changes how SLI for DirectX 12 is processed and works in the game.
Sync and Refresh[edit | edit source]
This section covers everything related to video frames displayed on the monitor that is controllable within the video drivers.
- Frame Rate Limiter
- This is the driver side frame rate limiter. Capping or limiting the frame rate is useful for users with high-end cards or users with 120/144Hz monitors, since it's common for the frame rate fluctuate above and below the monitor's refresh rate. This fluctuating causes choppy graphics and other issues (e.g. running above 60FPS will cause havoc issues in Skyrim). Limiting the frame rate prevents this fluctuation. A general recommendation is to cap the frame rate to 2/3 of the monitor's refresh rates which is measured in hertz. For example, a user with a 120Hz monitor should cap their frame rate to 80FPS.
- GSYNC - Application Mode
- Information unknown.
- GSYNC - Application Requested State
- Information unknown.
- GSYNC - Application State
- Information unknown.
- GSYNC - Global Feature
- Turns on Nvidia's GSYNC feature for users who have a GSYNC enabled monitor.
- GSYNC - Global Mode
- Sets the global mod in which GSYNC will display. Fullscreen only is the default.
- GSYNC - Indicator Overlay
- Displays an indicator on the screen that GSYNC is enabled.
- Maximum pre-rendered frames
- Maximum pre-rendered frames sets the number of frames the CPU can pre-render before the GPU takes over. Increasing this setting can cause an input delay (in milliseconds) from the mouse and keyboard when set to higher values; however, this will be different for every user. Raising this value can actually improve performance if users experience no input lag or stuttering by doing so. If experimenting with this setting, no harm will come from doing so. When adjusting the value, use the highest value possible where no lag or stuttering is experienced.
- Preferred Refreshrate
- Information unknown
- Triple buffering
- When vsync is enabled, triple buffering improves performance between the frame rate and monitor refresh rate, when the frame rate is below that of the monitor's refresh rate. There is no drawback from using this feature. This setting does nothing when vsync is disabled.
- Vertical Sync
- Users should leave this setting on Use the 3D application setting in most circumstances, unless playing an older game that does not have native vsync. In such cases, users should use the, Force On option.
- Vertical Sync Smooth AFR behavior
- This supposedly smooths out the stutter from movement and panning when vsync is enabled. Some users report smoother camera panning with this setting turned on, therefore, users experiencing some stuttering when moving the camera from side to side may want to enable this to test if it helps reduce the issue.
- Vertical Sync Tear Control
- This controls the type of vsync used for the game. Leaving this set to the default option is best in most cases.
Antialiasing[edit | edit source]
This section deals with everything antialiasing, which is controllable within the drivers.
NOTE
ENB Users:
Most up-to-date versions of ENBSeries no longer supports hardware AA. Users planing on using an ENB preset with their game will need to disable AA in the drivers. Some ENBSeries versions offer edge antialiasing, which is similar to MSAA, but with a FXAA-like blur. ENBSeries users looking for a superior AA solution should use SMAA Injector.- Antialiasing - Behavior Flags
- This tells the driver how to use antialiasing. Users would not normally change this from the default.
- Antialiasing - Gamma correction
- The default setting is On. Gamma correction can improve colors in a game in come circumstances.
- Antialiasing - Line gamma
- Information unknown
- Antialiasing - Mode
- This setting tells the drivers how to process AA. The Application-controlled option allows the game to control how the AA is processed. The Override any application setting option will override the game's AA and force the AA method that is specified below in Antialiasing - Setting. The Enhance the application setting will process the AA method specified below in Antialiasing - Setting in addition to the game's default AA. This last method can be performance intensive since two AA passes are performed before the frame is displayed on the monitor. SMAA users will want to set this to Application-controlled.
- Antialiasing - Setting
- This setting changes the method or type of AA used when either Override any application setting or Enhance the application setting is selected in Antialiasing - Mode above. SMAA users will want to set this to Application-controlled / Off.
- Antialiasing - Transparency Multisampling
- Transparency antialiasing provides AA for transparent textures. This is for objects like fences, foliage, trees, and water. This setting is for multisampling. If transparency AA is desired, consider using Supersampling (below,) since it's higher quality at about the same performance cost.
- Antialiasing - Transparency Supersampling
- Transparency antialiasing provides AA for transparent textures. This is for objects like fences, foliage, trees, and water. This setting is for supersampling instead of multisampling. Only use one or the other. If used, [2x Supersampling] is recommended as the minimum in most cases; however, adjust according to the performance/quality desired. Higher values come at more of a performance cost. Sparse Grid Supersampling is often better quality.
- Enable Maxwell sample interleaving (MFAA)
- This turns enables/disables Multi-Frame Sampled Anti-Aliasing (MFAA) and sets the quality of the setting. This is only available on Maxwell-based cards. MFAA is similar to TXAA, but is only implemented in a limited number of games by Nvidia (27 at the time of this writing). The idea of MFAA is to offer good antialiasing that has less impact on performance, providing higher frame rates for smoother gameplay. 4xMFAA would, in theory, be around the same performance hit as 2x MSAA but offers closer to 4xMSAA quality (or a little better).
- NVIDIA Predefined FXAA Usage
- This setting allows or disallows FXAA usage by the game. FXAA is a fast AA method. Although it works, it also softens the textures and hazes the scene so some texture sharpness is lost, which looks like a slight blur.
- Toggle FXAA Indicator on or off
- Setting to On will display an indicator on the screen telling the user if FXAA is enabled or not.
- Toggle FXAA on or off
- This will force FXAA on or off. If FXAA is desired, it's recommended to use a FXAA injector instead. RCRN includes a very nice FXAA injector which is extremely light on performance.
Texture Filtering[edit | edit source]
This section covers all the settings for texture processing.
- Anisotropic filtering mode
- Anisotropic filtering is a texture filtering technique that improves clarity of textures when those textures are viewed at angles, such as when walking down a path or viewing water from the shore. This setting defines its use.
- Anisotropic filtering setting
- This controls the amount the textures are filtered. Use the highest setting possible, however for older or weaker systems a lower setting can be used for a very slight performance gain. Higher values may cause texture shimmering in mid to long range texture LODs in some games. If this happens, adjusting the LOD Bias (below) can help to remedy the issue.
- Prevent Anisotropic filtering
- This will override the profile used for anisotropic filtering.
- Texture filtering - Anisotropic filtering optimization
- Runs optimized AF at the potential cost of image quality.
- Texture filtering - Anisotropic sampling optimization
- This setting is only used if the Texture Filtering - Quality setting (below) is not set to High Quality. If enabled, it limits the number of samples that Anisotropic Filtering uses. This "optimized texture sampling" is suppose to have better performance, but it often results in slightly lower quality results or produces shimmering in textures. Real world results are, most often, not noticeable for either performance nor quality.
- Texture filtering - Driver Controlled LOD Bias
- This will turn the driver's control of the LOD Bias on or off. If needing to adjust the LOD Bias (below), this setting will need to be set to On.
- Texture filtering - LOD Bias
- LOD Bias reduces the quality of textures as distance grows from the viewpoint to those textures. Setting this to a lower value will increase distant texture detail, however, this comes at a performance cost and lowering the value could also cause glitches such as texture shimmering. If a high anisotropic filtering setting is causing texture shimming (known as Z-fighting), then raising this value will make the distant textures more blurry and help to reduce the shimmering. It's best to leave it set to default if possible; +0.0000.
- Texture filtering - Negative LOD bias
- This allows negative LOD Bias values, which sharpen distant textures. If using anisotropic filtering, it is best to set this value to Allow. The Clamp option is no longer supported by Nvidia, even though it still appears in Inspector.
- Texture filtering - Quality
- This controls the quality of the texture filtering. High Quality is best the quality, but with the highest performance impact. Likewise, High Performance is the best performance, but with the lowest image quality. For real-world use, the performance difference is about 1% even on weaker systems with little to no discernible difference.
- Texture filtering - Trilinear optimization
- This setting is only adjustable if the Texture Filtering - Quality setting (above) is not set to High Quality and is only applicable to DirectX games. If enabled, this setting will substitute Trilinear filtering with Bilinear filtering, where the software thinks trilinear is not necessary. This can result in lower quality filtering on textures. It's is recommend to be set to Off for the best image quality, or whenever AF is in use.
Common[edit | edit source]
The Common header is where users will find the rest of the settings that don't really fit into any other areas.
- Ambient Occlusion setting
- This setting forces the driver-side AO on or off. Ambient occlusion (AO) is a lighting technique that determines when certain pixels are blocked from the environmental light by nearby geometry (such as corners), in which case, its brightness value is reduced creating a shadowing effect. This provides much richer, more realistic shadowing in-game. However, AO can be very performance heavy.
- Ambient Occlusion usage
- This determines the drivers usage of Ambient Occlusion (AO). If Ambient Occlusion setting (above) is set to anything other than Off, then this setting should be set to the default setting for the game profile being edited. If Ambient Occlusion setting is set to Off and another method of AO will be used instead (the the game's own built-in AO), then this setting should be set to Enabled. Else, if Ambient Occlusion isn't used at all due to the performance loss it come with, this setting should be set to Disabled.
- Extension limit
- This setting is only for use with OpenGL games and can cause crashes in DirectX games. It is normally left at its default setting.
- Multi-display/mixed-GPU acceleration
- This is another setting only used for OpenGL games. The setting tells OpenGL games how to handle both mult-display monitors and multi GPU systems. If only one monitor is used for gaming, use the Single display performance mode. If multiple monitors are used for gaming, use the Multi display performance mode. If multiple monitors are used and some issues arise with the previous settings use the Compatibility performance mode. OpenGL games are not very common anymore so this setting is not likely to be used.
- OpenGL - Version Override
- This setting is only for use with OpenGL games and overrides the version of OpenGL used for the game. It is normally left at its default setting.
- Power management mode
- This should be left on it's default, Adaptive, which ensures the graphics card changes its speed and power usage according to the load it's under. Users who have the newest GTX 10 series cards or higher may see a new setting, Optimal Power, which causes the GPU to not render any frames when nothing is changing on the screen. GTX 10 series or higher users should use this new setting instead. Per maximum performance should only be used for troubleshooting purposes as it forces the GPU to run at maximum speeds. However, this can reduce stutter in some games to provide a smoothing gaming experience.
- Shadercache
- Released with driver version 337.88, Shader Cache saves compiled shaders to a cache on your hard drive. This allows the shader to simply be recalled from the hard disk the next time it is required, potentially reducing load times and CPU usage.
- Show PhysX Visual Indicator
- Setting this to On will show an indicator on the screen for when PhysX is on or off.
- Thread optimization
- This setting controls the use of multithreaded optimization for games on systems with multiple cores and/or Hyper-threaded CPUs. By allowing the driver to offload certain GPU-related processing tasks as separate threads on available CPU cores, performance can potentially be improved. Some older games can have issues with this setting. If this is experienced users should set this to Off for those game profiles. Otherwise, it is recommended to leave this set to Auto.
Other Profile Sections[edit | edit source]
The remaining of the sections within the Profiles are mainly specific to the system and rarely require being changed. Users can research these settings on their own as they are not covered in this Guide.
Troubleshooting[edit | edit source]
There's not much for troubleshooting currently. Troubleshooting will be added over time as issues arise in the forums.
Transparent Textures[edit | edit source]
- If textures are displayed as transparent which should not be transparent, this could be caused by Sparse Grid Supersampling or Transparency Multisampling. To fix this issue set Antialiasing - Transparency Multisampling to [Disabled]. Users can also switch Antialiasing - Transparency Supersampling to [Supersampling] instead of [Sparse Grid Supersampling].
SSAO from ENB not rendering[edit | edit source]
- Some NVIDIA cards (like the GTX 560 Ti) ceased rendering SSAO outdoors in Skyrim after the official 1.5.24 patch. The problem hasn’t been resolved, but NVIDIA is aware of it. For now, users can temporarily switch to Oblivion or Fallout 3 compatibility to get back SSAO in exteriors.