
Recall that it is recommended to configure MO in "instanced mode" on first launch to allow game-specific mod management of multiple different games using a single MO installation.
By extension, instanced mode also allows multiple, independent mod builds under a single game. Upgrading a mod build is a good use case for mod-build instances. This is because instanced mod lists and individual mod configurations are independent among mod-build instances under the same game just as they are among mod-build instances under different games.
Profiles are still useful --particularly under portable MO installations-- because they alleviate the need to replicate portable MO installations under a single game. Nevertheless, Profiles can be somewhat convenient under instanced MO installations even though instancing mod-builds under a single game is more comprehensive in terms of parsing mod management.
Instances[edit | edit source]
Instances in Mod Organizer allow configuration of ALL aspects of a build independent from other instances and easily switching between them. This essentially means that instances can accomplish everything profiles allow and more, largely obviating the usefulness of profiles when MO is configured in instanced mode at first launch. The following are some things to consider about instances:
- When first created, an instance consumes < 200 Kb of disk space under
%LOCALAPPDATA%, which is on the OS drive by default (usually the C:\ drive). - Since the instance will typically include downloads and mods at some point, the disk space requirements will dramatically increase. As a basis for comparison, the Step SkyrimSE 2.2.0 build with all downloads and mods consumes about 250 Gb of disk space.
- Excluding/removing assets in the
..\downloadsfolder reduces the instance size by a little more than half (required disk space reduced to about 90 Gb for Step SkyrimSE 2.2.0). - Instances cannot be 'cloned' via the GUI, so duplicating an instance requires manual copy/paste from one instance into another via Explorer or analogous methods.
- Since new instances are completely distinct from others, customizations like themes and separators will not be configured in the new instance. This is easily resolved by copying specific files/folders from the source instance into the new one.
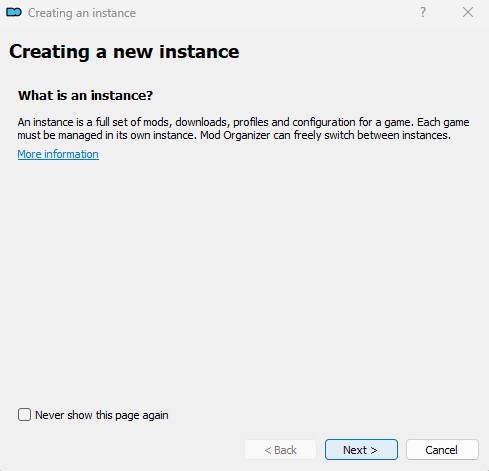
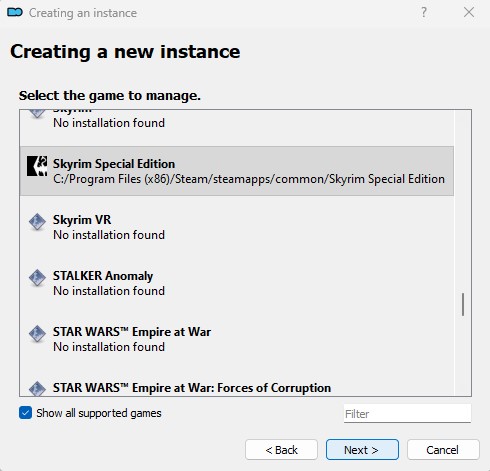
To create a new instance, begin by clicking on the ![]() button at top left of MO. Refer to the following images to create and clone an instance. Once the new instance is created and optionally cloned, launch MO and change instances using the
button at top left of MO. Refer to the following images to create and clone an instance. Once the new instance is created and optionally cloned, launch MO and change instances using the ![]() button at top left of MO.
button at top left of MO.


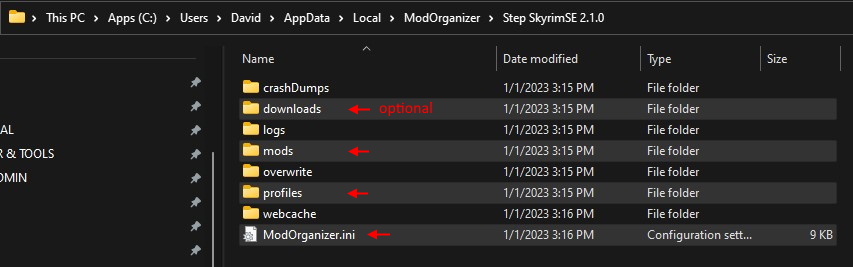
To replicate all customizations (e.g., MO theme [Settings] and configured separators) from a source instance, CLOSE MO, and copy ModOrganizer.ini from the source instance into the new one. To replicate an entire instance, copy the other folders indicated below in addition to the INI. Then restart MO.
Profiles[edit | edit source]
Profiles in Mod Organizer allow configuring all except mod list and individual mod configuration aspects of a build independent from each other and quickly switch between them.
Every aspect of the build other than the mod list and mod configurations are independently configurable among profiles, so each profile can have distinct control over the following without affecting other profiles:
- The selection of enabled mods. This can be toggled by checking and unchecking the mod's checkbox in the Left Pane.
- The priority order of the installed mods. This can be changed by dragging and dropping mods into the desired priority position in the Left Pane. To learn more, see the Priorities chapter.
- The selection of enabled plugins (ESPs and ESMs). This can be toggled by checking and unchecking the plugin's checkbox in the Plugins tab of the Right Pane.
- The priority order (load order) of plugins. This can be changed by dragging and dropping plugins into the desired priority position in the Plugins tab of the Right Pane.
- The selection of enabled BSA files in cases where BSAs are loaded without plugins when using MO BSA management, configured in the Archives tab of the Right Pane.
- Local saved games (if enabled).
- Game configuration files (e.g., skyrim.ini, skyrimprefs.ini).
NOTE
Please note that the ini files are copies of the global files, created at the time the profile is created. This means that if you change the global ini-files (i.e. by starting the Launcher outside MO) those changes affect profiles created afterwards but not the existing ones.Mod lists and mod configurations are NOT independently configurable among profiles, so all profiles share control of the mod list and individual mod configurations as follows:
- Optional ESPs. If you move an ESP in an open profile to Optional ESPs, it will be in Optional ESPs for all profiles, even if one of those profiles specified the optional ESP within its load order.
- Hidden files. If you hide one of the files in an installed mod in one profile, it will be hidden throughout all profiles.
- Mod names. If you rename a mod in one profile, it will have that name throughout all profiles.
- Category. If you change the category of a mod in one profile, it will have that category throughout all profiles.
- Version. If you change the version of a mod in one profile, it will be that version throughout all profiles.
- Mod ini files. If a mod has an ini file inside it, and you change it inside one profile, it will have that change throughout all profiles.
- Mod files. If you modify a mod file in one profile, it will be modified throughout all profiles.
- Notes. If you make a note in the Notes tab for a mod in one profile, it will retain that note throughout all profiles.
- Nexus mod ID. If you change an installed mod's Nexus ID in one profile, it will be changed throughout all profiles.
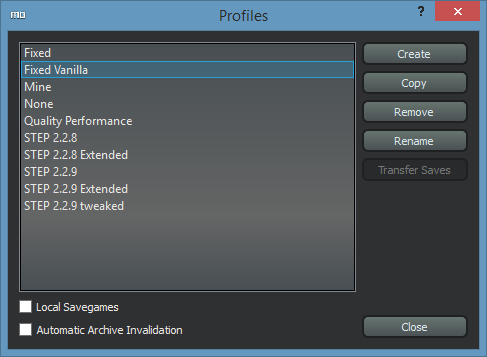
Creating profiles[edit | edit source]
To create a new profile:
- Click the
 button. (or click [<Manage...>] from the drop-down list at top left of the left pane.)
 - Click [Create], or select an existing profile and click [Copy].
- Type a name.
- To revert to default ini game settings, tick the Default Game INI Settings box
- Click [OK]
- Click [Close]
Mouse-hover over any of the other settings in the Profiles configuration window for a description of each. In most situations, ticking both Use profile-specific ... options is desirable.
The new profile can be selected from the drop-down list at top left of the left pane.