
User:Essarrbee/FalloutNewVegas UISectionUpdate
WIP
{{{text}}}Updating the User Interface section of Fear and Loathing in New Vegas can be a lot like a bad trip. So, to avoid having to install the entire section from the ground up, a new protocol has been established to help those in need of an update. If the instructions are followed then anyone can update their UI section without having to reinstall the entire section, bother EssArrBee about it, or have a minor coronary event when you hear "UI changes". (If you still have problems, ask EssArrBee, he will not be mad, promise).
The update procedure is quite simple now that all the ins and outs of Mod Organizer's relationship with FOMM are known. The idea is quite simple actually, just disable the UI section in MO by unticking all the UI mods when installing a new UI mod. Then just retick everything and reactivate Unified HUD Project with FOMM. That may sound simple enough to advanced users, but more like Greek to the everyone else (except the Greeks obviously). Do not worry, the following will explain the procedure in depth with step-by-step instructions and pictures of what your installation should look like.
Updating User Interface Procedure
Follow these instructions as they are laid out without skipping any part. Each action is taken for a reason that may not be obvious, even to the most advanced users. For the instructions, the mod Project Nevada - Extra Options will be used to demonstrate how this will work, but it can be applied to other mods as well.
Part 1: Select Install Method
- If during the installation of a mod with Mod Organizer, there is an error of some sort or the installer does not correctly install the mod's files, then FOMM must be used.
- If a mod installs correctly with Mod Organizer, then drag the mod into the UI section before Unified HUD and OneHUD and skip to Part 4.
- If during the installation of a mod with Mod Organizer, there is an error of some sort or the installer does not correctly install the mod's files, then FOMM must be used.
Part 2: Disable the UI Section
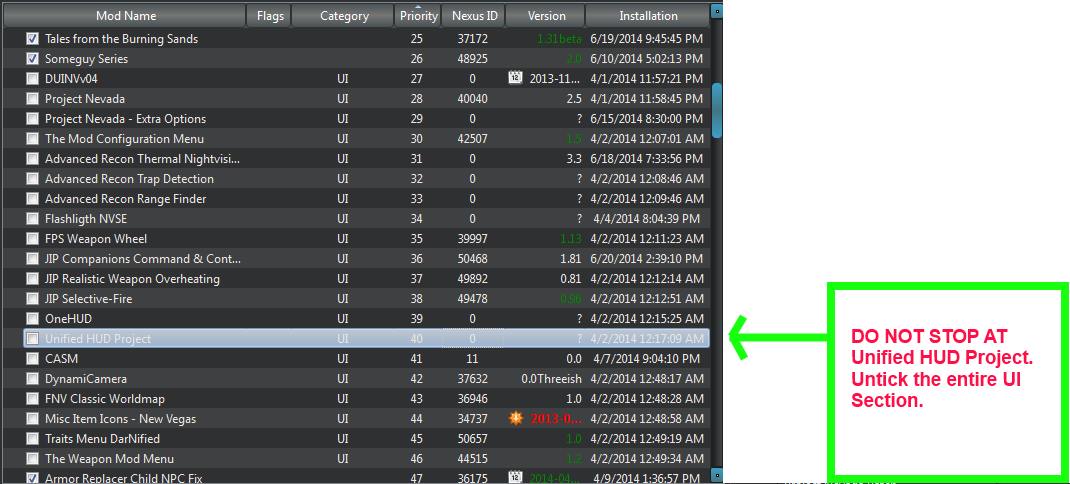
- Go through the UI section in the left pane of Mod Organizer and untick every mod in the UI section that is not required for the mod being installed.
- Though every mod does not need to be unticked, it can be hard to tell which ones do not, so it is good practice to just untick the whole section unless certain that one of the mods is required.
- Project Nevada cannot be unticked for this example because it is require to install Project Nevada - Extra Options.
- Go through the UI section in the left pane of Mod Organizer and untick every mod in the UI section that is not required for the mod being installed.
Part 3: Install the Mod
- Follow the installation procedure laid out in the F&LiNV Guide or on the mod's webpage.
- Here are the instructions taken from the guide for Project Nevada - Extra Options as a reference:
- Select FOMM from the executables dropdown in MO and run it.
- When FOMM - Fork starts click [Package Manager].
- From the Package Manager click [Add FOMod].
- Select Project Nevada - Extra Options 1-2-47285-1-2.7z and click [Open].
- Select Project Nevada - Extra Options from the Mod List and click [Activate].
- When the installer pops up, click [Install]. The Equipment module is left unticked by default, but clicking it will only add an easter egg to the MCM menu, nothing new to the game.
- If asked about overwrites, click [Yes to all] then close FOMM - Fork.
- In the left pane of MO, go to the bottom of the mod list and right click->Create Mod on "Overwrite".
- Type in Project Nevada - Extra Options and click [OK]. Drag the newly created mod folder right behind Project Nevada if need be.
- This is an example of a mod that needs to "see" other mods that are install, so FOMM is required.
- The procedure above will work for any mod that needs to be installed with FOMM.
- Here are the instructions taken from the guide for Project Nevada - Extra Options as a reference:
- Follow the installation procedure laid out in the F&LiNV Guide or on the mod's webpage.
Part 4: Reactivate Unified HUD
- First check that all the UI mods are ticked and in the correct position.
- Run FOMM from Mod Organizer.
- When FOMM starts click [Package Manager].
- Highlight Unified HUD Project and click [Reactivate].
- When the installer pops up, click [Install].
- When asked, click [Yes to all] then close FOMM.
- In the left pane of MO, go to the bottom of the mod list and double click on "Overwrite".
- In the left pane of MO, scroll up to Unified HUD Project and drag the "menus" folder from the "Overwrite" pop-up to uHUD.
- If asked, select "Yes" to merge or overwrite the folders.