
User:Adonis VII/TTW temp: Difference between revisions
Adonis VII (talk | contribs) |
Adonis VII (talk | contribs) |
||
| Line 1,036: | Line 1,036: | ||
* '''Version''': v1.0 | * '''Version''': v1.0 | ||
Replaces 50 of the 59 static Fission Battery models with the Misc Item version that can be taken. The remaining 9 are there as visual "power sources" for lights and such. | Replaces 50 of the 59 static Fission Battery models with the Misc Item version that can be taken. The remaining 9 are there as visual "power sources" for lights and such. | ||
===== Two bears high fiving ([http://www.nexusmods.com/newvegas/mods/36850/? FNV]) ===== | ===== Two bears high fiving ([http://www.nexusmods.com/newvegas/mods/36850/? FNV]) ===== | ||
Revision as of 22:33, January 5, 2017
FORUMS: Comments, Questions? Visit the forum thread Here
CHANGELOG: You can check any mod changes to this guide Here
Introduction
Tale of Two Wastelands brings FO3 into New Vegas, bringing all the feature and engine upgrades(reputations, crafting, iron sights, hardcore, survival skill) from New Vegas to the Capital Wasteland. It provides a bridge to connect the stories in a logical fashion to allow both games in a single playthrough if desired. It has some of the biggest names in Fallout modding working on it, bringing features exclusive to TTW.
This guide seeks to be minimal in its approach, fixing bugs, restoring cut content implementing quality of life upgrades, and improving the physics for better gun-play. It additionally enhances the graphics of the game while remaining faithful to the original look (except the green or red tints) and add additional quests and locations for enhanced exploration.
Setup
Install Fallout New Vegas somewhere NOT in your program files directory.
Launch the game once, setting everything to highest.
Install Fallout 3 somewhere NOT in your program files directory.
Launch the game once.
If you have previously installed either game, and cleaned or altered any of the Bethesda .esm, restore them through steam.
Utilities
FNVEdit aka xEdit (FNV)
- Author: ElminsterAU
- Version: v3.2
- Installation: Place FNVEdit folder is into the Fallout New Vegas root folder. This video can be applied to any xEdit version: TES5Edit Installation
Merge Plugins xEdit Script (TESV)
- Author: Matortheeternal
- Version: v1.9
- Requirements: xEdit, mteFunctions
- Installation: Extract the archive directly to the FNVEdit folder.
TTW xEdit Conversion Script (TTW)
- Author: Jax Firehart
- Installation: Download the first link ...JaxFirehart/conversionpack.zip Extract the archive to directly the the FNVEdit folder.
LOOT (Github)
- Author: LOOT Team
- Version: v0.8.1
- Installation: LOOT Installation Video
Mod Organizer (TESV)
- Author: Tannin
- Version: v1.3.11
- Installation: To use MO for multiple games it must have multiple installs in different locations. It is recommended to put each install of MO into the game directory of each game that it will be installed for. For New Vegas, it should go into .../Steam/steamapps/common/Fallout New Vegas. MO Install Video
- Note: There is some information to be aware of when installing Mod Organizer:
- The newest version of Mod Organizer introduces a new system of handling mods not installed by Mod Organizer and the official DLC. They will now be listed in the left pane of MO and can be moved around so those files will become part of the file priority.
- Left Pane should have the official content listed first, without check boxes to tick and the category should say Non-MO. Any mods installed in the Data folder will also be listed the same way.
- For more information, see the Mod Organizer Guide.
- Official STEP Mod Organizer Video Series by Gamer Poets.
- The newest version of Mod Organizer introduces a new system of handling mods not installed by Mod Organizer and the official DLC. They will now be listed in the left pane of MO and can be moved around so those files will become part of the file priority.
MO is a powerful mod manager that does not install mods into the game's data folder like other mod managers. Instead, MO uses a virtual directory which gives modders the ability to switch between profiles very easily without having to install and uninstall mods. Template:Notice Small
Wyre Flash NV (FNV)
- Authors: valda and Sharlikran
- Version: v17.1
- Note: This is require to created Bash Patches.
- Installation: Download Wrye Flash 17_1 - Standalone Executable. Follow these instructions:
Open up the Wrye Flash 17_1 - Standalone Executable archive from where ever it was downloaded to.
Extract the entire contents to the "...\Steam\steamapps\common\Fallout New Vegas" folder, not the "Data" folder.
Start Wrye Flash NV right now to correct an annoying setting:
From the Mods tab, right click the File on the top bar and make sure Lock Times is UNTICKED.
Setting up Mod Organizer
Now that all the programs necessary to mod New Vegas are installed, it is time to set them up for installing mods and running New Vegas with Mod Organizer.
- Start MO and click the Profiles button
 .
.
- Now highlight the Default profile, make sure Archive Invalidation is checked, and click [Copy].
- Rename the profile to the desired name (e.g. Worlds of Tomorrow), and click [Okay], then [Close].
- This procedure can be repeated for copying any profile in the future (such as for Fear & Loathing).
- Setup MO to download mods from the Nexus, follow the directions provided on the Mod Organizer Guide. Linking to Nexus
- Click the Executables button
 and set up the programs that will be run from the MO launcher using directions from the Mod Organizer Guide. Third Party Programs
- For this guide add: LOOT, FNVEdit, FNVLODGen.
- MO LOOT Installation. Other programs can be installed similarly.
- LOOT has one extra instruction to setup
- In the Executables menu select LOOT.
- Next to the Arguments text box, type "--game=FalloutNV", without quotations.
- Click [Modify], then [Close].
- FNVLODGen has special instructions
- In the Executables menu add FNVEdit.exe a second time and name it FNVLODGen.
- Next to the Arguments text box, type "-lodgen -o:"C:\FNVLODGenOutput" ", without the outer quotations. Alternatively, any other location outside of MO's virtual directory can be chosen.
- Click [Modify], then [Close].
- For this guide add: LOOT, FNVEdit, FNVLODGen.
- Set up optional settings as desired:
- Click the Settings button
 . General Settings
 - Choose style, language, mod folders, customize mod categories among other things.
- Click the Settings button
- Check that the official DLC is sorted correctly.
- In the left pane make sure the official DLC are listed as the first mods when sorted by priority. Left Pane: Columns
Mod Organizer should now be installed and properly set up for modding from this point forward.
BSAs and Mod Organizer
Bethesda Software Archives (BSA) can be used to store mod files in an attempt to reduce file sizes. The added benefit is the reducing in file system fragmentation caused by having many loose, small files. Although this is the case, it may be desirable to extract the contents of a BSA for various reasons, such as: if the user does not wish to install the entire contents of the BSA, if textures within the BSA need to be optimized, or simply if the user wishes to view the contents of the BSA.
VERY IMPORTANT - make sure to follow the directions in this paragraph: First of all, go to the Archives tab on the right pane of MO. Checking the BSAs under this tab allows MO to read their contents. Then make sure that Have MO manage archives is checked. Next, be aware that the Fallout - Invalidation.bsa file must be the top file in the list, just under data. If is not the top file in the list it will cause many mods to not function properly. Perhaps the easiest way to recognize this is that the textures of many objects in the game will look vanilla. In addition to this, make sure that all BSAs in the list are checked. If there are any that aren't, then make them so. Greyed out BSAs will be checked no matter what due to their plugin requiring that BSA to load.
For various reasons, the guide may give instructions to extract certain BSAs. The instructions given in the guide would explain how to that after they have been already installed. An alternative method to extracting BSAs after installing them is to change the setting for the BSA Extractor plugin. Open the Settings and change false to true. Each time a mod that has a BSA is installed a dialog will be presented offering to extract the included BSA.
In versions of MO prior to v1.3.x there was a limit to how many characters are allowed by the game engine when loading BSAs. If the names of all the BSAs being loaded are more than 254 characters, the game will not load or if there are just too many files in the data folder directory, thrashing can take place which causes the game not to load either. This creates an issue that either causes users to rename BSAs or extract some of them to remain under the 255 character limit. This (and other potential reasons) is why when following this guide it is very important to make sure that your installed version of MO is up to date with the guide's listed MO version.
INI Tweaks
Fallout.ini
- TTW Changes
[General]
sIntroMovie = (yes this one is blank on purpose, it needs to be blank)
bLoadFaceGenHeadEGTFiles = 1
- Allow AI threading (Strip, Battle for Hoover Dam, Operation Anchroage, etc)
[General]
bUseThreadedAI=1
iNumHWThreads=2 (Add this line)
- Light distance fade (optional)(performance cost)
fLightLODDefaultStartFade=10240.0
fLightLODRange=10240.0
fLightLODMinStartFade=10240.0
fLightLODMaxStartFade=10240.0
fShadowLODDefaultStartFade=200.0
fShadowLODRange=200.0
fShadowLODMinStartFade=100.0
fShadowLODMaxStartFade=1000.0
fSpecularLODDefaultStartFade=10240.0
fSpecularLODRange=10240.0
fSpecularLODMinStartFade=10240.0
fSpecularLODMaxStartFade=10240.0
- Extending LOD (optional)(performance cost)
[LOD]
bDisplayLODBuildings=1
fLODFadeOutMultItems=15
fLODFadeOutMultObjects=15
fLODFadeOutMultActors=15
FalloutPrefs.ini
- Allow additional plugins to be loaded.
[Launcher]
bEnableFileSelection = 1
- TTW changes
[General]
bLoadFaceGenHeadEGTFiles = 1
- Allow AI threading (Strip, Battle for Hoover Dam, Operation Anchroage, etc)
[General]
bUseThreadedAI=1 (Change from 0->1)
iNumHWThreads=2 (Add this line)
- Increase Grass Render distance from 3 to 5 cells (optional)(performance cost)(Requires NVAC).
[Grass]
fGrassStartFadeDistance = 17000
- Select Resolution
[Display]
iSize W=1920     <---Choose horizontal
iSize H=1080     <---Choose vertical
- Double LOD Distance (optional)(performance cost)
[TerrainManager]
fBlockLoadDistanceLow=100000.0000
Extenders
NVSE (Silverlock)
- Authors: Ian Patterson, Stephen Abel, Paul Connelly and Hugues LE PORS
- Version: v5.0 beta3
- Instructions: Download the v5.0 beta3 file. Follow these instructions:
Extract the files from the archive into the Fallout New Vegas folder, NOT into the Data folder. The src folder and text files are not needed.
In the Data folder "right click->New->Folder", then name it "NVSE". Only do this if the folder DOES NOT exist.
Open up the Data/NVSE folder and "right click->New->Text Document", then name the file "nvse_config.ini".
Open nvse_config.ini and add the following:
[Memory]
DefaultHeapInitialAllocMB=400
Save and close.
The value for DefaultHeapInitialAllocMB must be between 200 and <500. You can alter the value to find the best for your setup. I use 500 personally.
JIP NVSE Plugin (FNV)
- Author: Jazzisparis
- Version: 32.10
- Requirements: NVSE
NVSE extender for extra functions.
Lutana NVSE Plugin (FNV)
- Author: Luthien Anarion
- Version: v19.0b1
- Requirements: NVSE
NVSE extender for extra functions.
FNV 4GB Patcher (FNV)
- Authors: Roy Batty, LuthienAnarion
- Version: v1.3
- Installation: Download and extract FalloutNVpatch.exe into the Fallout New Vegas folder. Run the executable.
TTW
Tale of Two Wastelands (TTW)
- Authors: TTW Team
- Version: v2.9.4b
- Requirements: NVSE,MCM
- Installation: The installation for TTW requires a couple steps.
Creating the TTW FOMODS:
Download and Extract the latest TTW Installer (e.g. C:/TTW Installer)
Launch the installer .exe file by right-clicking on it and choosing "Run as Administrator".
Choose the correct locations for your Fallout 3 and Fallout New Vegas installs.
Choose a temporary location to install the TTW FOMODs (e.g. C:/TTW FOMOD).
Click Install
     Watch the log and the progress bars to see how things are going. The installer can take between 10 to 30 minutes depending on the speed of your computer.
When prompted to Build FOMODs? Click Yes.
Installing TTW Main File:
In MO, install TaleOfTwoWastelands_Main.fomod from the directory you choose (e.g. C:/TTW FOMOD/).
Installing TTW Option Files:
In MO, install TaleOfTwoWastelands_Options.fomod from the directory you choose (e.g. C:/TTW FOMOD/).
Select the following options when installing Options fomod:
   MCM Optionals
   Outcast Trading
   Skill Based Speech Challenges
   Wild Wasteland
Installing TTW Hotfixes:
Download and install any Hotfixes
Fixes
NVAC - New Vegas Anti Crash (FNV)
- Autor: Queue
- Version: v7.5.1.0
- Requirements: NVSE
This mod extends error handling of New Vegas, leading to fewer crashes.
NVSR - New Vegas Stutter Remover (FNV)
- Author: SkyRanger-1
- Version: v4.1.36
- Installation: This mod is packaged incorrectly, follow these instructions:
During install right click Data and select "Set data directory".
This mod has an INI file that has some options users should be aware of. Changes should made by right clicking NVSR in the left pane of MO, selecting Information..., and selecting the INI-Files Tab. "NVSE/plugins/sr_New_Vegas_Stutter_Remover.ini" should be listed in the top left box, click it, and use the following to make changes accordingly:
Master = {
       _comment = You can turn on or off each distinct feature from here.
       bManageFPS = 1
       bHookCriticalSections = 1
       bHookLightCriticalSections = 0
       bHookHashtables = 1
       bReplaceHeap = 0
       bReplaceGetTickCount = 1
       bLogToConsole = 0
       bFastExit = 1
       bFlushLog = 1
       iSchedulingResolution = 1
       bReplaceRandom = 0
       bExperimentalStuff = 0
       iMainHookPoint = 1
}
FPS
FPS_Management = {
	bInject_iFPSClamp = 1
	fMaximumFPS = 60
	fMinimumFPS = 20
	iFPS_Report_Period = 15000
	fExtraSleepPercent =0.05
 }
TTW Fixes (TTW)
- Authors: TJ and all upstream resources
- Version: v2.2.2
This is the main Fixes mod made custom for TTW.
OWB Sonic Emitter Projectile Fix (FNV)
- Author: by EssArrBee
- Version: v1.0
Reload Speed game Start Fix (FNV)
- Author: sergelac
- Requirements: NVSE
REPCONN Test Site Fixes (FNV)
- Author: Yukichigai
- Version: v0.2
- Note: This was accidentally left out of YUP v9 and is not in TTWFixes.
Project Nevada
Project Nevada (FNV)
- Author: PN Team
- Version v2.5
- Requirements: NVSE
- Installation: Install all modules.
Project Nevada - Extra Options (FNV)
- Authors: Gribbleshnibit8, Roy Batty
- Version: v1.3
- Requirements: NVSE, Project Nevada
- Installation: Install all modules.
Project Nevada w/ Extra Options TTW Patch (TTW)
- Author: Roy Batty
UI
JIP Improved Recipe Menu (FNV)
- Author: jazzisparis
- Version: v1.10
- Requirements: NVSE, JIP NVSE
The Mod Configuration Menu (FNV)
- Author: Pelinor
- Version: v1.5
- Requirements: NVSE
- Installation: Get The Mod Configuration Menu main file and the MCM BugFix 2 update file.
Loot Menu for FNV (FNV)
- Author: Gribbleshnibit8
- Version: v1.1
- Requirements: NVSE, Lutana NVSE, JIP NVSE, and UIO
- Note: Currently this doesn't disable the default loot text. If this annoys you this mod can be skipped without issue.
UIO - UI Organizer (FNV)
- Author: jazzisparis
- Version: v1.31
- Note: There may some files or folders in the Overwrite folder after exiting the game or after a crash. This is not a problem, those files can be ignored or deleted without issue. The mod will regenerate those files every time the game loads.
Physics
Collision Meshes (FO3)
- Author: KaneWright
- Version: 1.4.1
- Installation: Install CollisionMeshesFO3. Get the BetterBoozeFix and PrecisionCollisionClutterFix optional files, and use [Merge] when installing to combine with the main mod in MO.
Collision Meshes (FNV)
- Author: MadAce
- Version: 1.4.1
- Installation: Install Collision Meshes and [Merge].
These mods overhaul collision meshes on many statics. Want to shoot between those metal bars? Now you can. No more bullets being stopped when they shouldn't be.
Ragdolls (FNV)
- Author: MadAce
- Version: 3.0.2
- Installation: Install Ragdoll TTW.
Cut Content
Strip Wall Billboards (FNV)
- Author: sandbox6
- Version: v1.0
Adds previously unused billboards which were only seen during the intro to The Strip's perimeter wall making it slightly less dull.
No more giant manhole covers (FNV)
- Author: sandbox6
- Version: v1.0
Location
Auto Gates (TTW)
- Author: William Sea
- Patcher: Roy Batty
Adds closing animations to gates so that the open and close as you come and go instead of staying permanently open after your first visit.
Kentbury Way (TTW)
- Author: WastelandLonder
- Patcher: Roy Batty
Metro Carriage Interiors (TTW)
- Author: WastelandLonder
- Patcher: Adonis VII
- Version: v1.0
Adds interiors to all Metro Cars in the Capital Wasteland.
Rivet City Realignment (TTW)
- Author: Angleae
- Patchers: Adonis VII, Roy Batty
Realigns the interior cells of Rivet City into a more logical layout, matching the exterior.
TTW Interiors (TTW)
- Author: ChuckSteel
- Version: v5.2.5
- Installation: Download TTW_Interiors Core v3.5, TTW_InteriorsProject Combo v5.4.1, TTWInt-Streetlights Patch v1.1, and NMC NVInt/TTWInt compatibility Patch Large v1.2
Adds new immersive interiors to many of the empty buildings.
Texture Overhauls
Retextured Clutter Collection (FO3)
- Author: ObsidianStag
- Version: vfinal
- Installation: This mod if packaged improperly. Right click the data folder and click {ui|set data directory}.
MG's Neat Clutter Retextures (FNV)
- Author: Mental Gear
- Version: v7
- Installation: Install MGs NCR Pack Ojo friendly 7
- Note: Will have a look at Moraelins Machete improved
NMC's Texture Pack (FO3/FNV/TTW)
- Author: NMC
- Installation: Follow instructions on the TTW page.
Ojo Bueno Texture Pack (FNV)
- Author: Tapiokas
- Version: Quiznak
- Installation: Install Ojo Bueno Texture Pack for FNV - HIGH and Ojo Bueno Vending Machine Update HIGH.
Hide Textures/vehicles
Ojo Bueno Nuka-Cola TTW Patch (TTW)
- Authors: Adonis VII
- Instructions: Install TTW Patch.
Mothership Zeta DLC Retextured (FO3)
- Author: by Weijiesen
- Version: v1.0
- Installation: Get main file. Click yes to BAIN installer. Check options to be installed.
TTW Title Screen (TTW)
- Authors: Roy Battay, zlostnypopolnik
- Installation: Install 'ttwtilescreen'.
Environment
Gas Pumps of New Vegas (FNV)
- Authors: EdibleGrenade12, Thaiauxn
- Version: v1.5
- Note: Despite the name, I'm calling these Coolant Pumps in line with lore. They don't say gas anywhere in game.
- Installation: Download Gas Pumps of NV Ver. 1.0 and Gas Pumps of NV Update 1.5 and [Merge].
Hectrol FX Dustorm Deluxe (FNV)
- Author: Hectrol
- Version: v1.0
- Installation: There are 1k,2k,4k options. 2k suggested.
Expand "Hectrol_FX_Duststorm_Deluxe_HighRes_Retex" and then right click "2048" and select "Set data directory".
Click [OK].
Hectrol Tumbleweed (FNV)
- Author: Hectrol
- Version: v1.0
- Installation: 512,1k,2k options. 1k suggested.
Textures Over Time (FNV)
- Author: DonKnotts
- Version: v1.0
- Installation: Download FlagStoneWalls, HH_Sandstone, and Sandbags, and [Merge] all three.
Vurt's Flora Overhaul (TTW)
Enneract has done a conversion for both wastelands
Vault 22 Flora Overhaul (FNV)
- Author: Macintroll
- Version: v1.1
- Installation: This mod is not packaged correctly, follow these instruction:
When the installation window pops up, expand "Vault22FloraOverhaul-mod".
Right click "data" and select Set data directory and click [OK]
Manual FNVEdit Changes: Remove the following forms from vault22FloralOverhaul.esp:
- XX00554F (D.C. Journal of Internal Medicine)
- XX00554F (Lying, Congressional Style)
- XX005551 (Pugilism Illustrated)
- XX00AE3D (D.C. Journal of Internal Medicine)
- XX00AE3F (Dean's Electronics)
Creatures
Improved Robots Textures (FNV)
by Tau34RUS
It's a Dogs World - Dog Texture Overhaul (FNV)
- Author: Nivea
- Version: v1.0
- Installation: Install DogsWorldTextureOverhaul_Optimized_V1_0.
Robots HD Retexture (Mediafire)
- Author: Magnesium Fire aka QuasarX
- Installaion: First install the Data folder which provides the main mod. Then install the same mod again but this time choose the DC Interiors Patch (which provides high quality retextures of the robotic toys in DCInteriors Project. Install this using [Merge] to combine this with the previously installed main portion of the mod.
If desired, this step can be repeated to install a 4kx4k Liberty Prime replacement, but most users who want to use this option will want to first reduce the size of the
textures with DDSopt before installing. If you wish to install the Liberty Prime replacement, select "no" when asked to install as a bain installer, then expand "Liberty
HD Retexture" and right click on "Либерти 4096" and choose set as the data folder.
Fawkes Retexture Hi-Res (FO3)
- Author: Macintroll
- Note: We just want this for the clothes.
FO3 Hirezd - Supermutants (FO3)
- Author: Emerald Reign
- Installation: Install Supermutants, and Supermutant - 4k Fawkes.
Swampfolk Backwater Retexture (FO3)
- Author: Deathclaw Alpha
- Installation: Install Backwater Retexture.
Robot Revolution HD - Protectron (FO3)
- Author: OpenSaucer
- Version: v1_1
Vandr HD Creatures (FO3)
- Author: Vandrerer
- Version: v1.0
- Installation: This mod is not packaged correctly, follow these instructions:
Right click "data" and select "Set data directory", then click [OK].
AmidianBorn Book of Water - Book of Flesh (FNV)
- Author: CaBaL
- Version: vOmni2
- Installation: Install BOA NV The Book Of Flesh.
FeralGhouls Hires Retexture (FNV)
- Author: Macintrol
- Version: 1.0
- Installation: This mod is not packaged correctly, follow these instructions:
During install, open FeralGhoulsHD, right click "data" and select "Set data directory", then click [OK].
Hectrol ED-E Deluxe (FNV)
- Author: Hectrol
- Version: v1.0
- Note:Note, significant deviation from original appearance.
- Installation: During the FOMOD installer choose High Res [2048x2048] and Spooky ED-E by archerarcher.
Super Mutant Mesh Replacer (MEGA)
- Author: TheNeglected
- Version: v1.3
- Note: Original nexus link: FNV
NPCs
While I plan for FCO to be the main NPC mod, I have not had time to test FCO 3.0 or bugfixes. Additionally TTW patches made for FCO 2.0 have not been updated to FCO 3.0
Authentic Burned Man (FNV)
- Author: Rocket
- Version: v1.0
FNVEdit Cleaning Required: 2 ITM
TTW Redesigned (TTW)
Download TTW Redesigned file
Beards (FNV)
- Author: Drumber
- Version: v1.0
512, 1k, 2k options. 512 suggested.
Clutter & Misc
Hi-Res Chems and Health Re-Texture (FO3/FNV)
- Author: clintmich
- Version: v1.1 (FO3), v1.2 (FNV)
- Installation: From FNV page, install HI-RES Chems and Health ReTexture Pak. From FO3 page install Urban Food and Chems Retex. [Merge] files.
Right Click the mod
In Filetree hide textures/architecture
Money Higher Quality Retex (FNV)
- Author: Lord Inquisitor
- Version: v1.2
Acoraito HD Textures Pack (FNV)
- Author: Acoraito
- Installation: Download 2k Main File and 1k Optional and [Merge] them.
6IXES Clutter Texture Pack (FO3)
- Author: 6IX
- Version: v1.0
- Installation: Install 6IXES Clutter Texture Pack'. This mod has uneeded esp files.
 Right Click the mod
 In Optional-ESPs move 6IXES Clutter Texture Pack.esp to Optional Esps.
Audley's Misc Textures (FNV)
- Author: Audley
- Version: v1.1b
- Installation: Grab the F&L optional file.
Bear Trap Retextured (FO3)
- Author: konji
Cherry Bomb HD Retexture (FNV)
- Author: legandalfo and Jokerine
- Installation: Install Round mesh for cherry bomb along with 512x512 textures.
When installing the "512x512 textures" right click the preferred retexture (default is recommended) and select Set data directory, then click [OK].
If the BAIN installer is used simply select the Default option.
Fallout Food Package Retexture Compilation (FNV)
- Author: Majormodder
- Version: 3.0
- Installation': Install Food compilation dirty set uncompressed 3 point Oh.
Right Click the mod
In Optional-ESPs move Majormodder's Junk Food to Barbeque Chrisps.esp to Optional Esps.
Collision Meshes - Fallout Food Package Retexture Patch (FO3)
- Author: KaneWright
- Version: 1.4.1
- Installation: Install FalloutFoodPackageRetextureCompilationFix.
Hectrol Lockinterface Deluxe (FNV)
- Author: Hectrol
- Version: v1.0
- Installation: 1k and 2k options. 2k suggested.
Hectrol Mailbox Deluxe (FNV)
- Author: Hectrol
- Version: v1.0
- Installation: 256,512,1k options. 512 suggested.
Hi-Res Lunchbox (FO3)
- Author: Dazington
- Version: v1.0
Magazine Redux (FNV)
- Author: razzy1319
- Version: v1.1
- Installation: Install 1k. Install MagRedux QuickFix and [Merge].
Minimod - High Resolution Newspapers (FNV)
- Authors: Tagaziel and LadySinestro
- Version: v1.5
- Installation: This mod is not packaged correctly, follow these instructions:
During install, right click "data" and select "Set data directory", then click [OK].
Neglected Clutter (FNV)
- Author: aogara
- Version: v1.2
- Installation: Install Neglected Architecture and Furnitures, Neglected Clutters, and Neglected Clutters - New Paint Gun.
Pre-War Money Retexture (FNV)
- Author: Red.Room.Service
- Installation: Install Pre-War Money Retexture -RRS. When prompted, select Light Distress for both bills.
Tweaked Cashregister (FNV)
- Authors: Lord Inquisitor and Tapiokas
- Version: v1.0
Tweaked Chems Replacer (FNV)
- Author: Lord Inquisitor
Tweaked Coffee Maker (FO3)
- Author: Lord Inquistior
- Note: Causes minor issue with a TTW Interiors mesh. Will see about fixing.
Tweaked Generator (FO3)
- Author: Lord Inquisitor
- Note: I need to find a better matching texture to make the buttons more apparent than is current in the above textures.
Tweaked Intercom (FO3)
- Author: Lord Inquisitor
- Installation: This mod is packaged incorrectly:
Expand "Intercom01 14-11-2009" then expand "Lord inquisitor", then expand "NIF".
Right click on "NIF" and create 3 nested directories called "Meshes", "Clutter" and "Consoles".
Drag the intercom01.nif file into the Consoles folder.
Drag the Consoles folder into the Clutter folder then drag the Clutter folder into the Meshes folder. Set the NIF directory as data directory.
Tweaked Wrench (FO3)
- Author: Lord Inquisitor
Vertibird Re-textured (FO3)
- Author: Macintroll
- Version: v0.1
- Installation: Install Vertibird re-textured olive green, then do the following:
Right click the mod and select Open in Explorer
Create a new textures folder
Move the vehicles folder into the textures folder.
Close the Explorer window.
Effects
Enhanced Blood (FNV)
- Author: dDefinder
- Version: v2.22c
- Installation: Download the Enhanced Blood Texture, Alternate Textures, and Low Res Textures. Follow these instructions:
Install the main file.
Install "Low Res textures" file and [Merge].
Open downloads folder in windows explorer to find Alternate Textures-34917.rar and extract Alt Blur Screen Blood.zip and Alt v2.0 Blood splatter.rar to download folder.
Go back to MO and install Alt Screen Blood Blur and Alt v2.0 Blood splatter into Enhanced Blood Textures and [Merge].
HD Fog (Mediafire)
- Author: weijiesen
- Version: v1.0
HD Mist (FNV)
- Authors: Ramccoid, Adonis VII
- Version: v1.0
- Installation: 1k and 2k versions. 2k is suggested.
HD Smokey Fire and Explosions (FNV)
- Authors: Deanoman and Rheadude
- Version: v1.0
- Installation: Install the main file HD Fire and Explosions.
New Vegas - Enhanced Camera (FNV)
- Author: LogicDragon
- Version: v1.4b
- Requirements: NVSE
Armor
Power & Combat Armors
aMidianBornNV Book of Water (FNV)
- Authors: Cabal
- Version: omni2
- Installation: Install nov 2011 book of steel.
Double click aMidianBornNV Book of Water in the left pane and go to the [Optional ESPs] tab.
Move "boa ncrpahelmet.esp" and "Boacombat2glove.esp" to the "Optional ESPs" box.
Bornagain Combar Armor (FO3)
- Authors: EmeraldReign and Cabal
- Version: v1.0
- Installation: Install BornagainCombatArmor4096, BornagainCombatArmor4096EnvironmentMaps, BornagainAnchorageCombatArmor2048, BornagainGhoulCombatArmor4096, and BornagainZetaCombatArmor4096.
Double click Bornagain Combar Armor in the left pane and go to the [Optional ESPs] tab.
Move "Bornagain Zeta Combat Armor Texture Patch.esp" to the "Optional ESPs" box.
Bornagain Combar Armor (FNV)
- Authors: EmeraldReign and Cabal
- Version: v1.0
- Installation: Install BornagainFNVCombatArmorLonesomeRoad4096.
Bornagain FO3 T45d Power Armor (FO3)
- Authors: Cabal
- Version: v3
- Installation: Install bornagain fo3 t45d 4096 huge v3 fixed. Optionally install bornagain fo3 t45d 2048 mid v3 if lower res is desired.
Bornagain Outcast T-45d Power Armor (FO3)
- Authors: Cabal
- Version: v1.0
- Installation: Install BornagainOutcastT45d4096.
Double click Bornagain Outcast T-45d Power Armor in the left pane and go to the [Optional ESPs] tab.
Move "Bornagain Outcast T-45d Texture Patch.esp" to the "Optional ESPs" box.
Bornagain FO3 Outcast (FO3)
- Author: Cabal
- Installation: Install Bornagain Fo3 outcast MAIN, and helmet fix.
Enclave Power Armors Retextured (FO3)
- Author: d_seven aka id2301
- Version: v1
- Installation: Install EPA, Hellfire, and Tesla. [Merge] all 3 files.
Double click Enclave Power Armors Retextured in the left pane and go to the [Optional ESPs] tab.
Move "teslaPA -retextured.esp" to the "Optional ESPs" box.
Book of Steel - Compatibility Edition (FNV)
- Author: Darthbdaman
- Version: v1.4
- Installation: Install Book of Steel - Compatibility Edition and Tale of Two Wastelands.
Tribal DX (FO3)
- Author: Weijiesen
- Installation: Install Tribal DX - 2048 res.
Double click Tribal DX in the left pane and go to the [Optional ESPs] tab.
Move "Tribal_DX.esp" to the "Optional ESPs" box.
Winterized DX (FO3)
- Author: Weijiesen
- Installation: Install Winterized DX and NEEDED MESHES.
Double click Winterized DX in the left pane and go to the [Optional ESPs] tab.
Move "WinterizedT51bDX.esp" to the "Optional ESPs" box.
Other Armors
Mono's Updated ADAM Package (FNV)
- Author: MonoAccipiter, EssArrBee & darthbdaman
- Version: v4.4.1
- Installation: Grab the ADAM All-in-one Installer 4.3 main file
WARNING
Template:FOMOD_Instructions is deprecated and should no longer be used on this wiki. Please change this template call to use the better-looking and simpler Template:Fomod. We apologize for the inconvenience.| FOMOD Instructions Mono's Updated ADAM Package |
Main
Complete Version or Custom Install
Next NCR Trooper
Do you want to install NCR Trooper module?
Install |
ALR - Aptoms Legion Retextured (FNV)
- Author: sukayoupt aka Aptom
- Version: v1.1
NCR Civilian Clothing (FNV)
- Author: Darziak
- Version: v1.0
NCR Trooper Overhaul_beta (FNV)
- Authors: Emerald Reign, nekronom, cabal, wjs, dragbody
- Version: vbeta
- Installation: Install Main File Beta 7_2 and Sapper Leg Fix. This mod's plugin is not needed, follow these instructions:
Double click NCR Trooper Overhaul in the left pane of MO and click the [Optional ESPs] tab.
Move the "NCRTrooperOverhaul.esp" to the Optional ESPs box.
NCR Trooper Overhaul - Distributed (FNV)
- Author: pwinkle
- Version: v1.0
- Requirements: NC Trooper Overhaul beta
Realistic Pip-Boy Retexture (FO3)
- Author: Numb Squirrel
- Version: v1.0
- Installation: Install Numb Squirrel Pip-Boy 4k Compressed.
Pimpboy (FNV)
- Author: weijiesen
- Version: v1.0
- Installation: Install Pimpboy - Opal - default.
SuperMutant Armor Retextured HiRes (FO3)
- Author: Macintrol
- Installation: Install SuperMutant Armor retextured. This mod is not packaged correctly, follow these instructions:
During install, right click "data" and select "Set data directory", then click [OK].
The Legacy of X13 - An Armor Overhaul (FNV)
by Emerald Reign
Wasteland clothing Hires retexture (FNV)
- Author: Macintroll
- Version: v1.3A
- Installation: Install Wasteland Clothing HD V1-3 FULL PACK and Wasteland Clothing HD V1-3 POWDERGANG FIX -IMPORTANT-. Both files are packaged incorrectly, follow these instructions:
During main file install, expand "wastelandclothing-HD-v1.3", then right click "data" and select "Set data directory", click [OK].
During optional file install, expand "wastelandclothing-HD-Powdergang-FIX", then right click "data" and select "Set data directory", click [OK], then select [Merge], not [Replace].
HR Armored Vault 101 Jumpsuit (FO3)
- Author: Ellise
- Version: v1.0
- Notes: Higher resolution Vault 101 clothing
- Installation: Get one of the two main files, 2k recommended, and install with MO.
Weapons
Misc Weapon Retextures
Fallout 3 Hirezd (FO3)
- Author: Emerald Reign
- Installation: Install the following files:
BB Gun
Grenades
Knuckles
Lincolns Repeater
Mines
Fire Axe - Retextured (FNV)
- Author: id2301
- Version: v1
- Installation: Install fireAxe_retextured and knock-knock_retextured and [Merge] both files.
HD One Hand Melee (FNV)
- Author: InsanitySorrow, 2cooldays
- Version: v1.0
- Installation: Install One Hand Melee HD and Gun Runner Box HD and [Merge].
Laer Retexture (FNV)
- Author: The Riff
- Version: v1.1
- Installation: This mod is not packaged correctly, follow these instructions:
During install, right click "data" and select "Set data directory", untick "before.png" and "after.png", then click [OK].
MFC Grenade Texture Fix (FNV)
- Author: Adonis VII
- Version: v1.0
Retextured Fallout Ordnance - RFO (FNV)
- Author: Emerald Reign
- Version: v0.2
Shishkebab the Retexture (FO3)
- Author: Macintroll
Weapon Enhancement Project (FO3)
- Authors: Christopher Wallace and MadCat221
- Version: v1.0
- Installation: Install Weapon Enhancement Pack.
Weapon Retexture Project Mods
Weapon Retexture Project (FNV)
- Author: Millenia
- Version: v1,95
- Installation: Install weapon_retexture_project_1dot95 and New 12_7mm SMG.
357 Revolver Reretextured (FNV)
- Author: Millenia
- Version: v1.2
In Mod Organizer's left pane double-click the mod and in the pop-up box select the "Optional ESPs" tab.
Move "357retex.esp" to the "Optional ESPs" box.
Single Shotgun reretexture (FNV)
- Author: Millenia
- Version: v1.0
In Mod Organizer's left pane double-click the mod and in the pop-up box select the "Optional ESPs" tab.
Move "singleshot_retex.esp" to the "Optional ESPs" box.
Bozar Retexture (FNV)
- Author: Millenia
- Version: v1.1
- Installation: Install Bozar_retexture_2k_maps.
GRA WRP Patch (FNV)
- Authors: Millenia and Micalov
- Version: v2.1
Half Hansified Holorifle (FNV)
- Author: MadCat221
- Version: v1
- Installation: Download Half Hansified Holorifle Standard. The file is named incorrectly.
Rename: holorifle.nif -> Nvdlc01weapholorifle.nif
New Models
2019 Detective Special (FNV)
- Author: Toasty Fresh
- Version: v1.01
- Installation: This mod has multiple .esp files.
In MO, right click the mod and click properties.
Move ThatGunReplacer.esp to Optional ESPs
2019 Detective Special TTW patches (FNV)
- Author: Adonis VII
- Version: v1.0
- Installation: Install ThatGunReplacerGRA TTW patch.
Enclave Colt 10mm Pistol (FNV)
- Authors: Micalov, Millenia
- Version: v1.0
- Installation: Install Enclave Colt 10mm Pistol and TTW Col Autums 10mm replacer [Merge].
 In MO, right click the mod and click properties.
 Move Colt_10mm_pistol.esp to Optional ESPs.
 Load [TTW]AutumnsPistol.esp in FNVEdit. Change the FormID from 0006b531 to 0A06b531.
Forge Beyond (FNV)
- Author: EmeraldReign
- Version: v1.0a
- Installation: Install Forge Beyond - Bozar Hirezd.
TTW-FO3 Hirezd (FO3/TTW)
- Author: Emerald Reign
- Patcher: Adonis VII
- Version: v1.0
- Installation: From the FO3 page, download Flamer - Deluxe, Lincolns Repeater - Optional Cubemaps, and Minigun - Deluxe v2 optional files. From the TTW Page download TTW - FO3 Hirezd V1.0. Multiple .esp files need to be hidden.
 In MO, right click the mod and click properties.
 Move FO3HirezdFlamer.esp, Fo3HirezdLincolnRepeater.esp, and Fo3HirezdMinigun.esp to Optional ESPs.
 In filetree, rename the following textures in textures/weapons/2handhandle/
   minigununique.dds -> Eugene.dds.
   1stpersonminigununique.dds -> 1stpersonEugene.dds
   1stpersonflamerunique.dds -> 1stpersonburnmaster.dds
   flamerunique.dds -> Burnmaster.dds
TTW-WEP-EVE (TTW)
- Authors: ChristopherWallace, & MadCat221
- Patcher: Adonis VII
- Version: v1.2
- Installation: Follow instructions on page.
Weapon Retexture Project - WRP (Christine's COS Rifle) (FNV)
- Author: Millenia
- Version: v1.0
- Installation: Install ChristineCOSRifle.
XChainsaw (FNV)
- Authors: jobra888 and weijiesen
- Version: v2.0
- Installation: Install XChainsaw with smoke-effect.
XChainsaw GRA Patch (FNV)
- Author: VWGolfR1
- Version: v1.0
- Installation: Install XChainsaw GRA patch.
Weapon Effects & Impacts
EVE - TTW (TTW)
- Authors: by weijiesen, jonnyeah, Roy
- Installation: Follow instructions on TTW page
IMPACT (FNV)
- Author: Weijiesen
- Version: v2.0
- Installation:Install one of the main IMPACT - files (The Gaming Rig suggested) and Optional Option - No Refract Hits.
IMPACT - Compatibility Edition (FNV)
- Author: weijiesen - darthbdaman
- Version: v2.0
Lighting
Interior Lighting Overhaul (FNV)
- Authors: Sarge198 and Killergrimm
- Version: v6.9
- Installation: This mod is packaged incorrectly. Download Interior Lighting Overhaul 6-9 - Mod Organizer and extract the .fomod in the file. You will then install this .fomod through MO. Choose Ultimate edition and any other patches for mods you may have installed. DO NOT INSTALL THE TTW PATCH. It is depricated.
Old World Blues Path Lighting (FNV)
- Author: Sarge198
- Version: v1.1
- Installation: This mod has an extra plugin, follow these instructions:
Double click Old World Blues - Path Lighting in the left pane of MO, and go to the "Optional ESPs" tab.
Move "OWB-Path Lights - Darker Nights.esp" to the "Optional ESPs" box.
Realistic Interior Lighting (TTW)
- Authors: Scarecrow, CourierSix
- Installation: Install ttw_realistic_interior_lighting.rar in Pokepunch's post.
FNV Realistic Wasteland Lighting (FNV)
- Authors: xCamoLegend, Sal203, RoyBatty
- Version: v1.0
- Installation: Install TTW Realistic Wasteland Lighting - Complete Main File.
Street Lights (TTW)
- Authors: SpeedyB, Dekoman91, TJ, Roy
- Version: v1.4
- Installation: Install TTW Streetlights v1.4 and TTW Streetlights NMC Patch. [Merge]
Gameplay
Animation Project (FNV)
- Authors: ILikeToPunch - Decer aka Asurah - TommInfinite
- Version: v4
- Requirements: NVSE, JIP, MCM
- Installation: Install Animation Project V4.
Reload Reloaded (FNV)
- Author: migck
- Version: v1.3
- Requirements: NVSE, MCM
- Installation: Install Reload Reloaded. This mod has unneeded .esp files.
 Right Click the mod
 In Optional-ESPs move Reload Reloaded - perks.esp and Reload Reloaded - Weapon Handling.esp to Optional Esps.
More Perks for TTW (TTW)
- Authors: Deadboy, Dree
- Version: v1.3
- Installation: Install all 4 files: More Perks Merged for TTW and More Perks Merged - EVE patch for Chemical Engineer, "Patch for 1.3 to fix the stuff listed above (for real this time on Powered Accelerator)", and "Patch for 2.94b of TTW".
This custom updated, optimized version built for TTW adds 14 new traits and 213 perks.
Courier's Stash Pack Distribution (TTW)
- Author: Retlaw83
- Note: Only install if you have the Courier's Stash Packs. Also CANNOT be used with TTWStashPackOptions.esp
This mod distributes the Courier's Stash items around the early areas of the Capital Wasteland, telling little stories of how they got there.
Delay DLC - TTW (FNV)
- Author: Gribbleshnibit8
- Version: v2.1
- Installation: Install Delay DLC 2-1.
Delay those pesky DLC messages until the appropriate time.
Luck Based Sunset Sarsparilla Star Bottle Caps (FNV)
- Author: CapnLilNemo
This mod adjusts the chance of finding Star Bottle Caps based on your luck. 1 Luck = 1%, 10 Luck = 10%. Average Luck = 5 gives the vanilla value of 5%.
Nipton Fires Extinguished (FNV)
- Author: Qwerty
- Version: v1.0
Makes fire and smoke effects in Nipton disappear 1 day after the first player visit.
Pickable Cave Fungus outisde of Zion (FNV)
- Authoer: Yukichigai
- Version: v1
- Installation: Install Main File
Repair Bladed Weapons with Whet Stone (FNV)
- Author: Yukichigai
- Note: May need patch for TTW DLC weapons
This mod adds the Whet Stone miscellaneous item to the repair list for all bladed weapons. Surprisingly, this simple implementation actually works: when you go to repair any bladed weapon (e.g. a Combat Knife) Whet Stones will appear in the repair list as though they were any other weapon.
Static Battery Replacer (FNV)
- Author: Pintocat
- Version: v1.0
Replaces 50 of the 59 static Fission Battery models with the Misc Item version that can be taken. The remaining 9 are there as visual "power sources" for lights and such.
Two bears high fiving (FNV)
- Author: tehDman
Working Grinding Wheel (FNV)
- Author: Yukichigai
- Version: v2
- Note: May need patch for TTW DLC weapons. Should work fine since TTW adds weapons to VPoisonWeapons list, but let me know if you find an issue.
LOD
In Bethesda games, there are 3 main types of LOD: TerrainLOD, ObjectLOD, and TreeLOD. TerrainLOD covers the actual heightmaps of a worldspace. ObjectLOD covers placed statics in a worldspace. TreeLOD consists of 2D billboards of trees and bushes placed in a worldspace. In New Vegas however, the TreeLOD system is broken, so all threes should be built as 3D meshes and inserted into the ObjectLOD system.
TerrainLOD
Improved LOD Noise (FNV)
- Author: Cyberlazy
- Version: v1.00
Ultimate resolution landscape LODs and generator tes4ll (FO3)
- Author: Gruftikus
- Version: 5.11
- Installation: Install Color maps with rocky filter, Meshes, and Normalmaps with lod shadow option.
- Note: This will cover the Capital Wasteland.
Ultimate resolution landscape LODs and generator tes4ll (FNV)
- Author: Gruftikus
- Version: 5.11
- Installation: Install Color maps NMC version with rocky filter , Meshes, and Normal maps with lod shadow option.
- Note: This will cover the Mojave.
ObjectLOD
FNVLODGen - Resources (FO3/FNV)
- Authors: Ehamloptiran, Sheson, and FNVEdit Team
- Installtion: From the FO3 Page, install FO3LODGen Resources, Vurts Flora Overhaul (choose one). From the FNV page, install FNVLODGen Resources, NMC LOD Texture Fix. This mod has unneded esps.
Move "FO3LODGen.esp" and "FNVLODGen.esp" to the "Optional ESPs" box.
TTWLODGen (Dropbox)
- Authors: Ehamloptiran, Sheson, and FNVEdit Team
Load Order
Load Order can be sorted either manually or with an automatic tool such a LOOT.
Basic instructions for manual sorting can be found here: TTW Load Order General Guide
Thanks to darthbdaman's work on updating the LOOT masterlist for TTW, most mods should now be properly tagged and sorted.
Open LOOT through Mod Organizer and sort the mod list. Click [Apply] when the list of mods is presented. Close LOOT.
Patches
Generate Bash Tags
The purpose of this process is to analyze plugins and recognize the correct bash tags to apply to them. This is a tedious process that involves running a script on all non-vanilla plugins that have been installed, but it is necessary in order to allow a vital patch called a bashed patch to properly combine records from all installed plugins that can benefit from being in that patch.
- Go to this link here.
- Right click the [DOWNLOAD] button and download the "Generate Bash Tags.pas" file.
- Navigate to the FNVEdit\Edit Scripts folder on your computer and move the .pas file there.
- Open FNVEdit through MO.
- Right click the list of mods and choose "Select None".
- Scroll down past FalloutNV.esm, DeadMoney.esm, HonestHearts.esm, OldWorldBlues.esm, LonesomeRoad.esm, GunRunnersArsenal.esm, ClassicPack.esm, MercenaryPack.esm, TribalPack.esm, and CaravanPack.esm (skip the vanilla files) and find the first non-vanilla plugin in the list; it will likely be YUP - Base Game + All DLC.esm.
- Tick that plugin (and that plugin only), then hold
shiftand click [OK]. - After FNVEdit loads, right click on the previously ticked plugin from the list on the left and select "Apply Script".
- From the top dropdown select Generate Bash Tags and click [OK].
- Click [Yes] in the popup.
- After the script is completed, you will see a [Apply Script done] message at the bottom of the right window panel.
- Close FNVEdit and save the plugin.
- Now repeat steps 7-12 on the next plugin in the list.
- Repeat the previous step until you have run the script on all the rest of the plugins in your list (shortcuts will not work - only process one plugin at a time), but don't run the script on your bashed patch if you already have one created.
Remember that this process will need to be redone on any plugin reinstalled in MO. The current version of the script can recognize all known bash tags but one: Deflst. Currently, there is only one plugin in this guide that contains that bash tag and it will have to be treated as a special circumstance; that plugin is 1nivVSLArmors.esp. The script would have determined that Deflst was a bad tag in 1nivVSLArmors.esp and improperly removed it. Follow these steps to manually correct the tags for this plugin:
- Open Wrye Flash NV though MO.
- Select "1nivVSLArmors.esp" and then right click the Bash Tags box in the bottom right and add each these tags:
- Actors.Stats
- Deflst
- Graphics
- Invent
- Names
- Relev
- Stats
- Close Wrye Flash NV.
Create a Bashed Patch
The Bashed Patch is almost as versatile for New Vegas as it is for Oblivion. This means that many more options exist to merge things to the Bashed Patch.
- Run Wrye Flash NV through Mod Organizer. When started right click "Bashed Patch,0.esp" and select Rebuild Patch.
- If the "Bashed Patch,0.esp" is not listed, copy one from the "...Fallout New Vegas\Mopy\Templates" folder to the "...Fallout New Vegas\Data" folder.
- If there is a pop-up that saying certain mods will be disable because they are mergeable, click [Yes]. If not disregard.
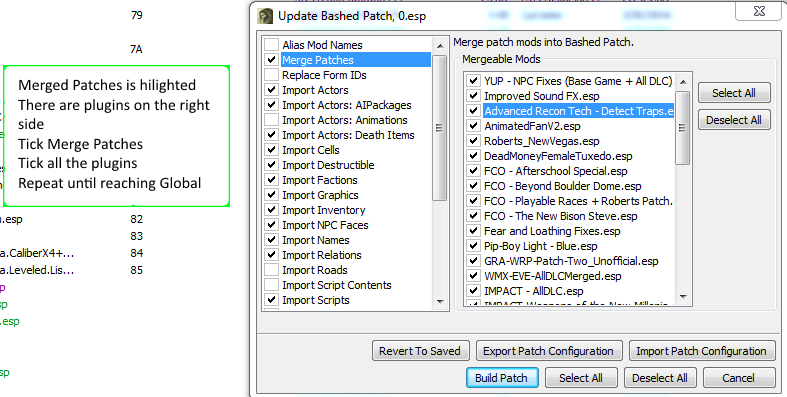
- Go through the left side and click each tag one at a time and stop after Import Weapon Modifications, before Global.
- If there are any plugins listed on the right side, tick the highlighted tab on the left side and tick all the plugins on the right side. (image on right)
- For Import Names, leave FalloutNV.esm unticked.
- Tick Tweak Settings, Content Checker, FormID Lists, Leveled Lists, and Race Records.
- For Tweak Settings, tick Cost Multiplier: Repair and then right click and select '1.5', then tick Terminal Speed Adjustment and then right click and set to 'x 6'.
- For Race Record tick all the plugins on the right side.
- If there are any plugins listed on the right side, tick the highlighted tab on the left side and tick all the plugins on the right side. (image on right)
- Click Build Patch and wait for it to finish. Wrye Flash should take care of everything from here and ask to activate itself if that is needed.
- After building the Bashed Patch you will notice that all plugins merged into the patch appear green. Those have been merged into the Bashed Patch and deactivated. In addition to those, there are a couple mods (MiscItemIconsNV.esp and WMX-ArenovalisTextures.esp) that appear purple. These have not been merged into the Bashed Patch due to being flagged NoMerge, but have been deactivated during the process and must be manually re-enabled in order to work as intended. Click the checkbox to the left of these mods (make sure there is a check in the box next to each, rather than a dot) in order to reactivate them.
- When done, close Wrye Flash NV.
- In the left pane of MO, go to the bottom of the mod list and right click->Create Mod on "Overwrite".
- Type in <Profile Name> Bashed Patch and click [OK]. There is no specific place to put the new folder since it is only a plugin with some files that are irrelevant and LOOT will sort it.
- Once the folder is created, a new Bashed Patch can be generated again and again without having to transfer the Bashed Patch from the "Overwrite" folder repeatedly.
Create a Merged Patch
A merged patch covering what the bash patch does not will be provided shortly after TTW 3.0 launches.
Running FNVLODGen
In MO, go to the archives tab and make sure "Have MO manage archives" is Unchecked.
Launch FNVLODGen through MO. After a moment of processing a window will popup.
On the left pane, select the worldspace(s) for which you wish to generate LOD.  You can select all of them at once.
On the right side make sure Objects LOD is checked and that Tree LOD is unchecked.
Click Generate.
Once the FNVLODGen has finished it will give you the message "LOD Generator: finished (you can close this application now)." Close the program
Go to the location which you selected when setting it up (C:\FNVLODGenOutput was suggested). Archive the meshes + textures folder and install with MO. Name this mod Generated LOD.
In MO, go to the archives tab and make sure "Have MO manage archives" is Checked.
MCM Configuration
MCM is a powerful tool that allows you to customize your game once everything is installed. Details of my suggested setup can be found here.
Credits
EssArrBee & Kelymch - A majority of this guide is based on the two setups by these extraordinary gentlemen. They are effectively co-authors. It wouldn't be possible without them!
Roy - Constantly teaching me and telling me when I'm wrong.
Darth mathias - Stylistic parts of his guide.
STEP - Graciously hosting this guide and being an amazing community. They're how I got into modding!
TTW Team - Making TTW, and providing support on chat.