
Guide:System Setup Guide: Difference between revisions
m (→Tool List) |
|||
| (408 intermediate revisions by 6 users not shown) | |||
| Line 1: | Line 1: | ||
[[Category:General Modding Guides]][[Category:Official Mod-Build Guides]]{{PageTitle|logo=delta|title=System Setup Guide (SSG)|subtitle=A Mandatory Prerequisite for Step Mod-Build Guides|author=The Step Team|forumtid=14917}}{{TOC|limit=4}} | |||
{{Fc|important|This guide describes the expected configuration of the PC environment in order to | {{Fc|important|This guide describes the expected configuration of the Windows 10/11 PC environment in order to follow mod-build guides on this wiki.}} This standard configuration prevents some common modding issues and facilitates support and resolution of many others. | ||
== Modding Folders == | |||
Create modding-related folders (aka, directory locations or 'paths'). Before doing so, consider the space requirements. {{Fc|important|A good rule of thumb for drive space requirements is ~100GB per game}}; however, this will vary from game to game. This space accounts for the game (e.g., Skyrim LE requires ~13GB, Fallout 4 requires ~30GB), installed mods, temporary files, modding tools, etc. Also remember that no PC drive should be filled to more than 90% of its capacity. | |||
To avoid potential Windows Security / User Account Control (UAC) pemissions issues, {{Fc|salmon|avoid installing moddable games and modding resources under existing paths created by Windows or third-party programs}}. {{Fc|red|Install locations to avoid}} include but are not limited to... | |||
* <code>{{Fc|red|C:\Program Files\}}</code> | |||
* <code>C: | * <code>{{Fc|red|C:\Program Files (x86)\}}</code> | ||
* <code>{{Fc|red|C:\Users\}}</code> | |||
* <code>C: | * <code>{{Fc|red|C:\Windows\}}</code> | ||
* <code>C: | |||
Instead, create the following folders on any drive root (e.g., <code>C:\</code>, <code>D:\</code>, <code>E:\</code>, etc.) to keep paths shallow. Installing games and modding tools onto a large, fast drive is beneficial: | |||
<pre>C:\Modding | |||
C:\Modding\Tools | |||
C:\Games</pre> | |||
: | In creating these directories, the 'Owner' is the Windows user who created them and who has full permissions under these locations by default, thus avoiding any potential Windows Security issues in the future. | ||
=== File Extensions === | === File Extensions === | ||
It's recommended to unhide file extensions | It's recommended to unhide file-type extensions to simplify asset identification. | ||
{{Spoiler|shown= | {{Spoiler|shown=Steps - Show Windows File Extensions|hidden= | ||
# Click on the Windows button. | # Click on the Windows button. | ||
# Type in the search, ''File Explorer Options''. | # Type in the search, ''File Explorer Options''. | ||
| Line 32: | Line 27: | ||
== Steam Installation == | == Steam Installation == | ||
Steam is a digital distribution platform by Valve Corp. used for purchasing, downloading, installing, and launching PC games. Download the program [https://store.steampowered.com/about/ from their website] | As is mentioned throughout this guide, Step only supports Steam games at this time. Steam is a digital distribution platform by Valve Corp. used for purchasing, downloading, installing, and launching PC games. | ||
# Download the program [https://store.steampowered.com/about/ from their website] | |||
# Install Steam under the 'Games' folder created previously (e.g., <code>C:\Games\Steam\</code>) | |||
* | #* This location is outside of UAC control (by virtue of being owned by the user) and ensures path depth is shallow and simple. | ||
* | #* Steam installs its games in the <code>..\steamapps\common\</code> sub-folder. | ||
Steam can be installed to any drive and any location, regardless of the paths used for this Guide. However, all Step guides reference these default paths, so any deviations must be taken into account. When installing Steam to an alternative path... | |||
* Avoid installing to existing paths created by Windows or third-party installations (see [[Guide:SystemSetupGuide#Modding_Folders|Modding Folders]]). | |||
* Keep in mind the space requirements for the games that will be installed. | |||
{{Spoiler|shown=Steps - Steam Installation|hidden= | |||
Steam can be installed one of two ways: | Steam can be installed one of two ways: | ||
# {{fc|#ddd|Using a physical copy of the Steam-hosted game purchased from a retailer}}: | # {{fc|#ddd|Using a physical copy of the Steam-hosted game purchased from a retailer}}: | ||
## Insert the game disk into your disk drive. | ## Insert the game disk into your disk drive. | ||
| Line 49: | Line 47: | ||
## Navigate to your downloads location and launch '''SteamSetup.exe''' (see video link below).}} | ## Navigate to your downloads location and launch '''SteamSetup.exe''' (see video link below).}} | ||
== | == Steam Game Installation & Maintenance == | ||
The basics relating to the Step guides follow. Visit [https://help.steampowered.com/en/faqs/view/71AB-698D-57EB-178C '''Steam Support'''] for official documentation. | |||
Games are downloaded and installed using the Steam application. Those who have installed a physical copy of the official game will have done the following. | |||
Games are installed using the Steam application | {{Spoiler|shown=Steps - Game Download & Install|hidden= | ||
{{Spoiler|shown= | |||
# Open the Steam application. | # Open the Steam application. | ||
# | # From the top menu, click {{Ui|Library}}. | ||
# | # If the game is not listed in the left menu, click {{Ui|Store}} from the top menu, and use the search bar to find and purchase the game. | ||
# Grayed out listings in the left menu of the Steam library are not installed. Click on the game listing to install it, choosing the default 'Apps' location.}} | |||
=== | === Move Steam and Installed Games === | ||
Since Steam is presumably installed under a user-created folder like <code>C:\Games\Steam</code> Windows Security is not an issue; however, if Steam was previously installed into its default location, or if space for installed games is running low, it's simple (and recommended) to [https://help.steampowered.com/en/faqs/view/4BD4-4528-6B2E-8327 moved Steam games or Steam itself into a custom location]. | |||
=== Initialize the Game === | |||
Once the game is installed, it needs to be loaded with the default launcher to register it with Windows and create necessary files. For games with DLC, it's mandatory to purchase and install all DLC prior to following the corresponding guide. Furthermore, it's mandatory to be running the latest version of said game(s), because the Step guides are only compatible with the latest game versions + all available DLC: | |||
# Launch Steam, and click the {{Ui|Library}} from the top menu. | |||
# Click on the game of choice in the left menu. | |||
# Click {{Ui|Play}} button on the game page at right. | |||
#* This will invoke one-time initialization scripts for required software. | |||
#* For Bethesda games, video settings will be autodetected, game INIs will be created, and keys/values will be written to the Windows registry. | |||
# {{Fc|salmon|SkyrimSE ONLY}} (skip to #5 for other games) - This ensures all CC content are the latest versions available. | |||
## Click {{Ui|Play}} within the launcher. | |||
## Click {{Ui|Download}} to download the Creation Club data files. | |||
## Click {{Ui|OK}} to reset the game files. | |||
# Exit/quit the launcher/game. | |||
=== Game Backup{{ | === Revert to Vanilla === | ||
Though not necessary with the use of Mod Organizer, some | It's important to begin creating or updating a Step build using a clean slate to avoid unnecessary complications and to meet guide requirements (Step guides always expect the most current Steam game release). Refer to [[Guide:System_Setup_Guide#Game_Backup(optional)|Game Backup]] below to preserve game files used in previous Step builds if desired. | ||
If an archived backup was not created, the default game content can be downloaded fresh from Steam. This is a two part process: | |||
==== Remove Installed Content ==== | |||
{{Spoiler|shown=Steps - Remove Installed Content|hidden= | |||
# If mods from the Steam Workshop are installed, navigate to the Workshop and '''unsubscribe from ALL mods'''. | |||
# Browse to the game directory: <code>..\Steam\SteamApps\common\<gameFolder></code> | |||
# Delete all files and subdirectories. | |||
# Launch Steam, and click on {{Ui|Library}} from the top menu. | |||
# In the left menu, right click on the game, and click {{Ui|Manage >}} {{Ui|Uninstall}}. | |||
# Browse to: <code>%USERPROFILE%\My Documents\My Games\<gameName></code>, and delete all files and subdirectories.}} | |||
==== Verify Integrity of Game Files ==== | |||
{{Spoiler|shown=Steps - Reacquire Game Data From Steam|hidden= | |||
# Close any open mod managers. | |||
# In the Steam app Library, right-click the game and select Properties. | |||
# Under the '''''Installed Files''''' menu, click {{Ui|Verify integrity of game files...}} | |||
#* This will reset all game data, and the game will need to be [[Guide:System_Setup_Guide#Initialize_the_Game|reinitialized]].}} | |||
=== Disabling Steam Automatic Updates{{Fc|yellow|<sup>(optional)</sup>}} === | |||
Step guides expect the latest version of supported games with all available official DLC, so disabling automatic updates is not advised; however, certain updates can break the respective guide on occasion until the guide is updated likewise. To stop Steam from automatically updating a game, right click on a game title in the Library, and select Properties > Updates > "Only update this game when I launch it". | |||
=== Game Backup{{Fc|yellow|<sup>(optional)</sup>}} === | |||
Though not necessary with the use of Mod Organizer, some may wish to create a backup of the vanilla game before modding begins. If so, now would be the time to complete this task. For this, Step recommends using [https://www.7-zip.org/ 7-Zip] to archive the following directories: | |||
* ''{{fc|instruction|Replace 'GameFolder' with the name of the folder being archived.}}'' | * ''{{fc|instruction|Replace 'GameFolder' with the name of the folder being archived.}}'' | ||
* <code>.. | * <code>..\Steam\steamapps\common\{{Fc|orange|<gameFolder>}}</code> | ||
* <code>%USERPROFILE% | * <code>%USERPROFILE%\My Documents\My Games\{{Fc|orange|<gameFolder>}}</code> | ||
* <code>%LOCALAPPDATA% | * <code>{{Fc|blue|%LOCALAPPDATA%}}\{{Fc|orange|<gameFolder>}}</code> (e.g. <code>{{Fc|blue|C:\Users\<UserName>\AppData\Local}}\{{Fc|orange|<gameFolder>}}</code> ) | ||
== Tools Installation and Setup == | |||
Step recommends the tools for modding be installed and setup as “standalone” applications whenever possible. This means a tool is installed once and used for all games. | |||
=== Miscellaneous === | |||
There are some programs that are commonly used during modding that aren't necessarily "modding tools". These are general applications used for more than just modding and should NOT be installed under the <code>..\Modding\Tools\</code> location: | |||
; [https://www.7-zip.org/ 7-zip] | |||
:: This is a popular file archiver. All mods are archived before uploading and may need to be extracted. Most mods have the custom format from 7-zip (.7z). | |||
; [https://notepad-plus-plus.org/ Notepad++] | |||
:: This is a popular text editor that supports many coding languages and has syntax highlighting, plugins (including Papyrus), and many more features useful for modding. | |||
{{Alert|text=Install all of the following modding tools to the <code>..\Modding\Tools\</code> location created previously.}} | |||
=== Mod Organizer{{Fs|0.75em|<sup>([https://stepmodifications.org/forum/topic/417-- Forum])</sup>}} === | |||
Mod Organizer 2 (MO) is the required mod manager for all Step Guides, since mod installation instructions are written specifically for MO. Other mod managers can be used, but they are NOT supported. Vortex users can [https://stepmodifications.org/forum/topic/19414-pandora-behavior-engine/page/2/#comment-277826 easily switch to MO] without losing downloaded or installed mods by moving some files around using Windows Explorer. Then each download/mod's metadata can be synced, | |||
# Log in to [https://www.nexusmods.com/skyrimspecialedition/mods/6194 Nexus] and [https://www.nexusmods.com/skyrimspecialedition/mods/6194 Download] the MO Main File. | |||
# Install MO into <code>..\Modding\Tools\Mod Organizer\</code> | |||
The | {{alert|type=warn|size=mid|text={{Fc|highlight|'''No Man Sky:'''}} The following modding tools don't apply, so skip ahead to [[Guide:System_Setup_Guide#MO First-Launch Setup|MO First-Launch Setup]].}} | ||
== | === BethINI{{Fs|0.75em|<sup>([https://stepmodifications.org/forum/topic/13322-- Forum])}} === | ||
Step | # Download BethINI: | ||
#* Check the Release Date at the top of the [[Main_Page|Step guide of interest]] (Step guides are also linked in the top nav under '''Game Guides'''). | |||
#* For guides released prior to 2024: [https://www.nexusmods.com/skyrimspecialedition/mods/4875 Download the previous version of BethINI]. | |||
#* For guides released in 2024 onward: [https://www.nexusmods.com/site/mods/631 Download BethINI Pie]. | |||
# Double-click the archive to open it in 7z, and double-click into the top folder to expose all of the BethINI files/folders to be installed. | |||
# Create the <code>..\Modding\Tools\BethINI</code> folder, and drag all files/folders into this folder. | |||
#* When upgrading BethINI, remove all existing files/folders, and replace them with those from the latest archive. | |||
=== | === LOOT{{Fs|0.75em|<sup>([https://stepmodifications.org/forum/topic/4995-- Forum])}} === | ||
# [https://loot.github.io/ Download] the 7z archive of the latest 64-bit version of LOOT (e.g., <code>loot_#.#.#-win64.7z</code>). | |||
# | # Double-click the archive to open it in 7z, and double-click into the top folder to expose all of the LOOT files/folders to be installed. | ||
# | # Create the <code>..\Modding\Tools\LOOT</code> folder, and drag all files/folders into this folder. | ||
#* When upgrading LOOT, remove all existing files/folders, and replace them with those from the latest archive. | |||
#* | |||
=== | === xEdit{{Fs|0.75em|<sup>([https://stepmodifications.org/forum/topic/10094-- Forum])}} === | ||
''''xEdit'''' is the generic name that applies to all applicable game variants (e.g., SSEEdit, TES5Edit, FO4Edit, etc.). For example, SSEEdit is the ''same application'' as FO4Edit, and the only difference is the name of the EXE files in the downloads. The application's game-specific behavior is triggered by the file name but can be overridden by command-line argument. In keeping with all modding tools being installed as standalone applications, Step will use the command-line argument via MO to invoke the applicable game mode rather than installing each variant (more on that later in the Guide). | |||
# [https://www.nexusmods.com/skyrimspecialedition/mods/164 Download] SSEEdit (i.e., xEdit) from Nexus. {{Fc|salmon|'''SSEEdit' is 'xEdit', and applies to all Bethesda games!''}} | |||
# Double-click the archive to open it in 7z, and double-click into the top folder to expose all of the xEdit files/folders to be installed. | |||
# Create the <code>..\Modding\Tools\xEdit</code> folder, and drag all files/folders into this folder. | |||
#* When upgrading xEdit, remove all existing files/folders, and replace them with those from the latest archive. | |||
=== xLODGen{{Fs|0.75em|<sup>([https://stepmodifications.org/forum/topic/13451-xlodgen-terrain-lod-beta-85-for-fnv-fo3-fo4-fo4vr-tes5-sse-tes5vr-enderal-enderalse Forum])}} === | |||
# [https://stepmodifications.org/forum/topic/13451-xlodgen-terrain-lod-beta-85-for-fnv-fo3-fo4-fo4vr-tes5-sse-tes5vr-enderal-enderalse/ Read the OP carefully] before downloading and using xLODGen. | |||
# Double-click the archive to open it in 7z, and drag the ''xLODGen'' folder directly into <code>..\Modding\Tools\</code>. | |||
# Create a folder inside the xLODGen folder for the application output: <code>..\Modding\Tools\xLODGen\xLODGen_Output</code> | |||
#* When upgrading xLODGen, remove all existing files/folders ''except'' <code>xLODGen_Output</code>, and replace them with those from the latest archive. | |||
---- | |||
The "Modding" folder structure should now reflect: | The "Modding" folder structure should now reflect: | ||
<pre> | |||
..\Modding\Tools | |||
..\Modding\Tools\BethINI | |||
..\Modding\Tools\LOOT | |||
..\Modding\Tools\Mod Organizer | |||
..\Modding\Tools\xEdit | |||
..\Modding\Tools\xLODGen</pre> | |||
== | === MO First-Launch Setup === | ||
== | {{Alert|type=warn|text=For many instructions to make sense, this guide expects mods to be downloaded from Nexus using the "Mod Manager Download" button when it's available. This requires a Nexus user account to be associated with MO to leverage the API. Step doesn't support issues related to either 1) manual mod metadata maintenance or 2) obtaining mods from Nexus anonymously. Both add layers of complexity and potential issues that are out of scope.}} | ||
Step recommends installing all applications as standalone programs | |||
# Launch | As mentioned previously, Step recommends installing all applications as standalone programs. For MO, this behavior is configured at first launch of the program and creating a "Global Instance". For more detailed information about the MO configuration at first launch, see the [https://stepmodifications.org/wiki/Guide:Mod_Organizer#First-Launch_Setup Mod Organizer Guide]. | ||
# Upon launch, a | # Launch MO by running its executable (e.g. <code>..\Modding\Tools\Mod Organizer\ModOrganizer.exe</code>) | ||
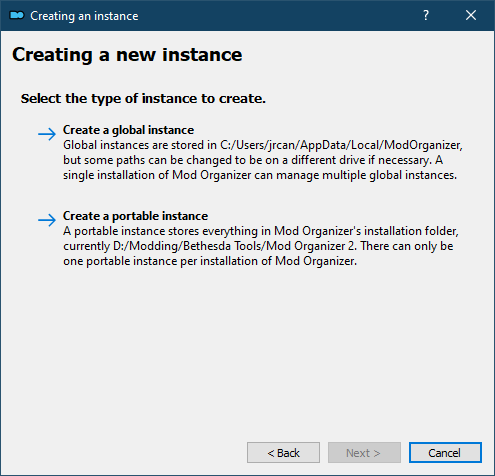
# Upon first launch, a window explaining "instances" will be presented. Click {{Ui|Next}}, and select "Create a global instance", and click {{ui|Next}} again. | |||
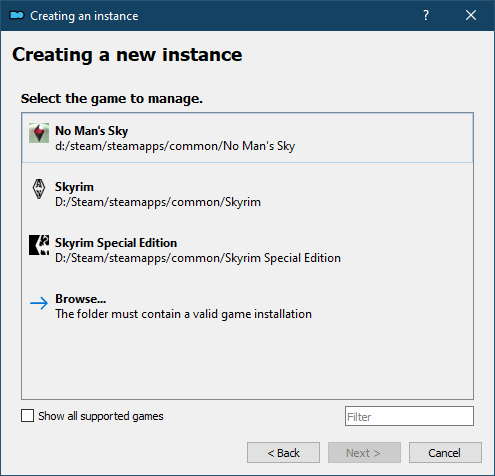
# | # MO will detect games that are installed. Select any one of the games listed and tick {{ui|Next}}. {{Fc|salmon|''If the game wasn't auto-detected, manually browse to the game directory.''}} | ||
#* Select the '''''Steam''''' game edition if prompted. {{Fc|salmon|''Step guides only support Steam games. Other editions can be used but aren't supported by Step guide curators.''}} | |||
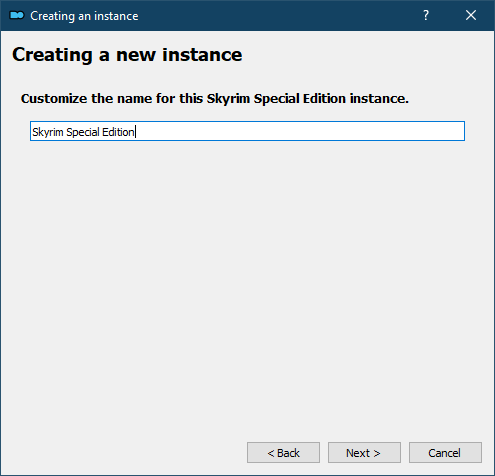
# | # Type a name, or use the default, and tick {{ui|Next}}. | ||
# | #* Tick all boxes if prompted to "Configure profile settings". | ||
# | #* Step recommends using the guide name and version number as the instance name (e.g. <code>Step SkyrimSE v#.#</code>), which makes it possible to completely partition game-specific mod build versions, preserving historic builds. MO profiles do not allow this degree of separation. See [[Guide:Mod_Organizer/Instances_vs_Profiles|Instances vs Profiles]] for more information. | ||
# Choose an installation path, and tick {{ui|Next}}. | |||
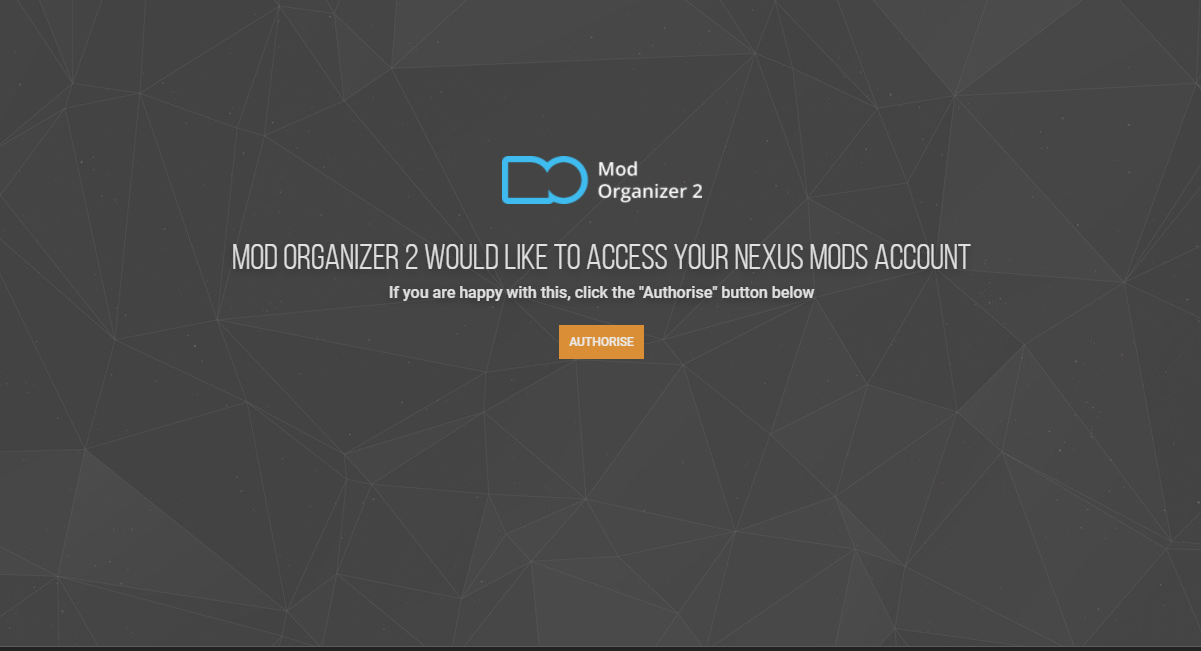
# Tick the {{ui|Connect to Nexus}} button. {{Fc|salmon|''This is necessary to leverage the Nexus API for mod data integrations between Nexus and MO!''}} | |||
#* If this fails, wait a moment and try again. | #* If this fails, wait a moment and try again. | ||
#* When successful, a browser window will open | #* When successful, a browser window will open Nexus Mods. Log in, and tick the {{ui|Authorise}} button to allow the connection. | ||
#* The browser page | #* The browser page should present a 'success' message. Close the window, and tick {{ui|Next}} | ||
# | # Tick {{ui|Finish}} after the confirmation message appears. | ||
#* A prompt | #* A tutorial prompt may appear, which is recommended for those new to MO. | ||
#* Another prompt will appear if MO is not set up to handle .NXM links | #* Another prompt will appear if MO is not set up to handle .NXM links. Select {{ui|Yes}}. | ||
# | # MO is now ready to use. {{Fc|salmon|''By default, the MO profile will be created under'' <code>%LOCALAPPDATA%\ModOrganizer\{{Fc|orange|<instanceName>}}\profiles\{{Fc|orange|<profileName>}}</code>.}} | ||
{{ | {{GallerySimple|id=MOFirstStart|img=File:MOSetup02.PNG|caption=Step 2}} | ||
{{ | {{GallerySimple|id=MOFirstStart|img=File:MOSetup03.PNG|caption=Step 3}} | ||
{{ | {{GallerySimple|id=MOFirstStart|img=File:MOSetup05.PNG|caption=Step 4}} | ||
{{ | {{GallerySimple|id=MOFirstStart|img=File:MOSetup06.PNG|caption=Step 5}} | ||
{{ | {{clear}} | ||
{{GallerySimple|id=MOFirstStart|img=File:MOSetup08.PNG|caption=Step 6}} | |||
{{ | {{GallerySimple|id=MOFirstStart|img=File:MOSetup09.PNG|caption=Step 6-2}} | ||
{{ | {{GallerySimple|id=MOFirstStart|img=File:MOSetup12.PNG|caption=Step 7}} | ||
{{ | {{GallerySimple|id=MOFirstStart|img=File:MOSetup15.PNG|caption=Step 8}} | ||
{{ | |||
}} | {{Alert|type=mo|text='''Note on MO version tracking''' | ||
To maximize efficiency of Nexus mod version tracking, Step now recommends that files not under "Main Files" be installed as separate mods to allow independent version tracking apart from the Main Files and global mod version. This will flag outdated versions of mods that have been updated. Because some mod authors don't understand or how this works (or just don't care), certain mods will perpetually be flagged as being outdated. To fix this, modify the '''''meta.ini''''' file MO creates in every mod such that the ''version'' and ''newestVersion'' values match the actual version of interest. When the mod is updated, this will trigger the flag again.}} | |||
== Update Drivers == | |||
Most drivers are updated fairly frequently, especially if hardware is relatively new. Driver updates often fix bugs, expand functionality, increase compatibility, and provide performance improvements. As such, it is important to keep drivers up to date, particularly chipset drivers. | |||
Pre-built PCs often bundle driver-update applications that can be used to download and install official driver updates specific to the PC. Drivers for custom-built PCs will be on the component manufacturer's websites. BIOS and firmware updates are often available as well but can be trickier and more risky to 'flash'. | |||
* [https://www.intel.com/content/www/us/en/download/18002/intel-driver-support-assistant.html '''Intel Driver Updates'''] | |||
*: Intel also provides a means to [https://www.intel.com/content/www/us/en/support/articles/000032252/software/software-applications.html update unsupported drivers]. | |||
* [https://www.amd.com/en/support '''AMD Driver Updates'''] | |||
{{Spoiler|shown= | Display drivers can often be upgraded without issue, particularly if done so using the video card's software; however, a bad installation or corruption is possible. In such situations, it is necessary to perform a "clean upgrade" as described below: | ||
{{Spoiler|shown=Steps - "Clean Upgrade" Display Drivers|hidden= | |||
# Download the latest stable [https://www.amd.com/en/support AMD drivers] / [https://www.geforce.com/drivers Nvidia drivers]. | # Download the latest stable [https://www.amd.com/en/support AMD drivers] / [https://www.geforce.com/drivers Nvidia drivers]. | ||
# Download [https://www.wagnardsoft.com/ DDU] and install it ([https://www.wagnardsoft.com/forums/viewforum.php?f=5 DDU forums]). | # Download [https://www.wagnardsoft.com/ DDU] and install it ([https://www.wagnardsoft.com/forums/viewforum.php?f=5 DDU forums]). | ||
# Restart | # Restart Windows, and boot into [https://support.microsoft.com/en-us/windows/start-your-pc-in-safe-mode-in-windows-10-92c27cff-db89-8644-1ce4-b3e5e56fe234 safe mode]. | ||
# Launch DDU, and select the appropriate driver from the dropdown. | |||
# Launch DDU, and select the appropriate driver from the | # Note the recommendations in DDU, and initialize the cleanup. | ||
# Note the recommendations in DDU and initialize the cleanup. | # Reboot normally, and install the latest drivers downloaded from step 1. | ||
# Reboot normally and install the latest drivers downloaded from step 1.}} | # Reboot normally again.}} | ||
== Display Configuration == | |||
Keep in mind that hardware and software vary wildly by end user, and there are many configuration possibilities that work for any given subset, but results will still vary. | |||
'''Important Considerations:''' | |||
# Configure driver software and frame-rate caps as described on [[SkyrimSE:SSE Display Tweaks|SSE Display Tweaks]]. | |||
# A 144Hz QHD gaming monitor is recommended for results comparable to the Step team. | |||
# TES games don't natively support HDR, so disabling monitor HDR and OS software HDR may (or may not) produce the best results for these games. | |||
# The monitor's on-board configuration settings that can impact end results. A warm or color-neutral standard preset is recommended. | |||
# Monitor calibration is essential and coming up next. | |||
=== | === Monitor Calibration === | ||
Color calibration is critical to photographers and graphic artists who work across media types, but it's also equally important for gaming. Nevertheless, all monitors vary in terms of color range/accuracy and brightness/contrast quality. | |||
There are three places to configure color saturation, temperature, brightness, contrast, gamma, etc.: | |||
# The monitor's on-board configuration | |||
# Windows ''Display Settings'' and ''Color Management'' | |||
# | # The graphics software configuration utility | ||
# | |||
# | |||
The value of one setting can affect the appearance of other settings, and depending on the quality of the monitor, #1 above could be very good or just 'okay'. The #2 and #3 options should be standard though, since they are made to work across various monitors. The fact of the matter is, each monitor's calibration process is going to be slightly different. So much so that Step can not reliably provide one set of instructions for everyone. As such, we recommend following [https://www.rtings.com/monitor/learn/how-to-calibrate-your-monitor-settings RTINGS's guide for monitor calibration]. It's well written by professionals and easy to understand. | |||
# | |||
# | |||
Additionally, RTINGS has a large [https://www.rtings.com/monitor/index list of monitors] they have professionally reviewed and calibrated. Many of these listings have ICC profiles available for downloaded and use, which provides their professional calibration for free. If using one of these ICC profiles, be sure the model matches the model of the monitor in use! Be aware there can be small differences even between monitors of the same models. Therefore, if an ICC profile is available it may not have the exact same results as RTINGS's review, but should be relatively close. | |||
Additional calibration images can be found here: [http://www.lagom.nl/lcd-test/ http://www.lagom.nl/lcd-test/] | |||
== Disabling Overlays == | |||
== | Certain programs (e.g., ENBSeries) don't work properly when other program overlays are active. Consider disabling all conflicting or unnecessary overlays commonly found on modern Windows PCs. | ||
{{CollapsibleTable | |||
| row = 1 | |||
''' | | type = Overlays | ||
| caption = Disable Overlays | |||
| heading = 4 | |||
# | | title = Disable the Discord Overlay | ||
# | | text = # Run Discord and open Settings (gear icon next to username). | ||
# In the left navigation under '''''Activity Settings''''', tick {{Ui|Game Overlay}}. | |||
# ''Un''tick {{Ui|Enable in-game overlay}}. | |||
#* To enable in some games but not others, leave this setting ticked, and ... | |||
#*# Still under '''''Activity Settings''''', click {{Ui|Activity Status}}. | |||
#*#* Ensure the monitor icon is toggled off (red) for each game for which the overlay should be disabled. | |||
# Close the window. | |||
#: Also see [https://support.discordapp.com/hc/en-us/articles/217659737-Games-Overlay-101 Discord's official documentation].}} | |||
{{CollapsibleTable | |||
| row = 2 | |||
| type = Overlays | |||
| title = Disable the GeForce Experience Overlay | |||
| text = # Open the GeForce Experience application. | |||
# Click the Settings icon (gear) at the top. | |||
# Midway down the page, ''Un''toggle '''IN-GAME OVERLAY'''. | |||
# Close the window.}} | |||
{{CollapsibleTable | |||
| row = final | |||
| type = Overlays | |||
| title = Disable the Steam Overlay | |||
| text = # Open Steam, and click on the ''LIBRARY'' tab at top. | |||
# In the game list, right-click on '''''The Elder Scrolls V: Skyrim Special Edition''''' | |||
# Select '''''Properties'''''. | |||
# ''Un''tick {{Ui|Enable the Steam Overlay while in-game}} | |||
# Close the window. | |||
To disable the Steam overlay for ALL games: | |||
# Open Steam, and click on '''Steam''' in the toolbar. | |||
# On the dropdown menu click '''Settings'''. | |||
# In the pop-up, ''Un''tick {{Ui|Enabled the Steam overlay while in-game}}, and click {{Ui|OK}}.}} | |||
Latest revision as of 02:15, April 18, 2024

System Setup Guide (SSG)
A Mandatory Prerequisite for Step Mod-Build Guides
by: The Step Team | Forum Topic
This guide describes the expected configuration of the Windows 10/11 PC environment in order to follow mod-build guides on this wiki. This standard configuration prevents some common modding issues and facilitates support and resolution of many others.
Modding Folders[edit | edit source]
Create modding-related folders (aka, directory locations or 'paths'). Before doing so, consider the space requirements. A good rule of thumb for drive space requirements is ~100GB per game; however, this will vary from game to game. This space accounts for the game (e.g., Skyrim LE requires ~13GB, Fallout 4 requires ~30GB), installed mods, temporary files, modding tools, etc. Also remember that no PC drive should be filled to more than 90% of its capacity.
To avoid potential Windows Security / User Account Control (UAC) pemissions issues, avoid installing moddable games and modding resources under existing paths created by Windows or third-party programs. Install locations to avoid include but are not limited to...
C:\Program Files\C:\Program Files (x86)\C:\Users\C:\Windows\
Instead, create the following folders on any drive root (e.g., C:\, D:\, E:\, etc.) to keep paths shallow. Installing games and modding tools onto a large, fast drive is beneficial:
C:\Modding
C:\Modding\Tools
C:\Games
In creating these directories, the 'Owner' is the Windows user who created them and who has full permissions under these locations by default, thus avoiding any potential Windows Security issues in the future.
File Extensions[edit | edit source]
It's recommended to unhide file-type extensions to simplify asset identification.
- Click on the Windows button.
- Type in the search, File Explorer Options.
- Click on the File Explorer Options listing.
- Click the View tab on the window that opens.
- In the Advanced settings pane, remove the checkbox next to Hide extensions for known file types.
Steam Installation[edit | edit source]
As is mentioned throughout this guide, Step only supports Steam games at this time. Steam is a digital distribution platform by Valve Corp. used for purchasing, downloading, installing, and launching PC games.
- Download the program from their website
- Install Steam under the 'Games' folder created previously (e.g.,
C:\Games\Steam\)- This location is outside of UAC control (by virtue of being owned by the user) and ensures path depth is shallow and simple.
- Steam installs its games in the
..\steamapps\common\sub-folder.
Steam can be installed to any drive and any location, regardless of the paths used for this Guide. However, all Step guides reference these default paths, so any deviations must be taken into account. When installing Steam to an alternative path...
- Avoid installing to existing paths created by Windows or third-party installations (see Modding Folders).
- Keep in mind the space requirements for the games that will be installed.
Steam can be installed one of two ways:
- Using a physical copy of the Steam-hosted game purchased from a retailer:
- Insert the game disk into your disk drive.
- If the installer doesn't run automatically, open the disk from Explorer and run Setup.exe.
- Follow the on-screen instructions to install Steam (see video link below)
- Download Steam from their website and install it:
- Navigate to the Steam website
- Download the Steam installer
- Navigate to your downloads location and launch SteamSetup.exe (see video link below).
Steam Game Installation & Maintenance[edit | edit source]
The basics relating to the Step guides follow. Visit Steam Support for official documentation.
Games are downloaded and installed using the Steam application. Those who have installed a physical copy of the official game will have done the following.
- Open the Steam application.
- From the top menu, click [Library].
- If the game is not listed in the left menu, click [Store] from the top menu, and use the search bar to find and purchase the game.
- Grayed out listings in the left menu of the Steam library are not installed. Click on the game listing to install it, choosing the default 'Apps' location.
Move Steam and Installed Games[edit | edit source]
Since Steam is presumably installed under a user-created folder like C:\Games\Steam Windows Security is not an issue; however, if Steam was previously installed into its default location, or if space for installed games is running low, it's simple (and recommended) to moved Steam games or Steam itself into a custom location.
Initialize the Game[edit | edit source]
Once the game is installed, it needs to be loaded with the default launcher to register it with Windows and create necessary files. For games with DLC, it's mandatory to purchase and install all DLC prior to following the corresponding guide. Furthermore, it's mandatory to be running the latest version of said game(s), because the Step guides are only compatible with the latest game versions + all available DLC:
- Launch Steam, and click the [Library] from the top menu.
- Click on the game of choice in the left menu.
- Click [Play] button on the game page at right.
- This will invoke one-time initialization scripts for required software.
- For Bethesda games, video settings will be autodetected, game INIs will be created, and keys/values will be written to the Windows registry.
- SkyrimSE ONLY (skip to #5 for other games) - This ensures all CC content are the latest versions available.
- Click [Play] within the launcher.
- Click [Download] to download the Creation Club data files.
- Click [OK] to reset the game files.
- Exit/quit the launcher/game.
Revert to Vanilla[edit | edit source]
It's important to begin creating or updating a Step build using a clean slate to avoid unnecessary complications and to meet guide requirements (Step guides always expect the most current Steam game release). Refer to Game Backup below to preserve game files used in previous Step builds if desired.
If an archived backup was not created, the default game content can be downloaded fresh from Steam. This is a two part process:
Remove Installed Content[edit | edit source]
- If mods from the Steam Workshop are installed, navigate to the Workshop and unsubscribe from ALL mods.
- Browse to the game directory:
..\Steam\SteamApps\common\<gameFolder> - Delete all files and subdirectories.
- Launch Steam, and click on [Library] from the top menu.
- In the left menu, right click on the game, and click [Manage >] [Uninstall].
- Browse to:
%USERPROFILE%\My Documents\My Games\<gameName>, and delete all files and subdirectories.
Verify Integrity of Game Files[edit | edit source]
- Close any open mod managers.
- In the Steam app Library, right-click the game and select Properties.
- Under the Installed Files menu, click [Verify integrity of game files...]
- This will reset all game data, and the game will need to be reinitialized.
Disabling Steam Automatic Updates(optional)[edit | edit source]
Step guides expect the latest version of supported games with all available official DLC, so disabling automatic updates is not advised; however, certain updates can break the respective guide on occasion until the guide is updated likewise. To stop Steam from automatically updating a game, right click on a game title in the Library, and select Properties > Updates > "Only update this game when I launch it".
Game Backup(optional)[edit | edit source]
Though not necessary with the use of Mod Organizer, some may wish to create a backup of the vanilla game before modding begins. If so, now would be the time to complete this task. For this, Step recommends using 7-Zip to archive the following directories:
- Replace 'GameFolder' with the name of the folder being archived.
..\Steam\steamapps\common\<gameFolder>%USERPROFILE%\My Documents\My Games\<gameFolder>%LOCALAPPDATA%\<gameFolder>(e.g.C:\Users\<UserName>\AppData\Local\<gameFolder>)
Tools Installation and Setup[edit | edit source]
Step recommends the tools for modding be installed and setup as “standalone” applications whenever possible. This means a tool is installed once and used for all games.
Miscellaneous[edit | edit source]
There are some programs that are commonly used during modding that aren't necessarily "modding tools". These are general applications used for more than just modding and should NOT be installed under the ..\Modding\Tools\ location:
- 7-zip
-
- This is a popular file archiver. All mods are archived before uploading and may need to be extracted. Most mods have the custom format from 7-zip (.7z).
- Notepad++
-
- This is a popular text editor that supports many coding languages and has syntax highlighting, plugins (including Papyrus), and many more features useful for modding.
NOTE
Install all of the following modding tools to the..\Modding\Tools\ location created previously.Mod Organizer(Forum)[edit | edit source]
Mod Organizer 2 (MO) is the required mod manager for all Step Guides, since mod installation instructions are written specifically for MO. Other mod managers can be used, but they are NOT supported. Vortex users can easily switch to MO without losing downloaded or installed mods by moving some files around using Windows Explorer. Then each download/mod's metadata can be synced,
WARNING
No Man Sky: The following modding tools don't apply, so skip ahead to MO First-Launch Setup.BethINI(Forum)[edit | edit source]
- Download BethINI:
- Check the Release Date at the top of the Step guide of interest (Step guides are also linked in the top nav under Game Guides).
- For guides released prior to 2024: Download the previous version of BethINI.
- For guides released in 2024 onward: Download BethINI Pie.
- Double-click the archive to open it in 7z, and double-click into the top folder to expose all of the BethINI files/folders to be installed.
- Create the
..\Modding\Tools\BethINIfolder, and drag all files/folders into this folder.- When upgrading BethINI, remove all existing files/folders, and replace them with those from the latest archive.
LOOT(Forum)[edit | edit source]
- Download the 7z archive of the latest 64-bit version of LOOT (e.g.,
loot_#.#.#-win64.7z). - Double-click the archive to open it in 7z, and double-click into the top folder to expose all of the LOOT files/folders to be installed.
- Create the
..\Modding\Tools\LOOTfolder, and drag all files/folders into this folder.- When upgrading LOOT, remove all existing files/folders, and replace them with those from the latest archive.
xEdit(Forum)[edit | edit source]
'xEdit' is the generic name that applies to all applicable game variants (e.g., SSEEdit, TES5Edit, FO4Edit, etc.). For example, SSEEdit is the same application as FO4Edit, and the only difference is the name of the EXE files in the downloads. The application's game-specific behavior is triggered by the file name but can be overridden by command-line argument. In keeping with all modding tools being installed as standalone applications, Step will use the command-line argument via MO to invoke the applicable game mode rather than installing each variant (more on that later in the Guide).
- Download SSEEdit (i.e., xEdit) from Nexus. 'SSEEdit' is 'xEdit', and applies to all Bethesda games!
- Double-click the archive to open it in 7z, and double-click into the top folder to expose all of the xEdit files/folders to be installed.
- Create the
..\Modding\Tools\xEditfolder, and drag all files/folders into this folder.- When upgrading xEdit, remove all existing files/folders, and replace them with those from the latest archive.
xLODGen(Forum)[edit | edit source]
- Read the OP carefully before downloading and using xLODGen.
- Double-click the archive to open it in 7z, and drag the xLODGen folder directly into
..\Modding\Tools\. - Create a folder inside the xLODGen folder for the application output:
..\Modding\Tools\xLODGen\xLODGen_Output- When upgrading xLODGen, remove all existing files/folders except
xLODGen_Output, and replace them with those from the latest archive.
- When upgrading xLODGen, remove all existing files/folders except
The "Modding" folder structure should now reflect:
..\Modding\Tools
..\Modding\Tools\BethINI
..\Modding\Tools\LOOT
..\Modding\Tools\Mod Organizer
..\Modding\Tools\xEdit
..\Modding\Tools\xLODGen
MO First-Launch Setup[edit | edit source]
WARNING
For many instructions to make sense, this guide expects mods to be downloaded from Nexus using the "Mod Manager Download" button when it's available. This requires a Nexus user account to be associated with MO to leverage the API. Step doesn't support issues related to either 1) manual mod metadata maintenance or 2) obtaining mods from Nexus anonymously. Both add layers of complexity and potential issues that are out of scope.As mentioned previously, Step recommends installing all applications as standalone programs. For MO, this behavior is configured at first launch of the program and creating a "Global Instance". For more detailed information about the MO configuration at first launch, see the Mod Organizer Guide.
- Launch MO by running its executable (e.g.
..\Modding\Tools\Mod Organizer\ModOrganizer.exe) - Upon first launch, a window explaining "instances" will be presented. Click [Next], and select "Create a global instance", and click [Next] again.
- MO will detect games that are installed. Select any one of the games listed and tick [Next]. If the game wasn't auto-detected, manually browse to the game directory.
- Select the Steam game edition if prompted. Step guides only support Steam games. Other editions can be used but aren't supported by Step guide curators.
- Type a name, or use the default, and tick [Next].
- Tick all boxes if prompted to "Configure profile settings".
- Step recommends using the guide name and version number as the instance name (e.g.
Step SkyrimSE v#.#), which makes it possible to completely partition game-specific mod build versions, preserving historic builds. MO profiles do not allow this degree of separation. See Instances vs Profiles for more information.
- Choose an installation path, and tick [Next].
- Tick the [Connect to Nexus] button. This is necessary to leverage the Nexus API for mod data integrations between Nexus and MO!
- If this fails, wait a moment and try again.
- When successful, a browser window will open Nexus Mods. Log in, and tick the [Authorise] button to allow the connection.
- The browser page should present a 'success' message. Close the window, and tick [Next]
- Tick [Finish] after the confirmation message appears.
- A tutorial prompt may appear, which is recommended for those new to MO.
- Another prompt will appear if MO is not set up to handle .NXM links. Select [Yes].
- MO is now ready to use. By default, the MO profile will be created under
%LOCALAPPDATA%\ModOrganizer\<instanceName>\profiles\<profileName>.


MO2
Note on MO version tracking
To maximize efficiency of Nexus mod version tracking, Step now recommends that files not under "Main Files" be installed as separate mods to allow independent version tracking apart from the Main Files and global mod version. This will flag outdated versions of mods that have been updated. Because some mod authors don't understand or how this works (or just don't care), certain mods will perpetually be flagged as being outdated. To fix this, modify the meta.ini file MO creates in every mod such that the version and newestVersion values match the actual version of interest. When the mod is updated, this will trigger the flag again.Update Drivers[edit | edit source]
Most drivers are updated fairly frequently, especially if hardware is relatively new. Driver updates often fix bugs, expand functionality, increase compatibility, and provide performance improvements. As such, it is important to keep drivers up to date, particularly chipset drivers.
Pre-built PCs often bundle driver-update applications that can be used to download and install official driver updates specific to the PC. Drivers for custom-built PCs will be on the component manufacturer's websites. BIOS and firmware updates are often available as well but can be trickier and more risky to 'flash'.
- Intel Driver Updates
- Intel also provides a means to update unsupported drivers.
- AMD Driver Updates
Display drivers can often be upgraded without issue, particularly if done so using the video card's software; however, a bad installation or corruption is possible. In such situations, it is necessary to perform a "clean upgrade" as described below:
- Download the latest stable AMD drivers / Nvidia drivers.
- Download DDU and install it (DDU forums).
- Restart Windows, and boot into safe mode.
- Launch DDU, and select the appropriate driver from the dropdown.
- Note the recommendations in DDU, and initialize the cleanup.
- Reboot normally, and install the latest drivers downloaded from step 1.
- Reboot normally again.
Display Configuration[edit | edit source]
Keep in mind that hardware and software vary wildly by end user, and there are many configuration possibilities that work for any given subset, but results will still vary.
Important Considerations:
- Configure driver software and frame-rate caps as described on SSE Display Tweaks.
- A 144Hz QHD gaming monitor is recommended for results comparable to the Step team.
- TES games don't natively support HDR, so disabling monitor HDR and OS software HDR may (or may not) produce the best results for these games.
- The monitor's on-board configuration settings that can impact end results. A warm or color-neutral standard preset is recommended.
- Monitor calibration is essential and coming up next.
Monitor Calibration[edit | edit source]
Color calibration is critical to photographers and graphic artists who work across media types, but it's also equally important for gaming. Nevertheless, all monitors vary in terms of color range/accuracy and brightness/contrast quality.
There are three places to configure color saturation, temperature, brightness, contrast, gamma, etc.:
- The monitor's on-board configuration
- Windows Display Settings and Color Management
- The graphics software configuration utility
The value of one setting can affect the appearance of other settings, and depending on the quality of the monitor, #1 above could be very good or just 'okay'. The #2 and #3 options should be standard though, since they are made to work across various monitors. The fact of the matter is, each monitor's calibration process is going to be slightly different. So much so that Step can not reliably provide one set of instructions for everyone. As such, we recommend following RTINGS's guide for monitor calibration. It's well written by professionals and easy to understand.
Additionally, RTINGS has a large list of monitors they have professionally reviewed and calibrated. Many of these listings have ICC profiles available for downloaded and use, which provides their professional calibration for free. If using one of these ICC profiles, be sure the model matches the model of the monitor in use! Be aware there can be small differences even between monitors of the same models. Therefore, if an ICC profile is available it may not have the exact same results as RTINGS's review, but should be relatively close.
Additional calibration images can be found here: http://www.lagom.nl/lcd-test/
Disabling Overlays[edit | edit source]
Certain programs (e.g., ENBSeries) don't work properly when other program overlays are active. Consider disabling all conflicting or unnecessary overlays commonly found on modern Windows PCs.
| Disable the Discord Overlay Click to show/hide |
|---|
|
| Disable the GeForce Experience Overlay Click to show/hide |
|
| Disable the Steam Overlay Click to show/hide |
To disable the Steam overlay for ALL games:
|