
User talk:Diana TES GotH/Morroblivion Overhaul
Morroblivion Overhaul Forum can be found here → Morroblivion Overhaul
Morroblivion Overhaul Change Log can be found here → Morroblivion Overhual Change Log
NOTICE: This guide is tailored specifically for Morroblivion Project Release. If you are simply looking to improve your Oblivion experience, I recommend reviewing and selecting one of the following guides:
Oblivion Vanilla Enhanced by Astien
Bevilex' modlist for Oblivion -Graphics by Bevilex
Frosty's Oblivion Gameplay Overhaul Tutorial by Laiilaiiheii

Introduction and Summary
Please visit my Patreon site to learn more about my goals and intentions: Diana TES GotH is creating Modding Guides and Tutorials.
Disclaimer: This is a guide intended to help first-time modders make their modding experience as successful as possible. The guide has been split into a number of small sections for your convenience.
Neither S.T.E.P. or I are responsible for users who do not install the recommended mods carefully and end up breaking their game. We are also NOT responsible if a user's system is not capable of handling the recommended mods.
Requirements:
Any questions or issues related to this guide will be addressed on the STEP: Morroblivion Overhaul forum. I encourage all users of this guide to register on the forum. For live assistance, discord members may join The Morroblivion Help Desk hosted by ponyrider0. I also encourage feedback and suggestions. While I am an experienced modder, I am by no means a master.
Notice: It is particularly important that new users begin with a clean installation of both Morrowind and Oblivion in order to be successful with their modding setup the first time through, so PLEASE READ EACH SECTION CAREFULLY, as no information included in this guide is irrelevant! Due to the many steps one must take in order to successfully install each mod, this will be a tedious and time-consuming project. It is recommended that you take the time to save all changes made to any files so that if you have to revert back to any part of this guide you can more easily retrieve the files you made any necessary changes to.
This guide has been created by experimenting with many online guides and modifying others recommendations to suit my own personal tastes. Mods tailored for Morroblivion are noted for convenience.
You must have LEGAL copies of BOTH Oblivion GOTY and Morrowind + All DLC’s.
IMPORTANT: READ the developer’s information provided before performing any installations. The instructions provided within this guide are only suggestions that work for the majority of users. Not all users have the same system specs.
Author's System
Motherboard: Alienware Aurora R6
OS: Windows 10 Pro
Processor: Intel(R) Core(TM) i7-7700K CPU @ 4.20GHz
RAM: 16.0 GB
Video Card: GTX 1080Ti
Hard Disks: Standard Disk Drive
Power Supply: 850 WPSU Liquid Cooled Chassis
Case or Enclosure: Desktop
Monitor: Dell UP3216Q
Audio Equipment: Logitech Z906 5.1 Channel Speaker System
Input Devices: Logitech HID-compliant keyboard and mouse, Xbox One Controller, Steam Wireless Controller
This setup is also being tested with:
Motherboard: DELL N3JV3 DDR3 SDRAM
OS: Windows 10 Home
Processor: Intel(R) Core(TM) i7-4510U CPU @ 2.00GHz, 2001 MHz, 2 Core(s), 4 Logical Processor(s)
RAM: 16.0 GB
Video Card: NVIDIA GeForce GT 750M
Hard Disks: Standard Disk Drive
Case or Enclosure: Laptop
Legend and Terminology
Each mod or tool is preceded by a tag for easier management of the guide:
- COREThis mod is a full part of the guide and is expected to be installed.
- TOOLThis isn't a mod, but a modding utility to be used during your modding adventure.
- OptionalThis mod is optional. This is an addition considered useful to the setup, but might be more of a personal preference.
- MorroblivionThis mod is specifically tailored for Morroblivion.
Terminology:
- Plugin - any .esp or .esm file.
- ESM - Elder Scrolls Master. Usually saved as a .esm file, which has the same format as a .esp file, only one bit (as in, one bit of a byte) is different.
- ESP - Elder Scrolls Plugin. Most mods are ESPs, but some are ESMs. Their format is the same, but the game handles them slightly differently in some specific cases.
- ESS - Elder Scrolls Save. Your saved games. This is loaded after all the ESPs and ESMs are loaded, so that its changes (like what items are in which containers) can override what the plugins say.
- BSA - Bethesda Softworks Archive. Sort of like a .zip file, but specific to Bethsoft's games, and optimized (sort of) for their specific usage.
- Load Order - The order that your mods (ESPs and ESMs) are loaded. When conflicts occur, the last loaded conflict "wins".
- Install Order - The order that files are installed into your Data folder. When multiple packages install the same file, the last installed package "wins".
- Loose File(s) - A resource file in the Data folder that's "loose", as in not packaged into a BSA.
- FormID - A unique ID assigned to each "record" of a plugin. Each object in the game is defined by a record, and each record has a FormID. A FormID is 32-bits, with the first 8 bits defining which ESM or ESP the record belongs to.
- Vanilla - A term referring to Skyrim as distribute by Bethesda and Steam. This means no modifications have been done. Alludes to the "plainness" of the vanilla ice-cream flavor.
Pre-requisite Steps
Related Video: Morrowind: Installation & Settings by GamerPoets
Related Video: Oblivion: Installation & Settings by GamerPoets
Clean Install of Morrowind & Oblivion
UNINSTALL Morrowind and Oblivion
1. Backup any data you may wish to save for reference or use later.
2. Deactivate all mods using your choice of mod manager.
3. Open Steam, right-click Oblivion in your Library → Delete Local Content → Delete. Wait until the game has been uninstalled.
4. Navigate to C:\Users\YourUsername\AppData\Local\Oblivion and delete the Oblivion folder.
5. Navigate to C:\Users\YourUsername\Documents\My Games and delete the Oblivion folder.
6. Uninstall your previous Mod Manager(s) and other installed game files from the Control Panel → Programs.
7. Browse to your Morrowind and Oblivion directories and delete all files and sub-directories that were not uninstalled by Steam or through the Control Panel Programs.
8. If you used any other mod manager, find and delete their mod directories also.
9. If you previously used Wrye Bash, navigate to the Oblivion Mods folder it created and delete it as well.
   Notice: If you do not wish to lose previously installed mods make certain to back them up.
It is recommended to install Morrowind and Oblivion to an SSD, if available, and preferably on a separate drive/partition than the Operating System (i.e. instead of installing to the C: drive, install it to D: or E: etc.). If a separate drive/partition is unavailable, avoid installing Steam and Oblivion in "C:\Program Files" or "C:\Program Files (x86)" folders since Windows User Account Control [UAC] will cause issues with a modded Morroblivion.
Morrowind and Oblivion can be installed one of three ways:
1. Purchase the physical DVD from a retailer. Insert the disk, select Run "Setup.exe," and follow the on-screen instructions.
2. Install STEAM and purchase the digital media from the Steam store.
   Navigate to the Steam website, download the installer, and launch "SteamSetup.exe". Once Steam is installed, use the Steam search bar to search for "Morrowind" and “Oblivion” to purchase and install the game.
   NOTICE: Make certain to disable Steam Overlay for all games. Steam Overlay is known to cause issues with modded setups.
3. Purchase the games from GOG.
   Elder Scrolls III: Morrowind GOTY Edition setup_tes_morrowind_goty_2.0.0.7.exe
   Elder Scrolls IV: Oblivion - Game of the Year Edition Deluxe install setup_oblivion_1.2.0416_cs_(12732).exe
Security Settings
Since User Account Control can prevent some tools from working correctly, it is recommended to edit the security settings of your game directories to give users full control. To do this:
• Locate your game directory.
• Right-click the folder and select Properties.
• Go to the Security tab and click Edit...
• Highlight Users (<username>\Users) in the top panel.
• In the bottom panel, under the Allow column for Full Control, check the check box and click Apply.
• Click OK and OK again.
Windows Folder Options
Use the following settings for Windows "Folder and Search Options" while modding Morroblivion. These settings can be reverted at any time.
Windows Folder Options should be adjusted as follows:
• Check Show hidden files, folders, or drives.
• Uncheck Hide extensions for known file types.
Downloads
Some Windows systems or antivirus programs will block unrecognized downloads. Simply right click on the file, select properties, select unblock, select Apply and exit.
Oblivion Launcher Options
It is recommended to launch Morrowind and choose the preferred launcher options and in-game options to initialize the auto-detection process. While the main game engine is that of Oblivion, and only Oblivion is launched for playing Morroblivion, Morrowind is still accessed during the installation of Morroblivion through the Morroblivion Installer executable file.
As a quick-start to installing utilities, simply launch Oblivion from the Oblivion.exe to initialize the auto-detection process, and adjust the settings according to your system setup and preference.
Launcher Options
• Adapter: Make certain to choose your video adapter.
• Screen Resolution: Select your screen resolution.
• Video Quality Presets: User’s Preference (Ultra is recommended).
• Mode: User’s Preference
• VSync: User’s Preference
• Screen Effects: Keep set to HDR - this is required for TES4LodGen used later in this guide. Note that anti-aliasing must remain at none for HDR to be enabled.
• Click [OK] when you are sure your settings match those above.
In-game Options &Controls
Click [Play] in the Oblivion launcher and once the menu loads click [Options] to set [Gameplay] and [Video] preferences.
• Difficulty: (Users Choice)
• General Subtitles: (On)
• Dialogue Subtitles: (On)
• Crosshair: (Users Choice)
• Save on Rest/Wait/Travel: Set all to (Off)
REQUIRED AND RECOMMENDED IN GAME VIDEO OPTIONS for Oblivion Reloaded
Resolution = User Preference (Choose your Monitor Resolution)
Brightness = 50% (Choose your Desired Setting)
Texture Size = Large (Recommended for OR)
Tree Fade = 100% (managed by the OR's frame rate manager)
Actor Fade = 76% (managed by the OR's frame rate manager)
Item Fade = 60% (managed by the OR's frame rate manager)
Object Fade = 60% (managed by the OR's frame rate manager)
Grass Distance = 100% (managed by the OR's frame rate manager)
View Distance = 100% (managed by the OR's frame rate manager)
Distant Land = On (managed by the OR's frame rate manager)
Distant Buildings = On (managed by the OR's frame rate manager)
Distant Trees = On (managed by the OR's frame rate manager)
Int. Shadows = 5 (User's Preference) (Minimal Recommended)
Ext. Shadows = 5 (User's Preference) (Minimal Recommended)
Self Shadows = Off (Recommended for OR, also Self-Shadows draw a line between the head and body with Seamless - OCOv2 Edition.)
Shadows on Grass = Off (Recommended for OR)
Tree Canopy Shadows = On (Recommended for OR)
Shadow Filtering = High (Recommended for OR)
Specular Dist = %50 (MIN 10% REQUIRED FOR POM SHADERS)
HDR Lighting = On (REQUIRED FOR HDR SHADERS)
Bloom Lighting = Off (Recommended for OR)
Water Detail = High (REQUIRED FOR WATER SHADERS)
Water Reflections = On (REQUIRED FOR WATER SHADERS)
Water Ripples = Off (REQUIRED FOR WATER SHADERS)
Window Reflections = On (Recommended for OR)
Blood Decals = High (REQUIRED FOR BLOOD SHADERS)
Anti-aliasing= Off (Recommended for OR)
Working Folder
Suggested “Working Folder” structure for repackaging archives into “BAIN Simple Structure” for proper manual installation:
Create a new folder on your desktop naming it Working Folder. Move any downloaded archives that need to be repackaged into this "Working Folder". Read the developer’s informational documents. Make any necessary changes to the folder structure and files that are recommended. Any documentation that is not relevant to the installation simply create a new folder with the name of the mod it represents and move this folder into the Docs folder.
Notice: Saving a mod’s documents is mandatory for the hard core modder as the hard core modder will be tweaking things and will need the information contained in the documents. The more casual modder may have no intention of doing any tweaking except what is covered in this guide. Therefore, the casual modder will not need these documents and if they are needed the mod can usually be downloaded again. Therefore, the casual modder can, at their own risk, delete document folders, text files .txt, screenshots .jpg, .bsl files, and any other files that is not an active part of the mod. Do not delete files such as .esp, .esm, meshes, scripts, textures, etc. Deleting files can also be helpful if your SSD is running out of space.
When the files are structured properly, create a new folder and name it as the original file is named + add _BAIN at the end of the file name in order to distinguish that it has been repackaged properly. We will do this later in the guide.
Notice: This is a simple structure recommended for all mods. Wrye Bash and Mod Organizer have the ability to allow the user to structure the mod within the utility before performing the installation. It is therefore a personal preference to create a Working Folder to restructure and repackage mods. Take the time to learn the abilities of the mod manager chosen.
Inside your Working Folder create a Data subfolder, inside the Data subfolder create a Docs subfolder and an OBSE subfolder, and inside the OBSE subfolder, create a Plugins subfolder:
1. Create a Data folder.
2. Create a Docs folder and move it into the Data folder.
3. Create an OBSE folder.
4. Create a Plugins folder and move it into the OBSE folder.
5. Move the OBSE folder into the Data folder. See examples below:

This is the original folder structure of the vanilla Oblivion\Data folder with an explanation of the added folders.


This is the original folder structure of the vanilla Oblivion\Data folder with an explanation of the added folders.


It is recommended that you create a new folder for downloads and repackaged files:
1. Navigate to the directory the games are stored in (for most users this will be \Steam\steamapps\common).
2. Create a New Folder naming it Oblivion Mods. This will be where you will store your downloads and repackaged mods for future retrieval, if needed, saving time and effort later. This will also be where Wrye Bash will retain mod files. Wrye Bash mod files will be located in the \Oblivion Mods\Bash Installers.
Backing Up Morrowind and Oblivion
Archiving the Data Folder and installing it as the first mod in Mod Organizer will be beneficial to correct any issues that may arise from certain utilities not recognizing the Unmanaged Oblivion.esm and other vanilla data files.
To archive your Data folder with Windows:
1. Navigate to your Oblivion\Data directory.
2. Select all folders and files.
3. De-select all files with a .bsa extension.
4. Right-Click and select "Add to archive…" naming it Oblivion Vanilla Assets.
5. Wait for the file to finish compressing, which may take a few minutes as it is a large file.

The Oblivion Vanilla Assets folder should look like the example below:

Contributed by Rogdonlp:
GOG Users should keep a copy of the four install files (3 for Oblivion and 1 for Morrowind). Make a New Folder and name it ‘GOG Install Files Backup’.  Put the four install files into the GOG Install Files Folder.  Move this file to another drive if possible. If you are running out of disk space the folder can be compressed with 7zip or the equivalent.
Now create a new folder and name it ‘INI and Other Files Backup’. Into the INI and Other Files Backup folder place the contents of:
<My Games>\Oblivion>
<YourUserName>\AppData\Local\Oblivion>
If possible, move the INI and Other Files Folder to another drive.

Steam Users should make a New Folder and name it Cleaned Data Files.  Copy the entire Oblivion\Data folder into the Cleaned Data Files Folder. Move this file to another drive if possible. If you are running out of disk space the folder can be compressed with 7zip or the equivalent.

All users should periodically make backups of both the Oblivion folder and its entire contents (perhaps once a month). You should also create a backup of just the folder that contains all of your mods at least monthly (two weeks after the Oblivion folder packup above) and always before making major changes to your mods.

Mod Organizer Users:
When using TES4Edit to clean .esp files you have the option to create a backup folder of the uncleaned mod which is created in the Overwrite folder.  The backup file contents can be placed in a folder outside of MO that will store the uncleaned .esp files should they ever be needed. Another approach is to not save your uncleaned .esp backups. Instead create a file outside of MO labeled ‘Uncleaned Mods’. Copy your Oblivion\Mod Organizer\mods folder into this file BEFORE you start cleaning your .esp files.  This way the uncleaned files are always available and you do not have to worry about backup files.  Also, you have made your first monthly backup.
Suggestions for In-Game Testing
Use the following Console Command to Enter Testing Cells:

For Morrowind: type coc mwToddTest; to leave type coc SeydaSNeen00
For Oblivion: type coc testinghall; to leave simply exit through the door labeled “to Hawkhaven”
Testing Morroblivion: Performance and Stability

Wait for all mods to load.
From the main menu open the console with ~ key and type in the commands.

First Test - Explore Interior and Exterior Cells.

1. tgm; player.setav speed 255; player.setav athletics 255; tcl (turns collision on or off); tdt (toggle the debugging text and show FPS)
2. Testing Cells:
   • coc mwToddTest (Morrowind)
   • coc TestingHall (Oblivion)
   Also try:
   • coc CharacterSStuffSWonderland (Morrowind)
   • coc MarkAsSVampireSTestSCell (Morrowind)
   • coc ClutterSWarehouseSTSEverythingSMustSGoX (Morrowind)
3. "tmm 1" will toggle the map markers on and can be used to fast travel if it is enabled. Explore Open World Spaces, as well as Interior and Exterior Cells.
   Morrowind Places:
   • Ald'ruhn (Test Fast Travel)
   • Balmora (Test Fast Travel)
   • Sadrith Mora (Test Fast Travel)
   • Vivec (Test Fast Travel)
   Mournhold Places:
   • coc MournholdSTemple
   Bloodmoon Places:
   • coc FortSFrostmoth00
   • Test fast travel to other Settlements.
4. Oblivion Places:
   • Test Portal Spell to Cyrodil
   • Test Fast travel to Cities, Towns, and Villages.
   Sheograth:
   • coc SEHighcrossExterior01
   • Test Fast Travel to other Settlements.
5. Tamriel Rebuilt
   Test Fast Travel to locations South East and South West of Vvardenfell.
   • coc FireWatch00
   • coc BaanSmalur00
Install a Mod Management Utility
A mod-management utility is REQUIRED in order to easily keep track of a complex mod setup like Morroblivion Overhaul. These utilities also make it far simpler to deconstruct a complex install in order to update to a new version and to update to newer versions of the mods. This is impossible to do simply or efficiently without a mod manager.
There are two mod managers that can be used to manage this setup; however, to simplify Morroblivion Overhaul maintenance/support for me and mod management for users, Morroblivion Overhaul only officially supports Mod Organizer. Although Wrye Bash is also a mod manager, Morroblivion Overhaul will only be using it for the functionality of creating the Bashed Patch. The reason for the limited support of Wrye Bash is, again, due to simplifying this Guide. Users who wish to use Wrye Bash may do so to install and maintain Morroblivion Overhual, however, unless these users are experienced in modding, these users may find it difficult to install this Guide. Wrye Bash users can use the Wrye Bash Guide for detailed instructions on setting it up as a modding utility package. Wrye Bash users should also be aware that support may be limited when seeking help on the forums due to Wrye Bash not being the officially supported mod manager.
Review the official guide for using Mod Organizer to manage your mods: Guide:Mod Organizer by S.T.E.P.
Notice: Revision as of February 3, 2018 of Morroblivion Overhaul provided support for Wrye Bash users. Wrye Bash users may wish to reference certain sections of the outdated version for tips on setting up certain utilities.
Prerequisites
While Mod Organizer (MO) boasts a standalone and fully modular platform, there are a few things necessary for an optimal experience:
Use 7-Zip or other compression software to extract any downloaded archives.
Description: For many features of MO to work correctly, a Nexus account is required. Membership is free, the registration process is simple, and the benefits are enormous, so there is no reason not to join.
Description: This download provides the DirectX end-user redistributable that developers can include with their product. (Required for Oblivion Reloaded).
Visual C++ Redistributable for Visual Studio
Description: The Visual C++ Redistributable Packages install run-time components that are required to run C++ applications built using Visual Studio 2015.
Special Installation Instructions:
Download manually:
• Visual C++ Redistributable for Visual Studio 2012 Update 4 (Required for DDSOpt)
• Visual C++ 2013
• Visual C++ Redistributable for Visual Studio 2015 x86 (Required for Oblivion Reloaded)
• Visual C++ 2017
Notice: .NET Framework 3.5 is queried by the MO code and although all future .NET versions have this as a component, there are times when Windows will disable it. To rectify this, open the Windows search function and type "Turn Windows Features on or off". Scroll through the list and enable the 3.5 Framework by clicking the box. Close the dialog and restart your system if prompted.
Description: Mod Organizer (MO) is a tool for managing mod collections of arbitrary size. It is specifically designed for people who like to experiment with mods and thus need an easy and reliable way to install and uninstall them.
Mod Organizer version 1.3.11 is the most stable and time tested build. Mod Organizer 2 is still in development and does not currently have support for hooking Steam versions of Oblivion with OBSE. It also does not support Landscape LOD Generator's tes4ll utility, please use Mod Organizer version 1.3.11 for this guide.
Notice: Since some "less-clever" Anti-virus software can mistake MO as malicious, it is important to ensure your AV packages are correctly set up to exclude MO, and it's components, from being quarantined.
Special Installation Instructions:
Download manually:
• Mod Organizer
1. Install into any folder outside User Account Control (read the provided documentation for recommendations).
2. Create a shortcut on your desktop, right-click the ModOrganizer executable, hover over the Send To menu, and select Desktop (create shortcut).
GamerPoets Useful Tips for Mod Organizer Users
Related Video: Mod Organizer : Installation & Setup by GamperPoets
Related Video: Mod Organizer 2 | Official Series by GamerPoets
Downloading Mods
MOD MANAGER DOWNLOAD
Each mod on Nexus has a Files section, which is where mods are downloaded from. The MOD MANAGER DOWNLOAD option, if setup properly in the previous guide, will download the mod to M.O.’s Downloads directory. The archive will then be displayed in the Downloads Tab, which can be double-clicked to install the mod. Once installed the mod will appear at the bottom of the left pane where you can activate it by ticking the checkbox and then drag its position up and down to alter it’s priority. Load Order is covered a bit later.
MANUAL DOWNLOAD
This option is not only helpful for some but necessary if Mod Organizer and Nexus are having issues linking to each other. Selecting MANUAL DOWNLOAD downloads the mods archive to your systems default location. From here there are two options:
1. Leave the archive where it is. From M.O.’s Toolbar select the Install from Archive icon. From the explorer navigate to the mod. Double-click it. One of M.O.’s various install options windows will open. Install the mod accordingly. I prefer to not use this method as it’s easy to lose track of the archive and or accidentally delete it.
2. The preferred manual method is to navigate to where the archive was downloaded to. Drag and drop the archive into MO2’s Downloads tab. Not only will the archive appear here but a copy will be added to your Downloads directory just as if you used MOD MANAGER DOWNLOAD. This option can be applied to any mod archive on your system regardless where you downloaded it from.
Downloads Tab Note
If you delete a mod from the Downloads tab it will also be deleted from the Downloads directory. Deleting mod archives is not advised because many mods, at some point, may no longer exist due to their authors removing them. Delete mods with caution. If you can help it don’t delete them at all unless you are sure that you will never want to use them again.
Installing Mods
Quick Install
This window opens when installing a mod for the first time that appears to be properly packaged for installation.
   - Cancel cancels the installation
   - OK is generally what you want to choose as it allows MO to seamlessly install the mod.
   - Manual opens additional installation options. Generally used if you are aware that a mod is packaged improperly; a folder is missing or the mod structure is incorrect. The window that you are presented with represents the archives contents exactly how the author packaged them. From here you can:
     • Organize files and folders the same way that you would in windows explorer, by expanding the arrows then dragging and dropping items.
     • Deactivate a checkbox so that none of the files or folders within it will be installed. Useful is a mod is packaged with multiple options.
     • If you receive the error message No game data on top level, right click the Data folder with the checkbox next to it and select Set data directory. The error message should change to a Looks good message.
     • The other right-click options allow you to undo the Set directory and to create a new one, or rather a new folder, to organize things into by dragging and dropping items.
     • At any point, select OK to install the mod or Cancel to cancel the process.
Improperly Packaged Mods
If installing a mod that M.O. detects as being packaged improperly the Install Mods window will open. This is the same window that opens when selecting the Manual option from the Quick Install window.
-With these mods you will notice the No game data on top level message. As previously mentioned right click the Data folder, the one with the checkbox, and select Set data directory. The error message should change to a Looks good message.
-If it doesn't change expand all of the arrows and search for the proper top level folder to Set data directory for. Select OK to install.
Mod Pages w/Multiple Archives & Updates
Some mod pages have multiple archives that can be installed. These could be full updates, hotfixes, optional resolutions, so on. The situation that I present here is if you have already installed your first mod from a particular page and now you plan to download and install another from same one. This scenario presents a few options.
   • At the Quick Install window select OK. The Mod Exists window will open. From here you can:
1. Merge: which is used the majority of the time. This option adds all of the contents from the additional archive to the existing mod from the same page merging the two together. If any files are duplicates, generally updates, the files being installed will overwrite the old ones. This also leaves personal changes that you have made to the mod intact. Think of this as an addition to a mod that is already installed.
2. Replace: generally not recommended unless you have a sound reason to do so. This option completely replaces the original mod with the new archives contents. Think of this as a clean wipe and reinstall.
3. Rename: allows you to rename the archive that you are currently installing, which allows archives from the same page to act as two separate mods.
4. Cancel cancels installation.
Special Installation Instructions:
1. Drag the Oblivion Vanilla Assets archive file that was created into the right pane of Mod Organizer's Data tab.
2. Double click to install the mod and select Manual. Uncheck all plugins except for Oblivion.esm.
   Note: The vanilla plugins will be cleaned and replaced later in the guide.
3. Move Oblivion Vanilla Data_BAIN to the top of the mods list in the left pane and activate the mod.
Install Essential Utilities
Applications and utilities that aid in Morroblivion mod management.
Note: All of the following utilities should be installed manually. It is not recommended to install any of them using a mod manager. However, if they include a Data directory, the Data folder can be archived and installed as a normal mod to allow the user to monitor any available updates or revisions.
Select a location you wish to store your downloaded files. Create a new folder and name it Oblivion Mods.
Side Note: I create my download directory on a separate drive to save space on my SSD. Mod Organizer Users have the ability to change Settings to redirect the Download Directory. In Settings → General check Advanced. Select your Download Directory and click OK.
4gb Ram Patcher
NOTICE GOG Users: 4gb Patch has already been applied to the executables. GOG Users can skip this setup.
Description: This very little tool patches x86 executables in order to let them have 4GB (instead of only 2) of virtual memory on x64 platforms. This tool comes very handy for applications which need a great amount of virtual memory like games, 3D renderization, multimedia etc. To gain these 2GB, you just have to use this tool to patch the executable (*.exe file) of the software you want to have these additional GBs of virtual memory. It can be used by clicking on it and choosing the file or through command line (e.g.: "4gb_patch file.exe"). It automatically creates a backup copy of the original executable.
Special Installation Instructions:
Download manually:
• Download the 4GB Patch
1. Create a new folder in \Oblivion Mods\Utilities and name it 4gb Patch.
2. Download the 4gb Patch and extract the file.
3. Open the archive:
4. Run: 4gb_patcher.exe
   • If you get a security warning, click [Run]
   • Navigate to <Morrowind>
   • Select "Morrowind.exe"
   • Select "Morrowind Launcher.exe"
   • Navigate to <Oblivion>
   • Select "Oblivion.exe"
   • Select "OblivionLauncher.exe"
   • [Open]
   • [OK]
Description: BethINI is an attempt to restore decency to the INI configuration files for games created by Bethesda.
Notice: Oblivion.ini tweaks is a controversial topic. It is recommended making only the absolute minimum changes to your Oblivion.ini. It is strongly advised to create a backup of the game generated Oblivion.ini that was created after selecting all of the Launcher and Game-play options. BehtINI will also create a backup of your original Oblivion.ini that can be restored if ever needed. Using BethINI may prevent the use of Wrye Bash's "INI Edits", or Mod Organizer's "Configurator".
Related Video: BethINI : Bethesda ini File Interface : Oblivion by GamerPoets
Related Forums: BethINI Support by DoubleYou
Special Installation Instructions:
Review BethINI Tweak list.
BethINI is a portable application. You can run it anywhere. Simply extract and run. Do NOT run through Wrye Bash or Mod Organizer!
Oblivion.ini Tweaks
See also Oblivion Launcher Video Presets to view the Oblivion.ini settings.
See also Alenet's Oblivion.ini thread at TES Reloaded.
See also Elder Scrolls IV: Oblivion Tweak Guide for a description and recommended settings.
See also UESP: Oblivion:Ini Settings: Multi-core CPU tweaks.
Before editing the Oblivion.ini, carefully check to ensure that there are no:
1. duplicate [sections]
2. duplicate settings
3. misspellings (avoid this by copying and pasting from the guide or using Wrye Bash INI Edits or Mod Organizers's Configurator.
4. invalid characters (each setting can only have characters accepted by its type, indicated by its prefix)
Oblivion.ini; Safe Tweaks
[BackgroundLoad]
iPostProcessMilliseconds=25 ;OR's RECOMMENDED OBLIVION.INI SETTINGS
iPostProcessMillisecondsLoadingQueuedPriority=100 ;OR's RECOMMENDED OBLIVION.INI SETTINGS
[Controls]
bBackground Keyboard=1 ;This will set the game to read all Keyboard input, and will disable all Joystick controls that may interfere with them. Required for AoG.
bUse Joystick=0 ;Set to 0 if you don't use a game pad, some people claim this improves FPS and resolves mouse/input lag.
[Display]
bAllowScreenShot=1 ;Screen Shots can aid in trouble shooting user issue.
bUseRefractionShader=0 ;Disables refraction shaders for particle effects,recommended by OR's Alenet
fLightLOD1=4000 ;See light sources from further away, no noticeable fps cost.
fLightLOD2=6000 ;See light sources from further away, no noticeable fps cost.
iShadowMapResolution=1024 ;Better looking shadows, no noticeable fps cost.
[Gameplay]
bSaveOnInteriorExteriorSwitch=0 ;Disables autosave when entering a new area, prevents corrupted savegames and crash to desktop.
[General]
bAllowScriptedAutosave=0 ;Disables scripted autosave, prevents corrupted savegames and crash to desktop.
bBorderRegionsEnabled=0 ;Disables the limit where you can go.
bFaceMipMaps=0 ;Create mipmaps for face texture, required for OCO2
bUseEyeEnvMapping=0 ;Disables reflections on the eye rendering.
iPreloadSizeLimit=104857600 ;The RAM cache to store data, recommended by OR's Alenet
SIntroSequence= ;Disables intro videos.
SMainMenuMovie= ;Disables intro videos. Notice: If this is disabled, the Morroblivion Menu Replacer will not work properly.
SMainMenuMovieIntro= ;Disables intro videos. Notice: If this is disabled, the Morroblivion Menu Replacer will not work properly.
uExterior Cell Buffer=36 ;recommended by OR's Alenet
uGridDistantCount=50 ;OR's RECOMMENDED OBLIVION.INI SETTINGS
uGridDistantTreeRange=30 ;OR's RECOMMENDED OBLIVION.INI SETTINGS
uInterior Cell Buffer=18 ;recommended by OR's Alenet
[Grass]
fGrassEndDistance=8200 ;Max distance grass.
fGrassStartFadeDistance=7200 ;Max distance grass.
iGrassDensityEvalSize=2 ;2 or 4 recommended by OR's Alenet
iMinGrassSize=120 ;Better performance with no noticeable loss of grass.
[HAVOK]
fHorseRunGravity=3.0000 ;Leave this at 3 for OR gravity, else change it to 5, recommended by OR's Alenet
fJumpAnimDelay=0.2500 ;Sets the delay between an animation and the jump animation, recommended by OR's Alenet
iNumHavokThreads=3 ;Sets the number of threads when havok is enable on an object, recommended by OR's Alenet
[Interface]
fDlgFocus=3.0000 ;Less zoomed-in camera when talking to NPCs.
[SpeedTree]
bForceFullLOD=1 ;Makes trees look slightly better with little impact on overall framerate.
fLocalTreeMipMapLODBias=0.0000 ;recommended by OR's Alenet
fLODTreeMipMapLODBias=-0.5000 ;recommended by OR's Alenet
[Water]
bUseWaterReflectionsStatics=1 ;OR's RECOMMENDED OBLIVION.INI SETTINGS
bUseWaterReflectionsTrees=1 ;Better water reflections, no noticeable fps loss. OR's RECOMMENDED OBLIVION.INI SETTINGS
Description: BOSS is designed to assist mod users in avoiding detrimental conflicts, by setting the correct load order for the plugins they have installed.
BOSS also provides thousands of plugin-specific messages, including usage notes, Bash Tag suggestions, requirements, incompatibilities, bug warnings and installation mistake notifications. It supports the sorting of plugins ghosted by the Wrye Bash utilities, is highly customizable, has been translated into multiple languages, and is simple to use.
BOSS's Masterlist is also kept updated for Oblivion (with the latest update as recent as April 1, 2018.
Related Video:: Bevilex Modlist Full Video Guide - part 2: BOSS by outdated TV
See Also: BOSS User Rules Manager located just after (below) this section.
Special Installation Instructions:
1. Download boss_installer.7z and boss.zip.
2. Extract boss_installer.7z and install into any folder outside User Account Control.
3. Extract boss.zip. Navigate to the bin\Release-32 folder to copy and paste the boss.exe and boss_gui.exe into the BOSS root directory (overwrite when prompted).
   Notice: Mod Organizer version 1.3.11 does not support 64 bit applications. Make certain to install x86 (32 bit) applications when they are available.
4. Add boss_gui.exe to Mod Organizer and Run from Mod Organizer.
BOSS Sorting
Notice: At any time during the mod installation process BOSS should be used to sort plugin load order before stopping to test Oblivion. This is necessary to ensure proper plugin priority order (load order), which can have a dramatic impact on the game (or at worst cause a CTD).
Launch BOSS and examine the BOSS output carefully looking for any alerts or warnings and address each as they appear.
BOSS User Rules Manager
Related Video: Bevilex Modlist Full Video Guide - part 5 update! by outdated TV
Editing the Boss Userlist
Be certain to read the BOSS Readme in the Docs section of the BOSS folder in order to become familiar with the utility.
1. In the Oblivion directory where BOSS was installed open the boss_gui.exe.
2. Select “Edit User Rules”


The User Rules Manager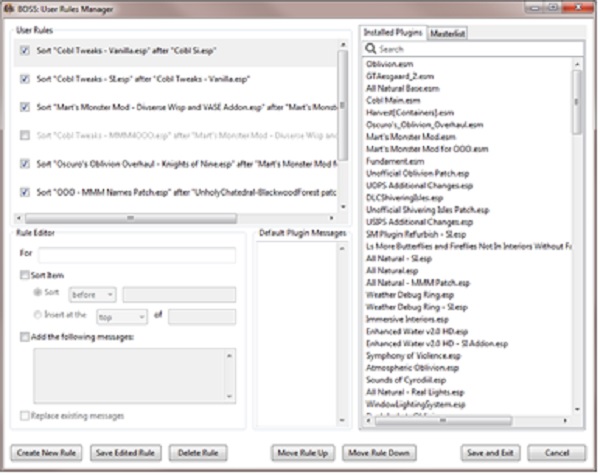


The User Rules Manager is a graphical interface for customizing how BOSS sorts your plugins and what messages it displays.
BOSS's sorting of your plugins and the messages it displays can be customized using user rules. User rules can:
1. Sort plugins relative to other plugins. Plugins can be .esp or .esm files, and you can both override the positions of plugins BOSS recognizes and sort plugins that are unrecognized.
2. Sort groups of plugins relative to other groups of plugins. BOSS's masterlist generally lists plugins in thematic groups, which you can override the relative positioning of. You can't create new groups though.
3. Insert plugins into the top or bottom of groups of plugins.
4. Edit the messages BOSS attaches to plugins. You can add new messages or replace existing messages with your own.
Notice: When adding a Sort user rule (e.g Immersive Interiors - Bravil.esp AFTER Immersive Interiors.esp), when you drag Immersive Interiors - Bravil.esp to “For” you should choose “Sort” “before”, then drag Immersive Interiors.esp to the right “of”. This actually sets Immersive Interiors - Bravil.esp AFTER Immersive Interiors.esp.
Userlist.txt
Navigate to the userlist.txt at \Oblivion\BOSS\oblivion. Create a shortcut of the userlist.txt to your desktop to perform some recommended edits.
Sorting An Unknown Plugin
To sort a plugin that is not in the masterlist after another plugin:
ADD: [RULE PLUGIN]
AFTER: [SORT PLUGIN]
To sort it before another plugin:
ADD: [RULE PLUGIN]
BEFORE: [SORT PLUGIN]
Changing A Recognised Plugin's Position
To sort a plugin that is already in the masterlist after another plugin:
OVERRIDE: [RULE PLUGIN]
AFTER: [SORT PLUGIN]
To sort it before another plugin:
OVERRIDE: [RULE PLUGIN]
BEFORE: [SORT PLUGIN]
The User Rules Manager allows easy management of your user rules without having to know any of their syntax (though if you want to customize messages, you need to know their syntax - fortunately it is pretty simple).
BOSS User Rules: contributed by ponyrider0
Instead of adding BOSS Rules based on position relative to specific files, add Rules based on the built-in BOSS groups. These groups are listed in the masterlist.txt (open with WordPad to see it formatted properly, Notepad will show you a mess). Some useful groups to know are "Morroblivion", "Pre Bash", "Post Bashed Patch" and "Map Changes". The "Morroblivion" group is a good place to put mods that are dependent on Morrowind_ob.esm/esp. The "Pre Bash" group is a good place to put mods which you want to load immediately before the Bashed Patch is loaded (and thus overriding all other mods which will be merged/imported into the Bashed Patch). "Map Changes" is a group which gets loaded after the Bashed Patch, and thus will preserve any custom map changes. "Post Bashed Patch" is a group which is similar to "Map Changes" but more generic. I personally make an over-ride to move the "Map Changes" group to be loaded after "Post Bashed Patch" (the default is to load Map Changes prior to the Post Bashed Patch group.
Description: DDSopt is a tool which manages (preview & resizes) and recompresses your DDS-files. It is an optimal tool for ensuring your textures are saved in the right format, to create high quality DDS-textures from your sources (PNG etc.) and to package down-scaled versions of your textures. It has been forked off NIFopt and both programm share the same underlying technology regarding DDSs and BSAs. It does everything BSAopt does, you don't need both tools.
Special Installation Instructions:
Download manually:
• DDSopt - pre-release - update 4
• Download v2.82 batch files referenced in the Guide (updated January 28, 2016)
1. Extract the archive.
2. Create a folder in the Oblivion directory and name it DDSopt.
3. Select the executable that matches your system setup and place it in the DDSopt folder.
4. Right-click the executable, go to the [Compatibility] tab, tick the [Run this program as an administrator] checkbox, and click the [OK] button.
5. Update to the latest version of DDSopt.ini, and place it into the same folder as the DDSopt executables, overwriting the older version of this file.
Other Optimization Tools
Description: The following tools will be used to optimize meshes for better game performance.
Special Installation Instructions:
Download and install the following utilities in the order presented:
• Spluff Download from the Miscellaneous section
• Python 2.6.6 Release by Python.org (Windows x86 MSI Installer (2.6.6) (sig))
• Python File Format Interface by amoriilia, seith (PyFFI-2.1.5.cb92090.win32.exe)
Notice: Optimizing meshes and textures might have benefit, but requires special attention. Never blindly replace any of the textures or meshes without first double checking their quality.
Description: Tool to fix tears in landscape. This utility should be used eEverytime you add/modify a mod with landscaping.
Related Video:: Bevilex Modlist Full Video Guide - part 2: OBSE by outdated TV
Description: The Oblivion Script Extender, or OBSE for short, is a modder's resource that expands the scripting capabilities of Oblivion. It doesn't make any modifications to oblivion.exe, TESConstructionSet.exe, or any other files in your oblivion install, so don't worry about permanent side effects. It is compatible with the Official Oblivion 12416 Patch, as well as the 1.2 or higher version of Official Oblivion Construction Set. Versions of Oblivion downloaded via Steam are supported as well.
Special Installation Instructions:
Download manually:
• Current Stable Version: v0021
• Latest loader: obse_loader.zip Notice: for GOG User's Only
1. Download and Extract obse_0021.zip to the OBSE folder.
2. -- USE THIS WITH THE GOG VERSION --
   Download and extract the obse_loader.exe from the obse_loader.zip to the OBSE folder overwriting the obse_loader.exe previously extracted.
3. Use the Working Folder structure included in the Pre-requisite Steps section to repackage the mod.
   • Create a new folder inside the Data folder and name it Docs.
   • Create a new folder inside the Docs folder and name it OBSE Docs.
   • Move the following files into Docs\OBSE Docs
   • src
   • obse_command_doc.html
   • obse_readme.txt
   • obse_whatsnew.txt
4. Move the newly restructured Docs\OBSE Docs folder into the Oblivion Data folder.
5. Move the following files into the main Oblivion game directory where the Oblivion.exe is located:
   • obse_1_2_416.dll
   • obse_editor_1_2.dll
   • obse_loader.exe
   • obse_steam_loader.dll Notice: for Steam User's Only
   ALL Steam Users must launch from the Oblivion.exe. DO NOT launch the obse_loader.exe file. The obse_loader.exe file is required for the Construction Set Extender and must be installed.
Mod Organizer Steam Users and OBSE Settings
To ensure that OBSE (Steam Version) works properly with Mod Organizer, some users may need to perform the following workaround:
1. Launch Steam, right click on Oblivion, and select Properties. Make certain that Steam Overlay is unchecked. 2. Launch Mod Organizer, go into Settings and click the Workarounds tab. There's an option called Load Mechanism. By default it will be set to Mod Organizer. Change it to Script Extender and make certain the Steam App ID is set as 22330. Click Ok to exit. 3. Open the Modify Executables dialog by clicking the Gear Iconto create a new executable. 4. Give the executable a title (e.g. Oblivion Steam Launch). 5. In the Binary box navigate to where you have steam installed. %\Steam\Steam.exe. 6. In the arguments box add the following argument -applaunch 22330. Click add and Ok. 7. From the executable select Steam → Shortcut and click Desktop. Notice: You can change the icon to the Oblivion.exe icon by right clicking on the shortcut, select Properties, select Change Icon and navigate to the Oblivion game directory to choose the Oblivion.exe file. 8. From this point forward only use MO Steam to launch Oblivion. Notice: After launching the game there may be a warning alerting that Ini Tweaks overwritten. Click Fix and Close.
Mod Organizer Users and OBSE Plugins
Mod Organizer does not run OBSE Plugin files. Nevertheless, installing OBSE mods with Mod Organizer will allow the user to input information about the mod and be informed of any version updates. When a mod with an OBSE directory is installed, open the mod in explorer. Copy the OBSE folder and paste it into the Oblivion\Data folder.
Official Oblivion Construction Set
NOTICE GOG Users: TESConstructionSet is included with the GOG version. Skip to Step 5.
Description: The Elder Scrolls Construction Set allows you to edit and create content for The Elder Scrolls IV: Oblivion.
Visit The Elder Scrolls: Construction Set Wiki page for guidance and tutorials.
Special Installation Instructions:
Download Manually:
• Construction Set 1_2_404
• Construction Set 1_2_404 Readme
• Optional files: LIP Template
1. Create a new folder in \Oblivion Mods\Utilities and name it Oblivion Construction Set.
2. Download and Extract the files.
3. Launch the executable to install the TES4 Construction Set.
4. Extract the LIPTemplate and manually install the Sound folder to the Oblivion\Data directory. Do not install the LIPTemplate.esp.
5. Add the TESConstructionSet.exe as an executable and Run from Mod Organizer. This will create the ConstructionSet.ini. Navigate to C:\Users\Username\Documents\My Games\Oblivion and open the ConstructionSet.ini with Notepad or other text editor and make the following changes:
   bForceCheckOutOnRefFix=1
   bFixPersistenceOnRefInit=1
   bFixBadLocRefsOnInit=1
   SArchiveList=Oblivion - Invalidation.bsa, Oblivion - Meshes.bsa, Oblivion - Textures - Compressed.bsa, Oblivion - Sounds.bsa, Oblivion - Voices1.bsa, Oblivion - Voices2.bsa, Oblivion - Misc.bsa
   SInvalidationFile= (this should be left blank)
6. Save and then close.
Description: Construction Set Extender (CSE) adds features and functionality to the CS - read the installation instructions.
Notice: CSE does not recognize obse_loader.exe loaders older than the most current v0021. If you chose to replace the Steam version in order to launch the game with an older obse_loader.exe, CSE will not function.
Special Installation Instructions:
Download manually all files in the links.
• CSE 8.0
• Visual Styles Enabled CS
Install Manually
1. Extract the files and move the following directly into the Oblivion game directory:
   • Data folder
   • CrashRpt1403.dll
   • crashrpt_lang.ini
   • CrashSender1403.exe
   • dbghelp.dll
   • DevComponents.DotNetBar2.dll
   • GlobalInputMonitor.dll
   • ICSharpCode.AvalonEdit.dll
   • lame.exe
   • Launch CSE.bat
   • ObjectListView.dll
   • TESConstructionSet.config
   • TESConstructionSetOld.exe
2. If you downloaded the Visual Styles Enabled CS-36370-1-2-0-404.zip extract it and copy the following file into the Oblivion game directory:
   • TESConstructionSet.exe
3. Move the Construction Set Extender_readme.rtf in the Data\Docs\Construction Set Extender folder.
4. Modify the Construction Set Executable
   Binary: %Steam\steamapps\common\Oblivion\Launch CSE.bat
   Start In: (leave blank)
   Arguments: -editor -notimeout
   Check "Close MO when started"
   Click Modify then Close
Notice: obse_loader.exe and TESConstructionSet.exe must be set up to Run as administrator for the CSE. Right click on each executable file, select Properties/Compatibility and check Run this program as an administrator.
Description: Oblivion's Construction Set Extender is a wonderful tool, but conflicts with the d3d9.dll file installed with ENBoost or ENBseries. Ponyrider0 has created this simple Launch CSE.bat which temporarily disables d3d9.dll file while the Construction Set Extender is in use. The user MUST NOT CLOSE the Command Prompt before closing exiting the Construction Set Extender.
Special Installation Instructions:
Download manually:
• Download MOB Ovherhaul Patches and extract CSE_ENB Compatible Launcher
INSTALLATION
1. Rename the existing Launch CSE.bat to Launch CSE.bat.bak to preserve the original file.
   Note: To restore the original file simply remove .bak from the filename.
2. Extract Launch CSE.bat from the CSE_ENB Compatible Launcher-47791-1-1.7z to the Oblivion's root directory (where Oblivion.exe is).
3. Add Launch CSE.bat as an executable.
4. To Run select Launch CSE.bat from the mod manager's executable list.
   NOTICE: DO NOT execute Launch CSE.bat until after the d3d9.dll file is installed with ENBoost. When Launch CSE.bat is executed you will see the following message pop up in the Command Prompt:
   NOTICE: DO NOT CLOSE the Command Prompt before exiting the Construction Set Extender. Follow the instruction in the Command Prompt:
=====================================================================
 Renaming d3d9.dll for CSE compatibility.  Please keep this window open.
 Do not press any key until you have quit the CSE.
======================================================================
======================================================================
 Renamed d3d9.dll.  You may press any key to close this window.
======================================================================
Press any key to continue . . .
======================================================================
Related Video: xEdit : TES5Edit , FO4Edit, etc... : Start to Finish : 1.0 by GamerPoets
Description: This tool is for manually editing your mods and mod cleaning.
Notice: xEdit is the collective name for TES5Edit, TES4Edit, FNVEdit, and FO3Edit. TES4Edit, Mator Smash, Merge Plugins, and TES4LODGen are all TES4Edit utilities. When installing files into the TES4Edit directory, keep the most recent files. DO NOT select to overwrite all.
Special Installation Instructions:
Download manually:
• TES4Edit 3.2
• FNVEdit Training Manual from the description page. (This manual is applicable to TES4Edit and strongly recommended.
1. Create a new folder in the Oblivion game directory. Name it TES4Edit. Extract the downloaded files into this folder.
2. Add TES4Edit as an executable.
   • In the Title field, type TES4Edit.
   • For the Binary field, browse \Oblivion and select the application.
   • For the "Argument" field, type -b:"pathto\Oblivion\Mod Organizer\mods\TES4Edit Backups\"
     Example: -b:"D:\Steam\steamapps\Common\Oblivion\Mod Organizer\mods\TES4Edit Backups\"
   • Click the Add button. This will add TES4Edit to the executables list.
2. The first time you Run TES4Edit in the Master/Plugin Selection screen right click and choose Select None.
3. Click OK.
4. Wait for Background Loader: Finished message and then close the window.
5. TES4Edit may generate an empty TES4Edit Backups folder in the Overwrite Mod.
   Right click on the Overwrite mod and select Create Mod. Name it TES4Edit Backups.
   Note: This mod does not need to be activated as it simply stores the TES4Edit Backup files.
Related Video: Merge Plugins : Start to Finish by GamerPoets
Related Forums: Mator's Utilities Support by Mator
Description: Merge Plugins Standalone (or just Merge Plugins), is a tool for combining mods from Bethesda games which have .ESP/.ESM files. It uses the xEdit codebase as an API, and can be used with Skyrim, Oblivion, Fallout New Vegas, and Fallout 3.
Special Installation Instructions:
Download manually:
• Merge Plugins
1. Download Merge Plugins and extract the archive into the Oblivion\TES4Edit folder.
2. Move the following files into the TES4Edit folder:
   • doc
   • lang
   • changelog.txt
   • MergePlugins.exe
   • Oblivion.Hardcoded.keep.this.with.the.exe.and.otherwise.ignore.it.I.really.mean.it.dat (overwrite the original)
   • TES4Dictionary.txt
3. Add Merge Plugins as an executable.
4. Run MergePlugins.
5. The Oblivion Profile should already be detected.
   Game: The Elder Scrolls IV: Oblivion
   Path: \Oblivion\
   Click on the Oblivion icon and then click OK.
   Right click in the window and select Uncheck All. Click OK.

When you first start Merge Plugins you should do some initial configuration. Click the settings icon.
6. Setup: Watch GamerPoets video linked above.
Notice to ALL Users: This application will be launched later in the guide.
Description: TES4LODGen is a One-Click DistantLOD Generator.
Special Installation Instructions:
Download manually:
• TES4LODGen_3_1_1
1. Download TES4LODGen and extract the archive.
2. Select the TES4LODGen.exe file and move it to the Oblivion\TES4Edit directory. Move the README.txt to the Oblivion\TES4Edit folder.
3. Add TES4LODGen as an executable.
   • In the Title field, type TES4LODGen.
   • For the Binary field, browse \Oblivion and select the application.
   • For the "Argument" field, type -o:"pathto\Oblivion\Mod Organizer\mods\TES4LODGen\"
     Example: -o:"D:\Steam\steamapps\Common\Oblivion\Mod Organizer\mods\TES4LODGen\"
   • Click the Add button. This will add TES4LODGen to the executables list.
4. From the executable button choose TES4LODGen and click Run.
5. Allow the DistantLOD Generator to finish then close the window.
   • Double click the Overwrite mod to view the contents. Close the window.
   • Right click on the Overwrite mod and select Create Mod. Name it TES4LODGen. Activate this mod and move it just below the Bashed Patch, 0.esp mod.
Description: Tes4ll creates new and individual high-resolution landscape meshes including all the additional changes added by the mods which one has installed.
Special Installation Instructions:
Download manually:
• Landscape LOD generator 5_15c
1. Install Landscape LOD generator manually into the Oblivion\Data folder to ensure this utility will work when launched with the MPGUI executable that is installed in the next section. 2. Open Mod Organizer. Select the Oblivion Vanilla Assets mod from the left pane and open in Explorer. 3. Copy Landscape LOD generator tes4ll-v5 files into the Mod Organizer\mods\Oblivion Vanilla Assts folder. 4. Tweak tes4ll_all.mpb: Right click tes4ll_all.mpb to open with your favorite text editor and replace all the instances of $_gamedir\Data\ with the full path name that points to the TES4LL folder. If your favorite text editor does not have a "Replace All" function, just use Wordpad: • Open tes4ll_all.mpb in WordPad, click Replace to open the Replace dialog window. • Fill in the "Find with" field with $_gamedir\Data\. • Fill in the "Replace with" field with the full path to your TES4LL project folder. Example: D:\Steam\steamapps\Common\Oblivion\Mod Organizer\mods\TES4LL\. • Make sure you have a \ at the end of each line, then click Replace All. 5. While still in Explorer, navigate to the Mod Organizer\mods folder and create a new folder named TES4LL. 6. In the TES4LL folder, create the following sub-folder structure: Meshes\Landscape\LOD Textures\LandscapeLOD\Generated Pictorial example below:7. In Mod Organizer's left pane, right click and select All Mods -> Refresh. The new TES4LL mod will now appear in the mods list.

Description: MPGUI (Multi Purpose GUI) is a graphical frontend for various command-line based tools such as Lightwaves TESAnnwyn/TES4qLOD and tes4ll. MPGUI works for Morrowind (TESAnnwyn only), Oblivion, Skyrim, and Fallout3/NV.
Special Installation Instructions:
Download manually:
• mpgui_2_00
1. Extract the archive and double-click on the Setup.exe or on MPGUI-Setup.msi. There is no need to install MPGUI in the game path; however, it is recommended to install it on same drive as the game directory.
2. Add mpgui.exe to Mod Organizer's executables.
3. Run mpgui from Mod Organizer.
4. From the header, select File -> Open batch... -> Navigate to the %\Mod Organizer\mods\Oblivion Vanilla Assets\Ini\tes4ll folder and select tes4ll_all.mpb
    Note: You could alternatively copy a shortcut of the tes4ll_all.mpb into the MPGUI folder for quicker access.
   File:MPGUI 01.jpg

5. From the header, select Options -> Game mode -> Oblivion.
6. From the header, select Options -> Load order -> By plugins/loadoer file.
7. From the header, select Options -> Choose mod path -> %\Oblivion\Data.
   File:MPGUI 02.jpg

8. From the header, select Plugins. Click Plugins.txt
   File:MPGUI 03.jpg

9. From the header, select Worldspace. Click Read Worldspaces. After it finishes loading the plugins, make certain Tamriel [0000003C] from 'Oblivion.esm' is selected.
   File:MPGUI 04.jpg

10. From the header, select LOD Meshes. Activate desired settings.
   File:MPGUI 05.jpg

11. From the header, select Normal Maps. Activate desired settings.
   File:MPGUI 06.jpg

12. From the header, select Color Maps. Activate desired settings.
   File:MPGUI 07.jpg

13. From the header, select Start Process. Activate Overwrite the original files and click Click me if you are ready.
   File:MPGUI 08.jpg

14. When the process is complete, close MPGUI.
   File:MPGUI 09.jpg

15. There may be file in the Overwrite mod. Move these files to the TES4LL mod. Check the TES4LL mod to ensure the files generated appropriately.
16. Activate the mod.
TesModManager
Related Forums: TesModManager
Related Video:: Bevilex Modlist Full Video Guide - part 1: OBMM by outdated TV
Notice: Some users prefer the outdated OBMM by Timeslip. This is acceptable as this utility is only be used for OMOD extraction.
Description: TesModManager is a new version of OBMM Extended that supports Skyrim SE, Skyrim, Oblivion and Morrowind.
Notice: TesModManager is only used for extracting OMODS to repackage them for normal installation.
Special Installation Instructions:
Download manually:
• TesModManager installer
1. Create a new folder in \Oblivion Mods and name it OMODs.
2. Download the installer version.
3. Right click and select Run as administrator.
4. Check Install for Oblivion and make certain it has properly chosen your Oblivion directory.
5. Click Install.
6. Uncheck Launch TesModManager and select Finish.
7. Add TesModManager as an executable and Run it from Mod Organizer. When the "Pick the game to mod" prompt window opens, select Oblivion. If it does not detect the Oblivion.exe, select the directory it is located in.
   Notice: If you are using Mod Organizer, ignore the popup warning "Administrative rights needed". Non Mod Organizer users may wish to run this utility as Administrator, however it is recommended to download all mods manually so this will not be necessary.
8. Click Settings → Move omod directory and click Yes
9. Choose \Oblivion Mods\OMODs
10. Uncheck: "Ask to be Nexus Download Manager" and "Ghost inactive mods".
   Check: "Never modify load order"
   Uncheck: Ghost inactive mods
   Check: Use zip/7z extension for omod2 Default mod formatting is omod2
11. Exit TesModManager.
Notice: With TesModManager, Mod Organizer users may experience some conflicts when running it for the first time. We can address these issues and work them out in the Morroblivion Overhaul forum, or on our discord The Morroblivion Help Desk hosted by ponyrider0.
Related Guide: Guide: Wrye Bash by STEP
Description: The function of this tool is to manage mods, create Bashed Patches and other functionalities that will be used in this guide. Bashed Patches merge the leveled lists from the installed mods and has some limited functionality to merge mods and tweak game values.
Notice: GOG Users: polik1 uses the GOG version of both Oblivion and Morrowind and has made us aware that there is a bug in Oblivion's BSA, ESM and ESP files - they are missing the Modified Date attribute (it's blank). This prevents Wrye Bash from launching properly. The fix for the GOG version of Oblivion is available at The Nexus Forums: Wrye Bash topic and is needed for all mentioned files.
Special Installation Instructions:
Download Manually:
• Wrye Bash 307 Beta2 - Installer
• Wrye Bash Pictorial Guide v8.4 by alt3rn1ty: Review and select your options
1. Download the files from both locations and extract the files into the Wrye Bash folder.
2. Launch the Wrye Bash Installer and click Next.
3. In the Installation Location(s) select Install for Oblivion and Wrye Bash [Standalone]. DO NOT select Wrye Bash [Python] unless you are experienced with Python.
4. Make certain the Oblivion game directory is selected. Click Next.
5. In the Choose Component screen Select all. Click Install.
6. In the Installation Complete screen click Next.
7. In the Finished installing Wrye Bash screen uncheck Oblivion, check View Readme, and Delete files from old Bash version. Click Close.
8. Add Wrye Bash to Mod Organizer's executable list and Run from Mod Organizer.
9. Right click on Bashed Patch, 0.esp and select Rebuild Bashed Patch...
   In the "Update Bashed Patch, 0.esp window, review the options and make selections based on user preference. The following can also be useful selections:
   Tweak Actors:
     Irresponsible Creatures
   Tweak Assorted:
     Bow Reach Fix
     Darnified Books
     Default Icons
     Magic: Script Effect Silencer
     Right Hand Rings
   Tweak Settings
     Crime: Alarm Distance (set to 2000)
     Greeting Distance (set to 100)
     UOP Vampire Aging and Face Fix.esp
     Warning: Exterior Distance to Hostiles (set to 2000)
10. Close Wrye Bash. If asked to Activate Bashed Patch, 0.esp click Yes then Close.
Notice: The Bashed Patch, 0.esp may become corrupted causing a CTD. If this happens, navigate to the Oblivion\Data folder and delete Bashed Patch, 0.esp (or delete the mod in Mod Organizer's left pane). Return to the Wrye Bash\Mods tab, right click on the File header → File → New Bashed Patch. Rebuild the Bashed Patch (make certain to select the desired tweaks).
Editing Bash tags
• Launch Wrye Bash.
• Locate the “Bash Tags” window in the bottom right window pane.
• Right click inside this window.
• Select the Bash Tag you wish to edit. A checkmark represents that it is active. To deactivate simply click the "Tag" to remove the checkmark.
Bash Tags:
File:Example 6.jpg
FINAL PRE-MOD INSTALLATION NOTES
A Final Consideration
Install mods in the order that they are presented in the following guide in order to achieve the desired result.
Read the ReadMe and other mod-related documentation that comes packaged with most mods. This includes the mod description on the Nexus. If the mod author has seen fit and taken time to create these reference materials, then they are relevant and important in the eyes of the mod author. This means that they are relevant and important to you!
Notice: While it is recommended to download all mods manually, you can still install the mods from the Downloads tab in Mod Organizer.
1. Once the mod is downloaded, drag and drop it into the Downloads tab in the right pane.
2. Right click on the downloaded file, select Query, and if prompted select the file association that best fits the mod. This will update the meta.ini associated with the mod, inputting the Nexus ID, Version, and related Category.
3. Either double click the file, or right click and select Install to install the mod.
Extenders and DLL Enhancements
Third-party programs (or extensions thereof) that enhance Morroblivion functionality or display.
Notice: Most of the mods in this sections are not packaged properly. Review GamerPoets Useful Tips for Mod Organizer Users for installation instructions.
Description: This is adaptation of code Boris Vorontsov did for TES Skyrim to reduce memory usage of the game and to fix most CTDs (crashes to desktop) because of "out of memory" issue when many mods installed. It's just a patch without any changes to graphics. What it's doing? Utilize your videocard memory much better, compress resources and send them to enbhost.exe process, so you can install more mods with x64 OS (up to 4 gb game use by default and with this it's max about 10 gb at this moment).
Special Installation Instructions:
Download manually:
• ENBoost v0.259 patch for TES Oblivion
Notice: Download the next file for installation instructions.
Description: A fix for CTDs and Memory Patch
Special Installation Instructions:
Download manually:
• ENBoost 1_0
1. Use the Working Folder structure to repackage the mod. This time, however, we will be repacking the mod to move data straight into the Oblivion directory.
2. Extract enbseries_oblivion_v0259enboost.zip.
3. Extract ENBoost 1_0-45266-259.zip.
4. Create a new folder and name it ENBoost.
5. From ENBoost v0.259 patch for TES Oblivion move the d3d9.dll file, enbhost.exe, and enblocal.ini from the WrapperVersion folder into the ENBoost folder.
6. Extract the CTD and Memory patch ENBoost files and choose the settings based on your graphics card. Move the enblocal.ini to the ENBoost folder replacing files when prompted.
   NOTE: Save this folder with your download files for easy access if you have to re-install ENBoost.
7. Now copy all of the files from the Working ENBoost folder into the Oblivion game directory.
8. Settings can be altered to suit the users’ preferences. Browse the web for recommended enbseries.ini configurations and test them out.
9. Review and make any needed changes to the "enblocal.ini". Some Recommendations include:

   [MEMORY]
   ExpandSystemMemoryX64=false
   ReduceSystemMemoryUsage=true
   DisableDriverMemoryManager=false
   DisablePreloadToVRAM=false
   EnableUnsafeMemoryHacks=false
   ReservedMemorySizeMb=64
   VideoMemorySizeMb=0 (Use Boris Vorontsov VRamSizeTest v1.0 to get the correct value for the parameter)
   EnableCompression=true

   [ENGINE]
   ForceAnisotropicFiltering=true

   Remap the Free VRAM key to a different unused key
   [INPUT]
   KeyFreeVRAM=121

10. Some users may still experience CTD issues. Review muffinz10's post on CTD and Memory patch ENBoost Nexus Forum.
Description: RefScope is a powerful tool that lets you explore the internals of objects in the game. All this information can be valuable in resolving conflicts, debugging mods, or just keeping track of where your game content is coming from.
Special Installation Instructions:
Download manually:
• RefScope 2_1_2
NOTICE: The following mods contain OBSE Plugins that will need to be manually installed into the Oblivion\Data\OBSE\Plugins folder.
Description: AddActorValues allow modders to create and use *new* actor values, which are treated *exactly* like the built-in ones. New actor values won't do anything by themselves, of course, but they are very convenient ways for mods to attach information to any actor, which is then saved with the save game. For details, see the included `Features' pdf.
Notice: AddActorValues is a requirement of FEA - Fundament Enchanting Addons which is installed in the [Gameplay][Magical] section.
Special Installation Instructions:
Download manually:
• AddActorValues
Description: Uncaps skills, attributes, and other actor values. Also modifies game formulas so that values above 100 actually have an effect.
Description: Ini file for AV Uncapper which uncaps skills & attributes and gives values over 100 an effect.
Description: This is a fork of the original shadeMe plugin which features improved shadow queueing, fixes the problem of disappearing shadows when turning, and adds some additional options and optimizations. You can now get nice dynamic shadows on architecture and landscape with a low shadow count and minimal performance drop.
Notice: Blockhead is a requirement of OCO2 which is installed in the [Body & Replacers] section.
Special Installation Instructions:
Download manually: Install with Wrye Bash
• Blockhead 10.3
Description: This plugin logs all console output to text files for later reviewing, including those typed in by the player. It removes the need for modders to adopt independent logging functions. This is only needed if you plan to make changes to the UI.
Special Installation Instructions:
Download manually:
• ConScribe 100
Description: When a character in the game isn't voiced Oblivion will skip through the dialogue even if there are subtitles. This mod fixes that by placing a blank audio track in place of the voiced dialogue so you are able to read the text dialogue.
Special Installation Instructions:
Download manually:
• OBSE -Elys- Universal Silent Voice v93
Description: EngineBugFixes is an OBSE plugin containing bug fixes for the Oblivion game engine.
Special Installation Instructions:
Download manually:
• EngineBugFixes v1.9
Edit the EngineBugFixes.ini: [Patch] Section, Set ALL to 0.
Description: Replaces the first person camera with third person and then moving the camera into a first person view.
Special Installation Instructions:
Download manually:
• Enhanced Camera
Description: MenuQue - OBSE Plugin extends Oblivions game-engine to deal with various additions/changes to the User Interface, Skills, Fonts and more.
Special Installation Instructions:
Download manually: Install with Wrye Bash
• MenuQue v16b
Description: MenuQue - OBSE Plugin extends Oblivions game-engine to deal with various additions/changes to the User Interface, Skills, Fonts and more.
Special Installation Instructions:
Download manually: Install with Wrye Bash
• MessageLogger v1.0
Description: Fixes the Windows 10 Anniversary Update + up-to-date Nvidia / AMD video driver crashes / issues for the following:
• Oblivion
• Construction Set (Oblivion)

NVAC (short for New Vegas Anti Crash) is an NVSE plugin that implements structured exception handling and sanity checking to reduce frequency of game crashes.
Special Installation Instructions:
Download manually: Install with Wrye Bash
• NVAC - New Vegas Anti Crash
Description: OBME extends the Oblivion magic system to make it more general and open to mod makers. It is a pair of plugin libraries for OBSE that hack the game/CS to change its behavior.
Notice: Required for Morroblivion_Unofficial_Patch_Magic_Addon.esp.
Special Installation Instructions:
Download manually:
• OBME v1_0
Esp/m Filter: Uncheck: ALL
Description: This is a must have for anyone playing Oblivion. It has many tools that are useful to Oblivion such as the FPS management, force quit and heap replacement.
Special Installation Instructions:
Download manually:
• OSR_4-1-37
1. Navigate to OBSE/Plugins and find "sr_Oblivion_Stutter_remover.ini" and open it with Notepad to make the following changes:

   Master
   bManageFPS = 1 (change to 0 if the GPU is managing FPS)
   bReplaceHeap = 0 (NOTICE: Modifying Heap settings has been known to cause instability in Oblivion.)
   bFastExit = 1
   bReplaceRandom = 0
   bExperimentalStuff = 1

   FPS_Management
   fMaximumFPS= 45
   fMinimumFPS= 10

   CriticalSections
   iDefaultSpin = 4200

2. Click Save and Close.
Notice: One Tweak will not be needed if installing Oblivion Reloaded, but is highly recommended for all other users.
Special Installation Instructions:
Download manually:
• OneTweak
Description: An OBSE plugin to profile script execution.
Description: Small Tool to parse information created by RuntimeScriptProfiler to gather some useful information.
Description: This is a fork of the original shadeMe plugin which features improved shadow queueing, fixes the problem of disappearing shadows when turning, and adds some additional options and optimizations. You can now get nice dynamic shadows on architecture and landscape with a low shadow count and minimal performance drop.
Special Installation Instructions:
Download manually:
• shadeMe Enhanced
Description: OBSE plugin to redirect missing voicefiles to other locations. Based on Elys_USV. Version 1.0 expands on elys_usv.dll functionallity with the following: If no voicefiles are present, it first tries to substitute the imperial race in the voice filename to find a match. If none present, it will try to detect if current dialog is a greeting and then redirect to a generic greeting based on race and sex of speaker. If both fail, it will fallback to elys_usv.mp3 if present.
Notice: This mod has been specifically tailored for Morroblivion However Morroblivion is not required and therefore it should work with Oblivion just as well.
Special Installation Instructions:
Download manually:
• voicefile_redirector-v1_2.7z
Navigate to \Oblivion\Data\OBSE\Plugins and delete Elys_usv.dll (or rename it to Elys_usv.dll.bak)
Clean Official Plugins and Install UOPs
Oblivion Official DLC BAIN Package
Description: This section will take the user through the creation and installation of a simple BAIN package for backing up the Original DLC plugins and then cleaning them with TES4Edit.
To remove errors in the Bethesda master files, it is recommended that they be cleaned with TES4Edit. This ensures maximum stability and compatibility within the Morroblivion modding experience. Some mods have "UDR(s)" or "ITM(s)" but must not be cleaned. Reminders will be located after the installation description of mods that will need cleaning.
Special Installation Instructions:
Download manually:
• Optional files: Oblivion Official Plugin BAIN Package
xEdit Mod Cleaning Instructions
1. Right-click the list of plugins and choose Select None.
2. Double-click the plugin to be cleaned.
3. Wait for the Background Loader: finished message in the right panel, and then right-click the plugin to be cleaned and select Apply Filter For Cleaning.
4. Wait for the [Filtering done] message in the right panel, and then right-click the plugin to be cleaned and select Remove "Identical to Master" records. If the Warning! prompt pops up, click Yes, I'm absolutely sure.
5. Wait for the [Removing "Identical to Master" records done] message, and then right-click the plugin being cleaned and select Undelete and Disable References.
6. Wait for the [Undeleting and Disabling References done] message, and then click the [X] to exit the program.
7. At the prompt, make sure the cleaned plugin is checked as well as Backup Plugins and click OK.
8. If using Mod Organizer, there will be an empty xEdit Backups folder in Overwrite (essentially a fake mod located at the bottom of the left pane if sorted by priority ascending) created by xEdit after cleaning. Double-click Overwrite and delete the empty folder.
Instructions for the setup and installation of the Oblivion Official Plugin BAIN Package:
1. Copy the Original esp in the appropriate folder as a backup.
2. Run xEdit to clean each DLC.
3. Move the xEdit cleaned mod into the appropriate folder.
4. Archive the Oblivion Official Plugin BAIN Package folder when cleaning is completed.
5. Select only the xEdit clean mods for installation.
   Review GamerPoets Useful Tips for Mod Organizer Users for installation instructions.
Or Create a New Mod
1. Create a folder in the "\Mod Organizer\mods\" directory and name it "Oblivion Official DLC - original". Copy each of the DLC file listed below from "\Oblivion\Data\" the "Oblivion Official DLC - original" folder you created.
2. Now select the "Oblivion Official DLC - original" folder and duplicate it by clicking copy and then paste. A folder named "Oblivion Official DLC - original - Copy" should be created in the "\Mod Organizer\mods\" folder. Rename this folder to "Oblivion Official DLC - cleaned".
3. Go into Mod Organizer and make sure the "Oblivion Official DLC - original" mod is deactivated (unchecked) and "Oblivion Official DLC - cleaned" mod is activated (checked).
4. Run TES4Edit from Mod Organizer to clean each DLC.
5. The cleaned ESP files should automatically synchronize into the "Oblivion Official DLC - cleaned" mod.
All of the following DLCs need to be cleaned with xEdit:
DLCHorseArmor.esp
DLCOrrey.esp
DLCVileLair.esp
DLCMehrunesRazor.esp
DLCSpellTomes.esp
DLCThievesDen.esp
DLCBattlehornCastle.esp
DLCFrostcrag.esp
Knights.esp
Unofficial Oblivion Patch
Description: Unofficial Patches are a must; they fix literally tens of thousands of bugs in the original game that were never addressed by Bethesda.
Special Installation Instructions:
Download:
• Unofficial Oblivion Patch
Esp/m Filter: Uncheck: UOP Vampire & Face Fix.esp
When the installation is complete move the mod directly below the Oblivion Data files to ensure it is first in the install order below the Oblivion.esm and before DLCs ESP files.
Notice: OBSE Plugin Included, manually install the OBSE folder.
Unofficial Shivering Isles Patch
Special Installation Instructions:
Download:
• Unofficial Shivering Isles Patch
When the installation is complete move the mod directly below the DLCShiveringIsles.esp to ensure it is first in the install order below the Oblivion.esm and before DLCs ESP files.
Unofficial Oblivion DLC Patches
Description: A must have mod with similar effects as UOP - Unofficial Oblivion Patch
Special Installation Instructions:
Download:
• Unofficial Oblivion DLC Patches
When the installation is complete move the mod directly below the Cleaned Vanilla DLC ESPs.
See BOSS Bash Tag suggestion(s)::
Knights - Unofficial Patch.esp ADD: Relev
Test the Game
1. Activate all installed mods and plugins.
2. Run BOSS to sort the load order and review any Bash Tag suggestions or Dirty Plugins references.
3. Run Wrye Bash. Deactivate any mods missing masters. Right click on the Bashed Patch, 0.esp Rebuild the Bashed Patch.
   Right click on the Bashed Patch, 0.esp Rebuild the Bashed Patch.
   In the "Update Bashed Patch, 0.esp window, review the options and make selections based on user preference. The following can also be useful selections:
   Tweak Actors:
     Irresponsible Creatures
   Tweak Assorted:
     Bow Reach Fix
     Darnified Books
     Default Icons
     Magic: Script Effect Silencer
     Right Hand Rings
   Tweak Settings
     Crime: Alarm Distance (set to 2000)
     Greeting Distance (set to 100)
     UOP Vampire Aging and Face Fix.esp
     Warning: Exterior Distance to Hostiles (set to 2000)
4. Run TES4LODGen
5. Run the following .bat files.
   • tes4ll_tes4qlod_cache.bat
   • tes4ll_normalmaps.bat
   • tes4ll_tes4qlod.bat
   • tes4ll_highres.bat or tes4ll_ultimate.bat
6. Launch Oblivion and play for a bit. If you are satisfied with the testing exit the game.
7. Back up the following files to keep a copy of the original game files:
   <Oblivion>
   <Oblivion Mods>
   <My Games>\Oblivion>
   <YourUserName>\AppData\Local\Oblivion>
Morroblivion CORE Installation and Patches
Create a new folder in \Oblivion Mods and name it Morroblivion with Fixes and Improvements to store the downloaded files.
Notice: Many of the download sites are external (i.e. Mediafire, Google Drive, Dropbox, etc...) Only mods I have personally downloaded and scanned with F-Secure are listed in this guide. I also advise that the user enable an Ad Blocker on their browser as some of the download sites do have persistent ads.
Morroblivion: FAQ TESrenewal.com is a video game community web site. We do not display advertisements, require membership fees, or impose other charges on site visitors. Members may voluntarily donate if they wish to help us offset server costs (which are approximately $2,000 per year), but this is COMPLETELY OPTIONAL and in no way changes the user's ability to use the site or download files.
Please review TESrenewal.com's entire FAQ page. As Diana TES GotH, I have been a user and member of their gaming site for about two years. I have personally downloaded and played many of the mods they develop and I endorse their site.
Create a shortcut of the BOSS userlist.txt to the desktop as there will be several edits to add in the course of installing all the mods. If BOSS was installed as instructed the userlist.txt should be located at \Oblivion\BOSS\oblivion.
Notice: At the end of the guide I will upload and share MISC User Files on the Morroblivion Overhaul Patch Central.
Description: Morroblivion is additional content - a 'mod' or an add-on - for the popular PC video game The Elder Scrolls IV: Oblivion, released by Bethesda Softworks in 2006. The Morroblivion project seeks to merge the content from the previous game of the series, The Elder Scrolls III: Morrowind, into the more modern gaming engine of Oblivion.
Special Installation Instructions:
Download manually: (Scroll down on the page to the Download Links and select your preferred download link.)
• Master File
• Morroblivion v064 Complete Resources
1. Add the Morroblivion Installer Mod Organizer executables.
2. Run the Morroblivion Installer with Mod Organizer. Select Yes if you are prompted to allow Mod Organizer Elevated privileges.
   • Click Next
   • Choose your Morrowind Directory pathto\Morrowind
   • Choose your Oblivion Directory pathto\Oblivion
   • Click Next
   • Click Install
3. Review the Overwrite mod, select create a new mod and name it Morroblivion Master. Move it to top in the left mod pane.
Special Installation Instructions:
Morroblivion v064 Complete Resources
1. Sub-Packages: Check:
   00 Core
   01 Better Map
   01 Chargen and Transport Mod
   01 Tree Replacer
   01 Voiced Conversations
2. Choose your Alternate Start before installing this mod.
   Navigate to 00 Core\Ini, open the Morroblivion.ini and scroll to the bottom:
   [Alternative Start]
   set mwMainMenu.AltStart to 1 to start in Morrowind.
   or
   set mwMainMenu.AltStart to 0 to start a normal Oblivion new game.
3. Disable the Morroblivion Errors message in the Morroblivion.ini:
   set MorroDefaultQuest.ErrorDetection to 0
Edit BOSS userlist.txt:
OVERRIDE: Morroblivion
BEFORE: Pre Bash

OVERRIDE: Morrowind_ob - Morroblivion Maps.esp
BOTTOM: Post Bashed Patch
Description: This unofficial patch is a mod-compilation of many bug-fixes and patches that have been posted to TESRenewal.com since the release of Morroblivion v064.
NOTE: You MUST start a new game when using this patch.
Special Installation Instructions:
Download manually:
• Morroblivion Unofficial Patch_BAIN
Sub-Packages: Check:
00 CORE
01 INI Tweaks
02 Optional, Fast Travel Cheat (Optional)
02 Optional, Firemoth Enemy Mage Rebalance
02 Optional, No Havok Bottles and Clutter
TES4Edit Cleaning Required:
MOB_NoHavok_Bottles_and_Cluter.esp
Edit BOSS userlist.txt:
ADD: MOB_FastTravel_Cheat.esp
BOTTOM: Morroblivion

ADD: MOB_Firemoth_Enemy_Mage_Rebalance.esp
BOTTOM: Morroblivion

ADD: MOB_NoHavok_Bottles_and_Cluter.esp
BOTTOM: Morroblivion

ADD: Morroblivion_Unofficial_Patch.esp
BOTTOM: Morroblivion

ADD: Morroblivion_Unofficial_Patch_Magic_Addon.esp
BOTTOM: Post Bashed Patch
Test the Game
1. Activate all installed mods and plugins.
2. Run BOSS to sort the load order and review any Bash Tag suggestions or Dirty Plugins references.
3. Run Wrye Bash. Deactivate any mods missing masters. Right click on the Bashed Patch, 0.esp Rebuild the Bashed Patch.
   Right click on the Bashed Patch, 0.esp Rebuild the Bashed Patch.
   In the "Update Bashed Patch, 0.esp window, review the options and make selections based on user preference. The following can also be useful selections:
   Tweak Actors:
     Irresponsible Creatures
   Tweak Assorted:
     Bow Reach Fix
     Darnified Books
     Default Icons
     Magic: Script Effect Silencer
     Right Hand Rings
   Tweak Settings
     Crime: Alarm Distance (set to 2000)
     Greeting Distance (set to 100)
     UOP Vampire Aging and Face Fix.esp
     Warning: Exterior Distance to Hostiles (set to 2000)
4. Run TES4LODGen
5. Run the following .bat files.
   • tes4ll_tes4qlod_cache.bat
   • tes4ll_normalmaps.bat
   • tes4ll_tes4qlod.bat
   • tes4ll_highres.bat or tes4ll_ultimate.bat
6. Launch Oblivion and play for a bit. If you are satisfied with the testing exit the game.
7. Back up the following files to keep a copy of the original game files:
   <Oblivion>
   <Oblivion Mods>
   <My Games>\Oblivion>
   <YourUserName>\AppData\Local\Oblivion>
Fixes
001 +Clean-up
001
002 -RefScope
002
003 +Morroblivion - Reward Fix The Shirt of His Back
003
004 +Morroblivion - Improved landscape lod and fps - For v064
004
User Interface
005 +CSI Update [OBME]
005
006 +DarkUId DarN 16 Manual Version
006
007 +DarkUId DarN MOB_Midnight
007
008 +FOV Modifier
008
009 +TLS for Dark UI - Replacer Alternate
009
010 +TLS for Dark UI - SI Replacer Alternate
010
011 +TLS for Dark UI - AddOn Alternate
011
012 +TLS - DarkUId DarN Compatibility Patch
012
013 +TLS for DarkUId Midnight
013
014 +Morroblivion - TLS for DarkUId Midnight
014
015 +Vanity Camera Smoother
015
016 +Dynamic Map
016
017 +Elven Map For Shivering Isles
017
018 +Map Marker Overhaul
018
019 +Morroblivion - TR WorldMaps
019
020 +Morroblivion - TR WorldMaps New Paper Map
020
Overhauls & Specialized Game Add ons
021 +Morroblivion - Armored Skeletons
021
022 +Morroblivion - Buyable Houses of Vvardenfell Update
022
023 +Morroblivion - Expanded Quests
023
024 +Morroblivion - Firemoth & Misc Additions
024
025 +Morroblivion - Guar Mounts & Pack Guars
025
026 +Morroblivion - Idol of Mephala
026
027 +Morroblivion - More Armor Slots
027
028 +Morroblivion - Sugar Tolerance
028
029 +Morroblivion - The Essential Mudcrab
029
030 +Morroblivion - ProtocolledDialogs
030
Gameplay Changes - Combat
031 +DenockArrowToo
031
032 +Vanilla Combat Enhanced + SI
032
033 +ResetEmotionAfterCombat1
033
Gameplay Changes - Magic
034 +LessAnnoyingMagicExperienceEV
034
035 +MIDAS MAGIC SPELLS OF AURUM - Clean
035
036 +Morroblivion - Magic v02
036
037 +Morroblivion - Portal to Vvardenfell v1.0
037
Gameplay Changes - MISC
038
038
Quests and Locations
039 +Better Dungeons non-BSA - Clean
039
040 +The Lost Spires14 - Clean
040
041 +Morroblivion Conversation - TLS Patch
041
Base Texture Packs
042 +QTP3 Redimized 1.0 Patched
042
043 +QTP3 UOP3350 Compatibility Patch
043
044 +Bomret's Texture Pack for Shivering Isles with meshes from USIP
044
Landscape Overhauls
045 -Unique Landscapes Compilation v2.1.1 - Performance Version
045
046 -Unique Landscapes Compilation v2.1.1 - Full Version
046
047 -UL - Chorrol Hinterland
047
048 -UL Compatibility Patches Compilation WIZBAIN
048
Grasses, Trees, & Landscape - Graphics
049 +Landscape retexture 2k
049
050 +Landscape retexture - Shivering Isles 2K
050
051 +Improved Doors and Flora
051
052 +IDFUpdate
052
053 +Improved Trees and Flora
053
054 +Improved Trees and Flora 2
054
055 +ITF2Update
055
056 +AliveWaters [OOO Optional]
056
057 +Alive Waters No Fish [OOO Optional]
057
058 -Grass Overhaul
058
059 -Arboretum all new
059
060 -Weeping willow
060
061 -Oblivion Trees Overhaul
061
062 +Lush and Gaudy Floriana Gloria
062
063 +Lush and Gaudy Floriana Gloria Cleaned and Optimized Patch
063
064 +LG - ENB fixed textures
064
065 -The Imperial Ecology Vanilla Flavour
065
066 +Far Cry Grass - Replacer Version Update2
066
067 +Far Cry Grass - Texture with better transition
067
068 +Tree Bark HD Reduced
068
069 +ITFBark2012
069
070 +Improved Fruits Vegetables and Meats
070
071 +IFVMUpdate
071
072 +cypressknee
072
073 +Harvest Flora
073
074 +Shivering Isles Floriana Gloria
074
075 +Shivering Isles Floriana Gloria Optimized Patch v1 2 Full Pack
075
076 -Shivering Isles Floriana Requiem In Moderation
076
077 -BlackwoodJungle Update2
077
078 +New tree shadows
078
079 +Morroblivion - MGSO (Baldurian's) Pondscum Replacer
079
080 -Morroblivion - MGSO Vality's Balmora Addon
080
081 +Morroblivion - MGSO Vurts Ashland Trees
081
082 +Morroblivion - MGSO Vurt's Bitter Coast Tree Replacer II
082
083 -Morroblivion - MGSO Vurt's Bitter Coast Tree Replacer II VWD
083
084 +Morroblivion - Water
084
085 +Morroblivion - Morrowecology desaturated version
085
Architecture & Cities - Graphics
086 +Imperial Roads
086
087 -Hi-Res Road Texture - QTP3 Replacement
087
088 +Arena Redone HD
088
089 +Imperial City Retextured - Modular version v 1.2
089
090 +Cathedral HD
090
091 +Geckos Ayleid Ruins Textures V2 - NO Parallax
091
092 +Gecko's Fort Interior Textures (2K Version)
092
093 +Geckos Imperial Dungeon Textures 2K Parallax
093
094 +Rocks retexture 2k
094
095 -QTP3 Custom Road Textures
095
096 +Completely Ruined Ruins
096
097 +Completely Ruined Ruins v03 skirting
097
098 +Caves retexture 2k
098
099 +Farm Fence
099
100 +Bruma Retexture
100
101 +Cheydinhal Retexture
101
102 +Anvil
102
103 +Leyawiin Woodland 2k
103
104 +Improved Chorrol
104
105 +Chorrol2011
105
106 +Improved Bravil
106
107 +BravilUpdate
107
108 +ImprovedSkingrad
108
109 +Kvatch HD
109
110 +Kvatch HD 1.1
110
111 +BettysSewerTextures Wet Version
111
112 +BettysSewerTextures - Better working rubble pile texture
112
113 +BettysSewerTextures - smaller bricks
113
114 +Statues HD
114
115 +Cloud Ruler Temple HD
115
116 +wayshrine
116
117 +HiRez Daedric Shrines
117
118 +HiRez God Statues
118
119 +basementsections
119
120 +TD CRT Reborn
120
121 +TD Tombstones
121
122 -Morroblivion - Hlaalu Project
122
123 +Morroblivion - Telvanni Architecture
123
Oblivion World - Graphics
124 +Oblivion Realm HD
124
125 +Oblivion landskape
125
126 +Oblivion Trees
126
127 +Oblivion Caves retexture 2K
127
Weather & Immersion - Graphics
128 +Weather - All Natural
128
129 +Morroblivion - All Natural Patch
129
130 +atmospheres 4 Heaven
130
131 +atmospheres 4 Heaven 2048
131
132 +atmospheres 4 Hell 2048
132
133 +atmospheres 4 Heaven and Hell - night sky
133
134 +DOWNPOUR
134
135 +Falling Stars
135
136 +Falling Leaves V1 0 BAIN
136
137 +QQuix - Rock rock rock your ship -
137
138 +Aurora in motion Update1
138
139 +High Quality Sowflakes
139
140 +smoke and dust
140
141 +smoke and dust patch for missing texture
141
142 +Less Radioactive Waterfalls
142
143 +Improved Moons
143
144 +IM moonshadow
144
145 +Immersive Interiors
145
146 +Immersive Interiors - Imperial City 1.5
146
147 +Immersive Interiors - Bravil Leyawiin New Sheoth
147
148 +ImmersiveInteriorsLandscapeAddOn
148
149 +Lights of Oblivion - Fantasy Mesh
149
150 +Morroblivion - Lights-and-Darkness
150
Viewable when Distant & AWLS - Graphics
151 -RAEVWD - Completely Ruined Ruins v03
151
152 -Morroblivion - VWD
152
153 +Animated Window Lighting System
153
154 -Animated Window Lighting System - RAEVWD
154
155 -AWLS - Elsweyr Desert of Anequina
155
Diverse Retextures & Replacers - Graphics
156 +Ships
156
157 +Mesh Improvement Project
157
158 +Hi-Res Soul Gems [OOO Optional]
158
159 +HiRes Gold Clutter
159
160 +HiRes Silver Clutter
160
161 +High-Res Varla and Welkynd Texture Replacer
161
162 +Particled Ayleid Stones 1.0
162
163 +better ropes worn
163
164 +ArenaPoster
164
165 +ImprovedAmuletsAndRings
165
166 +Improved Skulls and Bones and ironwork
166
167 +Shiny Septims - Oblivion
167
168 +Skeleton Key retexture
168
169 +Kaizits Animated Ingredients
169
170 +Kaizits Animated ingredients v1.1
170
171 +Kaizits Animated ingredients v 1.1 fix
171
172 +Kaizits Animated Daedric Ingredients
172
173 +Kaizits Animated Daedric Ingredients fix
173
174 +crystalball
174
175 +vinyard tools
175
176 +metalsmith
176
177 +FarmClutters 1
177
178 +High Quality Rugs
178
179 +Shivering Isles Rug Alpha Fix
179
180 +Painting replacer
180
181 +Strada Citta Imperiale
181
182 +Improved Fires and Flames
182
183 +Improved Fires and Flames - Optional torch
183
184 +Improved LightBeam
184
185 +Nirnroot retexture
185
186 +FoamingFalls
186
187 +Double Sided Cobwebs
187
188 +Oblivion Chapel Altar Replacer
188
189 +Better Chapel Altars - Richer Normal Map
189
190 +TD Lower Clutter
190
191 +TD Lower Clutter Patch
191
192 +TD Middleclass Replacer
192
193 +TD Middleclass
193
194 +TD Upperclass
194
195 +TD Upperclass v 3.1
195
196 +ImprovedSignsComplete
196
197 +Real Wood Road Signs Full
197
198 +Book Jackets Oblivion High Res - Cleaned
198
199 +Grimbots Spell Tomes [OOOSI Optional]
199
200 +Shivering Book Jackets
200
201 +Alluring Wine Bottles with Real Glass
201
202 +Alluring Potion Bottles
202
203 +Illuminated Signs
203
204 +Morroblivion - MGSO WA Signy Signposts for Morroblivion
204
Creatures & Animals - Graphics
205 +Mythic Creatures
205
206 +Mythic Animals High res part
206
207 +Mythic Ghosts and Goblins
207
208 +Mythic Madness
208
209 +Beautiful Creatures - Spriggan
209
210 +Beautiful Creatures - Spider Daedra
210
211 +Improved Storm Atronachs
211
212 +Improved Flame Atronachs
212
213 +boar
213
214 +SHEEP
214
215 +mountainlion
215
216 +wolf
216
217 +Realistic Horse Eyes
217
218 +Black Horse Color Overhaul
218
219 +Morroblivion - Better Creatures
219
220 +Morroblivion - Silt Striders Overhaul
220
Body, Armors & Weapons
221 +Skeletons
221
222 +Oblivion Character Overhaul
222
223 +New Eyes for OCOv2
223
224 +Brighter Elves Eyes
224
225 +Khajiit Optional - Cat
225
226 -Khajiit Optional - Tiger
226
227 +Ren BeautyPack v1 1 onlyhairs
227
228 +Kaleen v6 Full body and face marking
228
229 +Apachii Goddess Store v 1 6 Full - Cleaned
229
230 +SR- OCOv2 IDIOT
230
231 +SR- OCOv2 Nudes
231
232 +Morroblivion - OCO2 Facelift
232
233 +Morroblivion - OCO2 Redguard Facelift
233
234 +Vanilla Gear Redux - Mass Outfit Redesign
234
235 +Vanilla Gear Redux - Armors - Reasonable Protective Flavor - v1.0beta
235
236 +Insanity's Improved Armoury Compilation v1.21
236
237 +Mikes Clothes Replacer
237
238 +Aqua Silk and Tattered Robes Replacer
238
239 +Aqua Silk and Tattered Robes Replacer - HGEC
239
240 +Archmage Robe remodel
240
241 +Orcish armor remodelled
241
242 +Black Hand Robe Replacer
242
243 +Daedric replacer
243
244 +Deceiver's Finery Replacer
244
245 +Elven armor replacer
245
246 +Elven armor replacer - HGEC
246
247 +Fantasy Mithril
247
248 +Fur armor replacer
248
249 +Fur armor replacer - HGEC
249
250 +King of worms robe replacer
250
251 +Madness Armor Replacer
251
252 +Necromancer's Robes Remodel
252
253 +Mace of Molag Bal Retexture
253
254 +Weapon Improvement Project
254
255 +HiRes Iron Armor
255
256 +Morroblivion - More Better Good Clothes
256
257 +Morroblivion - Clothing Galore 1 3
257
258 +Morroblivion - Clothes Replacer Beta
258
259 +Morroblivion - Clothes Replacer Update
259
260 +Dalls Horse Armor
260
261 +SetBody Reloaded Blockhead Edition Core
261
262 +SetBody Reloaded Blockhead Edition Data
262
263 -SetBody Reloaded Blockhead Edition Data Buttock BB
263
Companions & Followers
264 +CM Partners Mod
264
265 +Morroblivion - CM Partners
265
266 +Morroblivion - CM Partners OCO2 Patch
266
Animations
267 +Idles Poses Replace
267
268 +Stylish Jump
268
Audio - SFX, Music, & Voice
269 +GOSH
269
270 +Morroblivion - CG Voices BAIN v1.0
270
271 +Morroblivion - Voice Acted Mod
271
ECTV
272
272
ENB & Oblivion Reloaded
273 -Cinematic ENB for Oblivion - New Dimension
273
274 +Oblivion Reloaded 6.4.1
274
Patches & Profile
275 -Land Magic
275
276 +TES4LODGen
276
277 +TES4LL
277
278 +Wrye Bash
278
More Useful Information
Morroblivion Overhaul CR Patch Creation
Description: This section will require users study material provided from other authors. Follow each link provided.
Special Installation Instructions:

Download manually:
• Compatibility Patch Creation Tutorial by Committee
Other Related Tutorials:
Basic Modding Guide for a General game Plus Optional Mods by Gopher
Mod Organizer #8 - Conflicts and Priorities by Gopher
Launch TES4Edit to resolve most conflicts (not landscape conflicts).
TIP: Refer to latest Data\Docs Bashed Patch, 0.html and Bashed Patch, 0.txt files to review the patch log and perform a similar function with TES4Edit.
TES5Edit
TES5Edit Cleaning Guide
TES5Edit Mod Cleaning Tutorial
TES5Edit Skyrim Dirty Plugins List
TES5Edit Scripting Functions
Fallout3 Training Manual (applies to all game versions)
FNVEdit Training Manual (applies to all game versions)
Tutorial Make your own Oblivion Character Overhaul compatibility patch] by ponyrider0
Launch CSE to resolve landscape conflicts.
Oblivion: Creating Compatibility Patches by Arthmoor
To create your own Morroblivion Ovherhaul CR Patch create a new mod named [Merge Plugins] Morroblivion Overhaul CR Patch.
Merge Plugins Script - Merging with Nexus Mod Manager by Matortheeternal
Merge Plugins Script - Merging with Mod Organizer by Matortheeternal
Merge Plugins : Start to Finish by GamerPoets
Move the following plugins into [Merge Plugins] Morroblivion Overhaul CR Patch:
Notice: These plugins will be merged with Merge Plugins.

1. Files to merge:
   Select each file you wish to merge.
2. Name: ++++Title Merged
   Filename: Plugin.esp
3. Navigate to pathto\Oblivion Mods\Merge Plugins to be Archived\ and add ++++Title Merged to archive.
4. Install ++++Title Merged.
5. Deactivate the merged mods.
   Uncheck the mod in the left pane.
6. Edit BOSS userlist.txt:
   ADD: Plugin.esp
   AFTER: Plugin.esp
7. Launch BOSS to sort the Lood Order.
8. Load the Plugin.esp in TES4Edit to fix most compatibility issues.
9. Load the Plugin.esp in CSE to fix landscape issues.
FCOM Convergence Overhaul
Troubleshooting Common Issues
Update Video Drivers
If there is any reason to believe that the latest drivers installed on your system are not the latest available or that they are not installed correctly and are causing issues then do the following. Else, just install the latest drivers as normal.
1. Download the latest stable AMD drivers / Nvidia drivers.
2. If installing/re-installing new drivers, download DDU and install it. See Display Driver Uninstaller Thread forum.
3. Boot into safe mode by repeatedly pressing F8 once the boot check initializes and before the OS begins loading (no need to uninstall the current drivers, but it will not hurt at all).
   • If using UEFI while using Windows 8 or later, go to your power options and while holding down the Shift key, press restart. This will open the advanced menu where you can select to boot into safe mode.
4. Launch DDU, and select the appropriate driver from the drop-down combo box.
5. Note the recommendations in DDU and initialize the cleanup.
6. Reboot normally and install the latest drivers.
Configure Driver Settings
The graphics software should only be forcing max Anisotropic Filtering (AF). All other settings should be left to the Oblivion configuration and ENBoost configurations. Check out the Elder Scrolls IV: Oblivion Tweak Guide.
AMD Users: Refer to the Elder Scrolls IV: Oblivion Tweak Guide
Nvidia Users
Make the following changes via Nvidia Inspector, otherwise leave the defaults (they can be tweaked later if absolutely necessary).
1. Download Nvidia Inspector and Nvidia Profiler. This is a portable program and requires no installation. Simply place in a convenient location and create a shortcut to the executable.
2. Within Inspector,select the "Elder Scrolls IV: Oblivion" profile and keep all of the default settings except for the following changes:
   Maximum pre-rendered frames: 1
   Antialiasing - Transparency: 8x(supersample)
   Anisotropic filtering setting: 16x
   Texture filtering - Anisotropic sample optimization: Off
   Texture filtering - Negative LOD bias:Clamp
   Power management mode: Prefer maximum performance
3. Click Apply changes twice and then close, accepting any overwrite when prompted.
Display Calibration
Color calibration is critical to photographers and graphic artists that work across media types, but it is also more or less important for everyone that uses a computer. For gamers like those interested in Morroblivion, it is a bit more important, because there is a lot of screenshot sharing and qualitative discussion about in-game visuals. It is ideal that all users are somewhat 'standardized' for comparative purposes alone.
The gist: Calibrate the monitor's display settings based on the video driver configuration utility with all other configuration baselines set to something akin to "mid level".
There are three places to configure color saturation, temp, brightness, contrast, gamma, etc:
• The monitor's built-in config
• Windows color management
• The driver configuration utility (see "Configure Driver Settings above)
The settings of one affect the settings of the other, and depending on the quality of the monitor, #1 could be very good or just 'OK'. The #2 and #3 settings should be standard though, since they are made to work across various monitors.
Ensure that #1 is set to "the middle ground" with respect to all settings. Having extreme settings in the monitor configuration could potentially constrain the other configurations. For some, wetting all #1 to mid levels will be best, but for others the 'auto-config' will be best (this may not set all #1 to mid settings). Depending on the monitor, there may be other auto-config options based on various presets. Whatever seems most "middle of the road" is probably best for #1.
Optionally, also run#2 (Control Panel > Display > Calibrate Color) and set to 'vanilla'mid-levels with respect to all attributes. If this was never run previously,then it should already be at mid-level.

Calibrate using #3 a room with no direct lighting that could affect what the monitor shows(not-too-bright, diffuse-lighted room). The main calibration should be left to#3 once a mid baseline 'canvas' has been established for #1 and #2.
• AMD-CCC:|Desktop Management| > |Desktop Color| (click "Reactivate AMD color controls").
• Nvidia Control Panel: Access from the Windows Control Panel. |Display| > |Adjust desktop color settings|.
“BlackScreen” Fix and Forcing 3.0 Shaders
For some users, it may be necessary to tweak some settings, especially the Shaders in order for the HDR setting to work properly. If you have a black screen try the following suggestion from the Elder Scrolls IV: Oblivion Tweak Guide for changing your Oblivion.ini settings:
“bAllow30Shaders=0 -If set to 1, this option allows (but does not force) the use of Shader Model 3.0 on graphics cards which support it, namely Nvidia GeForce 6600 or newer, or ATI X1000 series or newer. This can potentially improve performance when using HDR rendering for example. Check your RendererInfo.txt file in your \Documents and Settings\User\Documents\My Games\Oblivion directory to see if your card supports SM 3.0 next to the option '3.0 Shaders'. Note however that even by enabling this option, Oblivion still appears to use 2.0 shaders (check the 'PSTarget' and 'VS Target' lines in RendererInfo.txt). In any case, if you have one of the cards mentioned above, it cannot hurt to enable this option.

…To force the actual use of 3.0 Shaders after making the above change, you will also need to check your RenderInfo.txt file (see above), and on the last line of the file check which shader package it uses (e.g. Shader Package: 13). Then go to the\Program Files\Bethesda Softworks\Oblivion\Data\Shaders\ folder and rename that particular package to something else (e.g. rename shaderpackage013.sdp to shaderpackage013._bak. Now copy shaderpackage019.sdp and paste it back into the same directory, and rename this new copy to the package name your card uses(e.g. rename it to shaderpackage013.sdp in this example). This will forceOblivion to use the Shader Model 3.0 shaders in the game, which may increase(or reduce) performance and typically shows no image quality difference.”

Just remember that if you have to perform “Verify Integrity of Game Cache…” through Steam, the Shaders will be reverted back to their default settings. I suggest to make a backup copy of “Shaderpackage019.sdp”. To do this, create a Working Folder on your desktop. Create a Data subfolder. Click in your Data folder and create a Shaders subfolder. Now copy your shaderpackage019.sdp into the Shaders folder. Rename the shaders package to the one that is in your RenderInfo.txt and save it as an archive naming it “ShaderPackage019” to install via Mod Organizer. If it is installed with Mod Organizer it will always overwrite the Steam\vanilla file.
PSA: OR and G-SYNC
PSA: OR and G-SYNC explained by dankles on TES Reloaded Technical Support.
"G-SYNC and OR on Windows 10 (maybe other windows versions too) don't seem to be friends. When closing oblivion, the screen blanks. The only way to get the screen back is to turn the computer off, then back on. I recommend anyone using OR to disable G-SYNC, if that's something you normally use.

To disable G-SYNC for just Oblivion and not everything globally, you can go to the Nvidia Control Panel, then select Manage 3D Settings > Program Settings > Elder Scrolls IV: Oblivion (add it if you need to) > set Monitor Technology to Fixed Refresh."
Mod Not Working
Triple check all INI or config files to make certain they are correct.
Sometimes refreshing the mod manager being used is necessary. To do this close the mod manager. Clean up temp files with disk cleanup (or other such utility). Reboot the PC and allow the files to refresh. Restart the mod manager and test the mod again to see if it is now recognized and working.
In some instances the user may need to uninstall the mod from the mod manager being used. Install the mod manually then test it in-game to see if this fixes the issue.
Wrye Bash Error: Access is denied:
Sometimes a user can be blocked from accessing files and folders, even with administrative privileges. When this happens a workaround solution is the following:
1. Clean out the temp files:
   • From the Start Menu select Run.
   • Type temp, select all the files and then delete them (skip the files that will not delete).
   • Type %temp%, select all the files and then delete (skip the files that will not delete).
2. Empty the Recycle Bin.
3. Perform a Disk Cleanup.
4. Shutdown the PC and Reboot after 30 seconds.
Credits
I would sincerely like to thank:
STEP Wiki Admins for allowing me to host this guide on their site.
ponyrider0 is creating Morroblivion Mods (and other Open Source Stuff) who has been a contributor with me since I first began sharing my Morroblivion Overhual guide back in 2016.
Pack Author jdsmith2816 for his contribution and patches for this guide.
Mod Author zilav, RoyBatterian, GrantSP and all my GamerPoets friends.
mcshame and all the others who have been involved in helping to test this guide.
Rogdonlp for proofreading and suggesting edits for this guide.
The TESRewal Morroblivion Team
The TESRenewal Project Community
The Nexus Modding Community.
The TES Alliance Modding Community.
The Assimilation Lab Gaming and Modding Community.
Gamer Poets for his educational tutorials.
matortheeternal for sharing his utilities and settings.
Astien for Oblivion Vanilla Enhanced
Bevilex for Bevilex' modlist for Oblivion -Graphics
outdated TV for his Bevilex Modlist Full Video Guide
PredCaliber for Oblivion 2017 Ultimate Graphics Tutorial
Just Call Me Frosty for his Oblivion Graphic Tutorials and Guides.
Hishutup for the continued updates on Mythic Dawn  Oblivion Modding Guide
Xuul for Oblivion | How to install mods
Enigmas The Guy for Oblivion DarnUI and OBSE Mod Organizer Installation guide
The authors of mods recommended in this guide.
The authors of mods who granted permission for their mods to be shared with the TESRenewal Project Community.
Bethesda Softworks for TES in general.